A busy weeknight doesn’t have to mean sacrificing flavor or resorting to takeout. After years of testing recipes that fit into our chaotic family schedule, I’ve perfected a pork carnitas method that delivers restaurant-quality results with minimal hands-on time. All you need is one pot and a few simple ingredients to create tender, crispy-edged pork that will become your new go-to for taco Tuesday.
Why This Recipe Works
- The slow cooking method breaks down tough pork shoulder into melt-in-your-mouth tenderness without constant monitoring, perfect for parents who need to multitask during dinner prep
- Using orange juice and spices creates authentic flavor without requiring hard-to-find ingredients or complicated techniques that would add stress to your already busy day
- The final broiling step adds crispy edges that mimic traditional carnitas texture without deep frying, keeping cleanup minimal and avoiding the mess of splattered oil
- This recipe makes enough for multiple meals, allowing you to freeze portions for future busy nights when cooking from scratch isn’t an option
- All ingredients are easily found at any standard grocery store, eliminating the need for special trips that disrupt your carefully planned schedule
Ingredients
- 4 pounds boneless pork shoulder, cut into 2-inch chunks
- 1 large yellow onion, roughly chopped
- 6 cloves garlic, minced
- 1 cup fresh orange juice
- 1/4 cup lime juice
- 2 tablespoons ground cumin
- 1 tablespoon dried oregano
- 2 teaspoons chili powder
- 1 teaspoon smoked paprika
- 2 teaspoons salt
- 1 teaspoon black pepper
- 2 bay leaves
- 1/4 cup vegetable oil
- 1 cup chicken broth
Equipment Needed
- Large Dutch oven or heavy-bottomed pot with lid
- Cutting board and sharp knife
- Measuring cups and spoons
- Tongs
- Baking sheet
- Mixing bowl
Instructions
Prepare and Season the Pork
Begin by trimming excess fat from your 4 pounds of pork shoulder, leaving about 1/4-inch of fat for flavor and moisture. Cut the pork into uniform 2-inch chunks—this ensures even cooking and makes shredding easier later. In a large mixing bowl, combine your minced garlic, ground cumin, dried oregano, chili powder, smoked paprika, salt, and black pepper. Add the pork chunks and toss thoroughly until every piece is coated with the spice mixture. Let this sit while you prep other ingredients; the 10-15 minute rest allows the spices to penetrate the meat. This initial step might seem simple, but proper seasoning now means incredible flavor later without extra work. Tip: If you’re really pressed for time, you can skip the resting period—the flavor will still be great, though slightly less intense.
Brown the Pork and Aromatics
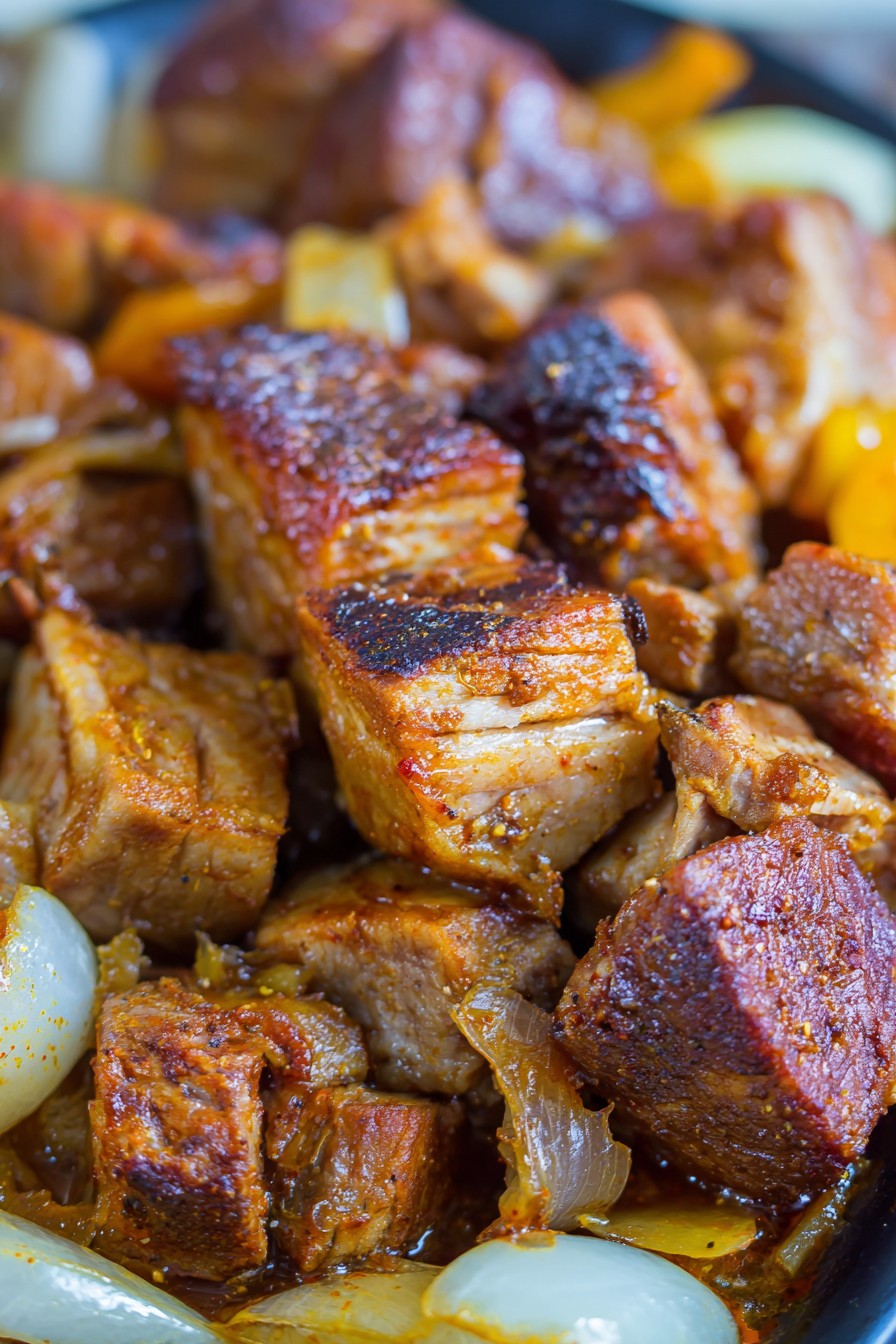
Heat 2 tablespoons of vegetable oil in your Dutch oven over medium-high heat until shimmering but not smoking. Working in batches to avoid crowding, add pork chunks in a single layer and brown for 3-4 minutes per side until deeply golden brown. Don’t skip this step—those browned bits create incredible flavor foundation. Remove browned pork to a plate and add remaining oil if needed. Add your roughly chopped onion and cook for 4-5 minutes until softened and beginning to brown around the edges. The onions will pick up all those delicious browned bits from the pork. Return all the pork to the pot along with any accumulated juices. This browning process takes about 15 minutes total but builds layers of flavor that make these carnitas taste like they simmered for hours.
Simmer Until Tender
Pour in 1 cup of chicken broth, 1 cup of fresh orange juice, and 1/4 cup of lime juice—the acid helps tenderize the pork while adding bright flavor. Add your 2 bay leaves and bring everything to a simmer over medium heat. Once bubbling, reduce heat to low, cover tightly, and let cook for 2.5 to 3 hours. Check occasionally to ensure it’s maintaining a gentle simmer—you want small bubbles breaking the surface, not a rolling boil. The pork is ready when it shreds easily with a fork, about 195°F internal temperature. This long, slow cook breaks down tough connective tissues into gelatin, creating that fall-apart tenderness we love in carnitas. Tip: If liquid reduces too much during cooking, add 1/4 cup water to prevent burning.
Shred and Reduce Cooking Liquid
Using tongs, transfer the cooked pork to a large bowl, leaving the cooking liquid in the pot. Remove and discard the bay leaves. Use two forks to shred the pork—this should require minimal effort if properly cooked. Meanwhile, increase heat to medium-high and boil the remaining cooking liquid until reduced by half, about 8-10 minutes. You’re looking for a syrupy consistency that will coat the pork beautifully. This reduced liquid is packed with concentrated flavor that will make your carnitas taste incredible. Return the shredded pork to the pot and toss to coat evenly with the reduced sauce. The pork will absorb this flavorful liquid, ensuring every bite is moist and delicious.
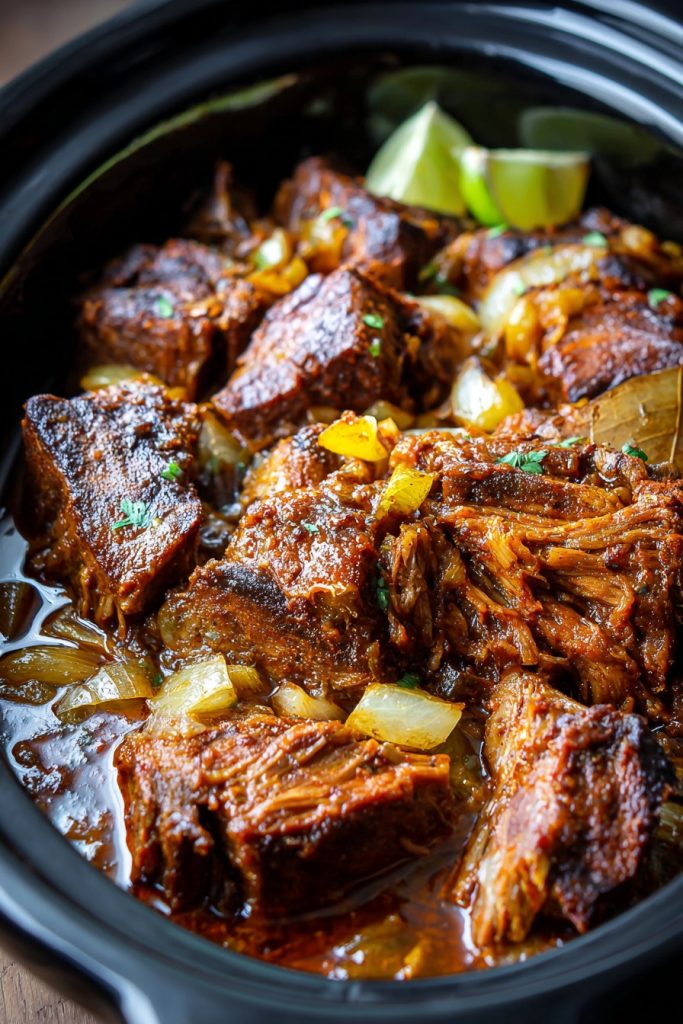
Crisp Under the Broiler
Preheat your broiler to high and position oven rack 6 inches from heat source. Spread the sauced pork in an even layer on a rimmed baking sheet. Broil for 3-5 minutes until the edges begin to crisp and caramelize—watch closely as broilers vary in intensity. You’re looking for browned, crispy bits mixed with tender meat, not uniform browning. The high heat creates those signature crispy edges that make carnitas so addictive. Remove from oven and let rest for 2 minutes before serving. This final step transforms the texture from simply tender to truly authentic carnitas with that perfect contrast between soft interior and crispy exterior. Tip: For extra crispy carnitas, don’t stir during broiling—let those edges really develop.
Tips and Tricks
If you’re preparing this during naptime or while kids are occupied, consider doubling the recipe—the cooked carnitas freeze beautifully for up to 3 months. Simply portion cooled carnitas into freezer bags, press out air, and freeze flat. To reheat, thaw overnight in refrigerator or microwave on defrost setting, then crisp in a skillet with a tablespoon of oil. For even easier weeknight meals, prep your spice mixture in advance—measure all dry spices into a small jar and store for up to 2 months. When ready to cook, just dump over pork. If you’re short on fresh oranges, bottled orange juice works fine in a pinch, though fresh will give slightly brighter flavor. For families with varying spice preferences, keep the carnitas mild during cooking and offer hot sauce or sliced jalapeños at the table. The cooking liquid reduction step is crucial—don’t skip it! That concentrated sauce is what makes these carnitas so flavorful without needing additional seasonings. If you notice fat separating from the reduced liquid, that’s actually perfect—that rendered pork fat will help create extra crispy edges during broiling. For maximum efficiency, use the pork cooking time to prep sides like rice, beans, or chop toppings so everything comes together seamlessly at dinner time. If your family prefers softer carnitas without crispy edges, you can skip the broiling step entirely—just serve directly from the pot. Leftovers make incredible next-day meals beyond tacos—try them in quesadillas, over nachos, mixed into scrambled eggs, or as pizza topping for easy lunch solutions.
Recipe Variations
- For a spicier version that adults will love but kids can still enjoy, add 1-2 chopped chipotle peppers in adobo sauce during the simmering stage. The smokiness complements the pork beautifully, and you can control the heat level by adjusting how many peppers you include. Serve with cooling toppings like sour cream or avocado to balance the spice for sensitive palates.
- Transform this into an instant pot or slow cooker adaptation for even easier prep. For pressure cooking, reduce liquid to 1/2 cup chicken broth and cook on high pressure for 45 minutes with natural release. For slow cooker, brown pork first for best flavor, then cook on low 6-8 hours. Both methods save active time while delivering similar results.
- Create a citrus-forward version by using a mix of orange, lime, and grapefruit juices instead of just orange. The grapefruit adds pleasant bitterness that cuts through the richness, while extra lime brightens the overall flavor profile. This works particularly well for summer meals when you want something feeling lighter and more refreshing.
- For a completely different flavor direction, substitute the cumin and chili powder with Chinese five-spice powder and soy sauce for Asian-inspired carnitas. Use ginger instead of garlic, and replace orange juice with pineapple juice. Serve in lettuce wraps with quick-pickled vegetables for an easy fusion dinner that breaks the taco night routine.
- Make it keto-friendly by omitting the orange juice and increasing chicken broth to 1.5 cups, adding a tablespoon of apple cider vinegar for acidity. The carnitas will still be deliciously tender and work perfectly for low-carb tortillas or salad bowls. This variation maintains all the convenience while fitting specific dietary needs.
Frequently Asked Questions
Can I use pork tenderloin instead of pork shoulder for leaner carnitas?
While pork tenderloin is leaner, I don’t recommend it for authentic carnitas texture. Pork shoulder contains more fat and connective tissue that breaks down during slow cooking, creating that melt-in-your-mouth tenderness carnitas are known for. Pork tenderloin would become dry and stringy with this cooking method. If you’re concerned about fat content, you can trim more visible fat from the shoulder before cooking, but keep some for moisture. The rendered fat also helps create those crispy edges during broiling that make carnitas so irresistible.
How can I make this recipe ahead for busy weeknights?
This recipe is perfect for make-ahead preparation! You can complete through the shredding step, then store the sauced pork in an airtight container in the refrigerator for up to 4 days. When ready to serve, spread on a baking sheet and broil as directed—it might need an extra minute since it’s starting cold. For longer storage, freeze the cooked carnitas before the broiling step for up to 3 months. The crisping step works best from cold or frozen state anyway, making this ideal for planning ahead.
What’s the best way to serve carnitas for picky eaters?
Set up a taco bar with separate components so everyone can build their perfect meal. Include soft and hard taco shells, shredded cheese, lettuce, sour cream, salsa, and guacamole. For extremely picky eaters, serve the carnitas plain with rice and beans on the side. The beauty of this recipe is its versatility—the pork itself has mild flavor that most kids enjoy, while adults can add spicier toppings. This approach minimizes dinner battles and lets everyone customize to their preferences.
My carnitas didn’t get crispy during broiling—what went wrong?
This usually happens if the pork was too wet before broiling or the broiler wasn’t hot enough. Make sure you’ve reduced the cooking liquid properly—it should be syrupy, not watery. Also, pat the pork dry with paper towels before spreading on the baking sheet. Ensure your broiler has preheated for at least 5 minutes and position the rack correctly. If still not crisping, try spreading the pork in a thinner layer or broiling for additional 1-2 minutes while watching closely to prevent burning.
Can I make this without citrus for someone with allergies?
Absolutely! Replace the orange and lime juice with 1 1/4 cups chicken broth mixed with 2 tablespoons apple cider vinegar. The vinegar provides the necessary acidity to tenderize the pork while mimicking citrus’s bright flavor. You might want to add an extra teaspoon of sugar to balance the acidity, though this is optional. The result will be slightly different but still delicious—more like traditional pulled pork than authentic carnitas, but equally family-friendly and convenient.
Summary
This pork carnitas recipe delivers restaurant-quality results with minimal hands-on time, perfect for busy families. The slow-cooked, broiler-crisped method creates tender, flavorful pork that works for multiple meals throughout the week. With simple ingredients and straightforward techniques, it transforms hectic taco nights into stress-free family favorites.
Pork Carnitas
6
servings20
minutes3
minutesIngredients
Instructions
- 1 Trim excess fat from pork shoulder and cut into 2-inch chunks. Combine with minced garlic, cumin, oregano, chili powder, smoked paprika, salt, and pepper in a large bowl. Toss to coat evenly.
- 2 Heat 2 tablespoons oil in Dutch oven over medium-high heat. Brown pork in batches, 3-4 minutes per side. Remove and set aside. Add remaining oil if needed and cook onions until softened, about 5 minutes.
- 3 Return pork to pot with any juices. Add chicken broth, orange juice, lime juice, and bay leaves. Bring to simmer, then reduce heat to low, cover, and cook 2.5-3 hours until pork shreds easily.
- 4 Remove pork to bowl and shred with two forks. Discard bay leaves. Boil cooking liquid until reduced by half, about 8-10 minutes. Return shredded pork to pot and toss with reduced sauce.
- 5 Preheat broiler to high. Spread pork on rimmed baking sheet and broil 6 inches from heat for 3-5 minutes until edges are crispy. Rest 2 minutes before serving.


