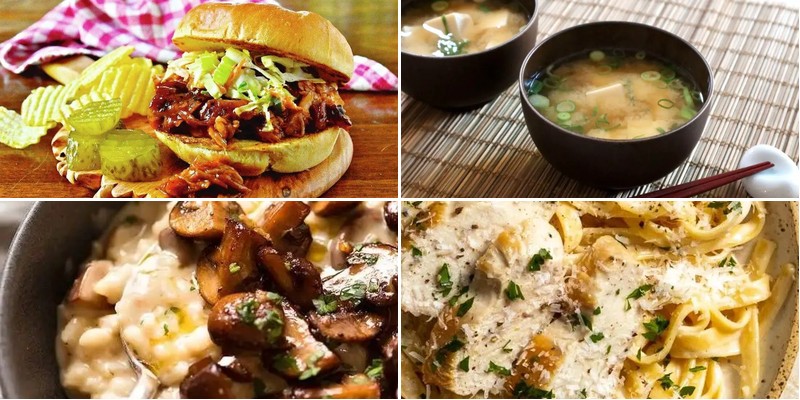
Dive into a world of culinary inspiration with these 34 delicious popular recipes! Whether you’re craving quick weeknight dinners, comforting classics, or fresh seasonal favorites, this roundup has something to satisfy every appetite. Get ready to discover new go-to dishes and rediscover beloved classics that will make your meal planning exciting and delicious. Let’s explore these mouthwatering options together!
Classic Spaghetti Carbonara
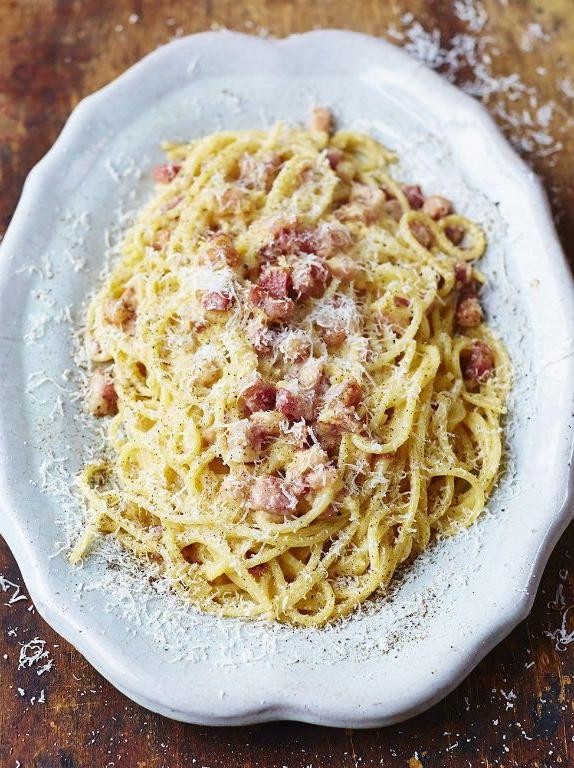
Get ready for the ultimate comfort food. This spaghetti carbonara delivers rich, creamy satisfaction without any cream. Golden egg sauce clings perfectly to al dente pasta.
3
servings15
minutes18
minutesIngredients
– 1 lb spaghetti
– 4 large eggs
– 1 cup grated Pecorino Romano cheese, plus extra for serving
– 6 oz pancetta, diced (or thick-cut bacon)
– 3 cloves garlic, minced
– 1/2 tsp black pepper, freshly ground
– 1/4 tsp salt, adjust to taste
Instructions
1. Bring 4 quarts of water to a rolling boil in a large pot.
2. Add 2 tablespoons of salt to the boiling water.
3. Add spaghetti and cook for 8-9 minutes until al dente, stirring occasionally.
4. While pasta cooks, whisk eggs, grated Pecorino Romano, and black pepper in a medium bowl until smooth.
5. Cook diced pancetta in a large skillet over medium heat for 6-8 minutes until crispy and fat renders.
6. Add minced garlic to the skillet and cook for 1 minute until fragrant but not browned.
7. Reserve 1 cup of pasta water before draining spaghetti.
8. Immediately transfer hot spaghetti to the skillet with pancetta, removing from heat.
9. Quickly toss spaghetti to coat evenly with pancetta fat.
10. Pour egg mixture over hot pasta while continuously tossing with tongs.
11. Add reserved pasta water 1/4 cup at a time, tossing until sauce becomes creamy and coats spaghetti.
12. Season with salt only if needed, as pancetta and cheese are already salty.
Zesty pepper cuts through the rich egg and cheese sauce. The spaghetti should be creamy, not watery or scrambled. Serve immediately with extra grated cheese and a crisp green salad to balance the richness.
Savory Chicken Alfredo
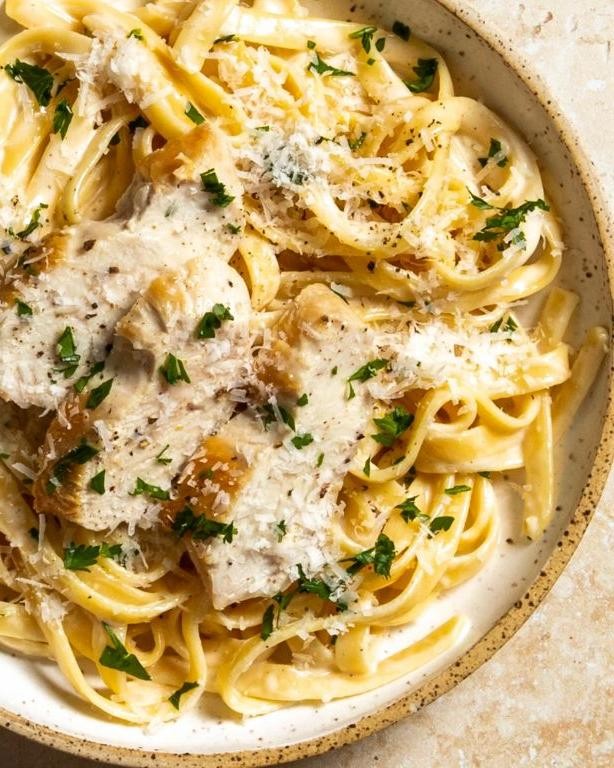
Mouthwatering chicken alfredo brings creamy comfort to any weeknight dinner. This version balances rich sauce with perfectly cooked pasta and tender chicken. Make it in under 30 minutes for a satisfying meal everyone will love.
2
servings10
minutes20
minutesIngredients
– 1 lb boneless, skinless chicken breasts, sliced thin for quick cooking
– 12 oz fettuccine pasta, or any long pasta shape
– 2 tbsp olive oil, or any neutral oil
– 3 cloves garlic, minced fine
– 1 cup heavy cream, full-fat for best texture
– 1/2 cup grated Parmesan cheese, freshly grated melts better
– 2 tbsp unsalted butter, for finishing the sauce
– 1/4 tsp black pepper, adjust to taste
– 1/4 tsp salt, adjust to taste
– 2 tbsp fresh parsley, chopped for garnish
Instructions
1. Bring 4 quarts of salted water to a rolling boil in a large pot.
2. Add fettuccine and cook for 8-10 minutes until al dente, stirring occasionally to prevent sticking.
3. Drain pasta, reserving 1/2 cup pasta water for later use in the sauce.
4. While pasta cooks, heat olive oil in a large skillet over medium-high heat until shimmering.
5. Add chicken slices in a single layer and cook for 4-5 minutes per side until internal temperature reaches 165°F.
6. Remove chicken from skillet and set aside on a clean plate.
7. Reduce heat to medium and add minced garlic to the same skillet.
8. Cook garlic for 30-45 seconds until fragrant but not browned.
9. Pour heavy cream into the skillet and bring to a gentle simmer.
10. Whisk in grated Parmesan cheese until completely melted and sauce thickens slightly.
11. Stir in butter until incorporated for a glossy finish.
12. Season sauce with salt and black pepper, tasting and adjusting as needed.
13. Return cooked chicken to the skillet and toss to coat in sauce.
14. Add drained pasta to the skillet along with 1/4 cup reserved pasta water.
15. Toss everything together until pasta is well coated and sauce clings evenly.
16. Garnish with fresh parsley before serving. Perfectly creamy sauce coats each strand of pasta with a balanced richness. The tender chicken adds protein while the garlic provides subtle aromatic notes. Serve immediately with extra Parmesan for those who want more cheesy flavor.
Authentic Margherita Pizza

Unbelievably simple yet perfect, this classic pizza lets quality ingredients shine through. Using just a few key components creates the ultimate comfort food. Follow these precise steps for authentic results every time.
2
portions80
minutes15
minutesIngredients
– 2 cups bread flour (or all-purpose flour)
– 1 tsp active dry yeast
– 3/4 cup warm water (110°F)
– 1 tsp salt
– 1 tbsp olive oil (plus extra for brushing)
– 1/2 cup crushed San Marzano tomatoes
– 4 oz fresh mozzarella cheese, sliced
– 6-8 fresh basil leaves
– 1/4 tsp salt (for sauce)
Instructions
1. Combine warm water (110°F) and yeast in a large bowl, letting it activate for 5 minutes until foamy.
2. Mix in bread flour, 1 tsp salt, and 1 tbsp olive oil until a shaggy dough forms.
3. Knead the dough on a floured surface for 8-10 minutes until smooth and elastic.
4. Place dough in an oiled bowl, cover with plastic wrap, and let rise in a warm spot for 1 hour until doubled.
5. Punch down the dough and divide into two equal portions.
6. Roll each portion into a 12-inch circle on a floured surface.
7. Transfer dough rounds to pizza pans or baking sheets dusted with cornmeal.
8. Brush the outer crust edges lightly with olive oil using a pastry brush.
9. Spread crushed tomatoes evenly over both pizza bases, leaving a 1-inch border.
10. Sprinkle 1/4 tsp salt evenly over the tomato sauce.
11. Arrange mozzarella slices in a single layer over the sauce.
12. Bake at 475°F for 12-15 minutes until crust is golden and cheese bubbles.
13. Remove pizzas from oven and immediately top with fresh basil leaves.
14. Let rest for 2 minutes before slicing with a pizza cutter.
Soft, chewy crust provides the perfect base for bright tomato flavor and creamy mozzarella. The fresh basil adds a peppery finish that elevates the entire dish. Serve immediately with a drizzle of quality olive oil for extra richness.
Zesty Tacos al Pastor

Ready to transform taco night? These zesty tacos al pastor deliver bold flavor with minimal effort. Marinated pork gets perfectly charred for authentic street-style appeal.
8
tacos30
minutes15
minutesIngredients
– 2 lbs pork shoulder, sliced thin (freeze for 30 minutes first for easier slicing)
– 1 cup pineapple juice (fresh or bottled)
– 3 tbsp achiote paste (find in Latin markets)
– 2 tbsp white vinegar
– 3 garlic cloves, minced
– 1 tsp dried oregano
– 1 tsp ground cumin
– 1/2 tsp salt
– 2 tbsp vegetable oil (or any neutral oil)
– 8 corn tortillas
– 1 cup fresh pineapple chunks
– 1/2 white onion, diced
– 1/4 cup chopped cilantro
– 1 lime, cut into wedges
Instructions
1. Combine pineapple juice, achiote paste, vinegar, garlic, oregano, cumin, and salt in a blender.
2. Blend on high speed for 30 seconds until completely smooth.
3. Place pork slices in a large resealable bag or shallow dish.
4. Pour marinade over pork, ensuring all pieces are coated.
5. Refrigerate for at least 4 hours or overnight for maximum flavor penetration.
6. Heat vegetable oil in a large skillet over medium-high heat until shimmering.
7. Remove pork from marinade, shaking off excess liquid.
8. Cook pork in single layer for 4-5 minutes per side until browned and slightly charred.
9. Transfer cooked pork to cutting board and let rest for 3 minutes.
10. Chop pork into bite-sized pieces using a sharp knife.
11. Warm corn tortillas in a dry skillet for 30 seconds per side until pliable.
12. Assemble tacos by dividing pork among warmed tortillas.
13. Top with fresh pineapple chunks, diced onion, and chopped cilantro.
14. Serve immediately with lime wedges for squeezing.
The tender, slightly charred pork contrasts beautifully with sweet pineapple and crisp onion. For a fun twist, grill the pineapple chunks alongside the pork to enhance their caramelized flavor. These tacos shine when served family-style with extra toppings for customization.
Rich Beef Wellington

A classic Beef Wellington elevates any dinner with its impressive layers. This version keeps preparation straightforward while delivering rich, savory flavor. Perfect for special occasions, it’s a showstopper worth mastering.
2
portions60
minutes45
minutesIngredients
– 1.5 lb beef tenderloin, center-cut (trimmed of silver skin)
– 2 tbsp olive oil, or any neutral oil
– 1 tsp kosher salt, adjust to taste
– 1/2 tsp black pepper, freshly ground
– 8 oz cremini mushrooms, finely chopped
– 1 shallot, minced (about 1/4 cup)
– 2 cloves garlic, minced
– 2 tbsp unsalted butter
– 2 tbsp dry sherry, or substitute with red wine
– 4 slices prosciutto, thinly sliced
– 2 tbsp Dijon mustard
– 1 sheet puff pastry, thawed according to package directions
– 1 egg, beaten (for egg wash)
– Flaky sea salt, for finishing
Instructions
1. Pat the beef tenderloin completely dry with paper towels.
2. Season all sides of the beef evenly with kosher salt and black pepper.
3. Heat olive oil in a large skillet over high heat until shimmering.
4. Sear the beef on all sides until deeply browned, about 2–3 minutes per side.
5. Transfer the beef to a plate and brush all over with Dijon mustard while still warm.
6. Let the beef cool to room temperature, about 20–25 minutes.
7. In the same skillet, melt butter over medium heat.
8. Add minced shallot and cook until softened, about 2 minutes.
9. Add minced garlic and cook for 30 seconds until fragrant.
10. Add chopped mushrooms and cook, stirring occasionally, until all liquid evaporates and mixture is pasty, about 8–10 minutes.
11. Stir in dry sherry and cook until absorbed, about 1 minute.
12. Spread the mushroom mixture (duxelles) on a plate and cool completely, about 15 minutes.
13. Lay prosciutto slices side-by-side on plastic wrap, slightly overlapping.
14. Spread the cooled duxelles evenly over the prosciutto.
15. Place the cooled beef in the center of the prosciutto-duxelles layer.
16. Use the plastic wrap to tightly roll the prosciutto and duxelles around the beef, twisting ends to seal.
17. Chill the wrapped beef in the refrigerator for 15 minutes to firm up.
18. Roll the puff pastry sheet on a floured surface to 1/8-inch thickness.
19. Unwrap the beef and place it in the center of the pastry.
20. Fold the pastry over the beef, trimming excess, and seal edges with beaten egg wash.
21. Place the Wellington seam-side down on a parchment-lined baking sheet.
22. Brush the entire pastry with egg wash and score the top lightly with a knife.
23. Sprinkle with flaky sea salt for extra crunch.
24. Chill the assembled Wellington for 20 minutes to prevent pastry shrinkage.
25. Preheat oven to 425°F.
26. Bake for 25–35 minutes until pastry is golden brown and internal temperature reaches 125°F for medium-rare.
27. Let rest for 10 minutes before slicing into thick portions.
Now you have a perfectly cooked Beef Wellington with a crisp, buttery crust. The tender beef pairs beautifully with the earthy mushroom layer. Serve it sliced atop a bed of arugula or with roasted root vegetables for a complete meal.
Hearty Vegetable Stir-fry
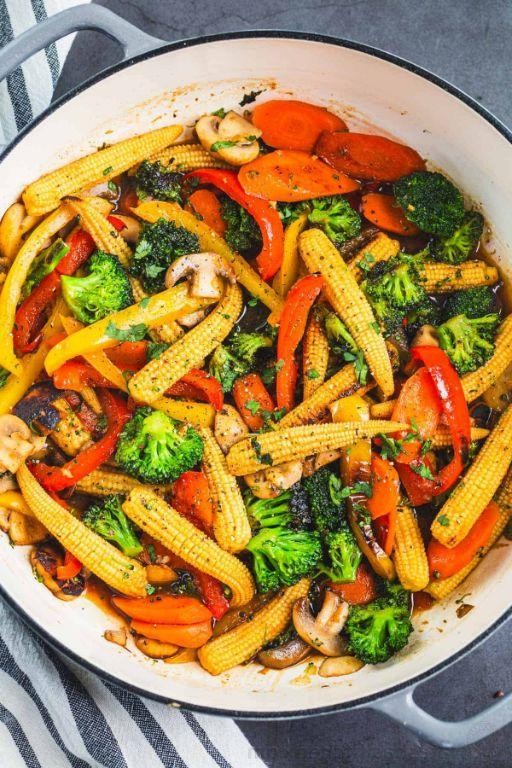
Mixing vibrant vegetables creates this satisfying stir-fry that comes together in minutes. Perfect for busy weeknights when you need something nutritious and fast. Customize with whatever veggies you have on hand for endless variations.
3
servings15
minutes10
minutesIngredients
– 2 tbsp vegetable oil (or any neutral oil)
– 1 medium onion, thinly sliced
– 2 cloves garlic, minced
– 1 bell pepper, sliced
– 2 carrots, julienned
– 2 cups broccoli florets
– 1 cup snap peas
– 3 tbsp soy sauce (use tamari for gluten-free)
– 1 tbsp rice vinegar
– 1 tsp sesame oil (adds nutty flavor)
– 1 tsp cornstarch
– 1/4 cup water
Instructions
1. Heat vegetable oil in a large wok or skillet over medium-high heat until shimmering.
2. Add sliced onion and cook for 2 minutes, stirring constantly until slightly softened.
3. Stir in minced garlic and cook for 30 seconds until fragrant but not browned.
4. Add bell pepper, carrots, and broccoli florets to the pan.
5. Cook vegetables for 4 minutes, tossing frequently with tongs.
6. Mix in snap peas and continue cooking for 2 more minutes.
7. Whisk together soy sauce, rice vinegar, sesame oil, cornstarch, and water in a small bowl until smooth.
8. Pour sauce mixture over the vegetables in the pan.
9. Cook for 1-2 minutes until sauce thickens and coats all vegetables evenly.
10. Remove from heat immediately to prevent overcooking.
Keep the vegetables crisp-tender with a glossy sauce that clings perfectly. The combination delivers satisfying crunch with savory-sweet notes. Try serving over quinoa or stuffing into warm tortillas for a fresh twist.
Flavorful Chicken Tikka Masala

Bold flavors and tender chicken make this tikka masala a weeknight winner. This creamy curry comes together faster than takeout. You’ll have restaurant-quality results in under an hour.
4
servings25
minutes30
minutesIngredients
– 1.5 lbs boneless, skinless chicken thighs, cut into 1-inch pieces
– 1 cup plain whole milk yogurt
– 2 tbsp lemon juice
– 4 garlic cloves, minced
– 1 tbsp grated fresh ginger
– 2 tsp garam masala
– 1 tsp ground cumin
– 1 tsp paprika
– 1/2 tsp cayenne pepper, adjust to spice preference
– 2 tbsp vegetable oil, or any neutral oil
– 1 large yellow onion, finely chopped
– 1 (15 oz) can tomato sauce
– 1 cup heavy cream
– 1 tsp salt
– 1/4 cup chopped fresh cilantro
Instructions
1. Combine chicken, yogurt, lemon juice, half the garlic, half the ginger, garam masala, cumin, paprika, and cayenne in a large bowl.
2. Marinate chicken mixture at room temperature for 20 minutes while you prep other ingredients.
3. Heat oil in a large Dutch oven or heavy-bottomed pot over medium-high heat until shimmering.
4. Add onion and cook for 6-8 minutes until softened and lightly browned, stirring frequently.
5. Add remaining garlic and ginger, cooking for 1 minute until fragrant.
6. Pour in tomato sauce and simmer for 5 minutes until slightly thickened.
7. Add marinated chicken and all marinade to the pot, stirring to combine.
8. Bring to a gentle boil, then reduce heat to maintain a simmer.
9. Cook uncovered for 15 minutes, stirring occasionally to prevent sticking.
10. Stir in heavy cream and salt, simmering for 5 more minutes until heated through.
11. Remove from heat and stir in cilantro.
Hearty chunks of chicken stay remarkably tender in the vibrant orange sauce. The creamy tomato base carries warm spices without overwhelming heat. Serve over basmati rice or with warm naan for soaking up every last drop.
Creamy Mushroom Risotto

Getting creamy mushroom risotto right requires patience and attention. Golden mushrooms create earthy depth while constant stirring releases the rice’s starches. This method delivers restaurant-quality results in your own kitchen.
3
servings15
minutes30
minutesIngredients
– 1.5 cups Arborio rice
– 8 oz cremini mushrooms, sliced (or mixed wild mushrooms)
– 1 medium yellow onion, finely diced
– 4 cups chicken broth, kept warm (or vegetable broth)
– 1/2 cup dry white wine
– 3 tbsp unsalted butter, divided
– 2 tbsp olive oil
– 1/2 cup grated Parmesan cheese
– 2 cloves garlic, minced
– 1 tsp fresh thyme leaves (or 1/2 tsp dried)
– Salt and black pepper to taste
Instructions
1. Heat chicken broth in a separate saucepan until simmering, then reduce heat to low to keep warm.
2. Melt 1 tablespoon butter with olive oil in a large heavy-bottomed pot over medium heat.
3. Add sliced mushrooms and cook for 6-8 minutes until browned and moisture evaporates.
4. Transfer mushrooms to a plate, leaving any liquid in the pot.
5. Add diced onion to the same pot and cook for 4 minutes until translucent.
6. Stir in minced garlic and cook for 1 minute until fragrant.
7. Add Arborio rice and toast for 2 minutes, stirring constantly until grains turn slightly translucent at edges.
8. Pour in white wine and cook while stirring until completely absorbed, about 2 minutes.
9. Add 1 cup of warm broth and stir continuously until liquid is nearly absorbed.
10. Continue adding broth 1/2 cup at a time, stirring constantly and waiting until each addition is absorbed before adding more.
11. After 18-20 minutes, test rice for doneness – it should be al dente with a creamy sauce.
12. Stir in cooked mushrooms, remaining 2 tablespoons butter, Parmesan cheese, and thyme.
13. Season with salt and black pepper, then remove from heat.
14. Let rest for 2 minutes before serving. Making risotto requires constant attention but rewards with incredible creaminess. Mushrooms provide earthy notes that pair beautifully with the rich, cheesy rice. Try topping with extra Parmesan and fresh herbs for a restaurant-worthy presentation.
Succulent BBQ Pulled Pork
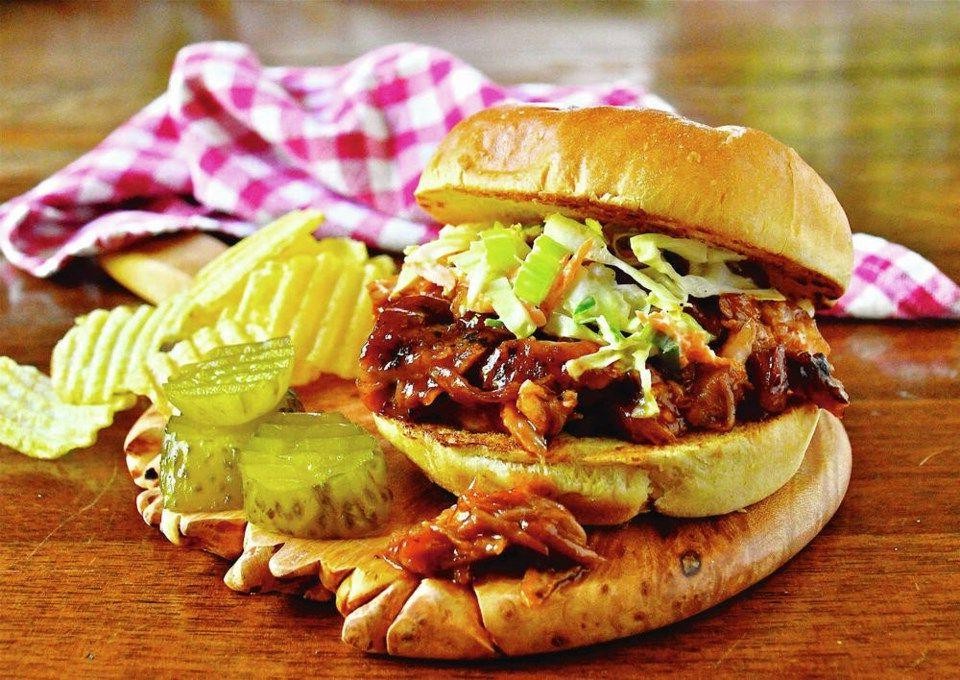
Tender, smoky, and effortlessly delicious, this BBQ pulled pork requires minimal effort for maximum flavor. Simply season, slow-cook until fall-apart tender, then shred and sauce. Perfect for sandwiches, tacos, or piled high on a plate.
3
sandwiches15
minutes485
minutesIngredients
– 4 lbs pork shoulder, fat cap trimmed to ¼-inch (or pork butt)
– 2 tbsp brown sugar
– 1 tbsp smoked paprika
– 1 tsp garlic powder
– 1 tsp onion powder
– 1 tsp salt
– ½ tsp black pepper
– 1 cup chicken broth (or apple cider vinegar for tang)
– 1 cup BBQ sauce, divided (use your favorite brand)
– 4 hamburger buns, toasted (or slider buns for parties)
Instructions
1. Pat the pork shoulder completely dry with paper towels for better seasoning adhesion.
2. In a small bowl, mix brown sugar, smoked paprika, garlic powder, onion powder, salt, and black pepper.
3. Rub the spice mixture evenly over all sides of the pork shoulder.
4. Pour chicken broth into a 6-quart slow cooker to prevent sticking and add moisture.
5. Place the seasoned pork shoulder fat-side up into the slow cooker.
6. Cover and cook on LOW for 8 hours until the pork shreds easily with a fork.
7. Transfer the pork to a large bowl, preserving ½ cup of cooking liquid.
8. Use two forks to shred the pork, discarding any large fat pieces.
9. Stir in ¾ cup BBQ sauce and the reserved cooking liquid to keep the meat moist.
10. Preheat your oven broiler to HIGH for a caramelized finish.
11. Spread the sauced pork in an even layer on a baking sheet.
12. Broil for 3–5 minutes until the edges are slightly crispy and caramelized.
13. Brush the remaining ¼ cup BBQ sauce over the pork for a glossy finish.
14. Serve immediately on toasted hamburger buns.
Lusciously tender strands of pork soak up the smoky-sweet BBQ sauce, creating a perfect balance of flavors. The quick broil at the end adds delightful crispy bits that contrast with the juicy meat. Pile it high on buns with coleslaw, or use it as a topping for loaded nachos or baked potatoes.
Spicy Thai Green Curry

Craving something bold and aromatic? This spicy Thai green curry delivers vibrant flavors in under 30 minutes. Customize the heat level to match your preference.
5
servings15
minutes17
minutesIngredients
- 1 tbsp vegetable oil (or any neutral oil)
- 2 tbsp green curry paste (adjust to taste)
- 1 (13.5 oz) can coconut milk
- 1 lb chicken breast, cut into 1-inch pieces
- 1 cup Thai eggplant, quartered (or substitute zucchini)
- 1 red bell pepper, sliced into strips
- 1 tbsp fish sauce
- 1 tsp palm sugar (or brown sugar)
- ½ cup Thai basil leaves
- 2 Thai chilies, sliced (optional, for extra heat)
- Cooked jasmine rice, for serving
Instructions
- Heat 1 tbsp vegetable oil in a large skillet over medium-high heat until shimmering.
- Add 2 tbsp green curry paste and fry for 1 minute, stirring constantly, until fragrant. (Tip: Frying the paste deepens the flavor.)
- Pour in the coconut milk, reserving 2 tbsp of the thick cream from the top of the can.
- Add the reserved coconut cream and simmer for 2 minutes, stirring occasionally.
- Add 1 lb chicken pieces and cook for 5 minutes, stirring occasionally, until opaque.
- Stir in 1 cup Thai eggplant and 1 sliced red bell pepper.
- Add 1 tbsp fish sauce and 1 tsp palm sugar, stirring to combine.
- Simmer uncovered for 8–10 minutes, until chicken is cooked through and vegetables are tender but still crisp. (Tip: Do not boil vigorously to prevent the coconut milk from separating.)
- Remove from heat and stir in ½ cup Thai basil leaves and optional Thai chilies.
- Let rest for 2 minutes before serving to allow flavors to meld. (Tip: Fresh basil wilts quickly, so add it off the heat.)
Ladle the curry over jasmine rice for a complete meal. The creamy coconut broth balances the curry’s sharp heat, while the eggplant soaks up the spicy sauce. For a dramatic presentation, garnish with extra basil and serve in shallow bowls to showcase the vibrant colors.
Fresh Caprese Salad
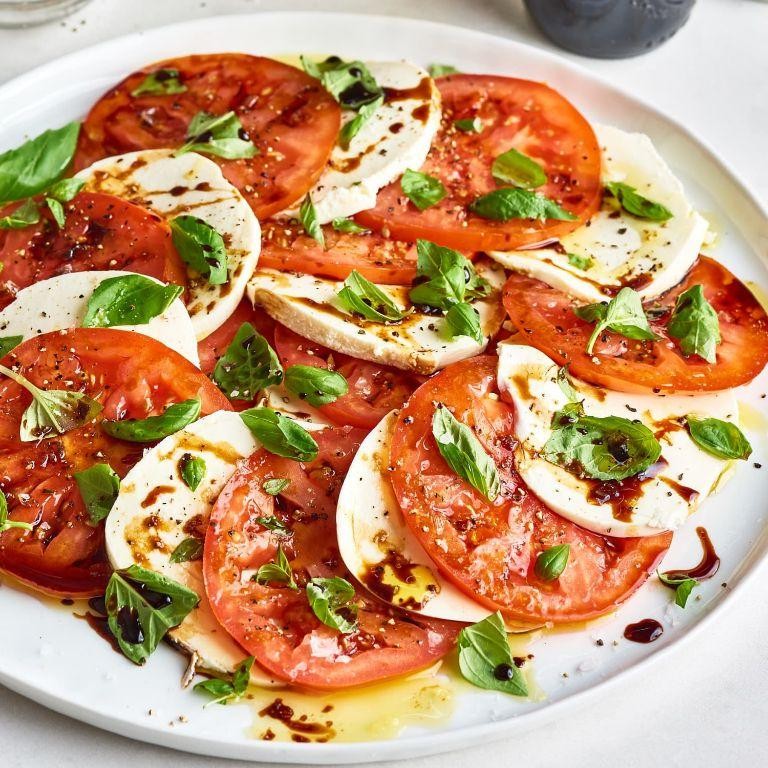
Dazzling in its simplicity, this Fresh Caprese Salad celebrates peak summer ingredients with minimal fuss. Perfect for hot days when you want something refreshing yet satisfying without heating up the kitchen. Let the quality of your ingredients shine through in this classic combination.
3
servings15
minutesIngredients
– 2 large ripe tomatoes (heirloom varieties work beautifully)
– 8 ounces fresh mozzarella cheese (bocconcini or sliced log)
– 1/4 cup fresh basil leaves (plus extra for garnish)
– 2 tablespoons extra virgin olive oil (high quality makes a difference)
– 1 tablespoon balsamic glaze (or reduced balsamic vinegar)
– 1/2 teaspoon sea salt (flaky salt preferred)
– 1/4 teaspoon black pepper (freshly cracked)
Instructions
1. Wash and dry the tomatoes thoroughly with paper towels.
2. Slice tomatoes into 1/4-inch thick rounds using a sharp serrated knife for clean cuts.
3. Slice mozzarella into 1/4-inch thick rounds that match your tomato slices.
4. Arrange tomato and mozzarella slices alternately on a serving platter in a circular pattern.
5. Tuck fresh basil leaves between the tomato and mozzarella slices throughout the arrangement.
6. Drizzle olive oil evenly over the entire salad using a circular motion.
7. Drizzle balsamic glaze in a zigzag pattern across the arranged ingredients.
8. Sprinkle sea salt evenly over the salad, focusing on the tomato slices.
9. Crack black pepper directly over the entire arrangement.
10. Let the salad rest at room temperature for 10 minutes before serving to allow flavors to meld. Fresh from the assembly, this salad delivers juicy tomatoes against creamy mozzarella with basil’s herbal punch. The olive oil and balsamic create a glossy sheen that makes it visually stunning. For a twist, serve over toasted baguette slices or alongside grilled chicken for a complete meal.
Traditional Miso Soup

Venturing beyond sushi rolls, traditional miso soup offers authentic Japanese comfort in minutes. This umami-rich broth balances delicate flavors with nourishing simplicity. Perfect for chilly evenings or light lunches.
2
servings15
minutes16
minutesIngredients
– 4 cups water
– 1 piece kombu (4-inch square), wiped clean with damp cloth
– 1/4 cup bonito flakes, packed loosely
– 3 tbsp white miso paste, or red for stronger flavor
– 1/2 cup soft tofu, cut into 1/2-inch cubes
– 2 tbsp dried wakame, rehydrated in water for 5 minutes
– 2 green onions, thinly sliced on diagonal
Instructions
1. Combine 4 cups cold water and kombu in medium saucepan over medium heat.
2. Heat until small bubbles form at pan edges (about 170°F), about 8 minutes—do not boil to prevent bitterness.
3. Remove kombu with tongs just before boiling point.
4. Add bonito flakes to hot broth, simmer 30 seconds then remove from heat.
5. Let bonito flakes steep 5 minutes until sinking to bottom.
6. Strain broth through fine-mesh sieve into clean pot, pressing flakes gently.
7. Return strained dashi to stove over low heat.
8. Place miso paste in small bowl, add 1/2 cup hot dashi, and whisk until smooth.
9. Stir dissolved miso mixture back into main pot—never boil miso to preserve probiotics.
10. Add tofu cubes and rehydrated wakame, heat 2 minutes until warmed through.
11. Remove from heat, stir in green onions just before serving.
Keep leftovers refrigerated separately: store dashi base and miso paste apart, combining when reheating. The silky broth contrasts with tender tofu and chewy seaweed. For variation, add shiitake mushrooms during the final heating stage.
Mouthwatering Beef Lasagna

Craving serious comfort food? This beef lasagna delivers rich, meaty layers between tender pasta sheets, all smothered in melted cheese. Perfect for feeding a crowd or freezing for later.
6
portions20
minutes55
minutesIngredients
– 1 lb ground beef (80/20 for best flavor)
– 9 lasagna noodles (no-boil variety saves time)
– 24 oz marinara sauce (or your favorite jarred sauce)
– 15 oz ricotta cheese (whole milk for creaminess)
– 1 large egg (helps bind ricotta)
– 2 cups shredded mozzarella (divided)
– 1/2 cup grated Parmesan cheese
– 1 tbsp olive oil (or any neutral oil)
– 1 small onion, diced
– 3 garlic cloves, minced
– 1 tsp dried oregano
– 1/2 tsp salt (adjust to taste)
– 1/4 tsp black pepper
Instructions
1. Preheat oven to 375°F.
2. Heat olive oil in a large skillet over medium-high heat.
3. Add diced onion and cook for 4 minutes until translucent.
4. Add minced garlic and cook for 1 minute until fragrant.
5. Add ground beef, breaking it up with a spoon, and cook for 6-8 minutes until browned.
6. Drain excess fat from the skillet.
7. Stir in marinara sauce, oregano, salt, and pepper.
8. Simmer the sauce for 5 minutes to blend flavors.
9. In a medium bowl, mix ricotta cheese, egg, 1 cup mozzarella, and Parmesan cheese until combined.
10. Spread 1/2 cup meat sauce in the bottom of a 9×13 inch baking dish.
11. Place 3 lasagna noodles over the sauce.
12. Spread 1/3 of the ricotta mixture over the noodles.
13. Spoon 1 cup meat sauce over the ricotta layer.
14. Repeat layers twice more, ending with meat sauce.
15. Sprinkle remaining 1 cup mozzarella over the top.
16. Cover dish tightly with foil and bake for 25 minutes.
17. Remove foil and bake for 15 more minutes until cheese is golden and bubbly.
18. Let lasagna rest for 10 minutes before slicing.
Perfectly baked lasagna holds its shape when sliced, revealing distinct layers of savory beef, creamy cheese, and tender pasta. Pair with garlic bread to soak up any extra sauce, or serve alongside a crisp green salad for contrast.
Sweet and Sour Chicken

Frying up crispy chicken and tossing it in a vibrant sweet and sour sauce makes for a classic takeout favorite you can easily recreate at home. This version comes together quickly with pantry staples and delivers that perfect balance of tangy and sweet. Skip the delivery and get that restaurant-quality crunch right in your own kitchen.
4
servings15
minutes15
minutesIngredients
– 1 lb boneless, skinless chicken breasts, cut into 1-inch pieces
– 1/2 cup cornstarch
– 2 large eggs, beaten
– 1/4 cup vegetable oil (or any neutral oil)
– 1/2 cup white sugar
– 1/4 cup rice vinegar
– 1/4 cup ketchup
– 2 tbsp soy sauce
– 1 tsp garlic powder
– 1/2 tsp ginger powder
– 1/2 cup pineapple chunks, canned or fresh
– 1/2 cup bell pepper, any color, cut into 1-inch pieces
– 1/4 cup white onion, cut into 1-inch pieces
Instructions
1. Cut 1 lb chicken breasts into uniform 1-inch pieces for even cooking.
2. Place 1/2 cup cornstarch in a shallow bowl and 2 beaten eggs in another bowl.
3. Dip each chicken piece first in cornstarch, then in egg, coating completely.
4. Heat 1/4 cup vegetable oil in a large skillet over medium-high heat until it shimmers (about 350°F).
5. Carefully place coated chicken pieces in hot oil without crowding the pan.
6. Fry chicken for 4-5 minutes per side until golden brown and internal temperature reaches 165°F.
7. Remove chicken from skillet and drain on paper towels to remove excess oil.
8. In a separate saucepan, combine 1/2 cup white sugar, 1/4 cup rice vinegar, 1/4 cup ketchup, 2 tbsp soy sauce, 1 tsp garlic powder, and 1/2 tsp ginger powder.
9. Bring sauce mixture to a boil over medium heat, then reduce to simmer for 3 minutes until slightly thickened.
10. Add 1/2 cup pineapple chunks, 1/2 cup bell pepper, and 1/4 cup onion to the sauce.
11. Cook vegetables in sauce for 2 minutes until slightly softened but still crisp.
12. Add fried chicken pieces to the sauce and vegetables, tossing to coat completely.
13. Simmer everything together for 1 minute to let flavors combine.
14. Remove from heat and serve immediately.
Mouthwatering crispy chicken coated in that signature glossy sauce creates the perfect texture contrast between tender meat and crunchy coating. The bright acidity from vinegar cuts through the sweetness beautifully, while the vegetables add fresh crunch. Serve it over steamed rice for the classic presentation, or try it in lettuce cups for a lighter meal that still delivers all the flavor.
Conclusion
Gathering these 34 popular recipes has been such a joy! Whether you’re cooking for family dinners, weekend gatherings, or just treating yourself, there’s something here to inspire your next kitchen adventure. We’d love to hear which recipes become your favorites—drop a comment below and share this roundup on Pinterest to spread the delicious inspiration!


