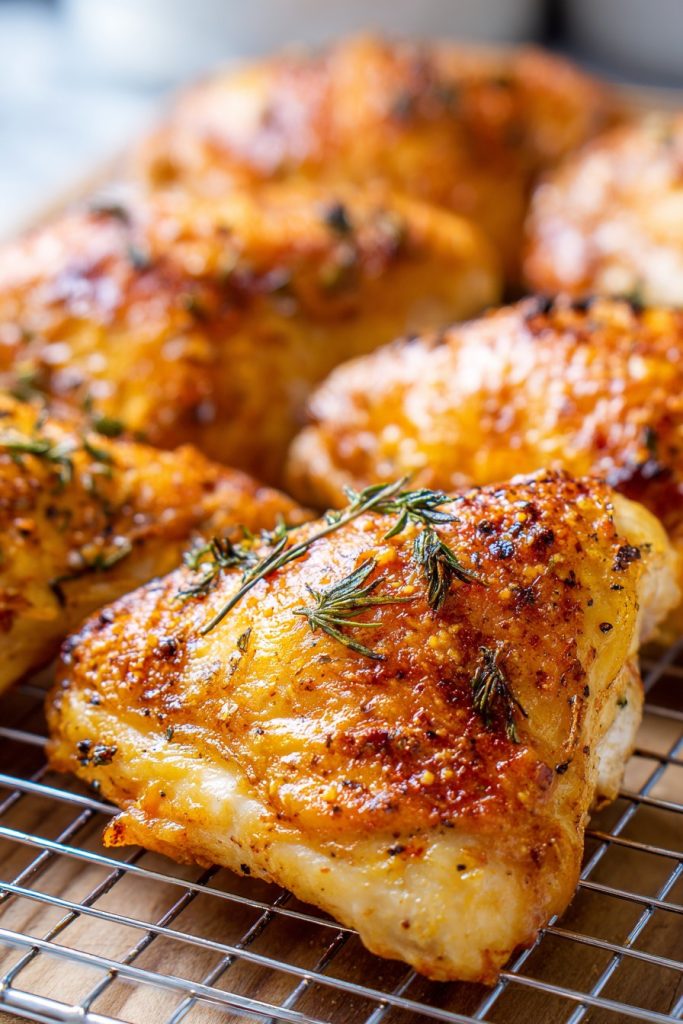
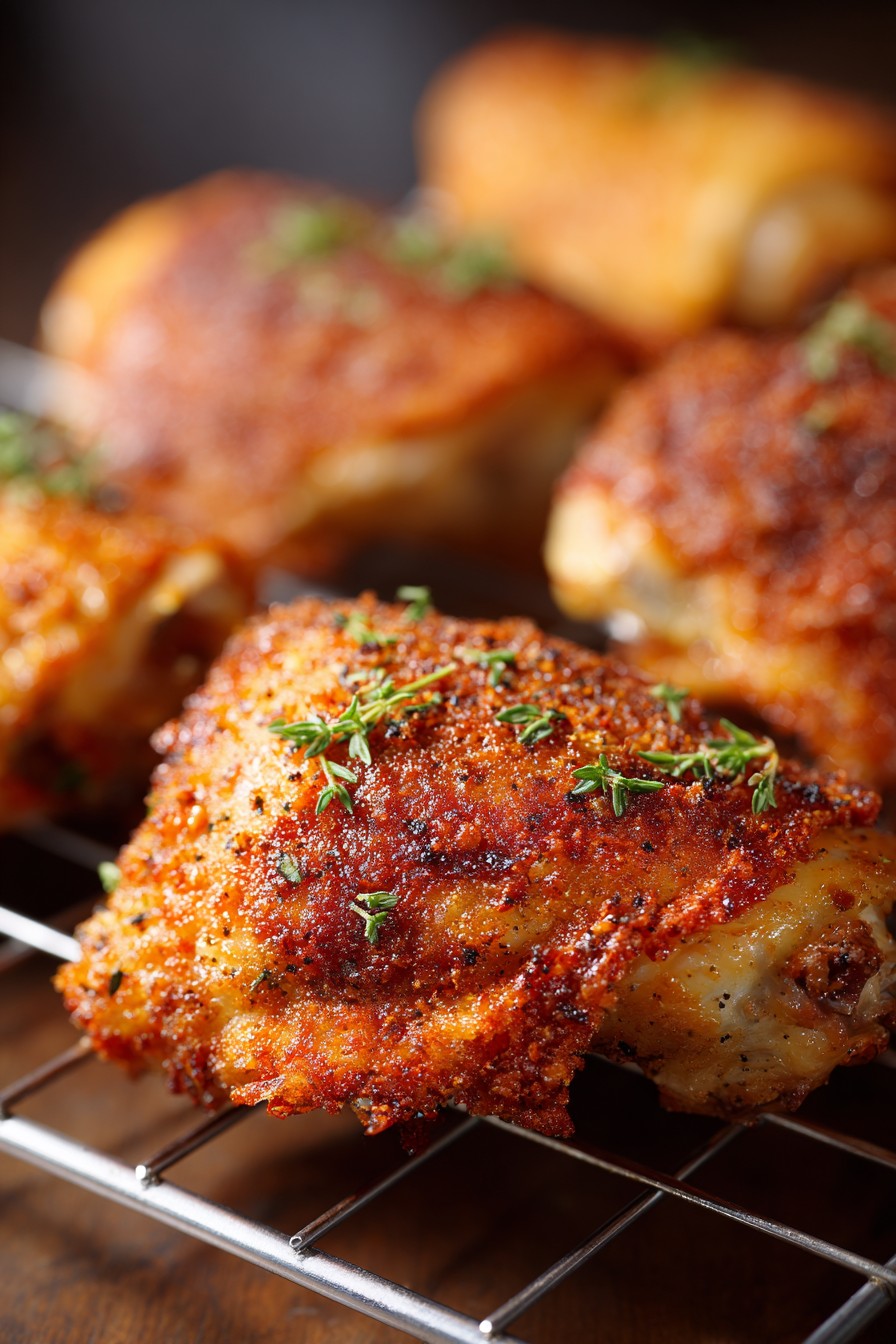
Picture this: golden-brown chicken with a crispy exterior that gives way to impossibly juicy meat inside, all while filling your kitchen with aromas that transport you straight to your favorite Southern cafeteria. Perfect for weeknight dinners or Sunday suppers, this iconic recipe brings nostalgia and flavor together in one glorious baking dish. Prepare to fall in love with chicken all over again!
Why This Recipe Works
- The buttermilk marinade tenderizes the chicken while adding tangy flavor that cuts through the richness
- Double coating with seasoned flour creates an extra crispy crust that stays crunchy even after baking
- Baking at high heat ensures the chicken cooks quickly while developing beautiful browning
- Resting time allows juices to redistribute throughout the meat, preventing dryness
- The simple seasoning blend delivers classic Southern flavor without overwhelming the natural taste of chicken
Ingredients
- 4 pounds chicken pieces (bone-in, skin-on thighs and drumsticks)
- 2 cups buttermilk
- 2 tablespoons hot sauce
- 2 cups all-purpose flour
- 1 tablespoon paprika
- 2 teaspoons garlic powder
- 2 teaspoons onion powder
- 1 teaspoon dried thyme
- 1 teaspoon black pepper
- 2 teaspoons salt
- 1/2 cup vegetable oil
- 4 tablespoons unsalted butter, melted
Equipment Needed
- Large mixing bowls (2)
- Whisk
- Rimmed baking sheet
- Wire rack
- Tongs
- Measuring cups and spoons
- Plastic wrap or airtight container
- Paper towels
Instructions
Prepare the Buttermilk Marinade
Begin by combining 2 cups of buttermilk and 2 tablespoons of hot sauce in a large mixing bowl, whisking vigorously until fully incorporated. The acidity in the buttermilk will work magic on your chicken, breaking down proteins for ultimate tenderness while the hot sauce adds subtle heat that complements the seasoning. Pat your 4 pounds of chicken pieces completely dry with paper towels – this crucial step ensures the marinade adheres properly rather than sliding off moisture. Submerge each piece in the buttermilk mixture, making sure every nook and cranny gets coated. Cover the bowl tightly with plastic wrap and refrigerate for at least 4 hours, though overnight marinating yields even more flavorful results. The transformation begins here as the chicken absorbs all that tangy goodness!
Create the Seasoned Flour Coating
While your chicken marinates, prepare the crispy coating that makes this recipe legendary. In another large bowl, combine 2 cups of all-purpose flour with 1 tablespoon paprika, 2 teaspoons garlic powder, 2 teaspoons onion powder, 1 teaspoon dried thyme, 1 teaspoon black pepper, and 2 teaspoons salt. Whisk these dry ingredients together for a full minute – don’t just give it a quick stir! Proper blending ensures every bite has balanced flavor rather than pockets of overwhelming seasoning. The paprika not only adds earthy sweetness but also gives that beautiful golden color we associate with perfect fried chicken. For extra crispy results, you can add a tablespoon of cornstarch to the flour mixture, which creates additional crunch without altering the flavor profile. Set this bowl aside until you’re ready to coat your chicken.
Coat the Chicken Pieces
Remove the chicken from the refrigerator and let it sit at room temperature for 20 minutes – this helps it cook more evenly. Preheat your oven to 400°F and place a wire rack inside a rimmed baking sheet. Using tongs, remove one piece of chicken from the buttermilk marinade, allowing excess liquid to drip off. Dredge the chicken thoroughly in the seasoned flour mixture, pressing firmly to ensure the coating adheres to all surfaces. For extra crunch, dip the floured chicken back into the buttermilk mixture and then into the flour again – this double coating creates those craggy, crispy bits we all love. Shake off any excess flour and place the chicken skin-side up on the wire rack. Repeat with all pieces, leaving about an inch between them for proper air circulation.
Bake to Golden Perfection
Combine 1/2 cup vegetable oil and 4 tablespoons melted butter, then brush this mixture generously over the top of each chicken piece – this helps the coating brown beautifully and adds rich flavor. Place the baking sheet on the middle rack of your 400°F oven and bake for 35 minutes. After this time, carefully flip each piece using tongs and continue baking for another 20-25 minutes. The chicken is done when the internal temperature reaches 165°F on an instant-read thermometer inserted into the thickest part without touching bone, and the coating is deep golden brown with some darker crispy spots. If your chicken is browning too quickly, you can tent it loosely with aluminum foil during the last 15 minutes of cooking.
Rest and Serve
Once perfectly cooked, remove the chicken from the oven and transfer it to a clean wire rack set over a baking sheet – never let it sit in the drippings or the bottom will become soggy. Let the chicken rest for exactly 10 minutes before serving; this allows the juices to redistribute throughout the meat rather than running out when you cut into it. The internal temperature will continue to rise about 5 degrees during this resting period, ensuring food safety while maintaining moisture. Serve your Piccadilly-style chicken with classic sides like mashed potatoes, green beans, or cornbread to complete the cafeteria experience. That first bite of crispy, juicy perfection will make all the effort worthwhile!
Tips and Tricks
For the crispiest possible chicken, pat your pieces completely dry before marinating – moisture is the enemy of crispy coating. If you don’t have buttermilk, make your own by adding 1 tablespoon of lemon juice or white vinegar to 2 cups of milk and letting it sit for 5 minutes until slightly curdled. When measuring flour for the coating, use the spoon-and-level method: spoon flour into your measuring cup and level it off with a knife rather than scooping directly from the bag, which compacts the flour and leads to dense coating. For extra flavor, add a teaspoon of cayenne pepper or smoked paprika to the flour mixture – the smokiness complements the chicken beautifully. If you prefer darker meat, use all thighs and drumsticks rather than breast pieces, as they remain juicier during the longer baking time. To make cleanup easier, line your baking sheet with aluminum foil before placing the wire rack – the drippings will caramelize and stick otherwise. For maximum crispiness, ensure your oven is fully preheated before baking and avoid opening the door frequently during cooking, as temperature fluctuations affect how the coating crisps. If you’re cooking for a crowd, you can prepare the chicken through the coating stage and refrigerate it on the wire rack for up to 2 hours before baking – the chilled coating actually becomes crispier during baking. Leftover chicken reheats beautifully in an air fryer at 375°F for 5-7 minutes or in a conventional oven at 375°F for 10-12 minutes, restoring the crispiness that microwave reheating destroys. For food safety, never marinate chicken at room temperature for more than 30 minutes, and always use a clean plate for cooked chicken rather than the one that held raw meat. If you notice the coating browning too quickly, reduce oven temperature to 375°F rather than opening the door frequently to check, which causes temperature drops that affect cooking time. For extra juicy meat, brine your chicken in a saltwater solution (1/4 cup salt per quart of water) for 2 hours before the buttermilk marinade – this additional step ensures moisture retention even if slightly overcooked.
Recipe Variations
- Spicy Nashville Hot Version: After baking, brush chicken with mixture of 1/2 cup melted butter, 2 tablespoons cayenne pepper, 1 tablespoon brown sugar, 1 teaspoon garlic powder, and 1/2 teaspoon paprika for fiery heat
- Lemon Herb Twist: Add 2 tablespoons lemon zest and 1/4 cup chopped fresh herbs (parsley, thyme, rosemary) to the flour mixture, and use lemon juice instead of hot sauce in the buttermilk marinade
- Gluten-Free Adaptation: Replace all-purpose flour with 1 cup almond flour and 1 cup cornstarch, adding 1 teaspoon xanthan gum to help the coating adhere properly
- Air Fryer Method: Prepare chicken as directed, then air fry at 380°F for 20-25 minutes, flipping halfway through, for quicker cooking with less oil
- Sheet Pan Dinner: Arrange chopped potatoes, carrots, and onions around the chicken on the baking sheet during the last 30 minutes of cooking for a complete meal
Frequently Asked Questions
Can I use boneless, skinless chicken breasts instead of bone-in pieces?
While you can use boneless, skinless chicken breasts, the results will be quite different. Bone-in, skin-on chicken pieces provide more flavor and stay juicier during the longer baking time required for the coating to crisp properly. If using breasts, reduce baking time to 25-30 minutes total and consider pounding them to an even thickness for consistent cooking. The skin helps protect the meat from drying out and contributes to that classic cafeteria-style texture, so boneless versions may be slightly drier despite the marinade.
Why did my coating turn out soggy instead of crispy?
Soggy coating usually results from three main issues: insufficient drying before marinating, overcrowding on the baking sheet, or not using a wire rack. The wire rack is crucial because it allows air to circulate around all sides of the chicken, preventing steam from making the bottom soggy. Also ensure your oven temperature is accurate – an oven thermometer can verify if your oven runs cool. Finally, don’t skip the step of bringing chicken to room temperature before baking, as cold chicken creates steam that softens the coating.
How long can I marinate the chicken in buttermilk?
The buttermilk marinade can work its magic for up to 24 hours in the refrigerator, with 4-12 hours being the ideal range. Beyond 24 hours, the acidity can begin to break down the chicken too much, resulting in mushy texture. If you need to marinate longer, you can reduce the acidity by using half buttermilk and half whole milk. Always marinate in the refrigerator, never at room temperature, and ensure the chicken is fully submerged to prevent exposed areas from drying out.
Can I make this recipe ahead of time for a party?
Absolutely! You can prepare the chicken through the coating stage and arrange it on the wire rack-covered baking sheet up to 2 hours before baking. Keep it refrigerated until ready to cook. For even further ahead preparation, you can freeze the coated, uncooked chicken on the baking sheet until solid, then transfer to freezer bags for up to 3 months. Bake frozen chicken at 375°F for 45-55 minutes, flipping halfway through. The coating may not be quite as crispy but still delivers great flavor.
What’s the purpose of the hot sauce in the marinade?
The hot sauce serves multiple purposes beyond adding subtle heat. The vinegar in hot sauce helps tenderize the chicken alongside the buttermilk, while the spices contribute depth of flavor that complements the seasoning blend. If you’re sensitive to spice, you can reduce the amount to 1 tablespoon or replace it with 1 tablespoon of vinegar-based barbecue sauce for similar tenderizing effects without noticeable heat. The small amount distributes throughout the marinade, providing background flavor rather than making the chicken spicy.
Summary
This Piccadilly Cafeteria baked chicken delivers crispy, juicy perfection through buttermilk marination, double coating, and proper baking technique. Ideal for family dinners or entertaining, it brings Southern comfort food magic to your kitchen with minimal fuss but maximum flavor impact.
Piccadilly Cafeteria Baked Chicken
5
servings30
minutes55
minutesIngredients
Instructions
- 1 Whisk buttermilk and hot sauce, marinate chicken 4+ hours refrigerated
- 2 Combine flour and seasonings, dredge chicken pieces thoroughly
- 3 Double coat by dipping back in buttermilk then flour again
- 4 Arrange on wire rack, brush with oil-butter mixture
- 5 Bake at 400°F for 35 minutes, flip, bake 20-25 minutes more
- 6 Rest 10 minutes before serving


