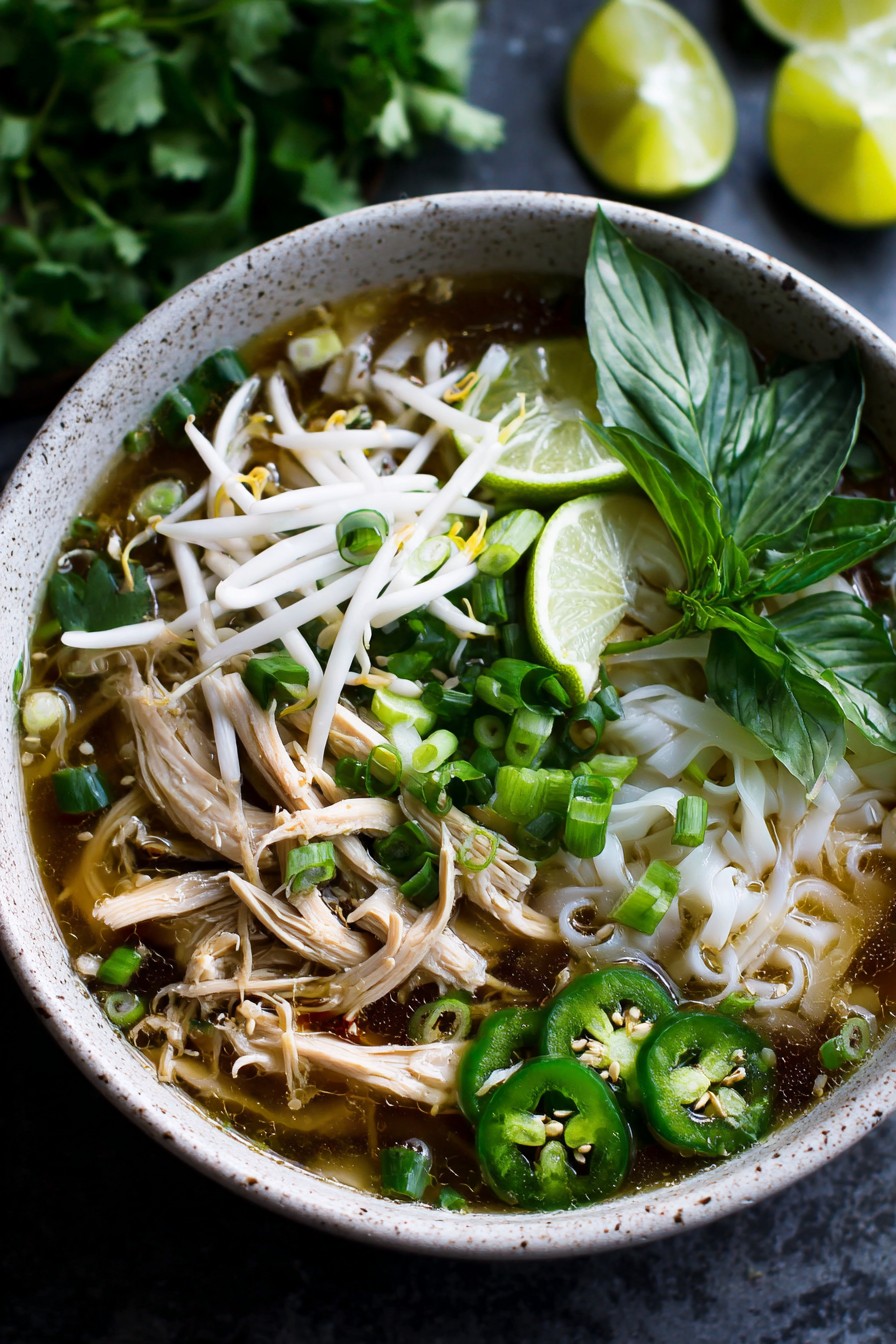
Never underestimate the power of a steaming bowl of homemade pho to cure what ails you. This chicken version is lighter than traditional beef pho but packs just as much flavor, and I promise it’s easier to make than you think!
Why This Recipe Works
- Using a combination of chicken thighs and bones creates a rich, collagen-packed broth that’s both flavorful and nourishing
- Toasting the spices before adding them to the broth intensifies their aroma and eliminates any raw spice taste
- Par-cooking the rice noodles separately prevents them from becoming mushy and allows for perfect texture control
- The quick chicken poaching method ensures tender, juicy meat that doesn’t dry out during the long simmering process
- Layering the fresh herbs and garnishes at serving time preserves their bright flavors and crisp textures
Ingredients
- 2 pounds chicken thighs, bone-in and skin-on
- 1 pound chicken backs or wings for extra broth flavor
- 1 large yellow onion, halved and unpeeled
- 4-inch piece of ginger, halved lengthwise
- 8 cups cold water
- 3 star anise pods
- 1 cinnamon stick (about 3 inches)
- 4 whole cloves
- 1 tablespoon coriander seeds
- 1 cardamom pod (optional)
- 2 tablespoons fish sauce
- 1 tablespoon sugar
- 1 teaspoon salt
- 8 ounces dried rice noodles (banh pho)
- 1/2 pound chicken breast, thinly sliced against the grain
- 1/2 cup bean sprouts
- 1/4 cup fresh cilantro leaves
- 1/4 cup fresh Thai basil leaves
- 2 green onions, thinly sliced
- 1 lime, cut into wedges
- 2 Thai chilies, thinly sliced (optional)
- Hoisin sauce and Sriracha for serving
Equipment Needed
- Large stockpot (8-quart or larger)
- Fine mesh strainer
- Cheesecloth or spice bag
- Large bowl for ice bath
- Slotted spoon or spider strainer
- Sharp knife and cutting board
- Medium saucepan for noodles
- Tongs
- Measuring cups and spoons
Instructions

Prepare and Char the Aromatics
Place your oven rack about 6 inches from the broiler element and preheat the broiler to high. Take the halved onion and ginger pieces and arrange them cut-side up on a baking sheet. Broil for 8-10 minutes until the surfaces are deeply charred and blackened in spots. The onion should have softened slightly and the ginger should be fragrant. This charring process is crucial—it adds a smoky depth to the broth that you just can’t get from raw aromatics. Let them cool slightly, then use a paper towel to rub off the blackened onion skin. Don’t worry about getting every bit of char off; those little black specks will add flavor. The ginger can stay as is since we’ll be straining the broth later anyway.
Toast the Spices and Build the Broth
In a dry skillet over medium heat, toast the star anise, cinnamon stick, cloves, coriander seeds, and cardamom pod if using. Toast for 2-3 minutes, shaking the pan frequently, until the spices become fragrant and slightly darkened. Be careful not to burn them—you’ll know they’re ready when your kitchen smells like a Vietnamese restaurant. Place the toasted spices in a piece of cheesecloth or a spice bag and tie it securely. In your large stockpot, combine the chicken thighs, chicken bones, charred onion and ginger, spice packet, and cold water. Bring to a boil over high heat, then immediately reduce to a gentle simmer. Using cold water helps extract more flavor from the ingredients as they heat up slowly.
Simmer and Skim the Broth
Maintain a gentle simmer where small bubbles occasionally break the surface—this should be around 180-190°F if you’re using a thermometer. Cook for 1.5 hours, skimming off any foam or impurities that rise to the surface every 15-20 minutes. This skimming step is essential for a clear, clean-tasting broth. After 1.5 hours, remove the chicken thighs with tongs and set aside to cool. Continue simmering the broth with the bones and aromatics for another 1.5 hours. The total simmering time should be about 3 hours. The broth should reduce by about one-third and take on a golden color. When done, strain the broth through a fine mesh strainer into a clean pot, pressing on the solids to extract all the flavorful liquid.
Prepare Noodles and Chicken
While the broth simmers, prepare your rice noodles according to package directions. Typically, you’ll soak them in hot water for 15-20 minutes until pliable but still slightly firm, then drain thoroughly. For the chicken thighs you removed earlier, let them cool until handleable, then shred the meat into bite-sized pieces, discarding the skin and bones. Take your thinly sliced chicken breast and have it ready—this will be added raw to the hot broth at serving time, where it will cook gently and remain incredibly tender. Have all your garnishes prepped and arranged in separate bowls: bean sprouts washed, herbs picked and roughly torn, green onions sliced, lime wedges cut, and chilies sliced if using.
Season Broth and Assemble Bowls
Bring your strained broth back to a boil and season with fish sauce, sugar, and salt. Taste and adjust—it should be slightly saltier than you think it should be because the noodles and garnishes will dilute it. To assemble each bowl, place a portion of drained noodles in the bottom, top with some shredded chicken thigh meat, then arrange a few slices of raw chicken breast on top. Ladle piping hot broth over everything—the heat will cook the raw chicken breast slices perfectly. Immediately serve with the platter of garnishes, letting everyone customize their bowl with bean sprouts, herbs, lime juice, and chili slices to their liking. The broth should be hot enough to hear a satisfying sizzle when it hits the bowl!
Tips and Tricks
If you want to take your pho game to the next level, consider making the broth a day ahead. Pho broth actually improves with time as the flavors continue to meld and develop in the refrigerator overnight. When you’re ready to serve, simply skim off any solidified fat from the top (though I personally love leaving some for richness) and reheat gently. For an even clearer broth, you can try the Vietnamese technique of “washing” the bones—blanch the chicken bones in boiling water for 5 minutes first, then rinse under cold water before starting the broth. This removes impurities that cause cloudiness. Don’t throw away those chicken skins! Render them slowly in a pan to make crispy chicken skin cracklings—sprinkle these on top of your finished pho for an incredible textural contrast. If you can’t find fresh Thai basil, regular Italian basil works in a pinch, but the flavor profile will be slightly different. For the ultimate pho experience, invest in proper pho noodles—look for flat, wide rice noodles labeled “banh pho” rather than the thinner vermicelli style. When storing leftovers, keep the broth, noodles, and garnishes separate—the noodles will continue to absorb liquid and become mushy if stored in the broth. Freeze extra broth in portion-sized containers for quick pho nights later. If your broth isn’t as flavorful as you’d like, don’t be afraid to add more fish sauce—it’s the secret weapon for building that umami depth. Finally, if you’re serving to guests, pre-warm your bowls by rinsing with hot water—this keeps the pho hotter longer and makes for a more authentic presentation.
Recipe Variations
- For a vegetarian version, replace the chicken with vegetable broth and use sliced mushrooms (shiitake or oyster work well) instead of meat. Add a piece of kombu seaweed during simmering for extra umami, and use soy sauce instead of fish sauce. The spice blend can remain the same, and you’ll still get that signature pho aroma.
- Try a seafood pho by using shrimp shells and fish bones to make the broth, then topping with cooked shrimp, scallops, and firm white fish fillets. Add a splash of coconut milk at the end for a creamy twist, and garnish with fresh dill instead of Thai basil for a Vietnamese coastal vibe.
- Make a spicy lemongrass pho by adding 2-3 bruised lemongrass stalks to the broth and increasing the chilies. You can also stir in a tablespoon of chili garlic paste into the broth at the end, and top with extra fresh chilies and a squeeze of calamansi juice if available.
- Create a breakfast pho by adding a soft-poached egg to each bowl and using breakfast sausage instead of chicken. The rich broth pairs wonderfully with the runny yolk, and it makes for a hearty morning meal that will keep you full until lunch.
- For a quick weeknight version, use store-bought chicken broth as a base but still toast your spices and char your aromatics. Add a tablespoon of beef bouillon paste for depth, and use rotisserie chicken instead of cooking your own. It won’t be quite as rich, but it’ll satisfy that pho craving in under 30 minutes.
Frequently Asked Questions
Can I use chicken breast instead of thighs for the broth?
While you can technically use chicken breast, I don’t recommend it for the broth-making process. Chicken thighs have more fat and connective tissue, which breaks down during long simmering to create a richer, more flavorful broth. Breast meat tends to dry out and can make the broth taste leaner. If you prefer white meat, use thighs for the broth and reserve breast for the raw slices that cook in the hot broth at serving time—this gives you the best of both worlds: rich broth and tender breast meat.
Why is my pho broth cloudy instead of clear?
Cloudy broth usually happens when the broth boils too vigorously instead of maintaining a gentle simmer. Aggressive boiling emulsifies fat and proteins into the liquid, creating cloudiness. To prevent this, always start with cold water, bring to a boil slowly, then immediately reduce to the barest simmer where only occasional bubbles break the surface. Skimming frequently during the first hour of cooking also helps remove impurities that cause cloudiness. If your broth still ends up cloudy, you can clarify it by straining through a cheesecloth-lined sieve or even using egg whites in a traditional clarification process.
Can I make this recipe in an Instant Pot or pressure cooker?
Absolutely! Pressure cooking is a great way to make pho broth in about a third of the time. Follow all the same steps for charring aromatics and toasting spices. Add everything to the pressure cooker but reduce the water to 6 cups since less evaporates under pressure. Cook on high pressure for 45 minutes, then allow natural pressure release for 15 minutes before quick releasing. The broth will be slightly cloudier than the traditional method but still delicious. You’ll still need to skim fat and strain before serving.
How do I store and reheat leftovers?
Store components separately for best results: broth in airtight containers, noodles drained and tossed with a little oil to prevent sticking, chicken meat separately, and garnishes in their own containers. The broth will keep refrigerated for 4-5 days or frozen for 3 months. To reheat, bring broth to a boil, then add noodles and chicken just to heat through. The raw chicken breast slices should only be added if you’re serving immediately after preparation—don’t try to store and reheat those. Assembled bowls don’t keep well as the noodles become mushy.
What’s the difference between pho and other Asian noodle soups?
Pho is distinct in its clear, aromatic broth flavored with charred aromatics and warm spices like star anise and cinnamon. Unlike ramen which often has a creamy, pork-based broth, or laksa with its coconut milk base, pho broth is characterized by its clarity and spice-forward profile. The rice noodles are also specific—flat and chewy rather than round or egg-based. The serving style is different too, with pho garnishes added tableside rather than cooked into the soup, allowing each diner to customize their bowl to their taste preferences.
Summary
Homemade chicken pho might take time, but the deeply flavorful broth and customizable bowls are absolutely worth the effort. Your kitchen will smell incredible, and your taste buds will thank you!
Pho Noodle Soup Recipe Chicken
5
servings30
minutes3
minutesIngredients
Instructions
- 1 Char onion and ginger under broiler until blackened in spots
- 2 Toast spices in dry skillet until fragrant, then place in spice bag
- 3 Combine chicken, aromatics, spices, and water in pot; simmer 3 hours, skimming regularly
- 4 Remove chicken thighs after 1.5 hours, shred when cool
- 5 Strain broth, season with fish sauce, sugar, and salt
- 6 Prepare noodles according to package directions
- 7 Assemble bowls with noodles, shredded chicken, raw chicken slices; pour hot broth over top
- 8 Serve immediately with garnishes and sauces on the side


