Now, let’s talk about one of the most underrated ingredients in your pantry: pepperoncini peppers! These tangy, mildly spicy gems can transform simple weeknight dinners into vibrant, flavor-packed meals that’ll have everyone asking for seconds. From zesty salads to hearty sandwiches, we’ve gathered 22 creative ways to make these peppers shine. Get ready to discover your new favorite recipes—your taste buds will thank you!
Spicy Pepperoncini Pickled Eggs
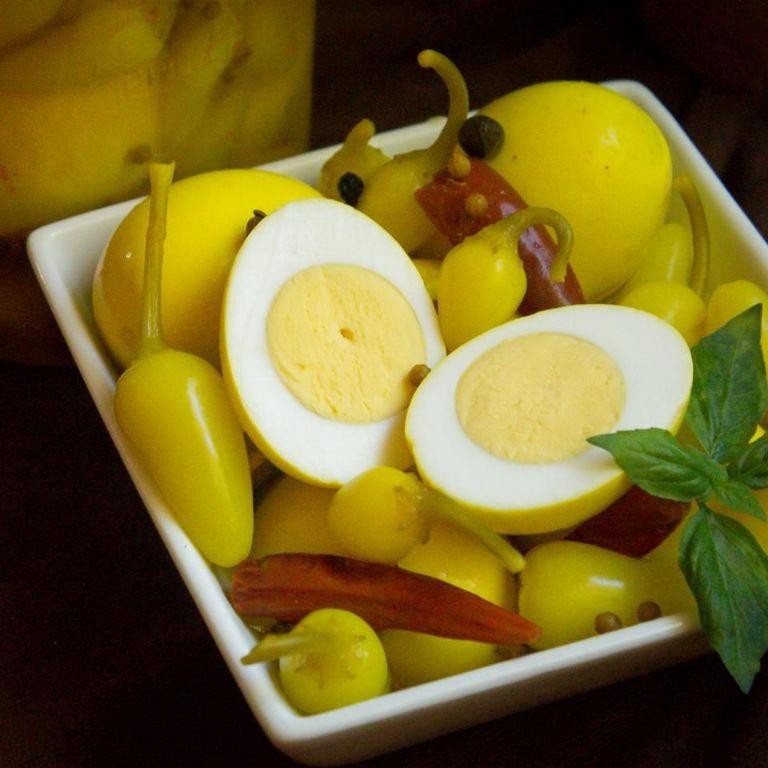
Zestfully contemplating the quiet hum of the refrigerator, I find myself drawn to the jar of pepperoncini pickled eggs—a humble preserve that marries gentle heat with the comfort of a pantry staple, inviting a moment of slow, deliberate enjoyment.
12
eggs25
minutes5
minutesIngredients
– 12 large eggs
– 2 cups white vinegar
– 1 cup water
– 1/4 cup granulated sugar
– 1 tablespoon kosher salt
– 1 teaspoon black peppercorns
– 1 teaspoon mustard seeds
– 1/2 teaspoon red pepper flakes
– 1 cup sliced pepperoncini peppers
– 4 cloves garlic, smashed
Instructions
1. Place 12 large eggs in a single layer in a large saucepan and cover with cold water by 1 inch.
2. Bring the water to a rolling boil over high heat, then immediately remove the pan from heat, cover, and let stand for 12 minutes.
3. Transfer the eggs to an ice water bath using a slotted spoon and let cool completely for 15 minutes to stop the cooking process and prevent gray yolks.
4. Gently tap each egg on a hard surface and peel under cool running water, starting from the wider end where the air pocket helps loosen the shell.
5. Combine 2 cups white vinegar, 1 cup water, 1/4 cup granulated sugar, 1 tablespoon kosher salt, 1 teaspoon black peppercorns, 1 teaspoon mustard seeds, and 1/2 teaspoon red pepper flakes in a medium saucepan.
6. Bring the brine mixture to a simmer over medium heat, stirring occasionally until the sugar and salt fully dissolve, about 5 minutes.
7. Remove the brine from heat and stir in 1 cup sliced pepperoncini peppers and 4 cloves smashed garlic to infuse the liquid with their flavors.
8. Arrange the peeled eggs in a clean 1-quart glass jar, pouring the warm brine over them until completely submerged.
9. Seal the jar tightly and refrigerate for at least 3 days before serving, gently inverting the jar daily to distribute the spices evenly.
10. Store the pickled eggs in the refrigerator for up to 2 weeks, ensuring they remain fully covered by brine to maintain food safety. During the quiet chill of the refrigerator, the eggs transform—their whites firm yet yielding, the yolks creamy against the pepperoncini’s gentle heat. I love them sliced over buttered rye toast or tucked into a lunchbox, their tangy warmth unfolding slowly with each bite.
Zesty Pepperoncini Pasta Salad
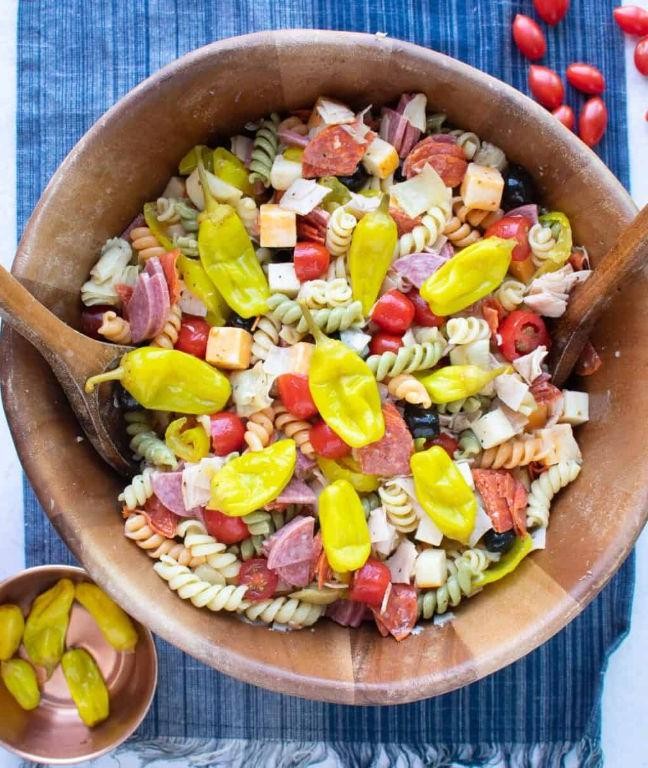
Holding this bowl of pasta salad feels like uncovering an old photograph, the vibrant colors and sharp aroma of pepperoncini pulling me back to summer picnics where flavors mingled with laughter and sunlight. There’s something quietly comforting about how the tangy brine softens into the creamy dressing, creating little moments of brightness that linger on the tongue long after the last bite. I find myself making this whenever I need a dish that feels both celebratory and deeply personal, a reminder that simple ingredients can hold profound memories.
6
servings20
minutes9
minutesIngredients
– 1 lb rotini pasta
– 1 cup sliced pepperoncini
– 1/2 cup pepperoncini brine
– 1/2 cup mayonnaise
– 1/4 cup sour cream
– 1 tbsp Dijon mustard
– 1 tsp garlic powder
– 1/2 tsp black pepper
– 1/2 cup diced red onion
– 1 cup halved cherry tomatoes
– 1/2 cup sliced black olives
– 1/2 cup crumbled feta cheese
Instructions
1. Bring a large pot of salted water to a rolling boil over high heat.
2. Add 1 lb rotini pasta to the boiling water and cook for 9 minutes, stirring occasionally to prevent sticking.
3. Drain the pasta in a colander and rinse immediately under cold running water for 2 minutes to stop the cooking process.
4. Transfer the cooled pasta to a large mixing bowl and drizzle with 2 tbsp olive oil, tossing gently to coat.
5. In a separate medium bowl, whisk together 1/2 cup pepperoncini brine, 1/2 cup mayonnaise, 1/4 cup sour cream, 1 tbsp Dijon mustard, 1 tsp garlic powder, and 1/2 tsp black pepper until fully combined and smooth.
6. Pour the dressing over the pasta and use a rubber spatula to fold until every piece is evenly coated.
7. Add 1 cup sliced pepperoncini, 1/2 cup diced red onion, 1 cup halved cherry tomatoes, 1/2 cup sliced black olives, and 1/2 cup crumbled feta cheese to the bowl.
8. Gently fold all ingredients together until evenly distributed, taking care not to crush the tomatoes.
9. Cover the bowl tightly with plastic wrap and refrigerate for at least 2 hours to allow flavors to meld.
10. Remove from refrigerator, give one final gentle stir, and serve chilled.
You’ll notice the pasta retains a pleasant chew against the crisp vegetables, while the pepperoncini brine cuts through the richness with its gentle heat. I love scooping it into butter lettuce cups for a handheld lunch, or pairing it with grilled chicken for a more substantial meal where the tangy dressing complements the smoky char.
Greek Style Pepperoncini Chicken
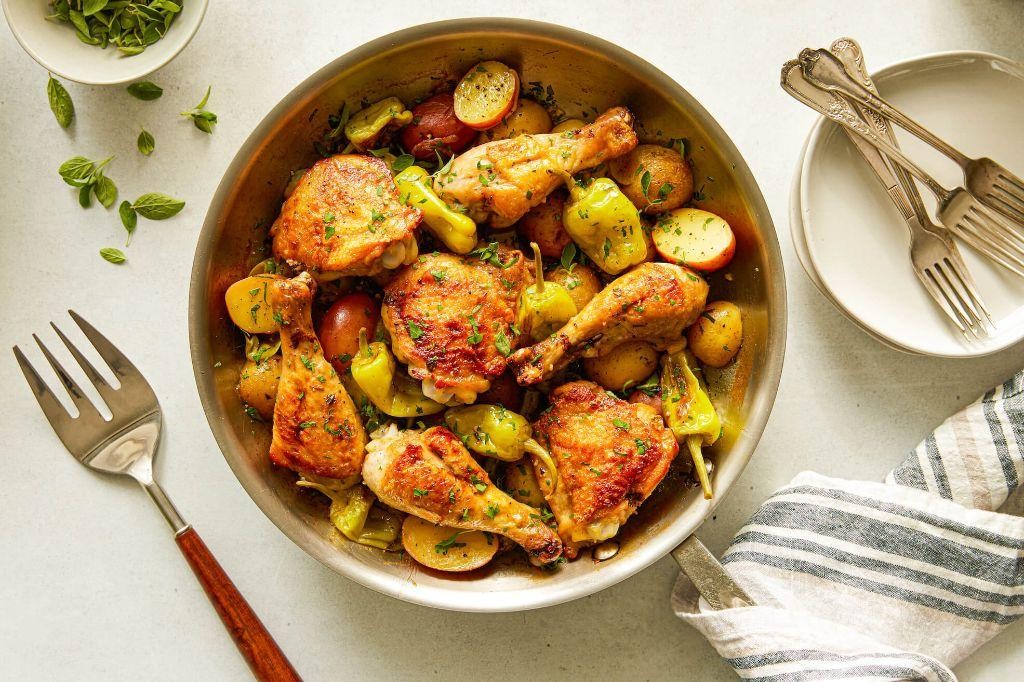
Kindly remembering how the golden afternoon light used to filter through my grandmother’s kitchen window, I find myself drawn to recipes that carry both warmth and memory. This Greek-inspired chicken dish brings together bright, tangy flavors with comforting, slow-cooked tenderness in a way that feels both nostalgic and wonderfully new.
3
portions15
minutes42
minutesIngredients
– 2 lbs chicken thighs
– 1 cup pepperoncini peppers
– 1/2 cup pepperoncini brine
– 1/4 cup olive oil
– 4 cloves garlic
– 1 tsp dried oregano
– 1/2 tsp black pepper
– 1/2 tsp salt
Instructions
1. Pat the chicken thighs completely dry with paper towels to ensure proper browning.
2. Season both sides of the chicken evenly with salt, black pepper, and dried oregano.
3. Heat olive oil in a large oven-safe skillet over medium-high heat until it shimmers.
4. Place chicken thighs skin-side down in the hot oil, being careful not to overcrowd the pan.
5. Cook for 6-8 minutes until the skin is deeply golden brown and crispy.
6. Flip the chicken thighs and cook for 3 more minutes to lightly brown the other side.
7. Remove chicken from the skillet and set aside on a plate.
8. Add minced garlic to the same skillet and cook for 1 minute until fragrant.
9. Pour in the pepperoncini brine, using a wooden spoon to scrape up any browned bits from the bottom of the pan.
10. Return the chicken thighs to the skillet, arranging them in a single layer.
11. Scatter the whole pepperoncini peppers around the chicken in the skillet.
12. Transfer the skillet to a preheated 375°F oven and bake for 25 minutes.
13. Check that the chicken has reached an internal temperature of 165°F using an instant-read thermometer.
14. Remove the skillet from the oven and let the chicken rest for 5 minutes before serving.
Deliciously tender chicken falls apart at the slightest touch, while the pepperoncini peppers provide a bright, vinegary counterpoint to the rich pan juices. Serve this over creamy polenta or with crusty bread to soak up every bit of the flavorful sauce, perhaps with a simple green salad on the side for a complete meal that feels both rustic and refined.
Pepperoncini Stuffed Olives

Sometimes the simplest pleasures arrive quietly, like discovering how two humble ingredients can transform an ordinary moment into something quietly extraordinary. These pepperoncini stuffed olives carry that gentle magic—a subtle heat wrapped in briny comfort that makes you pause and appreciate the small things.
1
cup20
minutesIngredients
– 1 cup large green olives, pitted
– 1/4 cup pepperoncini peppers, finely minced
– 2 tbsp cream cheese, softened
– 1 tsp lemon juice
– 1/2 tsp black pepper
Instructions
1. Pat 1 cup of pitted green olives completely dry with paper towels to ensure the filling adheres properly.
2. Combine 1/4 cup finely minced pepperoncini peppers, 2 tablespoons softened cream cheese, 1 teaspoon lemon juice, and 1/2 teaspoon black pepper in a small bowl.
3. Mix the filling ingredients thoroughly until they form a smooth, uniform paste.
4. Spoon approximately 1/2 teaspoon of the pepperoncini filling into each dried olive cavity, using a small piping bag or teaspoon for precision.
5. Gently press the filled olives between your palms to seal the openings, creating smooth, round shapes.
6. Arrange the stuffed olives in a single layer on a parchment-lined baking sheet.
7. Refrigerate the olives for at least 30 minutes to allow the filling to firm up before serving.
8. Serve chilled directly from refrigeration to maintain the ideal texture contrast.
You’ll notice the creamy filling provides a cool contrast to the briny olive exterior, while the pepperoncini delivers a slow-building warmth that lingers pleasantly. Consider serving them alongside crisp crackers or tucking them into martinis for an elegant twist—their balanced heat makes them surprisingly versatile for both casual snacking and thoughtful entertaining.
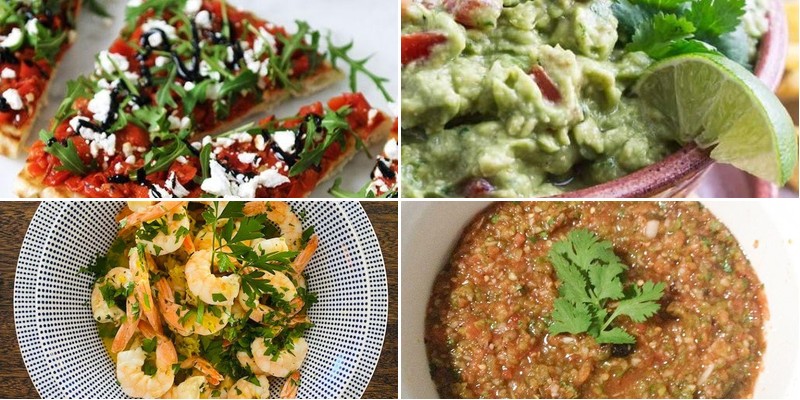
Pepperoncini and Feta Flatbread
Gently, as the afternoon light filters through the kitchen window, I find myself reaching for the familiar comfort of flatbread dough, remembering how the tang of pepperoncini and the salty crumble of feta can transform a simple meal into something quietly extraordinary. There’s a softness to the process, a slow unfolding of flavors that feels like a gentle pause in the middle of a busy day. It’s in these small, deliberate acts of cooking that I often find the most peace, creating something warm and welcoming with just a handful of honest ingredients.
5
portions10
minutes15
minutesIngredients
- 1 lb pizza dough
- 2 tbsp olive oil
- 1/2 cup sliced pepperoncini
- 4 oz crumbled feta cheese
- 1/2 tsp dried oregano
- 1/4 tsp garlic powder
Instructions
- Preheat your oven to 425°F and place a baking sheet inside to heat for 10 minutes.
- On a lightly floured surface, stretch the pizza dough into a 12-inch oval, taking care not to tear it.
- Brush the entire surface of the dough with olive oil, reaching all the way to the edges.
- Evenly distribute the sliced pepperoncini over the dough, leaving a 1/2-inch border around the edges.
- Sprinkle the crumbled feta cheese over the pepperoncini, covering the surface evenly.
- Combine the dried oregano and garlic powder in a small bowl, then sprinkle this mixture over the flatbread.
- Carefully transfer the assembled flatbread to the preheated baking sheet using a pizza peel or the back of a baking sheet.
- Bake for 12-15 minutes until the crust is golden brown and the cheese has softened but not melted completely.
- Remove from the oven and let rest for 3 minutes before slicing to allow the flavors to settle.
Nothing compares to the way the warm, chewy flatbread yields to the sharp, briny pepperoncini and creamy feta. The edges crisp beautifully while the center stays tender, creating a wonderful textural contrast that makes each bite interesting. Sometimes I’ll drizzle it with a little extra olive oil right before serving, or pair it with a simple arugula salad for a complete, comforting meal that feels both rustic and refined.
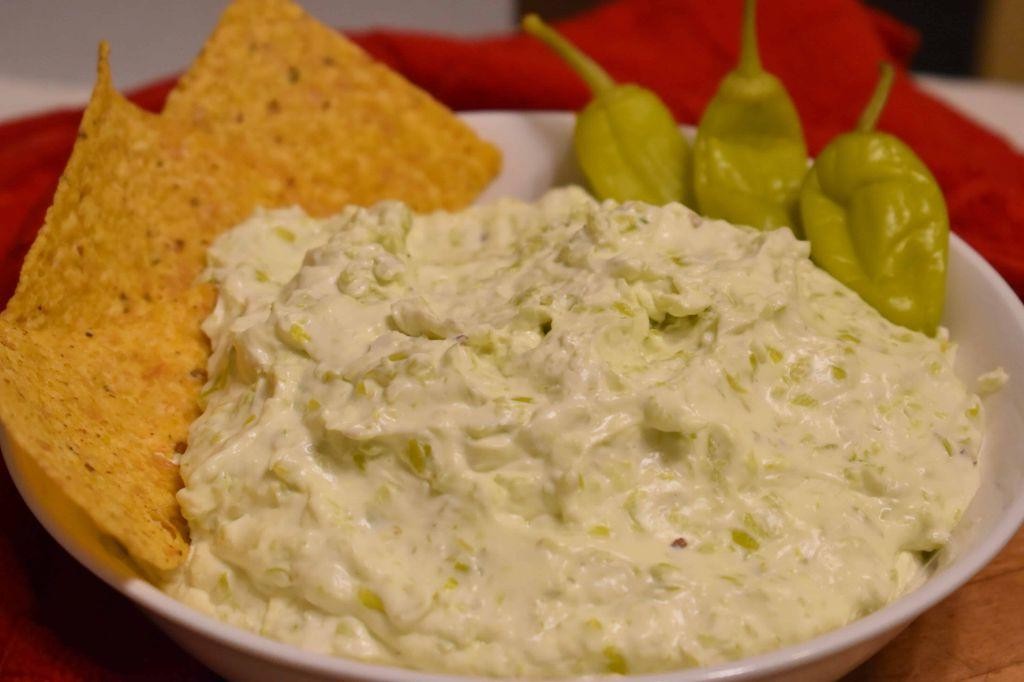
Creamy Pepperoncini Dip
T
There’s something quietly comforting about transforming simple ingredients into a dip that feels both nostalgic and new. This creamy pepperoncini dip emerged during one of those aimless afternoons when the kitchen becomes a sanctuary, the gentle rhythm of preparation slowing time itself. It’s the kind of recipe that asks for little but gives back generously, with each ingredient playing its part in creating something greater than the sum of its parts.
8
servings15
minutes25
minutesIngredients
– 8 ounces cream cheese
– 1/2 cup sour cream
– 1/2 cup mayonnaise
– 1/2 cup chopped pepperoncini peppers
– 1/4 cup pepperoncini brine
– 1 teaspoon garlic powder
– 1/2 teaspoon onion powder
– 1/4 teaspoon black pepper
– 1/4 cup shredded mozzarella cheese
– 1/4 cup shredded cheddar cheese
Instructions
1. Place 8 ounces of cream cheese in a medium mixing bowl and let it sit at room temperature for 30 minutes to soften completely.
2. Add 1/2 cup sour cream and 1/2 cup mayonnaise to the softened cream cheese.
3. Using an electric mixer on medium speed, beat the mixture for 2 minutes until smooth and fully combined.
4. Measure 1/2 cup of pepperoncini peppers, ensuring to drain them well before chopping finely with a sharp knife.
5. Stir the chopped pepperoncini peppers into the cream cheese mixture using a rubber spatula.
6. Pour 1/4 cup of pepperoncini brine into the bowl and mix thoroughly.
7. Sprinkle 1 teaspoon garlic powder, 1/2 teaspoon onion powder, and 1/4 teaspoon black pepper over the mixture.
8. Fold in 1/4 cup shredded mozzarella cheese and 1/4 cup shredded cheddar cheese until evenly distributed.
9. Transfer the dip to an oven-safe baking dish and spread it into an even layer with the spatula.
10. Bake at 350°F for 20-25 minutes until the edges are bubbling and the top develops light golden spots.
11. Remove the dip from the oven and let it rest for 5 minutes before serving.
K
Keep this dip warm in a small slow cooker for gatherings, where its creamy texture becomes even more luxurious as it settles. The pepperoncini provides a gentle heat that builds slowly rather than overwhelming, while the cheeses create pockets of gooey richness throughout. Try spreading it thickly on toasted baguette slices or using it as an unexpected filling for baked potatoes, where its tangy brightness cuts through the starchiness beautifully.
Pepperoncini Infused Hot Sauce

Perhaps it’s the gentle heat of pepperoncini that calls to me today—not the aggressive burn of other chilies, but something more patient, more reflective, like autumn light through a kitchen window. I find myself drawn to the quiet ritual of making this infused hot sauce, a process that feels less like cooking and more like steeping memories in a jar. There’s a softness to it, a slow unfolding of flavors that mirrors the way we savor small moments.
1
jar15
minutes20
minutesIngredients
– 1 pound fresh pepperoncini peppers
– 2 cups white vinegar
– 4 cloves garlic
– 1 tablespoon kosher salt
– 1 teaspoon sugar
– 1/2 cup water
Instructions
1. Rinse 1 pound of fresh pepperoncini peppers under cool running water to remove any dirt or debris.
2. Trim the stems from the peppers using kitchen shears, discarding any bruised or discolored pieces.
3. Thinly slice 4 cloves of garlic to release their aromatic oils more effectively during cooking.
4. Combine the cleaned peppers, sliced garlic, 2 cups of white vinegar, 1 tablespoon of kosher salt, 1 teaspoon of sugar, and 1/2 cup of water in a medium saucepan.
5. Bring the mixture to a gentle simmer over medium heat, then reduce the heat to low to maintain a bare simmer for 20 minutes—this slow infusion helps meld flavors without boiling away delicate notes.
6. Carefully transfer the hot mixture to a blender, filling it no more than halfway to prevent pressure buildup, and secure the lid tightly.
7. Blend on high speed for 2 full minutes until completely smooth, pausing occasionally to scrape down the sides with a spatula if needed.
8. Strain the blended sauce through a fine-mesh sieve into a clean bowl, pressing firmly with the back of a spoon to extract all liquid while leaving solids behind.
9. Pour the strained sauce into a sterilized glass bottle or jar, seal it, and refrigerate for at least 4 hours before using to allow the flavors to fully harmonize.
Dappled with flecks of pepperoncini, this sauce pours with a velvety consistency that clings lovingly to roasted vegetables or grilled chicken. Its flavor unfolds in layers—first a bright, tangy spark from the vinegar, then the gentle warmth of the peppers that lingers without overwhelming. Try drizzling it over creamy avocado toast or stirring a spoonful into soups for a subtle, slow-building heat that feels like a secret shared between friends.
Slow Cooker Pepperoncini Beef
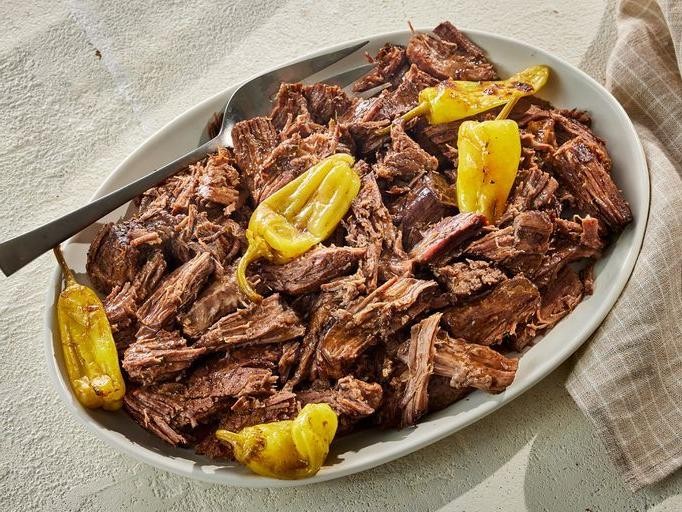
Often, the most comforting meals are the ones that quietly simmer away while life continues around them. On this crisp autumn afternoon, I find myself drawn to the gentle rhythm of slow cooking, where tough cuts transform into something tender and deeply satisfying. There’s a particular magic in how simple ingredients can create such profound nourishment.
6
sandwiches15
minutes510
minutesIngredients
– 3 pounds beef chuck roast
– 1 cup pepperoncini peppers
– 1/2 cup pepperoncini brine
– 1/4 cup beef broth
– 4 cloves garlic
– 1 teaspoon dried oregano
– 1/2 teaspoon black pepper
– 1/2 teaspoon salt
Instructions
1. Trim any large pieces of excess fat from the 3 pounds beef chuck roast using kitchen shears.
2. Season all sides of the beef chuck roast evenly with 1/2 teaspoon salt and 1/2 teaspoon black pepper.
3. Place the seasoned beef chuck roast in the center of a 6-quart slow cooker.
4. Mince 4 cloves garlic and sprinkle them over the beef along with 1 teaspoon dried oregano.
5. Arrange 1 cup pepperoncini peppers around the beef in the slow cooker.
6. Pour 1/2 cup pepperoncini brine and 1/4 cup beef broth into the slow cooker, being careful not to pour directly over the seasoned beef.
7. Cover the slow cooker with its lid and cook on LOW heat for 8 hours until the beef shreds easily with two forks.
8. Transfer the cooked beef to a cutting board using tongs, reserving the cooking liquid in the slow cooker.
9. Shred the beef completely using two forks, pulling against the grain of the meat.
10. Return the shredded beef to the slow cooker and stir to combine with the cooking liquid.
11. Cook for an additional 30 minutes on LOW heat to allow the flavors to meld.
The shredded beef becomes incredibly tender, falling apart at the slightest touch while maintaining just enough texture to hold together in sandwiches or over grains. That distinctive pepperoncini flavor permeates every strand, offering a gentle heat that builds slowly rather than overwhelming the palate. Try serving it over creamy polenta with a drizzle of the cooking liquid, or pile it high on crusty rolls with provolone cheese for the most satisfying lunch.
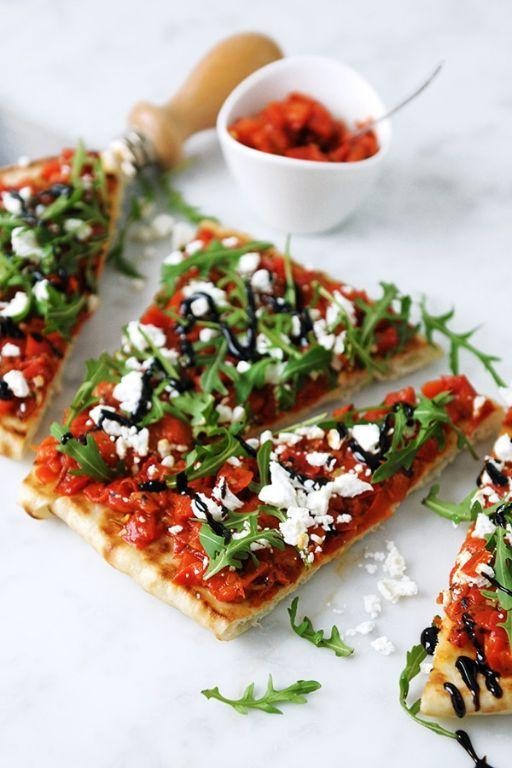
Pepperoncini and Basil Pesto Pizza

Years of chasing complex flavors have taught me that sometimes the most memorable meals emerge from the simplest combinations, like this quiet afternoon’s experiment with pantry staples and garden herbs. Yesterday’s leftover dough and a jar of pepperoncini whispered possibilities, leading to this unexpectedly harmonious pizza that feels both comforting and vibrant.
1
pizza15
minutes14
minutesIngredients
– 1 pound pizza dough
– 1/2 cup basil pesto
– 8 ounces fresh mozzarella cheese
– 1/4 cup sliced pepperoncini
– 2 tablespoons olive oil
– 1/4 teaspoon flaky sea salt
Instructions
1. Place pizza dough on a lightly floured countertop and let rest at room temperature for 30 minutes until pliable.
2. Preheat oven to 475°F with pizza stone or baking sheet inside for 45 minutes to ensure even heat distribution.
3. Gently stretch dough into 12-inch circle using your knuckles, being careful not to tear thin spots.
4. Brush entire surface with 1 tablespoon olive oil to create moisture barrier against soggy crust.
5. Spread basil pesto evenly over dough, leaving 1/2-inch border around edges for proper crust formation.
6. Tear fresh mozzarella into small pieces and distribute evenly across pesto layer.
7. Arrange pepperoncini slices in single layer, spacing them for balanced heat distribution.
8. Drizzle remaining 1 tablespoon olive oil over toppings to enhance browning.
9. Carefully transfer pizza to preheated stone using parchment paper as slider for easy handling.
10. Bake for 12-14 minutes until crust is golden brown and cheese is bubbling with spotted char.
11. Remove from oven using pizza peel or large spatula, immediately sprinkling with flaky sea salt.
12. Let rest on cutting board for 3 minutes before slicing to allow cheese to set properly.
Perhaps what surprises most is how the spicy pepperoncini mellows into sweet warmth against the bright pesto, creating a pizza that feels both familiar and novel. The crust stays wonderfully crisp beneath the creamy cheese, while those occasional salty flakes from the sea salt make each bite slightly different from the last—perfect for tearing into uneven slices and eating with your hands as the sun sets.
Smoky Pepperoncini Salsa
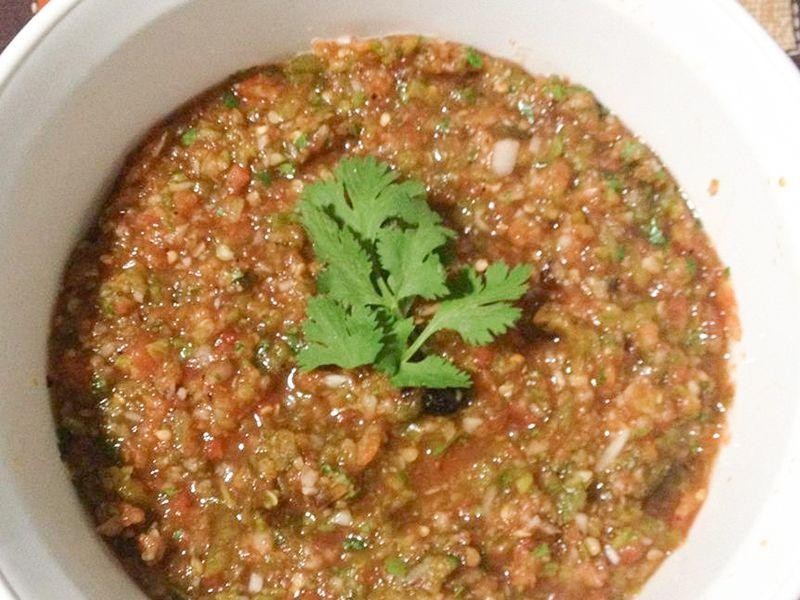
Years of chasing bold flavors have taught me that some of the most memorable ones are born from quiet afternoons in the kitchen. Yesterday, as the late sun warmed the countertops, I found myself slowly charring peppers, letting their smoky scent fill the air. This smoky pepperoncini salsa came together not from a rushed need to eat, but from a gentle desire to create something layered and bright.
3
servings25
minutes10
minutesIngredients
– 1 lb Roma tomatoes
– 4 large jalapeño peppers
– 1/2 cup pepperoncini peppers, drained
– 1/4 cup white onion, chopped
– 2 cloves garlic, peeled
– 1/4 cup fresh cilantro, chopped
– 2 tbsp lime juice
– 1 tsp kosher salt
– 1/2 tsp ground cumin
Instructions
1. Preheat your broiler to high and position an oven rack 6 inches below the heating element.
2. Arrange the Roma tomatoes and jalapeño peppers in a single layer on a baking sheet lined with aluminum foil.
3. Broil the tomatoes and jalapeños for 8-10 minutes, turning them once with tongs halfway through, until the skins are blistered and blackened in spots.
4. Transfer the charred tomatoes and jalapeños to a medium bowl and cover tightly with plastic wrap for 10 minutes—this steaming step makes peeling much easier.
5. While the vegetables steam, finely chop the pepperoncini peppers, white onion, and garlic.
6. Carefully peel the blackened skins from the tomatoes and jalapeños; discard the skins and any loose seeds from the jalapeños if you prefer less heat.
7. Roughly chop the peeled tomatoes and jalapeños, collecting any juices in the bowl.
8. Combine the chopped tomatoes, jalapeños, pepperoncini peppers, white onion, and garlic in a food processor.
9. Pulse the mixture 5-7 times, just until the ingredients are coarsely chopped and combined, but not puréed.
10. Transfer the salsa to a serving bowl and stir in the fresh cilantro, lime juice, kosher salt, and ground cumin by hand to keep the texture chunky.
11. Let the salsa rest at room temperature for 20 minutes to allow the flavors to meld before serving. On the tongue, this salsa offers a slow-building warmth from the smoked peppers, balanced by the tangy brightness of pepperoncini and lime. I love it spooned over grilled fish or simply with thick, salty tortilla chips on a lazy evening.
Pepperoncini Guacamole Delight

Years of making guacamole have taught me that the most memorable versions often come from unexpected additions. Yesterday’s experiment with pepperoncini created something quietly special—a gentle heat that lingers without overwhelming the creamy avocado base. Sometimes the smallest changes bring the most comfort.
4
servings20
minutesIngredients
- 3 ripe avocados
- 1/4 cup finely chopped pepperoncini
- 2 tbsp fresh lime juice
- 1/4 cup finely diced red onion
- 1/4 cup chopped fresh cilantro
- 1/2 tsp kosher salt
- 1/4 tsp black pepper
Instructions
- Cut 3 ripe avocados in half lengthwise and remove the pits.
- Scoop the avocado flesh into a medium mixing bowl using a spoon.
- Add 2 tbsp fresh lime juice immediately over the avocado to prevent browning.
- Mash the avocado with a fork until it reaches your desired consistency, leaving some chunks for texture.
- Finely dice 1/4 cup red onion and add it to the bowl.
- Chop 1/4 cup fresh cilantro leaves and stems, then incorporate them into the mixture.
- Measure 1/4 cup pepperoncini, drain any liquid, and chop them finely before adding.
- Sprinkle 1/2 tsp kosher salt and 1/4 tsp black pepper evenly over the mixture.
- Gently fold all ingredients together until just combined, being careful not to overmix.
- Transfer the guacamole to a serving bowl and press plastic wrap directly onto the surface.
- Refrigerate for 15 minutes to allow the flavors to meld before serving.
Unmistakably creamy with bright flecks of green, this guacamole carries a subtle warmth that builds slowly with each bite. The pepperoncini adds a tangy complexity that pairs beautifully with crispy tortilla chips or as a topping for grilled chicken tacos. I’ve found it particularly lovely when served alongside chilled cucumber slices for a refreshing contrast to the gentle heat.
Savory Pepperoncini Meatballs
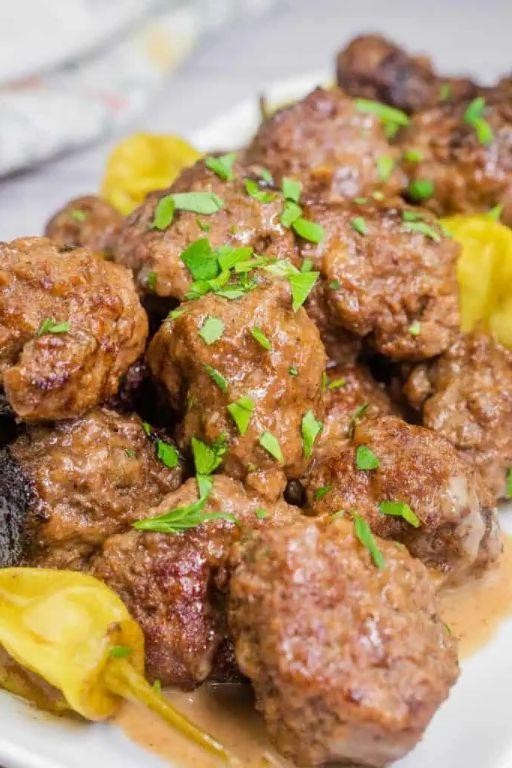
Often, on quiet afternoons when the kitchen feels like a sanctuary, I find myself drawn to recipes that simmer with patience and comfort. These pepperoncini meatballs carry that gentle warmth, their savory aroma filling the space like a soft embrace, reminding me how simple ingredients can transform into something deeply satisfying.
3
servings15
minutes30
minutesIngredients
– 1 lb ground beef
– 1/2 cup breadcrumbs
– 1/4 cup grated Parmesan cheese
– 1 large egg
– 2 tbsp chopped fresh parsley
– 1 tsp garlic powder
– 1/2 tsp black pepper
– 1/2 tsp salt
– 1 tbsp olive oil
– 1 cup sliced pepperoncini
– 1/2 cup pepperoncini brine
– 1/2 cup beef broth
Instructions
1. Preheat your oven to 375°F and line a baking sheet with parchment paper.
2. In a large mixing bowl, combine the ground beef, breadcrumbs, Parmesan cheese, egg, parsley, garlic powder, black pepper, and salt.
3. Gently mix the ingredients with your hands until just combined, being careful not to overwork the meat.
4. Shape the mixture into 1-inch meatballs, placing them evenly spaced on the prepared baking sheet.
5. Bake the meatballs for 18-20 minutes until they reach an internal temperature of 160°F and develop a light golden crust.
6. While the meatballs bake, heat the olive oil in a large skillet over medium heat.
7. Add the sliced pepperoncini to the skillet and sauté for 2-3 minutes until they become slightly softened.
8. Pour in the pepperoncini brine and beef broth, stirring to combine.
9. Transfer the baked meatballs directly from the oven into the skillet with the pepperoncini mixture.
10. Reduce the heat to low and simmer the meatballs in the sauce for 8-10 minutes, occasionally turning them to coat evenly.
11. Serve the meatballs immediately while hot.
Kindly tender with a subtle kick, these meatballs offer a beautiful contrast between the rich beef and the bright, tangy pepperoncini sauce. The texture remains remarkably moist inside while developing a delicate crust that holds the sauce perfectly. Consider serving them over creamy polenta or stuffing them into crusty rolls for a satisfying sandwich that celebrates both comfort and complexity.
Pepperoncini and Lemon Grilled Shrimp
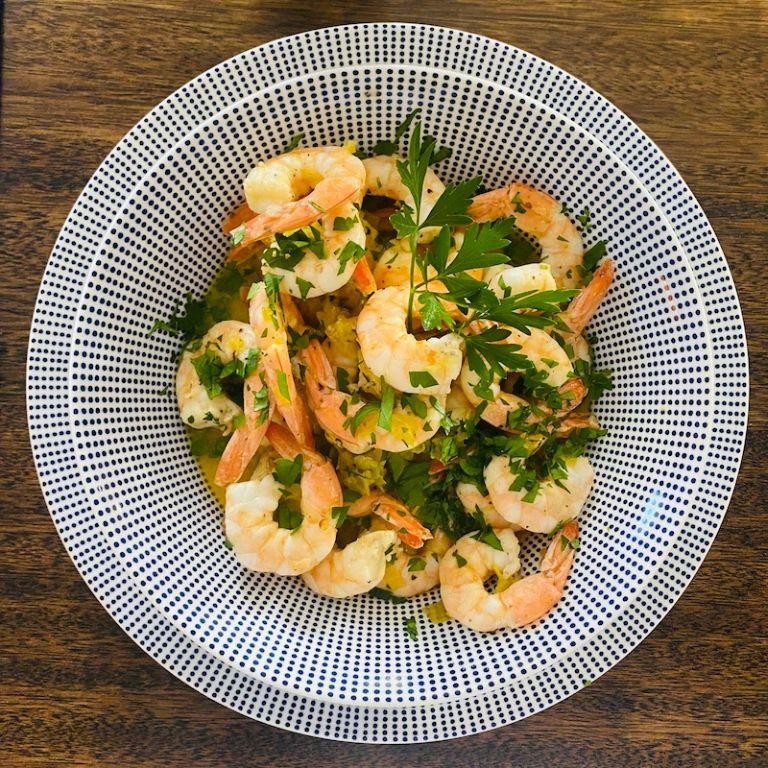
Floating through the kitchen this quiet afternoon, I find myself drawn to the simple poetry of shrimp sizzling on the grill, their delicate curves embracing the sharp brightness of lemon and the gentle heat of pepperoncini. There’s something deeply comforting in this dance of fire and brine, a moment where time slows and the senses awaken. Perhaps you, too, are seeking a little stillness, a recipe that feels both effortless and deeply satisfying.
5
servings25
minutes4
minutesIngredients
– 1 lb large shrimp, peeled and deveined
– 3 tbsp olive oil
– 2 tbsp freshly squeezed lemon juice
– 1 tbsp chopped pepperoncini
– 2 cloves garlic, minced
– 1 tsp smoked paprika
– ½ tsp salt
– ¼ tsp black pepper
– 1 lemon, sliced into ¼-inch rounds
Instructions
1. Pat the shrimp completely dry with paper towels to ensure a crisp sear on the grill.
2. In a medium bowl, whisk together olive oil, lemon juice, chopped pepperoncini, minced garlic, smoked paprika, salt, and black pepper.
3. Add the shrimp to the marinade, tossing gently to coat each piece evenly.
4. Cover the bowl and refrigerate for exactly 20 minutes to allow the flavors to penetrate without overcuring the shrimp.
5. Preheat your grill to medium-high heat, approximately 400°F, and lightly oil the grates to prevent sticking.
6. Thread the marinated shrimp and lemon slices onto skewers, alternating them for even cooking and caramelization.
7. Place the skewers on the preheated grill and cook for 2 minutes per side, until the shrimp turn pink and opaque with light grill marks.
8. Remove the skewers from the grill immediately to avoid overcooking, as shrimp continue to cook off the heat.
9. Let the shrimp rest for 2 minutes before serving to allow the juices to redistribute.
Once plated, the shrimp carry a tender, almost buttery texture that yields gently to the bite, while the pepperoncini whispers a subtle heat behind the lemon’s bright acidity. I love tucking them into warm corn tortillas with a sprinkle of fresh cilantro, or scattering them over a bed of peppery arugula for a light supper that feels both rustic and refined.
Pepperoncini Hummus Spread
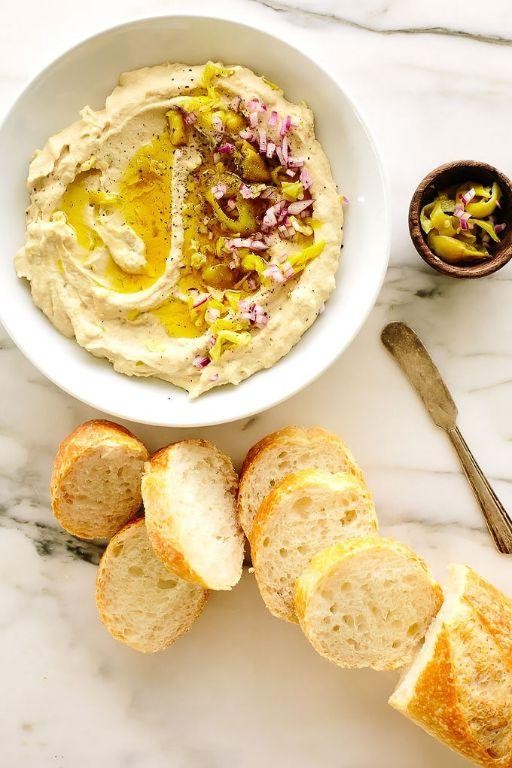
Holding this bowl of creamy hummus, I’m reminded how the simplest combinations often bring the most comfort, especially when tangy pepperoncini peppers mingle with earthy chickpeas. There’s something quietly satisfying about blending these humble ingredients into a spread that feels both familiar and new. Letting the flavors meld feels like giving a busy day a gentle pause.
4
servings15
minutesIngredients
– 2 (15-ounce) cans chickpeas
– 1/4 cup tahini
– 1/4 cup fresh lemon juice
– 1/4 cup olive oil
– 1/2 cup chopped pepperoncini peppers
– 2 tablespoons pepperoncini brine
– 2 cloves garlic
– 1/2 teaspoon salt
– 1/4 teaspoon black pepper
– 2 tablespoons cold water
Instructions
1. Drain both cans of chickpeas into a colander, reserving 1/4 cup of the liquid from one can.
2. Rinse the chickpeas under cool running water for 30 seconds to remove excess sodium.
3. Combine chickpeas, tahini, lemon juice, olive oil, pepperoncini peppers, pepperoncini brine, garlic, salt, and black pepper in a food processor.
4. Process the mixture on high speed for 1 minute until roughly combined.
5. Scrape down the sides of the food processor bowl with a spatula to ensure even blending.
6. Add the reserved chickpea liquid and cold water to the processor.
7. Process continuously for 2 full minutes until completely smooth and creamy.
8. Taste the hummus and adjust salt if needed, remembering the pepperoncini already adds saltiness.
9. Transfer the hummus to an airtight container and refrigerate for at least 1 hour before serving. Lightly tangy with a subtle heat that builds slowly, this hummus develops a wonderfully creamy texture after chilling. Last night I spread it thick on warm pita and topped it with extra pepperoncini slices, the bright flavors cutting through the richness beautifully.
Conclusion
Absolutely packed with flavor inspiration, this collection proves pepperoncini peppers can transform everyday meals into something special. We hope these 22 recipes spark your culinary creativity! Try your favorites, then share which ones you loved in the comments below. Don’t forget to pin this article to your Pinterest boards to save these delicious ideas for later.