Wandering through my grandmother’s old recipe box always brings back the sweetest memories, especially when I find her handwritten card for these peanut butter cookie cups. There’s something truly magical about how these little treats combine the nostalgic comfort of peanut butter cookies with the delightful surprise of a chocolate-filled center. Whenever I bake them, the warm aroma filling my kitchen transports me right back to those cherished afternoons spent at her farmhouse table, where every bite felt like a hug.
Why This Recipe Works
- The combination of creamy peanut butter and rich brown sugar creates that perfect chewy texture we all love in classic peanut butter cookies, while the mini muffin tin shaping gives each cup a sturdy structure that holds the chocolate filling beautifully without collapsing.
- Using both baking soda and a full teaspoon of vanilla extract ensures these cookie cups rise properly and develop that deep, comforting flavor profile that makes them taste like they came straight from a generations-old family recipe collection.
- The simple yet brilliant technique of creating indentations in the warm cookies allows the chocolate chips to melt into smooth, velvety pools that set up perfectly as the cookies cool, creating that irresistible contrast between the crisp cookie edges and the soft chocolate centers.
- Chilling the dough for just thirty minutes makes all the difference in preventing the cookies from spreading too thin, giving you those picture-perfect cups with just the right thickness to support the generous chocolate filling without becoming cakey or dense.
Ingredients
- 1 cup creamy peanut butter (the classic kind, not natural)
- 1 cup light brown sugar, packed firm
- 1 large egg, at room temperature
- 1 teaspoon pure vanilla extract
- 1 teaspoon baking soda
- 1/4 teaspoon fine sea salt
- 1 cup semi-sweet chocolate chips
Equipment Needed
- Standard 12-cup mini muffin tin
- Medium mixing bowl
- Electric hand mixer or sturdy wooden spoon
- Measuring cups and spoons
- Small cookie scoop or tablespoon
- Cooling rack
- Small round measuring spoon or bottle cap for shaping
Instructions
Prepare Your Cookie Dough
Begin by gathering all your ingredients and letting that egg come to room temperature on the counter for about thirty minutes—this simple step helps everything blend together smoothly, just like Grandma always insisted. In your mixing bowl, combine the creamy peanut butter, packed brown sugar, room temperature egg, vanilla extract, baking soda, and sea salt. Using your electric mixer on medium speed or a sturdy wooden spoon if you prefer doing things the old-fashioned way, beat everything together for about two minutes until the mixture becomes smooth, slightly lighter in color, and perfectly creamy. You’ll know it’s ready when the sugar granules have mostly dissolved and the dough pulls away from the sides of the bowl cleanly. The aroma of peanut butter and vanilla will already start filling your kitchen with that familiar, comforting scent that promises something wonderful is coming.
Chill and Preheat
Now comes the patience part—cover your bowl with plastic wrap or a clean kitchen towel and place it in the refrigerator to chill for exactly thirty minutes. This resting time allows the flavors to meld together beautifully and firms up the dough just enough to make shaping those perfect little cups much easier. While the dough chills, position your oven rack in the center and preheat your oven to 350°F—giving it plenty of time to reach the proper temperature ensures even baking. Lightly grease your mini muffin tin with butter or cooking spray, making sure to get into every cup’s corners so your cookie cups release easily later. This waiting period is the perfect time to wipe down your counters and enjoy the anticipation, much like those quiet moments in my grandmother’s kitchen before the baking magic began.
Shape and Bake
Remove your chilled dough from the refrigerator—it should be firm but still pliable. Using a small cookie scoop or tablespoon, portion out rounded scoops of dough and roll them into smooth balls between your palms. Place one ball into each prepared mini muffin cup, pressing down gently so they sit flat. You don’t need to press them into the cup shapes yet—that comes later. Slide the muffin tin into your preheated 350°F oven and bake for 10-12 minutes, until the edges are lightly golden and the centers appear set but still soft. The cookies will puff up beautifully as they bake, filling your kitchen with that irresistible peanut butter aroma that always makes the wait feel worthwhile.
Create the Cup Shapes
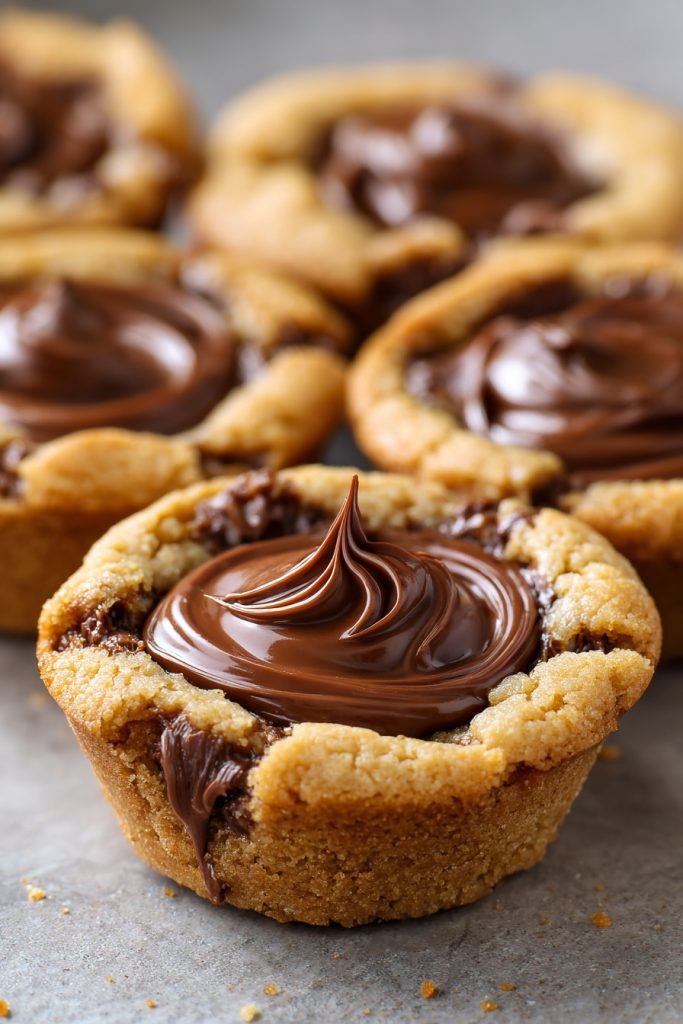
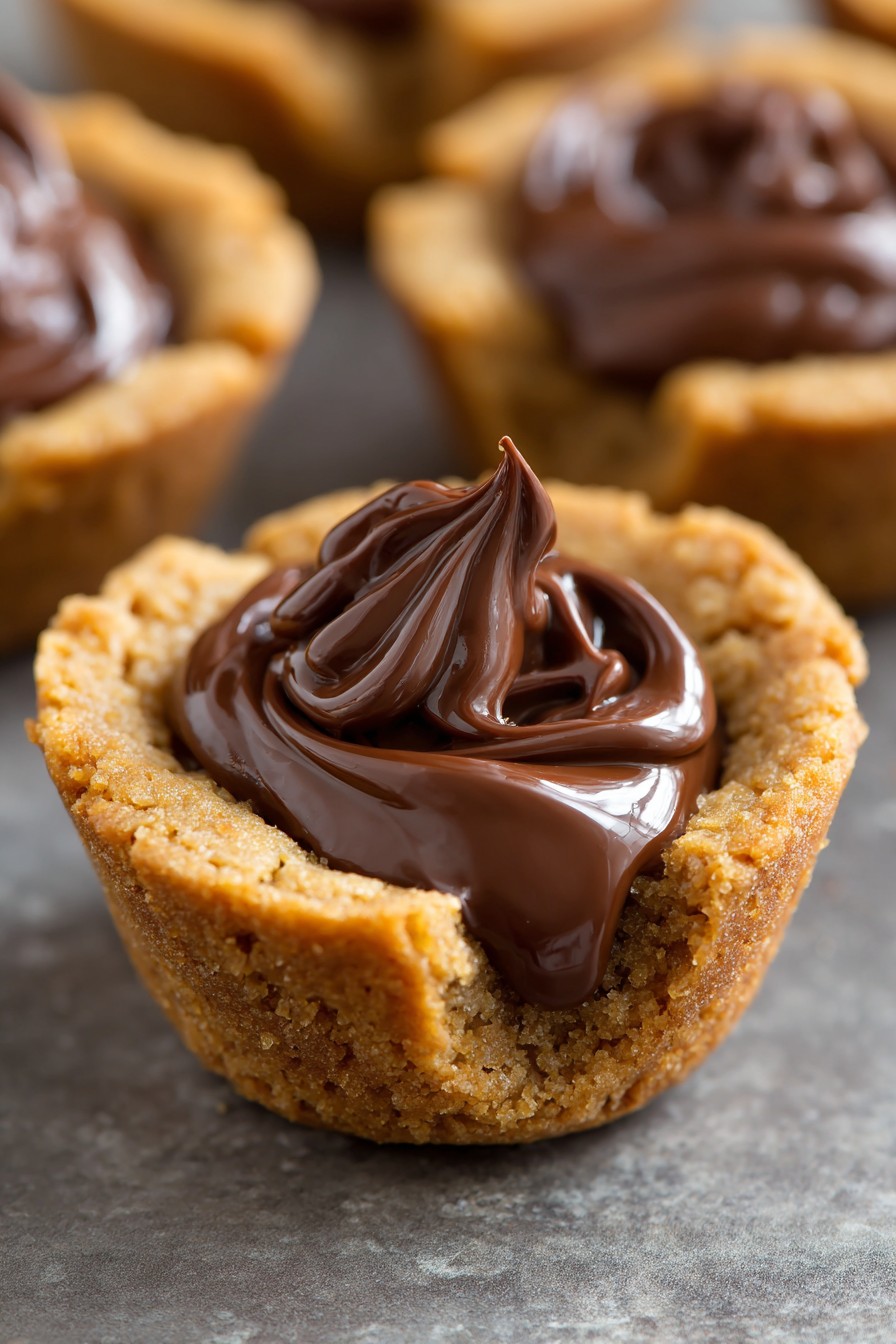
The moment the cookie cups come out of the oven is crucial for creating those perfect little wells for the chocolate. Working quickly but carefully, take a small round measuring spoon (about 1/2 teaspoon size) or even a clean bottle cap and gently press into the center of each hot cookie, twisting slightly to create a defined indentation. Be gentle but firm—you want to create a cup shape without pressing all the way through to the bottom. The cookies will be soft and pliable right from the oven, making this shaping process surprisingly easy. Let the shaped cookies cool in the pan for exactly 5 minutes—this allows them to set up enough to hold their shape but remain warm enough to melt the chocolate beautifully in the next step.
Add Chocolate and Final Cooling
After the initial 5-minute cooling period, carefully place about 10-12 chocolate chips into each cookie cup’s indentation. The residual heat from the cookies will begin melting the chocolate almost immediately, creating those lovely pools of melted goodness. Let the cookies continue cooling in the pan for another 10 minutes, during which time the chocolate will become perfectly spreadable. Then, using a small spoon or knife, gently swirl the melted chocolate to create an even layer across each cup. Finally, transfer the cookie cups to a wire cooling rack to cool completely, about 30-45 minutes, until the chocolate has set and the cookies are firm enough to handle. The chocolate will develop a beautiful satin finish as it sets, making these treats as lovely to look at as they are delicious to eat.
Tips and Tricks
If you find your cookie cups are spreading too much during baking, try chilling the shaped dough balls in the muffin tin for an additional 15 minutes before baking—this extra firming time helps them hold their shape beautifully. For those who love extra chocolate, consider using mini chocolate chips instead of standard size, as they distribute more evenly and create a smoother melted layer. When measuring your peanut butter, use the spoon-and-level method rather than scooping directly from the jar to ensure accurate measurements—too much peanut butter can make the cups greasy, while too little affects the texture. If your kitchen tends to be warm, you might need to chill the dough for up to 45 minutes, especially during summer months when ingredients soften more quickly. For picture-perfect presentation, wait until the chocolate has partially set but is still slightly soft before adding a light sprinkle of flaky sea salt or crushed peanuts on top. If you don’t have a mini muffin tin, you can use a standard muffin tin and simply double the baking time, though the proportions will be different and you’ll get fewer cookie cups. When storing these treats, place them in an airtight container with parchment paper between layers to prevent sticking, and they’ll keep beautifully at room temperature for up to five days. For that professional bakery look, you can gently re-warm the set chocolate with a kitchen torch for just a second to restore that freshly-melted sheen before serving. If your first batch doesn’t create perfect cups, remember that practice makes perfect—the indentations become easier to judge with experience, and even imperfect ones still taste absolutely wonderful.
Recipe Variations
- For a delightful twist, try using crunchy peanut butter instead of creamy—the added peanut pieces provide wonderful texture contrast and that satisfying crunch in every bite. You could also mix in 1/4 cup of chopped roasted peanuts to the dough for even more nutty goodness that reminds me of the peanut clusters my grandfather always kept in his overalls pocket.
- Chocolate lovers can experiment with different chocolate types—milk chocolate chips create a sweeter, creamier filling, while dark chocolate chips offer a richer, more sophisticated flavor profile that pairs beautifully with the peanut butter. You could even use white chocolate chips for a stunning visual contrast and sweeter flavor, or swirl together multiple chocolate types for a marbled effect that looks as beautiful as it tastes.
- For seasonal celebrations, fold in 1/4 cup of holiday sprinkles to the dough before chilling—red and green for Christmas, pastels for Easter, or orange and black for Halloween. You could also press a small candy into the center of each chocolate pool while it’s still soft—a mini peanut butter cup creates the ultimate peanut butter experience, while a Rolo candy adds caramel surprise.
- If you’re feeling adventurous, replace half the chocolate chips with butterscotch chips for a sweet, buttery variation that harks back to those old-fashioned candy counter treats. For a grown-up version, sprinkle a tiny pinch of flaky sea salt over the melted chocolate, or add 1/2 teaspoon of instant espresso powder to the dough to enhance the chocolate flavor without making it taste like coffee.
Frequently Asked Questions
Can I use natural peanut butter instead of regular creamy peanut butter?
While you can technically use natural peanut butter, I’d recommend sticking with the conventional creamy variety for the best results. Natural peanut butters tend to have more oil separation, which can make your cookie cups greasy and affect their ability to hold their cup shape properly. If natural is all you have, be sure to stir it thoroughly to incorporate all the oil, and consider reducing the baking time by 1-2 minutes since natural peanut butter cookies often bake faster. The texture might be slightly different, but they’ll still be delicious—just perhaps not as picture-perfect as when using standard peanut butter like my grandmother always preferred.
Why do I need to chill the dough before baking?
Chilling the dough serves several important purposes that really make a difference in your final cookie cups. First, it allows the flour proteins to hydrate properly and the fats to firm up, which prevents excessive spreading during baking and helps maintain those beautiful cup shapes. Second, it gives the flavors time to develop and meld together, creating that deep, rich taste we associate with well-rested cookie dough. Thirty minutes is the sweet spot—too little and the cookies spread too much, too long and the dough becomes difficult to work with. This simple step truly separates good cookie cups from great ones, much like how taking your time with family recipes always yields the best results.
My chocolate didn’t melt properly—what went wrong?
If your chocolate isn’t melting as it should, the cookie cups likely cooled too much before you added the chocolate chips. The ideal time to add chocolate is immediately after the initial 5-minute cooling period, while the cookies are still quite warm to the touch. If you missed this window, you can gently reheat the cookie cups in a 200°F oven for 2-3 minutes to warm them up again, then add the chocolate. Alternatively, you can melt the chocolate separately in a double boiler or microwave at 50% power in 30-second intervals, then spoon the melted chocolate into the cups—this method gives you more control over the chocolate’s consistency and ensures a perfectly smooth finish every time.
Can I make these cookie cups ahead of time?
Absolutely! These cookie cups actually keep wonderfully, making them perfect for preparing in advance. The baked and cooled cookie cups will stay fresh in an airtight container at room temperature for up to five days, or you can freeze them for up to three months. If freezing, place them in a single layer on a baking sheet until firm, then transfer to freezer bags with parchment between layers. The dough itself can also be made ahead and refrigerated for up to three days or frozen for two months—just thaw in the refrigerator overnight before shaping and baking. This make-ahead flexibility makes them ideal for holiday baking or unexpected guests, much like how my grandmother always had cookie dough waiting in her icebox.
Summary
These peanut butter cookie cups capture the heartwarming simplicity of family baking traditions, combining chewy peanut butter cookies with melted chocolate centers in a treat that feels both nostalgic and wonderfully satisfying. Perfect for sharing with loved ones or enjoying with a glass of cold milk, they’re sure to become a new favorite in your own recipe collection.
Peanut Butter Cookie Cups
4
servings15
minutes12
minutesIngredients
Instructions
- 1 In mixing bowl, combine peanut butter, brown sugar, egg, vanilla, baking soda, and salt. Beat until smooth and creamy.
- 2 Chill dough in refrigerator for 30 minutes. Preheat oven to 350°F and grease mini muffin tin.
- 3 Shape dough into balls and place in muffin cups. Bake 10-12 minutes until edges are golden.
- 4 Immediately press indentations into hot cookies using small spoon. Cool in pan 5 minutes.
- 5 Add chocolate chips to warm indentations. Cool 10 minutes, then swirl chocolate. Transfer to rack to cool completely.