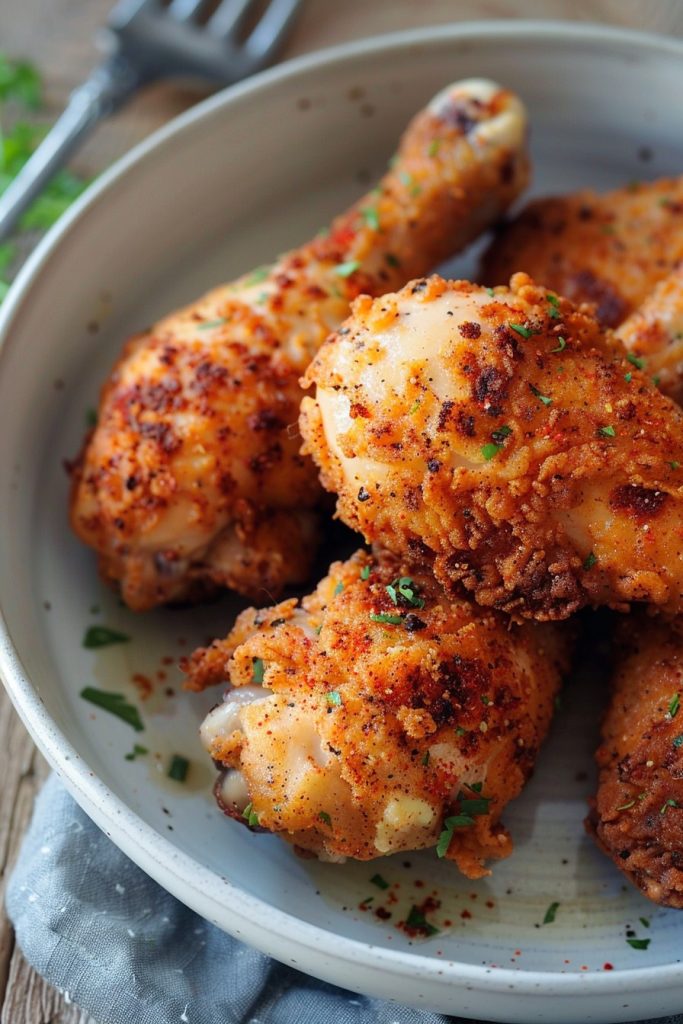
Bold flavors and crispy textures come together in this pan-fried chicken recipe that’s sure to become a weeknight favorite. Whether you’re a seasoned chef or a kitchen newbie, this guide will walk you through creating juicy, flavorful chicken with a golden crust that’s irresistibly crunchy.
Why This Recipe Works
- The buttermilk marinade tenderizes the chicken, ensuring it’s juicy and flavorful inside.
- A double coating of flour and spices creates an extra crispy crust that holds up to frying.
- Cooking in a cast-iron skillet ensures even heat distribution for perfectly golden chicken every time.
- Resting the chicken after frying allows the juices to redistribute, making every bite succulent.
- This recipe is versatile, allowing for various spices and herbs to customize the flavor to your liking.
Ingredients
- 4 boneless, skinless chicken breasts (about 2 pounds)
- 2 cups buttermilk
- 2 cups all-purpose flour
- 1 tablespoon garlic powder
- 1 tablespoon paprika
- 1 teaspoon salt
- 1 teaspoon black pepper
- 1 cup vegetable oil, for frying
Equipment Needed
- Cast-iron skillet
- Mixing bowls
- Whisk
- Tongs
- Meat thermometer
- Paper towels
Instructions

Step 1: Marinate the Chicken
Place the chicken breasts in a large bowl and cover with buttermilk. Ensure each piece is fully submerged. Cover the bowl with plastic wrap and refrigerate for at least 4 hours, or overnight for best results. This step is crucial for tender, juicy chicken.
Step 2: Prepare the Coating
In a separate bowl, whisk together the flour, garlic powder, paprika, salt, and pepper. This mixture will give your chicken its signature crispy coating and flavorful crust.
Step 3: Coat the Chicken
Remove the chicken from the buttermilk, allowing excess to drip off. Dredge each piece in the flour mixture, pressing firmly to adhere. For an extra crispy coating, dip the chicken back into the buttermilk and then into the flour mixture a second time.
Step 4: Heat the Oil
Pour the vegetable oil into your cast-iron skillet, filling it about 1/2 inch deep. Heat over medium-high heat until the oil reaches 350°F. A properly heated oil is key to achieving that golden crust without absorbing too much oil.
Step 5: Fry the Chicken
Carefully place the coated chicken breasts into the hot oil. Fry for about 5-7 minutes per side, or until the internal temperature reaches 165°F and the coating is golden brown and crispy. Use tongs to flip the chicken halfway through cooking.
Step 6: Rest and Serve
Transfer the fried chicken to a plate lined with paper towels to drain any excess oil. Let it rest for 5 minutes before serving to allow the juices to redistribute. This ensures every bite is as juicy as the last.
Tips and Tricks
For the crispiest chicken, make sure your oil is at the right temperature before adding the chicken. Too cool, and the chicken will absorb oil and become greasy; too hot, and the outside will burn before the inside cooks through. Using a meat thermometer to check the oil’s temperature can make all the difference. Additionally, letting the chicken rest after the first coating of flour for about 10 minutes before the second dip can help the coating adhere better, resulting in a thicker, crispier crust. Finally, don’t overcrowd the pan. Frying in batches ensures each piece cooks evenly and stays crispy.
Recipe Variations
- Spicy Version: Add cayenne pepper or hot sauce to the buttermilk marinade for a kick.
- Herb-Infused: Mix dried herbs like thyme, oregano, or rosemary into the flour coating for an aromatic twist.
- Gluten-Free: Substitute the all-purpose flour with a gluten-free flour blend to accommodate dietary restrictions.
- Buttermilk Substitute: No buttermilk? Mix 2 cups of milk with 2 tablespoons of vinegar or lemon juice and let it sit for 5 minutes.
- Oven-Fried: For a lighter version, bake the coated chicken on a wire rack at 400°F for 25-30 minutes, flipping halfway through.
Frequently Asked Questions
Can I use chicken thighs instead of breasts?
Absolutely! Chicken thighs are a great alternative to breasts in this recipe. They’re juicier and more flavorful, though they may require a slightly longer cooking time. Just ensure the internal temperature reaches 165°F.
How do I know when the oil is ready?
The oil is ready when it reaches 350°F on a meat thermometer. If you don’t have a thermometer, you can test the oil by dropping a small piece of bread into it. If it sizzles and turns golden within 60 seconds, the oil is ready.
Can I make this recipe ahead of time?
Yes! You can marinate the chicken overnight and even coat it in flour a few hours before frying. However, for the crispiest results, fry the chicken just before serving.
Summary
This pan-fried chicken recipe delivers crispy, juicy perfection with a flavorful crust. Marinating in buttermilk ensures tenderness, while a double coating guarantees crunch. Perfect for any occasion, it’s a versatile dish that’s sure to impress.
Crispy Pan Fried Chicken
4
servings4
minutes14
minutesIngredients
Instructions
- 1 Marinate the chicken in buttermilk for at least 4 hours.
- 2 Mix flour and spices in a bowl.
- 3 Coat chicken in flour mixture, then buttermilk, then flour again.
- 4 Heat oil to 350°F in a cast-iron skillet.
- 5 Fry chicken for 5-7 minutes per side until golden and cooked through.
- 6 Rest on paper towels for 5 minutes before serving.