Kick your culinary game into high gear with these intensely flavored oven-dried tomatoes that will revolutionize your cooking. Known for their deep, concentrated sweetness and chewy texture, these ruby gems deliver an explosion of umami that elevates everything from simple pastas to gourmet charcuterie boards. Prepare to unlock flavor dimensions you never knew existed in humble tomatoes.
Why This Recipe Works
- The slow, low-temperature drying process intensifies the tomatoes’ natural sugars, creating an incredible caramelized sweetness that fresh tomatoes can’t match
- Strategic seasoning with coarse sea salt and aromatic herbs creates flavor layers that penetrate deep into the tomato flesh during the extended cooking time
- Using high-quality olive oil for finishing preserves the tomatoes’ texture while adding rich, fruity notes that complement the concentrated tomato essence
- The precise temperature control prevents burning while ensuring perfect moisture evaporation, resulting in that ideal chewy-yet-tender texture
- Choosing ripe but firm Roma tomatoes provides the perfect balance of flavor concentration and structural integrity throughout the drying process
Ingredients
- 3 pounds ripe but firm Roma tomatoes, washed and dried thoroughly
- 1/4 cup high-quality extra virgin olive oil, divided for drizzling and finishing
- 2 tablespoons coarse sea salt for seasoning
- 1 tablespoon freshly cracked black pepper for aromatic heat
- 2 tablespoons dried oregano for earthy herbal notes
- 1 tablespoon garlic powder for savory depth
- 1 teaspoon red pepper flakes for subtle heat
Equipment Needed
- Large rimmed baking sheets
- Parchment paper or silicone baking mats
- Sharp chef’s knife
- Cutting board
- Mixing bowls
- Wire cooling racks
- Airtight storage containers
Instructions
Prepare and Season the Tomatoes
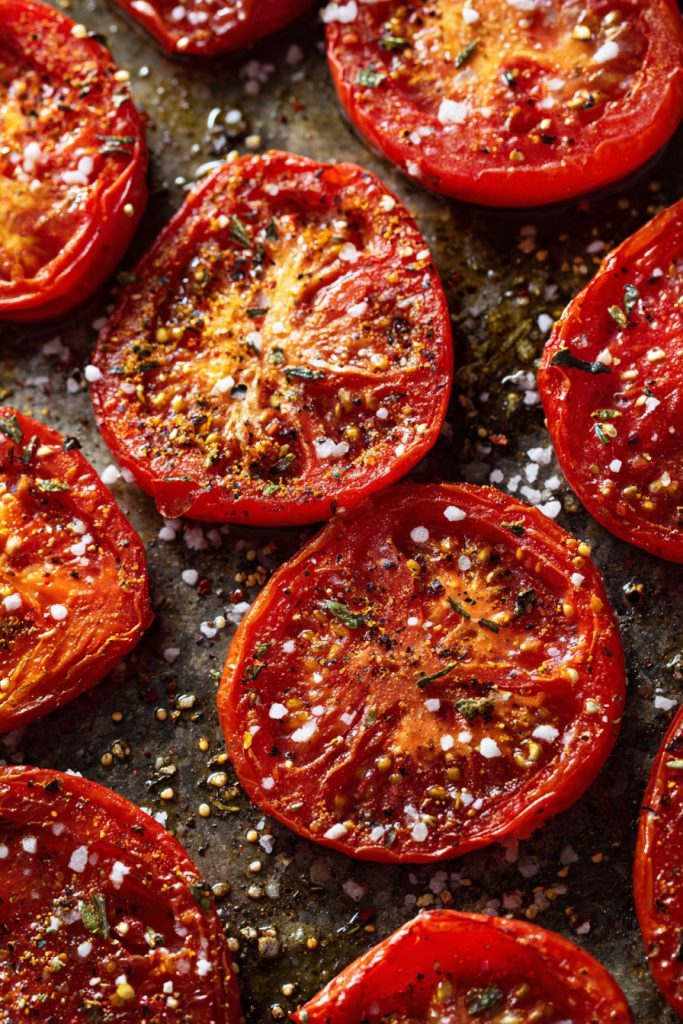
Begin by preheating your oven to 200°F—this low temperature is crucial for slow dehydration without cooking the tomatoes. Take your 3 pounds of firm Roma tomatoes and slice them lengthwise into halves, creating uniform pieces that will dry evenly. Arrange these tomato halves cut-side up on parchment-lined baking sheets, ensuring they don’t touch to allow proper air circulation. In a small bowl, combine 2 tablespoons of coarse sea salt, 1 tablespoon of freshly cracked black pepper, 2 tablespoons of dried oregano, 1 tablespoon of garlic powder, and 1 teaspoon of red pepper flakes. Generously sprinkle this aromatic seasoning blend over each tomato half, making sure every surface gets coated. The coarse salt will draw out moisture while the herbs infuse their flavors deep into the tomato flesh. Drizzle about 2 tablespoons of high-quality extra virgin olive oil evenly across all tomatoes, creating a glossy coating that will help conduct heat and prevent sticking. Pro tip: For maximum flavor penetration, gently press the seasoning into the tomato flesh with your fingertips.
Initial Slow Roasting Phase
Place the seasoned tomato halves in your preheated 200°F oven and set your timer for 4 hours. This extended low-heat period begins the crucial moisture evaporation process while preserving the tomatoes’ vibrant color and nutrients. After the first hour, you’ll notice the tomatoes beginning to shrink slightly and their edges curling inward—this is exactly what you want to see. At the 2-hour mark, rotate your baking sheets 180 degrees to ensure even drying, as most ovens have hot spots that can cause uneven results. By hour 3, the tomatoes should have reduced in size by about 30% and developed a slightly wrinkled appearance. The kitchen will fill with an incredible aroma of roasting tomatoes and herbs that will make your mouth water in anticipation. Continue roasting until the 4-hour mark, resisting the temptation to increase the temperature, as patience here rewards you with perfectly textured tomatoes rather than burnt or mushy results.
Mid-Process Assessment and Adjustment
After 4 hours of slow roasting, carefully remove the baking sheets from the oven and assess your tomatoes’ progress. They should appear significantly shrunken, with the cut surfaces looking matte rather than glossy, indicating substantial moisture loss. Gently press the center of a few tomato halves—they should feel soft but not squishy, with some resistance indicating the ideal moisture content. If any tomatoes appear to be drying faster than others, rearrange them on the baking sheets, moving those from the edges toward the center. This is also the perfect time to taste-test one tomato half—you should experience an intense burst of sweet, concentrated tomato flavor with well-balanced seasoning. Pro tip: If you notice excessive oil pooling around the tomatoes, carefully blot it with a paper towel to prevent greasiness in the final product.
Final Drying and Texture Development
Return the baking sheets to the 200°F oven for another 2-4 hours, depending on your desired final texture. For slightly chewy tomatoes that still have some moisture, aim for the 2-hour mark. For intensely concentrated, leathery tomatoes perfect for long-term storage, continue for the full 4 hours. During this final phase, check the tomatoes every 30 minutes, looking for that perfect balance between pliability and dryness. The ideal finished tomato should be reduced to about one-third of its original size, with deeply wrinkled skin and a rich, dark red color. When you gently squeeze a tomato half between your fingers, it should spring back slightly rather than feeling mushy or brittle. The edges may appear slightly darker but should never be blackened—this indicates perfect caramelization rather than burning.
Cooling and Final Preparation
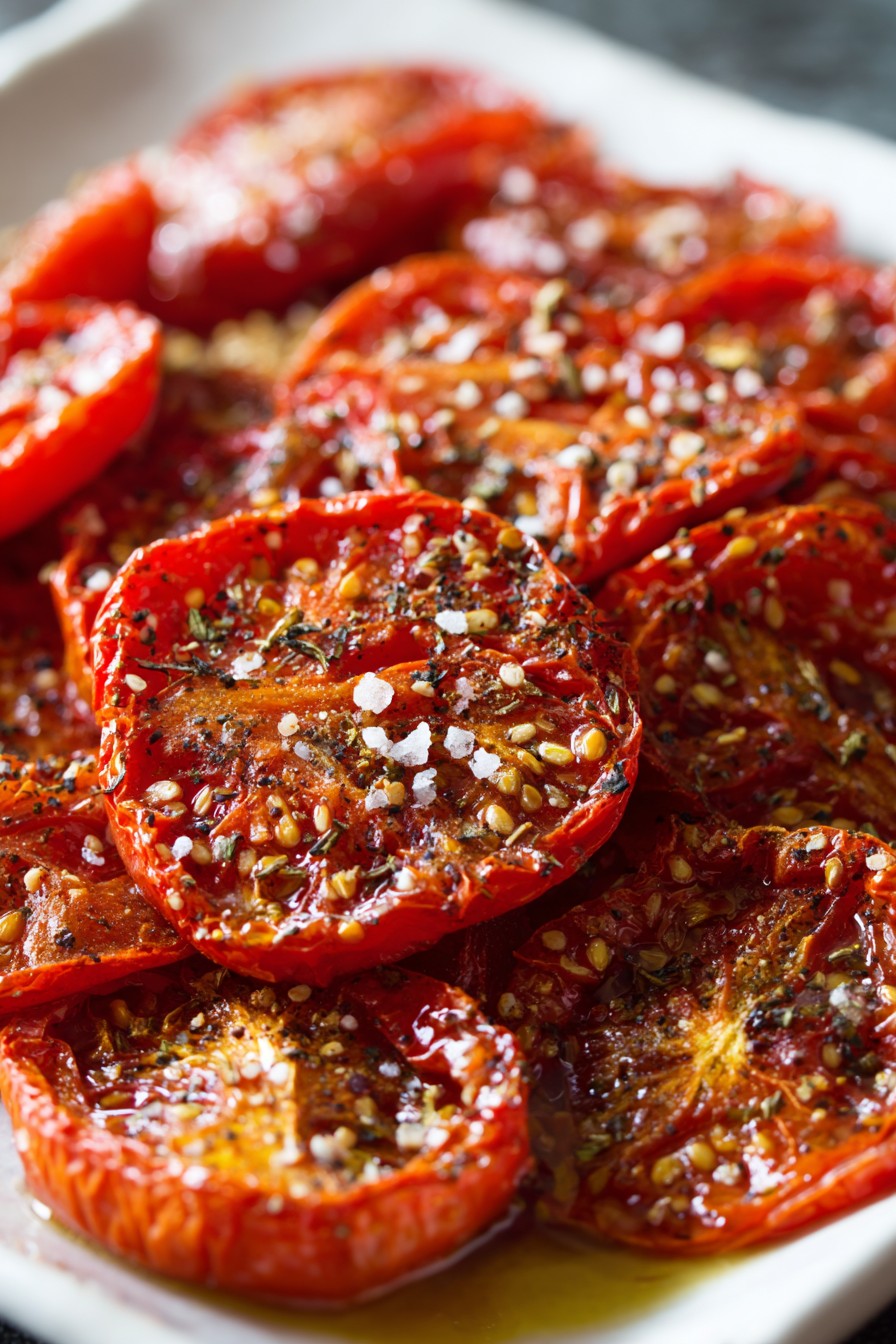
Once your tomatoes have reached the perfect texture, remove them from the oven and immediately transfer them to wire cooling racks using a spatula. This crucial step allows air to circulate around all surfaces, preventing steam from making the tomatoes soggy. Let them cool completely at room temperature for at least 2 hours—rushing this process can trap residual moisture that leads to spoilage. As the tomatoes cool, they’ll firm up slightly and develop their final chewy texture. Once completely cooled, arrange the tomato halves in clean, dry airtight containers, layering them carefully to avoid crushing. Drizzle the remaining 2 tablespoons of high-quality extra virgin olive oil over each layer, ensuring each tomato gets coated for preservation and added flavor. Pro tip: For the best flavor development, let the tomatoes rest in the refrigerator for 24 hours before using—this allows the oil and seasonings to fully penetrate and meld.
Tips and Tricks
For truly exceptional oven-dried tomatoes, consider these advanced techniques that separate good results from extraordinary ones. When selecting tomatoes, look for Roma varieties that feel heavy for their size—this indicates high solid content and less water, resulting in better concentration. If you have access to heirloom varieties like San Marzano, their thinner skins and lower moisture content create superior texture. For ultimate flavor customization, create your own herb blends—try adding smoked paprika for depth, fennel seeds for licorice notes, or citrus zest for brightness. The drying time can vary significantly based on your tomatoes’ initial moisture content and your oven’s accuracy—invest in an oven thermometer to ensure your 200°F is truly 200°F. For storage, consider dividing your finished tomatoes into smaller portions before freezing; this prevents having to thaw the entire batch when you only need a few. If you notice condensation forming inside your storage containers during the first day, your tomatoes needed more drying time—spread them on a baking sheet and return to the oven for another hour. For oil-packed preservation, ensure all tomatoes are completely submerged in oil and store in the refrigerator, where they’ll keep for several months. The leftover oil becomes incredibly flavorful—use it for salad dressings, bread dipping, or cooking. For maximum shelf life without refrigeration, continue drying until the tomatoes are completely leathery and brittle—they’ll reconstitute beautifully when soaked in warm water or added directly to soups and stews.
Recipe Variations
- Spicy Calabrian Style: Incorporate 2 tablespoons of crushed Calabrian chilies into your seasoning mix and add 1 tablespoon of fennel seeds for an authentic Southern Italian kick that brings both heat and aromatic complexity to your tomatoes
- Herbes de Provence Blend: Replace the oregano with 3 tablespoons of herbes de Provence mixture and add 1 tablespoon of lavender buds for a floral, French-inspired variation that pairs beautifully with goat cheese and rustic breads
- Smoked Paprika and Cumin: Use 2 tablespoons of smoked paprika and 1 tablespoon of ground cumin instead of oregano, creating a Spanish-inspired flavor profile that works wonderfully in paellas, tapas, and meat dishes
- Lemon-Zested Mediterranean: Add the zest of 2 large lemons to your seasoning mixture and include 1 tablespoon of dried thyme for a bright, citrus-forward variation that elevates seafood dishes and grain salads
- Balsamic Glazed: During the last hour of drying, brush the tomatoes with a mixture of 1/4 cup balsamic vinegar and 1 tablespoon honey, creating a sweet-tart glaze that caramelizes into a gorgeous, glossy finish
Frequently Asked Questions
Can I use different types of tomatoes for this recipe?
Absolutely, while Roma tomatoes are ideal for their meaty texture and low moisture content, you can successfully use cherry, grape, or heirloom varieties with some adjustments. Cherry and grape tomatoes should be halved rather than quartered and may require slightly less drying time—check them at the 3-hour mark. Larger beefsteak tomatoes work well but need to be sliced into 1/4-inch thick rounds rather than halves to ensure proper drying. Heirloom varieties often have thinner skins and more complex flavor profiles but may release more liquid, potentially extending your drying time by an additional hour. The key principle remains consistent: choose tomatoes that are ripe but firm, adjust slicing based on size, and monitor closely during the final hours to achieve your desired texture.
How long do oven-dried tomatoes last and what’s the best storage method?
Properly dried and stored tomatoes have impressive longevity. For tomatoes dried to a chewy texture and stored in oil in the refrigerator, expect 3-4 months of peak quality. Completely leathery-dry tomatoes stored in airtight containers at room temperature will maintain quality for up to 6 months. For longest preservation, freeze your dried tomatoes in vacuum-sealed bags or airtight containers where they’ll keep for up to a year. The key to successful storage is ensuring no moisture remains—any condensation or soft spots can lead to mold development. Always use clean, dry utensils when removing tomatoes from storage containers to prevent contamination, and regularly check for any signs of spoilage like off odors or discoloration.
What’s the difference between sun-dried and oven-dried tomatoes?
While both methods achieve concentrated tomato flavor, they differ significantly in process, texture, and flavor profile. Sun-dried tomatoes traditionally rely on natural sunlight and air circulation over several days, often resulting in a chewier, more leathery texture with concentrated sweetness. Oven-drying provides controlled, consistent heat that typically preserves more of the tomato’s natural color and allows for more precise texture control—from slightly moist to completely dry. Flavor-wise, oven-dried tomatoes often retain more of the tomato’s fresh characteristics while sun-dried versions develop deeper, almost raisin-like sweetness. Modern sun-dried tomatoes are frequently oven-dried commercially, so the method you choose depends on your texture preferences and available equipment—oven-drying offers reliability while traditional sun-drying provides artisanal charm.
Can I speed up the drying process by increasing the temperature?
While technically possible, increasing temperature significantly compromises quality and should be avoided for best results. Higher temperatures cook the tomatoes rather than dry them, resulting in caramelized exteriors but trapped interior moisture that leads to spoilage. The magic of proper drying happens slowly at 200°F, where moisture evaporates gradually while flavors concentrate and textures develop properly. If you must accelerate slightly, 225°F is the absolute maximum, but expect to sacrifice some texture quality and flavor complexity. Better alternatives include using convection oven settings if available, which circulates air more effectively, or ensuring your tomatoes are sliced uniformly thin for more consistent drying. Remember, patience rewards you with superior product—rushing typically creates inferior results.
What are the best uses for oven-dried tomatoes beyond basic recipes?
These flavor-packed gems transcend typical pasta and salad applications—their intense umami makes them secret weapons in countless dishes. Blend them into compound butters with garlic and herbs for incredible steak toppings or bread spreads. Pulse them in a food processor with nuts and Parmesan to create explosive tomato pesto that elevates everything from grilled fish to roasted vegetables. Soak them in warm broth until softened, then puree into the most incredible tomato soup base you’ve ever tasted. Chop them finely and mix into meatball or meatloaf mixtures where they’ll add moisture and deep flavor complexity. Even the leftover oil becomes culinary gold—use it for roasting potatoes, drizzling over pizzas, or as the base for vinaigrettes that will make ordinary salads extraordinary.
Summary
Transform ordinary tomatoes into intensely flavorful, versatile ingredients through patient oven-drying. This technique concentrates sweetness, develops complex textures, and creates culinary powerhouses that elevate countless dishes with their robust, umami-rich character.