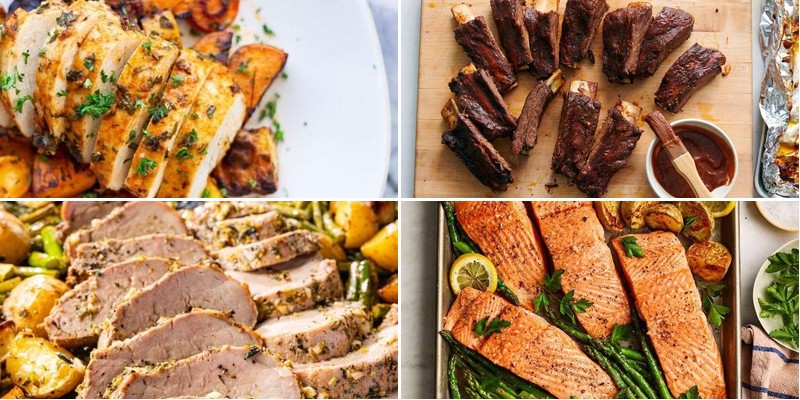
Let’s face it—weeknight dinners can be a real challenge when you’re short on time. That’s why we’ve gathered 24 delicious oven recipes that do most of the work for you! From comforting casseroles to sheet pan wonders, these easy meals will have dinner on the table with minimal fuss. Get ready to discover your new go-to favorites that make busy evenings so much tastier.
Cheesy Baked Ziti with Italian Sausage

There’s something magical about a bubbling pan of cheesy baked ziti straight from the oven—it’s the ultimate comfort food that never fails to bring my family running to the table, especially on busy weeknights when we all need a little extra warmth and coziness.
8
servings20
minutes55
minutesIngredients
– 1 pound Italian sausage
– 1 box (16 ounces) ziti pasta
– 1 jar (24 ounces) marinara sauce
– 1 cup ricotta cheese
– 2 cups shredded mozzarella cheese
– 1/2 cup grated Parmesan cheese
– 1 tablespoon olive oil
– 1 small yellow onion, diced
– 2 cloves garlic, minced
– 1 teaspoon dried oregano
– 1/4 teaspoon red pepper flakes
– 1/4 cup fresh basil, chopped
– Salt and black pepper
Instructions
1. Preheat your oven to 375°F.
2. Bring a large pot of salted water to a rolling boil.
3. Add the ziti pasta and cook for 8 minutes until al dente.
4. Drain the pasta and set it aside.
5. Heat olive oil in a large skillet over medium-high heat.
6. Add the Italian sausage and cook for 6–8 minutes, breaking it into crumbles with a spoon until browned.
7. Tip: If your sausage releases excess grease, drain it for a less oily dish.
8. Add the diced onion and sauté for 4 minutes until translucent.
9. Stir in the minced garlic and cook for 1 minute until fragrant.
10. Pour in the marinara sauce, dried oregano, and red pepper flakes.
11. Simmer the sauce for 10 minutes over low heat.
12. In a large bowl, combine the cooked ziti, ricotta cheese, and half of the mozzarella cheese.
13. Tip: Mixing ricotta directly with the pasta ensures every bite is creamy.
14. Fold the sausage sauce into the pasta mixture until evenly coated.
15. Transfer the mixture to a 9×13-inch baking dish.
16. Top with the remaining mozzarella and grated Parmesan cheese.
17. Bake uncovered for 25 minutes until the cheese is golden and bubbly.
18. Tip: For extra browning, broil for 2–3 minutes at the end, watching closely to avoid burning.
19. Let the baked ziti rest for 5 minutes before serving.
20. Garnish with fresh basil, salt, and black pepper.
Knowing how the crispy, cheesy top gives way to tender pasta and savory sausage makes this dish a repeat favorite in my home; I love serving it with a simple green salad and garlic bread to soak up every last bit of sauce, and it’s even better the next day when the flavors have melded together perfectly.
Herb-Roasted Chicken with Root Vegetables

Nothing says cozy fall evening like the aroma of herbs and roasting vegetables filling your kitchen. I first made this dish when my sister visited last October, and now it’s become our family’s go-to Sunday dinner. There’s something magical about how simple ingredients transform into such a comforting meal.
4
servings20
minutes68
minutesIngredients
– 1 whole chicken (3-4 pounds)
– 2 tablespoons olive oil
– 1 tablespoon fresh rosemary
– 1 tablespoon fresh thyme
– 2 teaspoons salt
– 1 teaspoon black pepper
– 4 medium carrots
– 2 large potatoes
– 1 large onion
– 3 cloves garlic
Instructions
1. Preheat your oven to 425°F and position the rack in the center.
2. Pat the chicken completely dry with paper towels inside and out.
3. Combine olive oil, rosemary, thyme, salt, and pepper in a small bowl.
4. Rub the herb mixture evenly over the entire surface of the chicken and inside the cavity.
5. Peel carrots and potatoes, then cut them into 2-inch chunks.
6. Cut the onion into 8 wedges and peel garlic cloves, leaving them whole.
7. Arrange the vegetables in a single layer in a 9×13-inch roasting pan.
8. Place the chicken breast-side up on top of the vegetables.
9. Roast for 20 minutes at 425°F until the skin begins to turn golden brown.
10. Reduce oven temperature to 375°F and continue roasting for 45 minutes.
11. Check the internal temperature of the chicken thigh with a meat thermometer—it should read 165°F.
12. If the skin isn’t crispy enough, broil for 2-3 minutes while watching closely.
13. Remove the pan from the oven and transfer the chicken to a cutting board.
14. Let the chicken rest for 10 minutes before carving to keep the juices inside.
15. Toss the roasted vegetables in the pan juices before serving.
Hearty and satisfying, this chicken emerges with crackling-crisp skin while the vegetables soak up all the delicious drippings. The rosemary and thyme create an earthy fragrance that pairs beautifully with the sweet caramelized root vegetables. Try serving it over creamy polenta or with crusty bread to soak up every last bit of those incredible pan juices.
Garlic Butter Baked Salmon with Asparagus
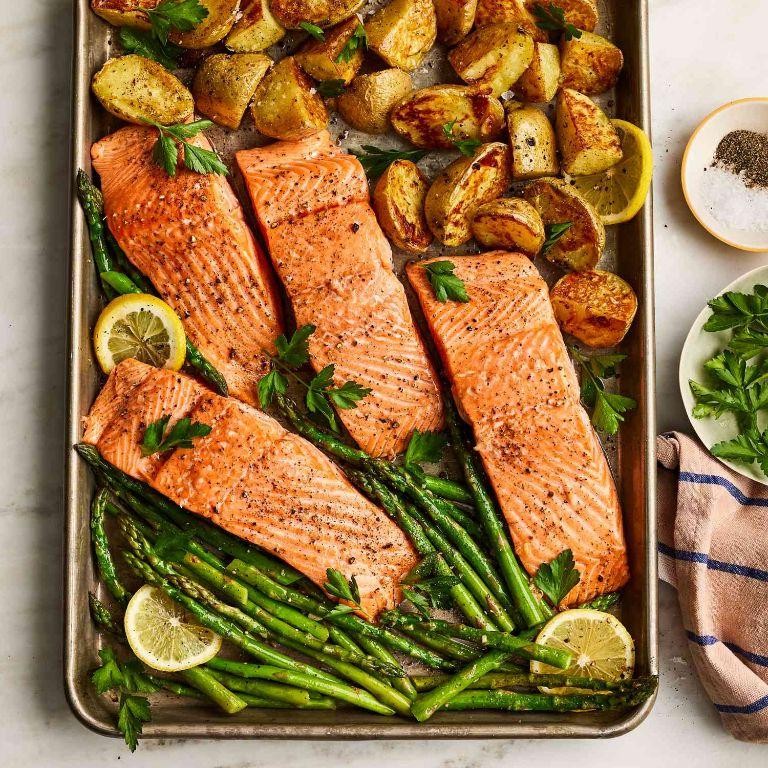
Just last week, I found myself staring into my fridge after a long day, craving something delicious but not wanting to spend hours cooking—that’s when this garlic butter baked salmon with asparagus became my new go-to. It’s the kind of meal that feels fancy enough for company but simple enough for a busy Tuesday night, and the way the butter melts over everything makes my kitchen smell incredible.
4
servings15
minutes15
minutesIngredients
- 4 (6-ounce) salmon fillets
- 1 pound asparagus, trimmed
- 4 tablespoons unsalted butter, melted
- 4 cloves garlic, minced
- 1 tablespoon lemon juice
- 1 teaspoon dried dill
- 1/2 teaspoon salt
- 1/4 teaspoon black pepper
- 1 tablespoon olive oil
Instructions
- Preheat your oven to 400°F and line a large baking sheet with parchment paper.
- Pat the 4 salmon fillets dry with paper towels to help the seasoning stick better.
- Arrange the 1 pound of trimmed asparagus in a single layer on one side of the baking sheet.
- Drizzle the 1 tablespoon of olive oil over the asparagus and toss to coat evenly.
- In a small bowl, combine the 4 tablespoons of melted unsalted butter, 4 minced garlic cloves, 1 tablespoon of lemon juice, 1 teaspoon of dried dill, 1/2 teaspoon of salt, and 1/4 teaspoon of black pepper.
- Brush about two-thirds of the garlic butter mixture evenly over the top of each salmon fillet.
- Place the salmon fillets on the empty side of the baking sheet, skin-side down if they have skin.
- Pour the remaining garlic butter mixture over the asparagus and toss gently.
- Bake in the preheated 400°F oven for 12-15 minutes, until the salmon flakes easily with a fork and the asparagus is tender-crisp.
- Check for doneness by inserting a fork into the thickest part of the salmon—it should separate into flakes.
What I love most is how the salmon stays moist and flaky while the asparagus soaks up all that garlic butter goodness. Serve it over a bed of lemon rice or with crusty bread to soak up the extra sauce from the pan—it’s too good to waste!
Sheet Pan Lemon Rosemary Pork Tenderloin
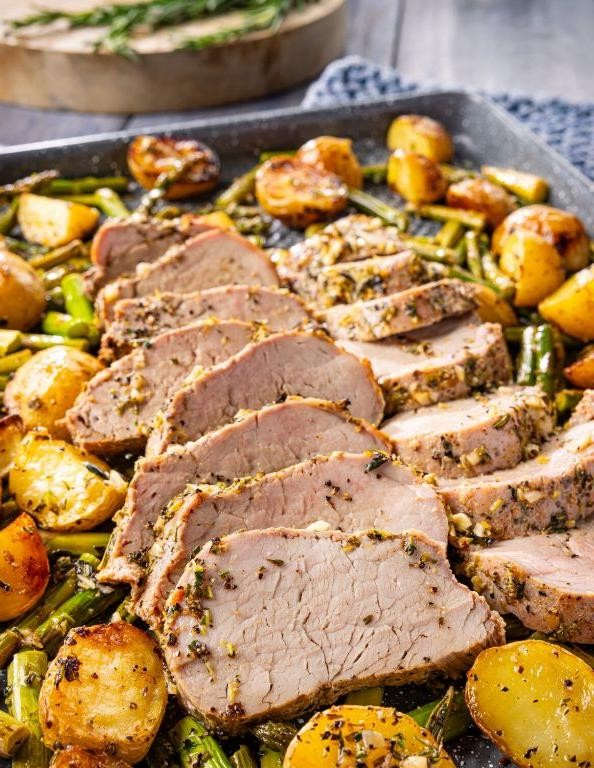
Zesty lemon and fragrant rosemary have become my go-to flavor combination for busy weeknights when I want something impressive but effortless. Last Tuesday, after my kids declared they were “so over” chicken, I threw together this sheet pan wonder and watched it become an instant family favorite. There’s something magical about how these simple ingredients transform ordinary pork into a restaurant-quality meal with minimal cleanup.
4
servings15
minutes35
minutesIngredients
– 1.5 lbs pork tenderloin
– 3 tbsp olive oil
– 2 tbsp fresh lemon juice
– 1 tbsp chopped fresh rosemary
– 3 cloves minced garlic
– 1 tsp kosher salt
– 1/2 tsp black pepper
– 1 lb baby potatoes
– 1 lb fresh asparagus
Instructions
1. Preheat your oven to 425°F and line a large baking sheet with parchment paper.
2. Pat the pork tenderloin completely dry with paper towels to ensure proper browning.
3. In a small bowl, whisk together olive oil, lemon juice, rosemary, garlic, salt, and pepper.
4. Brush the entire pork tenderloin with half of the marinade mixture, coating all sides evenly.
5. Arrange baby potatoes around the pork on the baking sheet.
6. Roast at 425°F for 15 minutes to start crisping the potatoes.
7. Remove the pan from oven and add asparagus spears to the sheet.
8. Brush the remaining marinade over the vegetables, tossing gently to coat.
9. Return the pan to oven and roast for another 15-20 minutes until pork reaches 145°F internally.
10. Let the pork rest for 5 minutes before slicing to allow juices to redistribute.
11. Slice the pork into 1-inch thick medallions against the grain for maximum tenderness.
Outrageously tender pork with crispy-edged potatoes and bright asparagus makes this feel like a special occasion meal. The lemon-infused juices mingle beautifully with the roasted vegetables when served family-style right from the pan. I love slicing the leftovers thin for next-day sandwiches or tossing them into a grain bowl with the remaining vegetables.
Classic Beef Lasagna with Ricotta and Mozzarella

Unbelievably, after years of trying various lasagna recipes, I finally perfected this classic version that my family now begs me to make every Sunday. There’s something magical about the way the aromas fill the house while it bakes that makes everyone gather in the kitchen, eagerly awaiting that first cheesy slice.
8
servings30
minutes65
minutesIngredients
- 1 pound ground beef
- 1 onion, diced
- 3 cloves garlic, minced
- 28 ounces crushed tomatoes
- 6 ounces tomato paste
- 2 teaspoons dried basil
- 1 teaspoon dried oregano
- 1 teaspoon salt
- 1/2 teaspoon black pepper
- 15 ounces ricotta cheese
- 1 large egg
- 1/4 cup fresh parsley, chopped
- 12 lasagna noodles
- 4 cups shredded mozzarella cheese
- 1/2 cup grated Parmesan cheese
Instructions
- Preheat your oven to 375°F and grease a 9×13 inch baking dish.
- Cook the lasagna noodles according to package directions until al dente, then drain and lay them flat on parchment paper to prevent sticking.
- Brown the ground beef in a large skillet over medium-high heat for 8-10 minutes, breaking it into small crumbles.
- Add diced onion and cook for 5 minutes until translucent, then add minced garlic and cook for 1 minute more.
- Stir in crushed tomatoes, tomato paste, basil, oregano, salt, and pepper, then simmer for 15 minutes to develop flavors.
- In a separate bowl, combine ricotta cheese, egg, and chopped parsley until smooth.
- Spread 1 cup of meat sauce evenly across the bottom of the prepared baking dish.
- Arrange 4 lasagna noodles over the sauce, slightly overlapping them.
- Spread half of the ricotta mixture over the noodles using a spatula.
- Sprinkle 1 1/3 cups of mozzarella cheese over the ricotta layer.
- Repeat the layers: meat sauce, noodles, remaining ricotta mixture, and another 1 1/3 cups mozzarella.
- Top with final layer of noodles, remaining meat sauce, remaining mozzarella, and Parmesan cheese.
- Cover with foil and bake at 375°F for 25 minutes, then remove foil and bake for 15 more minutes until bubbly and golden.
- Let the lasagna rest for 15 minutes before slicing to allow the layers to set properly.
My favorite part is how the edges get slightly crispy while the center remains wonderfully creamy and tender. The layers hold together beautifully when sliced, revealing perfect stripes of meat, cheese, and pasta that make this dish as visually stunning as it is delicious. Sometimes I’ll serve it with garlic bread for dipping into any extra sauce that pools around the edges.
Honey Mustard Glazed Ham with Sweet Potatoes

Perfect for holiday gatherings or cozy Sunday dinners, this honey mustard glazed ham with sweet potatoes has become my go-to centerpiece dish. I first discovered this combination when I needed to use up leftover sweet potatoes, and now my family requests it monthly—the sweet and savory balance is just irresistible.
8
servings20
minutes120
minutesIngredients
- 1 (8-pound) spiral-cut ham
- 4 large sweet potatoes
- 1/2 cup honey
- 1/4 cup Dijon mustard
- 2 tablespoons olive oil
- 1 teaspoon garlic powder
- 1/2 teaspoon black pepper
- 1/4 teaspoon salt
Instructions
- Preheat your oven to 325°F and position the rack in the center of the oven.
- Peel the sweet potatoes and cut them into 1-inch cubes for even cooking.
- Toss the sweet potato cubes with olive oil, garlic powder, black pepper, and salt in a large bowl until evenly coated.
- Arrange the sweet potatoes in a single layer around the edges of a large roasting pan, leaving space in the center for the ham.
- Place the spiral-cut ham in the center of the roasting pan, cut-side down.
- Whisk together the honey and Dijon mustard in a small bowl until smooth and well combined.
- Brush half of the honey mustard mixture evenly over the entire surface of the ham, getting between the slices for maximum flavor penetration.
- Cover the roasting pan tightly with aluminum foil and bake at 325°F for 1 hour and 30 minutes.
- Remove the pan from the oven and carefully remove the foil, watching for steam.
- Brush the remaining honey mustard glaze over the ham and stir the sweet potatoes to ensure even browning.
- Return the uncovered pan to the oven and bake for another 30 minutes at 325°F, or until the ham reaches an internal temperature of 140°F and the sweet potatoes are tender when pierced with a fork.
- Let the ham rest for 15 minutes before slicing to allow the juices to redistribute throughout the meat.
Finally, the ham emerges with a gorgeous caramelized crust that crackles slightly when sliced, while the sweet potatoes become meltingly tender with crispy edges. For a stunning presentation, I love arranging the sliced ham over a bed of those glazed sweet potatoes and drizzling everything with the pan juices—it makes the whole meal feel like a special occasion.
Vegetable-Stuffed Peppers with Quinoa and Black Beans

Unbelievably, these stuffed peppers have become my go-to weeknight dinner that even my picky eaters devour—I started making them during a busy soccer season when I needed something healthy that could prep ahead and bake while I handled carpool duty. The colorful bell peppers filled with quinoa and black beans create such a vibrant meal that feels both comforting and nourishing.
4
portions20
minutes52
minutesIngredients
– 4 large bell peppers
– 1 cup quinoa
– 2 cups vegetable broth
– 1 can (15 oz) black beans, rinsed and drained
– 1 cup corn kernels
– 1 small onion, diced
– 2 cloves garlic, minced
– 1 tbsp olive oil
– 1 tsp cumin
– 1/2 tsp chili powder
– 1/2 cup shredded Monterey Jack cheese
– 1/4 cup chopped fresh cilantro
– Salt to taste
Instructions
1. Preheat your oven to 375°F.
2. Cut the tops off the bell peppers and remove all seeds and membranes.
3. Rinse the quinoa thoroughly in a fine-mesh strainer until the water runs clear.
4. Heat olive oil in a medium saucepan over medium heat.
5. Sauté diced onion for 3-4 minutes until translucent.
6. Add minced garlic and cook for 1 minute until fragrant.
7. Stir in rinsed quinoa and toast for 2 minutes, stirring constantly.
8. Pour in vegetable broth and bring to a boil.
9. Reduce heat to low, cover, and simmer for 15 minutes until liquid is absorbed.
10. Remove quinoa from heat and let stand covered for 5 minutes.
11. Fluff quinoa with a fork, then mix in black beans, corn, cumin, chili powder, and salt.
12. Stir in chopped cilantro until evenly distributed.
13. Spoon the quinoa mixture evenly into the prepared bell peppers.
14. Place stuffed peppers upright in a baking dish.
15. Sprinkle shredded Monterey Jack cheese over the top of each pepper.
16. Pour 1/4 cup water into the bottom of the baking dish around the peppers.
17. Cover the dish tightly with aluminum foil.
18. Bake at 375°F for 25 minutes.
19. Remove foil and bake for another 10 minutes until peppers are tender and cheese is golden.
20. Let peppers rest for 5 minutes before serving.
Fresh from the oven, these peppers offer a wonderful contrast between the tender-crisp vegetable shell and the fluffy quinoa filling that’s studded with creamy black beans. The melted cheese forms a golden crust that gives way to the smoky-spiced interior, making each bite incredibly satisfying. For a fun twist, I sometimes serve them with a dollop of cool Greek yogurt and extra cilantro for a complete meal that looks as beautiful as it tastes.
Crispy Baked Chicken Thighs with Brussels Sprouts
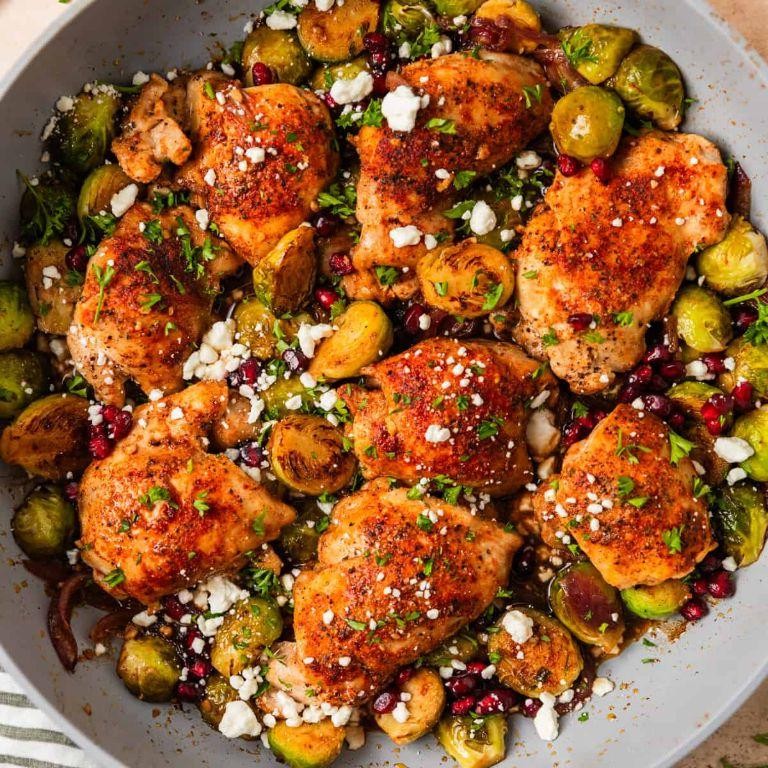
My family used to groan when I mentioned Brussels sprouts, but that all changed when I started roasting them alongside these incredibly crispy chicken thighs. There’s something magical about how the chicken fat renders and coats the sprouts as they bake together, transforming what was once a dreaded vegetable into the most requested side dish in our house.
8
portions15
minutes40
minutesIngredients
- 8 bone-in, skin-on chicken thighs
- 1 ½ lbs Brussels sprouts
- 3 tbsp olive oil
- 2 tsp garlic powder
- 1 tsp smoked paprika
- 1 tsp dried thyme
- ½ tsp black pepper
- 1 tsp salt
Instructions
- Preheat your oven to 425°F and line a large rimmed baking sheet with parchment paper.
- Pat the chicken thighs completely dry with paper towels—this is crucial for achieving crispy skin.
- Trim the Brussels sprouts and cut any large ones in half lengthwise.
- In a large bowl, toss the Brussels sprouts with 2 tablespoons of olive oil until evenly coated.
- Arrange the Brussels sprouts in a single layer on the prepared baking sheet.
- In a small bowl, mix together the garlic powder, smoked paprika, dried thyme, black pepper, and salt.
- Rub the remaining 1 tablespoon of olive oil over both sides of the chicken thighs.
- Sprinkle the spice mixture evenly over both sides of the chicken thighs, pressing gently to adhere.
- Place the seasoned chicken thighs skin-side up among the Brussels sprouts on the baking sheet.
- Bake for 35-40 minutes until the chicken skin is deep golden brown and crispy, and the internal temperature reaches 165°F when tested with an instant-read thermometer.
- Let the chicken rest for 5 minutes before serving to allow the juices to redistribute.
Look at that beautiful golden-brown crispiness on the chicken skin—it shatters when you bite into it, revealing incredibly juicy meat underneath. The Brussels sprouts become caramelized and tender while soaking up all those delicious chicken drippings, creating a perfect harmony of textures and flavors that makes this dish feel both comforting and elegant enough for company.
Savory Rosemary and Lemon Baked Tilapia
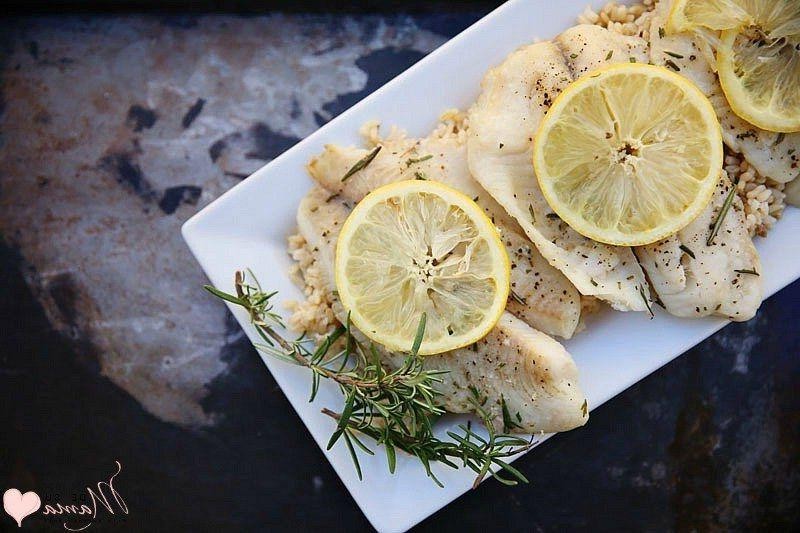
My family used to be strictly land-lovers when it came to dinner, until I discovered this baked tilapia recipe that even my picky eaters devour. There’s something magical about how rosemary and lemon transform simple fish into a fragrant, restaurant-quality meal that comes together in under 30 minutes.
4
servings10
minutes15
minutesIngredients
- 4 tilapia fillets (6 ounces each)
- 2 tablespoons olive oil
- 2 tablespoons fresh lemon juice
- 2 teaspoons fresh rosemary, minced
- 1 teaspoon garlic powder
- 1/2 teaspoon salt
- 1/4 teaspoon black pepper
- 1 lemon, thinly sliced
Instructions
- Preheat your oven to 400°F and line a baking sheet with parchment paper.
- Pat the tilapia fillets completely dry with paper towels—this helps them get beautifully golden rather than steaming.
- Place the dried fillets on the prepared baking sheet in a single layer.
- In a small bowl, whisk together olive oil, lemon juice, minced rosemary, garlic powder, salt, and black pepper.
- Brush the herb mixture evenly over both sides of each tilapia fillet.
- Arrange thin lemon slices over the top of each fillet, overlapping slightly.
- Bake at 400°F for 12-15 minutes until the fish flakes easily with a fork and reaches 145°F internally.
- Let the tilapia rest for 3 minutes before serving to allow the juices to redistribute.
Keep in mind that the rosemary becomes wonderfully fragrant as it bakes, infusing the tilapia with earthy notes that balance the bright lemon. The fish turns out moist and flaky with crispy edges, perfect alongside roasted potatoes or served over a bed of quinoa to soak up the delicious pan juices.
Oven-Baked Barbecue Ribs with Smoky Sauce
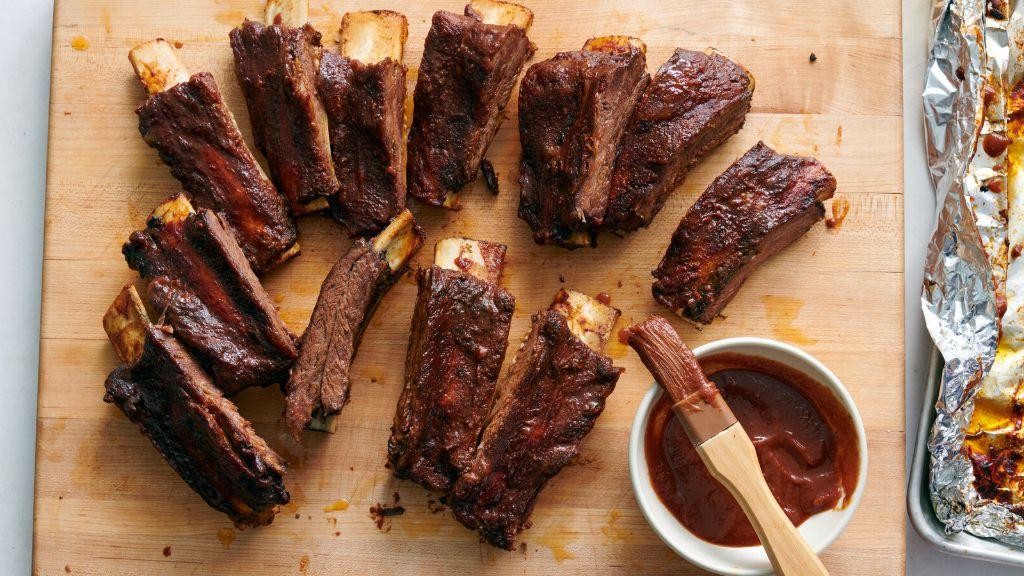
Perfectly tender, fall-off-the-bone ribs have been my go-to comfort food ever since I perfected this recipe during last summer’s backyard gatherings. There’s something magical about that slow-baked tenderness paired with smoky barbecue sauce that always brings everyone together around the table.
2
racks15
minutes175
minutesIngredients
– 2 racks pork ribs
– 2 tbsp olive oil
– 1 tbsp kosher salt
– 2 tsp black pepper
– 1 tsp garlic powder
– 1 tsp onion powder
– 1 cup barbecue sauce
– 1 tbsp Worcestershire sauce
– 1 tsp liquid smoke
– 1/4 cup brown sugar
– 2 tbsp apple cider vinegar
Instructions
1. Preheat your oven to 275°F and line a baking sheet with aluminum foil.
2. Pat the pork ribs completely dry with paper towels to ensure proper seasoning adhesion.
3. Rub olive oil evenly over both sides of the ribs using your hands.
4. Combine kosher salt, black pepper, garlic powder, and onion powder in a small bowl.
5. Sprinkle the seasoning mixture generously over both sides of the ribs, pressing gently to adhere.
6. Wrap each rack tightly in aluminum foil, creating a sealed packet to trap moisture.
7. Place the foil-wrapped ribs on the prepared baking sheet and bake at 275°F for 2.5 hours.
8. While ribs bake, whisk together barbecue sauce, Worcestershire sauce, liquid smoke, brown sugar, and apple cider vinegar in a medium bowl.
9. Carefully remove ribs from oven after 2.5 hours and unwrap the foil packets.
10. Brush a generous layer of the sauce mixture over both sides of the ribs using a pastry brush.
11. Return the uncovered ribs to the oven and increase temperature to 375°F.
12. Bake for an additional 20-25 minutes until the sauce is caramelized and slightly sticky.
13. Check for doneness by inserting a fork between the bones – the meat should pull away easily.
14. Let the ribs rest for 10 minutes before slicing between the bones to serve. What makes these ribs truly special is how the meat practically melts in your mouth while the smoky sauce forms a beautiful caramelized crust. I love serving them with extra sauce for dipping and plenty of napkins for the inevitable finger-licking that follows.
Butternut Squash and Spinach Baked Risotto

Craving something cozy that practically cooks itself? After a long day chasing my toddler around the house, I love recipes that deliver big flavor with minimal fuss, and this butternut squash risotto is my new favorite hands-off dinner. It’s the perfect autumnal comfort food that bakes away in the oven while I finally get to sit down.
2
servings15
minutes33
minutesIngredients
– 1 tbsp olive oil
– 1 small yellow onion, diced
– 2 cloves garlic, minced
– 1 ½ cups Arborio rice
– 4 cups vegetable broth
– 2 cups butternut squash, peeled and cubed into ½-inch pieces
– 1 tsp dried sage
– ½ tsp salt
– ¼ tsp black pepper
– 3 cups fresh spinach
– ½ cup grated Parmesan cheese
Instructions
1. Preheat your oven to 375°F.
2. Heat 1 tbsp olive oil in a large, oven-safe Dutch oven or pot over medium heat for 1 minute.
3. Add the diced onion and cook for 4-5 minutes, stirring occasionally, until the onion turns translucent.
4. Add the minced garlic and cook for 1 minute, stirring constantly, until fragrant.
5. Add 1 ½ cups Arborio rice and stir continuously for 2 minutes to lightly toast the grains—this helps the risotto become creamy later.
6. Pour in 4 cups vegetable broth and add 2 cups cubed butternut squash, 1 tsp dried sage, ½ tsp salt, and ¼ tsp black pepper.
7. Bring the mixture to a simmer over medium-high heat, stirring once.
8. Cover the pot with a tight-fitting lid and transfer it to the preheated oven.
9. Bake for 25 minutes—the rice should be tender and have absorbed most of the liquid.
10. Carefully remove the pot from the oven using oven mitts.
11. Stir in 3 cups fresh spinach and ½ cup grated Parmesan cheese until the spinach wilts and the cheese melts, about 2 minutes. Out of the oven, this risotto is wonderfully creamy with sweet, tender squash and earthy sage. I love topping it with extra Parmesan and serving it alongside a simple arugula salad for a complete meal that feels both rustic and elegant.
Tuscan Style Baked Cod with Tomatoes and Olives
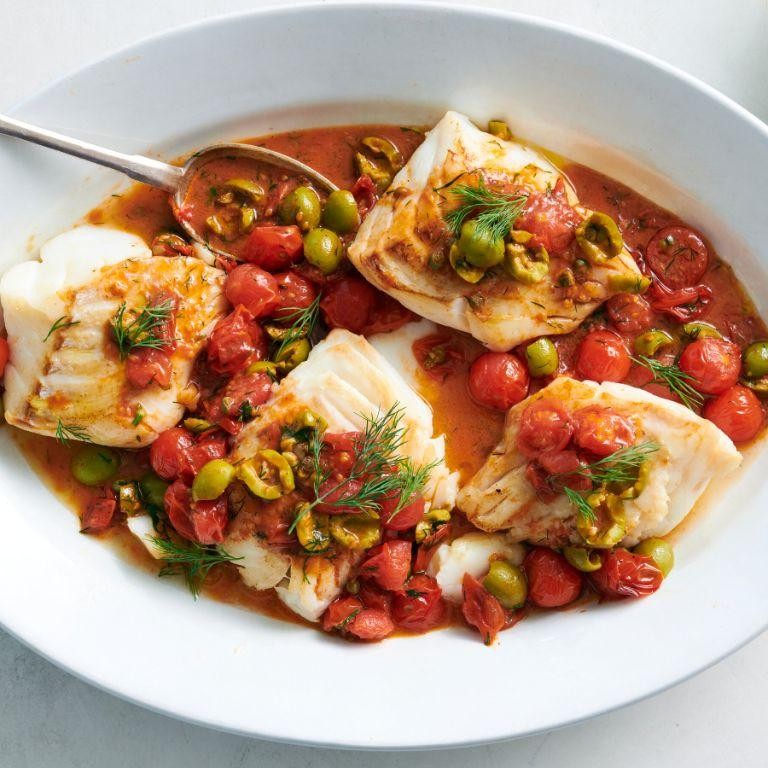
Tucked away in my recipe binder is this Tuscan-style baked cod that never fails to transport me straight to a sun-drenched Italian coastline. I first discovered this dish during a rainy Seattle autumn when I was craving Mediterranean flavors but wanted something comforting from my own oven. The combination of flaky white fish with briny olives and sweet tomatoes has become my go-to weeknight dinner that feels anything but ordinary.
4
servings15
minutes18
minutesIngredients
– 1.5 lbs cod fillets
– 2 cups cherry tomatoes
– 1/2 cup Kalamata olives
– 3 tbsp olive oil
– 4 garlic cloves
– 1 tsp dried oregano
– 1/2 tsp red pepper flakes
– 1/4 cup fresh basil
– 1 lemon
Instructions
1. Preheat your oven to 400°F and position the rack in the center.
2. Pat the cod fillets completely dry with paper towels to ensure proper browning.
3. Halve the cherry tomatoes and pit the Kalamata olives if they contain pits.
4. Mince the garlic cloves and chop the fresh basil leaves, keeping them separate.
5. Arrange the cod fillets in a single layer in a 9×13 inch baking dish.
6. Scatter the halved tomatoes and olives evenly around the fish.
7. Drizzle 2 tablespoons of olive oil over the fish and vegetables.
8. Sprinkle the minced garlic, dried oregano, and red pepper flakes over everything.
9. Season generously with salt and pepper, using about 1 teaspoon of salt total.
10. Bake for 15-18 minutes until the cod flakes easily with a fork and reaches 145°F internally.
11. Squeeze the juice from the lemon over the baked cod immediately after removing from oven.
12. Garnish with the chopped fresh basil and remaining tablespoon of olive oil.
My favorite thing about this dish is how the cod becomes incredibly tender while the tomatoes burst and create a light sauce. The briny olives provide the perfect counterpoint to the sweet tomatoes, making each bite complex yet balanced. I love serving this over creamy polenta or with crusty bread to soak up every last bit of the flavorful juices.
Conclusion
Here’s a collection of fuss-free oven dinners perfect for your busiest evenings. We hope these recipes bring delicious, stress-free meals to your table! Try them out and let us know which ones become your family favorites in the comments below. Don’t forget to share these time-saving recipes with your friends by pinning this article on Pinterest!