Every time I slide these beef ribs into the oven, the rich aroma that fills my kitchen takes me right back to my grandmother’s farmhouse kitchen, where she’d spend Sunday afternoons slow-roasting these beauties until the meat practically fell from the bone with just a gentle nudge. There’s something deeply comforting about this time-honored method that transforms simple ingredients into pure magic, creating memories as rich as the flavor itself.
Why This Recipe Works
- The low-and-slow baking method at 275°F for 4-5 hours gently breaks down the tough connective tissues in the beef ribs, transforming them into incredibly tender, fall-off-the-bone meat without drying out the precious juices that make each bite so memorable.
- Creating a simple dry rub with brown sugar, smoked paprika, garlic powder, and coarse black pepper forms a beautiful crust that caramelizes during the long bake, locking in moisture while developing complex layers of sweet, smoky, and savory flavors that penetrate deep into the meat.
- Wrapping the ribs tightly in aluminum foil after the initial baking creates a steamy environment that continues to tenderize the meat while preventing any moisture loss, ensuring every single rib emerges perfectly juicy and packed with the kind of flavor that makes you close your eyes and savor the moment.
- Finishing with a quick broil after brushing on your favorite barbecue sauce gives you that gorgeous, sticky glaze with just the right amount of char around the edges, creating the perfect textural contrast between the tender interior and slightly crispy exterior that makes these ribs truly unforgettable.
Ingredients
- 4 pounds beef back ribs, cut into individual ribs
- 1/4 cup packed dark brown sugar
- 2 tablespoons smoked paprika
- 1 tablespoon garlic powder
- 2 teaspoons onion powder
- 1 tablespoon coarse black pepper
- 2 teaspoons kosher salt
- 1 teaspoon dry mustard powder
- 1/2 teaspoon cayenne pepper (optional)
- 1 cup beef broth
- 1 cup your favorite barbecue sauce
- 2 tablespoons apple cider vinegar
Equipment Needed
- Large rimmed baking sheet
- Heavy-duty aluminum foil
- Mixing bowls
- Whisk
- Pastry brush
- Sharp knife
- Measuring cups and spoons
- Tongs
- Instant-read thermometer
Instructions

Preparing the Ribs and Dry Rub
Begin by patting your 4 pounds of beef back ribs completely dry with paper towels – this crucial step ensures your dry rub will adhere properly and create that beautiful crust we’re after. In a medium mixing bowl, combine 1/4 cup packed dark brown sugar, 2 tablespoons smoked paprika, 1 tablespoon garlic powder, 2 teaspoons onion powder, 1 tablespoon coarse black pepper, 2 teaspoons kosher salt, 1 teaspoon dry mustard powder, and 1/2 teaspoon cayenne pepper if you’re feeling adventurous. Use your fingers to work this magical mixture into every nook and cranny of those ribs, massaging it gently but thoroughly until each rib is evenly coated and looking like it’s been dusted with autumn spices. Let them rest at room temperature for about 30 minutes while your oven preheats to 275°F – this brief resting period allows the salt to begin drawing out the meat’s natural juices, which will then mingle with your spice blend to create an incredible flavor foundation.
Initial Slow Baking Phase
Arrange your beautifully seasoned ribs in a single layer on a large rimmed baking sheet lined with heavy-duty aluminum foil, making sure they aren’t crowded so the heat can circulate evenly around each piece. Pour 1 cup of beef broth around the ribs – not directly over them – to create steam during baking that will keep the meat incredibly moist while infusing it with rich, savory notes. Tightly cover the entire baking sheet with another layer of foil, crimping the edges securely to create a sealed environment that will work its magic over the next several hours. Slide them into your preheated 275°F oven and let them bake undisturbed for 3 hours – this extended gentle heat works wonders on breaking down tough collagen into silky gelatin, transforming what could be chewy into something spectacularly tender.
Checking Doneness and Unwrapping
After 3 hours, carefully remove the baking sheet from the oven – be mindful of the hot steam that will escape when you peel back that foil! Use tongs to gently lift one rib; the meat should already be pulling back from the bones by about 1/4 to 1/2 inch, and when you insert a fork and twist slightly, it should meet very little resistance. If using an instant-read thermometer, you’re looking for an internal temperature of around 190-195°F at this stage – remember, we’re going for fall-off-the-bone tenderness, which requires going beyond typical beef doneness temperatures. Carefully pour off and reserve about 1/2 cup of the accumulated juices from the baking sheet – this liquid gold is packed with flavor and can be used to thin your barbecue sauce or add to soups later.
Applying the Glaze and Final Bake
In a small bowl, whisk together 1 cup of your favorite barbecue sauce with 2 tablespoons of apple cider vinegar – the vinegar adds a bright counterpoint to the rich meat and helps thin the sauce for easier brushing. Using a pastry brush, generously coat each rib with this tangy-sweet mixture, making sure to get both sides and all those beautiful edges where the caramelization will be most dramatic. Return the ribs to the oven, uncovered this time, and bake for another 45-60 minutes at 275°F – during this phase, the sauce will thicken and caramelize, forming that sticky, finger-licking glaze that makes these ribs so irresistible.
Finishing with a Quick Broil
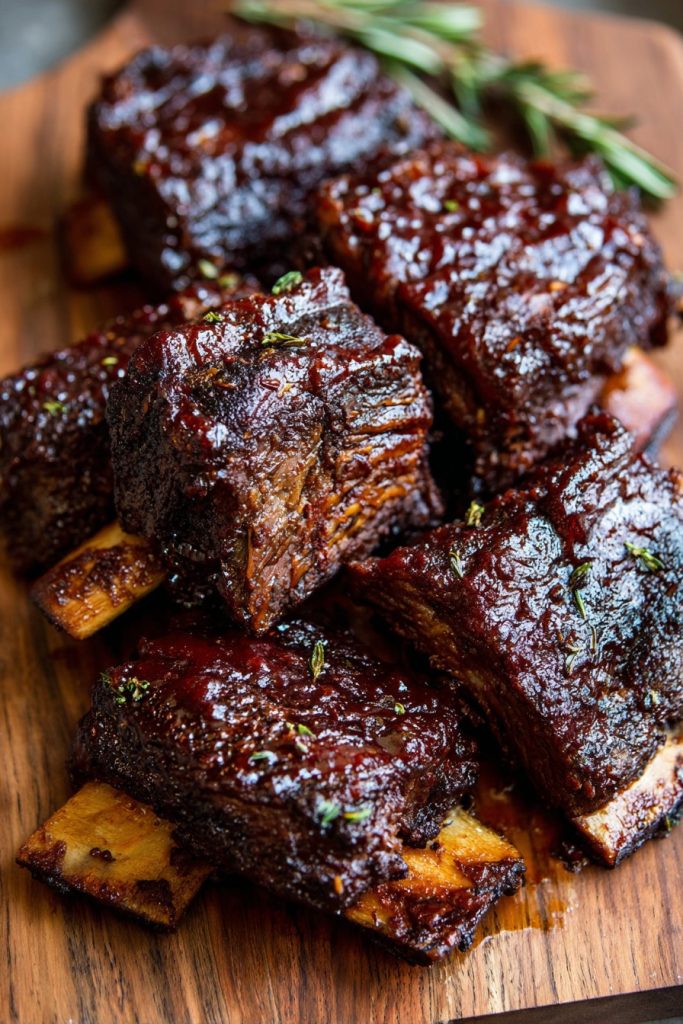
Now for the grand finale! Switch your oven to broil and position a rack about 6 inches from the heat source. Watch those ribs carefully as they broil for 2-4 minutes – you’re looking for the sauce to bubble vigorously and develop some beautiful charred spots around the edges, but not so long that it burns. The sugars in both your dry rub and barbecue sauce will caramelize quickly under the intense heat, creating that perfect combination of sweet, smoky, and slightly charred flavors that will have your family gathering around the kitchen in anticipation. Remove from the oven when the ribs have reached your desired level of caramelization and let them rest for 10 minutes before serving – this brief resting period allows the juices to redistribute throughout the meat.
Tips and Tricks
When selecting your beef ribs, look for racks with good marbling throughout the meat – those little white flecks of fat will render down during the long cooking process, basting the meat from within and creating unparalleled richness and flavor. If you have the time, consider applying the dry rub the night before and letting the ribs rest uncovered in the refrigerator overnight – this extended marinating time allows the salt to penetrate deeper into the meat while also helping to dry the surface slightly, which promotes better browning and crust formation. For the most tender results, never rush the cooking process – maintaining that steady 275°F temperature is crucial for properly breaking down collagen without causing the meat to seize up and become tough. If you find your ribs are cooking faster than expected, don’t hesitate to reduce the temperature to 250°F; better to extend the cooking time slightly than risk dried-out meat. When testing for doneness, look beyond just temperature – the meat should feel incredibly tender when pressed with tongs and should have pulled back significantly from the bones, revealing those classic clean bone ends that signal perfect preparation. For extra flavor dimension, consider adding a few sprigs of fresh thyme or rosemary to the beef broth before covering with foil – the gentle steam will carry those herbal notes right into the meat. If you prefer a thicker glaze, you can brush on additional barbecue sauce during the last 15 minutes of baking, then proceed with the broiling step as directed. Leftover ribs reheat beautifully – wrap them in foil and warm in a 300°F oven for about 20 minutes, or until heated through, which helps maintain their wonderful texture far better than microwave reheating. Don’t discard those precious pan juices – strain them and use as a base for incredible gravy, add to baked beans, or even use to cook down with onions for a spectacular sandwich topping.
Recipe Variations
- For a spicy kick that will warm you from the inside out, add 2 tablespoons of chili powder and 1 teaspoon of chipotle powder to your dry rub mixture, creating layers of smoke and heat that complement the rich beef beautifully. Serve these with cooling sides like creamy coleslaw or cornbread to balance the spice level, creating a meal that dances between comfort and excitement with every bite.
- Transform these into Asian-inspired ribs by replacing the dry rub with a mixture of 1/4 cup brown sugar, 2 tablespoons five-spice powder, and 1 tablespoon grated fresh ginger, then using a glaze made from hoisin sauce, soy sauce, and rice vinegar instead of traditional barbecue sauce. The result is sticky, sweet, and savory ribs with complex aromatic notes that will transport your taste buds straight to your favorite Asian restaurant.
- Create coffee-rubbed ribs by adding 2 tablespoons of finely ground dark roast coffee to your dry rub along with an extra tablespoon of brown sugar – the coffee adds incredible depth and a subtle bitterness that cuts through the richness of the beef. Use a coffee-infused barbecue sauce for the glaze to carry the theme through, creating a sophisticated flavor profile that’s perfect for entertaining or special occasions.
- For a sweet and tangy twist, replace half the barbecue sauce with peach or apricot preserves mixed with a tablespoon of Dijon mustard and a splash of apple cider vinegar. The fruit notes provide a lovely brightness against the rich beef, creating ribs that feel both comforting and slightly elegant – perfect for summer gatherings when stone fruits are at their peak.
- Go completely dry-rub style by skipping the barbecue sauce glaze altogether and instead creating a more complex rub with additional spices like cumin, coriander, and a touch of cinnamon. After the initial bake, simply remove the foil and continue cooking until the rub forms a dark, crispy bark that crackles when you bite into it, then serve with sauce on the side for dipping.
Frequently Asked Questions
Can I use baby back ribs instead of beef back ribs?
While you certainly can use baby back ribs, they require significant adjustments to both timing and technique since they’re much smaller and leaner than beef ribs. Pork ribs typically need only 2-3 hours at 275°F and benefit from a slightly different spice profile – I’d recommend reducing the smoked paprika to 1 tablespoon and adding 1 tablespoon of chili powder instead. The internal temperature you’re aiming for with pork is around 190°F as well, but the visual cues will be different since pork ribs have less fat marbling. The cooking method remains largely the same, but keep a closer eye during the final hour as pork can go from perfectly tender to dry more quickly than beef.
What’s the purpose of the brown sugar in the dry rub?
Can I prepare these ribs ahead of time for a party?
These ribs are actually fantastic for make-ahead preparation, which makes them perfect for stress-free entertaining. You can complete the recipe through the initial 3-hour bake, then let them cool completely before refrigerating for up to 2 days. When ready to serve, bring them to room temperature for about 30 minutes, then proceed with the saucing and final baking steps – you may need to add 10-15 minutes to the final bake time since you’re starting with cold ribs. Alternatively, you can fully prepare them and gently reheat wrapped in foil in a 300°F oven for 20-25 minutes, though the glaze won’t be quite as fresh-looking as when made the same day.
Why do I need to go to 190°F when beef is typically done at lower temperatures?
This is such an important question because it gets to the heart of what makes these ribs so incredibly tender. While beef steaks and roasts are indeed perfect at lower temperatures like 130-145°F for medium-rare to medium, ribs contain much more connective tissue and collagen that need higher temperatures and longer cooking times to properly break down. That magical transformation happens between 160-205°F as the collagen melts into rich, silky gelatin that bastes the meat from within. Stopping at 190-195°F gives you that fall-off-the-bone texture without risking the meat becoming dry or stringy, which can happen if you push much beyond 200°F.
My ribs seem tough after 3 hours – what should I do?
If your ribs are still tough after the initial bake, don’t worry – this usually means they needed more time rather than indicating anything wrong with your technique. Simply recover them with foil and continue baking, checking every 30 minutes until they reach the desired tenderness. The cooking time can vary based on the specific cut, the thickness of the ribs, and even slight variations in oven temperature. Another trick is to add another 1/2 cup of beef broth to the pan to ensure plenty of steam continues to work its magic. Remember, patience is key with tough cuts like beef ribs – they’ll reward you handsomely for that extra time investment.
Summary
These oven-baked beef ribs transform simple ingredients through patient, low-temperature cooking into fall-off-the-bone perfection. The combination of a flavorful dry rub, gentle steaming, and sticky glaze creates layers of texture and taste that will have your family requesting this comforting classic again and again.
Oven Baked Beef Ribs
6
servings45
minutes4
minutesIngredients
Instructions
- 1 Preheat oven to 275°F. Pat ribs dry and combine dry rub ingredients. Massage rub onto ribs and let rest 30 minutes.
- 2 Arrange ribs on foil-lined baking sheet. Pour broth around ribs, cover tightly with foil, and bake for 3 hours.
- 3 Remove from oven, check for tenderness (meat should pull back from bones), and reserve pan juices. Ribs should reach 190-195°F internally.
- 4 Mix barbecue sauce with vinegar, brush onto ribs, and return to oven uncovered for 45-60 minutes until glaze sets.
- 5 Broil 6 inches from heat for 2-4 minutes until nicely caramelized. Rest 10 minutes before serving.