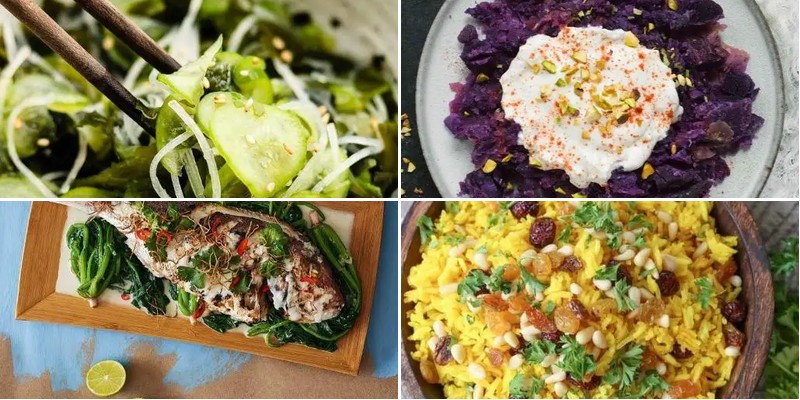
Nourishing your body with the wisdom of Okinawa—one of the world’s Blue Zones—is easier than you think! These vibrant, plant-forward recipes bring the secrets of longevity right to your kitchen, with simple ingredients and big flavor. Ready to eat well and feel amazing? Dive into these 31 delicious dishes that celebrate health, happiness, and everyday nourishment.
Okinawan Sweet Potato Stir Fry
Unexpectedly versatile and packed with natural sweetness, Okinawan sweet potatoes transform into a vibrant stir-fry that comes together in minutes. Their brilliant purple flesh holds its shape beautifully while absorbing savory flavors from the wok. This dish delivers both visual appeal and satisfying texture in every bite.
Ingredients
– 2 large Okinawan sweet potatoes, peeled and cut into matchsticks
– 3 tablespoons toasted sesame oil
– 1 medium yellow onion, thinly sliced
– 3 cloves garlic, minced
– 1 tablespoon freshly grated ginger
– ¼ cup low-sodium soy sauce
– 2 tablespoons rice vinegar
– 1 tablespoon honey
– 2 scallions, thinly sliced
– 1 tablespoon toasted sesame seeds
Instructions
1. Heat a large wok or skillet over medium-high heat for 2 minutes until properly preheated.
2. Add 3 tablespoons toasted sesame oil and swirl to coat the cooking surface evenly.
3. Add 2 large Okinawan sweet potatoes cut into matchsticks and stir-fry for 6-8 minutes until edges begin to crisp.
4. Incorporate 1 medium thinly sliced yellow onion and continue stir-frying for 3-4 minutes until translucent.
5. Add 3 cloves minced garlic and 1 tablespoon freshly grated ginger, cooking for 1 minute until fragrant but not browned.
6. Pour in ¼ cup low-sodium soy sauce, 2 tablespoons rice vinegar, and 1 tablespoon honey, stirring to coat all ingredients.
7. Reduce heat to medium and cook for 4-5 minutes until sauce thickens and clings to the vegetables.
8. Remove from heat and stir in 2 thinly sliced scallions and 1 tablespoon toasted sesame seeds.
9. Transfer immediately to serving plates while hot. Done right, this stir-fry showcases the sweet potato’s natural creaminess against crisp-tender vegetables. The purple hue makes a stunning presentation alongside grilled chicken or tofu. Leftovers maintain their texture surprisingly well when reheated gently.
Miso Soup with Kombu and Tofu
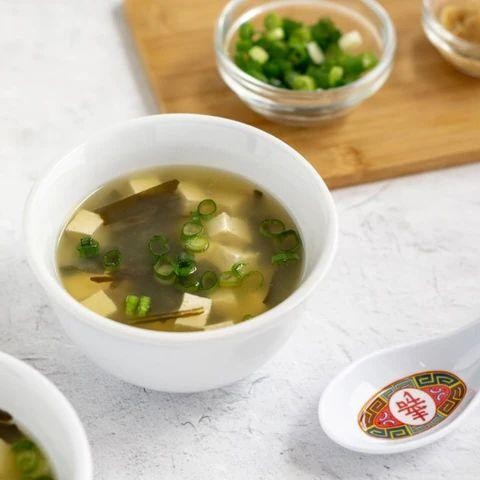
Brimming with umami depth, this miso soup comes together in minutes yet delivers restaurant-quality flavor. Simple ingredients create a complex broth that’s both comforting and nourishing. Perfect for chilly evenings or when you need a quick, satisfying meal.
Ingredients
– 4 cups cold filtered water
– 1 piece dried kombu seaweed (about 4×6 inches)
– 1/4 cup dried bonito flakes
– 1/2 cup firm organic tofu, cut into 1/2-inch cubes
– 2 tablespoons white miso paste
– 2 tablespoons finely chopped fresh scallions
Instructions
1. Place 4 cups cold filtered water and 1 piece dried kombu seaweed in a medium saucepan.
2. Let the kombu soak in cold water for 15 minutes to rehydrate and release its natural glutamates.
3. Heat the saucepan over medium heat until small bubbles form around the edges, about 160°F.
4. Remove the kombu immediately with tongs just before the water reaches a full boil to prevent bitterness.
5. Add 1/4 cup dried bonito flakes to the hot broth and simmer for exactly 2 minutes.
6. Strain the broth through a fine-mesh sieve into a clean bowl, pressing gently on the bonito flakes to extract maximum flavor.
7. Return the clear dashi broth to the saucepan over medium-low heat.
8. Add 1/2 cup firm organic tofu cubes and heat for 3 minutes until warmed through.
9. Ladle 1/2 cup of hot broth into a small bowl and whisk in 2 tablespoons white miso paste until completely smooth.
10. Turn off the heat and stir the dissolved miso mixture back into the main pot to preserve its probiotic benefits.
11. Divide the soup between two bowls and top with 2 tablespoons finely chopped fresh scallions.
Creamy miso melds with the ocean-kissed kombu and smoky bonito in this deeply satisfying broth. The silken tofu adds delicate texture against the crisp scallion finish. For a heartier version, stir in cooked soba noodles or add a soft-boiled egg with a runny yolk.
Bitter Melon and Tofu Salad
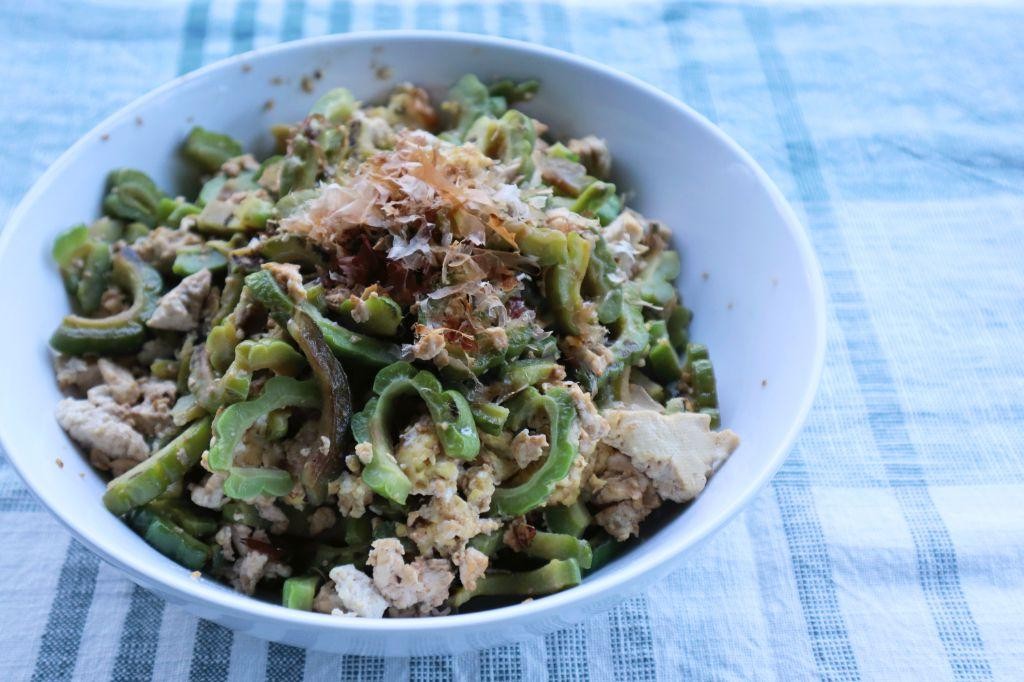
Daring cooks seeking bold flavors will appreciate this bitter melon and tofu salad. Its contrasting textures and vibrant ingredients create a memorable dish. Prepare for a unique culinary experience that balances bitterness with freshness.
Ingredients
- 1 large bitter melon, sliced thin
- 14 oz firm tofu, pressed and cubed
- 2 tbsp toasted sesame oil
- 3 tbsp fresh lime juice
- 1 tbsp soy sauce
- 1 tsp honey
- 1/4 cup fresh cilantro leaves
- 2 tbsp roasted peanuts, crushed
- 1/4 tsp red pepper flakes
Instructions
- Slice the bitter melon in half lengthwise and scoop out the seeds with a spoon.
- Cut the bitter melon into thin half-moons, about 1/8-inch thick.
- Sprinkle the bitter melon slices with salt and let sit for 10 minutes to reduce bitterness.
- Rinse the salted bitter melon thoroughly under cold water and pat dry with paper towels.
- Press the firm tofu between paper towels with a heavy pan for 15 minutes to remove excess moisture.
- Cut the pressed tofu into 1/2-inch cubes.
- Heat 1 tablespoon of toasted sesame oil in a non-stick skillet over medium-high heat.
- Pan-fry the tofu cubes for 3-4 minutes per side until golden brown and crisp.
- Transfer the fried tofu to a paper towel-lined plate to drain excess oil.
- Whisk together the remaining 1 tablespoon of toasted sesame oil, fresh lime juice, soy sauce, and honey in a small bowl.
- Combine the prepared bitter melon, fried tofu, and fresh cilantro leaves in a large mixing bowl.
- Pour the dressing over the salad mixture and toss gently to coat all ingredients evenly.
- Sprinkle the crushed roasted peanuts and red pepper flakes over the top as garnish.
Just toss everything together right before serving to maintain the tofu’s crisp texture. Juicy lime cuts through the bitter melon’s intensity while roasted peanuts add satisfying crunch. Serve chilled alongside grilled meats or as a standalone light lunch for maximum flavor contrast.
Turmeric and Ginger Brown Rice

Just when you thought brown rice couldn’t get more comforting, turmeric and ginger transform this humble grain into something extraordinary. These earthy flavors create a vibrant side dish that pairs beautifully with everything from roasted chicken to grilled vegetables. The golden hue makes it as visually appealing as it is delicious.
Ingredients
– 1 cup long-grain brown rice
– 2 cups filtered water
– 1 tablespoon golden turmeric powder
– 2 teaspoons freshly grated ginger root
– 1 tablespoon rich extra virgin olive oil
– ½ teaspoon fine sea salt
– 2 tablespoons freshly squeezed lemon juice
– ¼ cup finely chopped fresh parsley
Instructions
1. Rinse 1 cup long-grain brown rice under cold running water until the water runs clear, about 1 minute.
2. Heat 1 tablespoon rich extra virgin olive oil in a medium saucepan over medium heat for 30 seconds.
3. Add 2 teaspoons freshly grated ginger root and sauté until fragrant, about 1 minute.
4. Stir in 1 tablespoon golden turmeric powder and cook for 30 seconds to release its essential oils.
5. Add the rinsed brown rice and toast for 2 minutes, stirring constantly to coat each grain.
6. Pour in 2 cups filtered water and add ½ teaspoon fine sea salt, then bring to a rolling boil.
7. Reduce heat to low, cover tightly with a lid, and simmer for 45 minutes without peeking. Tip: Resist lifting the lid to maintain consistent steam and prevent uneven cooking.
8. Remove from heat and let stand covered for 10 minutes to allow grains to fully absorb remaining moisture.
9. Fluff the rice with a fork to separate the grains and release excess steam.
10. Drizzle 2 tablespoons freshly squeezed lemon juice over the rice and gently fold in ¼ cup finely chopped fresh parsley. Tip: Fluffing with a fork instead of stirring prevents the rice from becoming gummy.
11. Taste and adjust seasoning if needed, then serve immediately. Tip: For maximum flavor development, let the rice rest for 5 minutes after adding the final ingredients.
Delightfully fluffy with distinct grains that hold their shape perfectly, this turmeric rice offers earthy warmth from the ginger and vibrant color from the turmeric. The bright acidity of lemon juice cuts through the richness, while fresh parsley adds a clean, herbal finish. Serve it alongside grilled salmon for a complete meal, or use it as a base for grain bowls topped with roasted vegetables and a drizzle of tahini sauce.
Grilled Mackerel with Daikon Radish
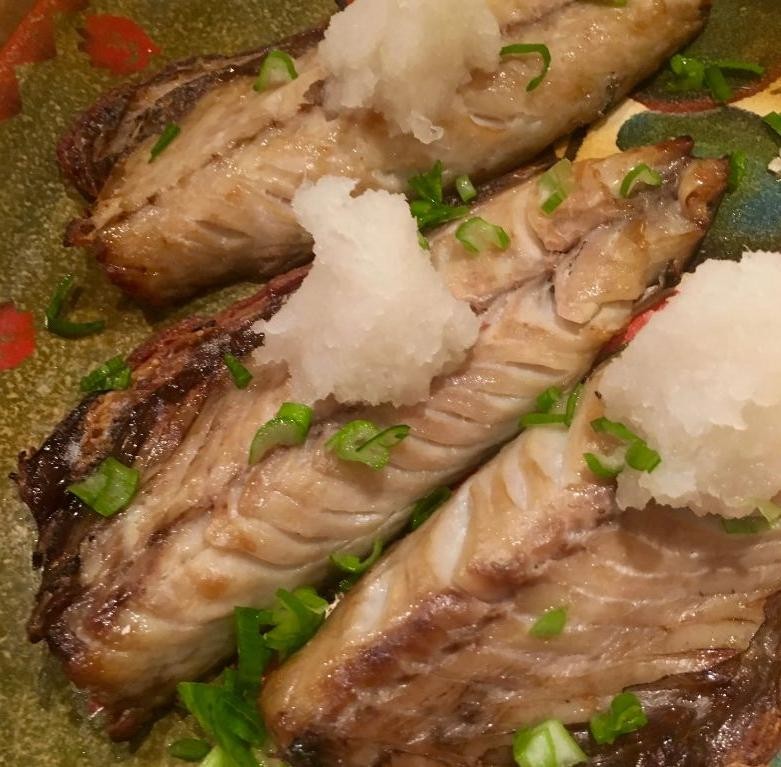
A perfectly grilled mackerel with crisp daikon makes for a stunning weeknight dinner. This Japanese-inspired dish balances rich, oily fish with bright, refreshing radish. You’ll love how quickly it comes together with minimal ingredients.
Ingredients
– 4 fresh mackerel fillets with silver skin
– 1 large daikon radish, peeled and firm
– 2 tablespoons rich toasted sesame oil
– 1 tablespoon vibrant rice vinegar
– 1 teaspoon finely grated fresh ginger
– 2 thinly sliced scallions with green tops
– ½ teaspoon coarse sea salt
– ¼ teaspoon freshly cracked black pepper
Instructions
1. Pat 4 fresh mackerel fillets completely dry with paper towels.
2. Score the mackerel skin in a crosshatch pattern with a sharp knife.
3. Rub both sides of fillets with 2 tablespoons rich toasted sesame oil.
4. Season fillets evenly with ½ teaspoon coarse sea salt and ¼ teaspoon freshly cracked black pepper.
5. Preheat your grill to medium-high heat, approximately 400°F.
6. Grill mackerel skin-side down for 4 minutes without moving.
7. Flip fillets carefully using a thin spatula and grill for 2 more minutes.
8. Grate 1 large daikon radish using the large holes of a box grater.
9. Squeeze excess liquid from grated daikon using your hands.
10. Toss daikon with 1 tablespoon vibrant rice vinegar and 1 teaspoon finely grated fresh ginger.
11. Arrange grilled mackerel on plates and top with daikon mixture.
12. Garnish with 2 thinly sliced scallions. Over the flaky mackerel, the sharp daikon cuts through the richness beautifully. Serve immediately with steamed rice for a complete meal, or chill the leftovers for a refreshing lunch salad tomorrow.
Green Papaya and Seaweed Salad
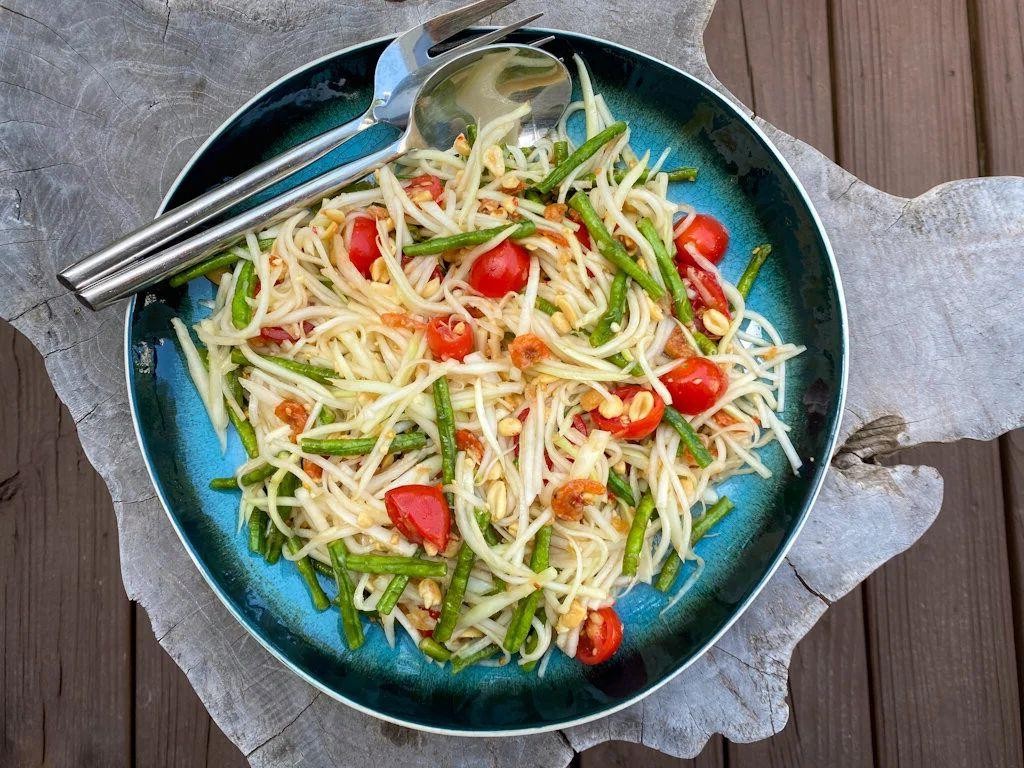
Looking for a crisp, refreshing salad that breaks from the ordinary? This vibrant green papaya and seaweed combo delivers satisfying crunch with every bite, perfect for warm weather meals or as a light starter. Let’s get straight to making it.
Ingredients
– 1 large green papaya, firm and unripe
– 1 ounce dried wakame seaweed
– 2 tablespoons toasted sesame oil
– 3 tablespoons fresh lime juice, freshly squeezed
– 1 tablespoon fish sauce
– 1 teaspoon granulated sugar
– 1 small red chili, thinly sliced
– ¼ cup roasted peanuts, roughly chopped
– 2 tablespoons fresh cilantro leaves, roughly chopped
Instructions
1. Place dried wakame seaweed in a medium bowl and cover with cold water, soaking for 10 minutes until fully rehydrated and tender.
2. While seaweed soaks, peel the firm green papaya using a vegetable peeler, removing all green skin.
3. Cut papaya in half lengthwise and scoop out seeds with a spoon, discarding them completely.
4. Using a box grater or mandoline, shred papaya into thin, uniform strips about 2 inches long.
5. Drain rehydrated seaweed thoroughly, squeezing out excess water with your hands.
6. In a small bowl, whisk together toasted sesame oil, freshly squeezed lime juice, fish sauce, and granulated sugar until sugar fully dissolves.
7. Combine shredded papaya and drained seaweed in a large mixing bowl.
8. Pour dressing over papaya and seaweed mixture, tossing thoroughly to coat every strand.
9. Add thinly sliced red chili and roughly chopped roasted peanuts, gently folding to distribute evenly.
10. Let salad rest for 5 minutes to allow flavors to meld and papaya to slightly soften.
11. Just before serving, sprinkle with roughly chopped fresh cilantro leaves.
Vibrant with contrasting textures, this salad offers the crispness of green papaya against the slippery chew of seaweed. The tangy lime dressing cuts through the richness of sesame oil, while chili provides subtle heat. Serve alongside grilled fish or stuff into lettuce cups for a handheld meal.
Okinawan Tofu Champuru

Unexpectedly satisfying, this Okinawan stir-fry combines soft tofu with crisp vegetables in a savory sauce. Using firm tofu prevents mushiness while maintaining protein richness. Ready in under 20 minutes, it’s perfect for busy weeknights.
Ingredients
– 1 package (14 oz) firm tofu, pressed and cubed
– 2 tablespoons toasted sesame oil
– 1 medium yellow onion, thinly sliced
– 2 cloves garlic, minced
– 1 large carrot, julienned
– 4 cups fresh spinach leaves
– 3 large eggs, beaten
– 2 tablespoons soy sauce
– 1 teaspoon granulated sugar
– ¼ teaspoon freshly ground black pepper
Instructions
1. Press tofu between paper towels for 10 minutes to remove excess moisture, then cut into 1-inch cubes.
2. Heat 1 tablespoon toasted sesame oil in a large skillet over medium-high heat until shimmering.
3. Add tofu cubes in a single layer and cook for 3-4 minutes per side until golden brown.
4. Transfer browned tofu to a plate, keeping the skillet on heat.
5. Add remaining 1 tablespoon sesame oil to the hot skillet.
6. Cook thinly sliced yellow onion for 2 minutes until slightly softened.
7. Add minced garlic and cook for 30 seconds until fragrant.
8. Stir in julienned carrot and cook for 2 minutes until bright orange.
9. Push vegetables to one side of the skillet.
10. Pour beaten eggs into the empty space and scramble for 1 minute until softly set.
11. Return tofu to the skillet and add fresh spinach leaves.
12. Cook for 1 minute while gently tossing until spinach wilts.
13. Drizzle soy sauce evenly over the mixture.
14. Sprinkle granulated sugar and freshly ground black pepper throughout.
15. Toss everything together for 1 minute until well combined and heated through.
16. Remove from heat and serve immediately. Keep the skillet hot throughout cooking to prevent sogginess. Brown tofu in a single layer without overcrowding for maximum crispness. Add spinach last to maintain its vibrant green color and delicate texture. Known for its contrasting textures, this champuru delivers crisp vegetables against soft tofu with savory egg richness. Serve over steamed rice or stuff into warm tortillas for a fusion twist.
Steamed Cabbage with Shiitake Mushrooms
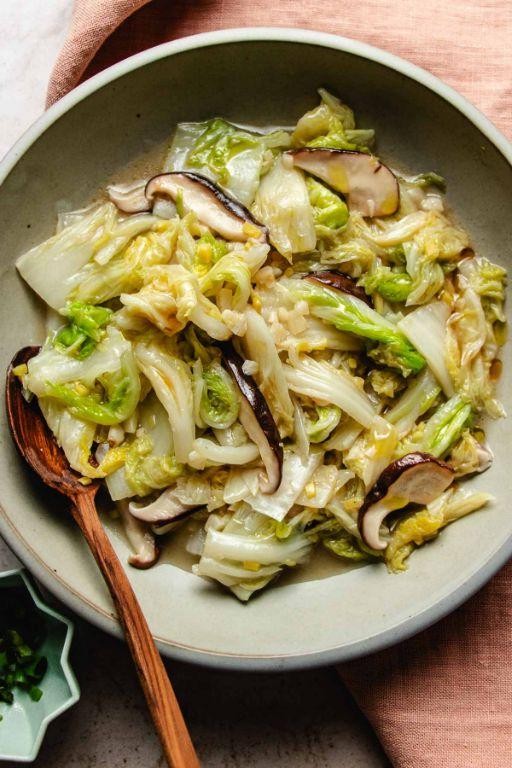
Don’t overlook humble cabbage when you need a quick, healthy side. This steamed version with earthy shiitakes comes together in under 20 minutes. Drizzle with toasted sesame oil at the end for maximum flavor impact.
Ingredients
- 1 medium green cabbage, cored and thinly sliced
- 8 ounces fresh shiitake mushrooms, stems removed and caps sliced
- 3 tablespoons rich toasted sesame oil
- 2 tablespoons premium soy sauce
- 1 tablespoon fresh ginger, finely grated
- 2 garlic cloves, minced
- 2 tablespoons rice vinegar
- 1 teaspoon coarse sea salt
- 2 tablespoons fresh scallions, thinly sliced
Instructions
- Bring 1 inch of water to a rolling boil in a large pot fitted with a steamer basket.
- Layer the thinly sliced green cabbage in the steamer basket, creating an even bed.
- Arrange the sliced shiitake mushroom caps over the cabbage in a single layer.
- Cover the pot tightly and steam over high heat for exactly 8 minutes until cabbage is tender-crisp.
- While vegetables steam, whisk together toasted sesame oil, soy sauce, grated ginger, minced garlic, and rice vinegar in a small bowl.
- Tip: Grate ginger directly over the bowl to capture all the flavorful juices.
- Transfer the steamed cabbage and mushrooms to a large serving bowl using tongs.
- Immediately pour the dressing over the hot vegetables and toss gently to coat.
- Sprinkle with coarse sea salt and toss again to distribute evenly.
- Let the dish rest for 2 minutes to allow flavors to meld.
- Tip: The residual heat will mellow the raw garlic flavor while keeping its aroma intact.
- Garnish with thinly sliced fresh scallions just before serving.
- Tip: For extra texture, reserve some scallions to sprinkle on individual portions.
Soft cabbage leaves absorb the savory dressing while maintaining slight crunch. Shiitakes add meaty texture against the delicate greens. Serve this warm as a side to grilled chicken or chill it for a refreshing next-day lunch salad.
Sesame Soba Noodles with Vegetables
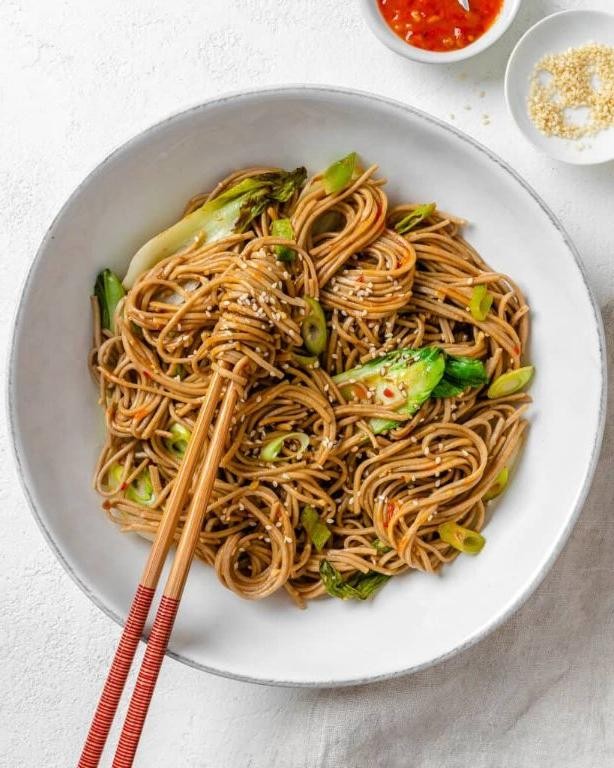
Sesame soba noodles offer a quick, satisfying meal that comes together in minutes. Simply toss nutty buckwheat noodles with crisp vegetables and a savory sesame dressing for a complete dish that works warm or cold. This versatile recipe adapts easily to whatever fresh produce you have on hand.
Ingredients
– 8 ounces dried soba noodles
– 2 tablespoons toasted sesame oil
– 3 tablespoons creamy tahini paste
– 2 tablespoons low-sodium soy sauce
– 1 tablespoon rice vinegar
– 1 teaspoon freshly grated ginger
– 1 large garlic clove, minced
– 2 cups thinly sliced crunchy carrots
– 1 cup thinly sliced crisp red bell pepper
– 4 thinly sliced fresh scallions
– 2 tablespoons toasted sesame seeds
Instructions
1. Bring a large pot of salted water to a rolling boil over high heat.
2. Add 8 ounces dried soba noodles and cook for exactly 5 minutes, stirring occasionally to prevent sticking.
3. Drain noodles immediately and rinse under cold running water until completely cool to stop the cooking process.
4. Whisk together 2 tablespoons toasted sesame oil, 3 tablespoons creamy tahini paste, 2 tablespoons low-sodium soy sauce, and 1 tablespoon rice vinegar in a large mixing bowl until smooth.
5. Stir in 1 teaspoon freshly grated ginger and 1 minced garlic clove until fully incorporated.
6. Add the cooled soba noodles to the dressing and toss thoroughly to coat every strand.
7. Fold in 2 cups thinly sliced crunchy carrots and 1 cup thinly sliced crisp red bell pepper.
8. Sprinkle with 4 thinly sliced fresh scallions and 2 tablespoons toasted sesame seeds.
9. Toss everything together until vegetables are evenly distributed throughout the noodles.
Ready to serve immediately or chill for up to 2 hours for colder noodles. The chewy soba noodles provide satisfying texture against the crisp vegetables, while the nutty sesame dressing coats everything in savory richness. For a protein boost, top with shredded rotisserie chicken or crispy baked tofu.
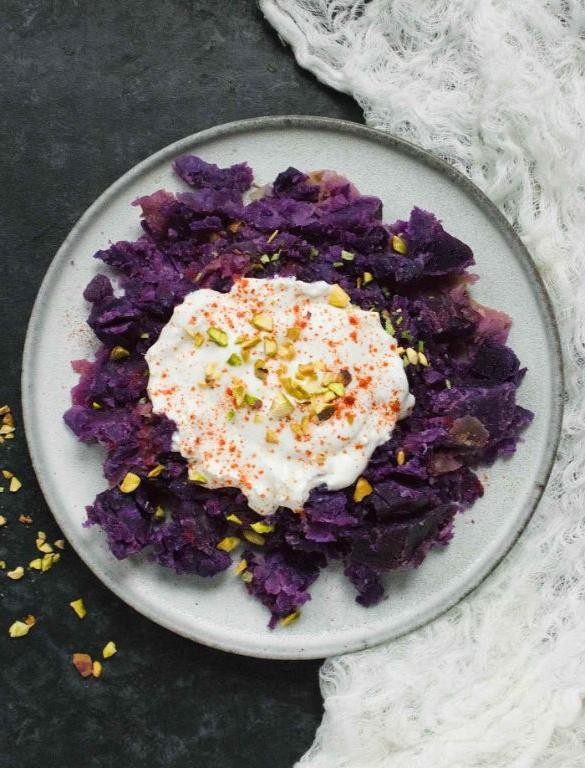
Simmered Kabocha Pumpkin
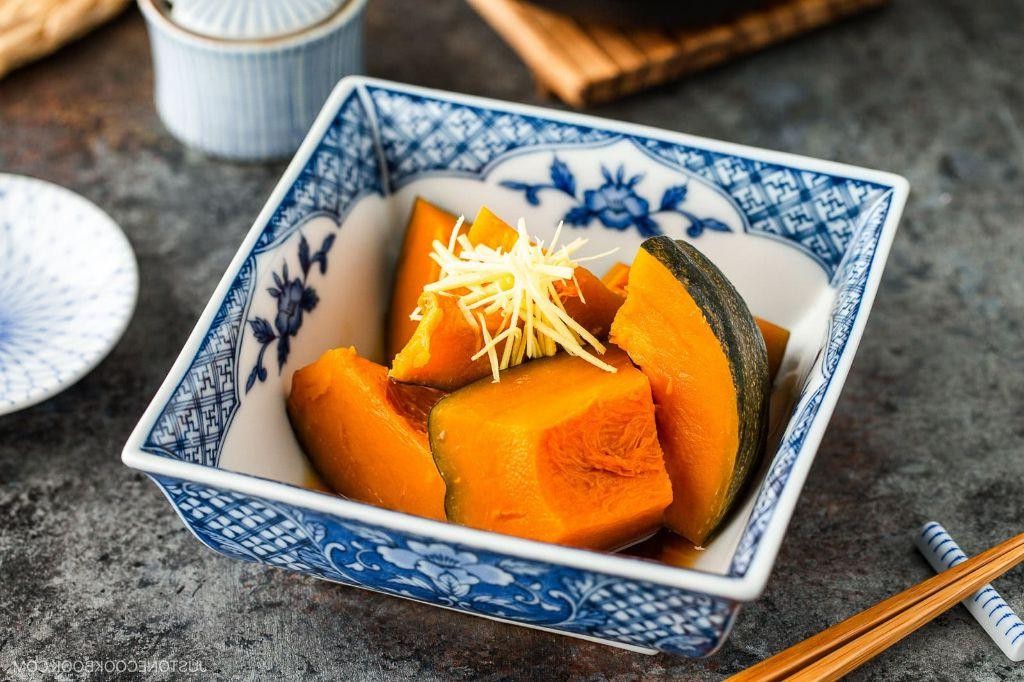
Humble kabocha transforms into silky perfection with minimal effort. This Japanese pumpkin’s natural sweetness deepens through gentle simmering. You’ll need just a few pantry staples to create this comforting side.
Ingredients
– 1 small kabocha pumpkin (about 2 pounds), vibrant orange flesh
– 2 cups rich dashi stock
– 2 tablespoons premium soy sauce
– 1 tablespoon high-quality mirin
– 1 tablespoon granulated sugar
– 1 teaspoon toasted sesame oil
Instructions
1. Rinse the kabocha pumpkin under cool running water to remove any dirt.
2. Carefully cut the pumpkin in half using a sharp chef’s knife.
3. Scoop out the stringy pulp and seeds with a sturdy spoon.
4. Cut the pumpkin halves into 1-inch wedges, leaving the nutritious skin intact for texture.
5. Combine dashi stock, soy sauce, mirin, and sugar in a medium saucepan.
6. Bring the liquid to a boil over high heat, stirring until sugar dissolves completely.
7. Add pumpkin wedges in a single layer, ensuring they’re mostly submerged.
8. Reduce heat to maintain a gentle simmer (small bubbles around the edges).
9. Place a circular parchment paper lid (otoshibuta) directly on the pumpkin to keep pieces immersed.
10. Simmer for 20 minutes until pumpkin is tender but not falling apart.
11. Test doneness by inserting a toothpick—it should slide through with slight resistance.
12. Remove parchment lid and increase heat to medium-high.
13. Cook uncovered for 5 minutes to reduce the sauce to a glossy coating consistency.
14. Drizzle with toasted sesame oil and gently toss to coat.
15. Remove from heat and let rest 2 minutes before serving.
Final spoonfuls reveal meltingly tender flesh that holds its shape beautifully. The subtle sweetness balances perfectly with the umami-rich glaze. Serve alongside grilled fish or fold into warm rice bowls for an instant comfort meal.
Seaweed and Cucumber Sunomono
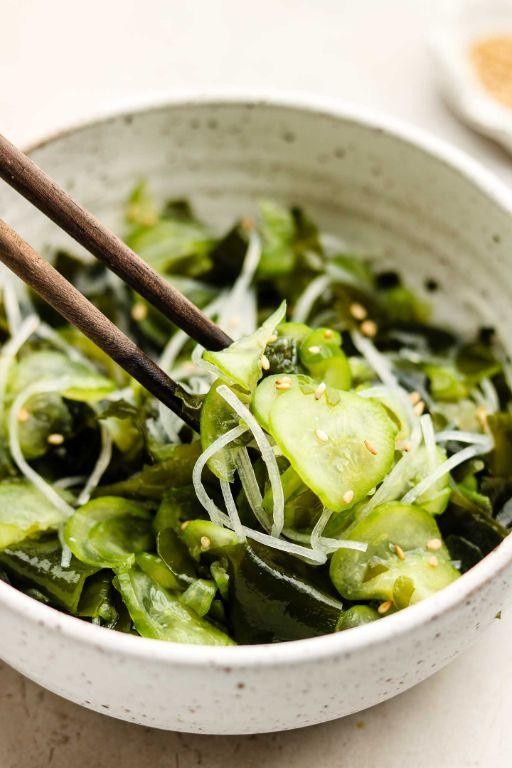
Refreshingly simple yet sophisticated, this seaweed and cucumber sunomono delivers crisp textures and bright flavors in minutes. Ready in under 15 minutes, it’s the perfect light starter or palate cleanser for rich meals. Rely on quality rice vinegar and fresh produce for the best results.
Ingredients
- 1 large English cucumber, thinly sliced
- 1 ounce dried wakame seaweed
- 1/4 cup seasoned rice vinegar, slightly sweet and tangy
- 1 tablespoon soy sauce, rich and umami-packed
- 1 teaspoon toasted sesame oil, fragrant and nutty
- 1 teaspoon white sesame seeds, lightly toasted
Instructions
- Place 1 ounce dried wakame seaweed in a medium bowl and cover with cold water; soak for 5 minutes until softened and expanded.
- While seaweed soaks, thinly slice 1 large English cucumber using a mandoline for uniform thickness.
- Sprinkle cucumber slices with 1/2 teaspoon salt, toss gently, and let sit for 5 minutes to draw out excess moisture.
- Drain rehydrated seaweed and squeeze firmly to remove all excess water.
- Rinse salted cucumber slices under cold running water and pat completely dry with paper towels.
- In a small bowl, whisk together 1/4 cup seasoned rice vinegar, 1 tablespoon soy sauce, and 1 teaspoon toasted sesame oil until fully combined.
- Combine drained seaweed and dried cucumber slices in a mixing bowl.
- Pour dressing over cucumber and seaweed mixture, tossing gently to coat every piece evenly.
- Sprinkle 1 teaspoon white sesame seeds over the salad and toss once more.
- Chill dressed sunomono in refrigerator for at least 10 minutes before serving to allow flavors to meld.
Fresh from the fridge, this sunomono offers a delightful crunch from the cucumber against the tender chew of seaweed. The balanced sweet-tangy dressing clings perfectly to each component, making it ideal alongside grilled fish or as a bright counterpoint to richer dishes. For a creative twist, serve in martini glasses garnished with edible flowers for an elegant appetizer presentation.
Sweet Potato and Black Bean Soup

A hearty bowl of sweet potato and black bean soup brings comfort on crisp autumn days. This vegetarian-friendly recipe delivers deep, smoky flavors with minimal effort. All you need is about 45 minutes from start to finish.
Ingredients
– 2 tablespoons rich extra virgin olive oil
– 1 large yellow onion, finely diced
– 3 cloves fresh garlic, minced
– 2 medium sweet potatoes, peeled and cubed
– 1 tablespoon ground cumin
– 1 teaspoon smoked paprika
– 4 cups robust vegetable broth
– 2 (15-ounce) cans black beans, rinsed and drained
– 1 (14.5-ounce) can fire-roasted diced tomatoes
– 1/2 cup fresh cilantro, chopped
– 1 lime, juiced
– 1 teaspoon coarse sea salt
– 1/2 teaspoon freshly cracked black pepper
Instructions
1. Heat 2 tablespoons rich extra virgin olive oil in a large Dutch oven over medium heat for 2 minutes until shimmering.
2. Add 1 large yellow onion, finely diced, and cook for 6-8 minutes until translucent and fragrant.
3. Stir in 3 cloves fresh garlic, minced, and cook for 1 minute until aromatic but not browned.
4. Add 2 medium sweet potatoes, peeled and cubed, and cook for 5 minutes, stirring occasionally to prevent sticking.
5. Sprinkle in 1 tablespoon ground cumin and 1 teaspoon smoked paprika, toasting for 30 seconds to deepen flavors.
6. Pour in 4 cups robust vegetable broth, scraping any browned bits from the bottom of the pot.
7. Add 2 (15-ounce) cans black beans, rinsed and drained, and 1 (14.5-ounce) can fire-roasted diced tomatoes with their juices.
8. Bring to a boil, then reduce heat to low and simmer uncovered for 20-25 minutes until sweet potatoes are fork-tender.
9. Stir in 1/2 cup fresh cilantro, chopped, 1 lime juiced, 1 teaspoon coarse sea salt, and 1/2 teaspoon freshly cracked black pepper.
10. Remove from heat and let rest for 5 minutes to allow flavors to meld. Garnish with extra cilantro and a lime wedge if desired. Generous ladles of this soup reveal a velvety texture where sweet potatoes melt into the broth. The smoky paprika and bright lime create a dynamic balance against the earthy beans. Serve with warm tortillas or over cilantro-lime rice for a complete meal.
Grilled Fish with Okinawan Spinach
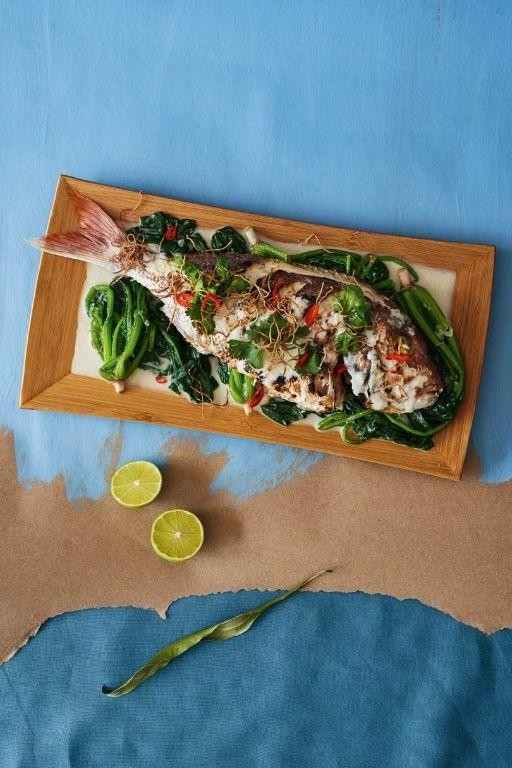
Crisp grilled fish meets vibrant Okinawan spinach in this quick weeknight dish that comes together in under 30 minutes. Clean flavors shine through simple preparation, letting the quality ingredients speak for themselves. This balanced meal delivers both lean protein and nutrient-dense greens in one satisfying plate.
Ingredients
– 4 (6-ounce) firm white fish fillets like cod or halibut
– 1 pound fresh Okinawan spinach with vibrant purple stems
– 3 tablespoons rich extra virgin olive oil
– 2 tablespoons freshly squeezed lemon juice
– 3 cloves aromatic garlic, thinly sliced
– 1 teaspoon coarse sea salt
– ½ teaspoon freshly cracked black pepper
– ¼ teaspoon smoked paprika for depth
Instructions
1. Pat dry 4 (6-ounce) firm white fish fillets thoroughly with paper towels.
2. Brush both sides of fish fillets with 1 tablespoon rich extra virgin olive oil.
3. Season fish evenly with ½ teaspoon coarse sea salt and ¼ teaspoon freshly cracked black pepper.
4. Preheat grill or grill pan to medium-high heat (400°F).
5. Place fish fillets skin-side down on hot grill grates.
6. Grill fish for 4-5 minutes until skin releases easily from grates.
7. Flip fish carefully using a thin spatula.
8. Grill second side for 3-4 minutes until flesh flakes easily with fork.
9. Transfer grilled fish to clean platter.
10. Heat remaining 2 tablespoons rich extra virgin olive oil in large skillet over medium heat.
11. Add 3 cloves thinly sliced aromatic garlic to skillet.
12. Sauté garlic for 1 minute until fragrant but not browned.
13. Add 1 pound fresh Okinawan spinach to skillet in batches.
14. Wilt spinach for 2-3 minutes, stirring constantly until leaves are tender but stems retain slight crunch.
15. Season spinach with remaining ½ teaspoon coarse sea salt, ¼ teaspoon freshly cracked black pepper, and ¼ teaspoon smoked paprika.
16. Drizzle 2 tablespoons freshly squeezed lemon juice over wilted spinach.
17. Toss spinach mixture to combine all ingredients evenly.
18. Arrange bed of seasoned spinach on serving plates.
19. Top each spinach bed with one grilled fish fillet.
20. Spoon any remaining pan juices over fish and spinach. A perfectly grilled fillet yields to gentle pressure with tender, moist flakes contrasting the spinach’s slight crunch. The garlic-infused olive oil and bright lemon cut through the fish’s richness beautifully. For a complete meal, serve alongside roasted sweet potatoes or over coconut rice to soak up the flavorful juices.
Purple Sweet Potato Dumplings

Kneading vibrant purple sweet potatoes into tender dumpling dough creates stunning, naturally colorful pockets. These plump dumplings showcase earthy sweetness balanced by savory fillings. Perfect for impressing guests or elevating weeknight dinners with minimal effort.
Ingredients
– 2 medium purple sweet potatoes, roasted until fork-tender
– 2 cups all-purpose flour, plus extra for dusting
– 1 large egg, lightly beaten
– 1/4 cup warm water
– 1/2 pound ground pork, preferably 80/20 blend
– 2 tablespoons soy sauce, preferably low-sodium
– 1 tablespoon freshly grated ginger
– 2 cloves garlic, finely minced
– 2 scallions, thinly sliced
– 1 tablespoon sesame oil, toasted variety
– Vegetable oil for pan-frying
– 1/2 cup water for steaming
Instructions
1. Peel 2 roasted purple sweet potatoes and mash thoroughly in a large bowl until completely smooth.2. Add 2 cups all-purpose flour and 1 lightly beaten egg to the mashed potatoes.3. Gradually incorporate 1/4 cup warm water while mixing until a cohesive dough forms.4. Knead the dough on a floured surface for 5 minutes until elastic and slightly sticky.5. Cover the dough with a damp cloth and rest at room temperature for 30 minutes.6. Combine 1/2 pound ground pork with 2 tablespoons soy sauce in a separate bowl.7. Mix in 1 tablespoon freshly grated ginger and 2 finely minced garlic cloves.8. Fold in 2 thinly sliced scallions and 1 tablespoon toasted sesame oil until fully incorporated.9. Divide the rested dough into 24 equal portions using a sharp knife or bench scraper.10. Roll each portion into a 3-inch circle on a floured surface, keeping unused dough covered.11. Place 1 tablespoon of pork filling in the center of each dough circle.12. Fold the dough over the filling and pinch edges firmly to seal, creating half-moon shapes.13. Heat 2 tablespoons vegetable oil in a large non-stick skillet over medium-high heat until shimmering.14. Arrange dumplings in a single layer without crowding and pan-fry for 3 minutes until golden brown bottoms form.15. Carefully pour 1/2 cup water into the skillet and immediately cover with a tight-fitting lid.16. Steam the dumplings for 8 minutes over medium heat until the filling reaches 165°F internally.17. Remove the lid and continue cooking for 2 more minutes to crisp the bottoms again.18. Transfer cooked dumplings to a serving plate using a spatula, keeping the crispy side up.Outstanding texture contrasts emerge between the crispy golden bottoms and tender steamed tops. The vibrant purple wrappers reveal earthy sweetness that complements the savory pork filling beautifully. Serve these eye-catching dumplings with chili crisp for extra heat or alongside a simple cucumber salad to cut through the richness.
Okinawan Short Grain Rice Balls

Never underestimate the power of perfectly shaped rice balls. Okinawan short grain rice creates exceptionally sticky, tender spheres that hold their shape beautifully. These handheld delights transform simple ingredients into satisfying bites.
Ingredients
– 2 cups premium Okinawan short grain rice
– 2 ½ cups filtered cold water
– 1 tablespoon fine sea salt
– 2 sheets roasted nori seaweed
– 1 tablespoon toasted sesame seeds
– 2 teaspoons rice vinegar
Instructions
1. Rinse 2 cups premium Okinawan short grain rice under cold running water until water runs clear, about 3-4 cycles.
2. Combine rinsed rice with 2 ½ cups filtered cold water in a heavy-bottomed saucepan.
3. Soak rice for exactly 30 minutes to ensure even cooking and maximum absorption.
4. Bring rice to a boil over high heat, then immediately reduce to lowest simmer.
5. Cover saucepan tightly and cook for 18 minutes without peeking to maintain steam.
6. Remove from heat and let stand covered for 10 minutes to complete the steaming process.
7. Transfer hot rice to a large wooden or glass bowl to prevent sticking.
8. Sprinkle 2 teaspoons rice vinegar evenly over rice while gently folding with a rice paddle.
9. Cool rice to room temperature, about 20 minutes, until comfortable to handle.
10. Wet hands with cold water and rub with 1 tablespoon fine sea salt to prevent sticking.
11. Scoop ¼ cup rice into your palm and press firmly into a compact triangle shape.
12. Repeat with remaining rice, rewetting hands between each ball to maintain clean edges.
13. Cut 2 sheets roasted nori seaweed into 1-inch wide strips using kitchen scissors.
14. Wrap one nori strip around the base of each rice ball for easy handling.
15. Sprinkle 1 tablespoon toasted sesame seeds over rice balls for nutty crunch.
A satisfying chew gives way to subtle sweetness in these compact rice triangles. The nori adds oceanic saltiness that balances the rice’s natural starchiness. Serve warm with pickled ginger or pack cold for a portable lunch that maintains its texture for hours.
Yushi Dofu with Wakame
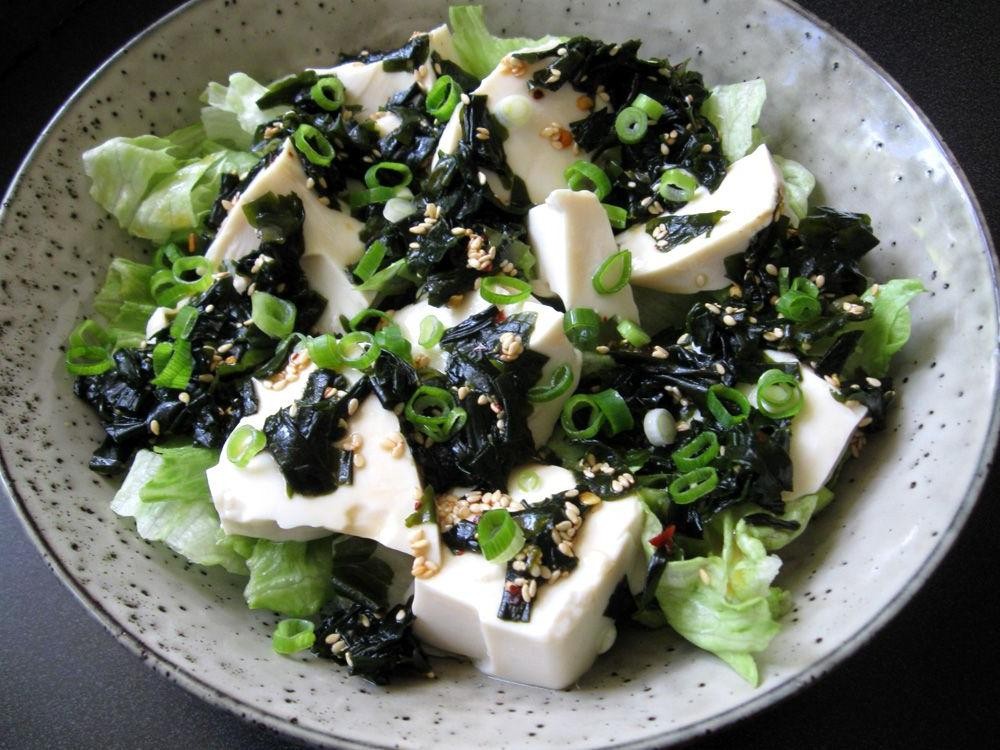
Kickstart your weeknight dinners with this comforting Japanese classic that comes together in under 20 minutes. Yushi dofu delivers silky tofu in a delicate broth, while wakame adds oceanic depth and textural contrast. This minimalist dish proves that sometimes the simplest preparations yield the most satisfying results.
Ingredients
– 1 package (14 oz) silken tofu
– 2 tablespoons dried wakame seaweed
– 4 cups high-quality dashi stock
– 1 tablespoon premium soy sauce
– 1 teaspoon fine sea salt
– 2 thinly sliced green onions
– 1 teaspoon freshly grated ginger
Instructions
1. Gently remove the silken tofu from its package and drain excess liquid.
2. Cut the tofu into 1-inch cubes using a sharp knife, handling carefully to prevent breaking.
3. Place dried wakame in a small bowl and cover with cold water for 5 minutes until rehydrated and expanded.
4. Pour dashi stock into a medium saucepan and heat over medium-high until it reaches 180°F.
5. Add soy sauce and sea salt to the heated dashi, stirring gently to combine.
6. Carefully slide tofu cubes into the broth using a slotted spoon to maintain their shape.
7. Simmer tofu for 3 minutes at 170°F, ensuring the broth doesn’t reach a rolling boil.
8. Drain rehydrated wakame and squeeze out excess water with your hands.
9. Add wakame to the broth and cook for 1 minute until tender but still slightly chewy.
10. Divide the soup between two bowls using a ladle, ensuring equal distribution of tofu and wakame.
11. Top each bowl with thinly sliced green onions and freshly grated ginger.
Each spoonful offers the contrast between meltingly soft tofu and the wakame’s slight chewiness. The clear broth carries subtle umami notes that let the ingredients shine. For a creative twist, serve over steamed rice or add a soft-poached egg to make it more substantial.
Braised Pork Belly with Bamboo Shoots
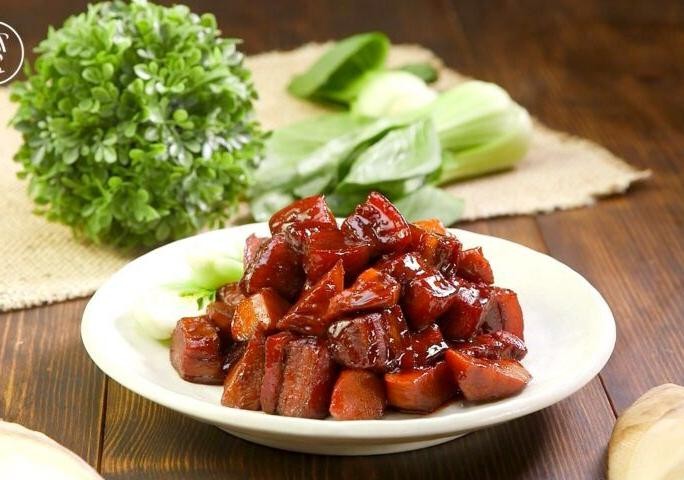
Braising transforms tough pork belly into meltingly tender perfection. This version with crisp bamboo shoots creates a satisfying contrast in every bite. You’ll need about 3 hours from start to finish for this comforting dish.
Ingredients
– 2 pounds skin-on pork belly, cut into 1-inch cubes
– 1 tablespoon avocado oil with high smoke point
– 1 large yellow onion, thinly sliced
– 4 garlic cloves, smashed and peeled
– 1-inch piece fresh ginger, sliced into coins
– 1/4 cup Shaoxing cooking wine
– 3 tablespoons dark soy sauce for color
– 2 tablespoons light soy sauce for saltiness
– 1 tablespoon rock sugar, crushed
– 2 cups rich chicken stock
– 15-ounce can bamboo shoots, rinsed and drained
– 2 green onions, sliced on bias for garnish
Instructions
1. Pat dry 2 pounds skin-on pork belly cubes thoroughly with paper towels.
2. Heat 1 tablespoon avocado oil in a heavy Dutch oven over medium-high heat until shimmering.
3. Sear pork belly in single layer until golden brown on all sides, about 8 minutes total.
4. Remove pork belly and set aside, leaving about 1 tablespoon fat in pot.
5. Add 1 large thinly sliced yellow onion and cook until softened, about 5 minutes.
6. Add 4 smashed garlic cloves and 1-inch ginger coins, cooking until fragrant, 1 minute.
7. Deglaze with 1/4 cup Shaoxing wine, scraping up all browned bits from bottom.
8. Return pork belly to pot along with any accumulated juices.
9. Add 3 tablespoons dark soy sauce, 2 tablespoons light soy sauce, and 1 tablespoon crushed rock sugar.
10. Pour in 2 cups rich chicken stock until pork is nearly submerged.
11. Bring to boil, then reduce heat to maintain gentle simmer.
12. Cover and braise for 2 hours, checking liquid level halfway through.
13. Add 15-ounce can rinsed bamboo shoots during last 30 minutes of cooking.
14. Remove lid and simmer uncovered until sauce reduces and thickens, about 15 minutes.
15. Skim excess fat from surface with a spoon before serving.
16. Garnish with 2 sliced green onions.
Outrageously tender pork belly practically dissolves on your tongue while bamboo shoots provide satisfying crunch. The glossy sauce clings perfectly to steamed rice, making each bite deeply savory. Try serving over chewy wheat noodles for a textural variation that soaks up every drop of the rich braising liquid.
Roasted Goya with Garlic and Olive Oil

Every home cook needs this simple roasted goya recipe in their arsenal. These bitter melons transform into tender, caramelized perfection with minimal effort. Expect bold flavors that balance bitterness with savory garlic richness.
Ingredients
– 2 medium bitter goya melons, sliced thin
– 4 cloves fresh garlic, minced
– 3 tablespoons rich extra virgin olive oil
– 1 teaspoon coarse kosher salt
– ½ teaspoon freshly cracked black pepper
Instructions
1. Preheat your oven to 425°F and line a baking sheet with parchment paper.
2. Slice both goya melons in half lengthwise and scoop out the seeds with a spoon.
3. Cut the seeded goya halves into ¼-inch thick half-moons for even roasting.
4. Toss the goya slices with 3 tablespoons of rich extra virgin olive oil in a large bowl.
5. Sprinkle 1 teaspoon of coarse kosher salt and ½ teaspoon of freshly cracked black pepper over the oiled goya.
6. Add 4 cloves of minced fresh garlic to the bowl and toss until evenly distributed.
7. Spread the seasoned goya in a single layer on your prepared baking sheet.
8. Roast at 425°F for 18-22 minutes until edges are crispy and golden brown.
9. Flip the goya slices halfway through cooking using tongs for even browning.
10. Remove from oven when most slices have developed deep caramelized spots.
Tip: Salting the goya before roasting helps draw out excess moisture and reduces bitterness.
Tip: Don’t overcrowd the pan—this ensures crispy edges rather than steamed vegetables.
Tip: For extra garlic flavor, reserve half the minced garlic to toss with the hot goya after roasting.
The roasted goya develops a satisfying crisp-tender texture with deeply caramelized edges. Its characteristic bitterness mellows into a complex savory flavor that pairs wonderfully with the aromatic garlic. Try serving these alongside grilled meats or tossing them into grain bowls for added texture and depth.
Conclusion
Kickstart your journey to vibrant health with these 31 nourishing Okinawa diet recipes! Each dish brings the secrets of longevity right to your kitchen. We hope you’ll try a few, leave a comment sharing your favorites, and pin this article on Pinterest to inspire others. Happy, healthy cooking!