You’re craving something sweet but don’t want to turn on the oven? You’ve come to the right place! We’ve gathered 30 irresistible no-bake desserts that are perfect for busy days, hot summer afternoons, or whenever you need a quick treat. From creamy cheesecakes to refreshing fruit delights, these easy recipes will satisfy your sweet tooth without heating up your kitchen. Let’s dive into these delicious creations!
Chocolate Peanut Butter Bars
Unbelievably simple, these chocolate peanut butter bars require zero baking and deliver maximum satisfaction. Use creamy peanut butter for that smooth texture we all crave, and don’t skip the sea salt sprinkle—it makes all the difference.
16
squares20
minutes2
minutesIngredients
- 2 cups graham cracker crumbs (I crush mine fresh for better texture)
- 1 cup creamy peanut butter (go for the natural kind—it spreads easier)
- 1/2 cup unsalted butter, melted (salted works too if that’s your preference)
- 1 1/2 cups powdered sugar (sift it to avoid lumps)
- 1 cup semi-sweet chocolate chips (I like Ghirardelli for melting smoothly)
- 1/4 cup heavy cream (warm it slightly to help the chocolate melt evenly)
- 1 tsp flaky sea salt (Maldon is my favorite for that crunch)
Instructions
- Line an 8×8 inch baking pan with parchment paper, leaving overhang on two sides for easy removal.
- Combine 2 cups graham cracker crumbs, 1 cup creamy peanut butter, 1/2 cup melted unsalted butter, and 1 1/2 cups powdered sugar in a large bowl.
- Mix with a spatula until fully incorporated and no dry spots remain—this takes about 2 minutes of stirring.
- Press the mixture firmly into the prepared pan using the bottom of a measuring cup to create an even layer.
- Chill the crust in the refrigerator for 15 minutes to set while you prepare the topping.
- Combine 1 cup semi-sweet chocolate chips and 1/4 cup heavy cream in a microwave-safe bowl.
- Microwave in 30-second intervals, stirring after each, until the chocolate is completely melted and smooth—this usually takes 60-90 seconds total.
- Pour the melted chocolate over the chilled crust and spread evenly with an offset spatula.
- Sprinkle 1 tsp flaky sea salt immediately over the chocolate before it sets.
- Refrigerate the bars for at least 2 hours, or until the chocolate topping is firm to the touch.
- Use the parchment overhang to lift the entire block from the pan onto a cutting board.
- Cut into 16 squares with a sharp knife, wiping the blade clean between cuts for neat edges.
Rich and fudgy with that perfect salty-sweet balance, these bars stay firm yet creamy when chilled. Try serving them slightly chilled for a satisfying snap, or let them sit at room temperature for 10 minutes to soften into gooey perfection.
Classic Tiramisu in a Jar
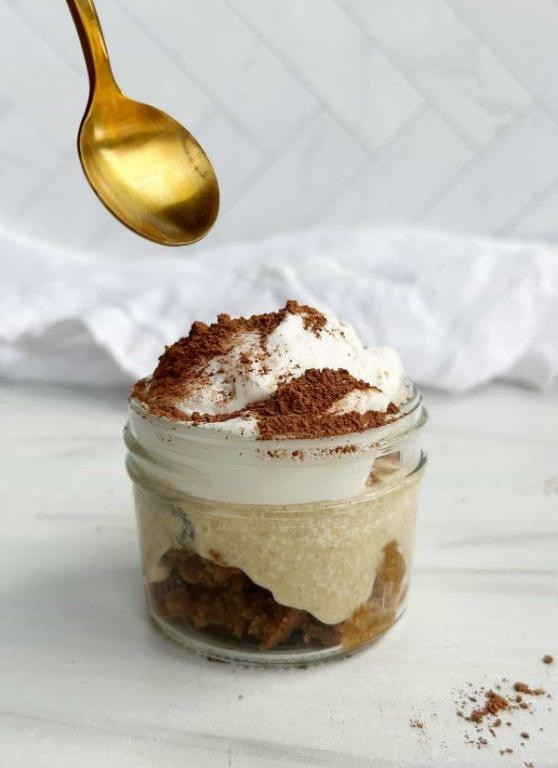
Skip the fancy plating—these individual tiramisu jars are your new party trick. Seriously satisfying layers of coffee-soaked ladyfingers and creamy mascarpone come together in minutes. Perfect for potlucks, date nights, or just treating yourself.
2
jars20
minutesIngredients
– 1 cup strong brewed coffee, cooled (I use espresso for that authentic kick)
– 3 tbsp coffee liqueur (optional but highly recommended for depth)
– 6 oz ladyfinger cookies (the crisp ones hold up best against soaking)
– 8 oz mascarpone cheese, room temp (crucial for smooth blending)
– 2 large eggs, separated and at room temp (whites whip up fluffier this way)
– 1/2 cup granulated sugar (divided—trust me, it makes the mixing easier)
– 1 tsp vanilla extract (pure vanilla brings out the sweetness)
– 2 tbsp unsweetened cocoa powder (for dusting—I like the bitter contrast)
Instructions
1. Brew 1 cup of strong coffee and let it cool completely to room temperature in a shallow bowl.
2. Stir 3 tbsp coffee liqueur into the cooled coffee if using.
3. Separate 2 large eggs, placing whites in a clean, dry mixing bowl and yolks in another.
4. Add 1/4 cup granulated sugar to the egg yolks and whisk vigorously by hand for 2–3 minutes until pale and slightly thickened.
5. Whisk in 8 oz room temperature mascarpone and 1 tsp vanilla extract until just combined and smooth—don’t overmix.
6. Using an electric mixer on medium-high speed, beat the egg whites until soft peaks form, about 2–3 minutes.
7. Gradually add the remaining 1/4 cup sugar while beating, and continue until stiff, glossy peaks form, about 1–2 more minutes.
8. Gently fold the whipped egg whites into the mascarpone mixture in two additions until no white streaks remain.
9. Quickly dip 6 oz ladyfinger cookies, one at a time, into the coffee mixture for 2–3 seconds per side—they should be moist but not soggy.
10. Break the soaked ladyfingers to fit snugly into the bottom of each jar.
11. Spoon half of the mascarpone cream over the ladyfingers, spreading it evenly.
12. Repeat with another layer of dipped ladyfingers and the remaining cream.
13. Cover the jars and refrigerate for at least 4 hours, or ideally overnight, to let the flavors meld.
14. Just before serving, dust the tops generously with 2 tbsp unsweetened cocoa powder using a fine-mesh sieve.
Zesty cocoa powder cuts through the rich cream, while the ladyfingers soften into a cake-like texture. Serve these straight from the fridge for a cool, creamy bite—or layer in fresh berries for a fruity twist. They’re even better the next day, if they last that long.
Raspberry Lemon Cheesecake Parfaits
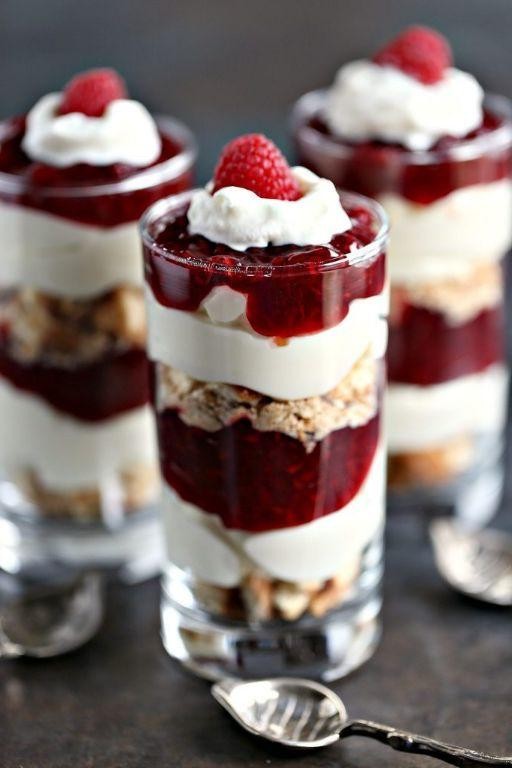
Let’s transform basic ingredients into elegant raspberry lemon cheesecake parfaits that’ll have everyone thinking you’re a pastry pro. These no-bake beauties layer creamy citrus filling with sweet-tart raspberry compote and buttery graham cracker crunch.
3
portions25
minutes5
minutesIngredients
- 8 oz cream cheese, softened to room temperature for that perfectly smooth texture
- 1 cup heavy whipping cream, chilled in the freezer for 15 minutes before whipping
- 1/2 cup granulated sugar, divided between the filling and compote
- 2 tbsp fresh lemon juice, squeezed from about 1 large lemon
- 1 tsp lemon zest, using the fine side of your grater
- 1 tsp vanilla extract, pure vanilla makes all the difference
- 1 1/2 cups fresh raspberries, plus extra for garnish
- 1 cup graham cracker crumbs, from about 8 full sheets
- 2 tbsp unsalted butter, melted and slightly cooled
Instructions
- Combine graham cracker crumbs and melted butter in a small bowl until mixture resembles wet sand.
- Press 2 tablespoons of graham cracker mixture firmly into the bottom of each parfait glass using the back of a spoon.
- Beat softened cream cheese with 1/4 cup sugar on medium speed for 2 minutes until completely smooth and lump-free.
- Add lemon juice, lemon zest, and vanilla extract to cream cheese mixture, beating for 30 seconds until fully incorporated.
- In a separate chilled bowl, whip heavy cream with remaining 1/4 cup sugar on high speed for 3-4 minutes until stiff peaks form.
- Gently fold whipped cream into cream cheese mixture using a spatula, being careful not to deflate the air bubbles.
- Mash 1 cup raspberries with a fork in a small saucepan, leaving some texture for visual appeal.
- Cook mashed raspberries with remaining 2 tablespoons sugar over medium heat for 5 minutes until slightly thickened.
- Strain raspberry compote through a fine mesh sieve to remove seeds, pressing with a spatula to extract all the liquid.
- Cool raspberry compote completely in the refrigerator for 15 minutes before assembling.
- Pipe or spoon 1/4 cup cheesecake filling over graham cracker layer in each glass.
- Drizzle 1 tablespoon cooled raspberry compote over cheesecake layer.
- Repeat layers once more, ending with cheesecake filling.
- Chill parfaits in refrigerator for at least 2 hours to set properly.
- Top with fresh raspberries and remaining graham cracker crumbs before serving.
Your patience pays off with dreamy layers that hold their shape beautifully. You’ll love the contrast between the velvety lemon filling and the bright raspberry swirl cutting through the richness. Try serving these in clear mason jars for a picnic-perfect presentation that shows off those stunning stripes.
Coconut Lime Energy Bites
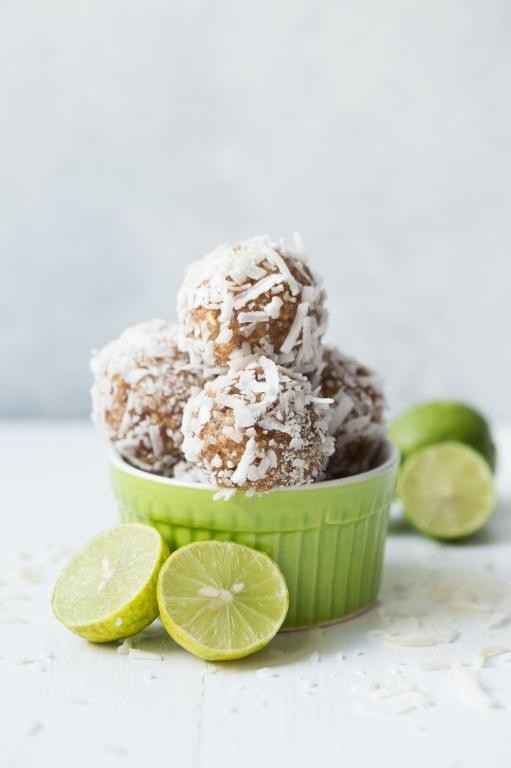
Sick of that 3 PM slump hitting harder than your Monday morning alarm? These coconut lime energy bites are your new secret weapon—packed with natural sweetness and zesty flavor that’ll power you through anything. Seriously, they’re so good you’ll forget they’re actually good for you.
16
portions15
minutesIngredients
– 1 cup old-fashioned rolled oats (not quick-cook—they hold texture better)
– 1/2 cup creamy almond butter (I always use the natural kind you have to stir)
– 1/3 cup pure maple syrup (the real stuff, not pancake syrup)
– 1/4 cup unsweetened shredded coconut, plus extra for rolling
– Zest of 2 fresh limes (trust me, fresh makes all the difference)
– 2 tablespoons chia seeds (these little powerhouses add great crunch)
– 1/2 teaspoon vanilla extract (I splurge on the good Mexican vanilla)
– Pinch of sea salt (just a tiny pinch to make flavors pop)
Instructions
1. Combine 1 cup old-fashioned rolled oats, 1/2 cup creamy almond butter, 1/3 cup pure maple syrup, 1/4 cup unsweetened shredded coconut, zest of 2 fresh limes, 2 tablespoons chia seeds, 1/2 teaspoon vanilla extract, and a pinch of sea salt in a medium mixing bowl.
2. Mix everything together with a spatula until fully combined and no dry spots remain—the mixture should be slightly sticky but hold together when pressed.
3. Chill the mixture in the refrigerator for exactly 30 minutes to make rolling easier and prevent sticking to your hands.
4. Scoop out 1 tablespoon portions of the chilled mixture and roll them into smooth balls between your palms.
5. Roll each ball in additional unsweetened shredded coconut until lightly coated on all sides.
6. Arrange the finished energy bites in a single layer on a parchment-lined baking sheet.
7. Refrigerate the energy bites for at least 1 hour before serving to allow them to firm up completely.
Light and refreshing with a tropical vibe, these bites have the perfect chewy-crunchy texture that makes them dangerously snackable. Try rolling them in toasted coconut for extra nutty flavor, or keep a batch in your freezer for instant grab-and-go energy—they’re seriously life-changing.
No Bake S’mores Bites
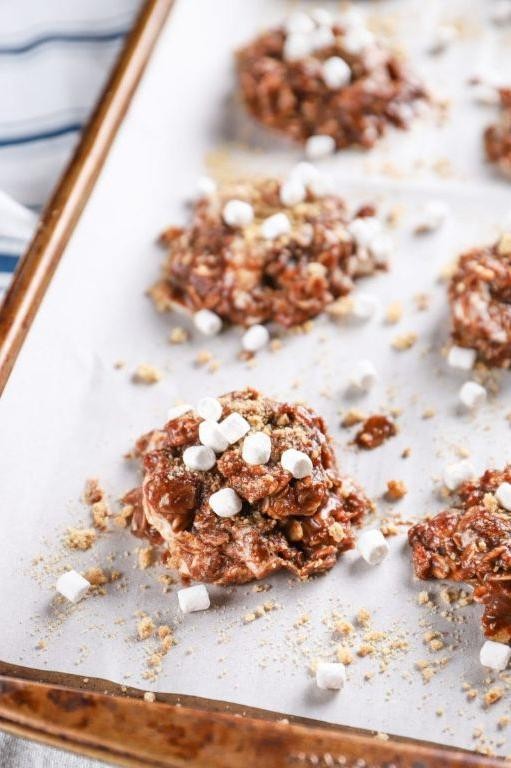
Ready for s’mores without the campfire? These no-bake bites deliver that nostalgic flavor in minutes. Seriously addictive and perfect for last-minute cravings.
24
bites15
minutesIngredients
– 2 cups graham cracker crumbs (I always crush mine fresh for better texture)
– 1 cup creamy peanut butter (the natural kind works best here)
– 1/3 cup honey (local honey adds amazing flavor)
– 1 tsp vanilla extract (real vanilla makes all the difference)
– 1 cup mini marshmallows (the tiny ones distribute perfectly)
– 1/2 cup mini chocolate chips (I prefer semi-sweet for balance)
Instructions
1. Combine graham cracker crumbs, peanut butter, honey, and vanilla extract in a large mixing bowl.
2. Mix thoroughly with a spatula until the mixture forms a uniform, slightly sticky dough.
3. Fold in mini marshmallows and mini chocolate chips until evenly distributed.
4. Line a baking sheet with parchment paper for easy cleanup.
5. Scoop 1 tablespoon portions of the mixture and roll into compact balls between your palms.
6. Arrange the balls on the prepared baking sheet, spacing them 1 inch apart.
7. Chill the bites in the refrigerator for exactly 30 minutes to firm up.
8. Transfer the chilled bites to an airtight container for storage.
Finally, these bites deliver that perfect chewy-crunchy texture with gooey marshmallow pockets. The peanut butter adds a savory twist that balances the sweetness beautifully. Try rolling them in extra graham cracker crumbs for an extra crunch before serving.
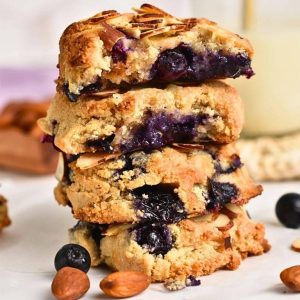
Strawberry Cheesecake Lasagna

Absolutely craving that creamy, fruity dessert magic? This no-bake strawberry cheesecake lasagna layers golden Oreos, velvety cream cheese filling, and fresh strawberries into one showstopping treat. Assemble it fast, chill it firm, and watch it disappear.
12
servings30
minutesIngredients
- 1 package Golden Oreos—these give a buttery crunch without the chocolate clash
- 6 tbsp melted salted butter, my secret for a richer crust
- 16 oz softened cream cheese—go full-fat for the creamiest texture
- 1 cup powdered sugar, sifted to avoid lumps
- 2 cups heavy whipping cream, chilled straight from the fridge
- 2 tsp pure vanilla extract, because imitation just won’t do
- 2 cups sliced fresh strawberries, plus extra for topping
- 1 box strawberry gelatin mix, for that glossy, fruity glaze
Instructions
- Crush the Golden Oreos into fine crumbs using a food processor or zip-top bag and rolling pin.
- Mix the cookie crumbs with melted butter until evenly moistened, like damp sand.
- Press the crumb mixture firmly into a 9×13-inch baking dish to form a compact base layer.
- Beat the softened cream cheese and powdered sugar on medium speed until completely smooth and lump-free.
- In a separate chilled bowl, whip the heavy cream and vanilla to stiff peaks—this takes about 3-4 minutes.
- Gently fold the whipped cream into the cream cheese mixture until no white streaks remain.
- Spread half of the cream cheese filling evenly over the crust using an offset spatula.
- Arrange one cup of sliced strawberries in a single layer over the filling.
- Top with the remaining cream cheese mixture, smoothing it to the edges.
- Prepare the strawberry gelatin according to package directions, but use only 1 cup boiling water for a thicker set.
- Let the gelatin cool for 10 minutes until lukewarm but still liquid.
- Scatter the remaining sliced strawberries over the top layer.
- Slowly pour the slightly thickened gelatin over the strawberries, covering them completely.
- Refrigerate the dessert for at least 4 hours, or until the gelatin is fully set and firm.
Zesty strawberries pop against the cool, creamy layers, while the Oreo crust adds a satisfying crunch. Serve chilled slices with a dollop of extra whipped cream or mint sprigs for a bright finish. This dessert holds its shape beautifully for potlucks—just keep it chilled until serving.
Banoffee Pie Cups
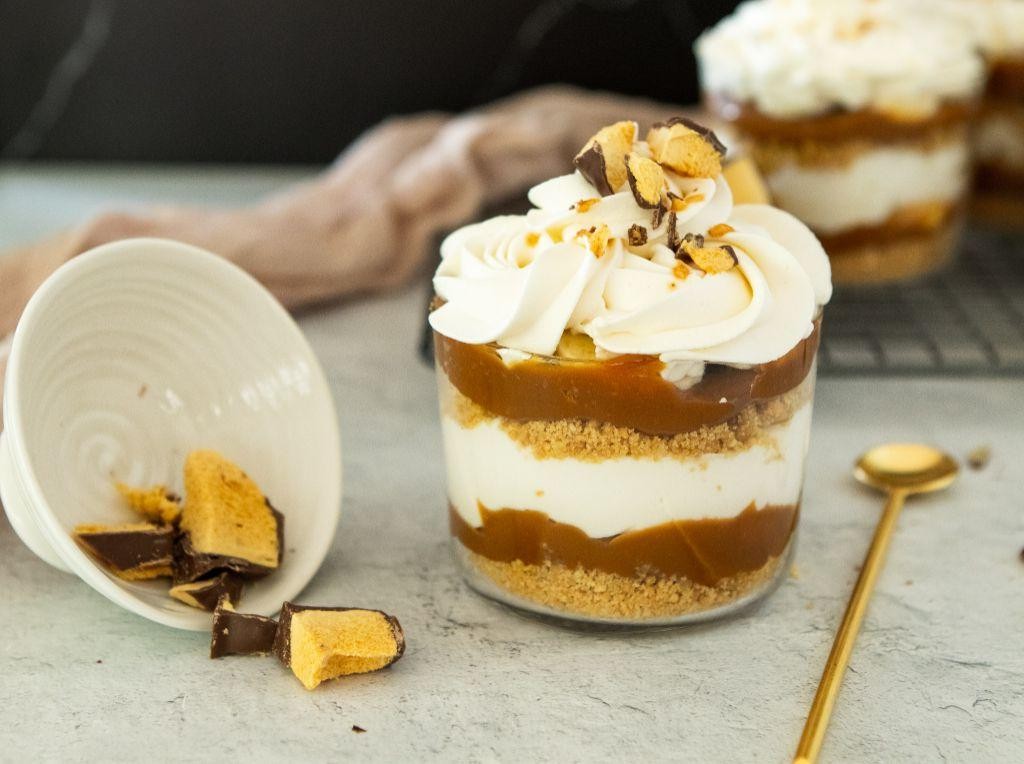
Every dessert lover needs these Banoffee Pie Cups in their life. Elevate classic banoffee into individual portions that scream “make me now.” They’re dangerously easy and ridiculously delicious.
6
portions30
minutes120
minutesIngredients
– 1 sleeve graham crackers (I always buy the honey kind for extra flavor)
– 6 tbsp salted butter, melted (salted gives that sweet-salty kick)
– 1 can (14 oz) sweetened condensed milk (don’t skip the boiling step—it’s magic)
– 3 ripe bananas (spotty ones work best for natural sweetness)
– 1 cup heavy whipping cream, chilled (cold cream whips up fluffier)
– 2 tbsp powdered sugar (I sift mine to avoid lumps)
– Dark chocolate shavings for garnish (a microplane makes this super easy)
Instructions
1. Crush graham crackers into fine crumbs using a food processor or rolling pin.
2. Mix crumbs with melted butter until fully coated and resembling wet sand.
3. Press 2 tablespoons of crumb mixture firmly into the bottom of each 6-ounce cup.
4. Chill crusts in refrigerator for 15 minutes to set.
5. Place unopened can of sweetened condensed milk in a deep pot and cover completely with water.
6. Boil for 2 hours, maintaining water level 2 inches above can at all times.
7. Remove can with tongs and let cool completely before opening—it will be thick caramel.
8. Spread 2 tablespoons of caramel over each chilled crust.
9. Slice bananas into ¼-inch rounds and arrange single layer over caramel.
10. Whip chilled heavy cream with powdered sugar on medium-high speed for 3-4 minutes until stiff peaks form.
11. Pipe or spoon whipped cream over banana layer.
12. Garnish with dark chocolate shavings using a microplane.
Fresh from the fridge, these cups deliver crisp crust, gooey caramel, and fluffy cream in every bite. For extra drama, torch the meringue-style peaks before serving. They disappear faster than you can say “banana bliss.”
Lemon Blueberry Icebox Cake
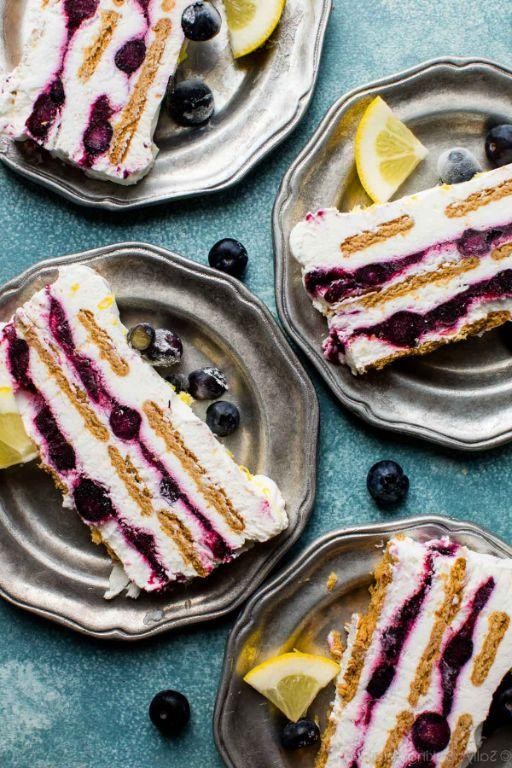
Tired of baking in this heat? This no-bake lemon blueberry icebox cake delivers that perfect summer dessert without turning on your oven. Just layer, chill, and watch it disappear faster than your AC can cool the house.
12
servings25
minutesIngredients
– 2 cups heavy whipping cream (chilled straight from the fridge works best for stiff peaks)
– 1/4 cup powdered sugar (I always sift mine to avoid lumps)
– 1 tsp vanilla extract (pure vanilla makes all the difference here)
– 1 package (14.3 oz) graham crackers (the honey kind adds nice warmth)
– 1 can (21 oz) blueberry pie filling (look for one with plump, whole berries)
– 1 jar (10 oz) lemon curd (room temp spreads easier)
– Fresh mint leaves for garnish (optional but pretty)
Instructions
1. Place a large mixing bowl and whisk attachment in the freezer for 10 minutes to chill.
2. Pour 2 cups heavy whipping cream into the chilled bowl.
3. Beat the cream on medium-high speed for 2 minutes until soft peaks form.
4. Add 1/4 cup powdered sugar and 1 tsp vanilla extract to the bowl.
5. Continue beating for 1-2 minutes until stiff peaks hold when you lift the whisk.
6. Spread a thin layer of the whipped cream on the bottom of a 9×13 inch baking dish.
7. Arrange a single layer of graham crackers over the whipped cream, breaking some to fill gaps.
8. Spoon half of the lemon curd over the graham crackers and spread evenly with a spatula.
9. Dollop half of the remaining whipped cream over the lemon curd and spread gently.
10. Spoon half of the blueberry pie filling over the whipped cream layer.
11. Repeat steps 7-10 to create a second identical layer.
12. Cover the baking dish tightly with plastic wrap.
13. Refrigerate the cake for at least 8 hours or overnight—the graham crackers will soften perfectly.
14. Remove the plastic wrap and garnish with fresh mint leaves before serving.
Just imagine slicing into those creamy layers with tart lemon curd bursting through sweet blueberries. The graham crackers transform into cake-like softness while holding their structure beautifully. Serve it straight from the dish for that rustic family-style vibe, or plate individual slices with extra fresh berries for a restaurant-worthy presentation.
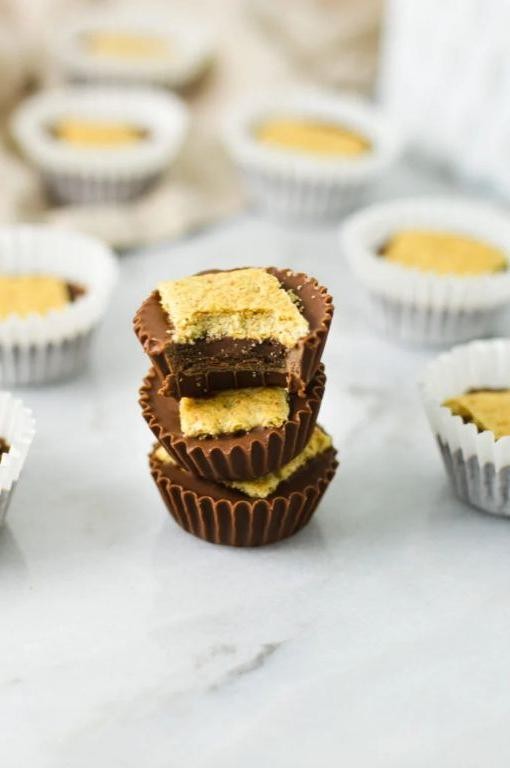
Nutella Stuffed Graham Cracker Bites
Perfect for when that sweet tooth hits hard. These Nutella-stuffed graham cracker bites deliver maximum satisfaction with minimal effort—ready in under 15 minutes flat.
12
sandwiches10
minutes5
minutesIngredients
– 12 whole graham cracker sheets (I always grab the honey-flavored ones for that extra caramel note)
– 1/2 cup Nutella (keep it at room temperature—it spreads like a dream)
– 1 cup semi-sweet chocolate chips (I prefer Ghirardelli for their smooth melt)
– 1 tablespoon coconut oil (this makes the chocolate coating perfectly dippable)
– Flaky sea salt for sprinkling (Maldon salt creates those beautiful crunchy bursts)
Instructions
1. Break each graham cracker sheet into 4 equal squares along the pre-scored lines.
2. Spread 1 teaspoon of room temperature Nutella onto 12 graham cracker squares using a small offset spatula.
3. Press the remaining 12 graham cracker squares on top to create sandwich cookies.
4. Place the sandwiched crackers on a parchment-lined baking sheet and freeze for exactly 10 minutes—this prevents the crackers from softening when dipped.
5. Combine chocolate chips and coconut oil in a microwave-safe bowl.
6. Microwave the chocolate mixture in 30-second intervals, stirring thoroughly between each burst, until completely smooth and glossy.
7. Use a fork to dip each frozen graham cracker sandwich into the melted chocolate, coating completely.
8. Tap the fork gently against the bowl’s edge to remove excess chocolate—this creates a thinner, crispier shell.
9. Return each coated bite to the parchment-lined sheet.
10. Immediately sprinkle with flaky sea salt before the chocolate sets.
11. Let the bites sit at room temperature for 20 minutes until the chocolate coating is fully hardened.
Velvety Nutella meets that signature graham crunch in every bite. The semi-sweet chocolate shell provides the perfect bitter contrast to the sweet filling—break them apart to reveal that gorgeous swirl. Serve these slightly chilled for a satisfying snap, or layer them in mini mason jars with whipped cream for an instant dessert parfait.
Mango Coconut Chia Pudding

Fancy a tropical breakfast that basically makes itself overnight? This mango coconut chia pudding requires zero cooking skills and delivers maximum creamy satisfaction. Forget complicated recipes—this one’s your new morning hero.
2
servings15
minutesIngredients
– 1/2 cup chia seeds (I always use black ones for that gorgeous speckled look)
– 1 can (13.5 oz) full-fat coconut milk (shake it well before opening—trust me)
– 1/4 cup pure maple syrup (the real stuff makes all the difference)
– 1 tsp vanilla extract (splash in a little extra if you’re feeling fancy)
– 1 ripe mango, peeled and diced (about 1 cup—pick one that gives slightly when pressed)
– Pinch of sea salt (just a tiny pinch to make flavors pop)
Instructions
1. Pour the coconut milk into a medium mixing bowl.
2. Whisk in the maple syrup vigorously for 30 seconds until fully combined.
3. Add the vanilla extract and sea salt to the coconut mixture.
4. Sprinkle chia seeds into the liquid while continuously whisking to prevent clumping.
5. Let the mixture sit undisturbed for 5 minutes to allow seeds to begin swelling.
6. Whisk the pudding mixture again thoroughly for 1 minute to break up any seed clusters.
7. Cover the bowl tightly with plastic wrap, pressing it directly against the pudding surface.
8. Refrigerate for at least 6 hours or overnight until thickened to a spoonable consistency.
9. Peel the mango and slice the flesh away from the pit in clean sections.
10. Dice the mango into 1/2-inch cubes using a sharp knife.
11. Remove the pudding from refrigerator and give it one final stir.
12. Layer the chia pudding and diced mango in serving glasses.
Keep this beauty chilled until serving—the texture firms up perfectly when cold. That creamy coconut base against the sweet mango bursts makes every spoonful feel like vacation. Try topping with toasted coconut flakes for extra crunch or layering with granola for breakfast parfait perfection.
Cookies and Cream Truffles

Satisfy your sweet tooth with these no-bake cookies and cream truffles. They’re dangerously easy to make and disappear even faster. Perfect for when you need a quick dessert fix without turning on the oven.
30
truffles20
minutes2
minutesIngredients
– 1 package (14.3 oz) Oreo cookies – I always grab the classic ones for that perfect cookies and cream flavor
– 1 package (8 oz) cream cheese, softened to room temperature – This makes blending so much easier and prevents lumps
– 16 oz semi-sweet chocolate chips – The good quality ones melt smoother and set better
– 1 tbsp coconut oil – My secret for that glossy, professional-looking chocolate coating
Instructions
1. Place all Oreo cookies in a food processor and pulse until you get fine crumbs with no large pieces remaining.
2. Transfer the cookie crumbs to a large mixing bowl and add the softened cream cheese.
3. Mix thoroughly with a spatula until the cream cheese is fully incorporated and the mixture forms a uniform dough.
4. Use a small cookie scoop to portion the dough into 1-inch balls, rolling them between your palms to create smooth spheres.
5. Place the rolled balls on a parchment-lined baking sheet and freeze for exactly 30 minutes until firm to the touch.
6. While the truffles chill, combine chocolate chips and coconut oil in a microwave-safe bowl.
7. Microwave in 30-second intervals, stirring between each, until the chocolate is completely melted and smooth.
8. Use a fork to dip each frozen truffle into the melted chocolate, tapping off excess chocolate against the bowl’s rim.
9. Return the coated truffles to the parchment-lined sheet and let them set at room temperature for 2 hours until the chocolate hardens.
10. Store the finished truffles in an airtight container in the refrigerator until ready to serve.
Melt-in-your-mouth chocolate gives way to that iconic cookies and cream crunch. The creamy center stays surprisingly firm yet soft. Try rolling them in crushed Oreo crumbs before the chocolate sets for extra texture, or package them in cute boxes for homemade gifts.
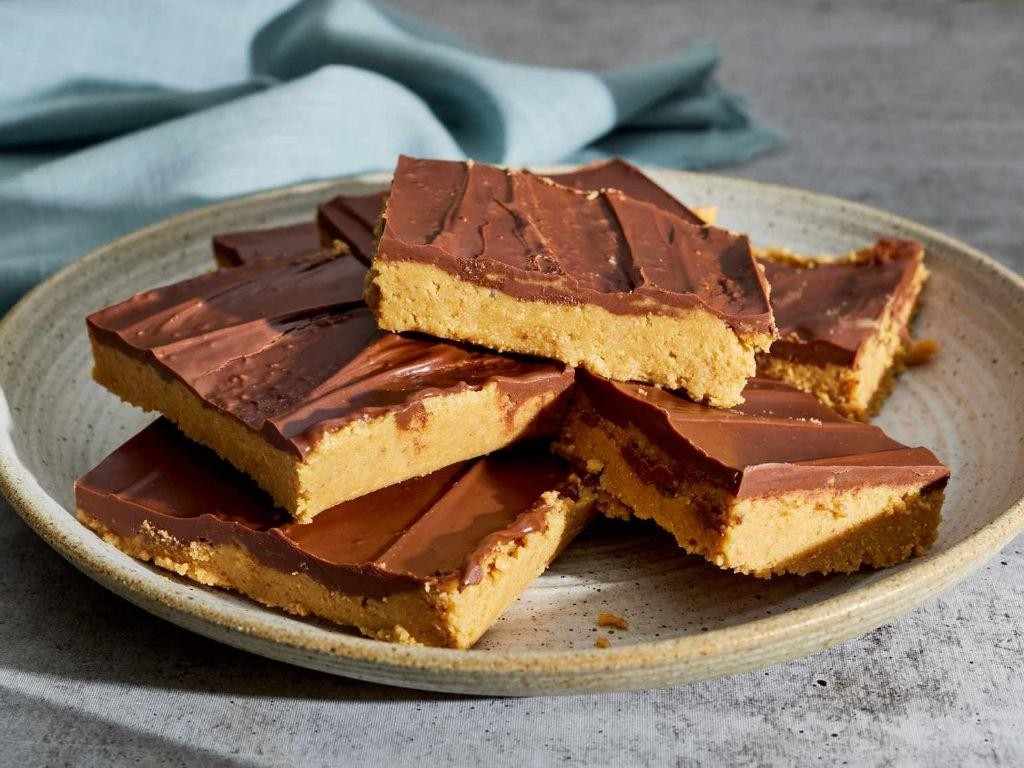
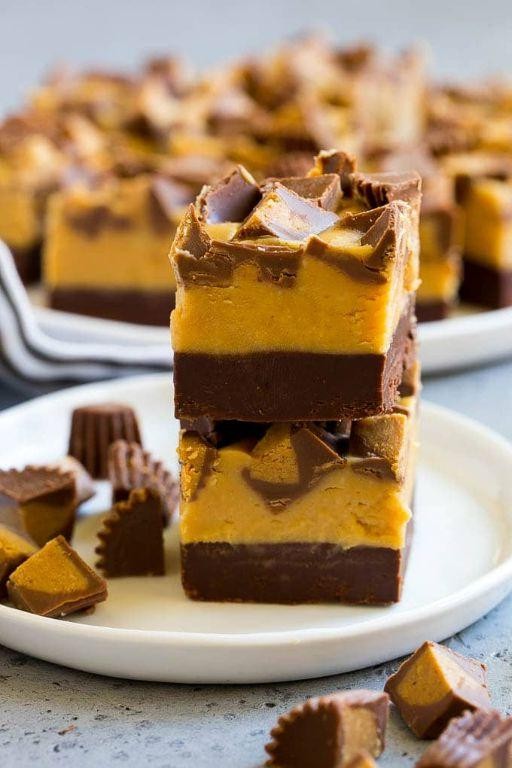
Peanut Butter Cup Fudge
Nailing the perfect peanut butter cup fudge is easier than you think. This rich, creamy dessert combines chocolate and peanut butter in a no-bake treat that sets up perfectly every time. Get ready to impress with minimal effort.
64
portions15
minutes7
minutesIngredients
– 3 cups semi-sweet chocolate chips (I prefer Ghirardelli for that deep chocolate flavor)
– 1 (14 oz) can sweetened condensed milk (don’t substitute evaporated milk – it won’t set properly)
– 1/2 cup creamy peanut butter (I use Jif for that perfect smooth texture)
– 1 tsp vanilla extract (real vanilla makes all the difference here)
– 1/4 tsp salt (balances the sweetness beautifully)
– 1 cup chopped peanut butter cups (I chop mine into rough chunks for texture)
Instructions
1. Line an 8×8 inch baking pan with parchment paper, leaving overhang on two sides for easy removal.
2. Combine 3 cups semi-sweet chocolate chips and the entire can of sweetened condensed milk in a medium saucepan.
3. Heat over low heat, stirring constantly with a rubber spatula, until chocolate is completely melted and mixture is smooth (about 5-7 minutes).
4. Remove from heat and immediately stir in 1/2 cup creamy peanut butter until fully incorporated.
5. Add 1 tsp vanilla extract and 1/4 tsp salt, stirring vigorously to combine.
6. Fold in 1 cup chopped peanut butter cups until evenly distributed throughout the fudge.
7. Immediately pour the fudge mixture into your prepared pan, spreading evenly with the spatula.
8. Tap the pan firmly on the counter 2-3 times to remove any air bubbles.
9. Refrigerate for at least 2 hours, or until completely firm to the touch.
10. Use the parchment paper overhang to lift the fudge block from the pan.
11. Cut into 1-inch squares using a sharp knife wiped clean between cuts for neat edges.
Melt-in-your-mouth creamy with that signature peanut butter cup crunch, this fudge hits all the right notes. Serve it chilled for a firm bite or let it sit at room temperature for 15 minutes for a softer, more decadent experience. Layer pieces between wax paper in an airtight container—they’ll keep beautifully in the fridge for up to two weeks (if they last that long).
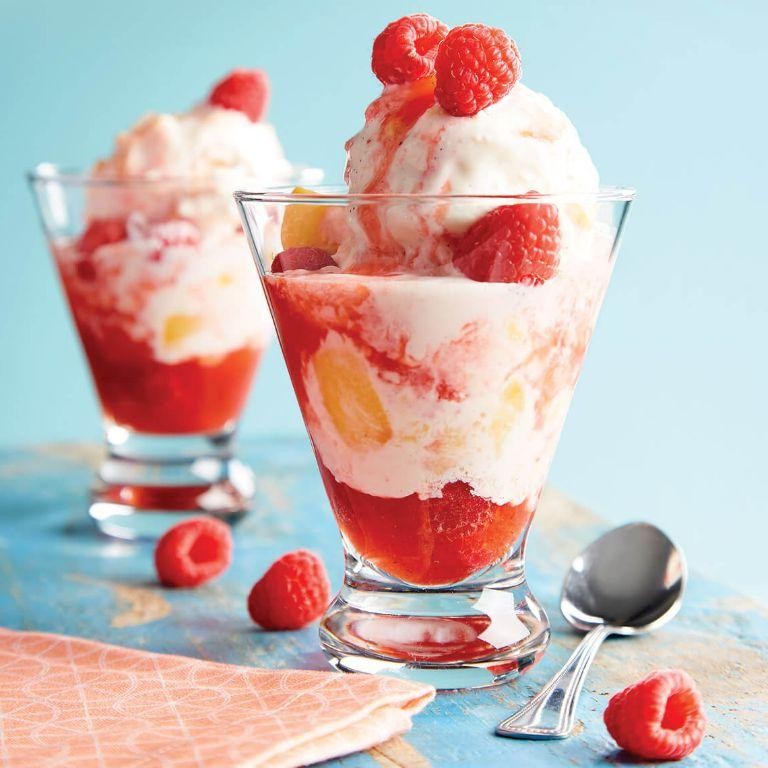
Peach Melba Parfaits
Brace yourself for the easiest dessert that looks like it came from a fancy restaurant kitchen. These peach melba parfaits layer sweet roasted peaches, tart raspberry sauce, and creamy vanilla yogurt in minutes. Seriously, you’ll impress everyone without breaking a sweat.
2
parfaits15
minutes23
minutesIngredients
– 2 large ripe peaches, peeled and sliced (go for freestone peaches—they’re way easier to pit)
– 1 cup fresh raspberries (frozen work perfectly if that’s all you have)
– 1 tablespoon granulated sugar (I like just a touch to balance the tartness)
– 1 teaspoon fresh lemon juice (bottled is fine, but fresh brightens everything up)
– 2 cups vanilla Greek yogurt (the thick kind holds the layers best)
– ¼ cup crushed vanilla wafer cookies (these add the perfect crunch)
Instructions
1. Preheat your oven to 400°F and line a baking sheet with parchment paper.
2. Arrange the peach slices in a single layer on the prepared baking sheet.
3. Roast the peaches for 15–18 minutes until they’re soft and lightly caramelized at the edges.
4. Let the roasted peaches cool completely to room temperature—this prevents the yogurt from getting watery. (Tip: Spread them out on a plate to speed up cooling.)
5. While the peaches cool, combine the raspberries, sugar, and lemon juice in a small saucepan.
6. Cook the raspberry mixture over medium heat for 5–7 minutes, mashing the berries with a spoon until they break down into a saucy consistency.
7. Strain the raspberry sauce through a fine-mesh sieve to remove the seeds, pressing with a spatula to extract all the liquid. (Tip: Don’t skip straining—seedless sauce feels so much more luxurious.)
8. Allow the raspberry sauce to cool slightly; it will thicken as it sits.
9. Grab four parfait glasses or clear cups and spoon 2 tablespoons of vanilla yogurt into the bottom of each.
10. Layer about ¼ of the roasted peaches over the yogurt in each glass.
11. Drizzle 1 tablespoon of the raspberry sauce over the peaches in each glass.
12. Repeat the layers once more: yogurt, peaches, and raspberry sauce. (Tip: Use the back of a spoon to spread each layer neatly for those Instagram-worthy stripes.)
13. Top each parfait with 1 tablespoon of crushed vanilla wafer cookies for crunch.
14. Serve immediately or refrigerate for up to 1 hour before serving. Perfect parfaits balance creamy yogurt with jammy peaches and that sharp raspberry zing. Try serving them in mason jars for a picnic or layer in some granola for extra texture.
Mint Chocolate Chip Cheesecake
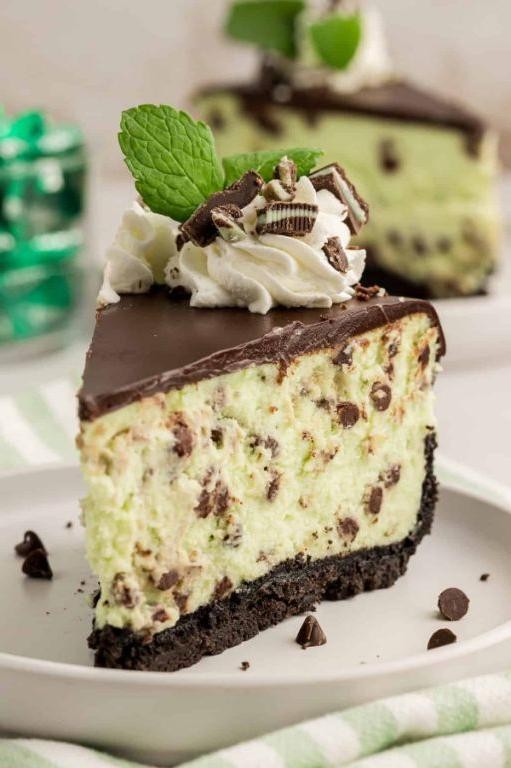
Y’all need to stop scrolling and make this immediately. This mint chocolate chip cheesecake hits that perfect sweet spot between refreshing and decadent. Trust me, it’s about to become your new signature dessert.
1
cheesecake45
minutes80
minutesIngredients
– 2 cups graham cracker crumbs (I always crush mine fresh for better texture)
– 1/2 cup melted butter (salted butter gives the crust that perfect salty-sweet balance)
– 24 oz cream cheese, room temperature (non-negotiable—cold cream cheese will give you lumpy filling)
– 1 cup granulated sugar
– 1 cup sour cream
– 3 large eggs, room temperature (seriously, take them out an hour before)
– 1 tsp peppermint extract (go for the pure stuff, not imitation)
– 6-8 drops green food coloring (I like the gel kind for vibrant color)
– 1 cup mini chocolate chips (mini ones distribute better throughout)
– 1 cup heavy whipping cream
– 1/4 cup powdered sugar
– 1/2 tsp vanilla extract
Instructions
1. Preheat your oven to 325°F.
2. Combine graham cracker crumbs and melted butter in a medium bowl.
3. Press the mixture firmly into the bottom of a 9-inch springform pan.
4. Bake the crust for 10 minutes at 325°F until lightly golden.
5. Remove crust from oven and let it cool completely.
6. Beat room temperature cream cheese and granulated sugar together until completely smooth.
7. Mix in sour cream until fully incorporated.
8. Add eggs one at a time, mixing just until combined after each addition.
9. Stir in peppermint extract and green food coloring.
10. Fold in mini chocolate chips gently with a spatula.
11. Pour the filling over the cooled crust.
12. Place the springform pan in a larger baking dish.
13. Create a water bath by pouring hot water into the larger dish until it reaches halfway up the springform pan.
14. Bake at 325°F for 60-70 minutes until the edges are set but the center still jiggles slightly.
15. Turn off the oven and crack the door open, letting the cheesecake cool inside for 1 hour.
16. Remove from oven and run a knife around the edge to prevent cracking.
17. Chill the cheesecake in the refrigerator for at least 6 hours, preferably overnight.
18. Whip heavy cream, powdered sugar, and vanilla extract until stiff peaks form.
19. Spread whipped cream over the chilled cheesecake.
20. Garnish with additional mini chocolate chips and mint leaves if desired.
Keep this beauty chilled until serving—the cold temperature makes that creamy texture absolutely dreamy. The cool mint perfectly balances the rich chocolate chips, creating that nostalgic ice cream flavor in cheesecake form. Try serving thin slices with an extra drizzle of chocolate sauce for maximum indulgence.
Conclusion
From quick fixes to impressive treats, these no-bake desserts prove delicious doesn’t have to be difficult. We hope this collection inspires your next sweet creation! Try your favorites and let us know which recipes you love most in the comments below. Don’t forget to share these easy ideas with fellow dessert lovers by pinning this article to your Pinterest boards.