Let’s journey back to the roots of Thanksgiving with these 28 authentic Native American recipes that honor the true origins of this holiday. From traditional corn dishes to seasonal harvest favorites, these culinary treasures will bring rich history and incredible flavor to your table. Get ready to discover recipes that connect us to the land and its original people—your Thanksgiving feast is about to become truly meaningful!
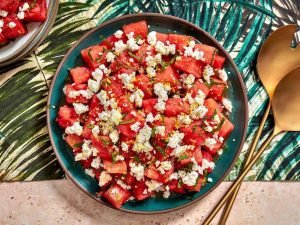
Corn and Cranberry Salad
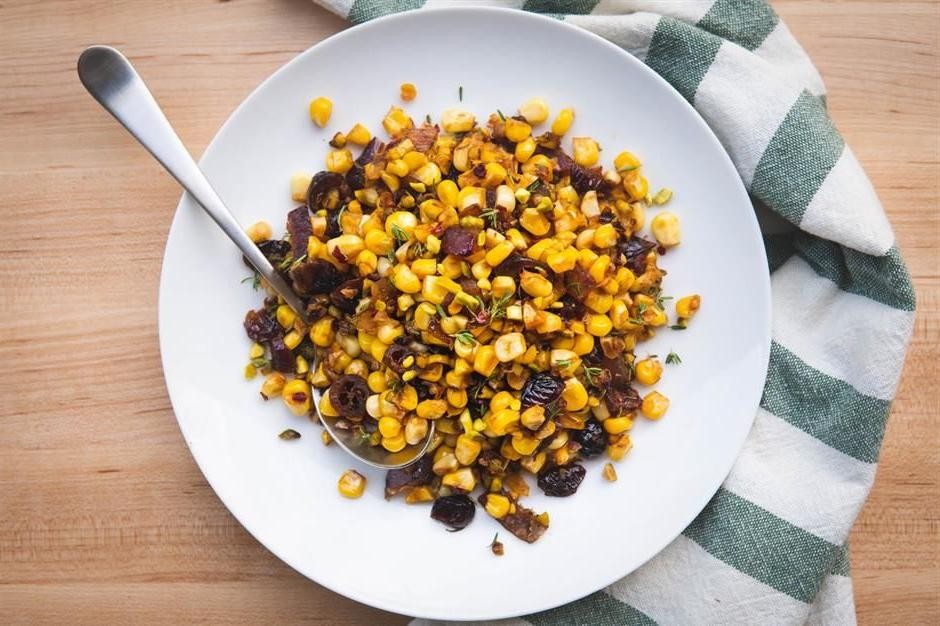
A bright, crunchy corn and cranberry salad brings the perfect balance of sweet and tangy to any table. Assembling this colorful dish takes just minutes, making it ideal for busy weeknights or last-minute potlucks. Follow these simple steps to create a salad that’s both refreshing and satisfying.
Ingredients
– 4 cups of fresh or thawed frozen corn kernels
– 1 cup of dried cranberries
– 1/2 cup of finely chopped red onion
– A generous handful of fresh parsley, chopped
– 1/4 cup of olive oil
– 2 tablespoons of apple cider vinegar
– A good squeeze of fresh lime juice (about 2 tablespoons)
– A pinch of salt and a few cracks of black pepper
Instructions
1. If using frozen corn, spread 4 cups of corn kernels in a single layer on a baking sheet and let them thaw completely at room temperature for about 30 minutes. (Tip: Thawing frozen corn separately prevents excess water from making your salad soggy.)
2. Place the thawed or fresh corn kernels in a large mixing bowl.
3. Add 1 cup of dried cranberries to the bowl with the corn.
4. Finely chop 1/2 cup of red onion and add it to the mixture.
5. Chop a generous handful of fresh parsley and sprinkle it over the other ingredients.
6. In a small separate bowl, whisk together 1/4 cup of olive oil, 2 tablespoons of apple cider vinegar, and 2 tablespoons of fresh lime juice until well combined. (Tip: Whisking the dressing separately ensures even distribution throughout the salad.)
7. Pour the dressing over the corn and cranberry mixture.
8. Add a pinch of salt and a few cracks of black pepper to the bowl.
9. Toss all ingredients together gently but thoroughly until everything is evenly coated with dressing. (Tip: Use a folding motion rather than stirring vigorously to keep the cranberries from breaking apart.)
10. Let the salad sit at room temperature for 15 minutes before serving to allow the flavors to meld. During this time, the cranberries will plump up slightly from absorbing the dressing. Delightfully crisp and sweet, this salad offers a satisfying crunch from the corn alongside the chewy texture of plumped cranberries. For a creative twist, serve it over grilled chicken or stuff it into pita pockets for a quick lunch—the vibrant colors make it as beautiful as it is delicious.
Wild Rice and Mushroom Stuffing
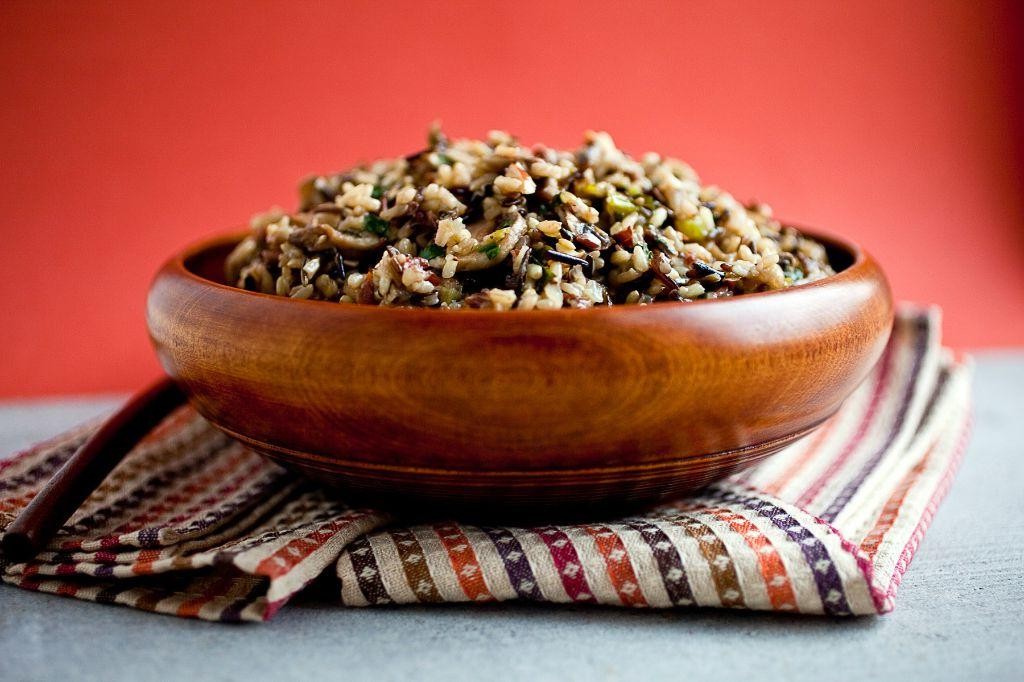
Every holiday table deserves a stuffing that stands out from the crowd, and this wild rice and mushroom version brings earthy flavors and satisfying texture that will have everyone asking for seconds. Essentially, we’re combining nutty wild rice with savory mushrooms and aromatic herbs for a dish that’s both comforting and sophisticated. Let’s walk through this step-by-step so you can create the perfect stuffing with confidence.
Ingredients
– 1 cup of wild rice
– 8 ounces of cremini mushrooms, sliced
– 1 medium yellow onion, chopped
– 2 stalks of celery, diced
– 3 cloves of garlic, minced
– 4 cups of vegetable broth
– 4 tablespoons of unsalted butter
– 2 tablespoons of olive oil
– A couple of fresh sage leaves, chopped
– A couple of sprigs of fresh thyme
– A splash of dry white wine
– 1 teaspoon of kosher salt
– ½ teaspoon of black pepper
Instructions
1. Rinse 1 cup of wild rice under cold water in a fine-mesh strainer until the water runs clear.
2. Heat 2 tablespoons of olive oil in a large Dutch oven over medium heat until shimmering.
3. Add the chopped onion and diced celery, cooking for 5-7 minutes until softened and translucent.
4. Stir in the minced garlic and cook for exactly 1 minute until fragrant but not browned.
5. Add the sliced mushrooms and cook for 8-10 minutes until they release their liquid and turn golden brown.
6. Pour in a splash of dry white wine to deglaze the pan, scraping up any browned bits from the bottom.
7. Add the rinsed wild rice to the pot and stir to coat with the vegetable mixture.
8. Pour in 4 cups of vegetable broth and bring to a boil over high heat.
9. Reduce heat to low, cover the pot, and simmer for 45 minutes until the rice has split open and is tender.
10. Stir in 4 tablespoons of butter, chopped sage, thyme leaves, 1 teaspoon of kosher salt, and ½ teaspoon of black pepper.
11. Continue cooking uncovered for 5 more minutes to allow the flavors to meld and any excess liquid to evaporate.
12. Remove from heat and let rest for 10 minutes before serving to allow the stuffing to set.
Miraculously, this stuffing achieves a perfect balance between the chewy wild rice and tender mushrooms, with the herbs providing subtle earthy notes that complement rather than overwhelm. The texture holds together beautifully when scooped, making it ideal for stuffing poultry or serving as a standalone side dish. For a creative twist, try baking individual portions in ramekins with a breadcrumb topping for added crunch.
Maple Roasted Acorn Squash
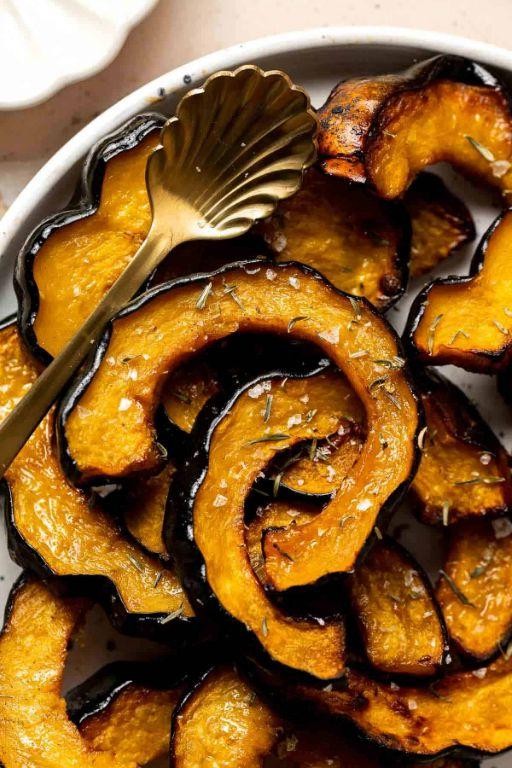
Now that autumn’s crisp air has arrived, let’s tackle a simple yet impressive side dish that celebrates seasonal produce. This maple roasted acorn squash transforms an ordinary vegetable into something special with just a few basic ingredients and straightforward techniques.
Ingredients
– One medium acorn squash
– A couple tablespoons of pure maple syrup
– A generous drizzle of olive oil
– A good pinch of kosher salt
– A few cracks of fresh black pepper
Instructions
1. Preheat your oven to 400°F and position a rack in the center.
2. Carefully slice the acorn squash in half lengthwise using a sharp chef’s knife.
3. Scoop out all the seeds and stringy pulp from each squash half with a sturdy spoon.
4. Cut each squash half into ¾-inch thick crescent-shaped slices.
5. Drizzle the olive oil over the squash slices, making sure each piece gets coated.
6. Arrange the squash slices in a single layer on a rimmed baking sheet.
7. Season evenly with kosher salt and several grinds of black pepper.
8. Roast for 15 minutes at 400°F until the edges begin to soften.
9. Remove the baking sheet from the oven and drizzle maple syrup over each squash slice.
10. Return to the oven and roast for another 15-20 minutes until the squash is tender when pierced with a fork and the edges are caramelized.
11. Let the squash rest for 5 minutes on the baking sheet before serving.
Perfectly roasted acorn squash develops beautifully caramelized edges while maintaining a tender, almost creamy interior texture. The maple syrup creates a glossy glaze that balances the squash’s natural earthiness with just the right amount of sweetness. Try serving these wedges alongside roasted chicken or crumbling some goat cheese over the top for an extra layer of flavor.
Three Sisters Vegetable Stew

Often, the simplest dishes are the most satisfying, especially when they honor traditional food wisdom. One of my favorite examples is this Three Sisters Vegetable Stew, where corn, beans, and squash come together in perfect harmony. Our methodical approach will guide you through each step to create a deeply flavorful, nourishing meal.
Ingredients
– A couple of tablespoons of olive oil
– One large yellow onion, chopped
– Three cloves of garlic, minced
– One butternut squash, peeled and cubed
– Two cups of corn kernels (fresh or frozen)
– One 15-ounce can of kidney beans, rinsed
– Four cups of vegetable broth
– A splash of apple cider vinegar
– A couple of teaspoons of smoked paprika
– A pinch of salt and black pepper
Instructions
1. Heat the olive oil in a large pot over medium heat until it shimmers.
2. Add the chopped onion and cook for 5–7 minutes, stirring occasionally, until it turns translucent.
3. Stir in the minced garlic and cook for 1 more minute until fragrant.
4. Add the cubed butternut squash and cook for 5 minutes, stirring to coat it in the oil. (Tip: Cutting the squash into uniform 1-inch cubes ensures even cooking.)
5. Pour in the vegetable broth and bring the mixture to a gentle boil.
6. Reduce the heat to low, cover the pot, and simmer for 15 minutes until the squash is tender when pierced with a fork.
7. Stir in the corn kernels, kidney beans, smoked paprika, salt, and black pepper.
8. Simmer uncovered for 10 more minutes to let the flavors meld. (Tip: Taste the broth at this stage and adjust seasoning if needed—the beans will absorb salt as they cook.)
9. Remove the pot from the heat and stir in the apple cider vinegar. (Tip: Adding vinegar at the end brightens the stew without making it overly acidic.)
Unbelievably creamy from the softened squash and hearty from the beans, this stew has a subtle sweetness from the corn that balances the smoky paprika. Serve it over a bed of quinoa for extra protein, or with a slice of crusty bread to soak up every last drop of the rich broth.
Pumpkin and Sage Fry Bread

Pumpkin and sage fry bread brings together the cozy flavors of autumn in a surprisingly simple fried dough that’s perfect for a snack or side. Picture warm, pillowy bread with a hint of earthy sage and sweet pumpkin—it’s easier to make than you might think, and I’ll walk you through each step so you can nail it on your first try.
Ingredients
– 2 cups of all-purpose flour
– 1 tablespoon of baking powder
– 1 teaspoon of salt
– ¾ cup of pumpkin puree
– ½ cup of warm water
– A couple of fresh sage leaves, finely chopped
– A splash of vegetable oil for frying
– A sprinkle of powdered sugar for dusting (optional)
Instructions
1. In a large mixing bowl, whisk together the 2 cups of all-purpose flour, 1 tablespoon of baking powder, and 1 teaspoon of salt until evenly combined.
2. Add the ¾ cup of pumpkin puree and ½ cup of warm water to the dry ingredients, then stir with a wooden spoon until a shaggy dough forms.
3. Knead the dough on a lightly floured surface for about 3 minutes until it becomes smooth and elastic, adding a bit more flour if it feels too sticky.
4. Gently fold in the chopped sage leaves until they are evenly distributed throughout the dough.
5. Divide the dough into 6 equal portions and roll each one into a ball, then flatten each ball into a ¼-inch thick round using your hands or a rolling pin.
6. Heat a splash of vegetable oil in a skillet over medium heat until it reaches 350°F, checking with a kitchen thermometer for accuracy.
7. Carefully place one dough round into the hot oil and fry for 2–3 minutes until the bottom is golden brown and bubbles form on the surface.
8. Flip the fry bread with tongs and cook for another 2–3 minutes until the other side is equally golden and crisp.
9. Transfer the cooked fry bread to a paper towel-lined plate to drain any excess oil, and repeat with the remaining dough rounds.
10. If desired, dust the warm fry bread with a sprinkle of powdered sugar just before serving.
Soft and slightly chewy on the inside with a crispy golden crust, this fry bread lets the pumpkin’s sweetness shine alongside the aromatic sage. Serve it warm with a drizzle of honey for a sweet treat or alongside a savory stew to soak up all the flavors.
Venison and Blue Corn Tamales

For those seeking an authentic taste of the Southwest, these venison and blue corn tamales deliver rich, earthy flavors wrapped in a beautiful package. First, let’s gather everything we’ll need to create this special dish from scratch.
Ingredients
– 2 cups of blue corn masa harina
– 1 cup of warm chicken broth
– ½ cup of softened lard
– 1 teaspoon of baking powder
– 1 pound of ground venison
– 1 diced yellow onion
– 2 minced garlic cloves
– 1 tablespoon of chili powder
– 1 teaspoon of ground cumin
– A splash of red wine vinegar
– About 24 dried corn husks soaked in warm water
– A couple of tablespoons of vegetable oil
Instructions
1. Soak the dried corn husks in warm water for 30 minutes until they become pliable and easy to work with.
2. Heat 2 tablespoons of vegetable oil in a large skillet over medium heat until it shimmers.
3. Add the diced yellow onion and cook for 5 minutes until translucent and fragrant.
4. Stir in the minced garlic cloves and cook for 1 minute until aromatic.
5. Add the ground venison to the skillet, breaking it up with a spoon, and cook for 8 minutes until browned throughout.
6. Sprinkle in 1 tablespoon of chili powder and 1 teaspoon of ground cumin, stirring to coat the meat evenly.
7. Add a splash of red wine vinegar to deglaze the pan, scraping up any browned bits from the bottom.
8. Remove the skillet from heat and let the filling cool completely—this prevents the masa from becoming greasy.
9. In a large bowl, beat ½ cup of softened lard with an electric mixer for 3 minutes until light and fluffy.
10. Gradually mix in 2 cups of blue corn masa harina and 1 teaspoon of baking powder until well combined.
11. Slowly pour in 1 cup of warm chicken broth while mixing, continuing for 5 minutes until the dough is smooth and holds its shape.
12. Test the masa by dropping a small ball into a glass of water—if it floats, it’s ready for steaming.
13. Pat dry a soaked corn husk and spread 2 tablespoons of masa dough in the center, leaving 1-inch borders on all sides.
14. Spoon 1 tablespoon of the cooled venison filling down the center of the masa.
15. Fold the sides of the husk inward to encase the filling, then fold up the bottom to create a packet.
16. Arrange the tamales upright in a steamer basket with the open ends facing upward.
17. Steam the tamales over boiling water for 60 minutes, checking periodically to ensure the water doesn’t evaporate completely.
18. Remove one tamale after 60 minutes—the husk should pull away cleanly from the masa when done.
During your first bite, you’ll notice the tender, slightly coarse texture of the blue corn masa contrasting beautifully with the savory, gamey venison filling. The corn husks impart a subtle earthy aroma that enhances the overall experience. Consider serving these tamales with a bright tomatillo salsa or alongside black beans for a complete meal that celebrates traditional Southwest cooking.
Herb-Basted Roast Turkey
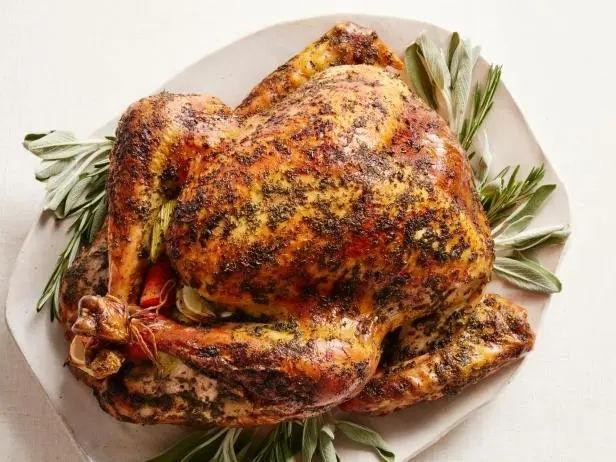
Just imagine the aroma of herbs filling your kitchen as you prepare this showstopping centerpiece. Juicy, flavorful turkey doesn’t have to be intimidating when you follow these simple, methodical steps. Consider this your foolproof guide to holiday success.
Ingredients
– One 12-14 pound turkey (completely thawed if frozen)
– A generous ½ cup of softened butter
– A couple of tablespoons of fresh chopped rosemary
– A couple of tablespoons of fresh chopped thyme
– A couple of tablespoons of fresh chopped sage
– A good splash of olive oil (about 2 tablespoons)
– A solid teaspoon of kosher salt
– A solid teaspoon of black pepper
– About 4 cups of chicken broth for basting
Instructions
1. Preheat your oven to 325°F and position a rack in the lowest third of the oven.
2. Remove the turkey from its packaging and pat the entire surface completely dry with paper towels. (Tip: A dry skin is crucial for getting that beautifully crisp, golden-brown finish.)
3. In a small bowl, mix the softened butter, chopped rosemary, thyme, sage, olive oil, kosher salt, and black pepper until it forms a smooth, fragrant herb butter.
4. Carefully loosen the skin over the turkey breast by gently sliding your fingers between the skin and the meat, being careful not to tear it.
5. Spread about two-thirds of the herb butter mixture evenly underneath the loosened skin, directly onto the breast meat.
6. Rub the remaining one-third of the herb butter mixture all over the outside of the turkey.
7. Place the turkey, breast-side up, on a rack set inside a roasting pan.
8. Pour the 4 cups of chicken broth into the bottom of the roasting pan, not over the turkey.
9. Place the turkey in the preheated 325°F oven and roast, uncovered.
10. After the first hour, begin basting the turkey every 30 minutes by spooning the pan juices from the bottom of the pan over the entire bird. (Tip: Basting with the broth-infused pan juices keeps the meat incredibly moist and builds flavor in the skin.)
11. Roast until a meat thermometer inserted into the thickest part of the thigh reads 165°F, which will take approximately 3 to 3 ½ hours for a 12-14 pound bird.
12. Once the turkey reaches 165°F, carefully remove it from the oven. (Tip: Letting the turkey rest is non-negotiable; it allows the juices to redistribute, ensuring every slice is succulent.)
13. Transfer the turkey to a clean cutting board or platter and let it rest, tented loosely with foil, for 30 full minutes before carving.
Carving reveals meat that’s incredibly juicy, with a crisp, herb-infused skin that shatters beautifully. The combination of rosemary, thyme, and sage creates a classic, aromatic flavor profile that pairs wonderfully with both rich gravy and bright cranberry sauce. For a stunning presentation, serve the carved turkey arranged on a platter with roasted autumn vegetables tucked all around it.
Chokecherry Jelly-Glazed Sweet Potatoes
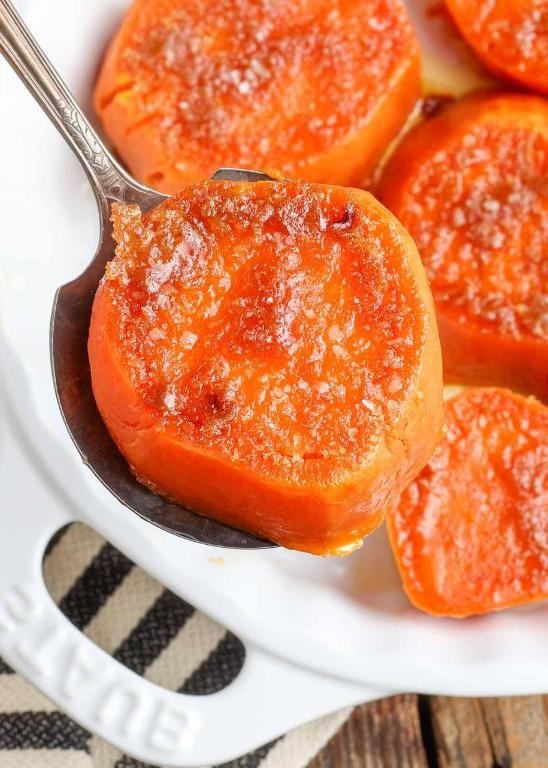
Keeping sweet potatoes perfectly tender while achieving that glossy, flavorful glaze can be tricky, but this method ensures success every time. Let’s walk through creating these chokecherry jelly-glazed sweet potatoes, where each step builds toward that ideal balance of sweet and earthy flavors. You’ll be amazed at how simple techniques transform humble ingredients into something truly special.
Ingredients
– 3 large sweet potatoes, peeled and cubed
– 1/2 cup of chokecherry jelly
– 2 tablespoons of unsalted butter
– A good pinch of salt
– A splash of water
Instructions
1. Preheat your oven to 400°F and line a baking sheet with parchment paper.
2. Peel 3 large sweet potatoes and cut them into 1-inch cubes for even cooking.
3. Arrange the sweet potato cubes in a single layer on the prepared baking sheet.
4. Roast the sweet potatoes for 25 minutes until they’re fork-tender but not mushy. (Tip: Don’t overcrowd the pan—this ensures they roast instead of steam.)
5. While the sweet potatoes roast, combine 1/2 cup chokecherry jelly, 2 tablespoons unsalted butter, a good pinch of salt, and a splash of water in a small saucepan.
6. Heat the glaze mixture over medium heat, stirring constantly until the butter melts and the ingredients are fully combined, about 3-4 minutes.
7. Remove the roasted sweet potatoes from the oven and transfer them to a large mixing bowl.
8. Pour the warm chokecherry jelly glaze over the sweet potatoes in the bowl.
9. Gently toss the sweet potatoes with the glaze until every piece is evenly coated. (Tip: Use a rubber spatula to avoid breaking the tender cubes.)
10. Return the glazed sweet potatoes to the baking sheet and spread them back into a single layer.
11. Roast for another 8-10 minutes until the glaze becomes sticky and caramelized at the edges. (Tip: Watch closely during the final minutes—the sugars in the jelly can burn quickly.)
12. Remove from the oven and let rest for 2 minutes before serving.
Creating that beautiful caramelized crust while keeping the interior fluffy is what makes this dish stand out. Consider serving these glazed sweet potatoes alongside roasted chicken or as part of a holiday spread—their vibrant color and sweet-tart flavor will definitely impress your guests.
Juniper Berry and Herb-Rubbed Roast Duck
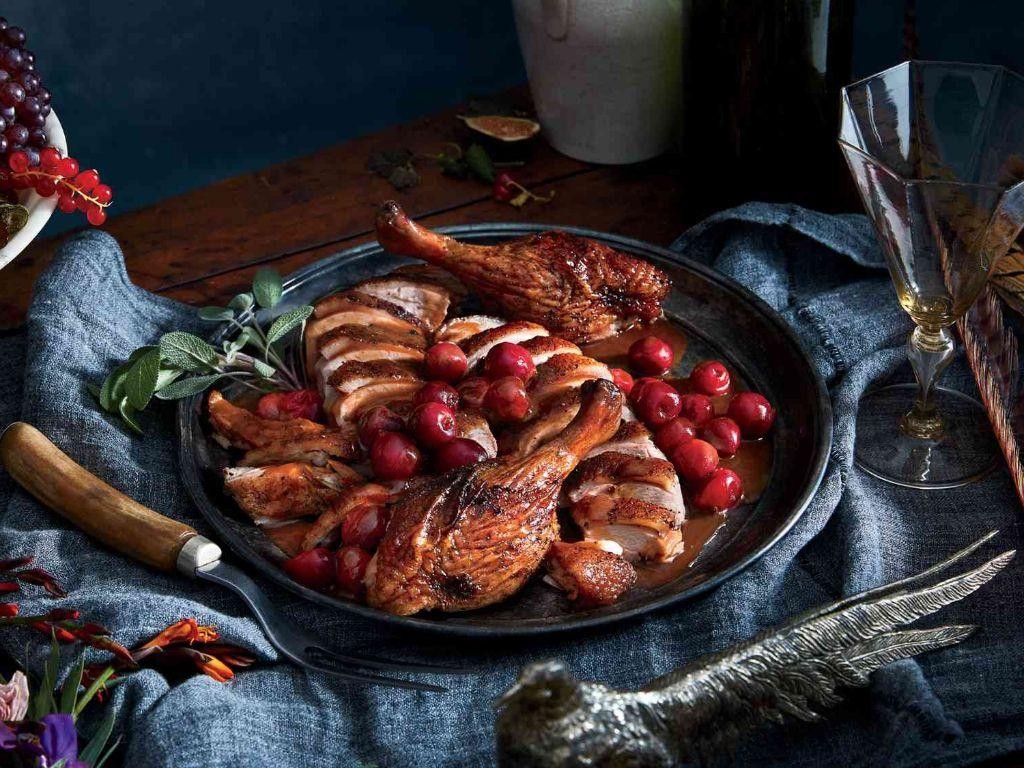
Tackling a whole duck might seem intimidating, but breaking it down into simple steps makes this impressive dish totally achievable for any home cook. This juniper berry and herb rub creates a beautifully aromatic crust that fills your kitchen with the most incredible savory fragrance while roasting.
Ingredients
– One whole duck (about 5-6 pounds)
– A couple tablespoons of olive oil
– A generous palmful of dried juniper berries (about 2 tablespoons)
– A few sprigs each of fresh rosemary and thyme
– A couple of garlic cloves
– A good sprinkle of kosher salt (about 1 tablespoon)
– A few cracks of black pepper (about 1 teaspoon)
Instructions
1. Preheat your oven to 350°F and position a rack in the center.
2. Pat the duck completely dry inside and out with paper towels—this helps the skin get extra crispy.
3. Crush the juniper berries using a mortar and pestle or the bottom of a heavy pan until they’re coarsely ground.
4. Strip the leaves from the rosemary and thyme sprigs, then finely chop them along with the garlic cloves.
5. Mix the crushed juniper berries, chopped herbs, garlic, salt, and pepper with the olive oil to form a thick paste.
6. Rub this mixture evenly over the entire surface of the duck, including inside the cavity.
7. Place the duck breast-side up on a rack in a roasting pan—using a rack allows heat to circulate evenly.
8. Roast for about 2 hours, until the skin is deep golden brown and crispy.
9. Check for doneness by inserting a meat thermometer into the thickest part of the thigh; it should read 165°F.
10. Let the duck rest for 15-20 minutes before carving—this allows the juices to redistribute throughout the meat.
What emerges from your oven is truly spectacular—the skin crackles with each bite while the meat beneath remains incredibly juicy and infused with the piney juniper and earthy herbs. Try serving thin slices over a bed of wild rice with roasted root vegetables, or shred the leftovers into tacos with pickled red onions for a completely different meal the next day.
Smoked Fish and Wild Green Salad
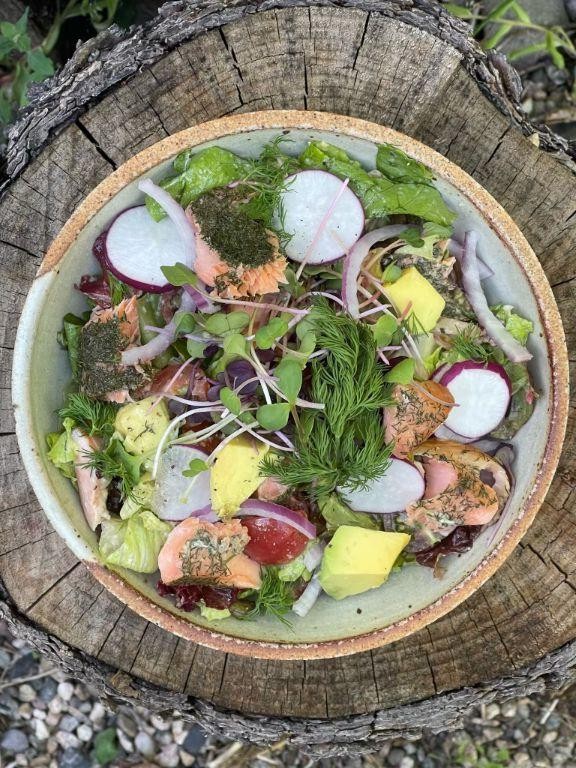
For those seeking a light yet satisfying meal that comes together with minimal fuss, this smoked fish and wild green salad delivers fresh flavors and satisfying textures in every bite. Follow these simple steps to create a restaurant-worthy dish right in your own kitchen.
Ingredients
– 4 cups of mixed wild greens
– 8 ounces of smoked trout or salmon, flaked into bite-sized pieces
– 1/2 cup of cherry tomatoes, halved
– 1/4 cup of thinly sliced red onion
– 2 tablespoons of extra virgin olive oil
– 1 tablespoon of fresh lemon juice
– A pinch of sea salt
– A couple of grinds of black pepper
Instructions
1. Place 4 cups of mixed wild greens in a large salad bowl.
2. Add 1/2 cup of halved cherry tomatoes to the bowl.
3. Sprinkle 1/4 cup of thinly sliced red onion over the greens and tomatoes.
4. Drizzle 2 tablespoons of extra virgin olive oil evenly over the salad ingredients.
5. Squeeze 1 tablespoon of fresh lemon juice directly over the salad.
6. Add a pinch of sea salt to the bowl.
7. Grind a couple of rounds of black pepper over the salad.
8. Using salad tongs, gently toss all ingredients until evenly coated with dressing.
9. Arrange 8 ounces of flaked smoked trout or salmon on top of the dressed greens.
10. Serve immediately to prevent the greens from wilting.
Light and refreshing, this salad offers a delightful contrast between the smoky fish and bright citrus notes, with the wild greens providing varied textures from tender to slightly crisp. Try serving it on toasted sourdough for an open-faced sandwich, or pack it for a sophisticated picnic where the flavors will meld beautifully during transport.
Cranberry Wojapi Dessert
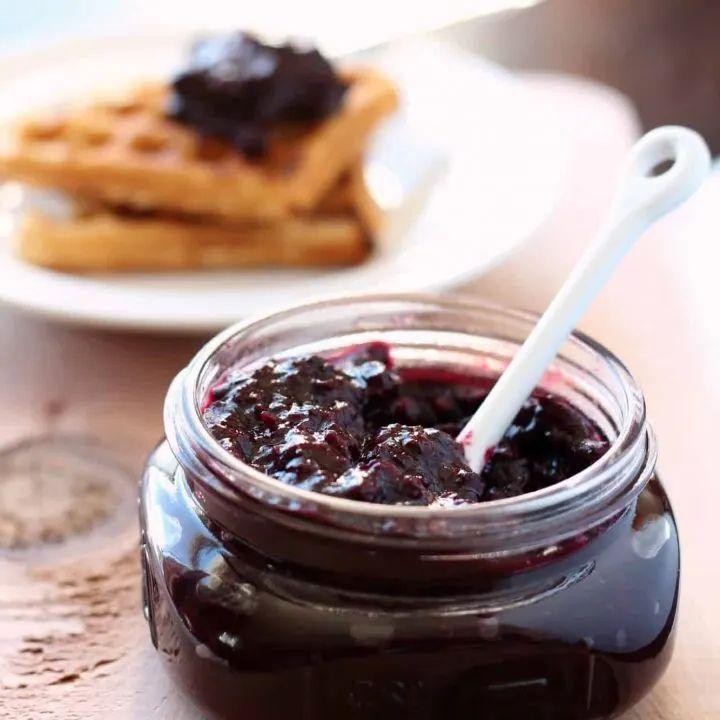
Many traditional Native American dishes have stood the test of time for good reason, and this cranberry wojapi dessert is no exception. Making this sweet-tart fruit pudding requires just a handful of simple ingredients but delivers incredible flavor that will have everyone asking for seconds. Let me walk you through each step so you can create this beautiful dessert with confidence.
Ingredients
– 4 cups of fresh or frozen cranberries
– 1 cup of granulated sugar
– 1/2 cup of cold water
– 3 tablespoons of cornstarch
– A splash of vanilla extract
– A pinch of salt
Instructions
1. Rinse 4 cups of cranberries thoroughly under cold running water and drain them completely.
2. Combine the rinsed cranberries, 1 cup of sugar, and 1/2 cup of cold water in a medium saucepan over medium heat.
3. Cook the mixture for 10-12 minutes, stirring occasionally with a wooden spoon until the cranberries burst open and release their juices.
4. Reduce the heat to low and simmer the cranberry mixture for another 5 minutes to develop deeper flavor.
5. In a small bowl, whisk together 3 tablespoons of cornstarch with 2 tablespoons of cold water until completely smooth with no lumps.
6. Slowly pour the cornstarch slurry into the simmering cranberry mixture while stirring constantly.
7. Continue cooking and stirring for 3-4 minutes until the mixture thickens noticeably and becomes glossy.
8. Remove the saucepan from heat and stir in a splash of vanilla extract and a pinch of salt.
9. Let the wojapi cool in the pan for 15 minutes before transferring to a serving bowl.
10. Cover the bowl with plastic wrap, pressing it directly onto the surface to prevent a skin from forming.
11. Refrigerate the wojapi for at least 2 hours until completely chilled and set.
Our finished wojapi has a beautiful jewel-like appearance with a texture that’s both silky and substantial. The tart cranberries balance perfectly with the sweetness, creating a dessert that’s refreshing rather than heavy. Over warm biscuits or alongside vanilla ice cream, this versatile sauce transforms simple treats into something truly special.
Elderberry Cornmeal Pudding
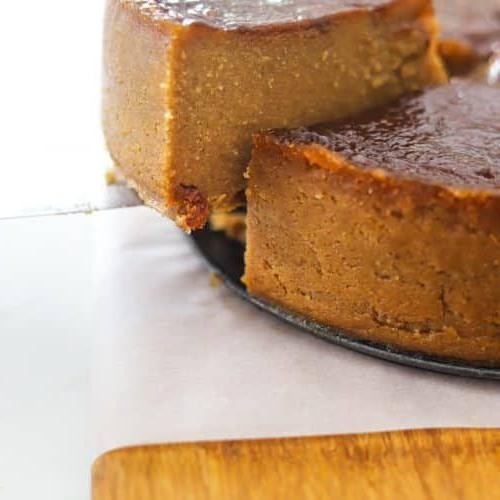
Cooking with seasonal ingredients often leads to delightful discoveries, and this elderberry cornmeal pudding perfectly captures late summer’s bounty in a comforting, old-fashioned dessert that comes together with simple pantry staples. Let’s walk through creating this rustic treat step by step.
Ingredients
– 1 cup of fine yellow cornmeal
– 2 cups of fresh elderberries (or frozen if that’s what you have)
– 1/2 cup of granulated sugar
– 2 large eggs from the fridge
– 1 cup of whole milk
– A good splash of vanilla extract (about 1 tablespoon)
– A couple of tablespoons of melted butter
– A pinch of salt
– 1 teaspoon of baking powder
Instructions
1. Preheat your oven to 350°F and grease an 8×8 inch baking dish with butter.
2. Rinse the elderberries thoroughly under cool water and pat them completely dry with paper towels.
3. In a medium bowl, whisk together the cornmeal, sugar, baking powder, and salt until well combined.
4. Crack the eggs into a separate large bowl and beat them with a whisk until they’re pale and frothy.
5. Pour the milk, melted butter, and vanilla extract into the eggs and whisk until the mixture is smooth.
6. Gradually add the dry ingredients to the wet ingredients, stirring constantly until no lumps remain.
7. Gently fold in the elderberries using a spatula, being careful not to crush them.
8. Pour the batter into your prepared baking dish and spread it evenly with the spatula.
9. Bake for 45-50 minutes, until the top is golden brown and a toothpick inserted in the center comes out clean.
10. Let the pudding cool in the dish on a wire rack for at least 20 minutes before serving.
Serve this warm pudding with a dollop of whipped cream or a scoop of vanilla ice cream. The cornmeal gives it a wonderfully gritty texture that contrasts beautifully with the burst of tart elderberries. This dessert also makes excellent leftovers—simply reheat individual portions in the microwave for 30 seconds.
Conclusion
Keeping these authentic Native American Thanksgiving recipes alive honors the true roots of this holiday. We hope you’ll bring these meaningful dishes to your table, share which recipes become family favorites in the comments below, and pin this article to your Pinterest boards to help preserve these important culinary traditions.