Unbelievably crispy, mouth-tingling spicy, and surprisingly easy to make right in your air fryer! This Nashville hot chicken recipe delivers all the fiery flavor you crave without the deep-fryer mess, making it the perfect weeknight indulgence that’ll have your taste buds dancing with joy.
Why This Recipe Works
- The air fryer creates an incredibly crispy exterior without submerging the chicken in oil, resulting in a lighter yet still satisfying crunch that rivals traditional deep-frying methods.
- Our signature spice blend combines cayenne pepper, paprika, and brown sugar to create that perfect balance of heat, smokiness, and subtle sweetness that defines authentic Nashville hot chicken flavor.
- Brining the chicken in buttermilk with hot sauce tenderizes the meat while infusing it with flavor, ensuring every bite is juicy, flavorful, and perfectly seasoned throughout.
- The two-stage cooking process – air frying first, then tossing in the spicy oil mixture – prevents the spices from burning while allowing the chicken to develop that signature glossy, fiery coating.
- Using chicken thighs instead of breasts provides more flavorful, moist results that stand up beautifully to the high heat and bold spices, giving you restaurant-quality results at home.
Ingredients
- 2 pounds boneless, skinless chicken thighs, trimmed of excess fat
- 2 cups buttermilk, shaken well before measuring
- 1/4 cup hot sauce (preferably Louisiana-style)
- 2 cups all-purpose flour, spooned and leveled
- 1 tablespoon garlic powder
- 1 tablespoon onion powder
- 2 teaspoons smoked paprika
- 2 teaspoons kosher salt
- 1 teaspoon black pepper, freshly ground
- 1/2 cup vegetable oil or peanut oil
- 1/4 cup cayenne pepper
- 2 tablespoons light brown sugar, packed
- 1 teaspoon chili powder
- 1/2 teaspoon garlic powder
- 1/2 teaspoon paprika
- White bread slices and pickle chips for serving
Equipment Needed
- Air fryer (basket or oven style)
- Large mixing bowls (2)
- Whisk
- Measuring cups and spoons
- Tongs
- Shallow dishes for dredging
- Small saucepan
- Instant-read thermometer
- Wire rack
Instructions
Prepare the Chicken Brine
Start by placing your chicken thighs in a large bowl and pouring over the buttermilk and hot sauce. Use your hands or tongs to ensure each piece is thoroughly coated in the mixture. The acidity in the buttermilk will work magic on tenderizing the chicken while the hot sauce begins building those flavor layers. Cover the bowl with plastic wrap and refrigerate for at least 4 hours, though overnight is even better if you have the time. This brining step is crucial for achieving that incredibly juicy interior that contrasts so beautifully with the crispy exterior. Pro tip: If you’re short on time, even 30 minutes of brining will help, but the longer you can let it soak, the more flavorful and tender your chicken will become.
Create the Dredging Station
While the chicken is brining, prepare your dredging station by combining the flour, garlic powder, onion powder, smoked paprika, kosher salt, and black pepper in a large shallow dish. Whisk these dry ingredients together until they’re completely uniform in color and texture – you shouldn’t see any streaks of individual spices. This ensures every piece of chicken gets consistent seasoning throughout the coating. Set up your workstation with the brined chicken in one bowl, the flour mixture next to it, and a clean plate or wire rack on the other side for the coated chicken. The key here is to keep one hand for wet ingredients and one for dry to avoid clumpy fingers. This methodical setup makes the dredging process smooth and efficient.
Dredge and Arrange the Chicken
Remove the chicken from the buttermilk brine, allowing excess liquid to drip off without shaking too vigorously – you want enough moisture to help the flour adhere properly. Working with one piece at a time, press the chicken firmly into the flour mixture, ensuring all sides are thoroughly coated. Then shake off any excess flour before placing it on your prepared wire rack. Repeat with all chicken pieces, making sure they don’t touch each other on the rack to prevent sticking. Let the dredged chicken rest for about 10-15 minutes while you preheat your air fryer to 375°F. This resting period helps the coating set up properly and results in a crispier final product that won’t fall off during cooking.
Air Fry to Golden Perfection
Lightly spray your air fryer basket with cooking spray to prevent sticking, then arrange the chicken in a single layer without overcrowding – you’ll likely need to work in batches depending on your air fryer size. Cook at 375°F for 12-15 minutes, then carefully flip each piece using tongs. Continue cooking for another 10-12 minutes until the coating is deeply golden brown and crispy. The internal temperature should reach 165°F when measured with an instant-read thermometer inserted into the thickest part of the chicken. If some pieces are cooking faster than others, rotate their positions in the basket halfway through. The chicken should sound hollow when tapped and the coating should be firm and crisp.
Prepare the Nashville Hot Oil
While the chicken is air frying, prepare the signature Nashville hot oil by combining vegetable oil, cayenne pepper, brown sugar, chili powder, garlic powder, and paprika in a small saucepan. Heat over medium heat for 3-4 minutes, stirring constantly, until the mixture becomes fragrant and the sugar dissolves completely. You’ll know it’s ready when tiny bubbles form around the edges and the spices have infused into the oil, creating a deep red, glossy mixture. Remove from heat immediately once heated through – be careful not to let it smoke or burn the spices. The oil should be warm but not scalding hot when you’re ready to use it. This gentle heating activates the spices without making them bitter.
Coat and Serve Immediately
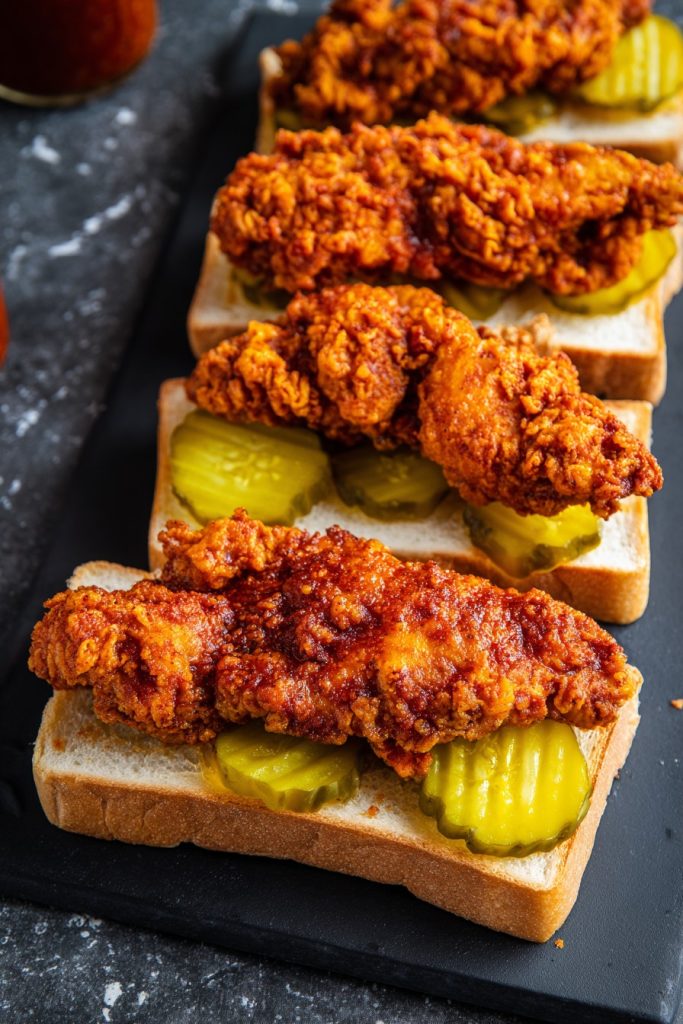
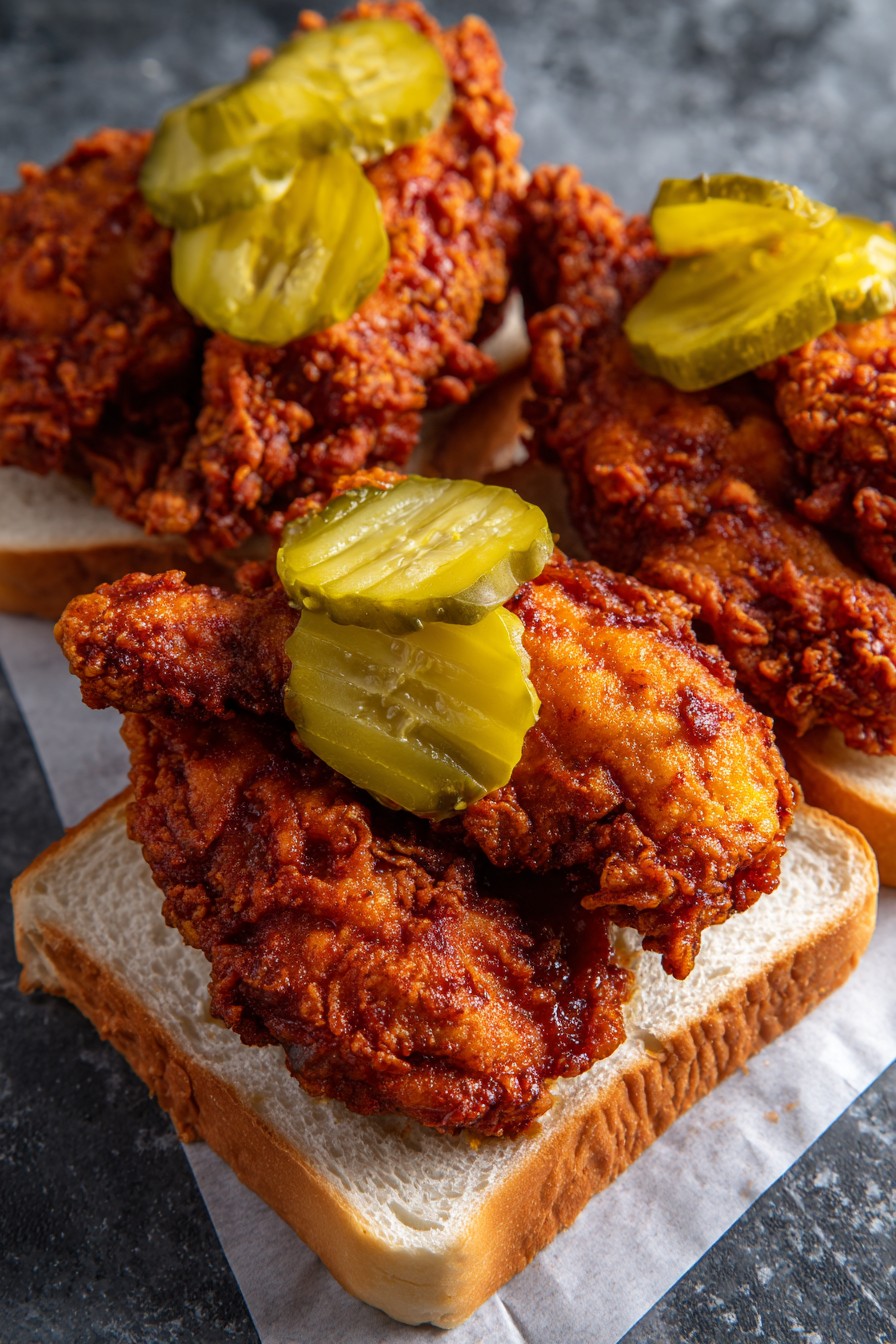
As soon as the chicken comes out of the air fryer, use tongs to dip each piece into the warm Nashville hot oil mixture, coating thoroughly on all sides. Work quickly while the chicken is still piping hot to ensure the oil adheres properly and soaks into the crispy coating. Transfer the coated chicken to a clean wire rack set over a baking sheet to catch any drips. Serve immediately on slices of white bread with pickle chips on the side – the traditional Nashville way! The bread soaks up the delicious spicy oil while the pickles provide that perfect tangy contrast to the heat. Enjoy while hot for the ultimate crispy, spicy experience.
Tips and Tricks
For the crispiest possible coating, make sure your chicken pieces are thoroughly dried after removing them from the buttermilk brine – pat them gently with paper towels before dredging. Excess moisture can create steam during cooking, which might make the coating soggy rather than crisp. When arranging chicken in your air fryer, leave plenty of space between pieces to allow for proper air circulation; overcrowding will result in steamed rather than crispy chicken. If your air fryer has a tendency to blow flour around, you can lightly spritz the dredged chicken with cooking spray before air frying to help set the coating. For extra crispy results, some air fryer models benefit from preheating empty for 2-3 minutes before adding the chicken – this gives you that immediate sear effect. If you’re concerned about the spice level, you can make the Nashville hot oil with half the cayenne pepper and serve additional hot oil on the side for those who want more heat. The beauty of making it yourself is controlling the spice level to your preference. For even cooking, choose chicken thighs that are relatively uniform in size and thickness – if you have some particularly thick pieces, consider pounding them gently to an even ½-inch thickness. When making the hot oil mixture, if you find it too thick, you can thin it with a tablespoon or two of additional oil until it reaches a brushable consistency. Leftover Nashville hot oil can be stored in an airtight container in the refrigerator for up to two weeks and makes an incredible seasoning for fries, roasted vegetables, or even drizzled over pizza. If you’re serving a crowd, you can keep the first batches of chicken warm in a 200°F oven while you finish cooking subsequent batches – just place them on a wire rack over a baking sheet to maintain crispness. For an extra flavor boost, try adding a teaspoon of mustard powder or a pinch of ground cumin to your flour dredge mixture. If you don’t have buttermilk, you can make a quick substitute by adding 1 tablespoon of lemon juice or vinegar to 1 cup of milk and letting it sit for 5 minutes before using. When testing for doneness, always use an instant-read thermometer rather than relying solely on timing – different air fryer models can vary significantly in actual temperature and cooking efficiency.
Recipe Variations
- For a gluten-free version, substitute the all-purpose flour with a 1:1 gluten-free flour blend and ensure your hot sauce and spices are certified gluten-free. The cooking time may need slight adjustment as gluten-free coatings can behave differently, but you’ll still achieve that wonderful crispy texture that makes this dish so addictive.
- Create a milder version by reducing the cayenne pepper to 2 tablespoons and adding 2 tablespoons of sweet paprika instead. This gives you all the flavor without the intense heat, perfect for family meals where not everyone enjoys spicy food but still wants that Nashville chicken experience.
- Try different chicken cuts like boneless skinless chicken breasts cut into strips for tenders, or even chicken wings for game day. Adjust cooking times accordingly – breasts will cook faster than thighs, while wings might need a few extra minutes to become properly crispy.
- Experiment with additional spices in your dredge like a teaspoon of mustard powder, smoked salt, or even a pinch of cinnamon for depth. In the hot oil mixture, try adding a tablespoon of maple syrup instead of brown sugar for a different sweetness profile that pairs beautifully with the heat.
- For a vegetarian alternative, use large cauliflower florets or thick slices of eggplant following the same process. You’ll need to reduce the cooking time to about 10-12 minutes per side at 375°F, and the result is a surprisingly satisfying plant-based version that still delivers that signature Nashville heat and crunch.
Frequently Asked Questions
Can I use chicken breasts instead of thighs?
Absolutely! Chicken breasts work well but require some adjustments. Since breasts are leaner, they cook faster and can dry out more easily. Reduce the cooking time to 10-12 minutes per side at 375°F and use an instant-read thermometer to ensure they reach 165°F without overcooking. I recommend pounding thicker breasts to an even ½-inch thickness for consistent cooking. The brining step becomes even more important with breasts to maintain juiciness. You might also want to spritz with a little oil before air frying since breasts have less natural fat than thighs.
How spicy is this recipe really?
This recipe delivers authentic Nashville heat, which means it’s quite spicy but balanced by the sweetness from brown sugar. On a scale of 1-10, I’d rate it about an 8. The cayenne pepper provides the primary heat, while the other spices add complexity without increasing burn. If you’re sensitive to spice, start with half the cayenne and add more to taste. Remember that the buttermilk brine and serving with bread and pickles help mitigate the heat. The spice level can also vary depending on the freshness of your cayenne pepper – newer spices tend to be more potent.
Can I make this ahead of time?
You can prepare components ahead but I don’t recommend fully making it in advance. The chicken can brine overnight (up to 24 hours) and the spice mixtures can be prepared days ahead. However, the dredging and air frying should be done just before serving for the crispiest results. If you must reheat, use the air fryer at 375°F for 3-4 minutes to restore crispness rather than the microwave which will make it soggy. Leftovers will keep for 3-4 days refrigerated but will lose some texture quality.
What if I don’t have an air fryer?
No worries! You can achieve similar results in a conventional oven. Bake at 400°F on a wire rack set over a baking sheet for 25-30 minutes, flipping halfway through. The coating won’t be quite as crispy as air frying but still delicious. For even closer results, use the convection setting if your oven has it. You could also pan-fry in ½ inch of oil at 350°F for 4-5 minutes per side, though this defeats the health benefits of air frying. The hot oil coating method remains the same regardless of cooking method.
How do I clean my air fryer after making this?
The spice coating can create some mess but it’s manageable. Always unplug and let your air fryer cool completely before cleaning. Remove the basket and soak it in warm soapy water for 15-20 minutes to loosen any stuck-on bits. Use a non-abrasive sponge to avoid damaging non-stick surfaces. For stubborn residue, make a paste of baking soda and water and let it sit for 10 minutes before scrubbing. Never use steel wool or harsh chemicals. The main unit can be wiped with a damp cloth – never immerse it in water. Regular cleaning after each use prevents buildup and maintains performance.
Summary
This air fryer Nashville hot chicken delivers incredible crispy-spicy perfection with less oil than traditional methods. The buttermilk brine ensures juicy meat while the signature spice coating provides authentic heat balanced by subtle sweetness. Perfect for weeknight dinners or game day gatherings, this recipe brings restaurant-quality flavor to your home kitchen with surprisingly easy techniques that guarantee fantastic results every time.
Nashville Hot Chicken Air Fryer Recipe
6
servings20
minutes25
minutesIngredients
Instructions
- 1 Brine chicken in buttermilk and hot sauce for 4+ hours
- 2 Whisk flour with spices for dredging station
- 3 Dredge chicken, rest 10 minutes
- 4 Air fry at 375°F for 12-15 minutes per side
- 5 Heat oil with spices for Nashville coating
- 6 Dip hot chicken in oil mixture and serve immediately


