Now, imagine transforming the traditional moon cake into a delightful adventure for your taste buds! Whether you’re a seasoned baker or just starting out, our collection of 33 unique moon cake flavors will inspire your next kitchen creation. From sweet to savory, these recipes bring a modern twist to a classic treat, perfect for sharing with friends and family. Get ready to explore and find your new favorite!
Traditional Lotus Seed Paste Moon Cake
Grab your rolling pin—we’re making moon cakes that’ll have your crew begging for the recipe. These Traditional Lotus Seed Paste Moon Cakes are a buttery, golden delight with a sweet, velvety center. Perfect for your next gathering or a cozy night in.
Serving: 12 | Pre Time: 30 minutes | Cooking Time: 25 minutes
Ingredients
– 2 cups of all-purpose flour
– 1/2 cup of powdered sugar
– 3/4 cup of unsalted butter, softened
– A splash of water
– 1 1/2 cups of lotus seed paste
– 1 egg, beaten
– A pinch of salt
Instructions
1. In a large bowl, combine 2 cups of all-purpose flour, 1/2 cup of powdered sugar, and a pinch of salt.
2. Add 3/4 cup of softened unsalted butter to the bowl and mix with your hands until it resembles coarse crumbs.
3. Pour in a splash of water and knead the dough for about 5 minutes until smooth and pliable. Tip: If the dough feels dry, add another teaspoon of water.
4. Cover the dough with plastic wrap and let it rest at room temperature for 20 minutes to relax the gluten.
5. Preheat your oven to 350°F and line a baking sheet with parchment paper.
6. Divide the dough into 12 equal portions and roll each into a ball.
7. Flatten each ball into a small disc, about 3 inches in diameter, using a rolling pin.
8. Place 2 tablespoons of lotus seed paste in the center of each disc.
9. Wrap the dough around the paste, pinching the edges to seal tightly. Tip: Roll it gently in your palms to form a smooth ball.
10. Arrange the filled balls on the prepared baking sheet, spacing them 2 inches apart.
11. Lightly brush the tops with the beaten egg for a shiny finish.
12. Bake in the preheated oven for 20-25 minutes, or until golden brown. Tip: Rotate the sheet halfway through for even browning.
13. Remove from the oven and let cool on a wire rack for at least 30 minutes before serving.
Make these moon cakes your own—they’re crisp on the outside with a melt-in-your-mouth lotus paste inside. Serve them warm with a drizzle of honey or pair with tea for an authentic touch. Trust me, they’ll disappear fast!
Red Bean Paste Moon Cake
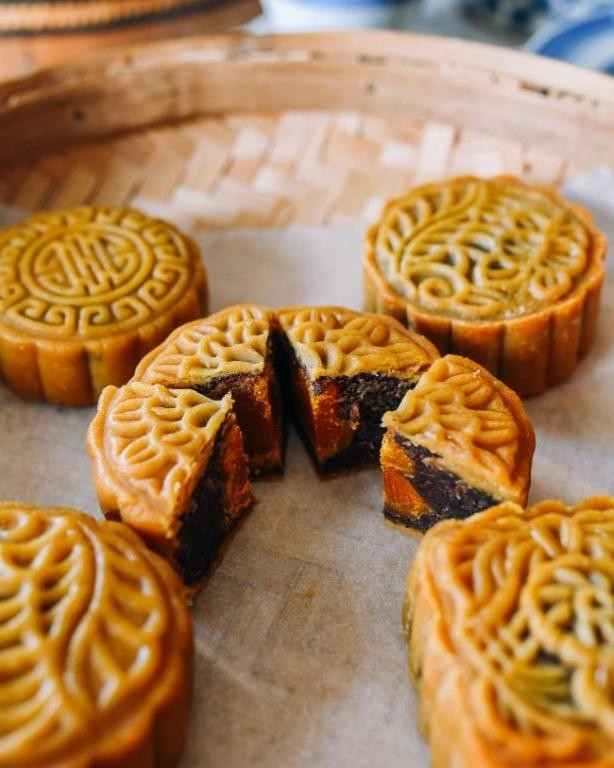
Packed with sweet tradition and modern flair, these Red Bean Paste Moon Cakes are your new autumn obsession. They’re surprisingly simple to make at home—just follow these steps for that iconic chewy crust and velvety filling. Get ready to impress everyone at your next gathering.
Serving: 12 | Pre Time: 30 minutes | Cooking Time: 25 minutes
Ingredients
– 2 cups of all-purpose flour
– ¾ cup of golden syrup (like Lyle’s)
– ½ cup of vegetable oil
– A splash of vanilla extract
– 1 teaspoon of baking soda
– A pinch of salt
– 2 cups of sweet red bean paste (store-bought or homemade)
– 1 egg, beaten (for that glossy egg wash)
Instructions
1. Preheat your oven to 350°F (175°C) and line a baking sheet with parchment paper.
2. In a large mixing bowl, whisk together 2 cups of all-purpose flour, 1 teaspoon of baking soda, and a pinch of salt until well combined.
3. In a separate bowl, stir ¾ cup of golden syrup, ½ cup of vegetable oil, and a splash of vanilla extract until smooth—this mixture should be glossy and thick.
4. Pour the wet ingredients into the dry ingredients and mix with a spatula until a soft dough forms; tip: don’t overmix to keep the crust tender.
5. Divide the dough into 12 equal portions and roll each into a ball, then flatten slightly with your palms.
6. Take 2 cups of sweet red bean paste and divide it into 12 portions, rolling each into a small ball about 1 inch in diameter.
7. Place a red bean paste ball in the center of each flattened dough piece and wrap the dough around it, pinching the edges to seal completely—tip: dust your hands with flour to prevent sticking.
8. Press each filled ball into a moon cake mold, applying firm pressure to imprint the design, then gently tap it out onto the prepared baking sheet.
9. Brush the tops of the moon cakes with the beaten egg wash using a pastry brush for a shiny finish.
10. Bake in the preheated oven for 20-25 minutes, or until the crust turns a light golden brown—tip: rotate the pan halfway through for even baking.
11. Remove from the oven and let cool on a wire rack for at least 1 hour before serving to allow the texture to set.
Rich and satisfying, these moon cakes boast a chewy, slightly crisp crust that gives way to a smooth, sweet red bean center. Serve them warm with a cup of tea for a cozy treat, or get creative by drizzling with honey or pairing with fresh fruit for a modern twist.
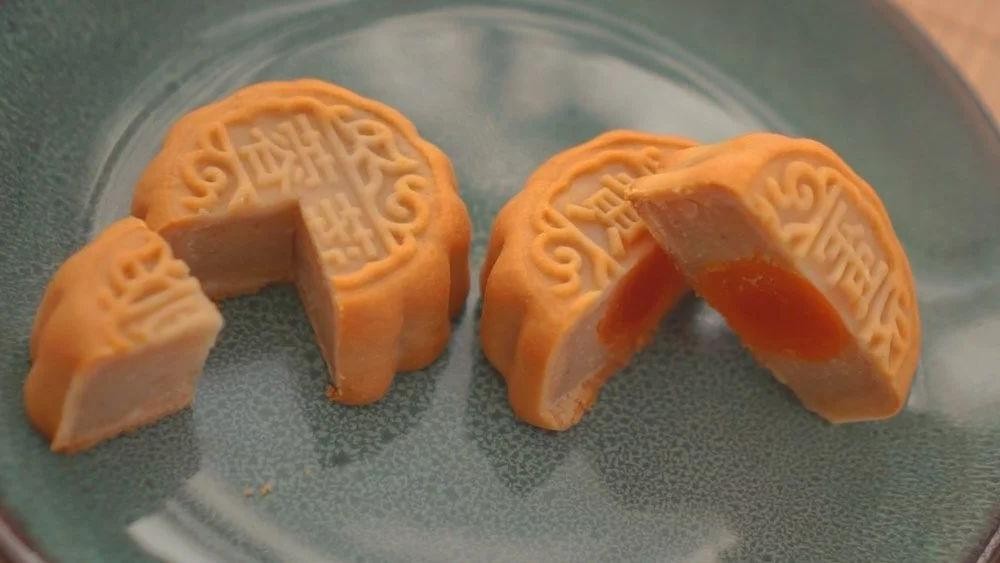
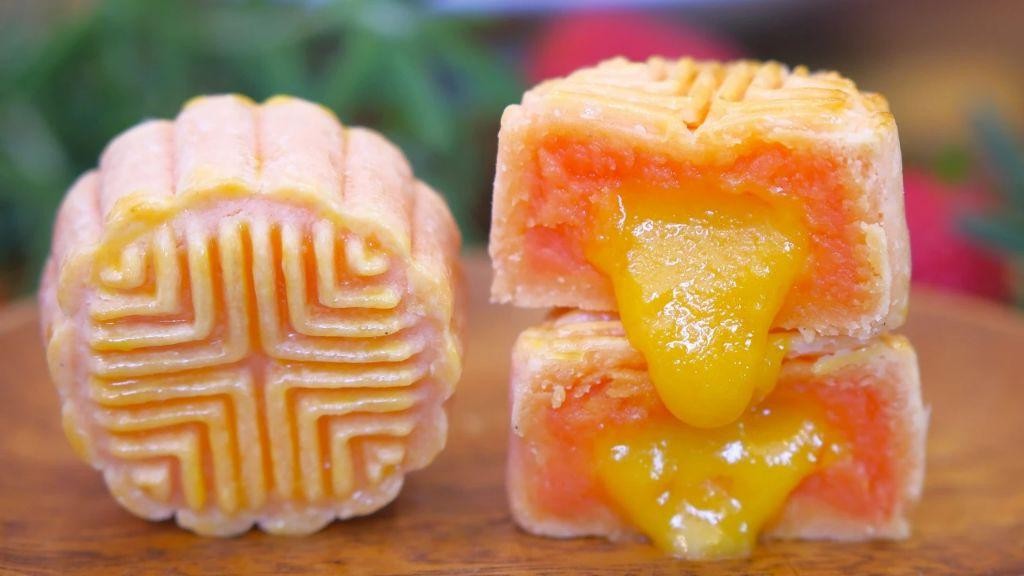
Salted Egg Yolk Moon Cake

A rich, savory-sweet treat that’s totally worth the hype. Imagine a golden pastry shell hugging a luscious salted egg yolk center—it’s a flavor bomb that’ll have you hooked. Get ready to impress at your next gathering with this showstopper.
Serving: 12 | Pre Time: 30 minutes | Cooking Time: 25 minutes
Ingredients
– 2 cups of all-purpose flour
– A pinch of salt
– 3/4 cup of unsalted butter, chilled and cubed
– 1/4 cup of cold water
– 12 salted duck egg yolks (you can find these at Asian grocery stores)
– A splash of milk for brushing
– A couple of tablespoons of sugar for dusting
Instructions
1. Preheat your oven to 350°F and line a baking sheet with parchment paper.
2. In a large bowl, mix the all-purpose flour and a pinch of salt until combined.
3. Add the chilled, cubed unsalted butter to the flour mixture—use your fingers to rub it in until it resembles coarse crumbs.
4. Gradually pour in the cold water, stirring until a dough forms, then knead it gently on a floured surface for about 2 minutes until smooth. Tip: Keep the butter cold to ensure a flaky crust!
5. Divide the dough into 12 equal portions and roll each into a ball, covering them with a damp cloth to prevent drying.
6. Take one salted duck egg yolk and wrap it tightly with a dough ball, sealing the edges by pinching them together.
7. Place each wrapped mooncake on the prepared baking sheet, spacing them about 2 inches apart.
8. Brush the tops lightly with a splash of milk for a golden finish.
9. Bake in the preheated oven for 20-25 minutes, or until the crust turns a light golden brown. Tip: Rotate the sheet halfway through for even baking!
10. Remove from the oven and immediately dust with a couple of tablespoons of sugar while still warm. Tip: The sugar will melt slightly, adding a subtle sweetness.
11. Let the mooncakes cool on a wire rack for at least 30 minutes before serving.
Delight in the contrast of the crisp, buttery shell against the creamy, salty yolk center. Serve these warm with a cup of tea for a cozy snack, or slice them up as a unique dessert at dinner parties—they’re sure to spark conversation!
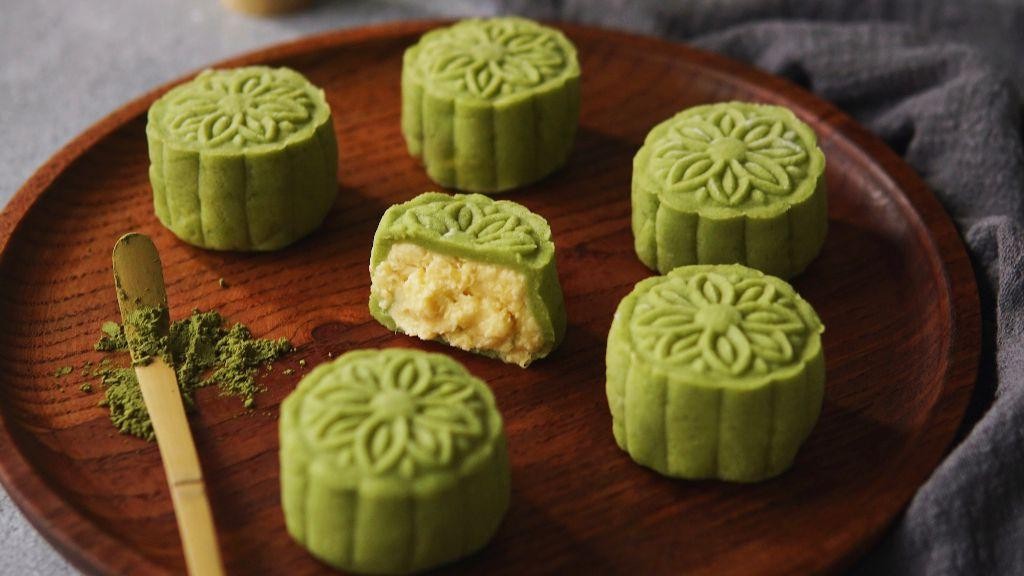
Green Tea Matcha Moon Cake
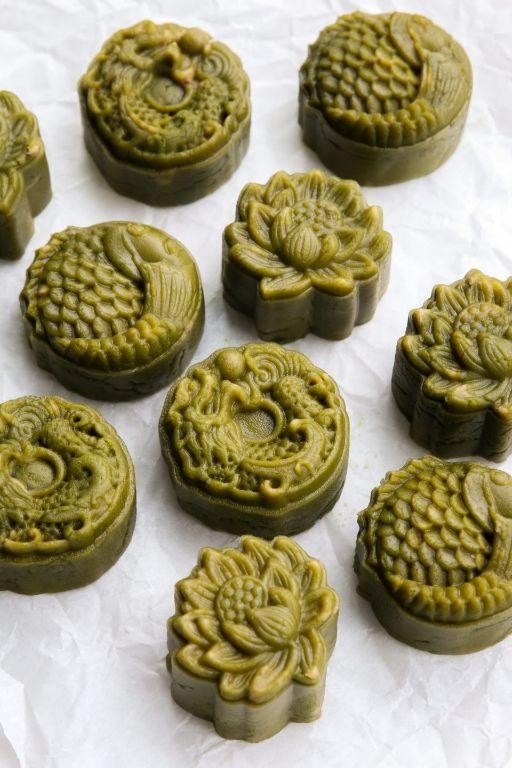
Tired of the same old mooncakes? This green tea matcha version brings a modern, earthy twist to the classic treat. It’s vibrant, not-too-sweet, and perfect for shaking up your dessert table.
Serving: 12 | Pre Time: 30 minutes | Cooking Time: 25 minutes
Ingredients
– 2 cups of all-purpose flour
– A good pinch of salt
– ¾ cup of granulated sugar
– ½ cup of unsalted butter, softened
– 1 large egg
– 2 tablespoons of matcha powder
– A splash of whole milk
– ½ cup of red bean paste (store-bought is fine!)
– 1 egg yolk mixed with a teaspoon of water (for that glossy egg wash)
Instructions
1. Preheat your oven to 350°F (175°C) and line a baking sheet with parchment paper.
2. In a large bowl, whisk together the all-purpose flour, salt, and matcha powder until evenly combined—no green streaks!
3. In a separate bowl, cream the softened butter and granulated sugar with an electric mixer on medium speed for about 3 minutes, until light and fluffy.
4. Beat in the large egg until fully incorporated, then add a splash of whole milk and mix briefly.
5. Gradually add the dry flour mixture to the wet ingredients, mixing on low speed just until a dough forms. Tip: Don’t overmix, or the cakes can get tough.
6. Divide the dough into 12 equal portions and roll each into a smooth ball between your palms.
7. Flatten each ball into a disc about 3 inches wide, place a teaspoon of red bean paste in the center, and wrap the dough around it, sealing tightly.
8. Place each filled ball seam-side down on the prepared baking sheet, spacing them about 2 inches apart.
9. Gently press a mooncake mold on top of each ball to imprint a design, if using. Tip: Dust the mold with a little flour first to prevent sticking.
10. Brush the tops lightly with the egg yolk wash using a pastry brush for a golden finish.
11. Bake in the preheated oven for 20–25 minutes, until the edges are lightly golden and the tops are firm to the touch.
12. Let the mooncakes cool on the baking sheet for 10 minutes, then transfer to a wire rack to cool completely. Tip: They firm up as they cool, so be patient for the best texture.
Chewy on the outside with a soft, sweet red bean center, these mooncakes offer a delightful contrast. The matcha adds a subtle bitterness that balances the sweetness perfectly. Serve them warm with a cup of green tea for an extra cozy treat, or gift them in a cute box for a homemade touch.
Chocolate Moon Cake with Almond Filling

Crafted for celestial cravings, this chocolate moon cake with almond filling delivers cosmic flavor in every bite. Think rich cocoa layers hugging a nutty surprise center—perfect for when you want dessert that’s out of this world. Grab your apron and let’s bake some magic.
Serving: 8 | Pre Time: 25 minutes | Cooking Time: 35 minutes
Ingredients
– 2 cups of all-purpose flour
– 1 cup of granulated sugar
– ¾ cup of unsweetened cocoa powder
– 1 teaspoon of baking soda
– A pinch of salt
– 2 large eggs
– 1 cup of buttermilk
– ½ cup of vegetable oil
– A splash of vanilla extract
– 1 cup of almond paste
– A couple of tablespoons of powdered sugar for dusting
Instructions
1. Preheat your oven to 350°F and grease a 9-inch round cake pan.
2. In a large bowl, whisk together the all-purpose flour, granulated sugar, unsweetened cocoa powder, baking soda, and salt until well combined.
3. In another bowl, beat the eggs lightly, then stir in the buttermilk, vegetable oil, and vanilla extract.
4. Tip: Mix wet ingredients gently to avoid overworking the batter for a tender crumb.
5. Pour the wet mixture into the dry ingredients and fold until just combined—no streaks of flour should remain.
6. Pour half of the batter into the prepared pan and spread it evenly with a spatula.
7. Roll the almond paste into a thin disk and place it over the batter layer in the pan.
8. Tip: If the almond paste is sticky, dust your hands with a bit of powdered sugar for easier handling.
9. Pour the remaining batter over the almond paste, covering it completely.
10. Bake in the preheated oven for 30-35 minutes, or until a toothpick inserted into the center comes out clean.
11. Tip: Check the cake at 30 minutes to prevent overbaking, as ovens can vary.
12. Remove the cake from the oven and let it cool in the pan for 10 minutes.
13. Transfer the cake to a wire rack to cool completely, about 1 hour.
14. Dust the cooled cake with powdered sugar before serving.
Zesty with a hint of nuttiness, this cake boasts a moist, fudgy texture that melts in your mouth. Serve it warm with a scoop of vanilla ice cream for a decadent twist, or slice it thin for an elegant afternoon treat.
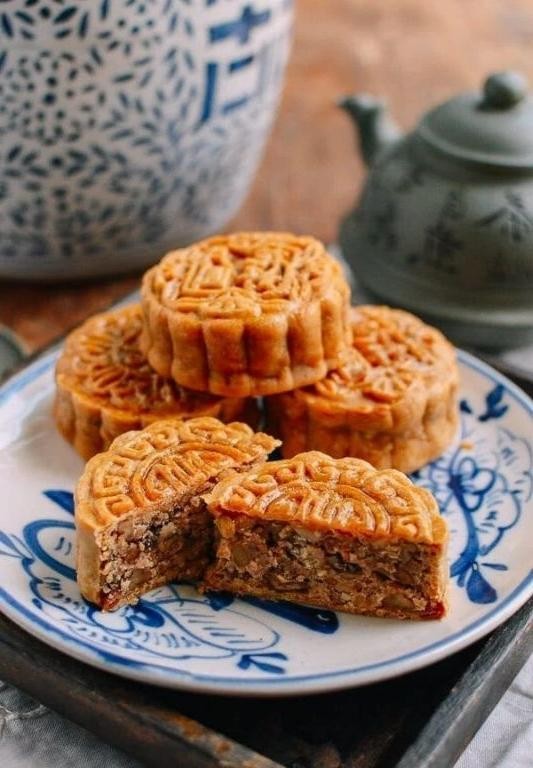
Fruit and Nut Moon Cake Medley
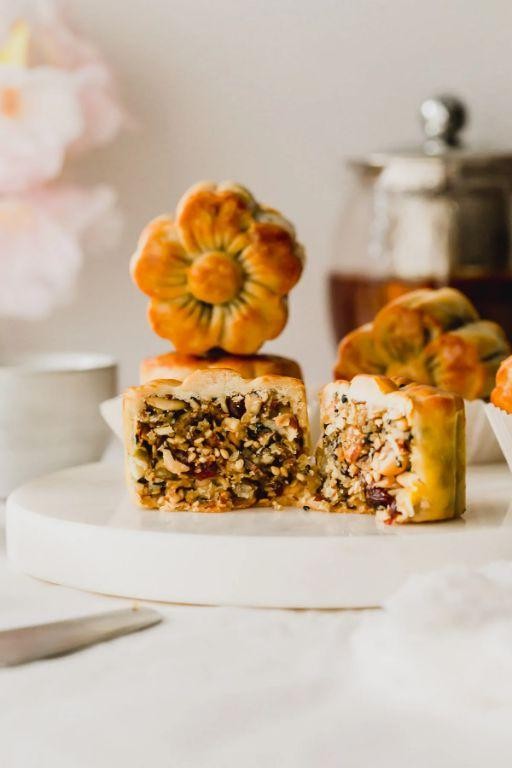
Make your holiday table unforgettable with this Fruit and Nut Moon Cake Medley. These golden pastries pack a sweet-tart punch with every bite. Trust us—they’ll disappear faster than you can say “mid-autumn festival.”
Serving: 12 | Pre Time: 30 minutes | Cooking Time: 25 minutes
Ingredients
– 2 cups of all-purpose flour
– 1 cup of granulated sugar
– ½ cup of unsalted butter, softened
– 3 large eggs
– A splash of vanilla extract
– 1 cup of mixed dried fruits (like apricots and cranberries), chopped
– A handful of chopped walnuts
– A pinch of salt
– A couple of tablespoons of milk
Instructions
1. Preheat your oven to 350°F (175°C) and line a baking sheet with parchment paper.
2. In a large bowl, cream together the softened butter and granulated sugar until light and fluffy, about 3 minutes.
3. Beat in the eggs one at a time, then stir in the vanilla extract and a pinch of salt.
4. Gradually mix in the all-purpose flour until just combined—don’t overmix to keep the texture tender.
5. Fold in the chopped mixed dried fruits and walnuts until evenly distributed.
6. If the dough feels too dry, add a couple of tablespoons of milk to bring it together.
7. Scoop the dough into 12 equal portions and roll each into a ball, placing them on the prepared baking sheet.
8. Flatten each ball slightly with your palm to about ½-inch thickness.
9. Bake in the preheated oven for 20–25 minutes, or until the edges turn golden brown.
10. Let the moon cakes cool on the baking sheet for 5 minutes, then transfer to a wire rack to cool completely.
Just out of the oven, these moon cakes boast a crisp exterior that gives way to a soft, chewy center studded with fruity bits and crunchy nuts. Serve them warm with a dollop of whipped cream or package them in cute boxes for a heartfelt homemade gift.
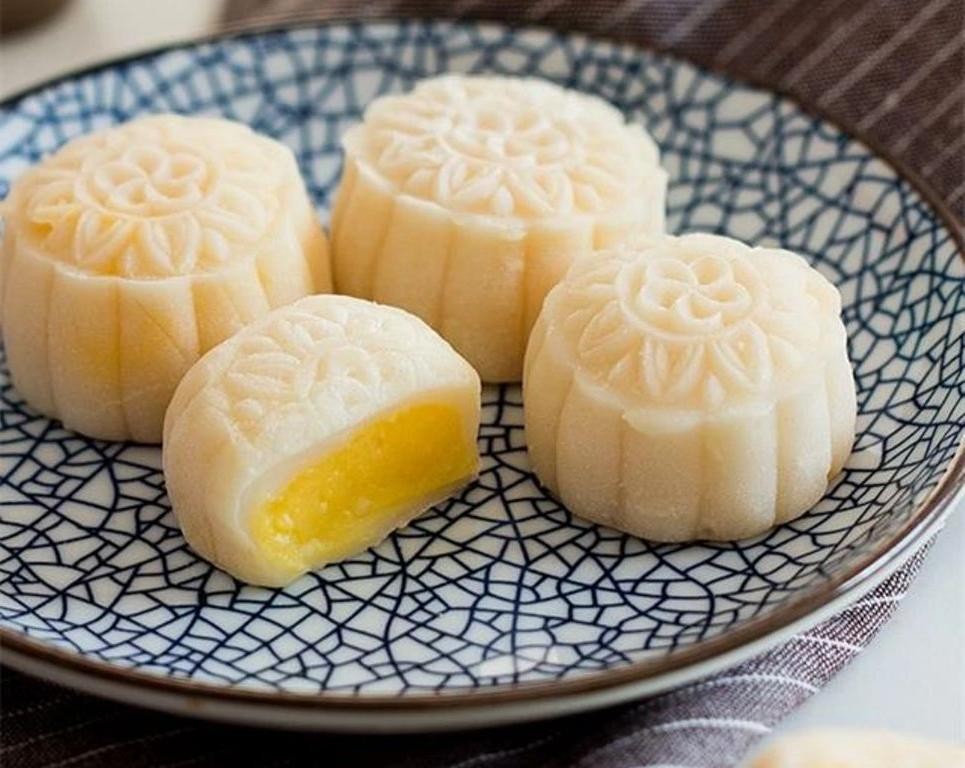
Custard Filled Moon Cake
Custard-filled mooncakes are the viral dessert you didn’t know you needed—think flaky, golden pastry hugging a silky-smooth, sweet custard center. Forget the fancy bakeries; we’re making these showstoppers at home with a few pantry staples. Get ready to impress every single guest at your next gathering.
Serving: 12 | Pre Time: 30 minutes | Cooking Time: 25 minutes
Ingredients
– 2 cups of all-purpose flour
– A stick of unsalted butter, cold and cubed
– A quarter cup of granulated sugar
– A couple of large eggs
– A splash of vanilla extract
– A pinch of salt
– One and a half cups of whole milk
– A third cup of cornstarch
– A half cup of heavy cream
Instructions
1. Preheat your oven to 375°F and line a baking sheet with parchment paper.
2. In a large bowl, combine the all-purpose flour, cold cubed unsalted butter, granulated sugar, and a pinch of salt—use your fingers to rub the butter into the flour until it resembles coarse crumbs.
3. Tip: Keep the butter cold for a flakier pastry; if it starts to soften, pop the bowl in the fridge for 5 minutes.
4. Crack one large egg into the flour mixture, add a splash of vanilla extract, and mix until a dough forms—knead it gently on a floured surface for about 30 seconds.
5. Wrap the dough in plastic wrap and chill it in the refrigerator for 15 minutes.
6. While the dough chills, make the custard: in a saucepan, whisk together the whole milk, cornstarch, and the remaining granulated sugar over medium heat until it thickens, about 5-7 minutes, stirring constantly.
7. Remove the saucepan from the heat and stir in the heavy cream and the other large egg until smooth—let it cool slightly.
8. Tip: For extra-smooth custard, strain it through a fine-mesh sieve to remove any lumps.
9. Roll out the chilled dough on a floured surface to a 1/4-inch thickness and cut it into 12 circles using a 3-inch cookie cutter.
10. Place a tablespoon of the custard filling in the center of each dough circle, fold the edges over, and pinch to seal—arrange them on the prepared baking sheet.
11. Brush the tops with a beaten egg wash for a golden finish and bake at 375°F for 20-25 minutes, or until the pastry is puffed and golden brown.
12. Tip: Let the mooncakes cool on a wire rack for 10 minutes before serving to set the custard properly.
13. You’ll love the contrast of the crisp, buttery crust against the creamy, vanilla-kissed custard inside—serve them warm with a dusting of powdered sugar or a drizzle of honey for an extra touch of sweetness. They’re perfect for sharing at parties or enjoying as a cozy treat with a cup of tea.
Coffee Infused Moon Cake
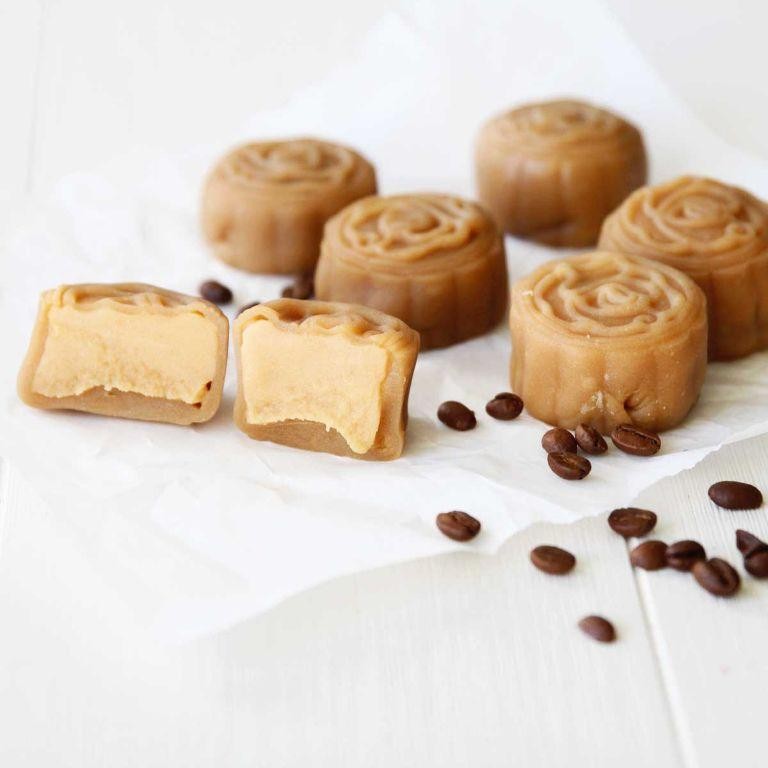
Viral-worthy and totally unexpected—this Coffee Infused Moon Cake is your new go-to for a modern twist on a classic. Think rich, aromatic coffee notes wrapped in a tender, golden pastry. It’s the perfect fusion of tradition and trendy flavor that’ll have everyone asking for the recipe.
Serving: 8 | Pre Time: 30 minutes | Cooking Time: 25 minutes
Ingredients
– 2 cups of all-purpose flour
– A cup of strong brewed coffee, cooled
– ¾ cup of granulated sugar
– A stick of unsalted butter, softened
– A couple of large eggs
– A tablespoon of baking powder
– A splash of vanilla extract
– A pinch of salt
Instructions
1. Preheat your oven to 350°F and grease an 8-inch round cake pan.
2. In a large bowl, whisk together the all-purpose flour, baking powder, and salt until fully combined.
3. In a separate bowl, cream the softened butter and granulated sugar with a mixer for about 3 minutes, until light and fluffy.
4. Beat in the large eggs one at a time, then stir in the vanilla extract.
5. Gradually add the flour mixture to the wet ingredients, alternating with the strong brewed coffee, mixing just until smooth—overmixing can make the cake tough.
6. Pour the batter into the prepared pan and smooth the top with a spatula.
7. Bake at 350°F for 25 minutes, or until a toothpick inserted into the center comes out clean.
8. Let the cake cool in the pan for 10 minutes, then transfer to a wire rack to cool completely—this prevents it from getting soggy.
9. Once cooled, slice into 8 even pieces for serving.
Rich and aromatic, this cake boasts a moist crumb with a deep coffee flavor that’s not too sweet. Serve it warm with a dollop of whipped cream for an extra indulgent treat, or pair it with a cold brew for the ultimate coffee lover’s experience.
Snow Skin Mango Moon Cake
Zap your taste buds with this modern twist on a classic! Snow Skin Mango Moon Cakes ditch the oven for a cool, creamy dessert that’s ready in a flash. Think tropical vibes meets soft, chewy texture—perfect for any celebration or just because.
Serving: 12 | Pre Time: 30 minutes | Cooking Time: 0 minutes
Ingredients
– 1 cup of glutinous rice flour (also called sweet rice flour)
– ½ cup of powdered sugar
– A splash of vegetable oil
– ¾ cup of cold water
– A couple of ripe mangoes, peeled and diced
– 1 tablespoon of cornstarch
– A pinch of salt
Instructions
1. Combine 1 cup of glutinous rice flour, ½ cup of powdered sugar, and a pinch of salt in a large mixing bowl.
2. Slowly pour in ¾ cup of cold water while whisking continuously to form a smooth batter without lumps.
3. Add a splash of vegetable oil to the batter and mix until fully incorporated.
4. Pour the batter into a heatproof dish and steam it over boiling water for 20 minutes, covering the dish with a lid to trap the steam.
5. While the batter steams, peel and dice a couple of ripe mangoes into small, uniform pieces for the filling.
6. Toss the diced mangoes with 1 tablespoon of cornstarch in a separate bowl to coat them evenly, which helps thicken the filling.
7. Transfer the steamed dough to a clean surface and knead it for 5 minutes until it becomes smooth and elastic—this prevents cracking when shaping.
8. Divide the kneaded dough into 12 equal portions and roll each into a small ball, covering them with plastic wrap to keep them from drying out.
9. Flatten one dough ball into a thin circle about 3 inches in diameter using your hands or a rolling pin dusted with extra glutinous rice flour to avoid sticking.
10. Place a spoonful of the cornstarch-coated mango filling in the center of the dough circle.
11. Gently wrap the dough around the filling, pinching the edges to seal it completely into a smooth ball.
12. Press the filled ball into a moon cake mold dusted with glutinous rice flour, applying even pressure to imprint the design clearly.
13. Tap the mold firmly on a counter to release the shaped moon cake onto a plate.
14. Repeat steps 9 through 13 with the remaining dough balls and mango filling until all 12 moon cakes are formed.
15. Chill the assembled moon cakes in the refrigerator for at least 1 hour before serving to set the texture and enhance the flavor. During this chill time, the dough firms up slightly for a perfect bite.
Delight in these treats fresh from the fridge—they boast a soft, slightly chewy skin that gives way to a juicy, sweet mango burst. Serve them chilled with a drizzle of honey or alongside a scoop of vanilla ice cream for an extra indulgent twist. Their vibrant color and creamy filling make them a showstopper at parties or a cozy night-in dessert.
Black Sesame Moon Cake Delight
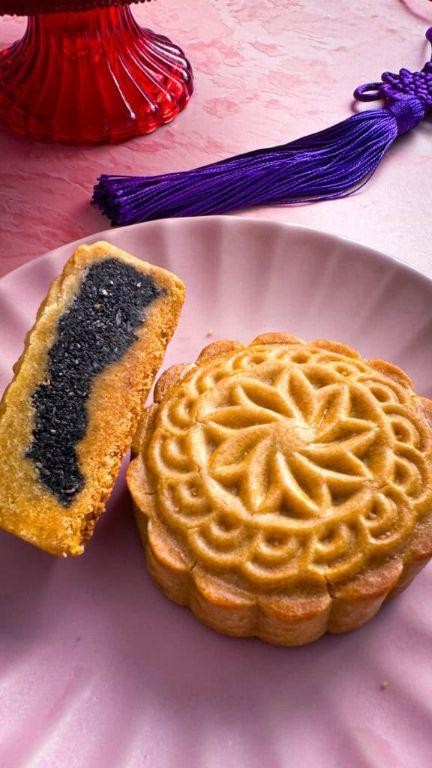
A nutty, modern twist on a classic treat that’s about to blow up your feed. Black sesame moon cake delight brings earthy flavor and a stunning dark swirl to your dessert table. Get ready to impress with this surprisingly simple bake.
Serving: 12 | Pre Time: 25 minutes | Cooking Time: 30 minutes
Ingredients
– 2 cups of all-purpose flour
– 1 cup of granulated sugar
– 3/4 cup of unsalted butter, softened
– 2 large eggs
– 1/4 cup of black sesame paste (find it in the Asian aisle)
– A splash of vanilla extract
– 1/2 teaspoon of baking powder
– A pinch of salt
– A couple of tablespoons of milk, if the dough feels dry
Instructions
1. Preheat your oven to 350°F and line a 9-inch round cake pan with parchment paper.
2. In a large bowl, cream together the softened butter and granulated sugar until light and fluffy, about 3 minutes.
3. Beat in the eggs one at a time, then mix in the vanilla extract.
4. In a separate bowl, whisk together the all-purpose flour, baking powder, and salt.
5. Gradually add the dry ingredients to the wet mixture, mixing just until combined. Tip: Overmixing can make the cake tough, so stop when no flour streaks remain.
6. Transfer half of the batter to another bowl and fold in the black sesame paste until fully incorporated.
7. Drop alternating spoonfuls of the plain and sesame batters into the prepared pan.
8. Use a knife to gently swirl the batters together for a marbled effect. Tip: Don’t over-swirl or you’ll lose the distinct dark pattern.
9. Bake at 350°F for 28-32 minutes, or until a toothpick inserted into the center comes out clean.
10. Let the cake cool in the pan for 10 minutes, then transfer to a wire rack to cool completely. Tip: Cooling fully ensures clean slices without crumbling.
Just slice into this beauty to reveal a gorgeous marbled interior with a rich, toasty sesame flavor. The texture is moist and tender, perfect with a dollop of whipped cream or a drizzle of honey. Serve it warm for a cozy treat or chilled for a refreshing twist—either way, it’s a showstopper.
Coconut Cream Moon Cake

Viral-worthy and velvety, this Coconut Cream Moon Cake transforms traditional dessert into a modern masterpiece. Grab your mixing bowls—this creamy, tropical treat comes together with pantry staples and a few bold techniques.
Serving: 8 | Pre Time: 20 minutes | Cooking Time: 50 minutes
Ingredients
- 2 cups of all-purpose flour
- 1 cup of granulated sugar
- 1/2 cup of unsalted butter, softened
- 3 large eggs
- 1 can (13.5 oz) of full-fat coconut milk
- 1/2 cup of shredded coconut
- 1 tsp of vanilla extract
- A splash of whole milk
- A pinch of salt
Instructions
- Preheat your oven to 350°F and grease a 9-inch round cake pan.
- In a large bowl, cream together the softened butter and granulated sugar until light and fluffy, about 3 minutes.
- Beat in the eggs one at a time, mixing fully after each addition.
- Gradually add the all-purpose flour and a pinch of salt, stirring just until combined—tip: overmixing can make the cake dense.
- Pour in the can of full-fat coconut milk and vanilla extract, then fold in the shredded coconut until the batter is smooth.
- If the batter seems too thick, add a splash of whole milk to reach a pourable consistency.
- Transfer the batter to the prepared pan and smooth the top with a spatula.
- Bake at 350°F for 45–50 minutes, or until a toothpick inserted into the center comes out clean—tip: check at 45 minutes to avoid overbaking.
- Let the cake cool in the pan for 10 minutes, then transfer to a wire rack to cool completely.
- Once cooled, slice and serve—tip: for extra flair, toast additional shredded coconut and sprinkle on top before serving.
Amazingly moist with a subtle tropical sweetness, this cake boasts a tender crumb that melts in your mouth. Serve it chilled with a drizzle of coconut cream or alongside fresh mango slices for a vibrant, Instagram-ready dessert that’s perfect for gatherings or a cozy night in.
Durian Cream Moon Cake
Unleash your inner dessert rebel with this durian cream moon cake—it’s the bold, creamy twist on a classic that’ll have everyone talking. We’re swapping traditional fillings for that funky, custardy durian punch, wrapped in a tender, golden pastry shell. Get ready to bake up a viral-worthy treat that’s equal parts tradition and totally unexpected.
Serving: 12 | Pre Time: 30 minutes | Cooking Time: 25 minutes
Ingredients
– 2 cups of all-purpose flour
– A pinch of salt
– ¾ cup of unsalted butter, chilled and cubed
– ¼ cup of powdered sugar
– 1 large egg, beaten
– 1 cup of durian pulp, thawed if frozen
– ½ cup of heavy cream
– 2 tablespoons of cornstarch
– A splash of vanilla extract
– 1 egg yolk mixed with a tablespoon of water for egg wash
Instructions
1. Preheat your oven to 350°F and line a baking sheet with parchment paper.
2. In a large bowl, whisk together the all-purpose flour and a pinch of salt until combined.
3. Add the chilled, cubed unsalted butter to the flour mixture, and use your fingers or a pastry cutter to work it in until it resembles coarse crumbs.
4. Stir in the powdered sugar until evenly distributed throughout the mixture.
5. Pour in the beaten large egg, and mix just until a dough forms—avoid overworking it to keep the pastry tender.
6. Tip: Chill the dough in the refrigerator for 15 minutes to make it easier to handle and prevent shrinkage during baking.
7. While the dough chills, make the filling by combining the durian pulp, heavy cream, cornstarch, and a splash of vanilla extract in a medium saucepan.
8. Cook the filling over medium heat, stirring constantly with a whisk, until it thickens to a pudding-like consistency, about 5-7 minutes.
9. Remove the filling from the heat and let it cool completely to room temperature to avoid a soggy crust.
10. Roll out the chilled dough on a floured surface to about ¼-inch thickness.
11. Use a round cookie cutter to cut out 24 circles from the dough.
12. Place 12 of the dough circles on the prepared baking sheet, spacing them about 1 inch apart.
13. Spoon a heaping tablespoon of the cooled durian filling onto the center of each dough circle on the baking sheet.
14. Top each filled circle with another dough circle, and press the edges firmly with a fork to seal them shut.
15. Tip: Brush the tops with the egg yolk and water mixture for a shiny, golden finish that makes them look bakery-perfect.
16. Bake in the preheated oven at 350°F for 20-25 minutes, or until the pastries are puffed and golden brown.
17. Tip: Let the moon cakes cool on a wire rack for at least 10 minutes before serving to set the filling and avoid burns.
18. Keep these durian cream moon cakes stored in an airtight container at room temperature for up to 2 days for the best texture.
Kick back and savor that creamy, funky durian filling encased in a flaky, buttery crust—it’s a texture dream that melts in your mouth with every bite. Serve these warm with a drizzle of honey or alongside a scoop of vanilla ice cream for a cool contrast that’ll wow your guests. Trust us, this unconventional twist is the conversation starter your dessert table needs.
Mixed Nut and Date Moon Cake
Unwrap a holiday classic with a nutty twist—this Mixed Nut and Date Moon Cake is your new festive obsession. Think chewy dates, crunchy nuts, and cozy spices all baked into a golden, tender cake that’s perfect for sharing (or not). Skip the store-bought versions and make this showstopper at home—it’s easier than you think and totally worth the hype.
Serving: 8 | Pre Time: 20 minutes | Cooking Time: 45 minutes
Ingredients
– A cup and a half of all-purpose flour
– A cup of pitted dates, chopped up
– A cup of mixed nuts (like almonds and walnuts), roughly chopped
– Three-quarters of a cup of brown sugar, packed tight
– Half a cup of unsalted butter, softened
– Two large eggs
– A teaspoon of vanilla extract
– A teaspoon of baking powder
– Half a teaspoon of ground cinnamon
– A pinch of salt
– A splash of milk, if the batter feels too thick
Instructions
1. Preheat your oven to 350°F and grease an 8-inch round cake pan—line it with parchment paper for easy removal later.
2. In a large bowl, cream together the softened butter and brown sugar until fluffy, about 2-3 minutes with a hand mixer.
3. Beat in the eggs one at a time, then mix in the vanilla extract until smooth.
4. In a separate bowl, whisk together the all-purpose flour, baking powder, ground cinnamon, and salt.
5. Gradually add the dry ingredients to the wet mixture, stirring just until combined—don’t overmix to keep the cake tender.
6. Fold in the chopped dates and mixed nuts evenly throughout the batter.
7. If the batter seems too thick, add a splash of milk to loosen it up slightly.
8. Pour the batter into the prepared pan and spread it out evenly with a spatula.
9. Bake for 40-45 minutes, or until a toothpick inserted into the center comes out clean and the top is golden brown.
10. Let the cake cool in the pan for 10 minutes, then transfer it to a wire rack to cool completely.
Zesty with cinnamon and packed with chewy dates, this cake has a moist crumb and satisfying crunch from the nuts. Serve it warm with a dollop of whipped cream or slice it up for a festive dessert platter—it’s a crowd-pleaser that’ll disappear fast!
Purple Sweet Potato Moon Cake
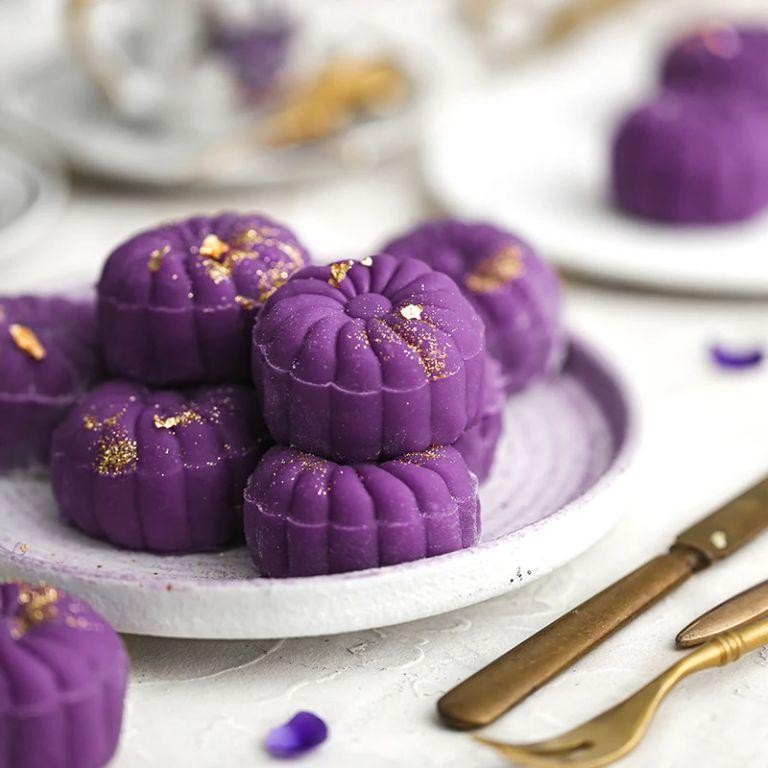
Nailing that vibrant purple hue and creamy texture? This Purple Sweet Potato Moon Cake delivers both with a modern twist. Skip the traditional molds—we’re making these handheld and Instagram-ready. Perfect for autumn gatherings or a cozy night in.
Serving: 12 | Pre Time: 30 minutes | Cooking Time: 45 minutes
Ingredients
– 2 medium purple sweet potatoes (about 2 cups mashed)
– 1 cup glutinous rice flour
– 1/2 cup sugar
– 1/4 cup coconut milk
– A splash of vanilla extract
– A couple of tablespoons of vegetable oil
– A pinch of salt
– 1 egg, beaten (for egg wash)
Instructions
1. Preheat your oven to 350°F (175°C) and line a baking sheet with parchment paper.
2. Peel the purple sweet potatoes, chop them into 1-inch cubes, and steam for 20 minutes until fork-tender.
3. Mash the steamed sweet potatoes in a bowl until smooth—no lumps! Tip: A potato masher works better than a fork for creaminess.
4. Add the glutinous rice flour, sugar, coconut milk, vanilla extract, vegetable oil, and salt to the mashed potatoes.
5. Mix everything with your hands until a soft, pliable dough forms. It should hold together without sticking.
6. Divide the dough into 12 equal portions and roll each into a smooth ball.
7. Place the balls on the prepared baking sheet, spacing them 2 inches apart.
8. Brush the tops lightly with the beaten egg wash for a golden finish.
9. Bake for 25 minutes at 350°F until the cakes are firm and lightly golden on top. Tip: Check at 20 minutes—ovens vary!
10. Let the moon cakes cool on the sheet for 10 minutes before handling. Tip: They firm up as they cool, so don’t rush it.
11. Transfer to a wire rack to cool completely, about 30 minutes.
These moon cakes boast a chewy, slightly dense texture with a subtle sweetness from the potatoes. The purple color deepens as they bake, making them a stunning centerpiece. Try serving them warm with a drizzle of honey or alongside a cup of green tea for an elegant touch.
Taro and Cream Cheese Moon Cake
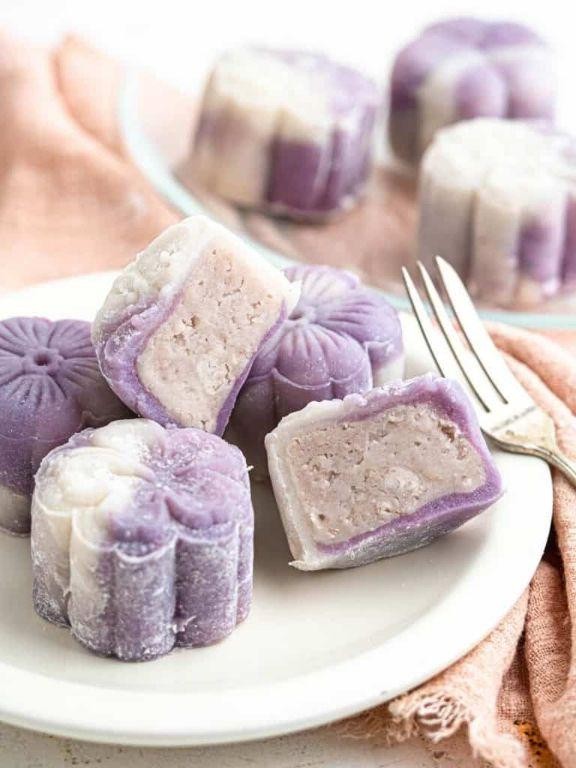
Punch up your moon cake game with this creamy, modern twist. We’re blending earthy taro and tangy cream cheese into a smooth, irresistible filling. Get ready to bake a batch that’s way better than store-bought.
Serving: 12 | Pre Time: 30 minutes | Cooking Time: 25 minutes
Ingredients
– 2 cups of all-purpose flour
– 1/2 cup of granulated sugar
– 1/2 cup of unsalted butter, softened
– 1 large egg
– A splash of vanilla extract
– 1 cup of taro, peeled and cubed
– 8 ounces of cream cheese, at room temp
– 1/4 cup of powdered sugar
– A couple of tablespoons of milk
Instructions
1. Preheat your oven to 350°F and line a baking sheet with parchment paper.
2. In a large bowl, mix the all-purpose flour and granulated sugar until combined.
3. Add the softened unsalted butter and use your hands to rub it into the flour mixture until it resembles coarse crumbs.
4. Crack in the large egg and pour in the vanilla extract, then stir until a dough forms. Tip: Don’t overmix to keep the crust tender.
5. Divide the dough into 12 equal portions and press each into a moon cake mold to form the base.
6. Steam the cubed taro for 15 minutes until fork-tender, then mash it until smooth in a separate bowl.
7. In another bowl, beat the cream cheese and powdered sugar together until creamy and lump-free.
8. Fold the mashed taro into the cream cheese mixture until fully incorporated. Tip: For extra smoothness, blend it briefly with an electric mixer.
9. Spoon the taro and cream cheese filling into each dough-lined mold, smoothing the tops.
10. Brush the tops with a couple of tablespoons of milk for a golden finish.
11. Bake in the preheated oven for 25 minutes, or until the edges are lightly golden. Tip: Check at 20 minutes to avoid overbrowning.
12. Let the moon cakes cool completely in the molds before gently unmolding.
Out of the oven, these moon cakes boast a soft, crumbly crust that gives way to a velvety, subtly sweet filling. The taro adds an earthy depth that balances the cream cheese’s tang perfectly. Serve them slightly warm with a drizzle of honey or chilled for a firmer, cheesecake-like bite—either way, they’re a showstopper at any gathering.
Conclusion
A treasure trove of 33 unique moon cake recipes awaits! From classic to creative, these treats are perfect for celebrating or simply indulging. We hope you find inspiration to bake something special. Give a recipe a try, then let us know your favorite in the comments below. If you enjoyed this roundup, please share it on Pinterest to spread the joy of baking with friends!