Kick your chocolate cravings into high gear with these 24 irresistible moist chocolate cake creations! Whether you’re craving a classic layer cake, decadent lava cake, or something uniquely indulgent, this roundup has a perfect slice for every occasion. Get ready to discover your new favorite recipe—each one promises rich flavor and that melt-in-your-mouth texture you love. Let’s dive into these heavenly treats!
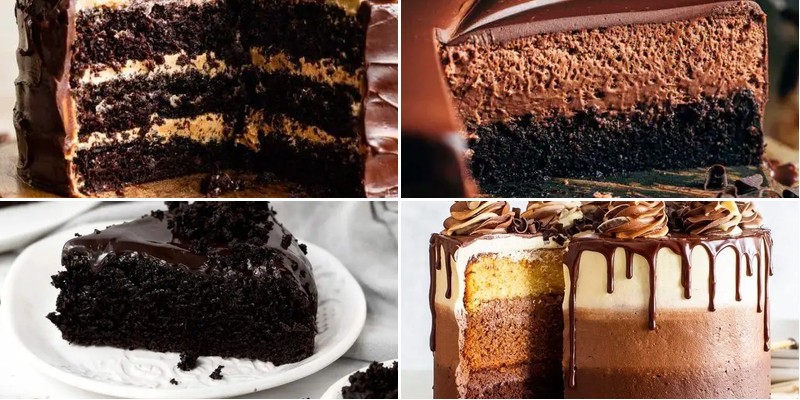
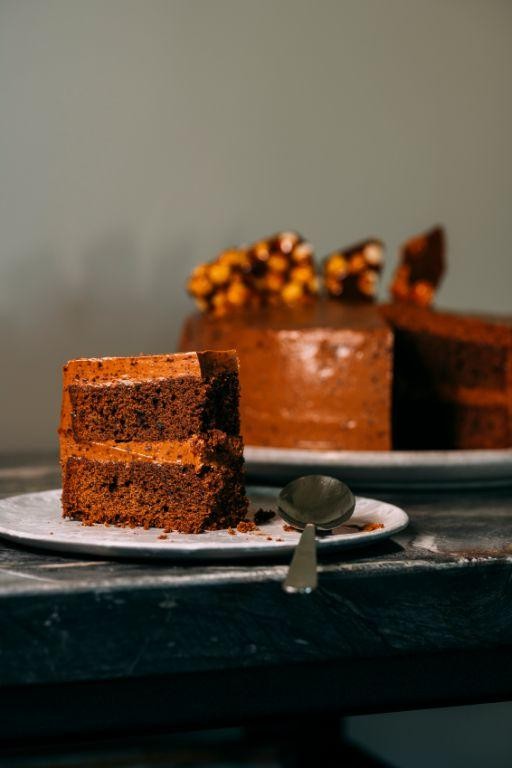
Decadent Double Chocolate Fudge Cake
Mixing up this decadent double chocolate fudge cake is simpler than you might think, even if you’re new to baking. We’ll walk through each step together, from measuring ingredients to that glorious moment when you pull a perfectly baked cake from the oven. This method ensures a rich, moist result every single time.
2
layers20
minutes35
minutesIngredients
– 2 cups of all-purpose flour
– 1¾ cups of granulated sugar
– ¾ cup of unsweetened cocoa powder
– 2 teaspoons of baking soda
– 1 teaspoon of baking powder
– A good pinch of salt
– 2 large eggs
– 1 cup of buttermilk
– ½ cup of vegetable oil
– 2 teaspoons of vanilla extract
– 1 cup of boiling water
– A couple of handfuls of semi-sweet chocolate chips
Instructions
1. Preheat your oven to 350°F and grease two 9-inch round cake pans, then line the bottoms with parchment paper for easy removal.
2. In a large bowl, whisk together the 2 cups of flour, 1¾ cups of sugar, ¾ cup of cocoa powder, 2 teaspoons of baking soda, 1 teaspoon of baking powder, and a pinch of salt until no streaks remain.
3. Add the 2 eggs, 1 cup of buttermilk, ½ cup of vegetable oil, and 2 teaspoons of vanilla extract to the dry ingredients.
4. Use an electric mixer on medium speed to blend the mixture for exactly 2 minutes, which develops the structure without overmixing.
5. Carefully pour in the 1 cup of boiling water and mix on low speed until the batter is smooth and thin; the hot water enhances the chocolate flavor.
6. Fold in the handfuls of semi-sweet chocolate chips gently with a spatula to distribute them evenly.
7. Divide the batter equally between the two prepared pans and tap them lightly on the counter to remove air bubbles.
8. Bake in the preheated oven for 30–35 minutes, or until a toothpick inserted into the center comes out clean.
9. Let the cakes cool in the pans for 10 minutes, then turn them out onto a wire rack to cool completely to prevent sogginess.
10. Frost the cooled layers with your favorite chocolate frosting, stacking them for a tall, impressive cake.
This cake emerges with an intensely fudgy crumb that stays moist for days, thanks to the boiling water trick. The melted chocolate chips create delightful pockets of gooey richness throughout each slice. Try serving it slightly warmed with a scoop of vanilla ice cream for an irresistible contrast of temperatures and flavors.
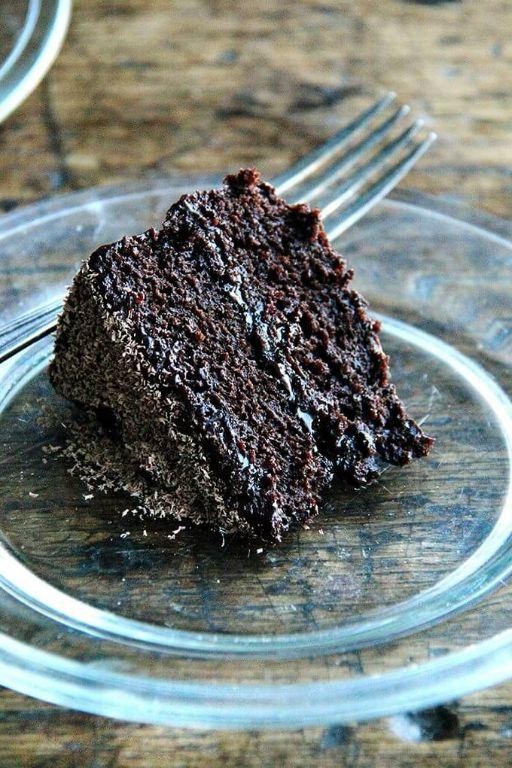
Rich Dark Chocolate Ganache Cake
Whether you’re celebrating a special occasion or simply craving something decadent, this rich dark chocolate ganache cake delivers intense flavor with a surprisingly straightforward method. We’ll walk through each stage together, from mixing the batter to pouring that glossy ganache, ensuring you achieve bakery-quality results right in your own kitchen. Follow these steps carefully, and you’ll have a showstopping dessert that’s as beautiful as it is delicious.
12
servings25
minutes35
minutesIngredients
– 1 and ¾ cups of all-purpose flour
– 2 cups of granulated sugar
– ¾ cup of unsweetened cocoa powder
– 2 teaspoons of baking soda
– 1 teaspoon of baking powder
– 1 teaspoon of salt
– 2 large eggs
– 1 cup of buttermilk
– ½ cup of vegetable oil
– 2 teaspoons of vanilla extract
– 1 cup of freshly brewed hot coffee
– 12 ounces of chopped dark chocolate
– 1 cup of heavy cream
– A couple of tablespoons of unsalted butter
Instructions
1. Preheat your oven to 350°F and grease two 9-inch round cake pans, then line them with parchment paper for easy removal.
2. In a large bowl, whisk together the flour, sugar, cocoa powder, baking soda, baking powder, and salt until fully combined.
3. Add the eggs, buttermilk, vegetable oil, and vanilla extract to the dry ingredients, then mix on medium speed for 2 minutes until the batter is smooth.
4. Slowly pour in the hot coffee while mixing on low speed, scraping the sides of the bowl to incorporate everything evenly.
5. Divide the batter equally between the prepared pans and tap them gently on the counter to remove any air bubbles.
6. Bake for 30–35 minutes, or until a toothpick inserted into the center comes out clean with no wet batter clinging to it.
7. Let the cakes cool in the pans for 10 minutes, then turn them out onto a wire rack to cool completely for at least 1 hour.
8. For the ganache, place the chopped dark chocolate in a heatproof bowl and set it aside.
9. Heat the heavy cream in a small saucepan over medium heat until it just begins to simmer, showing small bubbles around the edges.
10. Immediately pour the hot cream over the chocolate, let it sit for 2 minutes to melt, then whisk until smooth and glossy.
11. Stir in the butter until fully melted and combined, creating a silky ganache that’s perfect for pouring.
12. Place one cooled cake layer on a serving plate, spread a thin layer of ganache over the top, then stack the second layer on top.
13. Slowly pour the remaining ganache over the assembled cake, using an offset spatula to smooth it evenly across the top and sides.
14. Chill the cake in the refrigerator for 20 minutes to set the ganache before slicing and serving.
Buttery, moist layers meld with that deep, glossy ganache for a cake that’s both fudgy and elegantly smooth. Serve it slightly chilled to highlight the contrast between the tender crumb and firm chocolate coating, or add fresh berries on the side for a bright, tangy twist that cuts through the richness beautifully.
Moist Hazelnut Praline Chocolate Cake
A moist hazelnut praline chocolate cake is surprisingly simple to create when you follow these careful steps. Always begin by preparing your ingredients and equipment before starting, as this methodical approach ensures success. After baking, you’ll be rewarded with a rich, nutty dessert that’s perfect for any occasion.
2
layers20
minutes35
minutesIngredients
– 2 cups of all-purpose flour
– 1½ cups of granulated sugar
– ¾ cup of unsweetened cocoa powder
– 2 teaspoons of baking soda
– 1 teaspoon of baking powder
– A good pinch of salt
– 2 large eggs
– 1 cup of buttermilk
– ½ cup of vegetable oil
– 2 teaspoons of vanilla extract
– 1 cup of strong brewed coffee, cooled
– 1 cup of chopped toasted hazelnuts
– ½ cup of homemade or store-bought praline paste
– A couple of tablespoons of powdered sugar for dusting
Instructions
1. Preheat your oven to 350°F and generously grease two 9-inch round cake pans, then line the bottoms with parchment paper circles.
2. In a large mixing bowl, whisk together the 2 cups of all-purpose flour, 1½ cups of granulated sugar, ¾ cup of cocoa powder, 2 teaspoons of baking soda, 1 teaspoon of baking powder, and a pinch of salt until thoroughly combined.
3. Add the 2 large eggs, 1 cup of buttermilk, ½ cup of vegetable oil, and 2 teaspoons of vanilla extract to the dry ingredients, then mix on medium speed until just incorporated—be careful not to overmix.
4. Gradually pour in the 1 cup of cooled brewed coffee while mixing on low speed, scraping down the sides of the bowl to ensure everything is evenly blended.
5. Divide the batter equally between the two prepared cake pans, using a spatula to smooth the tops for even baking.
6. Bake in the preheated 350°F oven for 30–35 minutes, or until a toothpick inserted into the center comes out clean with just a few moist crumbs attached.
7. Let the cakes cool in their pans on a wire rack for exactly 15 minutes before carefully turning them out to cool completely—this prevents them from breaking.
8. While the cakes cool, toast the 1 cup of chopped hazelnuts in a dry skillet over medium heat for 5–7 minutes, stirring frequently until fragrant and lightly golden.
9. Spread ¼ cup of the praline paste evenly over the top of one cooled cake layer, then sprinkle half of the toasted hazelnuts over the praline.
10. Place the second cake layer on top and repeat with the remaining ¼ cup of praline paste and hazelnuts, gently pressing to adhere.
11. Just before serving, dust the top of the cake lightly with a couple of tablespoons of powdered sugar using a fine-mesh sieve for even coverage.
Just out of the oven, this cake boasts an incredibly tender crumb that melts in your mouth, complemented by the satisfying crunch of toasted hazelnuts. Joyfully slice it while slightly warm to experience the praline’s caramel notes melding with deep chocolate flavors. For a special touch, serve each portion with a dollop of whipped cream or alongside a scoop of vanilla bean ice cream to balance the richness.
Velvety Chocolate Coconut Cake
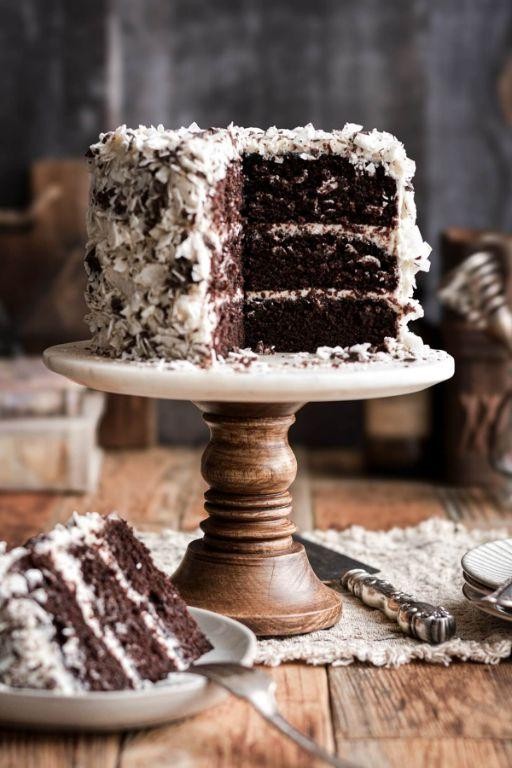
Keeping your dessert game strong just got easier with this foolproof chocolate coconut cake. Knowing how intimidating baking can be for beginners, I’ll walk you through each simple step to create this decadent treat that’s perfect for any occasion.
12
servings25
minutes35
minutesIngredients
– 2 cups of all-purpose flour
– 1 and 3/4 cups of granulated sugar
– 3/4 cup of unsweetened cocoa powder
– 2 teaspoons of baking soda
– 1 teaspoon of baking powder
– a good pinch of salt
– 2 large eggs
– 1 cup of buttermilk
– 1/2 cup of vegetable oil
– 2 teaspoons of vanilla extract
– 1 cup of boiling water
– 1 can (13.5 oz) of coconut milk
– 1 and 1/2 cups of sweetened shredded coconut
– a couple of tablespoons of powdered sugar for dusting
Instructions
1. Preheat your oven to 350°F and grease two 9-inch round cake pans, then line them with parchment paper for easy removal.
2. Whisk together the flour, sugar, cocoa powder, baking soda, baking powder, and salt in a large mixing bowl until thoroughly combined.
3. Add the eggs, buttermilk, vegetable oil, and vanilla extract to the dry ingredients, then mix on medium speed for exactly 2 minutes until the batter is smooth.
4. Carefully pour in the boiling water and stir by hand until the batter becomes thin and glossy, which helps create that velvety texture.
5. Divide the batter evenly between the prepared pans and bake for 30-35 minutes until a toothpick inserted in the center comes out clean.
6. Let the cakes cool in the pans for 10 minutes, then transfer them to a wire rack to cool completely to prevent crumbling.
7. While the cakes cool, toast the shredded coconut in a dry skillet over medium heat for 3-5 minutes, stirring constantly until golden brown.
8. Whip the coconut milk with an electric mixer on high speed for 4-5 minutes until it forms stiff peaks like whipped cream.
9. Place one cake layer on your serving plate and spread half of the coconut whipped cream over it, then sprinkle with half of the toasted coconut.
10. Top with the second cake layer and repeat with the remaining coconut cream and toasted coconut.
11. Dust the top lightly with powdered sugar using a fine mesh strainer for even distribution.
Rich, moist chocolate layers contrast beautifully with the creamy coconut filling and crunchy toasted coconut topping. Refrigerate for an hour before slicing to let the flavors meld, or serve immediately for a slightly softer texture that melts in your mouth.
Luscious Triple Chocolate Layer Cake
Let’s create a stunning triple chocolate cake that will become your go-to celebration dessert. This methodical approach ensures even beginners can achieve bakery-quality results with three distinct chocolate layers in one magnificent cake.
12
servings30
minutes35
minutesIngredients
– 2 cups all-purpose flour
– 1¾ cups granulated sugar
– ¾ cup unsweetened cocoa powder
– 2 teaspoons baking soda
– 1 teaspoon baking powder
– 1 teaspoon salt
– 2 large eggs
– 1 cup buttermilk
– ½ cup vegetable oil
– 2 teaspoons vanilla extract
– 1 cup boiling water
– 1 cup semi-sweet chocolate chips
– 2 cups heavy cream
– 8 ounces cream cheese
– 4 cups powdered sugar
– A couple of tablespoons of milk
– A splash of vanilla extract
Instructions
1. Preheat your oven to 350°F and grease two 9-inch round cake pans.
2. Whisk together flour, sugar, cocoa powder, baking soda, baking powder, and salt in a large bowl.
3. Beat in eggs, buttermilk, oil, and vanilla until smooth.
4. Carefully stir in boiling water until the batter becomes thin but uniform.
5. Divide batter evenly between prepared pans and bake for 30-35 minutes.
6. Test doneness by inserting a toothpick that comes out clean with just a few moist crumbs.
7. Cool cakes in pans for 15 minutes, then transfer to wire racks to cool completely.
8. Melt chocolate chips in 30-second intervals in the microwave, stirring between each.
9. Beat cream cheese until smooth, then gradually add powdered sugar.
10. Pour in heavy cream and beat on high until stiff peaks form.
11. Fold melted chocolate into one-third of the frosting for the middle layer.
12. Level cake layers if needed using a serrated knife for even stacking.
13. Place first cake layer on serving plate and spread with chocolate frosting.
14. Top with second layer and frost entire cake with remaining vanilla frosting.
15. Refrigerate for at least 2 hours before serving to set the layers.
Creating this masterpiece yields a moist, fudgy cake with contrasting creamy frostings that melt in your mouth. Consider serving chilled slices with fresh berries to cut through the richness, or warm individual portions slightly to release the chocolate’s aromatic depth.
Creamy Chocolate Mousse Cake

Diving into dessert making can feel intimidating, but this creamy chocolate mousse cake breaks it down into manageable steps that even first-time bakers can follow successfully. Let’s walk through each stage together, from crust to creamy topping, ensuring you end up with a showstopping treat that’s surprisingly simple to create.
8
servings45
minutesIngredients
– About 2 cups of chocolate cookie crumbs (from roughly 25 cookies)
– Half a cup of melted butter
– 12 ounces of good quality dark chocolate, chopped up
– A couple of cups of heavy cream, divided
– A quarter cup of powdered sugar
– A splash of vanilla extract
– A pinch of salt
Instructions
1. Combine the chocolate cookie crumbs with the melted butter in a medium bowl until the mixture resembles wet sand.
2. Press the crumb mixture firmly into the bottom of a 9-inch springform pan, using the bottom of a measuring cup to create an even layer.
3. Place the crust in the refrigerator to set for at least 30 minutes while you prepare the mousse filling.
4. Melt the chopped dark chocolate with 1/2 cup of heavy cream in a heatproof bowl set over a saucepan of simmering water, stirring until completely smooth.
5. Remove the chocolate mixture from heat and let it cool to room temperature, which should take about 15-20 minutes.
6. Whip the remaining 1 1/2 cups of heavy cream with powdered sugar and vanilla extract using an electric mixer on medium-high speed until soft peaks form.
7. Gently fold one-third of the whipped cream into the cooled chocolate mixture to lighten it before folding in the remaining whipped cream.
8. Spread the chocolate mousse evenly over the prepared crust, smoothing the top with an offset spatula.
9. Refrigerate the cake for at least 6 hours, or preferably overnight, until completely set.
10. Run a thin knife around the edge of the springform pan before releasing the sides to serve.
Key to this dessert’s magic is the contrast between the crunchy cookie base and the cloud-like chocolate mousse that melts on your tongue. The deep chocolate flavor shines through without being overly sweet, making it sophisticated enough for dinner parties yet simple enough for weeknight cravings. Try garnishing with fresh berries or a dusting of cocoa powder for an elegant presentation that requires minimal effort.
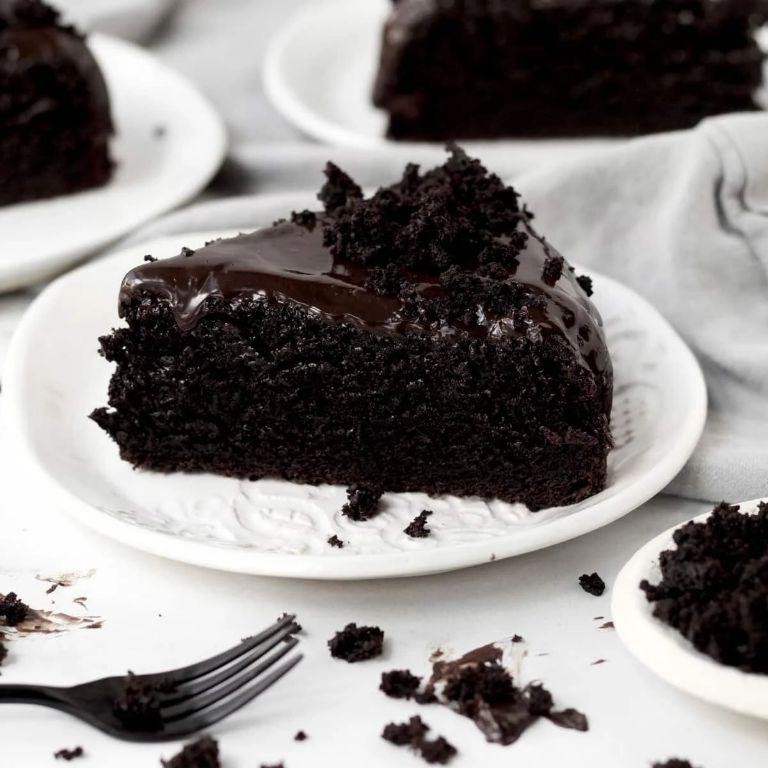
Silky Chocolate Coffee Bundt Cake
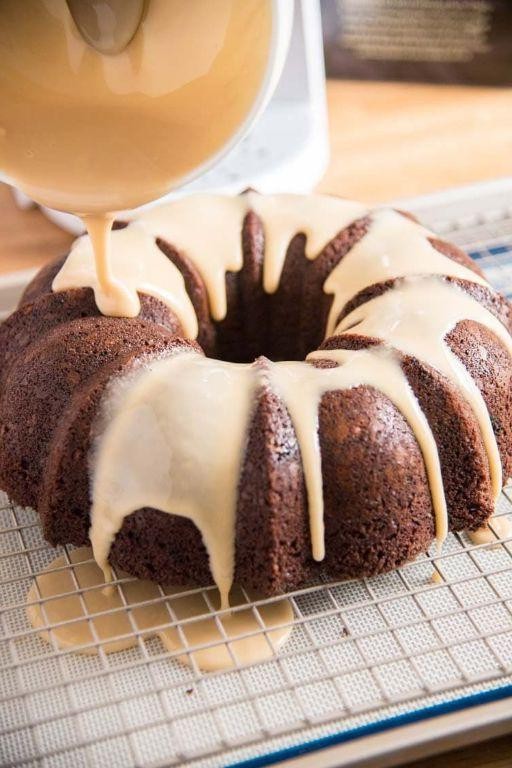
Every baker needs a showstopping chocolate cake in their repertoire, and this silky bundt version combines rich cocoa with the sophisticated depth of coffee for a dessert that’s both elegant and comforting. Let’s walk through creating this moist, tender cake step by step, perfect for your next gathering or cozy weekend baking project.
1
cake20
minutes50
minutesIngredients
– 2 cups of all-purpose flour
– 1¾ cups of granulated sugar
– ¾ cup of unsweetened cocoa powder
– 2 teaspoons of baking soda
– 1 teaspoon of baking powder
– A good pinch of salt
– 2 large eggs
– 1 cup of buttermilk
– ½ cup of vegetable oil
– 2 teaspoons of vanilla extract
– 1 cup of strong brewed coffee, cooled
– A splash of whole milk for the glaze
– 1 cup of powdered sugar for dusting
Instructions
1. Preheat your oven to 350°F and generously grease a 10-cup bundt pan with baking spray, making sure to get into all the crevices.
2. In a large bowl, whisk together the flour, sugar, cocoa powder, baking soda, baking powder, and salt until well combined and no lumps remain.
3. In a separate medium bowl, beat the eggs lightly with a fork before stirring in the buttermilk, vegetable oil, and vanilla extract until smooth.
4. Pour the wet ingredients into the dry ingredients and mix gently with a spatula until just combined—be careful not to overmix.
5. Slowly pour in the cooled coffee while stirring continuously until the batter is smooth and uniformly dark.
6. Transfer the batter to your prepared bundt pan, spreading it evenly with the spatula and tapping the pan lightly on the counter to remove air bubbles.
7. Bake for 45-50 minutes, or until a toothpick inserted into the center comes out clean with just a few moist crumbs attached.
8. Let the cake cool in the pan on a wire rack for exactly 15 minutes before inverting it onto the rack to cool completely.
9. For the glaze, whisk together the powdered sugar and a splash of milk until it reaches a thick but pourable consistency.
10. Drizzle the glaze over the cooled cake, allowing it to drip down the sides naturally.
Now you have a beautifully glazed bundt cake ready to impress. Notice how the coffee enhances the chocolate flavor without overpowering it, creating a moist crumb that stays tender for days. Serve slices with a dollop of whipped cream or alongside a fresh cup of coffee for a delightful pairing that highlights its silky texture.
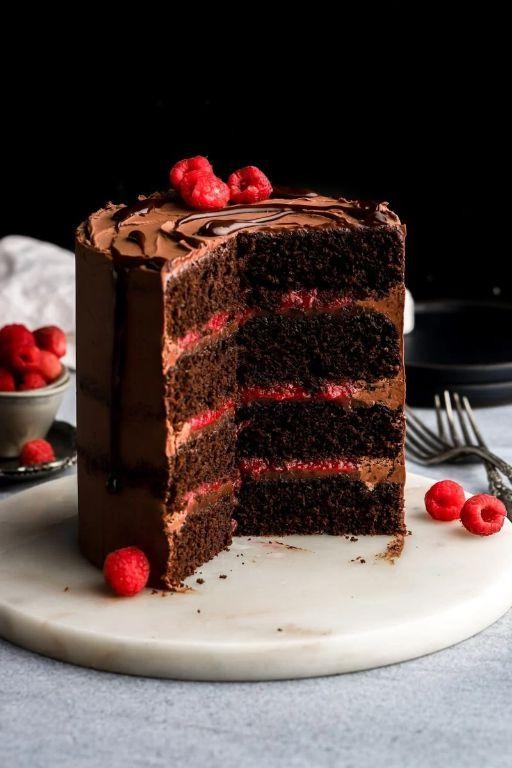
Fluffy Chocolate Raspberry Cake
Finally, let’s create a showstopping dessert that combines rich chocolate with tart raspberries in the most delightful way. Follow these careful steps to build a beautifully layered cake that’s perfect for celebrations or whenever you need a special treat.
12
servings45
minutes35
minutesIngredients
– 2 cups of all-purpose flour
– 1 ½ cups of granulated sugar
– ¾ cup of unsweetened cocoa powder
– 2 teaspoons of baking powder
– 1 teaspoon of baking soda
– ½ teaspoon of salt
– 2 large eggs
– 1 cup of whole milk
– ½ cup of vegetable oil
– 2 teaspoons of vanilla extract
– 1 cup of boiling water
– 2 cups of fresh raspberries
– 1 cup of heavy cream
– 8 ounces of cream cheese, softened
– 4 tablespoons of powdered sugar
– A splash of lemon juice
Instructions
1. Preheat your oven to 350°F and grease two 9-inch round cake pans, then line them with parchment paper for easy removal.
2. Whisk together the flour, granulated sugar, cocoa powder, baking powder, baking soda, and salt in a large mixing bowl until thoroughly combined.
3. Add the eggs, milk, vegetable oil, and vanilla extract to the dry ingredients, then mix on medium speed for exactly 2 minutes until the batter is smooth.
4. Carefully pour in the boiling water and stir by hand until the batter becomes thin and glossy—don’t worry, this is normal and creates that moist texture.
5. Divide the batter evenly between your prepared pans and bake for 30-35 minutes until a toothpick inserted in the center comes out clean.
6. Cool the cakes in their pans on a wire rack for 15 minutes, then turn them out onto the rack to cool completely—this prevents them from getting soggy.
7. While cakes cool, mash 1 cup of raspberries with a fork until they’re broken down but still chunky.
8. Beat the softened cream cheese with powdered sugar and lemon juice until fluffy, about 3 minutes on medium-high speed.
9. In a separate bowl, whip the heavy cream until stiff peaks form, then gently fold it into the cream cheese mixture along with the mashed raspberries.
10. Place one cooled cake layer on your serving plate and spread half of the raspberry cream filling evenly over the top.
11. Arrange the remaining whole raspberries over the filling, then place the second cake layer on top.
12. Frost the top and sides of the cake with the remaining raspberry cream, creating decorative swirls with your spatula.
13. Refrigerate the assembled cake for at least 2 hours before serving to allow the flavors to meld and the filling to set properly.
Absolutely dreamy in both texture and taste, this cake features incredibly moist chocolate layers that practically melt in your mouth, contrasted by the bright, tangy raspberry cream that cuts through the richness. For an extra special presentation, garnish with chocolate shavings and a few fresh raspberries right before serving, or try slicing it into smaller portions for an elegant afternoon tea treat.
Dense Chocolate Beetroot Cake

Now, let’s create a surprisingly moist chocolate cake where beets add natural sweetness and a beautiful deep color without any earthy taste. This methodical approach will guide you through each step for perfect results every time.
8
servings20
minutes50
minutesIngredients
– 2 cups of all-purpose flour
– 1½ cups of granulated sugar
– ¾ cup of unsweetened cocoa powder
– 2 teaspoons of baking soda
– 1 teaspoon of baking powder
– A good pinch of salt
– 3 large eggs
– 1 cup of vegetable oil
– 2 teaspoons of vanilla extract
– 1½ cups of finely grated raw beetroot (about 2 medium beets)
– 1 cup of buttermilk
Instructions
1. Preheat your oven to 350°F and generously grease a 9-inch round cake pan, then line the bottom with parchment paper for easy removal.
2. In a large mixing bowl, whisk together the flour, sugar, cocoa powder, baking soda, baking powder, and salt until thoroughly combined and no streaks remain.
3. In a separate medium bowl, beat the eggs with a whisk until they’re pale and slightly frothy, about 1 minute of vigorous whisking.
4. Pour the vegetable oil into the beaten eggs while continuously whisking to create an emulsion that won’t separate.
5. Stir in the vanilla extract and grated beetroot until the mixture is evenly pink throughout.
6. Gradually add the wet ingredients to the dry ingredients, mixing with a spatula until just combined—don’t overmix or your cake will be tough.
7. Pour in the buttermilk and fold gently until the batter is smooth and uniformly colored, scraping the bottom to incorporate any dry pockets.
8. Transfer the batter to your prepared pan and smooth the top with your spatula to ensure even baking.
9. Bake for 45-50 minutes until a toothpick inserted into the center comes out completely clean with no crumbs attached.
10. Cool the cake in the pan on a wire rack for exactly 15 minutes before running a knife around the edges and inverting it onto the rack.
11. Let the cake cool completely to room temperature, about 2 hours, before slicing to prevent crumbling.
Expect an incredibly dense, fudgy texture with deep chocolate flavor that’s subtly sweetened by the beets. This cake stands beautifully on its own, but for an extra treat, try serving thick slices slightly warmed with a dollop of whipped cream or crème fraîche to contrast the richness.
Delicious Peanut Butter Chocolate Cake

Tackling a homemade peanut butter chocolate cake might seem ambitious, but breaking it down into simple, manageable steps makes it entirely achievable. This guide will walk you through creating a rich, decadent dessert that’s perfect for any celebration, ensuring you understand each part of the process from mixing to frosting.
8
servings20
minutes35
minutesIngredients
- 2 cups of all-purpose flour
- 1 and 3/4 cups of granulated sugar
- 3/4 cup of unsweetened cocoa powder
- 2 teaspoons of baking soda
- 1 teaspoon of baking powder
- 1 teaspoon of salt
- 2 large eggs
- 1 cup of buttermilk
- 1/2 cup of vegetable oil
- 2 teaspoons of vanilla extract
- 1 cup of boiling water
- 1 cup of creamy peanut butter
- 1/2 cup of unsalted butter, softened
- 3 cups of powdered sugar
- A splash of milk
Instructions
- Preheat your oven to 350°F (175°C) and grease two 9-inch round cake pans.
- In a large bowl, whisk together the 2 cups of all-purpose flour, 1 and 3/4 cups of granulated sugar, 3/4 cup of unsweetened cocoa powder, 2 teaspoons of baking soda, 1 teaspoon of baking powder, and 1 teaspoon of salt until well combined.
- Add the 2 large eggs, 1 cup of buttermilk, 1/2 cup of vegetable oil, and 2 teaspoons of vanilla extract to the dry ingredients.
- Use an electric mixer on medium speed to beat the mixture for exactly 2 minutes, until smooth and creamy.
- Carefully pour in the 1 cup of boiling water and mix on low speed until the batter is thin and uniform; it will be liquidy, which is normal for a moist cake.
- Divide the batter evenly between the two prepared cake pans.
- Bake in the preheated oven for 30-35 minutes, or until a toothpick inserted into the center comes out clean with no wet batter.
- Remove the pans from the oven and let the cakes cool in the pans for 10 minutes to set.
- Tip: Run a knife around the edges of the pans to loosen the cakes before inverting them onto a wire rack to cool completely, which prevents breaking.
- While the cakes cool, make the frosting by beating 1 cup of creamy peanut butter and 1/2 cup of softened unsalted butter in a bowl with an electric mixer on medium-high speed for 2 minutes, until light and fluffy.
- Gradually add the 3 cups of powdered sugar, mixing on low speed until incorporated to avoid a sugar cloud.
- Add a splash of milk and beat on high speed for another 2 minutes, until the frosting is smooth and spreadable; if it’s too thick, add another teaspoon of milk.
- Place one cooled cake layer on a serving plate and spread a generous layer of peanut butter frosting evenly over the top.
- Carefully place the second cake layer on top and frost the top and sides with the remaining frosting, using a spatula to create smooth or swirled patterns.
- Tip: For a cleaner slice, chill the frosted cake in the refrigerator for 30 minutes before serving to firm up the layers.
Moist and fudgy, this cake boasts a deep chocolate flavor that’s perfectly balanced by the creamy, salty-sweet peanut butter frosting. Serve it chilled with a drizzle of melted chocolate or crumbled peanuts on top for an extra crunch that elevates each bite into a truly indulgent experience.
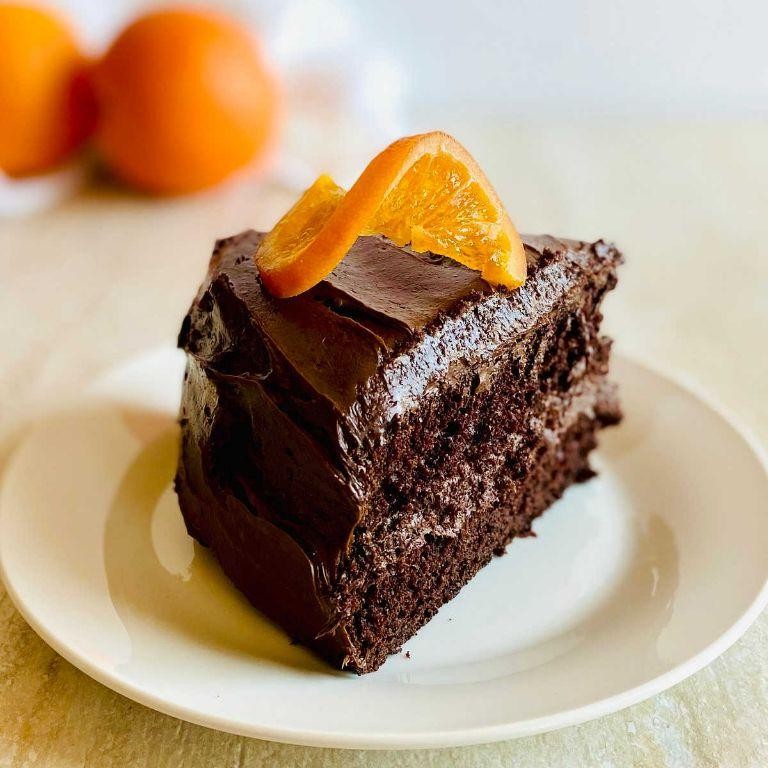
Smooth Chocolate Orange Zest Cake
Zesty and sophisticated, this chocolate orange zest cake combines rich cocoa with bright citrus notes in a moist, tender crumb that’s surprisingly simple to master. Let’s walk through each step together to ensure your cake turns out perfectly every single time. You’ll be amazed at how these few ingredients create such an elegant dessert.
8
servings15
minutes35
minutesIngredients
– 2 cups of all-purpose flour
– 1 ½ cups of granulated sugar
– ¾ cup of unsweetened cocoa powder
– 2 teaspoons of baking powder
– A pinch of salt
– 3 large eggs
– 1 cup of whole milk
– ½ cup of vegetable oil
– 2 teaspoons of pure vanilla extract
– Zest from 2 medium oranges
– A splash of fresh orange juice
Instructions
1. Preheat your oven to 350°F and generously grease a 9-inch round cake pan.
2. In a large mixing bowl, whisk together 2 cups of all-purpose flour, 1 ½ cups of granulated sugar, ¾ cup of unsweetened cocoa powder, 2 teaspoons of baking powder, and a pinch of salt until no streaks remain.
3. Crack 3 large eggs into a separate bowl and beat them with a fork until uniform in color.
4. Pour 1 cup of whole milk, ½ cup of vegetable oil, 2 teaspoons of pure vanilla extract, and the beaten eggs into the dry ingredients.
5. Use an electric mixer on medium speed to combine the wet and dry ingredients for exactly 2 minutes, scraping the bowl’s sides halfway through—this ensures a smooth, lump-free batter.
6. Finely zest 2 medium oranges directly into the batter, then squeeze in a splash of fresh orange juice.
7. Fold the zest and juice into the batter with a spatula until just incorporated; overmixing can make the cake dense, so stop as soon as you see no white streaks.
8. Pour the batter into the prepared pan and tap it firmly on the counter to release any large air bubbles.
9. Bake at 350°F for 30–35 minutes, or until a toothpick inserted into the center comes out clean with a few moist crumbs attached.
10. Let the cake cool in the pan for 10 minutes before transferring it to a wire rack to cool completely—this prevents it from breaking apart.
Now you’re ready to slice into this decadent treat. Notice how the moist, fudgy crumb melts in your mouth, with the orange zest cutting through the richness for a refreshing finish. Nothing beats serving a thick wedge alongside a scoop of vanilla ice cream for that classic hot-and-cold contrast.
Buttery Chocolate Almond Flour Cake
Perfect for when you need a simple yet impressive dessert, this buttery chocolate almond flour cake comes together with minimal fuss. Preparing it requires just a handful of ingredients and straightforward steps that even novice bakers can follow with confidence.
8
servings15
minutes30
minutesIngredients
- 1 ½ cups of finely ground almond flour
- ¾ cup of granulated sugar
- ½ cup of unsweetened cocoa powder
- 3 large eggs
- ½ cup of melted butter
- a splash of vanilla extract
- 1 teaspoon of baking powder
- a pinch of salt
Instructions
- Preheat your oven to 350°F and grease an 8-inch round cake pan, then line the bottom with parchment paper to prevent sticking.
- Whisk together the almond flour, cocoa powder, baking powder, and salt in a medium bowl until no lumps remain.
- In a separate large bowl, beat the eggs and sugar with an electric mixer on medium speed for about 2 minutes until the mixture is pale and slightly thickened.
- Pour in the melted butter and vanilla extract, then mix on low speed just until combined.
- Gradually add the dry ingredients to the wet ingredients, folding gently with a spatula until the batter is smooth and uniform. Tip: Avoid overmixing to keep the cake tender.
- Transfer the batter to the prepared pan and use a spatula to spread it evenly into the corners.
- Bake for 25–30 minutes, or until a toothpick inserted into the center comes out clean with no wet batter. Tip: Check at 25 minutes to prevent overbaking, as almond flour can brown quickly.
- Let the cake cool in the pan on a wire rack for 15 minutes before turning it out to cool completely. Tip: Run a knife around the edges to loosen it cleanly.
Buttery and rich, this cake boasts a moist, dense crumb with deep chocolate notes that pair wonderfully with fresh berries or a dusting of powdered sugar. For a decadent twist, try serving warm slices topped with a scoop of vanilla ice cream to contrast the intense cocoa flavor.
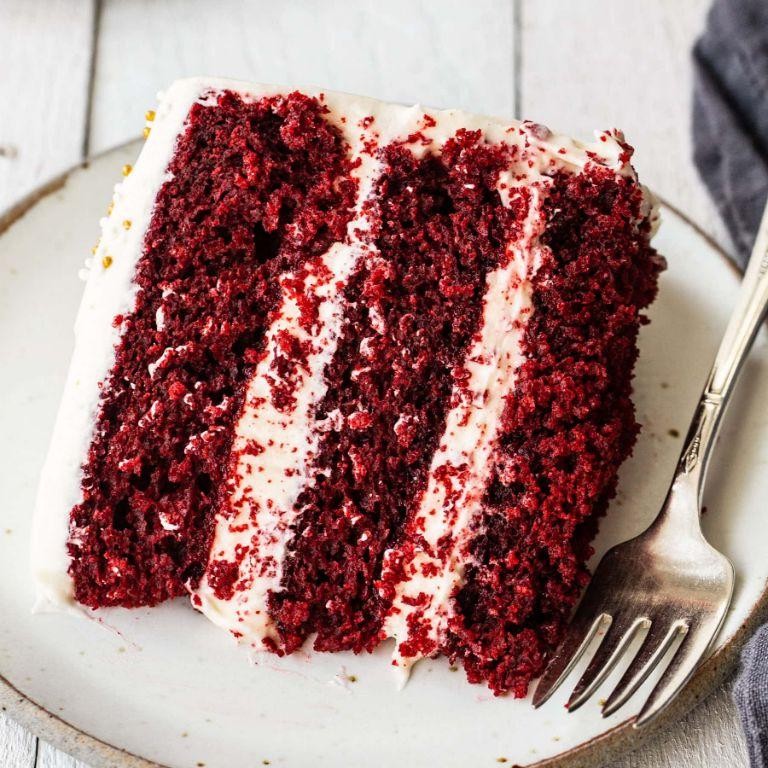
Classic Moist Red Velvet Chocolate Cake
Now, let’s dive into making this classic moist red velvet chocolate cake that’s perfect for any celebration. Nothing beats the rich cocoa flavor combined with that signature vibrant red color and creamy frosting. Follow these steps carefully for a foolproof dessert that will impress everyone.
12
servings20
minutes30
minutesIngredients
– 2 cups of all-purpose flour
– 1½ cups of granulated sugar
– 1 cup of buttermilk
– ½ cup of vegetable oil
– 2 large eggs
– 2 tablespoons of unsweetened cocoa powder
– 1 teaspoon of baking soda
– 1 teaspoon of vanilla extract
– ½ teaspoon of salt
– A splash of white vinegar
– 1 ounce of red food coloring
– 8 ounces of cream cheese, softened
– ½ cup of unsalted butter, softened
– 4 cups of powdered sugar
Instructions
1. Preheat your oven to 350°F and grease two 9-inch round cake pans, then line them with parchment paper for easy removal.
2. In a large bowl, whisk together 2 cups of all-purpose flour, 1½ cups of granulated sugar, 2 tablespoons of unsweetened cocoa powder, 1 teaspoon of baking soda, and ½ teaspoon of salt until well combined.
3. In a separate bowl, mix 1 cup of buttermilk, ½ cup of vegetable oil, 2 large eggs, 1 teaspoon of vanilla extract, a splash of white vinegar, and 1 ounce of red food coloring until smooth.
4. Tip: Combine wet and dry ingredients gradually to avoid lumps, stirring just until the batter comes together without overmixing.
5. Pour the batter evenly into the prepared pans and tap them gently on the counter to remove air bubbles.
6. Bake for 25–30 minutes, or until a toothpick inserted into the center comes out clean with no wet batter.
7. Cool the cakes in the pans for 10 minutes, then transfer to a wire rack to cool completely for about 1 hour.
8. For the frosting, beat 8 ounces of softened cream cheese and ½ cup of softened unsalted butter in a bowl until creamy and smooth.
9. Tip: Use room temperature ingredients for the frosting to prevent graininess and ensure a silky texture.
10. Gradually add 4 cups of powdered sugar, beating on low speed initially to avoid a sugar cloud, then increase to high until fluffy.
11. Place one cooled cake layer on a serving plate and spread a generous layer of frosting evenly over the top.
12. Top with the second cake layer and frost the entire cake, using a spatula to create smooth sides.
13. Tip: Chill the frosted cake for 30 minutes before slicing to make cleaner cuts and enhance the flavors.
Delight in the tender, moist crumb and subtle chocolate notes that make this cake a crowd-pleaser. Serve it chilled with a dusting of extra cocoa or fresh berries for a vibrant twist that balances the sweetness perfectly.
Conclusion
Vibrant chocolate dreams await in these 24 moist cake recipes! Whether you’re a baking novice or seasoned pro, there’s a perfect creation here to satisfy every chocolate craving. We’d love to hear which recipe becomes your new favorite—drop us a comment below and share your baking adventures by pinning this article on Pinterest. Happy baking!