
Now, let’s transform those versatile Mission tortillas into something extraordinary! Whether you’re craving quick weeknight dinners, festive party appetizers, or cozy comfort food, this collection has you covered. Get ready to be inspired by 28 deliciously creative recipes that will make your taste buds dance—let’s dive in and discover your next favorite meal!
Spicy Chicken Tortilla Wraps

Folding this warm tortilla around the spicy chicken filling feels like wrapping up comfort itself, the kind of simple meal that turns an ordinary Tuesday into something quietly special. There’s something deeply satisfying about the way the heat from the chili powder mellows into the creamy avocado, creating pockets of cool and warm in every bite. It’s the sort of uncomplicated dish that asks for little but gives back so much in return, perfect for those evenings when you need nourishment without the fuss.
2
servings15
minutes10
minutesIngredients
- 1 lb boneless, skinless chicken breasts, cut into ½-inch strips (thaw completely if frozen)
- 2 tbsp olive oil (or any neutral oil)
- 1 tsp chili powder (adjust to preference for heat)
- ½ tsp ground cumin
- ¼ tsp garlic powder
- ½ tsp salt
- 4 large flour tortillas (10-inch size works best)
- 1 cup shredded Monterey Jack cheese (or pepper jack for extra spice)
- 1 ripe avocado, sliced (choose one that yields slightly to gentle pressure)
- ¼ cup sour cream (full-fat for creamiest results)
- 2 tbsp fresh cilantro leaves (stems removed)
Instructions
- Pat the chicken strips completely dry with paper towels to ensure proper browning.
- Heat olive oil in a large skillet over medium-high heat until it shimmers, about 1 minute.
- Arrange chicken strips in a single layer in the hot skillet, being careful not to overcrowd the pan.
- Cook chicken undisturbed for 4 minutes to develop a golden-brown crust on one side.
- Flip each chicken strip using tongs and cook for another 3-4 minutes until internal temperature reaches 165°F.
- Sprinkle chili powder, cumin, garlic powder, and salt evenly over the chicken while still in the skillet.
- Stir gently to coat chicken evenly with spices, then remove skillet from heat.
- Warm tortillas one at a time in a dry skillet over medium heat for 20 seconds per side until pliable.
- Place one warmed tortilla on a clean work surface and arrange one-quarter of the spicy chicken down the center.
- Sprinkle ¼ cup of shredded cheese over the chicken while it’s still warm to help it melt slightly.
- Arrange avocado slices in a single layer over the cheese, using about one-quarter of the avocado per wrap.
- Dollop 1 tablespoon of sour cream in a line next to the avocado.
- Scatter fresh cilantro leaves over the other ingredients.
- Fold the bottom edge of the tortilla up over the filling, then fold in the sides tightly.
- Roll the wrap away from you, applying gentle pressure to create a secure bundle.
- Repeat the assembly process with remaining tortillas and filling ingredients.
Only now, as you take that first bite, does the full harmony reveal itself—the way the crisp tortilla gives way to tender chicken, the creamy avocado melting into the sharp cheese, and the gentle heat that lingers just long enough to make you reach for another. Consider serving these wraps sliced diagonally to show off the colorful layers, perhaps with a simple lime wedge for squeezing over the top, transforming each bite with a bright, citrusy note that cuts through the richness.
Mediterranean Veggie Tortilla Quiche

Lately, I’ve been craving something that feels both nourishing and comforting, a dish that bridges the gap between a lazy weekend brunch and a simple weeknight dinner, which is how this Mediterranean-inspired quiche came to be. It’s a humble, forgiving recipe that welcomes whatever vegetables you have on hand, baking into a golden, satisfying meal that somehow makes the kitchen feel warmer.
3
servings15
minutes40
minutesIngredients
– 1 large flour tortilla (10-inch, or any burrito-size tortilla)
– 1 tablespoon olive oil (or any neutral oil)
– 1 small yellow onion, thinly sliced
– 1 red bell pepper, thinly sliced
– 1 cup fresh spinach leaves (packed, or substitute kale)
– 4 large eggs
– 1/2 cup whole milk (or any milk you prefer)
– 1/2 cup crumbled feta cheese (about 2 ounces, or use goat cheese)
– 1/4 cup Kalamata olives, pitted and halved
– 1 teaspoon dried oregano
– 1/4 teaspoon black pepper (freshly ground if possible)
– 1/4 teaspoon salt (adjust to taste)
Instructions
1. Preheat your oven to 375°F (190°C).
2. Press the flour tortilla into a 9-inch pie dish, gently molding it to fit the bottom and sides to form a crust.
3. Heat the olive oil in a large skillet over medium heat until it shimmers, about 1 minute.
4. Add the thinly sliced yellow onion and red bell pepper to the skillet.
5. Sauté the vegetables for 6–8 minutes, stirring occasionally, until the onion is translucent and the pepper is tender.
6. Stir in the fresh spinach leaves and cook for 1–2 minutes, just until wilted.
7. Remove the skillet from the heat and let the vegetable mixture cool slightly.
8. In a medium bowl, whisk together the eggs, whole milk, dried oregano, black pepper, and salt until fully combined and slightly frothy.
9. Spread the sautéed vegetable mixture evenly over the tortilla crust in the pie dish.
10. Sprinkle the crumbled feta cheese and Kalamata olives over the vegetables.
11. Pour the egg mixture slowly over the fillings, ensuring it seeps into all the gaps.
12. Bake the quiche in the preheated oven for 25–30 minutes, or until the center is set and the edges are golden brown.
13. Remove the quiche from the oven and let it rest for 5 minutes before slicing.
Sitting down to a slice of this quiche feels like a quiet reward—the tortilla base crisps up just enough to hold its own against the soft, savory filling, while the briny olives and tangy feta brighten each bite. Serve it warm with a simple arugula salad dressed in lemon vinaigrette, or pack a cold slice for a picnic where its flavors seem to deepen under the open sky.
BBQ Pulled Pork Tortilla Bites

Lately, I’ve been thinking about how the simplest foods often hold the most comfort, especially when they bring together textures and flavors that feel like a warm embrace on a quiet afternoon. These little tortilla bites came to me during one of those reflective moments, when I wanted something savory, slightly smoky, and easy to share—or not share at all. They’re just the kind of humble, hands-on food that turns an ordinary day into something gently special.
8
portions10
minutes15
minutesIngredients
– 1 lb cooked pulled pork (store-bought or leftover, shredded)
– 1/2 cup BBQ sauce (your favorite brand, or homemade)
– 8 small flour tortillas (6-inch size, or corn tortillas for gluten-free)
– 1 cup shredded cheddar cheese (or Monterey Jack for milder flavor)
– 2 tbsp olive oil (or any neutral oil, for brushing)
– 1/4 cup chopped fresh cilantro (optional, for garnish)
Instructions
1. Preheat your oven to 375°F and line a baking sheet with parchment paper.
2. In a medium bowl, combine the pulled pork and BBQ sauce, stirring until the pork is evenly coated.
3. Place the tortillas on a clean work surface and spoon about 2 tablespoons of the pork mixture onto the center of each tortilla.
4. Sprinkle 2 tablespoons of shredded cheddar cheese over the pork on each tortilla.
5. Fold each tortilla in half, pressing gently to enclose the filling.
6. Brush the outside of each folded tortilla lightly with olive oil using a pastry brush.
7. Arrange the tortilla bites on the prepared baking sheet in a single layer, leaving space between them.
8. Bake for 12-15 minutes, or until the tortillas are golden brown and crisp at the edges.
9. Remove from the oven and let cool for 2-3 minutes before handling.
10. Garnish with chopped fresh cilantro, if using, just before serving.
Tip: For extra crispiness, flip the tortilla bites halfway through baking. Tip: If your tortillas are stiff, warm them briefly in the microwave for 10 seconds to make folding easier. Tip: Let the bites rest after baking so the filling sets and doesn’t spill out when bitten.
The tortillas become delightfully crisp, giving way to the tender, smoky pork inside, while the melted cheese adds a creamy contrast. I love serving these with a side of cool sour cream for dipping, or stacking them on a platter with pickled jalapeños for those who want a little heat.
Cheesy Black Bean Tortilla Casserole
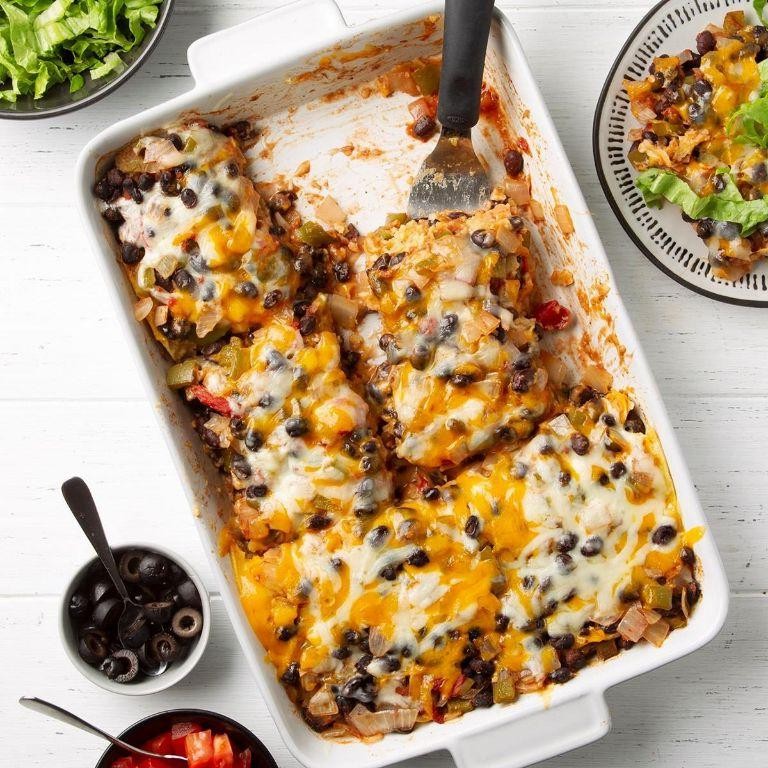
Lately, I’ve been craving the kind of meal that feels like a warm hug, something simple to prepare that fills the kitchen with comforting aromas and leaves plenty for tomorrow’s lunch. This cheesy black bean tortilla casserole is exactly that—a humble, layered dish that comes together with little fuss but delivers deep satisfaction in every bite.
6
portions15
minutes46
minutesIngredients
– 1 tablespoon olive oil (or any neutral oil)
– 1 medium yellow onion, diced
– 2 cloves garlic, minced
– 1 (15-ounce) can black beans, rinsed and drained
– 1 (15-ounce) can diced tomatoes, undrained
– 1 teaspoon ground cumin
– 1/2 teaspoon chili powder (adjust to preferred spice level)
– 8 (6-inch) corn tortillas
– 2 cups shredded Monterey Jack cheese
– 1/4 cup chopped fresh cilantro
Instructions
1. Preheat your oven to 375°F.
2. Heat 1 tablespoon olive oil in a large skillet over medium heat until it shimmers.
3. Add 1 diced yellow onion and cook for 5–7 minutes, stirring occasionally, until the onion turns translucent and soft.
4. Stir in 2 minced garlic cloves and cook for 1 minute until fragrant.
5. Add 1 can rinsed black beans, 1 can undrained diced tomatoes, 1 teaspoon cumin, and 1/2 teaspoon chili powder to the skillet.
6. Simmer the mixture for 8–10 minutes, stirring occasionally, until the liquid reduces slightly and the flavors meld.
7. Spread one-third of the bean mixture evenly over the bottom of a 9×13-inch baking dish.
8. Arrange 4 corn tortillas in a single layer over the bean mixture, tearing them as needed to cover the surface.
9. Sprinkle 1 cup shredded Monterey Jack cheese evenly over the tortillas.
10. Repeat the layers: add another one-third of the bean mixture, the remaining 4 tortillas, and the remaining 1 cup cheese.
11. Top with the final one-third of the bean mixture.
12. Cover the baking dish tightly with aluminum foil and bake at 375°F for 20 minutes.
13. Remove the foil and bake for another 10 minutes until the cheese is bubbly and lightly golden at the edges.
14. Let the casserole rest for 5 minutes after removing it from the oven to set the layers.
15. Sprinkle 1/4 cup chopped fresh cilantro over the top before serving.
Once baked, the casserole emerges with a wonderfully soft texture—the tortillas meld into the saucy beans, while the cheese forms a creamy, golden blanket. Each spoonful balances the earthiness of cumin with the bright kick of chili, and serving it alongside a crisp green salad or topped with a dollop of cool sour cream makes for a comforting, complete meal.
Buffalo Cauliflower Tortilla Tacos

Lately, I’ve been craving that perfect balance of spicy and comforting, the kind that makes you pause between bites to appreciate how simple ingredients can transform into something special. These cauliflower tacos emerged from one of those quiet kitchen experiments where everything just clicked.
8
tacos15
minutes28
minutesIngredients
– 1 large head cauliflower, cut into bite-sized florets (about 4 cups)
– 3 tablespoons olive oil, or any neutral oil
– 1/2 cup buffalo sauce
– 1 tablespoon honey, for subtle sweetness
– 8 small corn tortillas
– 1 cup shredded purple cabbage, for crunch
– 1/2 cup crumbled blue cheese, or feta for milder flavor
– 1/4 cup chopped cilantro
– 1 lime, cut into wedges
Instructions
1. Preheat your oven to 425°F and line a baking sheet with parchment paper.
2. Toss cauliflower florets with olive oil until evenly coated in a large bowl.
3. Spread cauliflower in a single layer on the prepared baking sheet.
4. Roast for 20 minutes until edges begin to brown and florets are tender when pierced with a fork.
5. Whisk together buffalo sauce and honey in a medium bowl until fully combined.
6. Carefully transfer hot cauliflower to the bowl with buffalo sauce mixture.
7. Gently toss until every piece is thoroughly coated with sauce.
8. Return sauced cauliflower to baking sheet and roast for 8 more minutes until sauce appears slightly caramelized.
9. Warm tortillas directly over a gas flame for 15 seconds per side, or in a dry skillet until pliable.
10. Divide roasted buffalo cauliflower evenly among the warmed tortillas.
11. Top each taco with shredded purple cabbage, creating a colorful base layer.
12. Sprinkle crumbled blue cheese generously over the cabbage.
13. Finish with fresh cilantro and serve immediately with lime wedges on the side.
The roasted cauliflower develops a satisfying tenderness that contrasts beautifully with the crisp cabbage, while the buffalo sauce soaks into the tortillas just enough to soften them without making them soggy. For a fun twist, try serving these with a cool ranch dip or extra lime wedges to brighten each bite.
Creamy Spinach and Artichoke Tortilla Roll-Ups

Dusk settles softly outside my kitchen window, the kind of quiet evening that calls for something comforting yet effortless to prepare, a dish that feels like a warm embrace after a long day. There’s a gentle satisfaction in rolling up simple ingredients into something special, a little project for hands and heart alike.
2
rolls15
minutes18
minutesIngredients
– 4 large flour tortillas (10-inch size, or use gluten-free if preferred)
– 1 cup frozen chopped spinach, thawed and squeezed dry (press firmly to remove excess water)
– 1 cup canned artichoke hearts, drained and chopped (quartered ones work well)
– 8 oz cream cheese, softened to room temperature for easy mixing
– 1/2 cup shredded mozzarella cheese (or a Italian blend for more flavor)
– 1/4 cup grated Parmesan cheese (freshly grated melts smoother)
– 1/4 cup mayonnaise (helps create a creamy texture)
– 1 tsp garlic powder (or 2 cloves minced fresh garlic for a sharper kick)
– 1/2 tsp onion powder (adds subtle depth)
– 1/4 tsp black pepper (freshly ground preferred)
– 1/4 tsp salt (adjust if using salted artichokes)
Instructions
1. Preheat your oven to 375°F and line a baking sheet with parchment paper to prevent sticking.
2. In a medium mixing bowl, combine the softened cream cheese, mayonnaise, garlic powder, onion powder, black pepper, and salt, stirring until smooth and fully incorporated.
3. Add the thawed, squeezed-dry spinach, chopped artichoke hearts, mozzarella cheese, and Parmesan cheese to the bowl, folding gently to distribute evenly without overmixing.
4. Lay one flour tortilla flat on a clean surface and spread one-quarter of the spinach-artichoke mixture evenly over the entire surface, leaving a 1/2-inch border around the edges to prevent spillage.
5. Roll the tortilla tightly away from you, pressing gently as you go to keep the filling compact, then place it seam-side down on the prepared baking sheet.
6. Repeat the spreading and rolling process with the remaining tortillas and filling, arranging them in a single layer on the baking sheet with slight space between each roll.
7. Bake in the preheated oven for 15–18 minutes, or until the tortillas turn golden brown and crisp at the edges and the filling is bubbly.
8. Remove the baking sheet from the oven and let the roll-ups rest for 5 minutes on the sheet to firm up slightly before slicing.
9. Use a sharp serrated knife to cut each roll-up crosswise into 1-inch thick slices, wiping the blade clean between cuts for neat edges.
Finally, these roll-ups emerge with a delightful contrast—warm, creamy centers that ooze gently against the crisp, golden tortilla shells. The spinach and artichoke meld into a savory, comforting flavor, perfect for dipping into marinara sauce or serving alongside a simple green salad for a light supper.
Chorizo and Egg Breakfast Tortilla

Remembering those quiet weekend mornings when the kitchen feels like a sanctuary, I find myself drawn to this simple yet deeply satisfying combination. There’s something comforting about the sizzle of chorizo meeting eggs, a ritual that transforms basic ingredients into a warm embrace on a plate. This breakfast tortilla wraps all that morning coziness into one handheld delight, perfect for those reflective moments when time seems to slow down.
2
sandwiches5
minutes12
minutesIngredients
– 4 large eggs (room temperature blends more evenly)
– 4 oz fresh Mexican chorizo, casings removed (or substitute with soy chorizo)
– 2 (8-inch) flour tortillas (warmed tortillas are more pliable)
– 1 tbsp olive oil (or any neutral oil)
– ¼ cup shredded Monterey Jack cheese (pepper Jack adds nice heat)
– 2 tbsp chopped fresh cilantro (optional, for freshness)
– Pinch of salt (adjust based on chorizo saltiness)
Instructions
1. Heat olive oil in a nonstick skillet over medium heat for 1 minute until shimmering.
2. Add chorizo to the skillet, breaking it into small crumbles with a wooden spoon.
3. Cook chorizo for 5-7 minutes, stirring occasionally, until fully cooked and slightly crispy at the edges.
4. Tip: Drain excess grease from the skillet using a spoon, leaving about 1 teaspoon for cooking the eggs.
5. Crack eggs into a medium bowl and whisk vigorously for 30 seconds until uniform and slightly frothy.
6. Pour whisked eggs over the chorizo in the skillet, tilting to distribute evenly.
7. Cook eggs undisturbed for 1 minute until edges begin to set.
8. Gently push cooked edges toward the center with a spatula, tilting skillet to let uncooked egg flow to edges.
9. Tip: For fluffier eggs, reduce heat to medium-low after the first minute of cooking.
10. Sprinkle shredded cheese evenly over the egg surface when eggs are 80% set (still slightly wet on top).
11. Continue cooking for 1-2 minutes until cheese melts and eggs are fully set but still moist.
12. Remove skillet from heat and let rest for 1 minute to finish cooking with residual heat.
13. Warm tortillas in a dry skillet over medium heat for 20 seconds per side until soft and pliable.
14. Divide egg and chorizo mixture evenly between the two warmed tortillas.
15. Tip: For easier rolling, place filling slightly off-center toward one edge of each tortilla.
16. Sprinkle chopped cilantro over the filling if using.
17. Fold bottom edge of each tortilla over filling, then fold in sides and roll tightly away from you.
18. Serve immediately while warm. Often the melted cheese creates delightful stretchy strands with each bite, while the spicy chorizo provides a warm contrast to the creamy eggs. I sometimes drizzle mine with hot sauce or serve alongside fresh fruit for a complete morning meal that feels both nourishing and indulgent.
Shrimp and Avocado Tortilla Bowls

When the afternoon light slants through the kitchen window, I find myself craving something that feels both nourishing and effortless, a meal that comes together with quiet intention rather than frantic effort. These shrimp and avocado tortilla bowls are exactly that—a gentle assembly of crisp, warm textures and cool, creamy ones, perfect for those moments when you want to feed both body and spirit.
5
portions15
minutes15
minutesIngredients
- 4 large flour tortillas (10-inch, or use corn for gluten-free)
- 1 lb raw medium shrimp, peeled and deveined (thawed if frozen)
- 2 ripe avocados, halved and pitted (yielding about 1 ½ cups diced)
- 1 cup cherry tomatoes, halved (or quartered if large)
- ½ cup red onion, finely diced (soak in cold water for 5 minutes to mellow sharpness)
- ¼ cup fresh cilantro leaves, roughly chopped (stems removed)
- 2 tbsp olive oil (or any neutral oil)
- 1 tbsp fresh lime juice (about half a lime)
- 1 tsp chili powder
- ½ tsp ground cumin
- ½ tsp garlic powder
- ¼ tsp salt (adjust to taste)
- ⅛ tsp black pepper (freshly ground if possible)
Instructions
- Preheat your oven to 375°F (190°C) and position a rack in the center.
- Brush both sides of each tortilla lightly with 1 tablespoon of the olive oil using a pastry brush.
- Press each oiled tortilla into an oven-safe bowl (about 5–6 inches wide) placed on a baking sheet, shaping it to form a bowl; the edges will crisp and hold their shape better if you gently pleat the sides.
- Bake the tortilla bowls for 8–10 minutes, until golden brown and firm to the touch; watch closely after 7 minutes to prevent over-browning.
- While the tortilla bowls bake, pat the shrimp dry with paper towels to ensure a good sear.
- In a medium bowl, toss the shrimp with the chili powder, cumin, garlic powder, salt, and black pepper until evenly coated.
- Heat the remaining 1 tablespoon of olive oil in a large skillet over medium-high heat until it shimmers, about 1–2 minutes.
- Add the seasoned shrimp to the hot skillet in a single layer, cooking for 2–3 minutes per side until opaque and lightly browned; avoid overcrowding to steam instead of sear.
- Transfer the cooked shrimp to a plate to rest while you prepare the avocado mixture.
- In a separate bowl, gently combine the diced avocado, halved cherry tomatoes, diced red onion, and chopped cilantro.
- Drizzle the avocado mixture with the fresh lime juice and toss lightly to coat, which helps prevent browning.
- Divide the avocado mixture evenly among the baked tortilla bowls, then top with the warm shrimp.
Perhaps what I love most is the contrast of the warm, spiced shrimp against the cool, creamy avocado, all cradled in that crisp tortilla shell. Play with adding a dollop of Greek yogurt or a sprinkle of cotija cheese for extra richness, or serve it alongside a simple citrus salad to brighten the meal further.
Grilled Steak and Pepper Quesadillas

Unfolding this quiet evening, I find myself drawn to the simple comfort of transforming humble ingredients into something warm and satisfying, the kind of meal that feels like a gentle exhale after a long day.
3
quesadillas15
minutes35
minutesIngredients
– 1 lb flank steak
– 1 large red bell pepper, sliced into thin strips
– 1 large yellow onion, thinly sliced
– 4 large flour tortillas (10-inch)
– 2 cups shredded Monterey Jack cheese
– 2 tbsp olive oil (or any neutral oil)
– 1 tsp chili powder
– 1/2 tsp ground cumin
– 1/2 tsp garlic powder
– 1/4 tsp salt
Instructions
1. Pat the flank steak completely dry with paper towels to ensure a good sear.
2. Rub the steak evenly on both sides with 1 tablespoon of olive oil.
3. Season the steak thoroughly with the chili powder, cumin, garlic powder, and salt.
4. Preheat a grill or grill pan to high heat, approximately 450°F.
5. Place the seasoned steak on the hot grill and cook for 5-7 minutes without moving it to develop grill marks.
6. Flip the steak and continue cooking for another 5-7 minutes for medium-rare, or until the internal temperature reaches 135°F.
7. Transfer the cooked steak to a cutting board and let it rest for 10 full minutes to allow the juices to redistribute.
8. While the steak rests, heat the remaining 1 tablespoon of olive oil in a large skillet over medium heat.
9. Add the sliced bell pepper and onion to the skillet and cook for 8-10 minutes, stirring occasionally, until they are soft and slightly caramelized.
10. Thinly slice the rested steak against the grain to ensure tenderness.
11. Lay one flour tortilla flat in a clean skillet over medium-low heat.
12. Sprinkle 1/2 cup of shredded Monterey Jack cheese evenly over one half of the tortilla.
13. Arrange one quarter of the sliced steak and the pepper-onion mixture over the cheese.
14. Fold the empty half of the tortilla over the filling, pressing down gently.
15. Cook the quesadilla for 2-3 minutes until the bottom is golden brown and crisp.
16. Carefully flip the quesadilla using a spatula and cook for another 2-3 minutes until the second side is golden and the cheese is fully melted.
17. Repeat the assembly and cooking process with the remaining tortillas and filling.
18. Cut each finished quesadilla into wedges for serving.
Offering a wonderful contrast, the crisp, buttery tortilla gives way to the tender, smoky steak and sweet, soft peppers, all bound by gooey, melted cheese. I love serving these wedges with a bright, creamy avocado crema for dipping, or simply enjoying them as they are, a perfect handheld feast.
Mushroom and Swiss Tortilla Melt
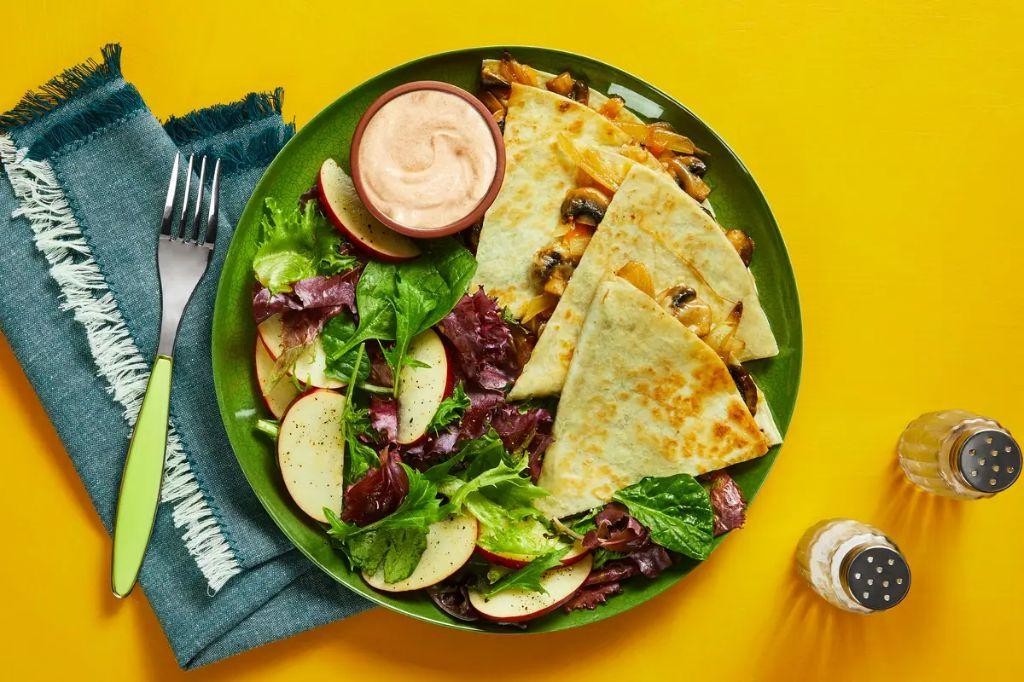
Wandering through the kitchen on this quiet afternoon, I find myself drawn to simple comforts, the kind that require little fuss but fill the space with warmth and earthy aromas. There’s something deeply soothing about transforming a few humble ingredients into a golden, bubbling tortilla melt, a personal ritual that feels both nourishing and gentle on the soul.
1
sandwich5
minutes15
minutesIngredients
– 1 large flour tortilla (10-inch size works well, or whole wheat for extra fiber)
– 1 cup sliced cremini mushrooms (or baby bellas for deeper flavor)
– 1/2 cup shredded Swiss cheese (Gruyère also melts beautifully)
– 1 tbsp unsalted butter (or olive oil for a lighter option)
– 1/4 tsp garlic powder (fresh minced garlic can be used instead)
– Pinch of salt (adjust based on cheese saltiness)
– Pinch of black pepper (freshly cracked adds brightness)
Instructions
1. Heat a medium non-stick skillet over medium-low heat for 2 minutes until evenly warm.
2. Add 1 tablespoon of butter to the skillet, swirling until melted and foaming slightly.
3. Place 1 cup of sliced mushrooms in the skillet, arranging them in a single layer for even cooking.
4. Cook mushrooms for 5-7 minutes, stirring occasionally, until they release their liquid and turn golden brown.
5. Sprinkle 1/4 teaspoon garlic powder, a pinch of salt, and a pinch of black pepper over the mushrooms, stirring to coat evenly.
6. Transfer the seasoned mushrooms to a clean plate, keeping the skillet on the heat.
7. Lay the flour tortilla flat in the same skillet, reheating it for 30 seconds until pliable.
8. Spread the cooked mushrooms evenly over one half of the tortilla, leaving a 1-inch border at the edge.
9. Sprinkle 1/2 cup of shredded Swiss cheese uniformly over the mushrooms.
10. Fold the bare half of the tortilla over the filling, pressing gently with a spatula to seal.
11. Cook the tortilla melt for 2-3 minutes until the bottom is golden brown and crisp.
12. Carefully flip the melt using a wide spatula, cooking for another 2-3 minutes until the second side is equally golden and the cheese is fully melted.
13. Transfer the finished tortilla melt to a cutting board and let it rest for 1 minute before slicing.
Crisp on the outside with a tender, steamy interior, this melt offers a satisfying contrast of textures. The earthy mushrooms and nutty Swiss cheese create a humble harmony that feels both familiar and special. Consider serving it alongside a simple salad or dipping it into warm tomato soup for a cozy, complete meal that turns an ordinary moment into something quietly delightful.
Zesty Lime and Cilantro Chicken Tostadas
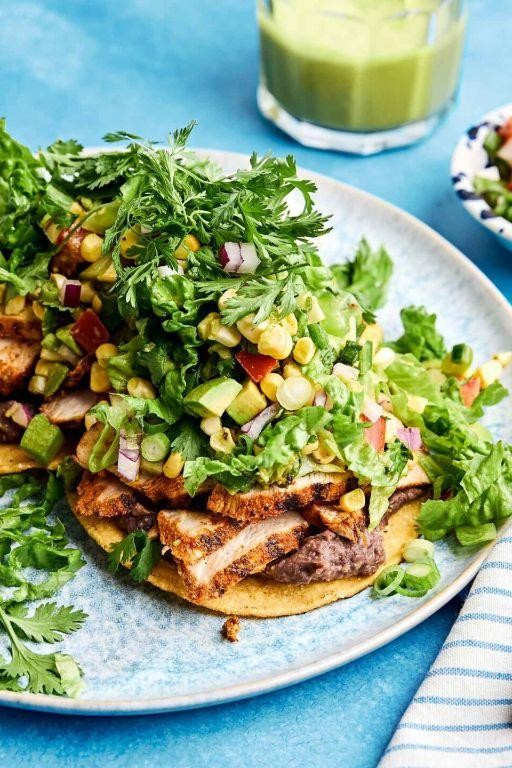
Kind of like finding an old photograph, this recipe surfaced from my kitchen experiments last summer, when the heat made everything feel slow and deliberate. I remember standing at the counter, the sharp scent of lime cutting through the humid air, and thinking how these simple ingredients could hold so much memory. It’s a dish that asks for your patience, not your hurry, unfolding one quiet step at a time.
2
tostadas35
minutes20
minutesIngredients
– 1 lb boneless, skinless chicken thighs, trimmed of excess fat (or substitute chicken breasts for a leaner option)
– 3 tbsp fresh lime juice, from about 2 medium limes (bottled works in a pinch, but fresh is brighter)
– 1/4 cup fresh cilantro leaves, finely chopped (stems removed for milder flavor)
– 2 tbsp olive oil (or any neutral oil like avocado or vegetable)
– 1 tsp ground cumin
– 1/2 tsp chili powder (adjust to preferred heat level)
– 1/2 tsp garlic powder
– 1/2 tsp salt
– 4 small corn tortillas (6-inch size works well)
– 1 cup shredded green cabbage (red cabbage adds color if you have it)
– 1/4 cup crumbled cotija cheese (feta is a fine substitute)
– 2 tbsp sour cream (or Greek yogurt for tang)
Instructions
1. In a medium bowl, combine 1 lb chicken thighs, 3 tbsp lime juice, 1/4 cup cilantro, 2 tbsp olive oil, 1 tsp cumin, 1/2 tsp chili powder, 1/2 tsp garlic powder, and 1/2 tsp salt, stirring until the chicken is evenly coated.
2. Cover the bowl with plastic wrap and marinate the chicken in the refrigerator for at least 30 minutes, or up to 4 hours for deeper flavor penetration.
3. Preheat a skillet over medium-high heat and lightly brush both sides of 4 corn tortillas with olive oil using a pastry brush.
4. Toast each tortilla in the dry skillet for 1-2 minutes per side, until lightly golden and crisp, pressing down gently with a spatula to prevent air pockets.
5. Remove the tortillas to a plate and set aside, covering loosely with a clean kitchen towel to keep warm.
6. Heat 1 tbsp olive oil in the same skillet over medium heat and add the marinated chicken, discarding any excess marinade left in the bowl.
7. Cook the chicken for 6-8 minutes per side, until the internal temperature reaches 165°F on an instant-read thermometer and the exterior is caramelized.
8. Transfer the cooked chicken to a cutting board and let it rest for 5 minutes to allow juices to redistribute, then shred it finely with two forks.
9. Divide the shredded chicken evenly among the toasted tortillas, spreading it in a single layer.
10. Top each tostada with 1/4 cup shredded green cabbage, 1 tbsp crumbled cotija cheese, and a drizzle of sour cream.
Crunchy tortillas give way to tender, citrus-kissed chicken, while the cool cabbage and tangy cheese soften each bite. I love serving these open-faced with extra lime wedges for squeezing, letting everyone build their own perfect balance of zest and creaminess on a warm evening.
Roasted Vegetable and Pesto Tortilla Pizza
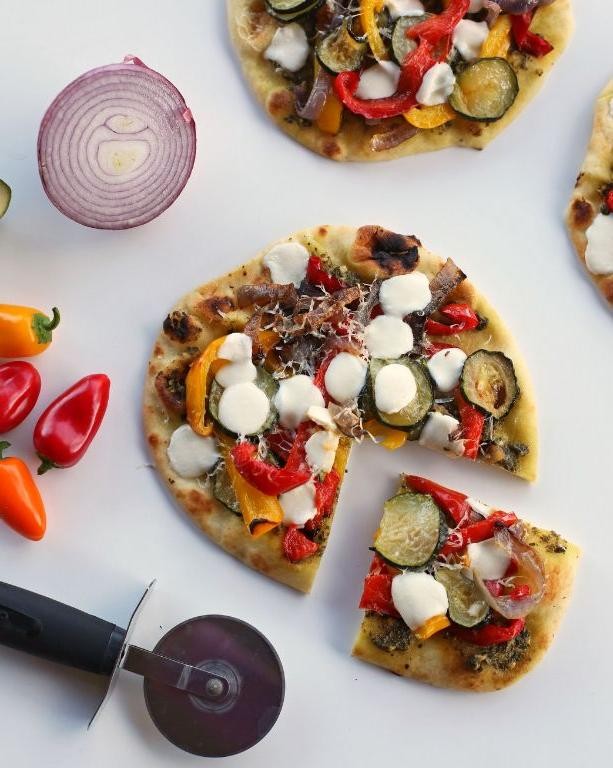
Keeping my kitchen quiet this afternoon, I find myself drawn to the simple comfort of transforming humble ingredients into something warm and nourishing. There’s something deeply satisfying about watching vegetables caramelize and cheese bubble, a small meditation in the midst of a busy week. This roasted vegetable and pesto tortilla pizza feels like a gentle hug on a plate, perfect for those evenings when you need both ease and comfort.
2
portions15
minutes30
minutesIngredients
– 2 large flour tortillas (8-inch)
– 1 cup mixed vegetables, chopped into ½-inch pieces (bell peppers, zucchini, red onion)
– 2 tablespoons olive oil (or any neutral oil)
– ¼ cup prepared pesto (store-bought or homemade)
– ½ cup shredded mozzarella cheese
– ¼ teaspoon salt
– ⅛ teaspoon black pepper
Instructions
1. Preheat your oven to 400°F and line a baking sheet with parchment paper.
2. Toss the chopped vegetables with 1 tablespoon olive oil, salt, and black pepper in a medium bowl until evenly coated.
3. Spread the vegetables in a single layer on the prepared baking sheet.
4. Roast the vegetables at 400°F for 15-18 minutes until edges are lightly browned and vegetables are tender.
5. Remove the roasted vegetables from the oven and let them cool for 5 minutes.
6. Brush both sides of each tortilla with the remaining 1 tablespoon olive oil.
7. Place the oiled tortillas directly on the oven rack and bake at 400°F for 3-4 minutes until lightly crisp.
8. Remove the partially baked tortillas from the oven using tongs.
9. Spread 2 tablespoons of pesto evenly over each tortilla, leaving a ½-inch border around the edges.
10. Sprinkle ¼ cup shredded mozzarella cheese over the pesto on each tortilla.
11. Divide the roasted vegetables evenly between the two tortillas.
12. Return the topped tortillas to the oven and bake at 400°F for 5-7 minutes until cheese is fully melted and bubbly.
13. Remove the pizzas from the oven and let them rest for 2 minutes before slicing.
Beneath the crisp tortilla base, the melted cheese creates pockets of creamy richness that contrast beautifully with the roasted vegetables’ caramelized edges. The pesto adds a bright, herbal note that cuts through the richness, making each bite feel both comforting and fresh. Try serving these personal pizzas with a simple arugula salad dressed in lemon vinaigrette for a complete meal that feels special yet requires minimal effort.
Crunchy Fish Stick Tortilla Wraps

Yesterday’s golden afternoon light reminded me how simple pleasures often make the most satisfying meals, these fish stick wraps coming together with the gentle rhythm of a quiet kitchen, each step feeling like a small meditation rather than a rushed task.
5
wraps10
minutes14
minutesIngredients
– 8 frozen fish sticks (or homemade breaded fish fillets)
– 4 large flour tortillas (warmed for easier rolling)
– 1 cup shredded iceberg lettuce (chilled for extra crunch)
– 1/2 cup shredded cheddar cheese (or Monterey Jack for milder flavor)
– 1/4 cup ranch dressing (thinned with 1 tbsp milk if too thick)
– 2 tbsp chopped fresh dill (parsley works if unavailable)
– 1 tbsp lemon juice (freshly squeezed for brightest flavor)
– 1/2 tsp garlic powder (not garlic salt)
– 1/4 tsp black pepper (freshly ground preferred)
Instructions
1. Preheat oven to 425°F and arrange frozen fish sticks in single layer on baking sheet.
2. Bake fish sticks for 12-14 minutes until coating is deep golden brown and crispy, flipping halfway through cooking.
3. Tip: Listen for the sizzle to subside—this indicates the interior is fully heated through.
4. Whisk ranch dressing with lemon juice, garlic powder, black pepper, and chopped dill in small bowl.
5. Warm tortillas in dry skillet over medium heat for 20 seconds per side until pliable.
6. Tip: Look for slight bubbling and softened texture—overheating makes tortillas brittle.
7. Place two fish sticks horizontally across center of each warmed tortilla.
8. Sprinkle 2 tablespoons shredded cheddar cheese over fish sticks while still hot.
9. Top with 1/4 cup shredded lettuce distributed evenly along the fish sticks.
10. Drizzle 1 tablespoon seasoned ranch dressing mixture over lettuce in zigzag pattern.
11. Fold bottom edge of tortilla over filling, then tightly roll from left to right into cylinder.
12. Tip: Press gently as you roll to compact ingredients without tearing the tortilla.
13. Repeat assembly process with remaining tortillas and ingredients.
14. Rest wraps seam-side down for 1 minute before slicing diagonally. Really, the contrast between the warm, flaky fish and the cool crispness of lettuce creates something wonderfully textured, while the dill-infused ranch brightens each bite—I sometimes serve these sliced into pinwheels for parties, where their layered cross-sections always draw admiring glances.
Sweet and Spicy Honey Sriracha Tortilla Chips

Unexpectedly, the simplest kitchen experiments often yield the most memorable rewards, like these sweet and spicy honey sriracha tortilla chips that came together on a quiet afternoon. Unfolding slowly, the process felt like a gentle meditation, transforming humble ingredients into something wonderfully complex. Using what I had on hand, I discovered how a few careful touches can elevate the everyday into something special.
6
servings10
minutes18
minutesIngredients
– 6 corn tortillas, cut into triangles (stale ones work perfectly for extra crispness)
– 2 tablespoons honey (warm slightly if too thick to mix easily)
– 1 tablespoon sriracha sauce (adjust for more or less heat)
– 1 tablespoon olive oil (or any neutral oil like avocado or vegetable)
– 1/4 teaspoon garlic powder
– 1/4 teaspoon salt
Instructions
1. Preheat your oven to 350°F and line a baking sheet with parchment paper.
2. Stack the corn tortillas and use a sharp knife or pizza cutter to slice them into 6 equal triangles each.
3. Arrange the tortilla triangles in a single layer on the prepared baking sheet, ensuring they don’t overlap for even cooking.
4. In a small bowl, combine the honey, sriracha, olive oil, garlic powder, and salt, whisking until fully incorporated. Tip: If the honey is too thick, warm the mixture briefly in the microwave for 10 seconds to make it easier to coat the chips.
5. Using a pastry brush, gently brush both sides of each tortilla triangle with the honey sriracha mixture, making sure to cover all surfaces evenly.
6. Bake for 8-10 minutes, then flip each chip carefully using tongs. Tip: Watch for the edges to begin curling slightly and turning golden brown as your visual cue to flip.
7. Continue baking for another 6-8 minutes until the chips are deeply golden and crisp throughout.
8. Remove from the oven and let cool completely on the baking sheet for 5-7 minutes. Tip: The chips will continue to crisp as they cool, so resist tasting them immediately for the best texture.
Heavenly crisp with just the right balance of sweet and heat, these chips develop an irresistible glass-like crunch that shatters satisfyingly with each bite. Their glossy coating catches the light beautifully, making them perfect for serving alongside cool dips or crumbling over autumn soups for unexpected texture.
Conclusion
Ready to transform your kitchen routine? These 28 creative Mission Tortilla recipes offer endless possibilities for quick, delicious meals that will delight your family. We’d love to hear which recipes become your new favorites—drop us a comment below and share this tasty inspiration on Pinterest with your fellow home cooks!


