Venture into the realm of culinary perfection where ordinary potatoes transform into extraordinary bite-sized wonders that will literally have your guests fighting for the last one! These mini baked potato appetizers aren’t just food—they’re edible magic that combines crispy skins, fluffy interiors, and decadent toppings in one irresistible package that will become the star of every gathering, celebration, and casual get-together you host from this moment forward.
Why This Recipe Works
- The genius combination of crispy potato skins and fluffy interiors creates a textural symphony that will make your taste buds sing with pure joy and satisfaction
- Perfectly portioned bite-sized wonders eliminate the need for plates and utensils, making them the ultimate party food that keeps the celebration flowing without interruption
- Customizable toppings allow you to create endless flavor combinations that cater to every palate and dietary preference imaginable
- The dramatic visual appeal of these golden-brown beauties arranged on a platter will stop guests in their tracks and create Instagram-worthy moments
- Make-ahead flexibility means you can prepare these showstoppers hours before your event, reducing last-minute stress and ensuring you’re the calm, collected host everyone admires
Ingredients
- 2 pounds baby potatoes, washed and thoroughly dried
- 3 tablespoons olive oil
- 1 teaspoon garlic powder
- 1 teaspoon smoked paprika
- 1/2 teaspoon black pepper, freshly ground
- 1 teaspoon sea salt, divided
- 1/2 cup sour cream
- 4 slices bacon, cooked until crispy and crumbled
- 1/2 cup sharp cheddar cheese, freshly shredded
- 2 tablespoons fresh chives, finely chopped
- 2 tablespoons unsalted butter, melted
Equipment Needed
- Baking sheet
- Parchment paper
- Mixing bowls
- Sharp knife
- Small spoon or melon baller
- Pastry brush
- Measuring spoons and cups
- Oven
Instructions

Prepare Your Potatoes for Perfection
Begin by preheating your oven to a blazing 400°F—this high temperature is absolutely crucial for achieving that dreamy crispy exterior we’re all craving! Take your beautifully washed and thoroughly dried baby potatoes and place them in a large mixing bowl where the magic begins. Drizzle that glorious olive oil over them like liquid gold, making sure every single potato gets coated in this shimmering elixir of deliciousness. Now for the flavor explosion: sprinkle the garlic powder, smoked paprika, black pepper, and half of your sea salt over these little gems, then use your hands to massage the seasonings into every nook and cranny until each potato is perfectly seasoned and glistening with promise. PRO TIP: Don’t be shy with the oil coating—this creates that irresistible crispy skin texture that will have people begging for your secret! Line your baking sheet with parchment paper to prevent sticking and arrange the potatoes in a single layer, giving them enough personal space to crisp up properly without steaming each other.
Bake to Golden Brown Brilliance
Place your perfectly seasoned potatoes into the preheated oven and let the transformation begin! Bake these beauties for 35-45 minutes, but here’s the critical part: you MUST rotate the baking sheet halfway through the cooking time to ensure even browning and prevent any hot spots from ruining your masterpiece. Watch for the visual cues that signal perfection—the skins should become gloriously crispy and develop deep golden-brown spots, while the insides become tender enough to pierce easily with a fork. The aroma filling your kitchen will be absolutely intoxicating, a symphony of roasted garlic and smoked paprika that will have everyone wandering in to see what culinary magic you’re creating. When you remove them from the oven, they should sizzle with satisfaction and look so irresistible you’ll be tempted to eat them plain right then and there. PRO TIP: Test one potato by gently pressing it—it should give slightly but still hold its shape beautifully.
Create the Perfect Potato Cavities
Now for the most satisfying part—transforming these roasted wonders into edible vessels of deliciousness! Allow the potatoes to cool just enough to handle, about 5-7 minutes, because rushing this step could lead to burned fingers and disappointment. Using a sharp paring knife, carefully slice off the top third of each potato, creating a perfect little lid that you’ll set aside like precious treasure. Then, with a small spoon or melon baller, gently scoop out the fluffy interior of each potato, leaving about 1/4-inch border around the edges and bottom to maintain structural integrity. Be careful not to scoop too aggressively—you want sturdy potato cups that can hold all your glorious toppings without collapsing. Save that precious potato flesh you’ve removed because it’s absolute gold for mashed potatoes or thickening soups later! PRO TIP: A gentle twisting motion with your spoon creates the cleanest removal of potato interior without damaging the delicate skin structure.
Brush with Butter and Crisp to Perfection
This step separates the amateurs from the potato pros—the double-crisping technique that creates textural nirvana! Take your melted unsalted butter and using a pastry brush, generously coat the inside of each potato cup, making sure to get into every crevice and corner. The butter will seep into the potato flesh, creating an additional layer of flavor and helping the interior develop a beautiful golden color during the second bake. Return these butter-blessed potato cups to your 400°F oven for another 8-10 minutes, watching carefully as they transform into crispy, golden vessels of pure joy. The visual cue you’re looking for is the edges beginning to curl slightly and develop deeper browning while the butter creates a shimmering, irresistible surface. This additional crisping time ensures your potato cups maintain their structural integrity when loaded with toppings and provide that satisfying crunch with every single bite.
Load with Irresistible Toppings
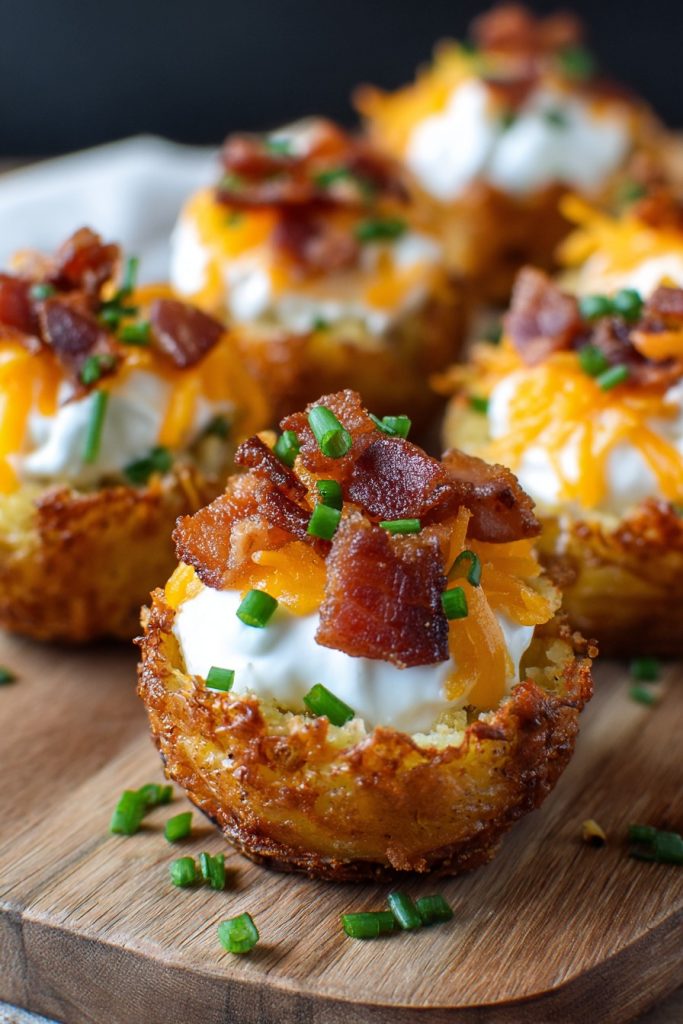
Now for the grand finale—the moment these potato vessels become legendary appetizers that will be talked about for years to come! Remove your perfectly crisped potato cups from the oven and let them cool for exactly 3-4 minutes—this brief resting period allows them to firm up slightly while still being warm enough to melt cheese beautifully. Begin by spooning a generous teaspoon of sour cream into each potato cup, creating that classic baked potato flavor foundation that everyone adores. Next, sprinkle that freshly shredded sharp cheddar cheese over the sour cream, watching as it begins to melt from the residual heat in the most satisfying way imaginable. Now for the bacon—generously top each potato with those crispy, crumbled bacon pieces that provide the perfect salty, smoky counterpoint to the creamy elements. Finish with a delicate sprinkle of fresh chives for that pop of color and fresh flavor that elevates everything to restaurant-quality status.
Tips and Tricks
Choosing the right potatoes is absolutely critical for success—look for baby potatoes that are approximately 1-1.5 inches in diameter with smooth, unblemished skins. The uniformity in size ensures even cooking and creates that picture-perfect presentation that will make your platter look professionally crafted. When washing your potatoes, be thorough but gentle—use a vegetable brush to remove any dirt while being careful not to damage the delicate skins that will become our crispy vessels. For the ultimate crispy exterior, make sure your potatoes are COMPLETELY dry before oiling them—any residual moisture will create steam during baking and prevent that glorious crunch we’re all dreaming about. If you’re preparing these for a large crowd, you can absolutely par-bake the potatoes up to the scooping stage the day before, then simply do the final crisping and topping assembly right before serving. The seasoning measurements are guidelines—don’t be afraid to adjust based on your personal preferences! If you love garlic, add an extra half teaspoon; if you crave heat, incorporate a pinch of cayenne pepper into your seasoning mix. For those avoiding dairy, coconut cream makes an excellent sour cream substitute, and nutritional yeast can provide that cheesy flavor without actual cheese. When scooping the potato interiors, reserve that precious potato flesh—it makes incredible mashed potatoes, can thicken soups, or can be mixed with the toppings and spooned back into the cups for a loaded potato bite variation. If your potato cups seem fragile after scooping, pop them back in the oven for an additional 5 minutes to firm up before adding toppings. For the most dramatic presentation, consider using a variety of baby potato colors—mix red, gold, and purple potatoes for a stunning visual effect that will wow your guests before they even take their first bite.
Recipe Variations
- Southwestern Fiesta: Transform these into spicy wonders by mixing the sour cream with 1 tablespoon of taco seasoning, topping with pepper jack cheese, crumbled chorizo, diced avocado, and a sprinkle of cilantro for a flavor explosion that will transport your taste buds straight to Mexico
- Mediterranean Magic: Create a lighter version by substituting the sour cream with Greek yogurt mixed with minced garlic and dill, then topping with crumbled feta cheese, chopped kalamata olives, diced cucumber, and a drizzle of olive oil for a refreshing twist that feels both elegant and healthy
- Buffalo Chicken Sensation: For the ultimate game-day appetizer, mix shredded cooked chicken with buffalo sauce, use blue cheese dressing instead of sour cream, top with Monterey Jack cheese, and finish with celery leaves for that classic buffalo flavor profile in perfect bite-sized form
- Vegan Delight: Create a plant-based masterpiece by using vegan sour cream, topping with dairy-free cheese, meatless bacon bits, and finishing with chopped scallions and a sprinkle of smoked paprika for a compassionate version that doesn’t sacrifice any flavor or satisfaction
- Breakfast Brilliance: Turn these into morning marvels by filling with scrambled eggs, topping with cheddar cheese, crumbled breakfast sausage, and a dollop of hollandaise sauce for the ultimate brunch showstopper that will make you the host of the year
Frequently Asked Questions
Can I make these mini baked potato appetizers ahead of time?
Absolutely, and this is one of their greatest advantages for stress-free entertaining! You can prepare these glorious potato cups through the second baking stage up to 24 hours in advance. Once they’ve completed their second crisping in the oven, allow them to cool completely to room temperature, then store them in an airtight container in the refrigerator. When you’re ready to serve, simply arrange them on a baking sheet and warm them in a 350°F oven for 5-7 minutes until they’re heated through but still maintain their perfect crispy texture. Then proceed with adding your toppings as directed. The toppings themselves can also be prepped in advance—have your bacon cooked and crumbled, cheese shredded, and chives chopped so assembly becomes a quick and effortless process right before your guests arrive.
What’s the best way to reheat leftover mini baked potatoes?
Leftovers are a rare occurrence with these irresistible bites, but if you’re lucky enough to have some, the reheating method is crucial for maintaining that perfect texture! Never use the microwave, as it will turn your beautifully crispy potato cups into sad, soggy disappointments. Instead, place them on a baking sheet in a single layer and reheat in a 375°F oven for 8-10 minutes until they’re heated through and the skins have regained their crispy magic. If the toppings seem dry after reheating, you can always add a fresh sprinkle of chives or a tiny additional dollop of sour cream to refresh them. The cheese will melt beautifully again, and the bacon will crisp up nicely, giving you nearly the same experience as when they were freshly made.
Can I use regular-sized potatoes instead of baby potatoes?
While baby potatoes create the perfect bite-sized appetizer experience, you can absolutely adapt this recipe for regular-sized potatoes if that’s what you have available! Choose medium russet or Yukon gold potatoes and cut them into approximately 1-inch cubes after the initial roasting. The cooking times will need adjustment—the initial roast might take 45-55 minutes depending on potato size, and the second crisping after scooping might require 10-12 minutes. The result will be more substantial potato bites that might require small plates or napkins, but the flavor profile will be equally magnificent. Just be mindful that the visual appeal changes from elegant individual cups to hearty potato squares, which can still be absolutely delicious but lack the delicate presentation of the baby potato version.
What other toppings work well with these potato appetizers?
The topping possibilities are truly endless and limited only by your imagination! Beyond the classic version, consider pulled pork with barbecue sauce and coleslaw for a Southern twist, or crab salad with Old Bay seasoning and lemon zest for coastal elegance. Caramelized onions with goat cheese and fresh thyme create a sophisticated option perfect for dinner parties, while buffalo cauliflower with blue cheese and celery offers a vegetarian alternative with big flavor. For holiday gatherings, consider topping with thinly sliced roast beef and horseradish cream, or turkey with cranberry sauce and stuffing for Thanksgiving-inspired bites. The key is balancing creamy, crunchy, salty, and fresh elements to create harmonious flavor explosions in every single bite that keep people coming back for more.
Summary
These mini baked potato appetizers combine crispy potato skins, fluffy interiors, and customizable toppings in perfect bite-sized packages that will become your go-to party masterpiece, delivering unforgettable flavor and stunning presentation with every single irresistible bite that disappears within moments of hitting the platter.
Mini Baked Potato Appetizers
6
servings20
minutes55
minutesIngredients
Instructions
- 1 Preheat oven to 400°F. Toss potatoes with olive oil, garlic powder, smoked paprika, black pepper, and 1/2 teaspoon salt. Bake for 35-45 minutes until crispy and tender.
- 2 Let potatoes cool slightly, then slice off tops and scoop out centers, leaving 1/4-inch borders.
- 3 Brush potato cups with melted butter and return to oven for 8-10 minutes until crispy.
- 4 Fill each potato cup with sour cream, then top with cheese, bacon, and chives.
- 5 Serve immediately while warm and crispy.


