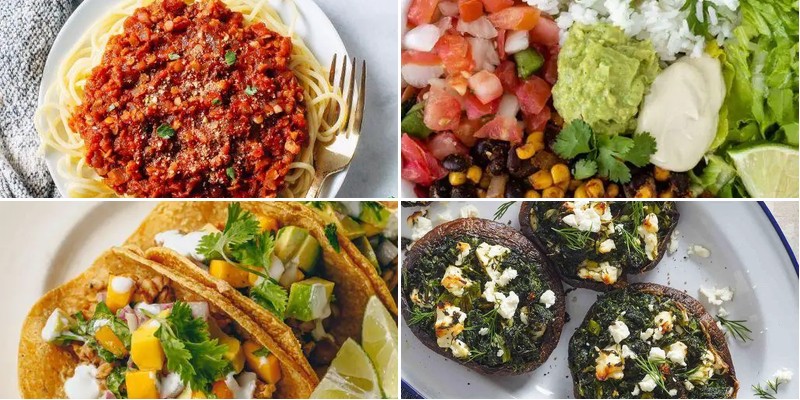
Zesty, satisfying, and packed with plant-powered goodness—these 20 meatless protein recipes are here to shake up your dinner routine! Whether you’re craving cozy comfort food, quick weeknight wins, or vibrant seasonal dishes, you’ll find plenty of inspiration to keep your meals exciting and nourishing. Ready to explore delicious ways to go meat-free without missing a thing? Let’s dive in!
Quinoa and Black Bean Stuffed Peppers

Cooking a satisfying, healthy meal doesn’t have to be complicated, and these quinoa and black bean stuffed peppers are the perfect example. Let’s walk through each step together to create a colorful, protein-packed dinner that’s as delicious as it is nutritious.
4
servings20
minutes51
minutesIngredients
– 4 large bell peppers (any color you like)
– 1 cup of uncooked quinoa
– 1 can of black beans, rinsed well
– 1 small yellow onion, chopped fine
– 2 cloves of garlic, minced
– 1 cup of your favorite salsa
– a couple of tablespoons of olive oil
– a good sprinkle of chili powder
– a generous pinch of salt
– about a half cup of shredded cheese (cheddar or Mexican blend works great)
Instructions
1. Preheat your oven to 375°F.
2. Slice each bell pepper in half lengthwise and carefully remove all the seeds and white membranes.
3. Place the pepper halves cut-side up in a 9×13 inch baking dish.
4. Rinse 1 cup of quinoa thoroughly in a fine-mesh strainer under cold running water for about 1 minute to remove the natural bitterness.
5. Cook the quinoa according to package directions, which typically means combining it with 2 cups of water, bringing to a boil, then simmering covered for 15 minutes until the water is absorbed.
6. While the quinoa cooks, heat 2 tablespoons of olive oil in a large skillet over medium heat.
7. Add the chopped onion and cook for 5-7 minutes, stirring occasionally, until it becomes translucent and soft.
8. Stir in the minced garlic and cook for just 1 more minute until fragrant.
9. Remove the skillet from heat and stir in the cooked quinoa, rinsed black beans, 1 cup of salsa, 1 teaspoon of chili powder, and 1 teaspoon of salt.
10. Spoon the quinoa mixture evenly into each pepper half, packing it down gently.
11. Cover the baking dish tightly with aluminum foil and bake for 25 minutes.
12. Remove the foil and sprinkle about a half cup of shredded cheese evenly over the stuffed peppers.
13. Return to the oven uncovered and bake for another 10 minutes, until the cheese is melted and bubbly and the pepper edges are slightly charred.
14. Let the peppers rest for 5 minutes before serving to allow the filling to set.
Vibrant and satisfying, these peppers offer a wonderful contrast between the tender-crisp pepper shells and the fluffy, savory filling. The melted cheese creates a golden blanket that adds richness to each bite. For a fresh twist, try serving them with a dollop of cool sour cream or sliced avocado on the side.
Chickpea and Avocado Salad with Lemon Dressing
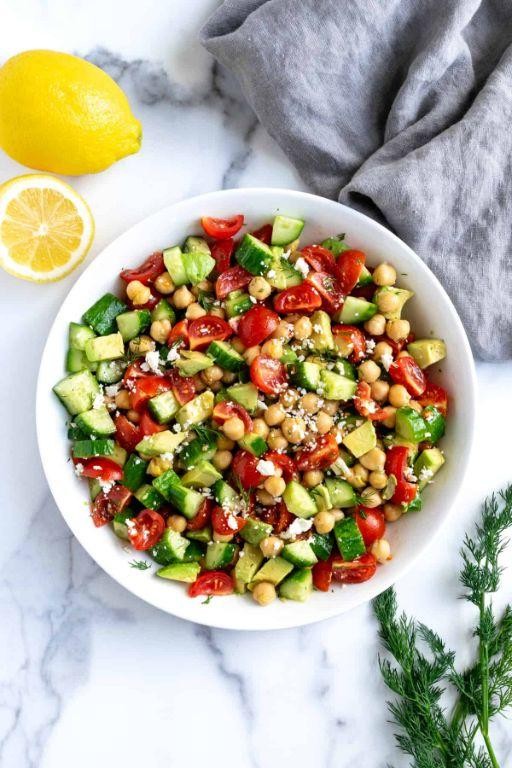
Keeping things fresh and simple, this chickpea and avocado salad comes together in minutes but delivers bright, satisfying flavors perfect for lunch or a light dinner. Let me walk you through each step methodically so you can create this vibrant dish with confidence.
2
servings10
minutesIngredients
– 1 can (15 oz) of chickpeas, drained and rinsed
– 1 ripe avocado, pitted and peeled
– 1/4 cup of fresh lemon juice
– 2 tablespoons of extra virgin olive oil
– 1/4 cup of finely chopped red onion
– A couple of tablespoons of chopped fresh parsley
– A pinch of salt
– A pinch of black pepper
Instructions
1. Drain the can of chickpeas into a colander and rinse them thoroughly under cold running water for about 30 seconds to remove excess sodium.
2. Transfer the rinsed chickpeas to a medium mixing bowl.
3. Cut the avocado in half lengthwise around the pit, twist the halves apart, and carefully remove the pit with a spoon.
4. Scoop the avocado flesh from both halves using a spoon and add it to the bowl with the chickpeas.
5. Pour 1/4 cup of fresh lemon juice over the chickpeas and avocado.
6. Drizzle 2 tablespoons of extra virgin olive oil into the bowl.
7. Add 1/4 cup of finely chopped red onion to the mixture.
8. Sprinkle in a couple of tablespoons of chopped fresh parsley.
9. Season with a pinch of salt and a pinch of black pepper.
10. Gently toss all ingredients together with a large spoon until everything is evenly coated with the dressing, being careful not to mash the avocado too much.
Slightly creamy avocado chunks mingle with firm chickpeas in this zesty salad, where the lemon dressing cuts through the richness beautifully. Try serving it over toasted whole-grain bread or alongside grilled chicken for a more substantial meal.
Lentil Bolognese Pasta
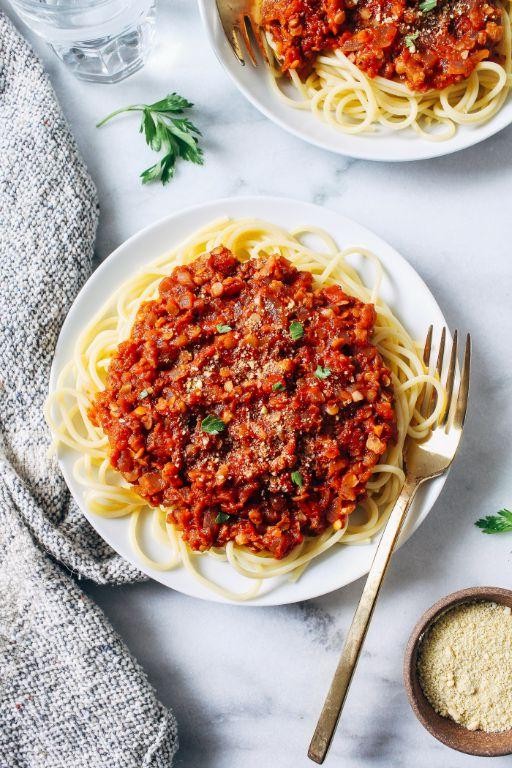
This hearty lentil Bolognese pasta transforms humble ingredients into a deeply satisfying meal that’s perfect for busy weeknights. Think of it as a cozy, plant-based twist on the Italian classic that comes together with minimal fuss but delivers maximum flavor.
4
servings15
minutes50
minutesIngredients
– A couple of tablespoons of olive oil
– One medium yellow onion, finely chopped
– Two carrots, finely diced
– Two celery stalks, finely diced
– Three cloves of garlic, minced
– One cup of brown lentils, rinsed
– One 28-ounce can of crushed tomatoes
– A couple of cups of vegetable broth
– A splash of red wine (optional but nice!)
– A teaspoon of dried oregano
– A bay leaf
– A pound of your favorite pasta
– A handful of fresh basil for garnish
– A generous sprinkle of Parmesan cheese (or nutritional yeast for vegan)
Instructions
1. Heat two tablespoons of olive oil in a large Dutch oven or heavy-bottomed pot over medium heat until shimmering.
2. Add the chopped onion, carrots, and celery and cook for 8-10 minutes, stirring occasionally, until the vegetables have softened and the onion is translucent.
3. Stir in the minced garlic and cook for 1 minute until fragrant, being careful not to let it burn.
4. Add the rinsed lentils, crushed tomatoes, two cups of vegetable broth, a splash of red wine (if using), one teaspoon of dried oregano, and one bay leaf to the pot.
5. Bring the mixture to a boil, then immediately reduce the heat to low, cover the pot, and simmer for 35-40 minutes until the lentils are tender and the sauce has thickened.
6. While the sauce simmers, bring a large pot of salted water to a rolling boil and cook one pound of pasta according to package directions until al dente.
7. Drain the cooked pasta, reserving about half a cup of the starchy pasta water.
8. Remove the bay leaf from the finished Bolognese sauce and discard it.
9. Tip: Stir a few tablespoons of the reserved pasta water into the sauce to help it cling beautifully to the pasta.
10. Combine the drained pasta with the lentil Bolognese sauce in the large pot, tossing gently to coat every strand.
11. Tip: Let the pasta and sauce mingle off the heat for 2-3 minutes to allow the flavors to meld together.
12. Divide the pasta among bowls and top with fresh basil leaves and a generous sprinkle of Parmesan cheese.
Tip: For extra richness, drizzle with a little more olive oil just before serving. The finished dish has a wonderfully meaty texture from the tender lentils, balanced by the bright acidity of tomatoes and subtle sweetness from the soffritto base. Try serving it with garlic bread to soak up every last bit of sauce, or pack the leftovers for a satisfying lunch that tastes even better the next day.
Tofu Stir-Fry with Broccoli and Cashews

Now, let’s create a simple yet satisfying tofu stir-fry that comes together in under 30 minutes. This recipe walks you through each step methodically, ensuring even beginners can achieve perfectly cooked vegetables and crispy tofu. You’ll love how the broccoli stays vibrant while the cashews add that satisfying crunch.
4
servings15
minutes15
minutesIngredients
– 1 block of extra-firm tofu, pressed and cubed
– 2 cups of broccoli florets (about 1 medium head)
– A generous handful of raw cashews
– 2 tablespoons of vegetable oil
– 2 cloves of garlic, minced
– A thumb-sized piece of ginger, grated
– 3 tablespoons of soy sauce
– 1 tablespoon of rice vinegar
– 1 teaspoon of cornstarch
– A splash of water
– A pinch of red pepper flakes (optional for heat)
Instructions
1. Press your tofu block between paper towels with a heavy pan on top for 15 minutes to remove excess water, then cut into 1-inch cubes.
2. Heat 1 tablespoon of vegetable oil in a large skillet or wok over medium-high heat until shimmering.
3. Add tofu cubes in a single layer and cook for 4-5 minutes per side until golden brown and crispy.
4. Remove tofu from the skillet and set aside on a plate.
5. Add remaining 1 tablespoon of oil to the same skillet and heat for 30 seconds.
6. Add broccoli florets and stir-fry for 3 minutes until bright green but still crisp.
7. Add minced garlic and grated ginger, stirring constantly for 1 minute until fragrant.
8. Tip: Don’t let the garlic brown or it will turn bitter.
9. Return tofu to the skillet along with raw cashews.
10. In a small bowl, whisk together soy sauce, rice vinegar, cornstarch, and 2 tablespoons of water until smooth.
11. Pour the sauce mixture over the stir-fry and toss everything to coat evenly.
12. Cook for 2-3 minutes until the sauce thickens and glazes the ingredients.
13. Tip: The cornstarch will create a glossy sauce that clings to every piece.
14. Add red pepper flakes if using, and stir to combine.
15. Tip: For extra crunch, add the cashews at the end rather than cooking them too long.
16. Remove from heat and serve immediately.
The finished dish offers a wonderful contrast between the crispy tofu and tender-crisp broccoli, with the cashews providing occasional buttery crunch. The savory soy-ginger sauce coats everything beautifully, making each bite balanced and flavorful. Try serving it over jasmine rice or tossing it with noodles for a complete meal that feels both wholesome and indulgent.
Vegan Tempeh Tacos with Mango Salsa

Whether you’re new to plant-based cooking or just looking for a fresh taco night twist, these vegan tempeh tacos with mango salsa come together with straightforward steps that build flavor beautifully. We’ll start by marinating the tempeh for depth, then prepare a bright mango salsa while it rests, and finally assemble everything for a satisfying meal. Just follow along one step at a time—you’ve got this.
8
tacos25
minutes11
minutesIngredients
- 8 ounces of tempeh, crumbled into small bits
- 2 tablespoons of olive oil
- 3 tablespoons of soy sauce
- 1 tablespoon of maple syrup
- 1 teaspoon of chili powder
- 1 ripe mango, diced into 1/2-inch pieces
- 1/4 cup of finely chopped red onion
- 1 jalapeño, minced (seeds removed for less heat)
- A big handful of fresh cilantro, chopped
- A splash of lime juice (about 2 tablespoons)
- A couple of pinches of salt
- 8 small corn tortillas
Instructions
- Crumble the 8 ounces of tempeh into a medium bowl using your hands, aiming for pea-sized pieces.
- Whisk together 2 tablespoons of olive oil, 3 tablespoons of soy sauce, 1 tablespoon of maple syrup, and 1 teaspoon of chili powder in a small bowl until fully combined.
- Pour the marinade over the crumbled tempeh, stirring gently to coat every piece, then let it sit for 15 minutes to absorb the flavors.
- While the tempeh marinates, dice 1 ripe mango into 1/2-inch cubes and place them in a separate bowl.
- Add 1/4 cup of finely chopped red onion, 1 minced jalapeño, a big handful of chopped cilantro, a splash of lime juice (about 2 tablespoons), and a couple of pinches of salt to the mango, tossing gently to combine.
- Heat a large skillet over medium heat and add the marinated tempeh, spreading it in an even layer.
- Cook the tempeh for 8–10 minutes, stirring occasionally, until it turns golden brown and slightly crispy at the edges.
- Warm 8 small corn tortillas one at a time in a dry skillet over medium heat for 30 seconds per side, or until soft and pliable.
- Spoon the cooked tempeh into the warmed tortillas, topping each with a generous scoop of the mango salsa.
Just before serving, you’ll love the contrast between the savory, slightly chewy tempeh and the juicy, sweet-spicy salsa—it’s a texture party in every bite. For a fun twist, try stacking the tacos with extra lime wedges or a dollop of vegan crema to balance the heat. They’re perfect for a casual dinner or a colorful addition to your next gathering.
Spinach and Feta Stuffed Portobello Mushrooms

Cooking a satisfying vegetarian meal doesn’t have to be complicated, and these stuffed portobello mushrooms prove just that. They combine earthy mushrooms with creamy cheese and fresh spinach for a dish that feels both elegant and approachable. Let’s walk through the simple steps to create this delicious dinner.
5
portions15
minutes28
minutesIngredients
– 4 large portobello mushroom caps
– A couple of tablespoons of olive oil
– A pinch of salt and black pepper
– 2 big handfuls of fresh spinach
– 2 minced garlic cloves
– About 1 cup of crumbled feta cheese
– A splash of balsamic vinegar
Instructions
1. Preheat your oven to 400°F and line a baking sheet with parchment paper.
2. Use a spoon to gently scrape out the dark gills from the underside of each mushroom cap. (Tip: Removing the gills prevents the mushrooms from becoming watery during baking.)
3. Brush both sides of each mushroom cap with olive oil and sprinkle with salt and black pepper.
4. Place the mushrooms gill-side up on the prepared baking sheet and bake for 10 minutes at 400°F.
5. While mushrooms bake, heat 1 tablespoon of olive oil in a large skillet over medium heat.
6. Add the minced garlic and cook for 1 minute until fragrant.
7. Add the fresh spinach and cook for 2–3 minutes, stirring constantly, until completely wilted.
8. Remove the skillet from heat and stir in the crumbled feta cheese. (Tip: Letting the spinach cool slightly before adding feta helps prevent the cheese from melting too quickly.)
9. Remove the partially baked mushrooms from the oven—they should be slightly softened.
10. Carefully pat the inside of each mushroom cap dry with a paper towel to remove any excess moisture.
11. Divide the spinach-feta mixture evenly among the four mushroom caps, pressing it gently into each one.
12. Drizzle each stuffed mushroom with a splash of balsamic vinegar. (Tip: The vinegar adds a tangy brightness that balances the richness of the feta.)
13. Return the baking sheet to the oven and bake for 15–18 minutes at 400°F, until the mushrooms are tender and the filling is lightly golden.
14. Let the mushrooms rest for 5 minutes before serving.
Fresh from the oven, these mushrooms offer a wonderful contrast between the meaty, tender caps and the creamy, tangy filling. The feta becomes slightly melted while maintaining its distinct salty character, perfectly complementing the earthy spinach and garlic. For a complete meal, serve them alongside a simple quinoa salad or slice them over toasted crusty bread to soak up all the delicious juices.
Savory Chickpea Pancakes with Vegetables
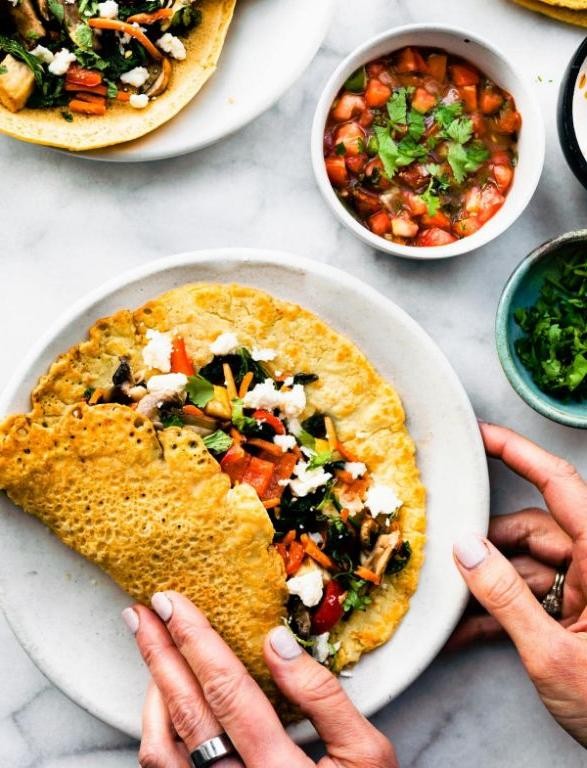
Craving something wholesome and packed with flavor? These savory chickpea pancakes are your new go-to—simple, nutritious, and perfect for a quick lunch or dinner. Let’s walk through each step together so you can master this veggie-loaded delight.
4
pancakes10
minutes30
minutesIngredients
– 1 cup of chickpea flour
– A couple of tablespoons of olive oil
– A splash of water (about 3/4 cup)
– Half a teaspoon of baking powder
– A pinch of salt
– A handful of chopped spinach
– A small diced bell pepper
– A quarter of a finely chopped red onion
– One minced garlic clove
– A sprinkle of black pepper
Instructions
1. In a medium bowl, whisk together the chickpea flour, baking powder, salt, and black pepper until well combined.
2. Gradually pour in the water while stirring continuously to avoid lumps—this ensures a smooth batter.
3. Fold in the chopped spinach, diced bell pepper, red onion, and minced garlic until evenly distributed.
4. Heat a non-stick skillet over medium heat and add a tablespoon of olive oil, swirling to coat the surface.
5. Pour about 1/4 cup of the batter into the skillet, spreading it gently into a round shape.
6. Cook for 3–4 minutes until the edges look set and small bubbles form on the surface—this is your cue to flip.
7. Carefully flip the pancake using a spatula and cook for another 2–3 minutes until golden brown on both sides.
8. Repeat with the remaining batter, adding more olive oil as needed to prevent sticking.
9. Transfer the cooked pancakes to a plate and let them rest for a minute to firm up. A crispy exterior gives way to a tender, veggie-filled center, making these pancakes irresistibly satisfying. Try stacking them high with a dollop of yogurt or drizzling with hot sauce for an extra kick—they’re versatile enough to shine at any meal.
Cauliflower and Almond Butter Curry

Perfect for a cozy weeknight, this cauliflower and almond butter curry comes together with minimal fuss and delivers maximum comfort. Preparing this dish involves simple techniques that build layers of flavor, making it an ideal project for anyone new to cooking with spices.
5
servings15
minutes30
minutesIngredients
- 1 large head of cauliflower, cut into florets
- 1 onion, chopped
- 3 cloves of garlic, minced
- 1 tablespoon of fresh ginger, grated
- 1 can (13.5 oz) of coconut milk
- 1/4 cup of almond butter
- 2 tablespoons of olive oil
- 1 tablespoon of curry powder
- 1/2 teaspoon of turmeric
- a pinch of red pepper flakes
- a couple of big handfuls of fresh spinach
- a splash of lime juice
- salt, to season
Instructions
- Heat 2 tablespoons of olive oil in a large pot over medium heat until it shimmers.
- Add the chopped onion and cook for 5–7 minutes, stirring occasionally, until it turns translucent and soft.
- Stir in the minced garlic and grated ginger, cooking for 1 minute until fragrant to avoid burning.
- Add the curry powder, turmeric, and a pinch of red pepper flakes, toasting the spices for 30 seconds to deepen their flavor.
- Pour in the entire can of coconut milk, using a whisk to combine it smoothly with the spices.
- Whisk in 1/4 cup of almond butter until the sauce is creamy and uniform.
- Add the cauliflower florets, stirring to coat them evenly in the sauce.
- Bring the curry to a gentle simmer, then reduce the heat to low, cover the pot, and let it cook for 15–20 minutes until the cauliflower is tender when pierced with a fork.
- Stir in a couple of big handfuls of fresh spinach, cooking for 2–3 minutes until it wilts completely.
- Finish with a splash of lime juice and season with salt to balance the flavors.
Velvety from the almond butter and coconut milk, this curry has a rich, nutty depth that complements the tender cauliflower and wilted spinach. Serve it over fluffy rice or with warm naan to soak up every bit of the creamy sauce, and consider topping it with extra red pepper flakes for a spicy kick.
Black Bean and Sweet Potato Enchiladas

Often, we crave something comforting yet wholesome, and these black bean and sweet potato enchiladas hit the spot perfectly. One of the best things about this recipe is how approachable it is, even if you’re new to cooking. Let’s walk through it together, step by step.
8
enchiladas25
minutes50
minutesIngredients
– 2 medium sweet potatoes, peeled and diced into ½-inch cubes
– 1 can (15 ounces) of black beans, rinsed and drained
– 1 small yellow onion, finely chopped
– 2 cloves of garlic, minced
– 8 corn tortillas
– 2 cups of your favorite red enchilada sauce
– A couple of tablespoons of olive oil
– A generous pinch of salt
– A sprinkle of ground cumin
– A handful of shredded Monterey Jack cheese
Instructions
1. Preheat your oven to 375°F.
2. Toss the diced sweet potatoes with a tablespoon of olive oil and a pinch of salt on a baking sheet.
3. Roast the sweet potatoes for 20–25 minutes, until they are tender and lightly browned at the edges.
4. While the sweet potatoes roast, heat a tablespoon of olive oil in a skillet over medium heat.
5. Add the chopped onion and cook for 5–7 minutes, until it turns soft and translucent.
6. Stir in the minced garlic and cook for 1 more minute, just until fragrant.
7. Add the rinsed black beans and a sprinkle of cumin to the skillet, stirring to combine.
8. Warm the corn tortillas by wrapping them in a damp paper towel and microwaving for 30 seconds to make them pliable.
9. Spread ½ cup of enchilada sauce evenly over the bottom of a 9×13-inch baking dish.
10. Spoon a portion of the sweet potato and black bean mixture onto each tortilla, roll them up tightly, and place them seam-side down in the dish.
11. Pour the remaining enchilada sauce over the top of the rolled tortillas.
12. Sprinkle the shredded Monterey Jack cheese evenly over the sauce.
13. Bake for 20 minutes, until the cheese is melted and bubbly and the edges are lightly golden.
14. Let the enchiladas rest for 5 minutes before serving to allow the filling to set.
Gently baked until the cheese is perfectly melted, these enchiladas offer a wonderful contrast of creamy sweet potatoes and hearty beans wrapped in soft tortillas. The smoky cumin and tangy sauce create a cozy, satisfying flavor that’s great for weeknight dinners. For a fun twist, try serving them with a dollop of cool Greek yogurt or a side of crisp jicama slaw.
Edamame and Quinoa Buddha Bowl
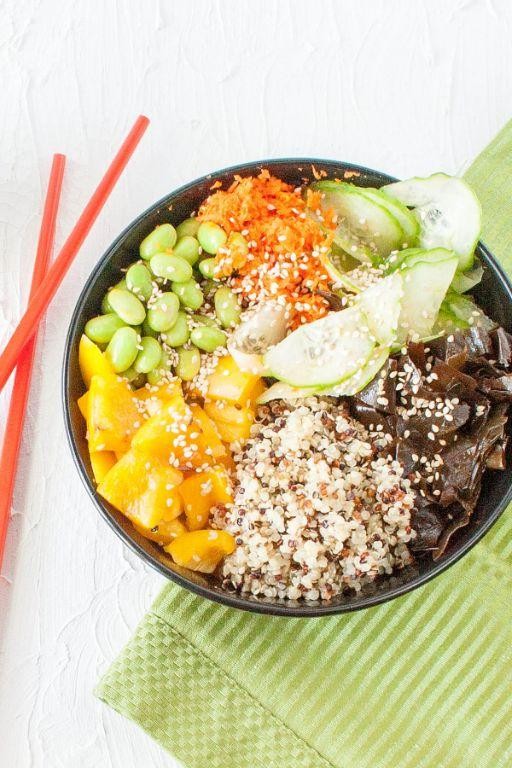
A perfectly balanced Edamame and Quinoa Buddha Bowl is easier to make than you might think, and today I’ll walk you through each simple step. This vibrant bowl combines protein-packed ingredients with fresh vegetables for a satisfying meal that’s as nutritious as it is delicious. Let’s build this colorful dish together from the ground up.
2
servings10
minutes20
minutesIngredients
– 1 cup of quinoa
– 2 cups of water
– 1 cup of frozen shelled edamame
– 2 tablespoons of olive oil
– 1 tablespoon of soy sauce
– 1 teaspoon of rice vinegar
– A pinch of salt
– A couple of handfuls of fresh spinach
– 1 medium carrot, shredded
– Half a cucumber, sliced
– A sprinkle of sesame seeds
Instructions
1. Rinse 1 cup of quinoa under cold running water for 1 minute to remove any bitterness.
2. Combine the rinsed quinoa with 2 cups of water in a medium saucepan and bring to a boil over high heat.
3. Once boiling, reduce heat to low, cover the saucepan, and simmer for 15 minutes until all water is absorbed.
4. Remove the quinoa from heat and let it sit covered for 5 minutes to steam and fluff up properly.
5. While quinoa rests, bring a small pot of water to boil and cook 1 cup of frozen edamame for 4 minutes until tender.
6. Drain the edamame and rinse with cold water to stop the cooking process and maintain bright green color.
7. In a small bowl, whisk together 2 tablespoons of olive oil, 1 tablespoon of soy sauce, and 1 teaspoon of rice vinegar.
8. Fluff the cooked quinoa with a fork and stir in the dressing while still warm to help absorb the flavors.
9. Arrange a couple of handfuls of fresh spinach as the base in your serving bowl.
10. Spoon the dressed quinoa over the spinach bed.
11. Top with the cooked edamame, shredded carrot, and sliced cucumber.
12. Finish with a sprinkle of sesame seeds for crunch and visual appeal.
My favorite thing about this bowl is how the warm quinoa slightly wilts the spinach while keeping the other vegetables crisp and fresh. The combination creates wonderful textural contrasts between the fluffy grains, tender edamame, and crunchy vegetables. For a creative twist, try serving it with a dollop of spicy sriracha or a squeeze of fresh lime juice to brighten all the flavors.
Zucchini Noodles with Peanut Sauce and Tofu
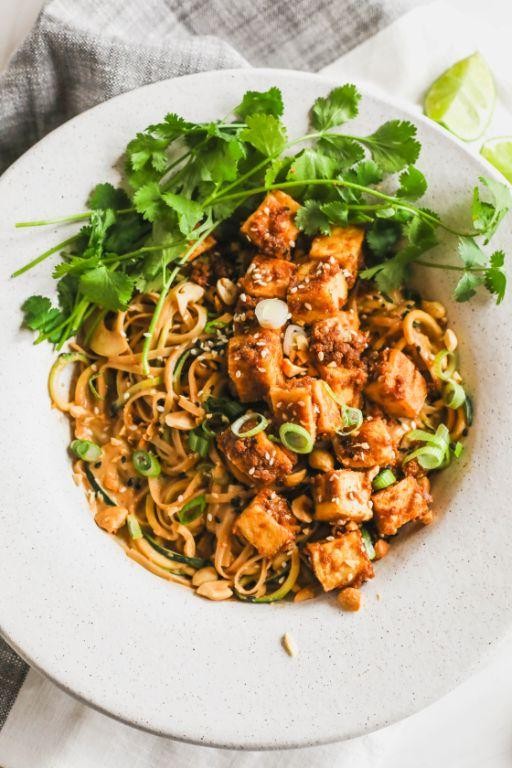
Finally, let’s make a simple, healthy meal that comes together in under 30 minutes. Fresh zucchini transforms into satisfying noodles, paired with crispy tofu and a creamy peanut sauce that’s both comforting and packed with flavor. Follow these steps closely for a perfect result every time.
2
servings15
minutes15
minutesIngredients
– 2 medium zucchinis
– 1 block of firm tofu
– 1/4 cup of creamy peanut butter
– 2 tablespoons of soy sauce
– 1 tablespoon of maple syrup
– 1 tablespoon of rice vinegar
– A splash of sesame oil
– A couple of garlic cloves
– 1 teaspoon of grated ginger
– 2 tablespoons of vegetable oil
– A pinch of red pepper flakes
Instructions
1. Press the tofu block between paper towels with a heavy pan on top for 15 minutes to remove excess water.
2. Cut the pressed tofu into 1-inch cubes while your spiralizer is ready.
3. Use a spiralizer to turn both zucchinis into noodle shapes, placing them in a colander.
4. Sprinkle 1/2 teaspoon of salt over the zucchini noodles and let them sit for 10 minutes to draw out moisture.
5. Heat 1 tablespoon of vegetable oil in a large skillet over medium-high heat until it shimmers.
6. Add tofu cubes to the hot skillet in a single layer and cook for 4-5 minutes until golden brown on the bottom.
7. Flip each tofu cube and cook for another 4-5 minutes until all sides are crispy and browned.
8. Remove tofu from the skillet and set aside on a plate lined with paper towels.
9. Mince 2 garlic cloves and grate 1 teaspoon of fresh ginger.
10. Whisk together 1/4 cup peanut butter, 2 tablespoons soy sauce, 1 tablespoon maple syrup, 1 tablespoon rice vinegar, and a splash of sesame oil in a small bowl.
11. Add 2-3 tablespoons of warm water to the sauce and whisk until it reaches a pourable consistency.
12. Heat the remaining 1 tablespoon of vegetable oil in the same skillet over medium heat.
13. Add the minced garlic and grated ginger to the skillet and cook for 30 seconds until fragrant.
14. Pat the zucchini noodles dry with paper towels to remove the released moisture.
15. Add the dried zucchini noodles to the skillet and toss for 2-3 minutes until just warmed through but still crisp.
16. Pour the peanut sauce over the zucchini noodles and toss to coat evenly.
17. Add the crispy tofu back to the skillet and gently mix everything together.
18. Sprinkle with a pinch of red pepper flakes and serve immediately.
Amazingly, the zucchini noodles maintain a satisfying al dente bite while the peanut sauce clings perfectly to every strand. The crispy tofu adds wonderful texture contrast, and the ginger-garlic notes shine through the creamy sauce. For a fun twist, try serving this in lettuce cups or topping with crushed peanuts for extra crunch.
Split Pea Soup with Smoked Paprika

Even the chilliest autumn day feels warmer with a bowl of this smoky split pea soup simmering on your stove. This methodical recipe builds layers of flavor while transforming simple ingredients into a velvety, satisfying meal. Follow each step precisely for foolproof results every time.
6
servings15
minutes56
minutesIngredients
– A couple of tablespoons of olive oil
– One large yellow onion, chopped
– Two carrots, chopped
– Two celery stalks, chopped
– Three garlic cloves, minced
– One pound of dried green split peas, rinsed
– Eight cups of vegetable broth
– Two teaspoons of smoked paprika
– A couple of bay leaves
– A splash of lemon juice
– Salt and freshly ground black pepper
Instructions
1. Heat two tablespoons of olive oil in a large Dutch oven over medium heat until shimmering.
2. Add one chopped yellow onion and cook for 5 minutes, stirring occasionally, until translucent.
3. Add two chopped carrots and two chopped celery stalks, cooking for another 5 minutes until slightly softened.
4. Stir in three minced garlic cloves and cook for 1 minute until fragrant.
5. Pour in one pound of rinsed split peas, eight cups of vegetable broth, two teaspoons of smoked paprika, and two bay leaves.
6. Bring the mixture to a boil over high heat, then immediately reduce to a low simmer.
7. Partially cover the pot and simmer for 45 minutes, stirring every 15 minutes to prevent sticking.
8. Remove the bay leaves and discard them.
9. Use an immersion blender to puree the soup for 30 seconds until creamy but still textured.
10. Stir in a splash of lemon juice, then season with salt and freshly ground black pepper.
11. Ladle the hot soup into bowls and serve immediately.
Zesty lemon brightens the smoky paprika base, while the split peas create a luxuriously thick texture that coats your spoon. For a creative twist, top with crispy croutons or a dollop of Greek yogurt to contrast the soup’s velvety richness. This satisfying bowl proves comfort food can be both simple and sophisticated.
Roasted Chickpea and Kale Salad
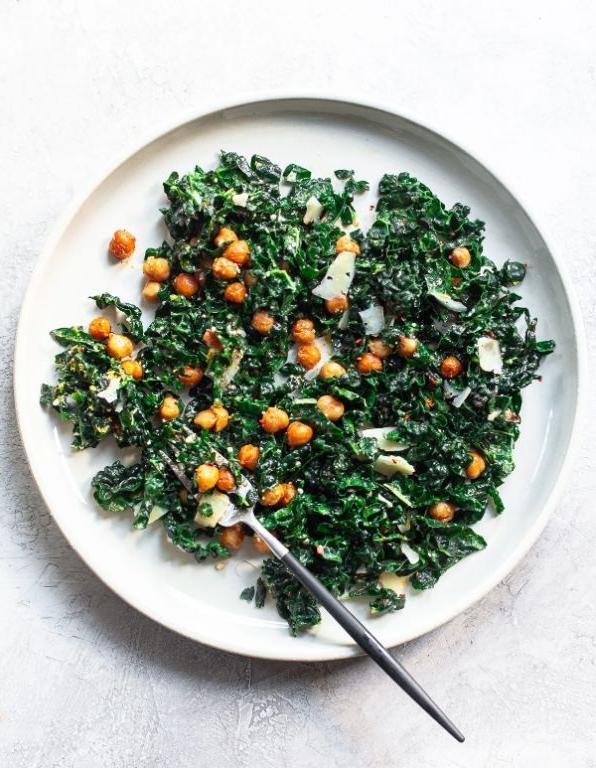
Savoring a wholesome meal doesn’t have to be complicated, and this Roasted Chickpea and Kale Salad is proof. Simply follow these straightforward steps to create a vibrant dish that’s both nourishing and satisfying, perfect for a quick lunch or light dinner.
2
servings15
minutes25
minutesIngredients
– 1 can (15 oz) of chickpeas, drained and rinsed
– A big bunch of fresh kale, stems removed and leaves torn
– A couple of tablespoons of olive oil
– A generous squeeze of lemon juice
– A sprinkle of salt and black pepper
– A handful of crumbled feta cheese (optional)
– A splash of balsamic glaze for drizzling
Instructions
1. Preheat your oven to 400°F (200°C).
2. Pat the chickpeas completely dry with a clean kitchen towel to help them crisp up in the oven.
3. Toss the dried chickpeas with 1 tablespoon of olive oil, 1/4 teaspoon of salt, and 1/4 teaspoon of black pepper on a baking sheet.
4. Roast the chickpeas in the preheated oven for 20–25 minutes, shaking the pan halfway through, until they are golden brown and crispy.
5. While the chickpeas roast, place the torn kale leaves in a large mixing bowl.
6. Drizzle the kale with the remaining 1 tablespoon of olive oil and the juice from half a lemon.
7. Massage the kale with your hands for 1–2 minutes until the leaves darken in color and soften slightly—this reduces bitterness and improves texture.
8. Let the roasted chickpeas cool for 5 minutes after removing them from the oven to prevent wilting the kale.
9. Add the slightly cooled chickpeas to the massaged kale in the bowl.
10. Toss everything together gently to combine evenly.
11. Top the salad with crumbled feta cheese if using.
12. Finish by drizzling balsamic glaze over the top for a touch of sweetness.Great job! You’ve made a salad with a wonderful mix of textures—crispy chickpeas, tender kale, and creamy feta. The bright lemon and rich balsamic balance each other beautifully. Try serving it alongside grilled chicken or stuffed into a pita for a hearty twist.
Vegan Burrito Bowl with Cilantro Lime Rice
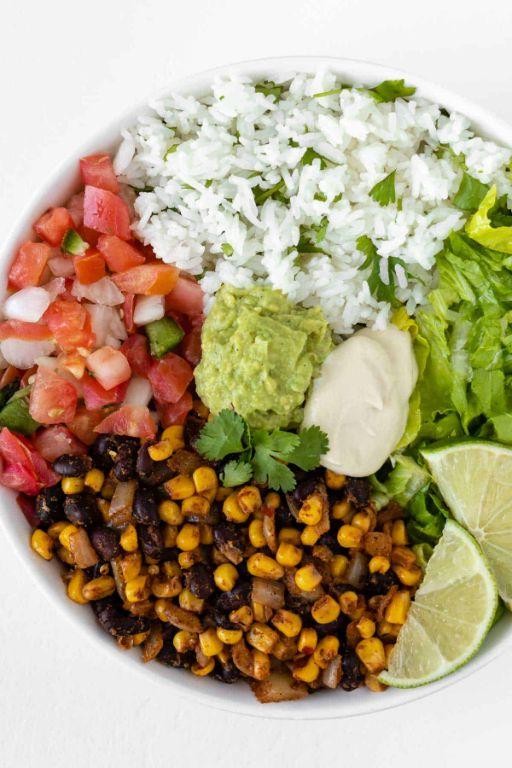
You’ve probably stared into your pantry, wondering how to whip up something fresh, filling, and totally plant-based without a fuss. This vegan burrito bowl with cilantro lime rice is your answer—it’s a vibrant, customizable meal that comes together with simple steps and big flavor.
2
servings15
minutes23
minutesIngredients
– 1 cup of white rice
– 2 cups of water
– A big handful of fresh cilantro, chopped
– Juice from 2 limes
– 1 tablespoon of olive oil
– 1 can of black beans, rinsed
– 2 cloves of garlic, minced
– 1 teaspoon of cumin
– A pinch of salt
– 1 avocado, sliced
– A couple of cherry tomatoes, halved
– A splash of hot sauce (optional)
Instructions
1. Rinse 1 cup of white rice under cold water in a fine-mesh strainer until the water runs clear to remove excess starch.
2. Combine the rinsed rice and 2 cups of water in a medium saucepan, bring to a boil over high heat, then reduce the heat to low, cover, and simmer for 18 minutes.
3. Remove the rice from heat, let it sit covered for 5 minutes to steam—this makes it fluffy and perfect for absorbing flavors.
4. Fluff the rice with a fork, then stir in the chopped cilantro, lime juice, and a pinch of salt until evenly mixed.
5. Heat 1 tablespoon of olive oil in a skillet over medium heat until it shimmers, about 1 minute.
6. Add the minced garlic and cook for 30 seconds until fragrant, stirring constantly to prevent burning.
7. Stir in the rinsed black beans, 1 teaspoon of cumin, and a pinch of salt, cooking for 3–4 minutes until warmed through.
8. Assemble the bowls by dividing the cilantro lime rice between two servings.
9. Top each bowl with the seasoned black beans, sliced avocado, and halved cherry tomatoes.
10. Drizzle with hot sauce if you like a bit of heat, and serve immediately.
Mmm, the creamy avocado and zesty lime rice play off the hearty beans for a satisfying texture. Try piling it all into lettuce wraps for a crunchy twist, or add a dollop of vegan sour cream to mellow the spices—it’s a bowl that’s as fun to customize as it is to eat.
Mushroom Stroganoff with Creamy Sauce
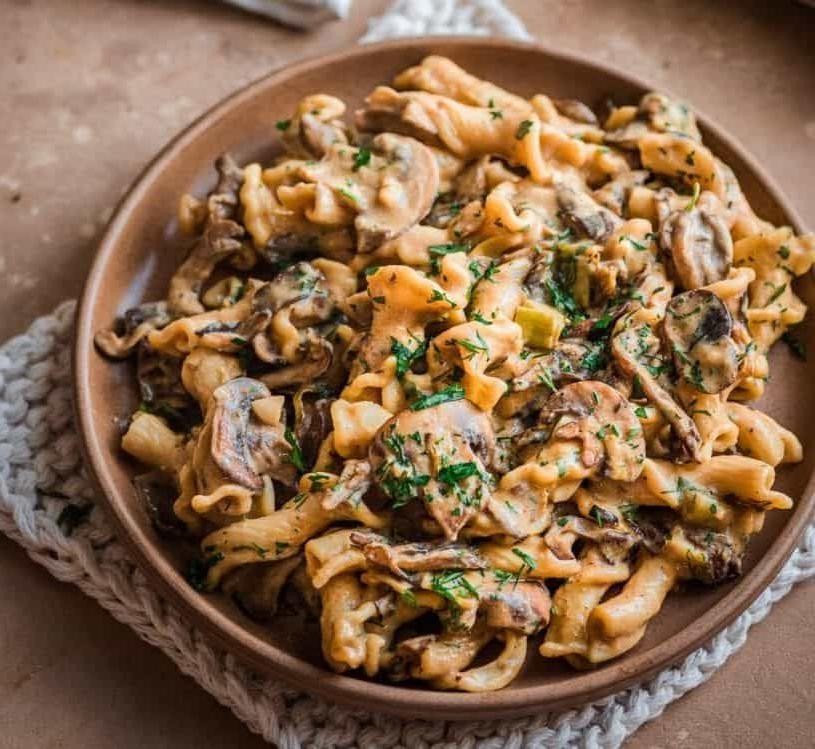
Deliciously creamy and deeply satisfying, this mushroom stroganoff transforms simple ingredients into a comforting meal that feels both elegant and approachable. During the cooler months, this dish becomes my go-to for cozy weeknight dinners that come together in under 30 minutes.
3
servings10
minutes25
minutesIngredients
- 1 pound of sliced cremini mushrooms
- 1 medium yellow onion, finely chopped
- 2 cloves of garlic, minced
- 2 tablespoons of olive oil
- 1 cup of vegetable broth
- 1 cup of heavy cream
- 2 tablespoons of all-purpose flour
- 1 tablespoon of Dijon mustard
- A generous splash of Worcestershire sauce
- A couple of sprigs of fresh thyme
- 8 ounces of egg noodles
- Salt and freshly ground black pepper
- A handful of fresh parsley, chopped
Instructions
- Bring a large pot of salted water to a rolling boil over high heat.
- Heat 2 tablespoons of olive oil in a large skillet over medium-high heat until shimmering.
- Add 1 chopped onion and cook for 4-5 minutes, stirring frequently, until translucent and fragrant.
- Add 1 pound of sliced mushrooms and cook for 8-10 minutes, stirring occasionally, until they release their liquid and turn golden brown.
- Stir in 2 minced garlic cloves and cook for exactly 1 minute until fragrant but not browned.
- Sprinkle 2 tablespoons of flour over the mushroom mixture and cook for 2 minutes, stirring constantly to coat everything evenly.
- Slowly pour in 1 cup of vegetable broth while continuously stirring to prevent lumps from forming.
- Add 1 cup of heavy cream, 1 tablespoon of Dijon mustard, a splash of Worcestershire sauce, and fresh thyme sprigs.
- Reduce heat to medium-low and simmer the sauce for 5-7 minutes until thickened enough to coat the back of a spoon.
- While the sauce simmers, cook 8 ounces of egg noodles in the boiling water for 6-8 minutes until al dente, then drain thoroughly.
- Remove the thyme sprigs from the sauce and season with salt and freshly ground black pepper to your preference.
- Gently fold the drained noodles into the creamy mushroom sauce until evenly coated.
Rich and velvety, the sauce clings beautifully to each noodle while the mushrooms provide an earthy depth that balances the creaminess. For an elegant twist, serve it in shallow bowls topped with extra fresh parsley and a side of crusty bread to soak up every last bit of sauce.
Grilled Vegetable and Hummus Wrap

Grilled vegetables and creamy hummus come together in this satisfying wrap that’s perfect for lunch or a light dinner. Getting the vegetables perfectly charred and tender makes all the difference, so let’s walk through each step to ensure your wrap turns out delicious every time.
2
servings15
minutes15
minutesIngredients
– 2 large flour tortillas
– 1 cup of hummus
– 1 medium zucchini, sliced into 1/4-inch rounds
– 1 red bell pepper, cut into strips
– 1 small red onion, sliced into 1/2-inch rings
– 2 tablespoons of olive oil
– a pinch of salt
– a pinch of black pepper
– a handful of fresh spinach leaves
– a squeeze of lemon juice
Instructions
1. Preheat your grill or grill pan to medium-high heat (about 400°F).
2. In a medium bowl, toss the zucchini slices, bell pepper strips, and red onion rings with the olive oil, salt, and black pepper until evenly coated.
3. Place the vegetables on the preheated grill in a single layer, working in batches if needed to avoid overcrowding.
4. Grill the vegetables for 4-5 minutes per side, or until they develop visible grill marks and become tender when pierced with a fork.
5. Tip: Let the vegetables sit undisturbed for the first few minutes to get those nice char lines.
6. Remove the grilled vegetables from the heat and transfer them to a clean plate.
7. Warm the flour tortillas on the grill for about 30 seconds per side, just until they’re pliable and lightly toasted.
8. Lay each warmed tortilla flat on a clean surface and spread 1/2 cup of hummus evenly over the center of each one, leaving a 1-inch border around the edges.
9. Tip: If your hummus is thick, thin it with a splash of water to make spreading easier.
10. Arrange a handful of fresh spinach leaves over the hummus on each tortilla.
11. Divide the grilled vegetables evenly between the two tortillas, stacking them neatly over the spinach.
12. Drizzle a squeeze of lemon juice over the vegetables in each wrap for a bright, fresh flavor.
13. Fold the bottom edge of each tortilla up over the filling, then fold in the sides and roll tightly away from you to form a secure wrap.
14. Tip: If you’re taking these on the go, wrap them tightly in parchment paper and slice in half just before serving to keep everything intact.
15. Serve the wraps immediately, or wrap them in foil to keep warm for up to 30 minutes. What makes this wrap truly special is the contrast between the smoky, tender vegetables and the cool, creamy hummus, all wrapped in a soft tortilla. For a fun twist, try adding a sprinkle of crumbled feta or serving it with a side of tangy pickled vegetables to cut through the richness.
Conclusion
These twenty delicious meatless protein recipes prove that plant-based eating can be both satisfying and flavorful. We hope this collection inspires you to try something new in your kitchen! Share your favorite recipe in the comments below, and don’t forget to pin this article on Pinterest to save these tasty ideas for later.