Get ready for pumpkin pie like you’ve never experienced before—this isn’t your grandmother’s Thanksgiving dessert. Golden autumn afternoons demand desserts that transcend tradition, and this marshmallow pumpkin pie delivers an explosive fusion of creamy pumpkin spice and ethereal toasted sweetness that will redefine your entire holiday dessert table.
Why This Recipe Works
- The toasted marshmallow topping creates a stunning textural contrast against the velvety pumpkin filling, offering both gooey sweetness and caramelized depth that elevates every single bite beyond ordinary pumpkin pie expectations.
- Using both pumpkin puree and sweetened condensed milk creates an impossibly smooth, rich custard base that sets perfectly without cracking, while the subtle caramel notes from the condensed milk complement the warm spice blend beautifully.
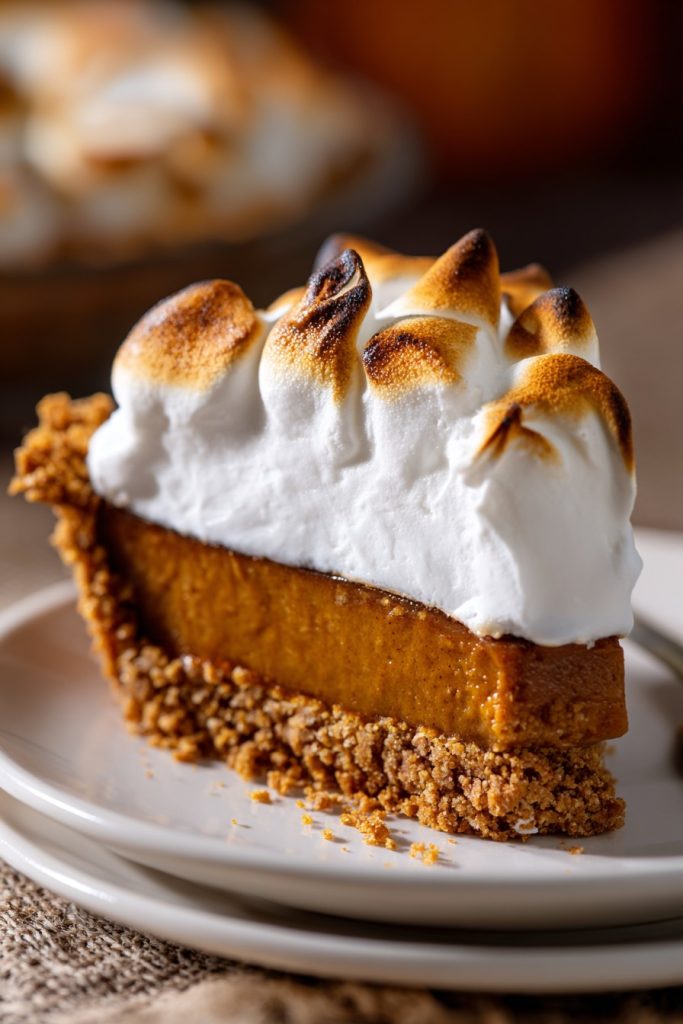
- The ginger snap crust provides a spicy, crunchy foundation that cuts through the richness of the filling, adding complexity and preventing the dessert from becoming overly sweet or one-dimensional in flavor profile.
- Toasting the marshmallows under the broiler creates those irresistible golden-brown spots and smoky caramelization that transform simple marshmallows into a sophisticated topping with incredible depth and visual appeal.
- The strategic balance of spices—cinnamon, ginger, nutmeg, and cloves—creates a warm, aromatic symphony that permeates every component without overwhelming the delicate pumpkin flavor, ensuring each spice note shines through distinctly.
Ingredients
- 1 ½ cups crushed ginger snap cookies (about 25 cookies)
- 6 tablespoons unsalted butter, melted and slightly cooled
- ¼ cup granulated sugar
- 1 (15-ounce) can pure pumpkin puree (not pumpkin pie filling)
- 1 (14-ounce) can sweetened condensed milk
- 2 large eggs, at room temperature
- 1 teaspoon ground cinnamon
- ½ teaspoon ground ginger
- ¼ teaspoon ground nutmeg
- ¼ teaspoon ground cloves
- ½ teaspoon fine sea salt
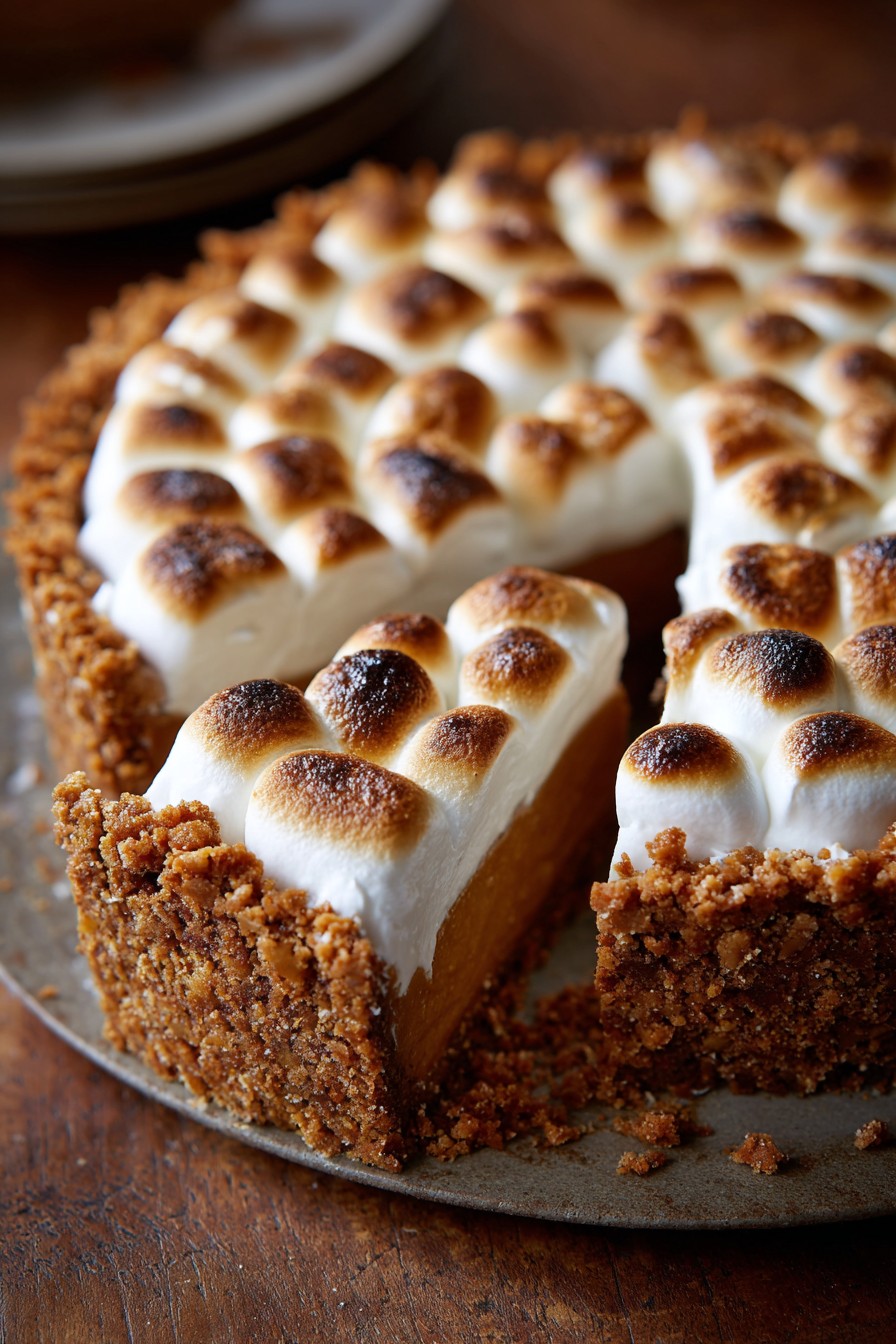
- 3 cups mini marshmallows
Equipment Needed
- 9-inch pie plate
- Food processor or rolling pin and zip-top bag
- Mixing bowls
- Whisk
- Measuring cups and spoons
- Oven
- Broiler
Instructions
Craft the Spiced Ginger Snap Crust
Begin by transforming those crisp ginger snap cookies into the most aromatic, spicy crust foundation imaginable. Place your ginger snaps in a food processor and pulse until they achieve a fine, sandy texture with just a few larger crumbs for character—this should take about 15-20 pulses. If you’re going manual, place cookies in a heavy-duty zip-top bag and crush with a rolling pin until you achieve that perfect coarse sand consistency. Transfer the crumbs to a medium bowl and add the granulated sugar, stirring to combine thoroughly. Now pour in that glorious melted butter—the scent of ginger and butter mingling will transport you straight to autumn paradise. Mix vigorously until every crumb is moistened and the mixture holds together when pressed. Tip: For maximum flavor development, toast your ginger snaps on a baking sheet at 325°F for 5 minutes before crushing to intensify their spicy warmth. Press this fragrant mixture firmly into your 9-inch pie plate, working from the center outward and building up the sides to about ¼-inch thickness. Use a flat-bottomed measuring cup to compact the crust evenly, ensuring no weak spots that might crumble later. Chill this masterpiece in the refrigerator for at least 30 minutes while you prepare the filling—this crucial step prevents shrinkage during baking.
Create the Velvety Pumpkin Filling
This is where magic happens—transforming simple ingredients into the most luxurious pumpkin custard you’ll ever taste. In a large mixing bowl, combine the pumpkin puree, sweetened condensed milk, and room-temperature eggs. The eggs must be at room temperature to emulsify properly with the other ingredients—cold eggs can cause the filling to separate or become grainy. Whisk with passionate vigor until the mixture becomes perfectly smooth and homogeneous, with no streaks of pumpkin or condensed milk visible. Now introduce the spice quartet: ground cinnamon for warmth, ginger for zing, nutmeg for earthy depth, and cloves for that unmistakable holiday aroma. Add the fine sea salt—this isn’t just for seasoning but actually enhances the sweetness and balances the spices. Continue whisking until the spices are fully incorporated and the filling takes on a beautiful uniform orange-brown hue. The aroma at this stage should be intoxicating—warm, spicy, and deeply comforting. Tip: For an extra flavor boost, toast your whole spices in a dry skillet for 1-2 minutes before grinding them fresh—the difference in aromatic intensity will astonish you. The filling should be silky smooth with the consistency of thick pancake batter—if it seems too thick, don’t add liquid as this could prevent proper setting.
Bake to Perfection
Retrieve your chilled crust from the refrigerator—it should feel firm and compact. Pour the magnificent pumpkin filling into the crust, using a spatula to scrape every last bit of that spiced goodness from the bowl. Gently tap the pie plate on the counter several times to release any air bubbles that might compromise the smooth texture of your finished pie. Place the pie on the center rack of your preheated 425°F oven and bake for 15 minutes—this initial high heat helps set the crust and gives the filling a head start. Then, without opening the oven door, reduce the temperature to 350°F and continue baking for another 30-35 minutes. Watch for visual cues: the edges should be firmly set with just a slight jiggle in the center when you gently shake the pan—this residual heat will continue cooking the center as it cools. The crust should be deep golden brown and your kitchen should smell like autumn heaven. Tip: Place a baking sheet on the rack below your pie to catch any potential butter drips from the crust. Remove from oven when perfectly set and transfer to a wire rack to cool completely—this gradual cooling prevents cracking.
Prepare the Marshmallow Topping
Once your pumpkin pie has cooled completely to room temperature—this typically takes about 2 hours—it’s time for the grand marshmallow transformation. Arrange your mini marshmallows in a single, dense layer covering the entire surface of the pie, working from the edges inward and ensuring no pumpkin filling peeks through. The miniature size ensures even melting and maximum coverage. For professional results, consider using kitchen tweezers to place marshmallows in perfect concentric circles—this creates stunning visual appeal when toasted. The marshmallows should completely blanket the pie, creating a pillowy white landscape ready for its caramelized transformation. If you prefer larger toasted areas, you can use regular-sized marshmallows cut in half, but mini marshmallows provide more consistent coverage and easier handling. At this stage, the pie can be refrigerated for up to 4 hours before the final toasting step if you’re preparing ahead for a dinner party or holiday gathering.
Toast and Serve Your Masterpiece
Position your oven rack about 6 inches from the broiler element and preheat the broiler to high. Place your marshmallow-topped pie on a baking sheet for easy handling and slide it under the broiler. Watch with intense focus—this process happens quickly and requires your undivided attention. Within 60-90 seconds, you’ll witness the magical transformation as the marshmallows begin to puff, then develop those gorgeous golden-brown spots and irresistible caramelization. Rotate the baking sheet halfway through if your broiler heats unevenly to ensure consistent coloring. The moment you achieve that perfect balance of gooey melted interior and crispy toasted exterior—usually around the 2-minute mark—remove your masterpiece immediately. Tip: For dramatic flair, use a kitchen torch instead of the broiler for precise control over the toasting pattern. Allow the pie to rest for 5-10 minutes until the marshmallow topping sets slightly but remains wonderfully gooey beneath the caramelized surface. Slice with a sharp knife dipped in hot water between cuts for clean slices through the marshmallow layer.
Tips and Tricks
For the ultimate ginger snap crust experience, seek out premium European-style ginger snaps with pronounced spice notes rather than generic supermarket varieties—the difference in flavor complexity is remarkable. When crushing your cookies, aim for a mix of textures rather than uniform fine crumbs; retaining some slightly larger pieces creates a more interesting mouthfeel and better structural integrity in the baked crust. If your crushed cookies seem dry after adding the butter, don’t hesitate to add another tablespoon of melted butter—the crust should hold together firmly when squeezed in your hand without crumbling. For the pumpkin filling, always use pure pumpkin puree rather than pumpkin pie filling, which contains added sugars and spices that will throw off your carefully balanced flavor profile. When testing your filling for doneness, remember that carryover cooking will continue as the pie cools, so that slight jiggle in the center is exactly what you want when removing it from the oven. If you notice your crust edges browning too quickly during baking, create a foil shield by cutting the center from a 12-inch square of aluminum foil and placing the ring around the crust edges. For the marshmallow topping, consider using a combination of regular and mini marshmallows for varied texture and visual interest—the different sizes create fascinating topography when toasted. If using a kitchen torch for toasting, keep the flame moving constantly about 4-6 inches from the marshmallows to prevent burning and achieve even caramelization. For make-ahead convenience, you can prepare the pie through the cooling stage up to two days in advance, then add and toast the marshmallows just before serving to maintain that perfect textural contrast. When storing leftovers, place them in an airtight container at room temperature rather than refrigerating, as refrigeration can cause the marshmallow topping to become unpleasantly sticky and the crust to soften.
Recipe Variations
- Chocolate Swirl Delight: Create a marbled masterpiece by reserving ½ cup of your pumpkin filling and mixing it with ¼ cup melted semi-sweet chocolate. After pouring the main filling into the crust, dollop the chocolate mixture randomly across the surface and use a knife to create beautiful swirl patterns before baking. The chocolate adds rich depth that complements the warm spices beautifully.
- Bourbon-Spiked Sophistication: For an adults-only version that brings incredible complexity, add 2 tablespoons of high-quality bourbon to the pumpkin filling along with the spices. The caramel and oak notes from the bourbon elevate the pumpkin and spice flavors while adding a subtle warmth that lingers pleasantly on the palate.
- Candied Ginger Crunch: Enhance the ginger theme by mixing ¼ cup finely chopped crystallized ginger into your ginger snap crust mixture. The chewy, spicy-sweet bites scattered throughout the crust provide unexpected textural surprises and intensify the ginger flavor in every component of the dessert.
- Coconut Cream Dream: Transform this into a tropical-inspired treat by toasting 1 cup sweetened shredded coconut along with your marshmallows during the final broiling step. The coconut develops a wonderful nutty flavor and crispy texture that plays beautifully against the creamy pumpkin and gooey marshmallow components.
- Maple Bacon Indulgence: For the ultimate sweet-savory experience, crumble 4 slices of crispy cooked bacon and sprinkle over the marshmallows before toasting. The smoky saltiness of the bacon creates an addictive contrast with the sweet marshmallow and spiced pumpkin, while maple syrup brushed on the crust before adding the filling ties everything together.
Frequently Asked Questions
Can I make this pie ahead of time?
Absolutely, with strategic planning you can prepare components at different stages. The crust can be prepared and chilled up to 24 hours in advance, or even frozen for up to a month if well-wrapped. The complete pie without marshmallow topping can be baked, cooled, and refrigerated for up to 2 days before serving. However, the marshmallow topping should always be added and toasted just before serving to maintain that perfect textural contrast between gooey interior and crispy exterior. If you must prepare the fully assembled pie in advance, expect the marshmallow layer to become somewhat sticky and lose its toasted crispness, though the flavor will remain excellent.
What’s the difference between pumpkin puree and pumpkin pie filling?
This distinction is crucial for recipe success. Pumpkin puree contains nothing but cooked, pureed pumpkin—it’s the blank canvas that allows your carefully balanced spices to shine. Pumpkin pie filling, however, already contains added sugars, spices, and thickeners that will completely throw off the delicate balance of this recipe. Using pie filling would make your dessert cloyingly sweet, overly spiced, and potentially prevent proper setting. Always check labels carefully and opt for 100% pure pumpkin puree to ensure you’re starting with the right foundation for building those complex, layered flavors that make this pie extraordinary.
Can I substitute graham crackers for the ginger snaps?
While graham crackers will work structurally, you’ll sacrifice significant flavor complexity that makes this recipe special. Ginger snaps contribute warm, spicy notes that complement the pumpkin filling beautifully, while graham crackers tend toward simple sweetness. If you must substitute, enhance plain graham crackers by adding 1 teaspoon of ground ginger and ½ teaspoon of cinnamon to the crust mixture to approximate some of that missing spice dimension. For the best results, though, seek out proper ginger snaps—their distinctive snap and bold flavor profile are worth the extra effort to find.
How do I prevent my marshmallows from burning under the broiler?
Vigilance and preparation are your best defenses against marshmallow tragedy. Always position your oven rack so the pie sits about 6 inches from the broiler element—too close guarantees instant charring. Preheat the broiler fully before adding the pie so toasting happens quickly and evenly. Never walk away during this process—stand by the oven door and watch continuously as the transformation from white to golden brown happens in mere seconds. Rotate the baking sheet halfway through if your broiler has hot spots. For ultimate control, consider using a kitchen torch which allows you to target specific areas and achieve perfect caramelization without risk of burning.
Can I use fresh pumpkin instead of canned puree?
Certainly, though the process requires additional steps and careful execution. Select sugar pie pumpkins specifically bred for baking—never use carving pumpkins which are watery and flavorless. Roast halved, seeded pumpkins cut-side down at 375°F for about 45-60 minutes until completely tender. Scoop out the flesh and puree in a food processor until perfectly smooth, then strain through cheesecloth to remove excess moisture that could prevent proper setting. The resulting puree will have a more complex, slightly earthier flavor than canned, but requires this extra effort. For consistent results, canned puree remains the reliable choice.
Summary
This marshmallow pumpkin pie revolutionizes autumn desserts with its perfect harmony of spicy ginger crust, velvety pumpkin filling, and spectacular toasted marshmallow crown. Each component builds upon the last to create an unforgettable sensory experience that balances warmth, creaminess, and caramelized sweetness in every glorious bite.
Marshmallow Pumpkin Pie
5
servings25
minutes50
minutesIngredients
Instructions
- 1 Preheat oven to 425°F. Combine crushed ginger snaps, sugar, and melted butter. Press firmly into 9-inch pie plate and chill 30 minutes.
- 2 Whisk pumpkin puree, condensed milk, eggs, spices, and salt until completely smooth. Pour into chilled crust.
- 3 Bake at 425°F for 15 minutes, then reduce to 350°F and bake 30-35 minutes until edges are set and center jiggles slightly.
- 4 Cool completely on wire rack, about 2 hours. Arrange marshmallows in single layer over cooled pie.
- 5 Broil 6 inches from heat for 1-2 minutes until marshmallows are golden brown. Rest 5-10 minutes before slicing.