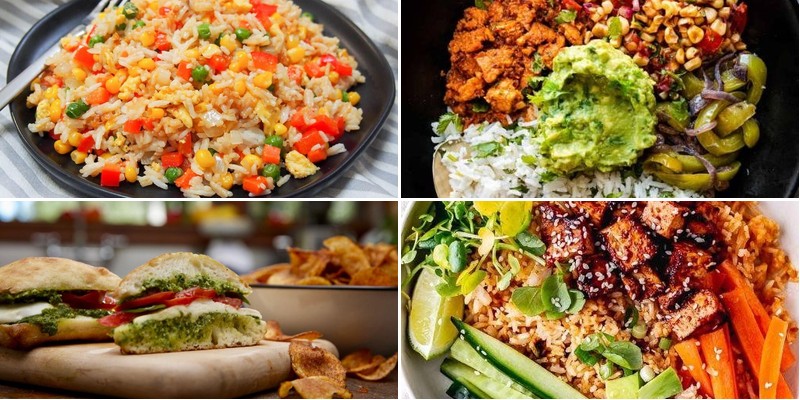
Hectic mornings got you scrambling? We’ve all been there—rushing out the door with no time to pack a satisfying lunch. That’s why we’ve gathered 35 delicious make-ahead recipes perfect for busy days. From hearty salads to comforting soups, these easy, prep-friendly ideas will save you time and keep you fueled all week long. Dive in and discover your new go-to lunches!
Honey Garlic Shrimp Meal Prep Bowls
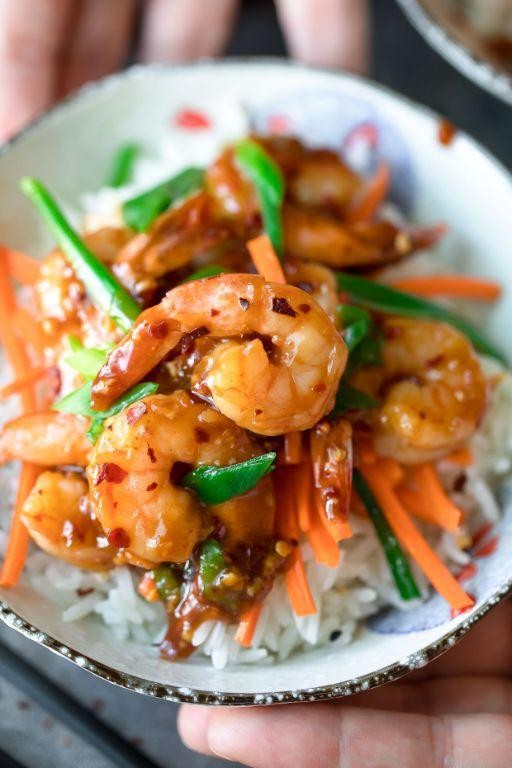
Perfectly balancing sweet and savory, these Honey Garlic Shrimp Meal Prep Bowls offer a sophisticated yet approachable solution for elegant, efficient dining. Featuring plump shrimp glazed in a glossy, aromatic sauce, this dish transforms simple ingredients into a culinary experience worthy of any discerning palate, all while being designed for seamless weekly preparation.
Serving: 4 | Pre Time: 15 minutes | Cooking Time: 20 minutes
Ingredients
– 1 ½ pounds large wild-caught shrimp, peeled and deveined, patted dry
– ¼ cup raw, unfiltered honey
– 6 large garlic cloves, finely minced
– 3 tablespoons low-sodium tamari
– 2 tablespoons freshly squeezed lemon juice
– 1 tablespoon toasted sesame oil
– 2 tablespoons cold-pressed avocado oil, divided
– 1 teaspoon freshly grated ginger root
– ¼ teaspoon freshly cracked black pepper
– 4 cups cooked jasmine rice, kept warm
– 2 cups broccolini florets, trimmed
– 2 tablespoons toasted sesame seeds, for garnish
– 2 scallions, thinly sliced on a bias, for garnish
Instructions
1. In a medium mixing bowl, whisk together the raw honey, minced garlic, tamari, lemon juice, toasted sesame oil, and grated ginger until fully emulsified.
2. Pat the shrimp completely dry with paper towels to ensure a proper sear, then season evenly with the cracked black pepper.
3. Heat 1 tablespoon of avocado oil in a large skillet over medium-high heat until it shimmers, about 90 seconds.
4. Arrange the shrimp in a single layer in the hot skillet, searing for 90 seconds per side until they turn opaque and develop a light golden crust.
5. Transfer the seared shrimp to a clean plate, reducing the skillet heat to medium.
6. Pour the prepared honey-garlic sauce into the skillet, simmering for 3-4 minutes while stirring frequently until it thickens slightly and becomes glossy.
7. Return the shrimp to the skillet, tossing gently to coat each piece thoroughly in the sauce, then remove from heat.
8. In a separate skillet, heat the remaining tablespoon of avocado oil over medium heat and sauté the broccolini florets for 5-6 minutes until tender-crisp and bright green.
9. Divide the warm jasmine rice evenly among four meal prep containers.
10. Top each portion of rice with the sautéed broccolini and the glazed shrimp, spooning any remaining sauce over the shrimp.
11. Garnish each bowl with a sprinkle of toasted sesame seeds and the sliced scallions.
12. Seal the containers and refrigerate for up to 4 days, reheating gently before serving.
Now, these bowls present a delightful contrast of textures, from the tender, succulent shrimp enveloped in a sticky-sweet glaze to the fluffy jasmine rice and crisp-tender broccolini. The complex flavor profile, with its harmonious blend of garlicky depth, gingery warmth, and citrusy brightness, deepens upon refrigeration, making each reheated meal even more flavorful. For a creative twist, serve the components deconstructed over a bed of crisp romaine for a vibrant salad or alongside chilled soba noodles for a refreshing cold lunch option.
Mediterranean Chickpea Salad Jars
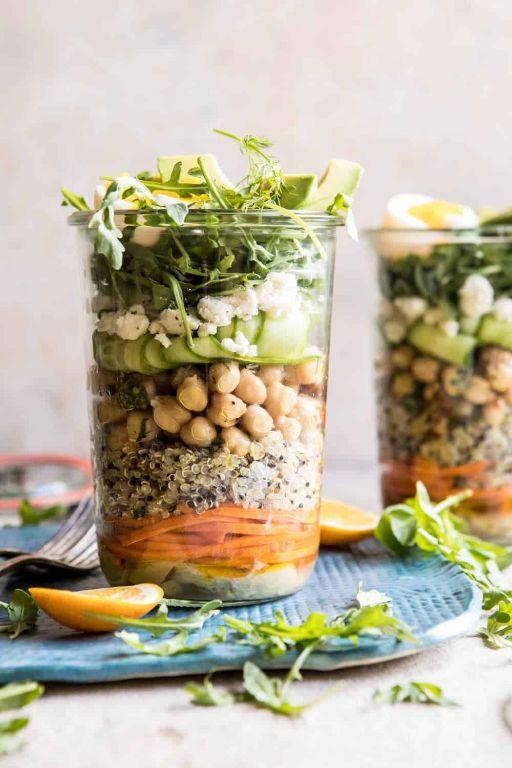
On a bustling weekday, when time feels scarce yet nourishment remains essential, these Mediterranean Chickpea Salad Jars emerge as a brilliant solution—layered with vibrant colors and robust flavors, they transform simple ingredients into a portable feast that delights both the palate and the eye.
Serving: 4 | Pre Time: 20 minutes | Cooking Time: 0 minutes
Ingredients
– 1 ½ cups cooked chickpeas, drained and rinsed
– 1 cup cherry tomatoes, halved
– ¾ cup English cucumber, finely diced
– ½ cup Kalamata olives, pitted and sliced
– ⅓ cup red onion, thinly sliced
– ¼ cup fresh parsley, chopped
– ¼ cup fresh mint, chopped
– ½ cup feta cheese, crumbled
– ¼ cup extra-virgin olive oil
– 2 tablespoons fresh lemon juice
– 1 teaspoon dried oregano
– ½ teaspoon sea salt
– ¼ teaspoon freshly ground black pepper
Instructions
1. In a medium mixing bowl, combine the chickpeas, cherry tomatoes, cucumber, Kalamata olives, red onion, parsley, and mint.
2. In a small bowl, whisk together the extra-virgin olive oil, fresh lemon juice, dried oregano, sea salt, and black pepper until fully emulsified, about 30 seconds.
3. Pour the dressing over the chickpea mixture and toss gently to coat all ingredients evenly, ensuring no component remains dry.
4. Divide the dressed salad equally among four 16-ounce glass jars, packing it down lightly to create distinct layers.
5. Top each jar with crumbled feta cheese, distributing it evenly across the servings.
6. Seal the jars tightly and refrigerate for at least 1 hour to allow the flavors to meld and the salad to chill thoroughly.
7. To serve, shake the jar vigorously to redistribute the dressing, then enjoy directly from the container or pour into a bowl.
These salad jars offer a delightful contrast of textures, from the creamy feta and tender chickpeas to the crisp cucumber and juicy tomatoes, all brightened by the herbaceous notes of mint and parsley. They travel effortlessly for picnics or office lunches, and for an elegant twist, layer the ingredients in clear glassware to showcase their vibrant strata before tossing.
Thai Peanut Chicken Wraps
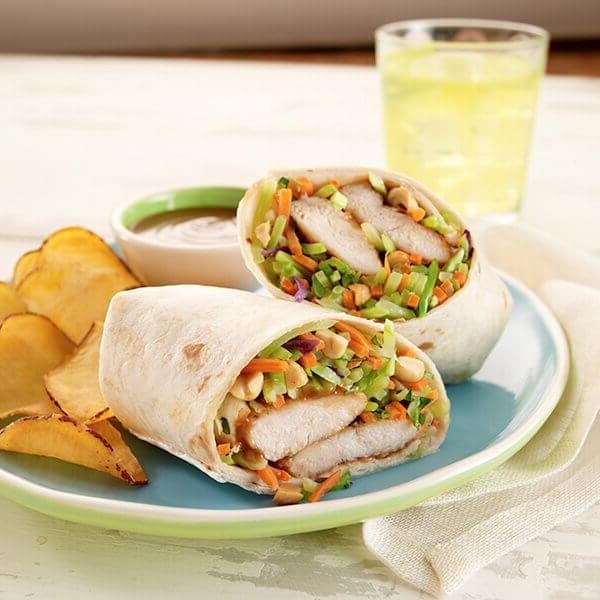
Lusciously aromatic and vibrantly textured, these Thai Peanut Chicken Wraps offer a symphony of Southeast Asian flavors elegantly contained for effortless enjoyment. Imagine tender, marinated chicken mingling with crisp vegetables and a velvety, complex peanut sauce, all cradled in a soft, pliable tortilla—a perfect harmony of savory, sweet, and subtly spicy notes designed to delight the senses.
Serving: 4 | Pre Time: 25 minutes | Cooking Time: 15 minutes
Ingredients
– 1.5 pounds boneless, skinless chicken thighs, cut into 1-inch strips
– 3 tablespoons toasted sesame oil
– 3 tablespoons tamari or high-quality soy sauce
– 2 tablespoons freshly squeezed lime juice
– 1 tablespoon finely grated fresh ginger root
– 2 garlic cloves, minced
– 1/2 cup creamy natural peanut butter
– 1/4 cup full-fat coconut milk
– 2 tablespoons honey
– 1 tablespoon rice vinegar
– 1 teaspoon sriracha sauce
– 4 large flour tortillas (10-inch diameter)
– 2 cups finely shredded Napa cabbage
– 1 large carrot, julienned
– 1/2 English cucumber, thinly sliced into half-moons
– 1/4 cup fresh cilantro leaves, roughly chopped
– 1/4 cup roasted unsalted peanuts, coarsely chopped
Instructions
1. In a medium bowl, whisk together the toasted sesame oil, tamari, lime juice, grated ginger, and minced garlic to create the marinade.
2. Add the chicken strips to the marinade, ensuring each piece is thoroughly coated, then cover and refrigerate for 20 minutes to allow the flavors to penetrate.
3. While the chicken marinates, prepare the peanut sauce by combining the creamy natural peanut butter, coconut milk, honey, rice vinegar, and sriracha in a small saucepan over low heat.
4. Whisk the sauce constantly for 3-4 minutes until it becomes smooth, glossy, and slightly warmed, then remove from heat and set aside.
5. Heat a large skillet or wok over medium-high heat until a drop of water sizzles upon contact.
6. Using tongs, transfer the marinated chicken strips to the hot skillet, discarding the remaining marinade, and arrange them in a single layer.
7. Cook the chicken for 5-6 minutes, turning occasionally, until the exterior is caramelized and the internal temperature reaches 165°F on an instant-read thermometer.
8. Transfer the cooked chicken to a clean plate and let it rest for 3 minutes to allow the juices to redistribute, then slice into bite-sized pieces.
9. Warm the flour tortillas in a dry skillet over medium heat for 30 seconds per side until pliable and lightly speckled.
10. To assemble each wrap, place one warmed tortilla on a clean surface and spread 2 tablespoons of the prepared peanut sauce evenly across the center.
11. Layer 1/2 cup of shredded Napa cabbage, followed by the sliced chicken, julienned carrot, cucumber slices, cilantro leaves, and a sprinkle of chopped peanuts.
12. Fold the bottom edge of the tortilla over the filling, then tightly roll from one side to enclose completely, creating a secure cylinder.
13. Repeat the assembly process with the remaining tortillas and ingredients.
14. Just before serving, drizzle each wrap with an additional tablespoon of the remaining peanut sauce for extra richness and visual appeal.
Juxtaposing textures create the wrap’s magic: the tender chicken contrasts with the cabbage’s delicate crunch, while the creamy peanut sauce binds the elements with its nuanced depth. For an elegant presentation, slice each wrap diagonally to reveal the colorful layers, or accompany with a small side of quick-pickled vegetables to cut through the richness.
Quinoa and Black Bean Stuffed Peppers

Crafted for both elegance and nourishment, these quinoa and black bean stuffed peppers offer a vibrant, plant-based feast that marries wholesome ingredients with sophisticated flavors. The colorful bell peppers, roasted to tender perfection, cradle a savory filling of protein-rich quinoa and earthy black beans, creating a dish that is as visually stunning as it is satisfying. This recipe transforms simple components into a refined meal, perfect for a cozy dinner or an impressive gathering.
Serving: 4 | Pre Time: 15 minutes | Cooking Time: 45 minutes
Ingredients
– 4 large bell peppers, preferably a mix of red, yellow, and orange, halved lengthwise and seeded
– 1 cup quinoa, rinsed thoroughly under cold water
– 2 cups vegetable broth
– 1 (15-ounce) can black beans, drained and rinsed
– 1 small yellow onion, finely diced
– 2 cloves garlic, minced
– 1 tablespoon extra-virgin olive oil
– 1 teaspoon ground cumin
– ½ teaspoon smoked paprika
– ½ cup fresh cilantro, chopped
– ½ cup Monterey Jack cheese, freshly grated
– Kosher salt and freshly ground black pepper, to season
Instructions
1. Preheat the oven to 375°F and lightly grease a baking dish with extra-virgin olive oil.
2. Arrange the bell pepper halves in the prepared dish, cut-side up, and season the interiors with a pinch of kosher salt.
3. In a medium saucepan, combine the rinsed quinoa and vegetable broth, bringing to a boil over medium-high heat.
4. Reduce the heat to low, cover the saucepan, and simmer the quinoa for 15 minutes, or until all the liquid is absorbed and the grains are fluffy.
5. While the quinoa cooks, heat 1 tablespoon of extra-virgin olive oil in a skillet over medium heat until shimmering.
6. Add the finely diced yellow onion to the skillet and sauté for 5 minutes, until translucent and fragrant.
7. Stir in the minced garlic, ground cumin, and smoked paprika, cooking for an additional 1 minute to bloom the spices.
8. Fold the drained black beans into the skillet, warming through for 2 minutes, then remove from heat.
9. In a large mixing bowl, combine the cooked quinoa, black bean mixture, and chopped fresh cilantro, seasoning with kosher salt and freshly ground black pepper to taste.
10. Evenly divide the quinoa filling among the bell pepper halves, pressing gently to pack it in.
11. Sprinkle the freshly grated Monterey Jack cheese over the top of each stuffed pepper.
12. Cover the baking dish with aluminum foil and bake at 375°F for 25 minutes.
13. Remove the foil and continue baking for an additional 10 minutes, until the peppers are tender and the cheese is golden and bubbly.
14. Let the stuffed peppers rest for 5 minutes before serving to allow the flavors to meld.
Perfectly balanced, these stuffed peppers boast a tender-crisp texture from the roasted peppers, complemented by the fluffy quinoa and creamy black beans. The smoky undertones of paprika and cumin elevate the dish, while the melted cheese adds a rich finish. For a creative twist, serve alongside a dollop of tangy Greek yogurt or a fresh avocado salsa to enhance the vibrant flavors.
Caprese Pesto Sandwiches

Delightfully simple yet profoundly satisfying, Caprese Pesto Sandwiches elevate the classic Italian trinity of tomato, mozzarella, and basil into a portable masterpiece. This recipe transforms humble ingredients into a symphony of fresh, vibrant flavors, perfect for an elegant picnic or a sophisticated lunch. With just a few quality components and minimal preparation, you can craft a sandwich that feels both rustic and refined.
Serving: 4 | Pre Time: 15 minutes | Cooking Time: 5 minutes
Ingredients
– 1 large ciabatta loaf, halved horizontally
– ½ cup high-quality basil pesto
– 8 ounces fresh mozzarella di bufala, thinly sliced
– 2 large heirloom tomatoes, sliced ¼-inch thick
– ¼ cup extra-virgin olive oil
– 1 tablespoon aged balsamic vinegar reduction
– ½ teaspoon flaky sea salt
– ¼ teaspoon freshly cracked black pepper
– 8 large fresh basil leaves
Instructions
1. Preheat a panini press or grill pan to 375°F.
2. Brush the cut sides of the ciabatta loaf evenly with 2 tablespoons of extra-virgin olive oil.
3. Toast the ciabatta halves, cut-side down, in the preheated press or pan for 3–4 minutes until golden-brown and crisp.
4. Spread the basil pesto generously over the toasted interior of the bottom ciabatta half.
5. Arrange the fresh mozzarella di bufala slices in a single, overlapping layer over the pesto.
6. Layer the heirloom tomato slices evenly atop the mozzarella.
7. Drizzle the tomatoes with the remaining 2 tablespoons of extra-virgin olive oil and the aged balsamic vinegar reduction.
8. Season the layered ingredients precisely with flaky sea salt and freshly cracked black pepper.
9. Place the fresh basil leaves in a single layer over the seasoned tomatoes.
10. Cap the sandwich with the top ciabatta half, pressing down gently to compact the layers.
11. Slice the assembled sandwich into four equal portions with a serrated bread knife.
12. Serve immediately while the bread retains its crisp exterior.
Buttery, crisp ciabatta yields to the creamy resistance of fresh mozzarella and the juicy burst of heirloom tomatoes, all harmonized by the herbaceous punch of pesto. For a delightful variation, serve these sandwiches alongside a chilled gazpacho or deconstructed into elegant skewers for an appetizer presentation.
Lemon Herb Chicken and Orzo Skillet
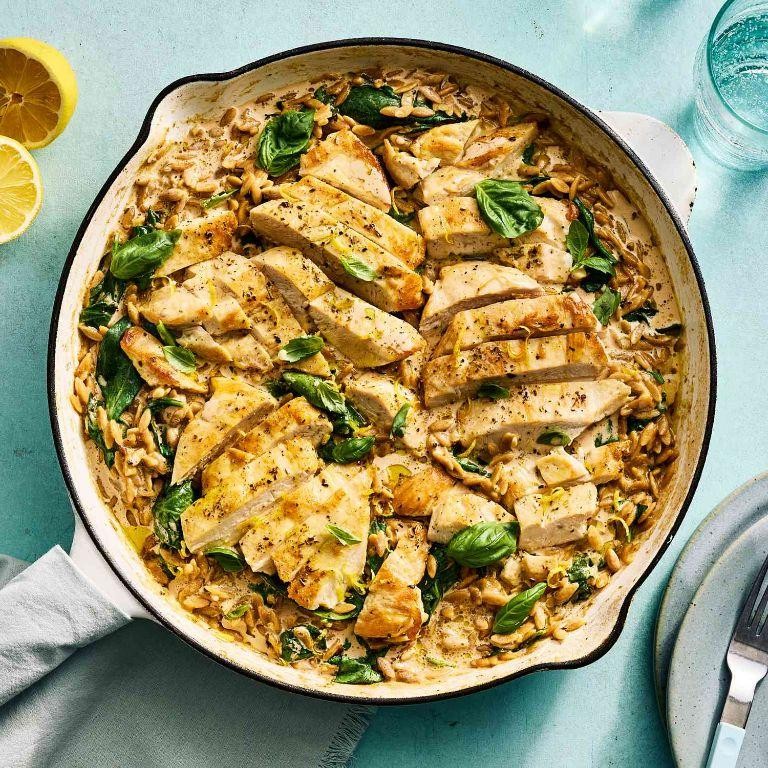
Warm, golden evenings call for effortless elegance at the dinner table, and this one-pan wonder delivers just that. A vibrant medley of tender chicken, bright citrus, and aromatic herbs simmers with delicate orzo, creating a dish that feels both comforting and sophisticated. It’s the perfect centerpiece for a weeknight gathering or a quiet, refined meal for two.
Serving: 4 | Prep Time: 15 minutes | Cooking Time: 25 minutes
Ingredients
– 1.5 pounds boneless, skinless chicken thighs, patted dry and cut into 1-inch pieces
– 3 tablespoons extra-virgin olive oil, divided
– 1 teaspoon kosher salt, plus more for seasoning
– ½ teaspoon freshly cracked black pepper
– 1 medium yellow onion, finely diced
– 3 cloves garlic, minced
– 1 cup uncooked orzo pasta
– 2 cups low-sodium chicken broth
– Zest and juice of 1 large lemon
– 2 tablespoons unsalted butter
– ¼ cup dry white wine
– 2 teaspoons fresh thyme leaves
– 1 tablespoon fresh parsley, finely chopped
– ¼ cup freshly grated Parmesan cheese
Instructions
1. Season the chicken pieces evenly with the kosher salt and black pepper.
2. Heat 2 tablespoons of olive oil in a large, high-sided skillet over medium-high heat until shimmering, about 90 seconds.
3. Add the chicken in a single layer, working in batches if necessary to avoid crowding, and sear undisturbed for 4-5 minutes per side until deeply golden brown. Transfer to a clean plate. *Tip: For the best fond, do not move the chicken during the initial sear.*
4. Reduce the heat to medium and add the remaining 1 tablespoon of olive oil to the skillet.
5. Add the diced onion and cook, stirring occasionally, for 4-5 minutes until translucent and softened.
6. Add the minced garlic and cook for 1 minute until fragrant.
7. Pour in the dry white wine to deglaze the pan, using a wooden spoon to scrape up any browned bits from the bottom, and cook for 2 minutes until the wine is nearly evaporated.
8. Add the uncooked orzo to the skillet and toast, stirring constantly, for 1 minute.
9. Pour in the chicken broth and lemon juice, then add the lemon zest, thyme, and butter. Stir to combine and bring to a gentle simmer.
10. Return the seared chicken and any accumulated juices to the skillet, nestling the pieces into the orzo mixture.
11. Cover the skillet, reduce the heat to low, and simmer for 12-14 minutes, or until the orzo is al dente and the liquid is mostly absorbed. *Tip: Avoid stirring once covered to prevent the orzo from becoming gummy.*
12. Remove the skillet from the heat and stir in the chopped parsley and grated Parmesan cheese until the cheese is melted and creamy. *Tip: Let the dish rest, covered, for 5 minutes off the heat to allow the flavors to meld perfectly.*
Just moments off the heat, the orzo achieves a luxuriously creamy texture while each grain remains distinct, coated in a bright, buttery sauce. The tender chicken, infused with lemon and herbs, offers a delightful contrast, making every bite a harmonious blend of comfort and zest. For an elegant presentation, garnish with additional lemon zest and a drizzle of high-quality olive oil, or serve alongside a simple arugula salad dressed with lemon vinaigrette.
Vegan Burrito Bowls
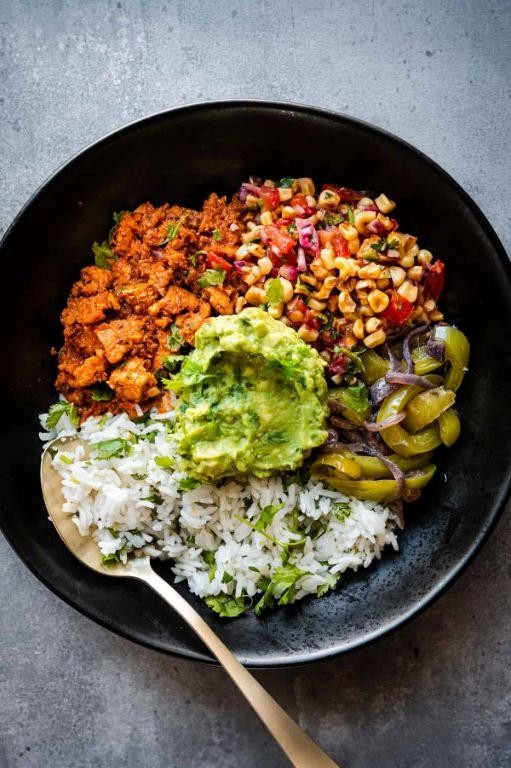
Perfectly balanced and vibrantly colorful, vegan burrito bowls offer a customizable feast that celebrates fresh, plant-based ingredients in an elegant assembly. This wholesome dish layers textures and flavors with thoughtful precision, transforming simple components into a satisfying meal that delights both the palate and the eye. Serving: 4 | Pre Time: 20 minutes | Cooking Time: 30 minutes
Ingredients
– 1 cup long-grain white rice, rinsed
– 1 ¾ cups vegetable broth
– 2 tablespoons extra-virgin olive oil
– 1 medium yellow onion, finely diced
– 3 cloves garlic, minced
– 1 tablespoon ground cumin
– 1 teaspoon smoked paprika
– 1 (15-ounce) can black beans, drained and rinsed
– 2 ripe avocados, pitted and sliced
– 1 cup cherry tomatoes, halved
– ½ cup fresh cilantro leaves, roughly chopped
– 1 lime, cut into wedges
– Sea salt to season
Instructions
1. In a medium saucepan, combine the rinsed long-grain white rice and vegetable broth, then bring to a boil over high heat.
2. Reduce the heat to low, cover the saucepan, and simmer the rice for 18 minutes, or until all liquid is absorbed and the grains are tender.
3. Remove the rice from heat, fluff it gently with a fork, and let it rest covered for 5 minutes to achieve a light, fluffy texture.
4. Heat the extra-virgin olive oil in a large skillet over medium heat until it shimmers, about 2 minutes.
5. Add the finely diced yellow onion to the skillet and sauté for 5 minutes, stirring occasionally, until translucent and fragrant.
6. Stir in the minced garlic, ground cumin, and smoked paprika, cooking for 1 minute to toast the spices and release their aromas.
7. Incorporate the drained and rinsed black beans into the skillet, cooking for 3-4 minutes until heated through and well-coated with the spice mixture.
8. Season the bean mixture with sea salt, adjusting to your preference, and remove from heat.
9. Assemble the bowls by dividing the fluffy rice evenly among four serving dishes.
10. Top each bowl with the seasoned black bean mixture, arranging it neatly over the rice.
11. Garnish with sliced ripe avocados, halved cherry tomatoes, and roughly chopped fresh cilantro leaves.
12. Serve immediately with lime wedges on the side for squeezing over the bowls. Creamy avocado slices meld with the hearty beans and aromatic rice, creating a harmonious blend of textures from soft to slightly firm. For a creative twist, drizzle with a cashew crema or add pickled red onions to introduce a tangy contrast that elevates the dish’s complexity.
Overnight Oats with Berries and Almonds
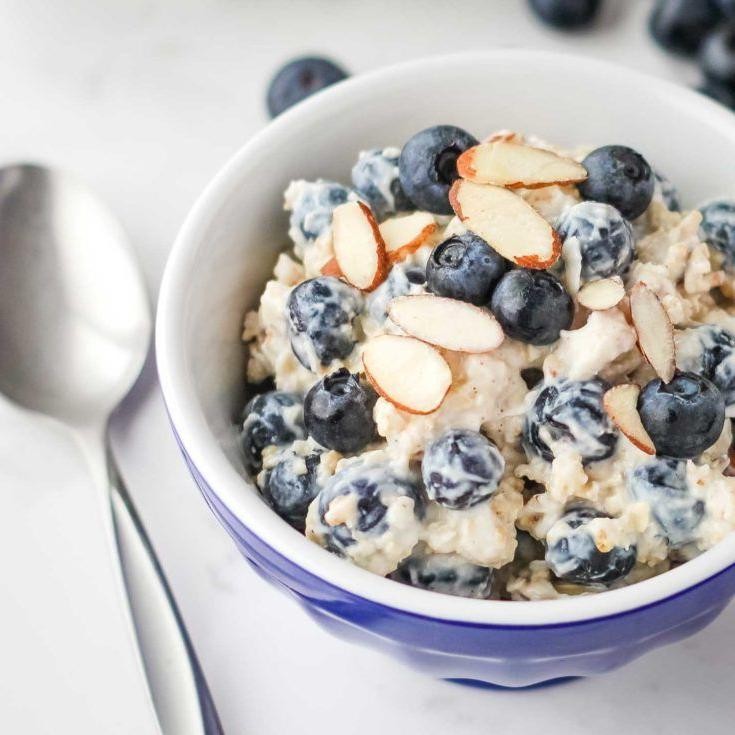
Gently ushering in the morning with effortless sophistication, overnight oats with berries and almonds offer a sublime fusion of creamy texture and vibrant flavor. This no-cook marvel allows the ingredients to meld overnight, transforming simple components into a breakfast masterpiece that feels both indulgent and nourishing. Perfect for busy mornings, it delivers restaurant-worthy elegance with minimal effort.
Serving: 2 | Pre Time: 10 minutes | Cooking Time: 0 minutes
Ingredients
– 1 cup old-fashioned rolled oats
– 1 cup unsweetened almond milk
– 1/2 cup plain Greek yogurt
– 2 tablespoons pure maple syrup
– 1 teaspoon pure vanilla extract
– 1/4 teaspoon fine sea salt
– 1 cup mixed fresh berries (such as raspberries, blueberries, and blackberries)
– 1/4 cup sliced almonds, toasted
– Fresh mint leaves for garnish (optional)
Instructions
1. In a medium mixing bowl, combine 1 cup old-fashioned rolled oats, 1 cup unsweetened almond milk, 1/2 cup plain Greek yogurt, 2 tablespoons pure maple syrup, 1 teaspoon pure vanilla extract, and 1/4 teaspoon fine sea salt.
2. Whisk the mixture vigorously for 30 seconds until fully integrated and slightly aerated, ensuring no lumps remain for a uniformly creamy base.
3. Divide the oat mixture evenly between two 12-ounce mason jars or airtight containers, filling each about two-thirds full.
4. Gently fold 1 cup mixed fresh berries into each jar, distributing them evenly without crushing to maintain their delicate structure.
5. Seal the jars tightly and refrigerate for at least 8 hours or overnight, allowing the oats to fully hydrate and the flavors to develop.
6. Just before serving, sprinkle 2 tablespoons of sliced almonds, toasted to a golden hue at 350°F for 5-7 minutes, over each portion for a nutty crunch.
7. Garnish optionally with fresh mint leaves for a bright, aromatic finish.
Creating a velvety, spoonable consistency, the oats absorb the almond milk and yogurt, yielding a lush texture that contrasts beautifully with the burst of juicy berries. Consider layering additional berries and a drizzle of honey in a parfait glass for an elevated presentation, or enjoy it straight from the jar for a rustic yet refined treat.
Grilled Vegetable and Hummus Wraps

Wrapped in a soft tortilla, these grilled vegetable and hummus wraps offer a symphony of smoky, charred flavors and creamy textures, perfect for a light yet satisfying meal. The vibrant medley of seasonal vegetables, kissed by the grill, pairs beautifully with the rich, garlicky hummus, creating a dish that is both elegant and approachable. This recipe transforms simple ingredients into a culinary delight that is as visually stunning as it is delicious.
Serving: 4 | Pre Time: 15 minutes | Cooking Time: 10 minutes
Ingredients
– 4 large flour tortillas (10-inch diameter)
– 1 cup classic hummus
– 1 medium zucchini, sliced into ¼-inch rounds
– 1 medium yellow squash, sliced into ¼-inch rounds
– 1 large red bell pepper, seeded and sliced into ½-inch strips
– 1 medium red onion, sliced into ½-inch rings
– 2 tablespoons extra-virgin olive oil
– 1 teaspoon kosher salt
– ½ teaspoon freshly ground black pepper
– ½ cup fresh baby arugula
– ¼ cup crumbled feta cheese
Instructions
1. Preheat a grill or grill pan to medium-high heat (approximately 400°F).
2. In a large mixing bowl, combine the zucchini rounds, yellow squash rounds, red bell pepper strips, and red onion rings.
3. Drizzle the vegetables with 2 tablespoons of extra-virgin olive oil, then season with 1 teaspoon of kosher salt and ½ teaspoon of freshly ground black pepper; toss gently to coat evenly.
4. Place the seasoned vegetables directly on the preheated grill in a single layer, working in batches if necessary to avoid overcrowding.
5. Grill the vegetables for 3-4 minutes per side, or until they develop distinct grill marks and become tender-crisp, using tongs to flip them carefully.
6. Transfer the grilled vegetables to a clean plate and allow them to cool slightly for 2-3 minutes to prevent the tortillas from becoming soggy.
7. Warm the 4 flour tortillas on the grill for 15-20 seconds per side, just until pliable and lightly toasted.
8. Lay each warmed tortilla flat on a clean work surface and spread ¼ cup of classic hummus evenly over the center, leaving a 1-inch border around the edges.
9. Arrange a quarter of the grilled vegetables in a horizontal line over the hummus on each tortilla.
10. Top the vegetables on each tortilla with 2 tablespoons of fresh baby arugula and 1 tablespoon of crumbled feta cheese.
11. Fold the bottom edge of each tortilla up over the filling, then fold in the sides, and roll tightly away from you to form a secure wrap.
12. Slice each wrap in half diagonally with a sharp serrated knife for a clean cut and elegant presentation.
Zesty and vibrant, these wraps boast a delightful contrast between the warm, smoky vegetables and the cool, creamy hummus, with the peppery arugula and salty feta adding layers of complexity. For a creative twist, serve them alongside a drizzle of balsamic reduction or a side of marinated olives, enhancing the Mediterranean flair and making for a truly memorable meal.
High-Protein Tuna and White Bean Salad
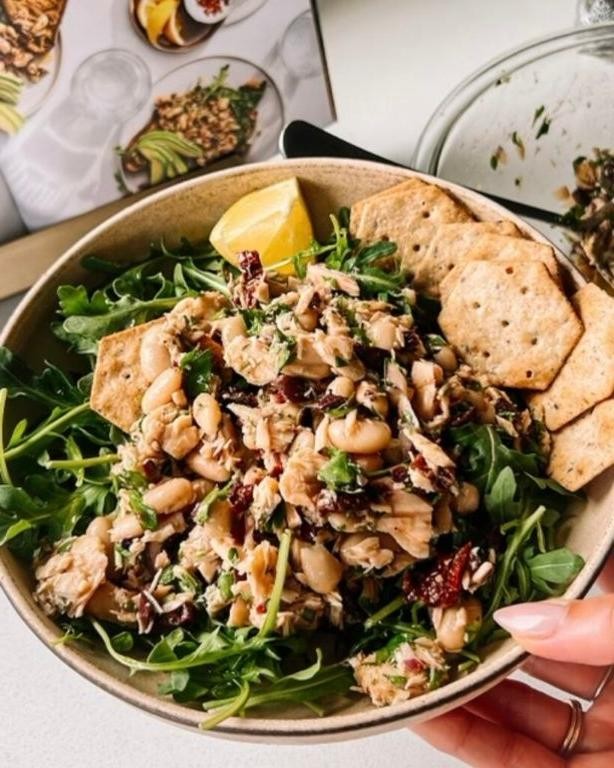
Often overlooked in the realm of quick, nutritious meals, this salad masterfully combines the robust, savory notes of high-quality tuna with the creamy, earthy foundation of white beans. Offering a symphony of textures and a powerhouse of protein, it’s a dish that feels both indulgent and virtuous, perfect for a sophisticated lunch or a light yet satisfying dinner.
Serving: 4 | Pre Time: 15 minutes | Cooking Time: 0 minutes
Ingredients
– 2 (5-ounce) cans solid white albacore tuna in olive oil, drained
– 1 (15.5-ounce) can cannellini beans, rinsed and drained
– ½ cup extra-virgin olive oil
– 3 tablespoons freshly squeezed lemon juice
– 1 small shallot, finely minced
– 2 tablespoons capers, drained
– ¼ cup fresh flat-leaf parsley leaves, finely chopped
– Kosher salt
– Freshly cracked black pepper
Instructions
1. In a large mixing bowl, gently flake the drained solid white albacore tuna with a fork until it reaches a coarse, textured consistency.
2. Add the rinsed and drained cannellini beans to the bowl with the tuna.
3. In a separate small bowl, vigorously whisk together the extra-virgin olive oil and freshly squeezed lemon juice for 45 seconds to form a stable, emulsified vinaigrette.
4. Whisk the finely minced shallot and drained capers into the vinaigrette until fully incorporated.
5. Pour the prepared vinaigrette over the tuna and bean mixture.
6. Using a rubber spatula, fold the ingredients together gently to combine, ensuring the beans remain intact for optimal texture.
7. Fold in the finely chopped fresh flat-leaf parsley leaves until evenly distributed.
8. Season the salad with kosher salt and freshly cracked black pepper, starting with ½ teaspoon of salt and ¼ teaspoon of pepper, then adjust precisely after tasting.
9. Allow the salad to rest at room temperature for 10 minutes to let the flavors meld.
Generously creamy beans contrast delightfully with the firm, savory flakes of tuna, while the briny capers and sharp shallot provide a bright, aromatic lift. For an elegant presentation, serve it atop a bed of peppery arugula or spoon it into endive leaves for a refined, handheld appetizer.
Spinach and Feta Stuffed Chicken Breasts
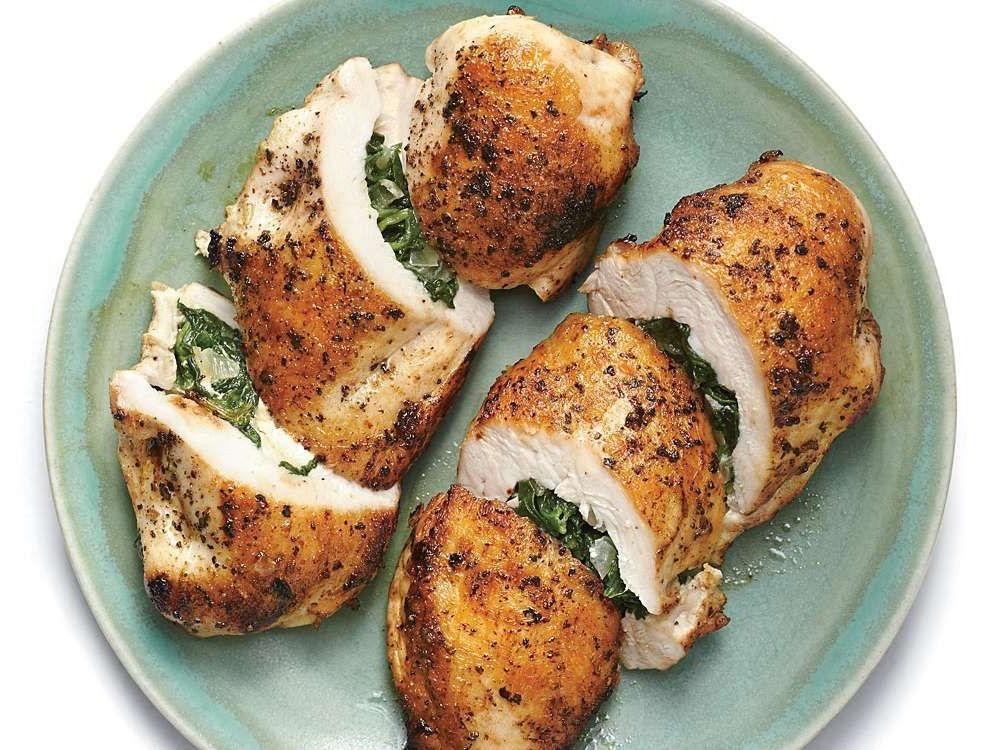
Crafted with culinary finesse, these spinach and feta stuffed chicken breasts transform humble ingredients into an elegant centerpiece, where tender poultry embraces a vibrant filling of wilted greens and briny cheese, creating a dish that delights both the palate and the eye with its golden-brown exterior and savory interior.
Serving: 4 | Pre Time: 20 minutes | Cooking Time: 25 minutes
Ingredients
– 4 boneless, skinless chicken breasts (approximately 6 ounces each)
– 2 tablespoons extra-virgin olive oil
– 1 tablespoon unsalted butter
– 4 cups fresh baby spinach leaves, tightly packed
– 2 cloves garlic, finely minced
– 4 ounces high-quality feta cheese, crumbled
– ¼ cup whole-milk ricotta cheese
– 1 large pasture-raised egg, lightly beaten
– ¼ teaspoon freshly grated nutmeg
– Kosher salt and freshly ground black pepper, to season
– ½ cup all-purpose flour
– 1 tablespoon clarified butter
Instructions
1. Preheat the oven to 375°F and position a rack in the center.
2. Place each chicken breast between two sheets of parchment paper and gently pound to an even ¼-inch thickness using a meat mallet.
3. Season both sides of the chicken breasts generously with kosher salt and freshly ground black pepper.
4. Heat 1 tablespoon of extra-virgin olive oil and the unsalted butter in a large skillet over medium heat until the butter foams.
5. Add the baby spinach leaves and cook, stirring frequently, until fully wilted, about 2-3 minutes.
6. Stir in the finely minced garlic and cook for an additional 30 seconds until fragrant, then transfer the mixture to a medium bowl to cool slightly.
7. To the cooled spinach, add the crumbled feta cheese, whole-milk ricotta cheese, lightly beaten pasture-raised egg, and freshly grated nutmeg, mixing until fully combined.
8. Lay the pounded chicken breasts flat and divide the spinach-feta mixture evenly among them, spooning it onto the center of each.
9. Carefully roll each chicken breast tightly around the filling, securing the ends with toothpicks to prevent leakage.
10. Dredge each stuffed chicken roll in the all-purpose flour, shaking off any excess to ensure a light, even coating.
11. Heat the clarified butter and remaining 1 tablespoon of extra-virgin olive oil in the same skillet over medium-high heat until shimmering.
12. Sear the chicken rolls on all sides until golden brown, about 2-3 minutes per side, to develop a flavorful crust.
13. Transfer the seared chicken to a baking dish and roast in the preheated oven until the internal temperature reaches 165°F, approximately 15-18 minutes.
14. Remove the chicken from the oven and let it rest for 5 minutes before carefully removing the toothpicks and slicing.
15. Serve the stuffed chicken breasts immediately, garnished with additional fresh herbs if desired.
Velvety and moist, the chicken yields to reveal a creamy, herbaceous filling that melts seamlessly with each bite, while the golden sear adds a subtle crunch. For a refined presentation, slice the rolls into medallions and arrange them over a bed of lemon-infused orzo or alongside roasted heirloom carrots, allowing the vibrant colors and textures to shine.
Make-Ahead Greek Pasta Salad
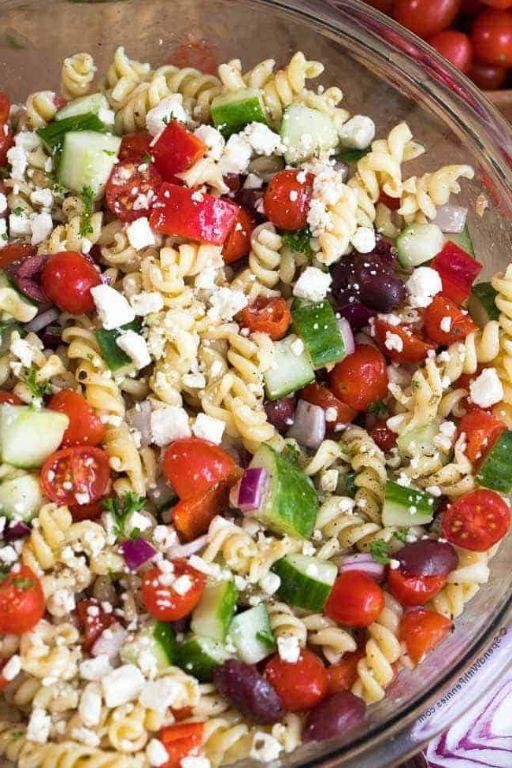
Savory and vibrant, this make-ahead Greek pasta salad transforms simple ingredients into an elegant, crowd-pleasing dish. Perfect for entertaining or meal prep, its bright Mediterranean flavors and satisfying textures only improve with time, making it an ideal centerpiece for any gathering.
Serving: 6 | Pre Time: 20 minutes | Cooking Time: 10 minutes
Ingredients
– 12 ounces of dried orzo pasta
– 1/4 cup of extra-virgin olive oil
– 3 tablespoons of freshly squeezed lemon juice
– 1 teaspoon of Dijon mustard
– 1 large English cucumber, finely diced
– 1 pint of cherry tomatoes, halved
– 1/2 cup of Kalamata olives, pitted and sliced
– 4 ounces of feta cheese, crumbled
– 1/4 cup of fresh dill, finely chopped
– 1/4 cup of fresh mint, finely chopped
– Kosher salt to season
– Freshly ground black pepper to season
Instructions
1. Bring a large pot of salted water to a rolling boil over high heat.
2. Add the orzo pasta and cook for 8–10 minutes, stirring occasionally, until al dente with a slight bite.
3. Drain the pasta in a colander and rinse briefly under cold water to stop the cooking process, then transfer to a large mixing bowl.
4. In a small bowl, whisk together the extra-virgin olive oil, freshly squeezed lemon juice, and Dijon mustard until emulsified into a smooth vinaigrette.
5. Pour the vinaigrette over the cooled orzo and toss gently to coat evenly, allowing the pasta to absorb the flavors.
6. Add the finely diced English cucumber, halved cherry tomatoes, sliced Kalamata olives, crumbled feta cheese, finely chopped fresh dill, and finely chopped fresh mint to the bowl.
7. Season generously with kosher salt and freshly ground black pepper, then fold all ingredients together until well combined.
8. Cover the bowl with plastic wrap and refrigerate for at least 2 hours, or preferably overnight, to let the flavors meld.
9. Before serving, give the salad a final gentle toss and adjust seasoning if needed.
Hearty yet refreshing, this salad offers a delightful contrast of tender orzo, crisp vegetables, and briny olives, all brightened by the herbaceous notes of dill and mint. For a creative twist, serve it alongside grilled lamb chops or as a filling for lettuce wraps, letting its make-ahead convenience shine through effortlessly.
Turkey and Avocado Lettuce Wraps
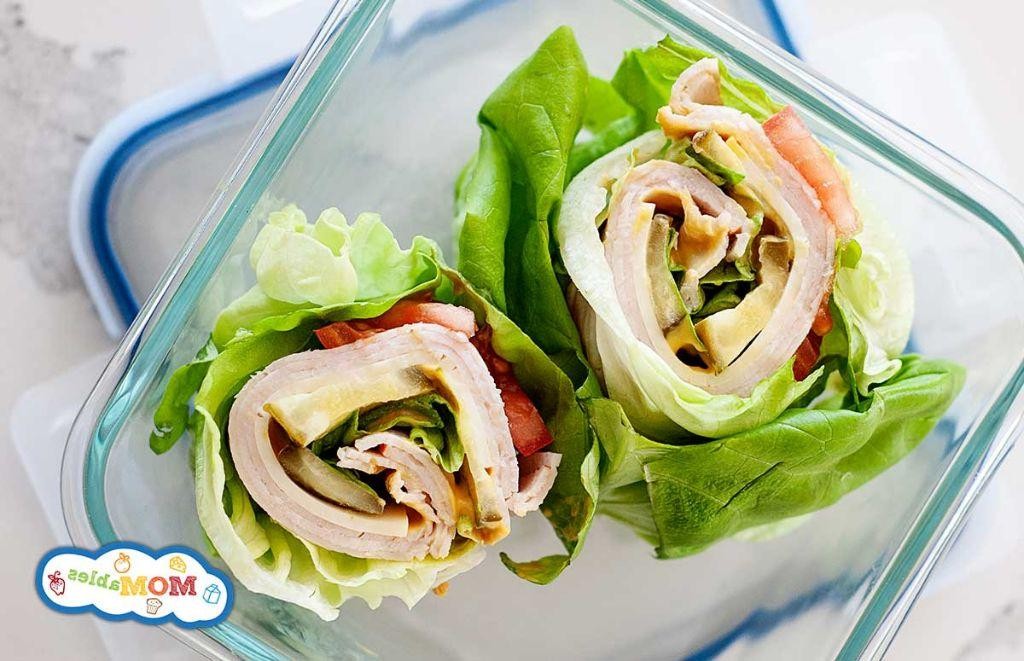
Fusing the lean elegance of ground turkey with the creamy sophistication of ripe avocado, these lettuce wraps offer a refreshing departure from heavy winter fare. Perfect for a light lunch or elegant appetizer, they balance protein-rich satisfaction with crisp, garden-fresh textures. Each bite delivers a harmonious blend of savory, tangy, and herbal notes, wrapped in delicate butter lettuce leaves for a handheld masterpiece.
Serving: 4 | Pre Time: 15 minutes | Cooking Time: 10 minutes
Ingredients
– 1 lb ground turkey (93% lean)
– 2 ripe Hass avocados, pitted and diced
– 8 large butter lettuce leaves, washed and patted dry
– 1/4 cup finely diced red onion
– 1/4 cup chopped fresh cilantro
– 2 tbsp freshly squeezed lime juice
– 1 tbsp extra-virgin olive oil
– 1 tsp ground cumin
– 1/2 tsp smoked paprika
– 1/4 tsp fine sea salt
– 1/8 tsp freshly ground black pepper
Instructions
1. Heat the extra-virgin olive oil in a large skillet over medium-high heat until it shimmers, about 1 minute.
2. Add the ground turkey to the skillet, breaking it apart with a wooden spoon into small crumbles.
3. Sprinkle the ground cumin, smoked paprika, fine sea salt, and freshly ground black pepper evenly over the turkey.
4. Cook the turkey, stirring occasionally, until it is fully browned and no pink remains, approximately 6–8 minutes. Tip: Avoid overcrowding the skillet to ensure proper browning and caramelization.
5. Transfer the cooked turkey to a medium mixing bowl and allow it to cool for 5 minutes to room temperature.
6. Add the diced red onion, chopped fresh cilantro, and freshly squeezed lime juice to the bowl with the turkey.
7. Gently fold in the diced Hass avocados until just combined. Tip: Add the avocados last to prevent them from becoming mushy during mixing.
8. Arrange the butter lettuce leaves on a serving platter, ensuring they are completely dry to prevent sogginess.
9. Spoon approximately 1/3 cup of the turkey-avocado mixture into the center of each lettuce leaf. Tip: For a neater presentation, use a small ice cream scoop to portion the filling evenly.
10. Serve immediately to maintain the crisp texture of the lettuce and the freshness of the ingredients.
Meticulously crafted, these wraps offer a delightful contrast between the warm, savory turkey and the cool, creamy avocado, punctuated by the bright acidity of lime. The butter lettuce provides a crisp, pliable vessel that holds the filling without overpowering it. For an elegant twist, garnish with micro-cilantro or a drizzle of chili-infused honey to elevate the flavor profile further.
Curried Lentil and Vegetable Soup

Hearty and aromatic, this Curried Lentil and Vegetable Soup transforms humble ingredients into a sophisticated, soul-warming meal. Infused with warm spices and a medley of fresh vegetables, it offers a comforting yet elegant bowl that’s perfect for chilly evenings. Each spoonful delivers a harmonious blend of earthy lentils, tender vegetables, and a gently spiced broth that’s both nourishing and deeply satisfying.
Serving: 6 | Pre Time: 15 minutes | Cooking Time: 40 minutes
Ingredients
– 2 tablespoons extra-virgin olive oil
– 1 large yellow onion, finely diced
– 3 cloves garlic, minced
– 1 tablespoon freshly grated ginger
– 2 tablespoons curry powder
– 1 teaspoon ground turmeric
– 1 cup brown lentils, rinsed and drained
– 4 cups vegetable broth
– 2 cups filtered water
– 2 medium carrots, peeled and diced into ½-inch pieces
– 2 stalks celery, diced into ½-inch pieces
– 1 medium sweet potato, peeled and diced into ¾-inch cubes
– 1 (14.5-ounce) can diced tomatoes, with juices
– 1 (13.5-ounce) can full-fat coconut milk
– 1 teaspoon fine sea salt
– ½ teaspoon freshly cracked black pepper
– ¼ cup fresh cilantro leaves, roughly chopped
– 1 tablespoon freshly squeezed lime juice
Instructions
1. Heat the extra-virgin olive oil in a large Dutch oven or heavy-bottomed pot over medium heat until shimmering, about 2 minutes.
2. Add the finely diced yellow onion and sauté, stirring occasionally, until translucent and softened, 5–7 minutes.
3. Stir in the minced garlic and freshly grated ginger, cooking until fragrant, about 1 minute, to bloom their flavors without browning.
4. Sprinkle the curry powder and ground turmeric over the aromatics, stirring constantly for 30 seconds to toast the spices and deepen their aroma.
5. Add the rinsed brown lentils, vegetable broth, and filtered water to the pot, scraping the bottom to incorporate any browned bits.
6. Bring the mixture to a boil over high heat, then reduce to a simmer and cook uncovered for 15 minutes, allowing the lentils to begin softening.
7. Stir in the diced carrots, celery, and sweet potato, along with the diced tomatoes and their juices, ensuring the vegetables are submerged.
8. Simmer gently, partially covered, until the lentils and vegetables are tender, 20–25 minutes, stirring occasionally to prevent sticking.
9. Pour in the full-fat coconut milk, stirring to combine, and season with fine sea salt and freshly cracked black pepper.
10. Simmer for an additional 5 minutes to allow the flavors to meld and the soup to thicken slightly.
11. Remove from heat and stir in the roughly chopped fresh cilantro leaves and freshly squeezed lime juice just before serving.
A velvety, creamy texture envelops each spoonful, with the sweet potato melting into the broth and the lentils offering a satisfying bite. The curry’s warmth is balanced by the bright acidity of lime and the herbal freshness of cilantro, creating a complex flavor profile. For an elegant presentation, garnish with a drizzle of coconut milk and a sprinkle of toasted cumin seeds, or serve alongside warm naan for dipping.
Simple Chicken Caesar Meal Prep Salad

For those seeking a sophisticated yet effortless lunch solution, this Simple Chicken Caesar Meal Prep Salad transforms humble ingredients into a culinary delight. Featuring crisp romaine, tender chicken, and a velvety homemade dressing, it’s a masterclass in balancing freshness with savory depth. Each component is thoughtfully prepared to ensure vibrant flavors and textures throughout the week.
Serving: 4 | Pre Time: 20 minutes | Cooking Time: 15 minutes
Ingredients
– 1.5 pounds boneless, skinless chicken breasts, patted dry
– 2 tablespoons extra-virgin olive oil, divided
– 1 teaspoon kosher salt
– 1/2 teaspoon freshly cracked black pepper
– 2 large heads romaine lettuce, washed and thoroughly dried
– 1/2 cup freshly grated Parmigiano-Reggiano cheese
– 1/3 cup high-quality mayonnaise
– 2 tablespoons freshly squeezed lemon juice
– 2 anchovy fillets, finely minced
– 1 teaspoon Dijon mustard
– 1/2 teaspoon Worcestershire sauce
– 1/4 teaspoon garlic powder
Instructions
1. Preheat a heavy-bottomed skillet over medium-high heat until a drop of water sizzles upon contact.
2. Season the chicken breasts evenly on both sides with kosher salt and freshly cracked black pepper.
3. Add 1 tablespoon of extra-virgin olive oil to the skillet, swirling to coat the surface.
4. Place the chicken breasts in the skillet, cooking undisturbed for 6-7 minutes until a golden-brown crust forms.
5. Flip the chicken using tongs, reduce heat to medium, and cook for an additional 6-7 minutes until the internal temperature reaches 165°F on an instant-read thermometer.
6. Transfer the chicken to a cutting board, tent loosely with aluminum foil, and allow it to rest for 5 minutes to redistribute juices.
7. While the chicken rests, tear the romaine lettuce into bite-sized pieces and divide evenly among four meal prep containers.
8. In a medium mixing bowl, whisk together the mayonnaise, freshly squeezed lemon juice, minced anchovy fillets, Dijon mustard, Worcestershire sauce, garlic powder, and remaining 1 tablespoon of extra-virgin olive oil until emulsified and smooth.
9. Thinly slice the rested chicken against the grain and arrange over the romaine in the containers.
10. Drizzle the dressing evenly over each salad, then top with freshly grated Parmigiano-Reggiano cheese.
11. Seal the containers and refrigerate for up to 4 days, storing the dressing separately if preferred for optimal crispness.
Graciously, this salad offers a symphony of textures—from the juicy, herbaceous chicken to the crunchy romaine and umami-rich dressing. The anchovy and Parmigiano-Reggiano meld into a deeply savory note, elevated by the bright acidity of lemon. For a creative twist, serve it alongside grilled asparagus or tucked into a whole-grain wrap for a portable feast.
Egg Fried Rice with Vegetables
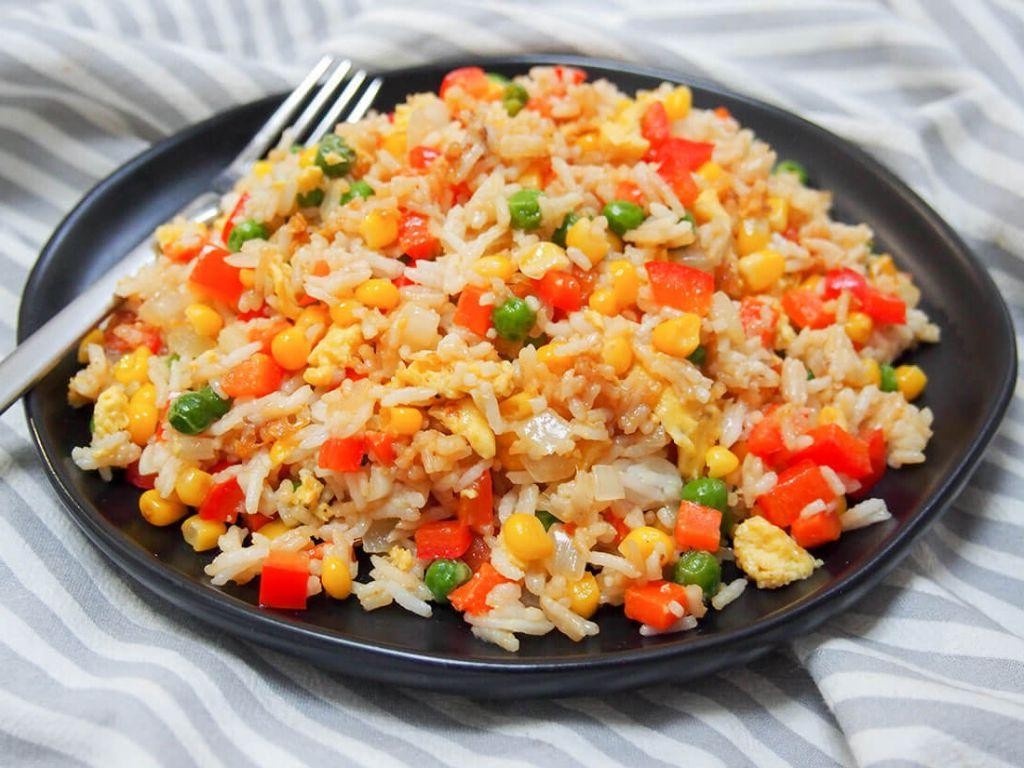
Just as the evening light softens, a humble dish transforms into a canvas of comfort and vibrant color. Egg Fried Rice with Vegetables elevates the familiar with a refined touch, marrying the delicate richness of eggs with the crisp, garden-fresh notes of seasonal produce for a meal that is both nourishing and deeply satisfying.
Serving: 4 | Prep Time: 15 minutes | Cooking Time: 15 minutes
Ingredients
– 3 cups of day-old, chilled jasmine rice
– 4 large pasture-raised eggs, lightly beaten
– 1 cup of finely diced yellow onion
– 1 cup of julienned carrots
– 1 cup of thinly sliced snap peas
– 3 tablespoons of toasted sesame oil
– 2 tablespoons of clarified butter (ghee)
– 3 cloves of garlic, minced
– 1 tablespoon of freshly grated ginger
– 2 tablespoons of tamari or high-quality soy sauce
– 1 teaspoon of fine sea salt
– ½ teaspoon of freshly ground white pepper
– 2 scallions, thinly sliced on a bias for garnish
Instructions
1. Ensure all ingredients are prepped and measured before heating your wok or large skillet.
2. Heat a wok or large skillet over high heat until a drop of water sizzles and evaporates upon contact, about 2 minutes.
3. Add the toasted sesame oil and clarified butter, swirling to coat the surface evenly.
4. Pour in the lightly beaten eggs and let them set for 15 seconds without stirring to create large, soft curds.
5. Gently scramble the eggs for 30 seconds until just set but still slightly glossy, then transfer them to a clean plate.
6. In the same wok, add the diced yellow onion and sauté over high heat for 2 minutes until translucent and fragrant.
7. Incorporate the minced garlic and grated ginger, stirring constantly for 45 seconds to release their aromas without burning.
8. Add the julienned carrots and thinly sliced snap peas, stir-frying for 3 minutes until the vegetables are tender-crisp and bright in color.
9. Crumble the chilled jasmine rice into the wok, breaking up any clumps with a spatula, and stir-fry for 4 minutes until each grain is separated and lightly toasted.
10. Return the scrambled eggs to the wok, gently folding them into the rice and vegetable mixture.
11. Drizzle the tamari evenly over the rice, followed by the fine sea salt and freshly ground white pepper, tossing everything together for 1 minute to ensure even seasoning.
12. Remove the wok from the heat and fold in the bias-cut scallions just before serving.
Soft, individual grains of rice offer a pleasing contrast to the tender-crisp vegetables and fluffy egg curds. The dish presents a harmonious balance of savory depth from the tamari and aromatic warmth from the ginger and garlic. For an elegant presentation, serve in warmed bowls and garnish with additional scallions or a drizzle of chili oil to introduce a subtle heat.
Marinated Tofu and Rice Bowl

Yielded from the simplest of pantry staples, this marinated tofu and rice bowl transforms humble ingredients into an elegant, satisfying meal. The key lies in the deeply savory marinade that permeates the tofu, creating a protein-rich centerpiece that pairs beautifully with fluffy, steaming rice. It’s a versatile canvas, ready to be adorned with your favorite crisp vegetables or a drizzle of chili crisp for a touch of heat.
Serving: 2 | Pre Time: 30 minutes (includes marinating) | Cooking Time: 25 minutes
Ingredients
– 1 (14-ounce) block extra-firm tofu, pressed and cubed
– ¾ cup long-grain white rice, such as jasmine
– ¼ cup low-sodium soy sauce
– 2 tablespoons pure maple syrup
– 1 tablespoon toasted sesame oil
– 2 cloves garlic, finely minced
– 1 teaspoon freshly grated ginger
– 2 tablespoons neutral oil, such as avocado oil
– 2 scallions, thinly sliced
– 1 tablespoon toasted sesame seeds
Instructions
1. In a medium bowl, whisk together the soy sauce, maple syrup, toasted sesame oil, minced garlic, and grated ginger to create the marinade.
2. Add the pressed, cubed tofu to the marinade, ensuring all pieces are fully coated. Cover and refrigerate for at least 20 minutes to allow the flavors to penetrate.
3. While the tofu marinates, rinse the rice under cold water until the water runs clear to remove excess starch, which yields fluffier grains.
4. In a small saucepan, combine the rinsed rice with 1½ cups of water. Bring to a boil over high heat, then immediately reduce the heat to low, cover, and simmer for 15 minutes.
5. After 15 minutes, remove the rice from heat and let it sit, covered, for 10 minutes to steam and finish cooking.
6. Heat the neutral oil in a large non-stick skillet over medium-high heat until shimmering, about 2 minutes.
7. Using a slotted spoon, transfer the marinated tofu to the hot skillet, reserving the remaining marinade. Arrange the tofu in a single layer.
8. Cook the tofu undisturbed for 4–5 minutes, or until the bottom develops a deep golden-brown crust, then flip each piece and cook for an additional 4–5 minutes.
9. Pour the reserved marinade into the skillet with the tofu and cook, stirring gently, for 1–2 minutes until the sauce thickens slightly and coats the tofu.
10. Fluff the rested rice with a fork and divide it evenly between two bowls.
11. Top the rice with the glazed tofu and any remaining sauce from the skillet.
12. Garnish each bowl with sliced scallions and a sprinkle of toasted sesame seeds.
Perfectly balanced, this dish offers a delightful contrast: the tofu boasts a caramelized, slightly crisp exterior giving way to a tender, flavorful interior, while the rice provides a soft, neutral base. The savory-sweet marinade reduces to a glossy glaze that clings to every component. For a vibrant twist, serve it alongside quick-pickled vegetables or topped with a softly fried, pasture-raised egg.
Slow Cooker Beef and Broccoli
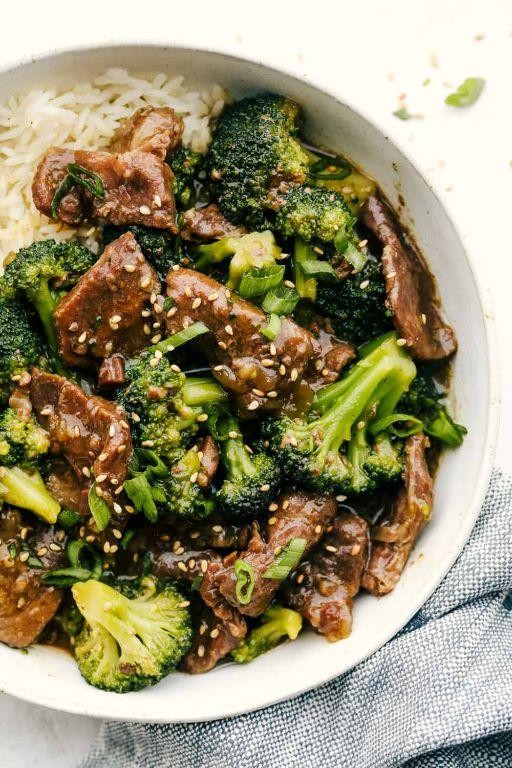
Gently coaxing tender, succulent beef into a state of melt-in-your-mouth perfection, this slow cooker beef and broccoli transforms humble ingredients into an elegant, deeply savory meal. By allowing the flavors to meld and develop over hours of gentle heat, the dish achieves a complexity and richness that belies its straightforward preparation, offering a comforting yet sophisticated centerpiece for any gathering.
Serving: 6 | Pre Time: 20 minutes | Cooking Time: 4 hours
Ingredients
– 2 pounds boneless beef chuck roast, trimmed of excess fat and cut into 1-inch cubes
– 1/4 cup low-sodium soy sauce
– 1/4 cup oyster sauce
– 2 tablespoons honey
– 1 tablespoon toasted sesame oil
– 4 cloves garlic, minced
– 1 tablespoon freshly grated ginger
– 1/2 cup beef broth
– 1 tablespoon cornstarch
– 2 tablespoons cold water
– 1 1/2 pounds fresh broccoli crowns, cut into florets
– 2 tablespoons neutral oil, such as avocado oil
– Cooked jasmine rice, for serving
– Toasted sesame seeds, for garnish
– Thinly sliced green onions, for garnish
Instructions
1. Pat the beef cubes completely dry with paper towels to ensure proper browning.
2. Heat the neutral oil in a large skillet over medium-high heat until shimmering, about 2 minutes.
3. Working in batches to avoid overcrowding, sear the beef cubes on all sides until a deep golden-brown crust forms, approximately 3-4 minutes per batch. Transfer seared beef to the insert of a 6-quart slow cooker.
4. In a medium bowl, whisk together the low-sodium soy sauce, oyster sauce, honey, toasted sesame oil, minced garlic, and freshly grated ginger until fully combined.
5. Pour the sauce mixture and the beef broth over the seared beef in the slow cooker, stirring gently to coat.
6. Cover the slow cooker and cook on the LOW setting for 4 hours, until the beef is fork-tender.
7. Thirty minutes before the cooking time is complete, create a slurry by whisking the cornstarch and cold water in a small bowl until smooth.
8. Stir the cornstarch slurry into the slow cooker, then add the broccoli florets, submerging them in the sauce.
9. Re-cover the slow cooker and continue cooking on LOW for 30 minutes, until the broccoli is bright green and tender-crisp and the sauce has thickened to a glossy consistency.
10. Serve the beef and broccoli immediately over cooked jasmine rice, garnished generously with toasted sesame seeds and thinly sliced green onions.
Each bite offers a luxurious contrast between the impossibly tender, savory beef and the vibrant, crisp-tender broccoli, all enveloped in a glossy, umami-rich sauce. Elevate the presentation by serving it in shallow bowls with a side of quick-pickled vegetables, or for a heartier meal, spoon it over a bed of cauliflower rice to soak up every last drop of the deeply flavorful sauce.
Conclusion
You’ve now got a fantastic collection of 35 delicious make-ahead lunch recipes to simplify your busy days. We hope these ideas inspire you to pack tasty, satisfying meals that save you time and money. Give a few recipes a try, leave a comment below with your favorites, and don’t forget to share this roundup on Pinterest to help other busy home cooks!


