So, you’re hosting a lunch party and want to impress your guests without spending all day in the kitchen? You’ve come to the right place! We’ve gathered 22 delectable recipes that are perfect for sharing, from vibrant salads to hearty mains and irresistible desserts. Get ready to create a memorable feast that will have everyone asking for seconds—and the recipes. Let’s dive into these crowd-pleasing dishes!
Tangy Lemon Herb Grilled Chicken Skewers
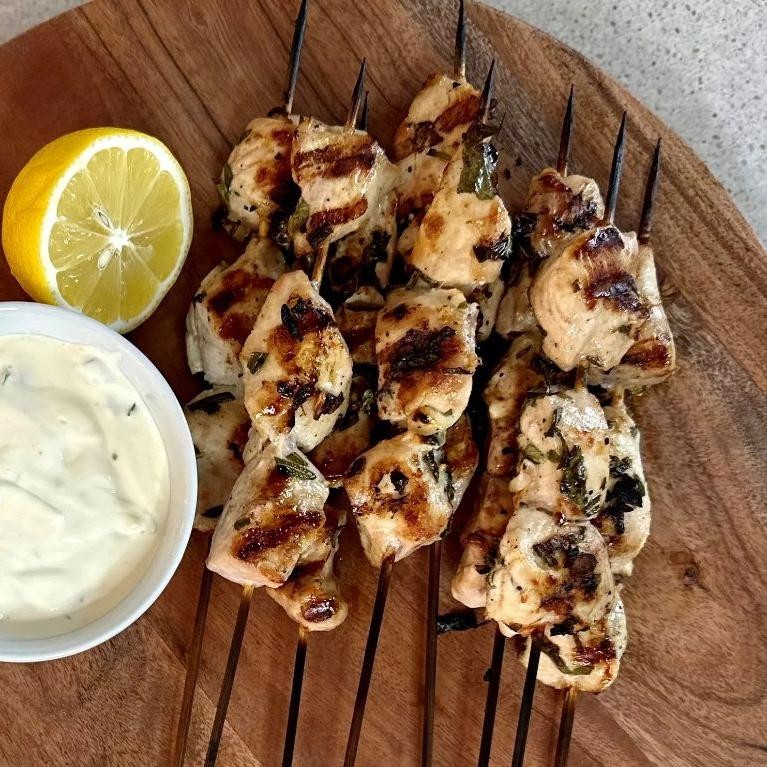
Crafted with vibrant citrus and aromatic herbs, these grilled chicken skewers offer a perfect balance of tangy brightness and savory depth that transforms ordinary weeknight dinners into something truly special. The zesty marinade penetrates each tender piece of chicken, creating layers of flavor that sing with every bite. Ideal for summer gatherings or whenever you crave a taste of sunshine on your plate.
8
skewers150
minutes12
minutesIngredients
– 1.5 pounds of boneless, skinless chicken thighs, cut into 1-inch chunks
– A generous ¼ cup of freshly squeezed lemon juice
– A couple of tablespoons of extra virgin olive oil
– A couple of minced garlic cloves
– A tablespoon of fresh chopped rosemary
– A tablespoon of fresh chopped thyme
– A teaspoon of honey
– A good pinch of kosher salt
– A few cracks of freshly ground black pepper
– A splash of water if needed to thin the marinade
Instructions
1. In a medium bowl, whisk together ¼ cup lemon juice, 2 tablespoons olive oil, 2 minced garlic cloves, 1 tablespoon rosemary, 1 tablespoon thyme, 1 teaspoon honey, 1 teaspoon kosher salt, and ½ teaspoon black pepper until fully combined.
2. Add 1.5 pounds of chicken chunks to the marinade, tossing thoroughly to coat every piece.
3. Cover the bowl and refrigerate for exactly 2 hours to allow the flavors to penetrate deeply—marinating longer can break down the texture.
4. While the chicken marinates, soak 8-10 wooden skewers in water for 30 minutes to prevent burning on the grill.
5. Preheat your grill to medium-high heat, aiming for 400°F, and lightly oil the grates to avoid sticking.
6. Thread the marinated chicken onto the soaked skewers, leaving small gaps between pieces for even cooking.
7. Place the skewers on the preheated grill and cook for 5-6 minutes until the bottoms show clear grill marks and release easily.
8. Flip the skewers and grill for another 5-6 minutes until the internal temperature reaches 165°F when checked with a meat thermometer.
9. Remove the skewers from the grill and let them rest for 3 minutes to redistribute juices, keeping them moist.
Zesty and succulent, these skewers boast a caramelized exterior that gives way to tender, juicy meat infused with herbal notes. Serve them over a bed of quinoa with extra lemon wedges for squeezing, or slice the chicken into salads for a refreshing twist that highlights their vibrant character.
Creamy Pesto Pasta Salad with Cherry Tomatoes
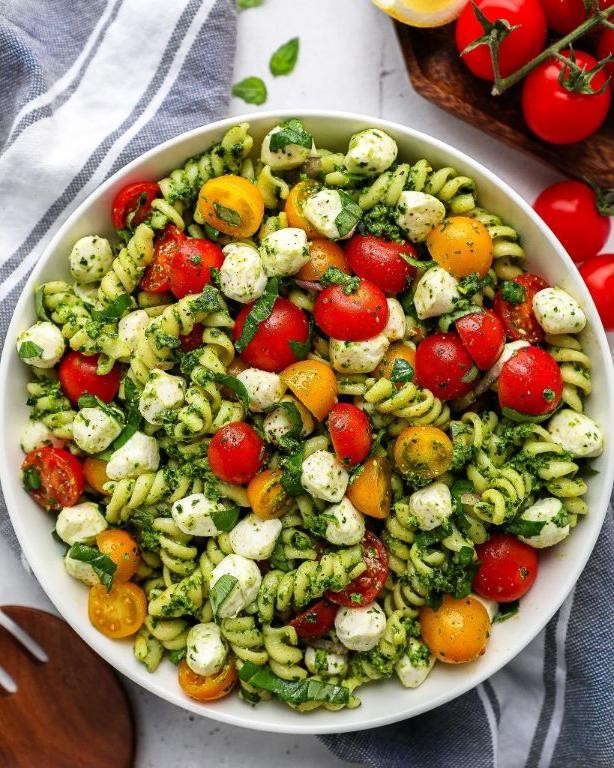
Nothing captures the essence of late summer quite like this vibrant Creamy Pesto Pasta Salad with Cherry Tomatoes. Nestled among tender pasta shells, sun-kissed cherry tomatoes burst with sweetness against a velvety, herbaceous pesto dressing that clings beautifully to every curve. This elegant yet effortless dish transforms simple ingredients into a celebration of seasonal abundance.
3
servings15
minutes9
minutesIngredients
- a pound of rotini pasta
- a couple of cups of cherry tomatoes, halved
- a generous cup of homemade basil pesto
- a big scoop of mayonnaise, about half a cup
- a splash of fresh lemon juice
- a sprinkle of salt and freshly ground black pepper
- a handful of toasted pine nuts
- a shower of freshly grated Parmesan cheese
Instructions
- Bring a large pot of salted water to a rolling boil over high heat.
- Add the rotini pasta and cook for exactly 9 minutes, stirring occasionally to prevent sticking.
- Drain the pasta in a colander and immediately rinse with cold water for 1 minute to stop the cooking process.
- Transfer the cooled pasta to a large mixing bowl.
- Halve the cherry tomatoes lengthwise and add them to the pasta bowl.
- In a separate small bowl, whisk together the basil pesto, mayonnaise, and fresh lemon juice until completely smooth and emulsified.
- Pour the creamy pesto dressing over the pasta and tomatoes.
- Season with 1 teaspoon of salt and ½ teaspoon of freshly ground black pepper.
- Gently toss everything together until every ingredient is evenly coated with the dressing.
- Fold in the toasted pine nuts and freshly grated Parmesan cheese.
- Cover the bowl with plastic wrap and refrigerate for at least 30 minutes to allow the flavors to meld.
But what makes this salad truly memorable is the delightful contrast of textures—the al dente pasta provides satisfying chew, while the tomatoes offer juicy bursts that complement the creamy, herbaceous dressing. Serve it chilled in a beautiful ceramic bowl for an elegant picnic centerpiece, or pack individual portions for a sophisticated lunch that travels beautifully.
Spicy Sriracha Honey Glazed Meatballs

Perfectly balancing sweet, spicy, and savory, these glazed meatballs transform humble ingredients into an elegant appetizer or main course. Plump and juicy with a glossy, caramelized coating, they offer a sophisticated twist on classic party fare that will impress even the most discerning palates.
5
servings15
minutes25
minutesIngredients
– 1 pound of ground pork
– 1 large egg
– ½ cup of panko breadcrumbs
– 3 minced garlic cloves
– a couple of tablespoons of soy sauce
– a generous ¼ cup of sriracha
– ½ cup of honey
– a splash of rice vinegar
– 2 tablespoons of vegetable oil
Instructions
1. Preheat your oven to 400°F and line a baking sheet with parchment paper.
2. In a large bowl, combine the ground pork, egg, panko breadcrumbs, minced garlic, and soy sauce until fully incorporated.
3. Roll the mixture into 1-inch meatballs, placing them evenly on the prepared baking sheet.
4. Bake the meatballs for 15 minutes, or until they are firm and lightly browned.
5. While the meatballs bake, whisk together the sriracha, honey, and rice vinegar in a small saucepan over medium heat.
6. Bring the glaze to a simmer, then reduce the heat to low and cook for 5 minutes until slightly thickened.
7. Heat the vegetable oil in a large skillet over medium-high heat.
8. Transfer the baked meatballs to the skillet and pour the glaze over them.
9. Toss the meatballs gently in the skillet for 3-4 minutes, until they are evenly coated and the glaze caramelizes.
10. Remove the skillet from the heat and let the meatballs rest for 2 minutes before serving.
Remarkably tender with a sticky, glossy exterior, these meatballs deliver a complex flavor profile where the honey’s sweetness tempers the sriracha’s fiery kick. Serve them over jasmine rice to soak up the extra glaze or skewer them as elegant passed hors d’oeuvres for your next gathering.
Savory Quiche Lorraine with Bacon and Cheese

Luscious and sophisticated, this classic quiche Lorraine elevates the humble egg tart into a culinary masterpiece. With its golden, flaky crust embracing a rich custard filling studded with smoky bacon and nutty Gruyère, this dish embodies French country elegance. Perfect for brunch entertaining or a special weekend breakfast, it delivers both visual appeal and unforgettable flavor in every slice.
6
servings20
minutes65
minutesIngredients
– 1 store-bought pie crust, thawed if frozen
– 6 slices of thick-cut bacon, chopped into little bits
– 1 cup of shredded Gruyère cheese
– 4 large eggs
– 1 cup of heavy cream
– A good splash of whole milk
– A pinch of freshly grated nutmeg
– A couple of generous pinches of kosher salt
– A few cracks of black pepper
Instructions
1. Preheat your oven to 375°F.
2. Press the thawed pie crust into a 9-inch pie dish and crimp the edges decoratively.
3. Line the crust with parchment paper and fill with pie weights or dried beans.
4. Blind bake the crust for 15 minutes until the edges look lightly golden.
5. Carefully remove the parchment and weights, then bake for 5 more minutes until the bottom appears dry.
6. Cook the chopped bacon in a skillet over medium heat for 8-10 minutes until crispy and browned.
7. Transfer the bacon to a paper towel-lined plate to drain excess grease.
8. Sprinkle the cooked bacon and shredded Gruyère evenly over the pre-baked crust.
9. In a medium bowl, whisk the eggs until they’re smooth and pale yellow.
10. Whisk in the heavy cream, milk, nutmeg, salt, and pepper until fully combined.
11. Pour the egg mixture slowly over the bacon and cheese in the crust.
12. Bake at 375°F for 35-40 minutes until the center is set and the top is golden brown.
13. Let the quiche cool on a wire rack for at least 15 minutes before slicing.
Melted Gruyère creates beautiful golden pockets throughout the creamy custard, while the bacon adds satisfying salty crunch. The flaky crust provides the perfect buttery contrast to the rich filling. Serve warm slices alongside a simple arugula salad dressed with lemon vinaigrette for a complete meal that feels both rustic and refined.
Zesty Cilantro Lime Shrimp Tacos

Tender shrimp marinated in vibrant citrus and fresh herbs transform ordinary taco night into an extraordinary culinary experience. These zesty cilantro lime creations balance bright acidity with delicate seafood sweetness, wrapped in warm tortillas for a meal that feels both sophisticated and approachable. Perfect for weeknight dinners or casual entertaining, they bring restaurant-quality flair to your kitchen with minimal effort.
2
servings20
minutes5
minutesIngredients
– 1 pound of medium raw shrimp, peeled and deveined
– A couple of limes for both juice and zest
– A generous handful of fresh cilantro, chopped
– 2 cloves of garlic, minced
– A splash of olive oil
– 1 teaspoon of chili powder
– 8 small corn tortillas
– A pinch of salt
– A dollop of sour cream for serving
– A handful of shredded cabbage for crunch
Instructions
1. Pat the shrimp completely dry with paper towels to ensure proper searing.
2. Combine the shrimp with lime juice, lime zest, minced garlic, chili powder, and salt in a medium bowl, tossing until evenly coated.
3. Let the shrimp marinate at room temperature for exactly 15 minutes to allow flavors to penetrate without cooking the shrimp in the acid.
4. Heat a large skillet over medium-high heat and add the olive oil until it shimmers, about 1 minute.
5. Cook the shrimp in a single layer for 2 minutes per side until they turn pink and opaque with slight caramelization.
6. Warm the corn tortillas directly over a gas flame for 15 seconds per side or in a dry skillet until pliable and lightly charred.
7. Arrange two tortillas on each plate and divide the cooked shrimp evenly among them.
8. Top each taco with shredded cabbage, chopped cilantro, and a dollop of sour cream.
9. Serve immediately while the tortillas are still warm and the shrimp retains its juicy texture.
An irresistible contrast emerges between the succulent shrimp and crisp cabbage, while the bright lime cuts through the richness of the sour cream. For an elegant presentation, arrange the tacos on a wooden board with lime wedges and extra cilantro sprigs scattered around—the vibrant green against the pink shrimp creates a visually stunning dish that tastes as beautiful as it looks.
Rich and Creamy Tomato Basil Soup

Delightfully comforting and sophisticated, this velvety tomato basil soup transforms humble ingredients into an elegant culinary experience. During the crisp autumn months, its rich crimson hue and aromatic basil fragrance create the perfect balance of warmth and freshness that feels both nostalgic and refined. Each spoonful offers a harmonious blend of sweet tomatoes and earthy herbs that lingers beautifully on the palate.
5
servings15
minutes39
minutesIngredients
– A couple of tablespoons of good olive oil
– One medium yellow onion, roughly chopped
– Two cloves of garlic, minced
– Two 28-ounce cans of whole peeled tomatoes with their juices
– A generous splash of heavy cream
– A big handful of fresh basil leaves
– A couple of cups of vegetable broth
– A pinch of sugar to balance the acidity
– A good sprinkle of salt and freshly ground black pepper
Instructions
1. Heat two tablespoons of olive oil in a large Dutch oven over medium heat until shimmering.
2. Add one chopped yellow onion and cook for 8-10 minutes, stirring occasionally, until translucent and fragrant.
3. Stir in two minced garlic cloves and cook for exactly 1 minute until aromatic but not browned.
4. Pour in both cans of tomatoes with their juices and two cups of vegetable broth, scraping any browned bits from the bottom.
5. Bring the mixture to a gentle boil, then reduce heat to low and simmer uncovered for 25 minutes.
6. Carefully transfer the hot soup in batches to a blender, filling only halfway to prevent splattering.
7. Blend each batch on high speed for 45-60 seconds until completely smooth and velvety.
8. Return all blended soup to the clean pot and stir in a generous splash of heavy cream.
9. Add a big handful of fresh basil leaves, a pinch of sugar, and season with salt and pepper.
10. Warm the soup over low heat for 5 minutes, stirring gently, until heated through but not boiling.
Kitchen wisdom reveals itself in this soup’s luxurious texture—the velvety smoothness envelops your palate while the bright tomato essence shines through the creamy backdrop. Consider serving it in warmed bowls with a dramatic swirl of cream and fresh basil chiffonade, or pair it with a sharp grilled cheese sandwich for that perfect contrast of temperatures and textures that makes this classic combination truly unforgettable.
Mediterranean Couscous Salad with Feta
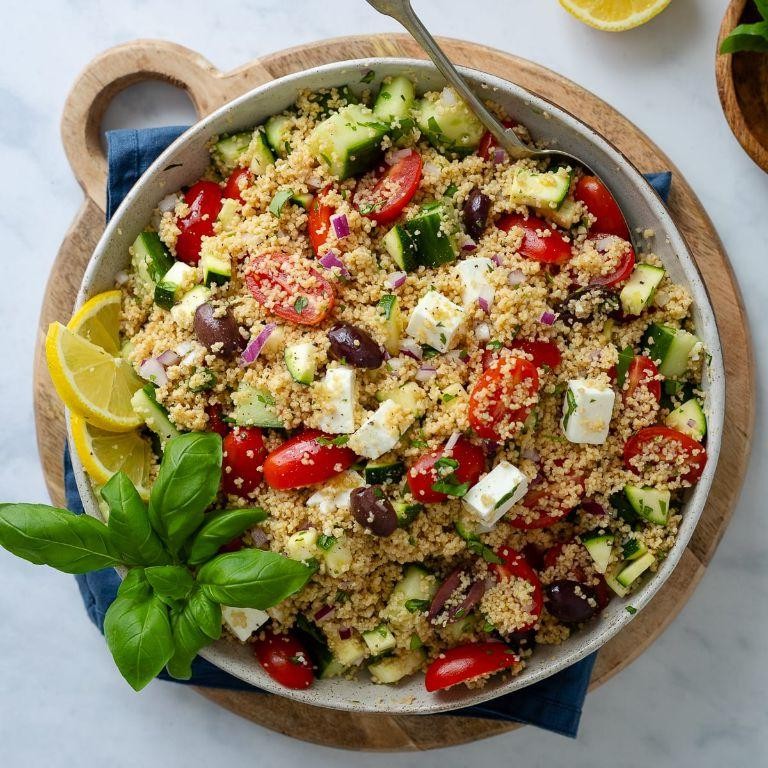
Yet another sweltering afternoon calls for something that transports you straight to sun-drenched Mediterranean shores. This vibrant couscous salad, studded with creamy feta and crisp vegetables, offers both refreshment and substance in every forkful. It’s the kind of dish that feels equally at home on a picnic blanket or as the star of your dinner table.
2
servings20
minutes10
minutesIngredients
– 1 cup of dry couscous
– 1 ¼ cups of boiling water
– A generous glug of extra virgin olive oil (about 3 tablespoons)
– A big squeeze of fresh lemon juice (roughly 2 tablespoons)
– A couple of minced garlic cloves
– A pinch of salt and a few cracks of black pepper
– A handful of chopped fresh parsley
– A handful of chopped fresh mint
– 1 cup of diced cucumber
– 1 cup of halved cherry tomatoes
– ½ cup of crumbled feta cheese
– ¼ cup of sliced Kalamata olives
Instructions
1. Place 1 cup of dry couscous in a large heatproof bowl.
2. Pour 1 ¼ cups of boiling water over the couscous, cover the bowl tightly with plastic wrap, and let it steam for exactly 10 minutes until all liquid is absorbed.
3. Fluff the couscous thoroughly with a fork to separate the grains and prevent clumping.
4. Whisk together 3 tablespoons of extra virgin olive oil, 2 tablespoons of fresh lemon juice, 2 minced garlic cloves, ½ teaspoon of salt, and ¼ teaspoon of black pepper in a small bowl.
5. Pour the dressing over the fluffed couscous and toss gently to coat every grain.
6. Fold in ½ cup of chopped fresh parsley and ¼ cup of chopped fresh mint to preserve their bright color and fragrance.
7. Gently stir in 1 cup of diced cucumber, 1 cup of halved cherry tomatoes, ½ cup of crumbled feta cheese, and ¼ cup of sliced Kalamata olives until evenly distributed.
8. Let the salad rest at room temperature for 15 minutes to allow the flavors to meld together beautifully.
9. Taste and adjust seasoning with an extra pinch of salt if needed before serving.
Keep in mind that the couscous continues to absorb flavors as it sits, making this salad even more delightful the next day. The fluffy grains provide a tender base for the juicy tomatoes and crisp cucumber, while the briny olives and tangy feta create a symphony of Mediterranean tastes. For a stunning presentation, serve it in a hollowed-out watermelon bowl at your next summer gathering, or pack it in mason jars for a portable lunch that feels anything but ordinary.
Grilled Veggie and Halloumi Stacks
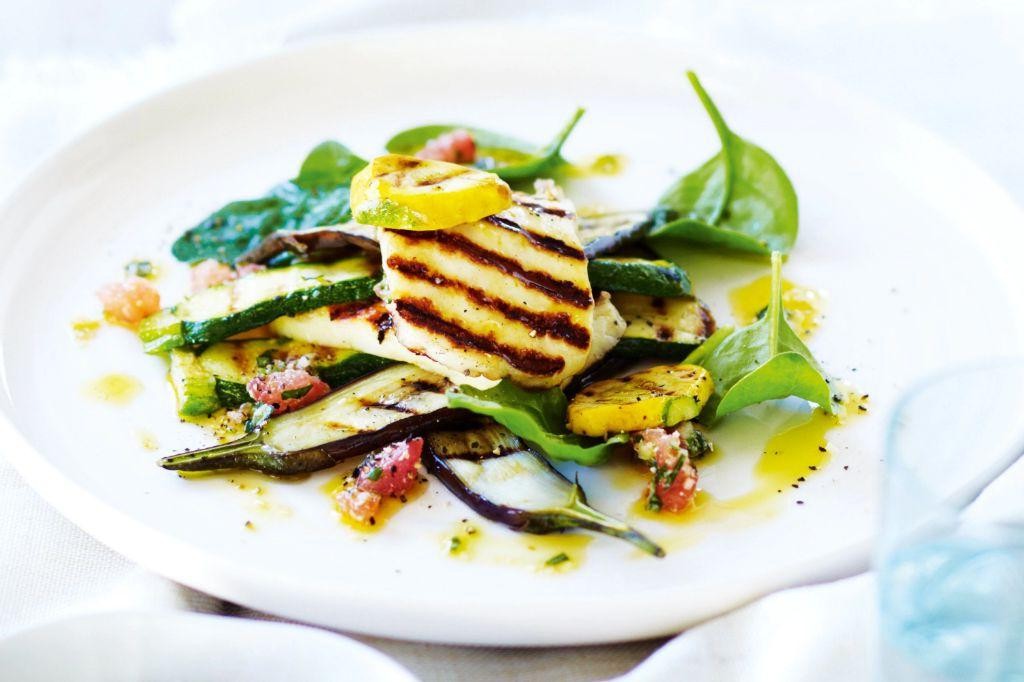
Unveiling a masterpiece of summer simplicity, these grilled vegetable and halloumi stacks transform humble ingredients into an elegant tower of smoky, savory perfection. Each layer offers a symphony of textures and flavors that celebrates the season’s bounty with effortless sophistication.
3
stacks15
minutes22
minutesIngredients
- 2 medium zucchini, sliced lengthwise into ¼-inch planks
- 1 large eggplant, cut into ½-inch rounds
- 2 red bell peppers, quartered and seeded
- 8 ounces halloumi cheese, sliced into ½-inch thick rectangles
- 3 tablespoons extra virgin olive oil
- 1 tablespoon balsamic glaze
- A generous pinch of kosher salt
- A few cracks of freshly ground black pepper
- A small handful of fresh basil leaves for garnish
Instructions
- Preheat your grill to medium-high heat, approximately 400°F, and lightly oil the grates to prevent sticking.
- Brush both sides of the zucchini planks, eggplant rounds, and bell pepper quarters evenly with 2 tablespoons of olive oil.
- Sprinkle the oiled vegetables generously with kosher salt and freshly ground black pepper.
- Place the vegetables on the preheated grill, arranging them in a single layer without overcrowding.
- Grill the vegetables for 4-5 minutes per side, until they develop distinct grill marks and become tender but still hold their shape.
- Transfer the grilled vegetables to a clean plate, keeping them separated by type for easier stacking later.
- Brush the halloumi slices with the remaining 1 tablespoon of olive oil on both sides.
- Place the halloumi slices on the hot grill and cook for 2-3 minutes per side, until golden brown grill marks appear and the cheese softens without melting completely.
- Begin assembling stacks by placing one eggplant round as the base on each serving plate.
- Layer one zucchini plank crosswise over the eggplant, creating a stable foundation.
- Add a grilled bell pepper quarter as the next layer, tucking it neatly within the stack’s footprint.
- Top with one slice of grilled halloumi, positioning it centered on the vegetable layers beneath.
- Drizzle each completed stack lightly with balsamic glaze, using about ¼ teaspoon per stack.
- Garnish each stack with 2-3 fresh basil leaves arranged artfully on top.
- Serve immediately while the halloumi is still warm and slightly soft.
Yielding to the first bite reveals the halloumi’s satisfying squeak against the tender, smoky vegetables, while the balsamic glaze provides a sweet-tart counterpoint that elevates every layer. Consider serving these stacks alongside crusty bread to soak up the mingled juices, or deconstruct them over a bed of peppery arugula for a sophisticated salad variation.
Smoky BBQ Pulled Pork Sliders

A slow-cooked masterpiece that transforms humble pork shoulder into tender, smoky perfection, these sliders capture the essence of backyard barbecue in elegant, handheld form. An aromatic blend of spices and gentle smoking creates layers of flavor that melt into soft brioche buns. After hours of patient cooking, the pork shreds effortlessly, ready to be piled high for your next gathering.
12
sandwiches15
minutes240
minutesIngredients
– a 4-pound pork shoulder roast
– a generous sprinkle of brown sugar
– a couple of tablespoons of smoked paprika
– a good pinch of garlic powder
– a splash of apple cider vinegar
– about half a cup of your favorite BBQ sauce
– a package of 12 slider buns
– a handful of coleslaw mix for topping
Instructions
1. Preheat your oven to 300°F and pat the pork shoulder completely dry with paper towels.
2. Combine brown sugar, smoked paprika, and garlic powder in a small bowl, then rub this mixture evenly over all surfaces of the pork.
3. Place the seasoned pork in a Dutch oven or roasting pan, fat side up, and pour apple cider vinegar around (not over) the meat.
4. Cover tightly with a lid or aluminum foil and roast for 4 hours until the pork reaches an internal temperature of 195°F.
5. Carefully transfer the pork to a cutting board, reserving all cooking juices in the pan.
6. Using two forks, shred the pork completely, discarding any large fat pieces.
7. Mix the shredded pork with BBQ sauce and 1/4 cup of the reserved cooking juices until well coated.
8. Toast the slider buns lightly in a 350°F oven for 3-4 minutes until golden around the edges.
9. Spoon the pulled pork onto the bottom halves of the toasted buns.
10. Top each slider with a small handful of coleslaw mix before placing the bun tops.
11. Arrange the sliders on a platter and serve immediately. Creating the perfect balance of textures, the tender pork contrasts beautifully with the crisp coleslaw and soft brioche. Consider serving these sliders with pickle spears and potato salad for a complete backyard feast that feels both rustic and refined.
Crispy Parmesan and Herb Crusted Chicken
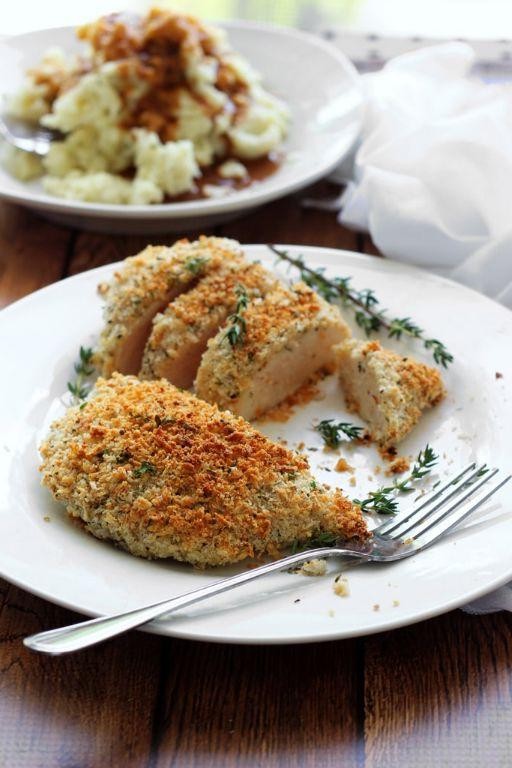
Masterfully combining simplicity with sophistication, this Crispy Parmesan and Herb Crusted Chicken transforms humble ingredients into an elegant centerpiece. Moist, tender chicken breasts are enveloped in a golden, aromatic crust that crackles with each satisfying bite. The harmonious blend of sharp Parmesan and fragrant herbs creates a dish that feels both comforting and refined.
5
servings15
minutes25
minutesIngredients
- Four boneless, skinless chicken breasts (about 6 ounces each)
- A good glug of olive oil (about 3 tablespoons)
- A generous cup of finely grated Parmesan cheese
- About half a cup of plain breadcrumbs
- A couple of tablespoons of fresh parsley, finely chopped
- A teaspoon of dried oregano
- A couple of cloves of garlic, minced
- A pinch of salt and a few cracks of black pepper
- One large egg, lightly beaten
Instructions
- Preheat your oven to 400°F and line a baking sheet with parchment paper.
- Pat the chicken breasts completely dry with paper towels to ensure maximum crispiness.
- In a shallow bowl, combine the Parmesan, breadcrumbs, parsley, oregano, garlic, salt, and pepper.
- Pour the beaten egg into a separate shallow bowl.
- Dip each chicken breast first into the egg, allowing any excess to drip off.
- Press the chicken firmly into the Parmesan-herb mixture, coating both sides evenly and using your fingers to pack on the crust.
- Place the coated chicken breasts on the prepared baking sheet and drizzle them with the olive oil.
- Bake for 20-25 minutes, until the internal temperature reaches 165°F and the crust is deep golden brown.
- Let the chicken rest on the baking sheet for 5 minutes before slicing to allow the juices to redistribute.
Unbelievably crisp and golden, the exterior gives way to incredibly juicy, perfectly cooked chicken within. The sharp, salty Parmesan and earthy herbs create a flavor profile that pairs beautifully with a bright arugula salad or over a bed of creamy lemon risotto for a truly restaurant-worthy meal at home.
Gourmet Caprese Sandwich with Fresh Mozzarella
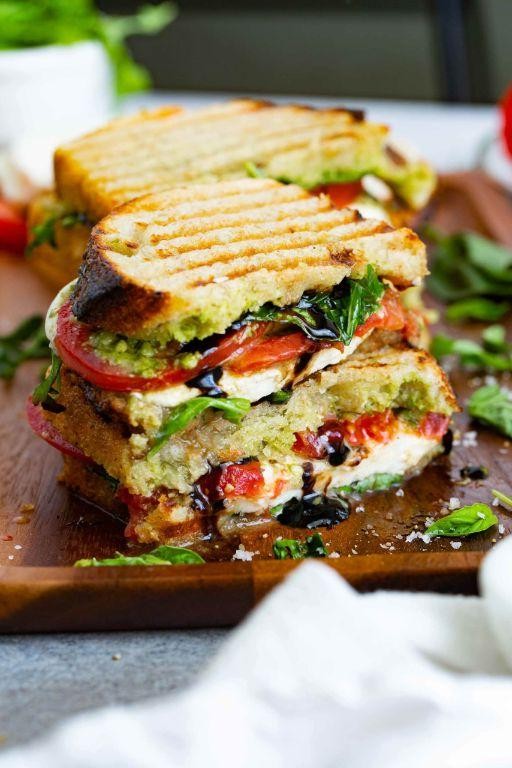
Fusing Italian elegance with everyday ease, this gourmet Caprese sandwich transforms simple ingredients into a symphony of flavors. Fresh mozzarella, ripe tomatoes, and fragrant basil create a harmonious balance that feels both sophisticated and comforting. Perfect for a leisurely lunch or elegant picnic, this sandwich elevates the classic combination to new heights.
1
sandwich10
minutes7
minutesIngredients
– 2 thick slices of crusty artisan bread
– 4 ounces of fresh mozzarella ball, sliced into ¼-inch rounds
– 1 large ripe heirloom tomato, sliced ½-inch thick
– a handful of fresh basil leaves
– a generous drizzle of extra virgin olive oil
– a splash of balsamic glaze
– a couple of pinches of flaky sea salt
– a few cracks of freshly ground black pepper
Instructions
1. Preheat your oven to 375°F and line a baking sheet with parchment paper.
2. Arrange both bread slices on the prepared baking sheet and toast for 5-7 minutes until golden and crisp around the edges.
3. Remove the toasted bread from the oven and let cool for 2 minutes to prevent the cheese from melting too quickly.
4. Drizzle 1 tablespoon of olive oil evenly over one side of each bread slice.
5. Layer the mozzarella slices evenly across one piece of bread, covering the surface completely.
6. Arrange the tomato slices in a single layer over the mozzarella, slightly overlapping them.
7. Sprinkle ¼ teaspoon of flaky sea salt directly over the tomatoes to help draw out their juices.
8. Tuck the fresh basil leaves between the tomato slices, ensuring even distribution.
9. Crack fresh black pepper generously over the basil layer.
10. Drizzle 2 teaspoons of balsamic glaze in a zigzag pattern across the ingredients.
11. Carefully place the second bread slice on top, oiled side facing inward.
12. Press down gently with the palm of your hand to compact the layers slightly.
13. Use a sharp serrated knife to cut the sandwich diagonally, applying gentle sawing motion to prevent crushing.
Each bite delivers a satisfying crunch that gives way to creamy mozzarella and juicy tomatoes. The balsamic glaze provides a sweet-tart counterpoint to the rich olive oil, while the basil adds refreshing herbal notes. For an extra touch of luxury, serve with a side of marinated olives and a crisp white wine.
Honey Dijon Glazed Salmon Fillets

Delicately balanced between sweet and savory, this honey Dijon glazed salmon transforms simple weeknight dining into an elegant occasion. The glossy, caramelized crust gives way to tender, flaky flesh that practically melts on the tongue. Perfect for both intimate dinners and impressive entertaining, this dish delivers restaurant-quality sophistication with home kitchen ease.
2
servings10
minutes15
minutesIngredients
- 4 salmon fillets, about 6 ounces each
- A generous quarter cup of honey
- A couple of tablespoons of Dijon mustard
- A tablespoon of fresh lemon juice
- A splash of olive oil
- A pinch of kosher salt
- A few cracks of black pepper
- A teaspoon of minced garlic
Instructions
- Preheat your oven to 400°F and line a baking sheet with parchment paper for easy cleanup.
- Pat the salmon fillets completely dry with paper towels to ensure proper searing and glaze adhesion.
- Brush both sides of each fillet lightly with olive oil, then season evenly with kosher salt and black pepper.
- Whisk together the honey, Dijon mustard, fresh lemon juice, and minced garlic in a small bowl until smooth and well combined.
- Place the seasoned salmon fillets skin-side down on the prepared baking sheet, spacing them about an inch apart for even air circulation.
- Brush half of the honey Dijon mixture generously over the top and sides of each salmon fillet, reserving the remaining glaze.
- Bake for 8 minutes, then remove from oven and brush with the reserved glaze to build layers of flavor.
- Return to oven and bake for another 4-6 minutes, until the internal temperature reaches 125°F for medium-rare or the flesh flakes easily with a fork.
- Switch your oven to broil and cook for 1-2 minutes until the glaze bubbles and develops a beautiful caramelized finish.
- Let the salmon rest for 3 minutes before serving to allow the juices to redistribute throughout the flesh.
The finished salmon boasts a crackly, sweet-savory crust that gives way to moist, buttery flakes beneath. Serve it over a bed of lemon-herb quinoa or alongside roasted asparagus to let the glossy glaze become a sauce for the entire plate. For a stunning presentation, garnish with fresh dill sprigs and lemon wedges to brighten the rich flavors.
Hearty Spinach and Mushroom Stuffed Peppers
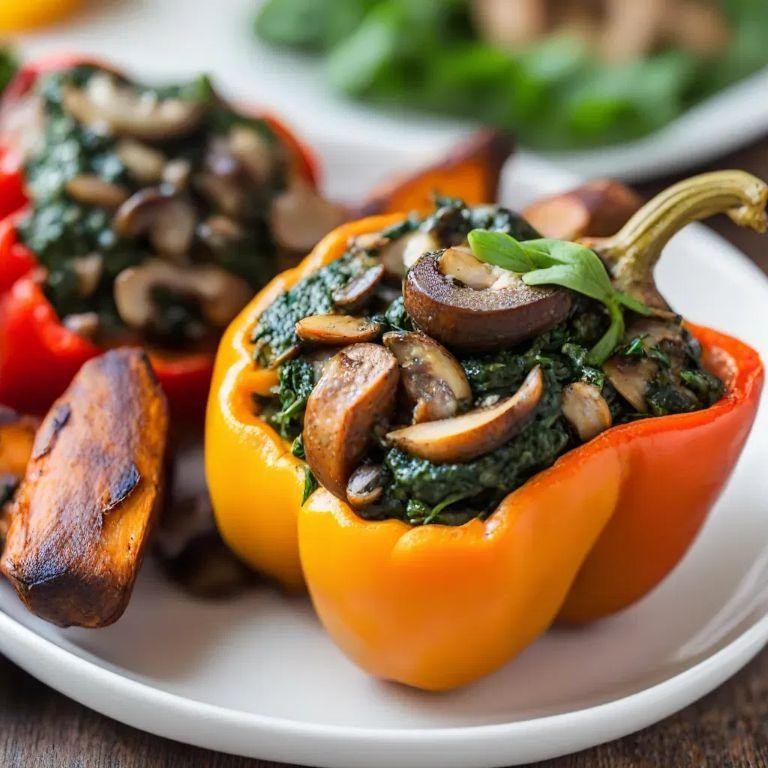
These vibrant bell peppers transform into elegant vessels brimming with earthy mushrooms and tender spinach, creating a satisfying vegetarian centerpiece that feels both wholesome and sophisticated. The rich filling, kissed with garlic and herbs, bakes to perfection while the peppers soften into sweet, colorful cups that hold every savory morsel. This dish celebrates how simple ingredients can elevate weeknight dining into something truly special.
5
portions20
minutes50
minutesIngredients
– 4 large bell peppers (any color you love)
– a couple of tablespoons of olive oil
– 1 medium yellow onion, finely chopped
– 2 cloves of garlic, minced
– 8 ounces of cremini mushrooms, sliced
– 5 ounces of fresh spinach
– 1 cup of cooked quinoa
– ½ cup of grated Parmesan cheese
– a splash of balsamic vinegar
– a pinch of dried oregano
– salt and freshly ground black pepper
Instructions
1. Preheat your oven to 375°F and lightly grease a baking dish.
2. Carefully slice the tops off the bell peppers and remove all seeds and membranes.
3. Heat olive oil in a large skillet over medium heat until it shimmers.
4. Sauté the chopped onion for 4-5 minutes until translucent and fragrant.
5. Add the minced garlic and cook for 1 minute until golden and aromatic.
6. Stir in the sliced mushrooms and cook for 6-8 minutes until they release their liquid and turn golden brown.
7. Add the fresh spinach and cook for 2-3 minutes until completely wilted.
8. Remove the skillet from heat and stir in the cooked quinoa, Parmesan cheese, balsamic vinegar, and dried oregano.
9. Season the mixture generously with salt and freshly ground black pepper.
10. Spoon the filling evenly into the prepared bell pepper shells, packing it gently.
11. Place the stuffed peppers in the greased baking dish and cover tightly with foil.
12. Bake at 375°F for 25 minutes until the peppers are tender when pierced with a fork.
13. Remove the foil and bake for another 10 minutes until the tops are lightly golden.
14. Let the peppers rest for 5 minutes before serving to allow the filling to set.
Hearty and satisfying, these stuffed peppers offer a delightful contrast between the tender, sweet pepper shells and the savory, textured filling. The mushrooms provide an earthy depth that complements the bright freshness of spinach, while the Parmesan adds a subtle salty richness. For an elegant presentation, serve them alongside a crisp arugula salad drizzled with lemon vinaigrette, or top with fresh basil leaves for an extra burst of herbal freshness.
Decadent Four-Cheese Macaroni
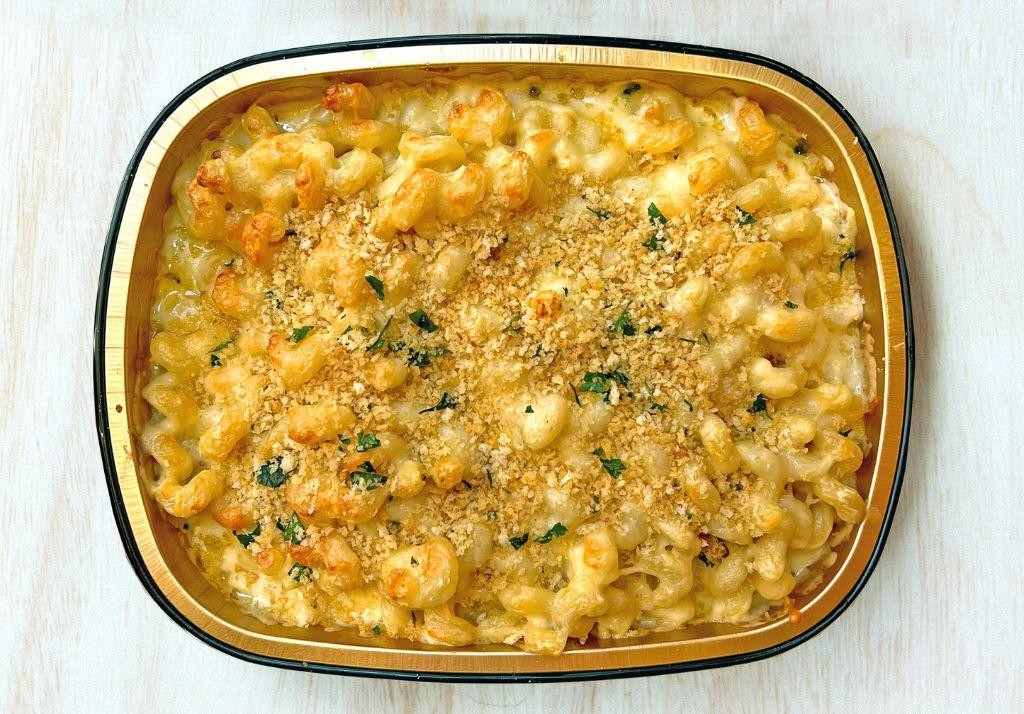
Visions of creamy, bubbling cheese and tender pasta come to life in this luxurious four-cheese macaroni, where sharp cheddar, nutty Gruyère, buttery fontina, and salty Parmesan unite in perfect harmony. Each forkful delivers a sophisticated blend of flavors that elevates this classic comfort dish into something truly special. Crafted with care, it’s an indulgent centerpiece for cozy dinners or celebratory gatherings alike.
8
servings20
minutes50
minutesIngredients
– A pound of elbow macaroni
– A stick of unsalted butter
– A third of a cup of all-purpose flour
– 4 cups of whole milk, warmed up a bit
– A cup of shredded sharp cheddar
– A cup of shredded Gruyère
– A cup of shredded fontina
– Half a cup of grated Parmesan
– A teaspoon of Dijon mustard
– A pinch of freshly grated nutmeg
– A sprinkle of salt and black pepper
Instructions
1. Preheat your oven to 375°F and lightly grease a 9×13-inch baking dish.
2. Bring a large pot of salted water to a rolling boil and cook the elbow macaroni for 8 minutes, until just al dente, then drain it well.
3. In a heavy-bottomed saucepan, melt the unsalted butter over medium heat until it’s foamy but not browned.
4. Whisk in the all-purpose flour and cook for 2 minutes, stirring constantly, to form a smooth, pale roux—this prevents a raw flour taste.
5. Gradually pour in the warmed whole milk, whisking continuously to avoid lumps, and bring the mixture to a gentle simmer.
6. Cook the sauce for 5–7 minutes, stirring often, until it thickens enough to coat the back of a spoon.
7. Remove the saucepan from the heat and stir in the Dijon mustard, nutmeg, salt, and black pepper until fully incorporated.
8. Add the shredded sharp cheddar, Gruyère, and fontina, along with the grated Parmesan, stirring until the cheeses melt into a velvety sauce.
9. Tip: For extra creaminess, let the sauce rest off the heat for a minute before adding the pasta.
10. Gently fold the drained macaroni into the cheese sauce, ensuring every piece is evenly coated.
11. Transfer the mixture to the prepared baking dish, spreading it into an even layer.
12. Bake for 25–30 minutes, until the top is golden and the edges are bubbly—check at 20 minutes to avoid over-browning.
13. Let it rest for 10 minutes before serving to allow the sauce to set slightly.
14. Tip: If you prefer a crispier top, broil for the last 2–3 minutes, watching closely to prevent burning.
15. Tip: For a make-ahead option, assemble the dish, cover, and refrigerate for up to a day; just add 5–10 minutes to the baking time.
Yet this macaroni’s magic lies in its lush, velvety texture and the way the Gruyère adds a subtle earthy note against the cheddar’s sharpness. Serve it alongside a crisp arugula salad to cut through the richness, or top with buttery breadcrumbs for an extra crunch that makes every bite unforgettable.
Refreshing Watermelon Feta Mint Salad

Elegantly simple yet sophisticated, this watermelon feta mint salad captures the essence of summer in every vibrant bite. The marriage of sweet, juicy watermelon with salty, creamy feta creates a delightful contrast that dances on the palate. Fresh mint leaves add a cooling, aromatic note that elevates this dish from simple salad to culinary masterpiece.
5
servings15
minutesIngredients
– 4 cups of cubed watermelon (about 1-inch pieces)
– A generous handful of crumbled feta cheese
– A big bunch of fresh mint leaves
– A good drizzle of extra virgin olive oil
– A squeeze of fresh lime juice
– A pinch of flaky sea salt
– A few cracks of black pepper
Instructions
1. Cut 4 cups of watermelon into 1-inch cubes, removing any seeds as you go.
2. Place the watermelon cubes in a large mixing bowl, being careful not to crush them.
3. Crumble the feta cheese directly over the watermelon using your fingers for rustic texture.
4. Pick the mint leaves from their stems and tear them gently with your hands to release their oils.
5. Drizzle the extra virgin olive oil over the salad in a circular motion for even distribution.
6. Squeeze the fresh lime juice directly over the ingredients, catching any seeds with your other hand.
7. Sprinkle the flaky sea salt evenly across the surface of the salad.
8. Grind black pepper over the salad using 3-4 turns of your pepper mill.
9. Toss everything together gently with salad tongs, just until combined—about 5-6 turns.
10. Let the salad rest for exactly 5 minutes to allow the flavors to meld together.
11. Transfer to a serving platter, arranging the ingredients attractively with visible layers.
Fresh and vibrant, this salad offers a wonderful textural play between the crisp watermelon and creamy feta. The mint provides a cooling counterpoint to the salty-sweet combination, making it perfect for warm weather entertaining. Consider serving it alongside grilled meats or as a stunning centerpiece for brunch gatherings.
Savory Prosciutto and Fig Crostini
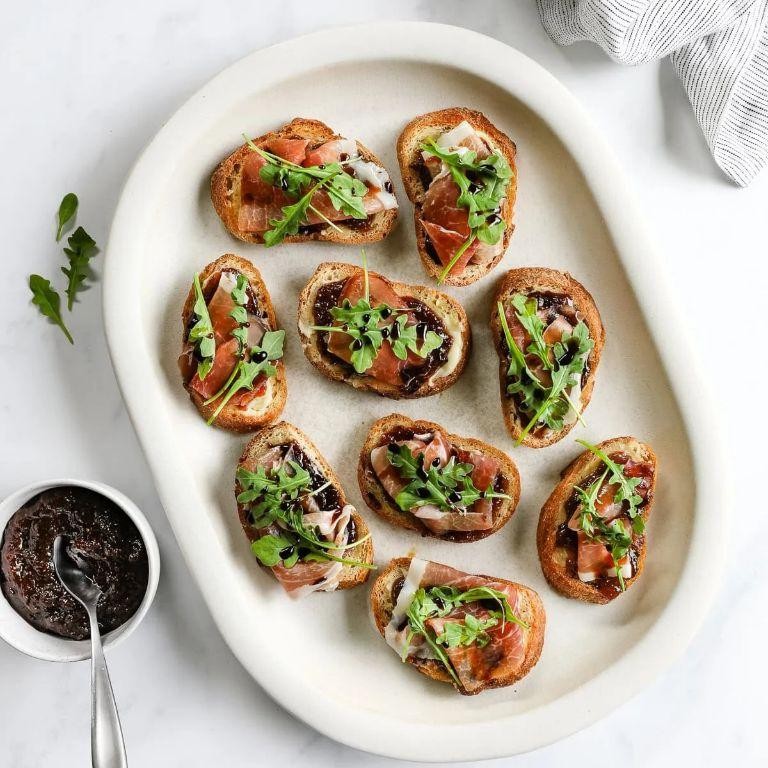
Wrapped in golden elegance, these crostini transform humble ingredients into sophisticated bites perfect for autumn entertaining. The marriage of salty prosciutto and sweet figs creates a harmonious balance that delights the palate with each crisp, savory mouthful.
20
crostini15
minutes10
minutesIngredients
– a baguette, sliced into about 20 half-inch pieces
– 3 tablespoons of extra virgin olive oil
– 8 ounces of fresh figs, sliced thin
– 6 ounces of prosciutto, torn into pieces
– 4 ounces of creamy goat cheese
– a couple of tablespoons of honey
– a handful of fresh arugula
– a splash of balsamic glaze for drizzling
– a pinch of flaky sea salt and freshly cracked black pepper
Instructions
1. Preheat your oven to 375°F and line a baking sheet with parchment paper.
2. Arrange the baguette slices in a single layer on the prepared baking sheet.
3. Brush each slice generously with olive oil using a pastry brush, ensuring even coverage for uniform browning.
4. Bake for 8-10 minutes until the edges turn golden brown and the centers feel crisp to the touch.
5. Remove the toasted crostini from the oven and let them cool completely on a wire rack, which prevents sogginess.
6. Spread about a teaspoon of goat cheese evenly across each cooled crostini base.
7. Layer 2-3 thin fig slices over the goat cheese on each crostini.
8. Drape a piece of torn prosciutto over the figs, allowing it to cascade naturally for visual appeal.
9. Top each crostini with 3-4 fresh arugula leaves for peppery contrast.
10. Drizzle honey lightly over the assembled crostini using a spoon or squeeze bottle.
11. Finish with a delicate zigzag of balsamic glaze across the top of each piece.
12. Sprinkle flaky sea salt and cracked black pepper over the finished crostini just before serving. Marvel at how the crisp bread provides the perfect foundation for the creamy cheese and tender figs. The prosciutto adds salty depth while the honey and balsamic create sweet-tart complexity that lingers beautifully. For an elegant presentation, arrange these on a slate board with fresh fig halves and rosemary sprigs scattered between them.
Classic Caesar Salad with Homemade Dressing
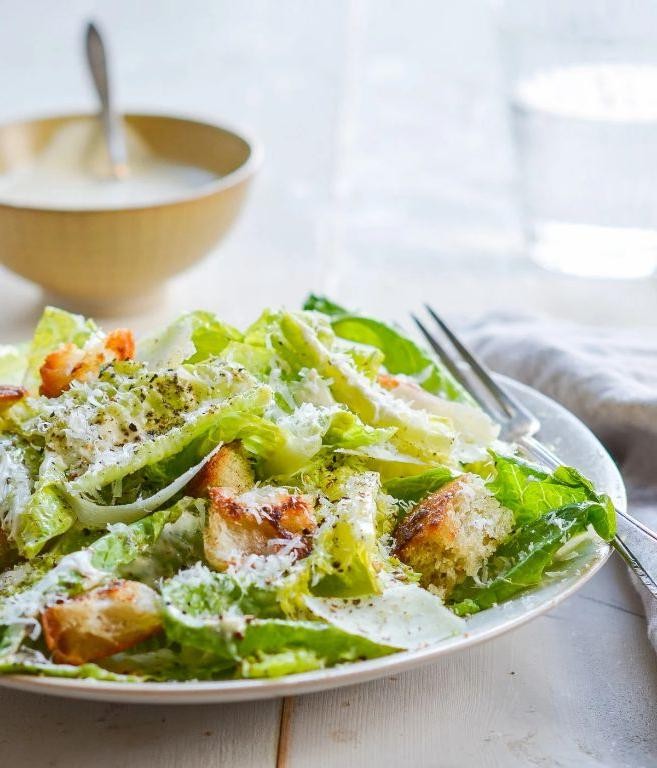
Perfectly balanced between crisp freshness and rich umami depth, this timeless Caesar salad elevates simple ingredients into something truly extraordinary. With its creamy, garlicky homemade dressing clinging to each crunchy romaine leaf, this classic preparation brings restaurant-quality elegance to your home kitchen in mere minutes.
5
portions15
minutes15
minutesIngredients
– A couple of large romaine hearts
– A generous handful of freshly grated Parmesan
– A couple of cups of rustic bread cubes
– A couple of garlic cloves
– A couple of anchovy fillets
– A big squeeze of fresh lemon juice
– A splash of extra virgin olive oil
– A tablespoon of Dijon mustard
– A couple of egg yolks
– A pinch of salt and freshly cracked black pepper
Instructions
1. Preheat your oven to 375°F and tear the bread into 1-inch cubes.
2. Toss the bread cubes with 2 tablespoons of olive oil and bake for 12-15 minutes until golden brown and crisp.
3. Meanwhile, finely mince the garlic cloves and anchovy fillets together until they form a smooth paste.
4. Whisk the egg yolks, Dijon mustard, and lemon juice in a medium bowl until fully combined.
5. Slowly drizzle in the remaining olive oil while continuously whisking to create an emulsified dressing.
6. Stir the garlic-anchovy paste into the dressing mixture until thoroughly incorporated.
7. Wash the romaine hearts and spin them completely dry in a salad spinner.
8. Tear the dried romaine leaves into bite-sized pieces directly into your serving bowl.
9. Pour the prepared dressing over the romaine and toss gently until every leaf is coated.
10. Sprinkle the freshly grated Parmesan and warm croutons over the dressed greens.
11. Finish with several twists of freshly cracked black pepper and serve immediately.
Unbelievably creamy yet bright, this salad delivers contrasting textures that make each bite exciting—the cold crispness of romaine against warm, garlicky croutons creates perfect harmony. For an elegant twist, try serving individual portions in chilled bowls or topping with grilled shrimp for a complete meal that feels both luxurious and satisfyingly simple.
Indulgent Chocolate Lava Cakes

Zestfully elegant yet deceptively simple, these molten chocolate cakes emerge as the ultimate dinner party finale, their warm, flowing centers promising pure indulgence with every spoonful. Crafted with premium dark chocolate and a touch of espresso to deepen the cocoa notes, each individual portion bakes to perfection with a delicate cake exterior that gives way to a river of rich, liquid chocolate.
5
portions15
minutes14
minutesIngredients
– 4 ounces of really good dark chocolate, chopped up
– a half cup of unsalted butter, plus an extra pat for greasing
– 2 large eggs
– a quarter cup of granulated sugar
– a splash of vanilla extract
– a tiny pinch of salt
– 2 tablespoons of all-purpose flour
– a teaspoon of instant espresso powder (trust me on this one!)
– a couple of tablespoons of cocoa powder for dusting
Instructions
1. Preheat your oven to 425°F and generously butter four 6-ounce ramekins.
2. Dust the buttered ramekins with cocoa powder, tapping out any excess to create a non-stick coating.
3. Combine the chopped dark chocolate and butter in a microwave-safe bowl.
4. Microwave the chocolate-butter mixture in 30-second intervals, stirring between each, until completely smooth and melted.
5. In a separate bowl, whisk together the eggs, sugar, vanilla extract, and salt until pale and slightly thickened, about 2-3 minutes.
6. Gently fold the melted chocolate mixture into the egg mixture until fully incorporated.
7. Sift the flour and instant espresso powder over the batter and fold gently until just combined—be careful not to overmix.
8. Divide the batter evenly among the prepared ramekins, filling each about three-quarters full.
9. Place the ramekins on a baking sheet and bake for 12-14 minutes, until the edges are set but the centers still jiggle slightly when shaken.
10. Let the cakes rest for exactly 1 minute after removing from the oven—this allows the edges to firm up while keeping the center molten.
11. Run a knife around the edge of each ramekin to loosen the cakes.
12. Invert each ramekin onto a serving plate and carefully lift to reveal the cake.
Keenly balanced between cake and sauce, these lava cakes offer a textural symphony—crisp exterior yielding to a warm, velvety river of dark chocolate. Serve immediately with a dusting of powdered sugar or alongside a scoop of vanilla bean ice cream, whose cool creaminess creates a perfect temperature contrast against the molten center.
Conclusion
You now have everything needed to create an unforgettable lunch party! These 22 delectable recipes offer endless inspiration for your next gathering. We’d love to hear which dishes become your favorites—leave a comment below and share this collection with fellow food lovers on Pinterest. Happy cooking!


