Just because you’re watching your sodium doesn’t mean you have to skip dessert! We’ve gathered 35 scrumptious low-salt treats that let you indulge guilt-free. From creamy puddings to fruity delights, these recipes prove healthy desserts can be absolutely delicious. Get ready to satisfy your sweet tooth while keeping things wholesome—your taste buds (and your heart) will thank you!
Salt-Free Chocolate Avocado Mousse
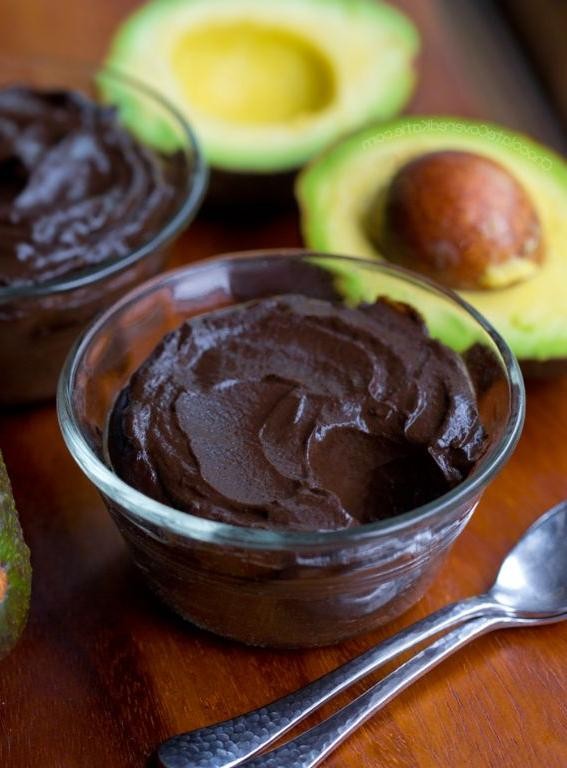
Musing on quiet afternoons when the world feels too loud, I find myself reaching for simple comforts that soothe both body and soul. This velvety chocolate mousse, born from ripe avocados and rich cocoa, offers a moment of gentle indulgence without overwhelming the senses. It’s a humble creation that whispers rather than shouts, perfect for those tender pockets of time when sweetness is needed most.
5
servings15
minutesIngredients
– 2 large ripe avocados, peeled and pitted (should yield about 1 cup when mashed)
– 1/2 cup pure maple syrup (or honey for a different floral note)
– 1/2 cup unsweetened cocoa powder (sifted to avoid lumps)
– 1/4 cup full-fat coconut milk, chilled (shake the can well before measuring)
– 1 teaspoon pure vanilla extract (use alcohol-free for deeper flavor)
– 1/8 teaspoon ground cinnamon (optional, for subtle warmth)
Instructions
1. Scoop the flesh of 2 large ripe avocados into a food processor or high-speed blender bowl.
2. Add 1/2 cup pure maple syrup, 1/2 cup unsweetened cocoa powder, 1/4 cup full-fat coconut milk, 1 teaspoon pure vanilla extract, and 1/8 teaspoon ground cinnamon (if using) to the avocados.
3. Secure the lid tightly on the food processor or blender.
4. Blend the mixture on medium speed for 30 seconds, then pause to scrape down the sides with a spatula to ensure even incorporation.
5. Continue blending on high speed for 1-2 minutes until the mixture becomes completely smooth and no avocado bits remain, stopping to scrape the sides once more if needed.
6. Taste the mousse and check consistency; if it seems too thick, add another tablespoon of chilled coconut milk and blend for 15 seconds to incorporate.
7. Divide the mousse evenly among 4 serving glasses or small bowls using a spoon or piping bag.
8. Cover each serving tightly with plastic wrap, pressing the wrap directly onto the surface of the mousse to prevent oxidation.
9. Refrigerate the covered mousse for at least 2 hours, or until thoroughly chilled and set.
10. Remove from refrigerator just before serving, garnishing with fresh berries, shaved dark chocolate, or a sprinkle of cocoa powder if desired. How the mousse transforms in the chill of the refrigerator never ceases to amaze me—the avocados surrender their earthy notes to the dark cocoa, creating a silken texture that melts like cool velvet on the tongue. Serve it in delicate teacups for an intimate treat, or layer it with crushed nuts for contrasting crunch, letting each spoonful linger as a quiet moment of chocolate-hued comfort.
Low Sodium Banana Bread
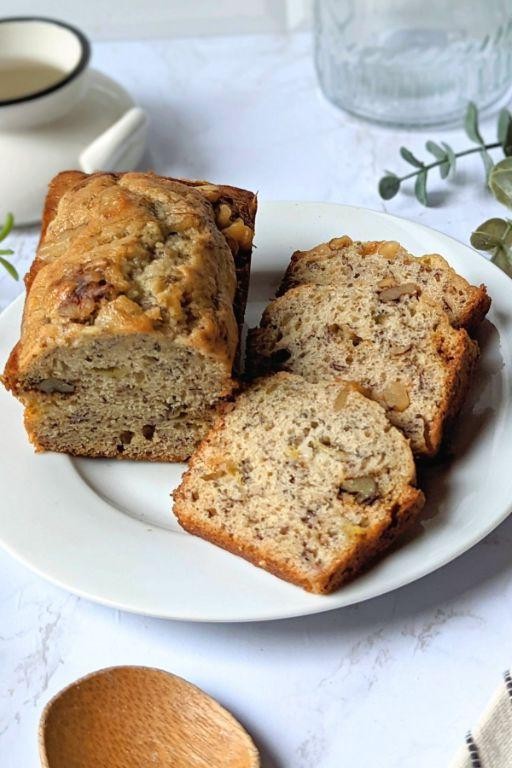
Folding this batter together feels like a quiet morning ritual, the gentle rhythm of mixing offering a moment of calm before the oven’s warmth fills the kitchen. There’s something deeply comforting about transforming overripe bananas into a tender, lightly spiced loaf that feels like a hug in bread form. This low-sodium version lets the natural sweetness shine through, creating a treat that’s both nourishing and nostalgic.
1
loaf15
minutes55
minutesIngredients
– 3 very ripe medium bananas, mashed (about 1 1/4 cups)
– 1/3 cup melted coconut oil (or any neutral oil)
– 2 large eggs, at room temperature
– 1/2 cup pure maple syrup (adjust sweetness to preference)
– 1 teaspoon vanilla extract
– 1 3/4 cups all-purpose flour (can substitute half with whole wheat)
– 1 teaspoon baking soda
– 1/2 teaspoon ground cinnamon
– 1/4 teaspoon ground nutmeg
– 1/2 cup chopped walnuts (optional, for crunch)
Instructions
1. Preheat your oven to 350°F and grease a 9×5-inch loaf pan thoroughly.
2. In a large bowl, mash the bananas with a fork until only small lumps remain.
3. Whisk the melted coconut oil into the mashed bananas until fully incorporated.
4. Crack the eggs into the mixture and whisk vigorously for 30 seconds until smooth.
5. Pour in the maple syrup and vanilla extract, then whisk for another 30 seconds until the liquid ingredients are completely combined.
6. In a separate medium bowl, whisk together the flour, baking soda, cinnamon, and nutmeg for 45 seconds to ensure even distribution.
7. Gradually add the dry ingredients to the wet ingredients, folding gently with a spatula until just combined—do not overmix.
8. Fold in the chopped walnuts until evenly distributed throughout the batter.
9. Pour the batter into the prepared loaf pan and use your spatula to spread it evenly into the corners.
10. Bake for 50-60 minutes until the top is golden brown and a toothpick inserted into the center comes out clean.
11. Remove the pan from the oven and let it cool in the pan for 15 minutes before transferring to a wire rack.
12. Allow the banana bread to cool completely for 1-2 hours before slicing for clean cuts. Here’s how it turns out: The crumb stays remarkably moist and tender, with the maple syrup lending a subtle caramel note that complements the banana’s natural sweetness. I love serving thick slices slightly warmed with a dollop of Greek yogurt, or toasting slices until the edges crisp for a delightful texture contrast.
Sugar-Free Strawberry Sorbet

Musing on the quiet hum of the freezer, I remember how a simple craving for something bright and cold led me here, to this bowl of pure strawberry essence, a dessert that feels both indulgent and wonderfully light.
3
servings15
minutesIngredients
– 1 pound fresh strawberries, hulled and halved (frozen strawberries work too, no need to thaw)
– 1/2 cup water
– 1/4 cup freshly squeezed lemon juice (about 1 large lemon, for a bright, tart kick)
– 1/4 cup granulated erythritol (or your preferred sugar-free sweetener, adjust to taste)
– 1/8 teaspoon fine sea salt (to enhance the berry flavor)
Instructions
1. Combine the halved strawberries, water, lemon juice, erythritol, and salt in a blender.
2. Blend on high speed for 60 seconds, or until the mixture is completely smooth and no strawberry chunks remain. (Tip: For an ultra-smooth sorbet, strain the puree through a fine-mesh sieve to remove any seeds.)
3. Pour the puree into a 9×5-inch loaf pan or a shallow, freezer-safe container.
4. Cover the container tightly with plastic wrap, pressing it directly onto the surface of the puree to prevent ice crystals from forming.
5. Freeze the sorbet for 4 hours, or until it is firm around the edges but still slightly soft in the center.
6. Transfer the partially frozen sorbet back into the blender. (Tip: Let it sit at room temperature for 5-10 minutes to soften slightly for easier blending.)
7. Blend on medium-high speed for 30-45 seconds, until the sorbet is smooth and creamy, scraping down the sides as needed.
8. Return the sorbet to the container, cover it tightly again with plastic wrap, and freeze for another 2 hours, or until it is completely firm and scoopable. (Tip: For the best texture, let the sorbet sit at room temperature for 5-7 minutes before scooping.)
Finally, scooping into the pale pink sorbet reveals its velvety, almost creamy texture that belies its simple ingredients. The flavor is a pure, intense burst of summer strawberry, brightened by a clean, tart finish from the lemon. Serve it in chilled glasses with a few fresh mint leaves, or layer it with coconut yogurt for a pretty, parfait-style treat.
No-Salt Apple Cinnamon Crisp

Nestled in the quiet of this autumn afternoon, I find myself drawn to the kitchen, where the gentle rhythm of peeling apples becomes a meditation, each slice releasing the sweet scent of memory and comfort. This no-salt apple cinnamon crisp feels like a warm embrace, a simple dessert that honors the fruit’s natural sweetness without overwhelming it, perfect for those moments when you crave something tender and wholesome. It’s a recipe that asks for little but gives so much—a humble treat that fills the home with the cozy aroma of cinnamon and baked fruit, inviting you to slow down and savor.
6
portions15
minutes40
minutesIngredients
– 6 medium apples, peeled and sliced (such as Honeycrisp or Granny Smith for balance)
– 1/4 cup maple syrup (or honey, for a deeper flavor)
– 1 tsp ground cinnamon (adjust for more warmth)
– 1 cup old-fashioned rolled oats (not instant, for better texture)
– 1/2 cup all-purpose flour (or gluten-free blend, if preferred)
– 1/3 cup coconut oil, melted (or unsalted butter, for richness)
– 2 tbsp brown sugar (optional, for extra sweetness)
Instructions
1. Preheat your oven to 375°F (190°C) to ensure even baking from the start.
2. Peel and slice 6 medium apples into 1/4-inch thick pieces, discarding the cores for a uniform texture.
3. In a large bowl, toss the sliced apples with 1/4 cup maple syrup and 1 tsp ground cinnamon until evenly coated, letting the syrup enhance the fruit’s natural juices.
4. Transfer the apple mixture to a 9×9-inch baking dish, spreading it in an even layer to promote consistent cooking.
5. In the same bowl, combine 1 cup old-fashioned rolled oats, 1/2 cup all-purpose flour, and 2 tbsp brown sugar, if using, for a crumbly topping base.
6. Pour 1/3 cup melted coconut oil over the oat mixture, stirring with a fork until clumps form and the oil is fully incorporated.
7. Sprinkle the oat topping evenly over the apples, covering them completely but loosely to allow steam to escape during baking.
8. Bake in the preheated oven for 35–40 minutes, or until the topping is golden brown and the apples are tender when pierced with a fork.
9. Tip: Let the crisp cool for 10–15 minutes before serving to allow the flavors to meld and prevent burning your tongue.
10. Tip: For a crispier topping, press it down lightly halfway through baking to create more surface area for browning.
11. Tip: Check for doneness by listening for a soft bubbling sound from the apples, indicating they’ve released their juices and caramelized slightly.
Crisp and tender, this dessert offers a delightful contrast between the soft, cinnamon-kissed apples and the oat topping’s gentle crunch, with each bite feeling like a cozy autumn walk. Serve it warm with a dollop of Greek yogurt or a drizzle of extra maple syrup for a touch of indulgence, or enjoy it straight from the dish as a simple, soul-soothing treat that needs no embellishment.
Low Salt Lemon Poppy Seed Muffins
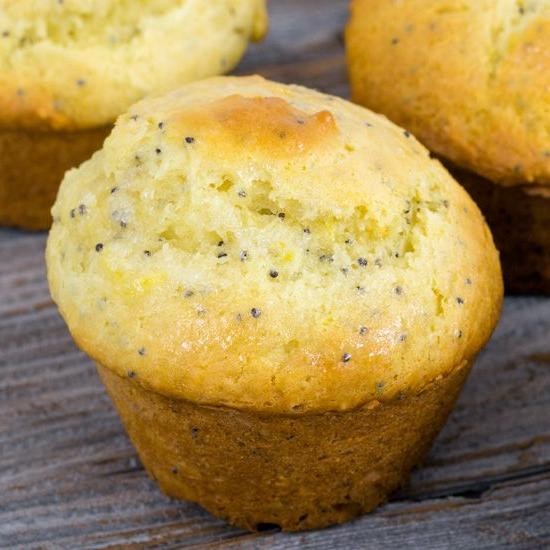
Often, the simplest recipes are the ones that linger in memory, like these low-salt lemon poppy seed muffins, which I find myself baking on quiet afternoons when the kitchen light feels just right. They’re a gentle nod to classic flavors, with a mindful twist for those watching their sodium, and they fill the house with a soft, citrus-scented warmth that feels like a quiet hug. Making them is a slow, thoughtful process—one that rewards patience with tender, golden-crowned muffins that are perfect for a peaceful moment with tea.
12
muffins15
minutes20
minutesIngredients
– 2 cups all-purpose flour (spooned and leveled for accuracy)
– 1/2 cup granulated sugar (or substitute with coconut sugar for a deeper flavor)
– 2 teaspoons baking powder (ensure it’s fresh for proper rise)
– 1/4 teaspoon salt (use fine sea salt for even distribution)
– 1 large egg, at room temperature (this helps with smooth mixing)
– 1 cup whole milk (or any milk alternative like almond milk)
– 1/3 cup vegetable oil (or any neutral oil like canola)
– Zest of 1 large lemon (about 1 tablespoon, packed)
– 2 tablespoons fresh lemon juice (from about 1/2 a lemon)
– 1 tablespoon poppy seeds (toast lightly for enhanced nuttiness, if desired)
Instructions
1. Preheat your oven to 375°F and line a 12-cup muffin tin with paper liners or grease lightly with oil.
2. In a large bowl, whisk together 2 cups all-purpose flour, 1/2 cup granulated sugar, 2 teaspoons baking powder, and 1/4 teaspoon salt until no streaks remain.
3. In a separate medium bowl, whisk 1 large egg until frothy, about 30 seconds, to incorporate air for a lighter texture.
4. Pour 1 cup whole milk, 1/3 cup vegetable oil, and 2 tablespoons fresh lemon juice into the egg mixture, whisking gently to combine without overmixing.
5. Tip: Fold the wet ingredients into the dry ingredients using a spatula, stopping as soon as no dry flour is visible to avoid tough muffins.
6. Gently stir in 1 tablespoon lemon zest and 1 tablespoon poppy seeds until just distributed throughout the batter.
7. Divide the batter evenly among the 12 muffin cups, filling each about 2/3 full to allow room for rising.
8. Bake in the preheated oven at 375°F for 18–20 minutes, or until a toothpick inserted into the center of a muffin comes out clean with no wet batter.
9. Tip: Rotate the muffin tin halfway through baking for even browning, especially if your oven has hot spots.
10. Remove the muffins from the oven and let them cool in the tin for 5 minutes to set their structure.
11. Transfer the muffins to a wire rack to cool completely, about 30 minutes, to prevent sogginess.
12. Tip: For a glossy finish, brush the warm muffin tops with a little honey or maple syrup if you prefer a touch of sweetness.
You’ll find these muffins delightfully tender with a subtle crumb, the poppy seeds adding a gentle crunch that contrasts the bright, zesty lemon flavor. They’re perfect split and toasted with a dab of honey, or simply enjoyed as they are, still warm from the oven, on a lazy weekend morning.
Unsalted Vanilla Almond Butter Cookies
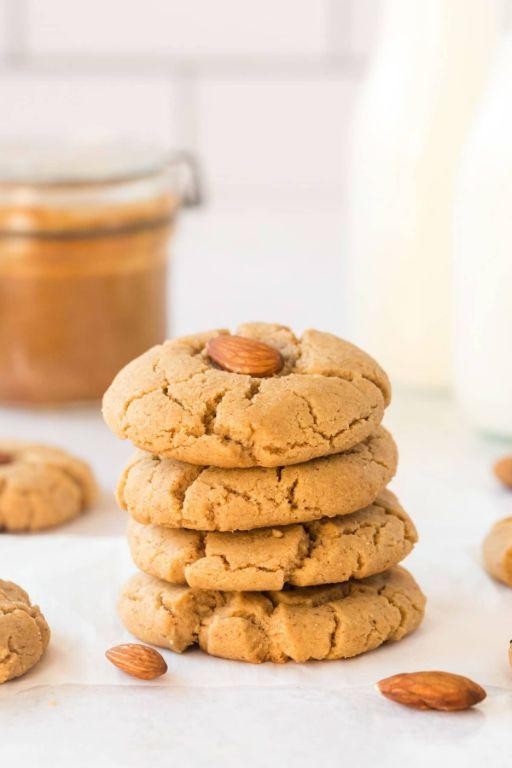
Nestled in the quiet of my kitchen this afternoon, I found myself craving something simple yet deeply comforting, the kind of treat that feels like a warm, gentle pause. These unsalted vanilla almond butter cookies came to mind, a recipe born from wanting something wholesome and subtly sweet, without the sharpness of salt. It’s a humble creation, perfect for those moments when you need a soft, nourishing bite with your tea or coffee.
24
cookies15
minutes12
minutesIngredients
– 1 cup unsalted almond butter (stir well if oil separates, for smoother dough)
– 1/2 cup maple syrup (or honey, for a richer sweetness)
– 1 large egg (at room temperature, to blend evenly)
– 1 teaspoon vanilla extract (pure, for a warm, aromatic note)
– 1 1/4 cups all-purpose flour (spooned and leveled, to avoid dense cookies)
– 1/2 teaspoon baking soda (for a light, tender rise)
Instructions
1. Preheat your oven to 350°F and line a baking sheet with parchment paper to prevent sticking.
2. In a medium bowl, combine 1 cup unsalted almond butter, 1/2 cup maple syrup, 1 large egg, and 1 teaspoon vanilla extract, stirring until the mixture is smooth and fully incorporated.
3. Tip: If the almond butter is stiff, warm it slightly for 10-15 seconds to make mixing easier.
4. Add 1 1/4 cups all-purpose flour and 1/2 teaspoon baking soda to the wet ingredients, folding gently until just combined and no dry streaks remain.
5. Tip: Avoid overmixing to keep the cookies tender; stop as soon as the flour disappears.
6. Scoop tablespoon-sized portions of dough, roll them into balls, and place them 2 inches apart on the prepared baking sheet.
7. Gently flatten each ball with the back of a fork, creating a crisscross pattern for even baking and a classic look.
8. Bake for 10-12 minutes, or until the edges are lightly golden and the centers appear set but soft.
9. Tip: For chewier cookies, remove them when the centers still look slightly underdone; they’ll firm up as they cool.
10. Let the cookies cool on the baking sheet for 5 minutes before transferring to a wire rack to cool completely.
A soft, crumbly texture gives way to the gentle nuttiness of almond butter, with vanilla weaving through like a whisper. Enjoy them slightly warm, perhaps crumbled over yogurt or alongside a quiet moment with a book, where their simplicity truly shines.
Sodium-Free Chia Pudding with Berries
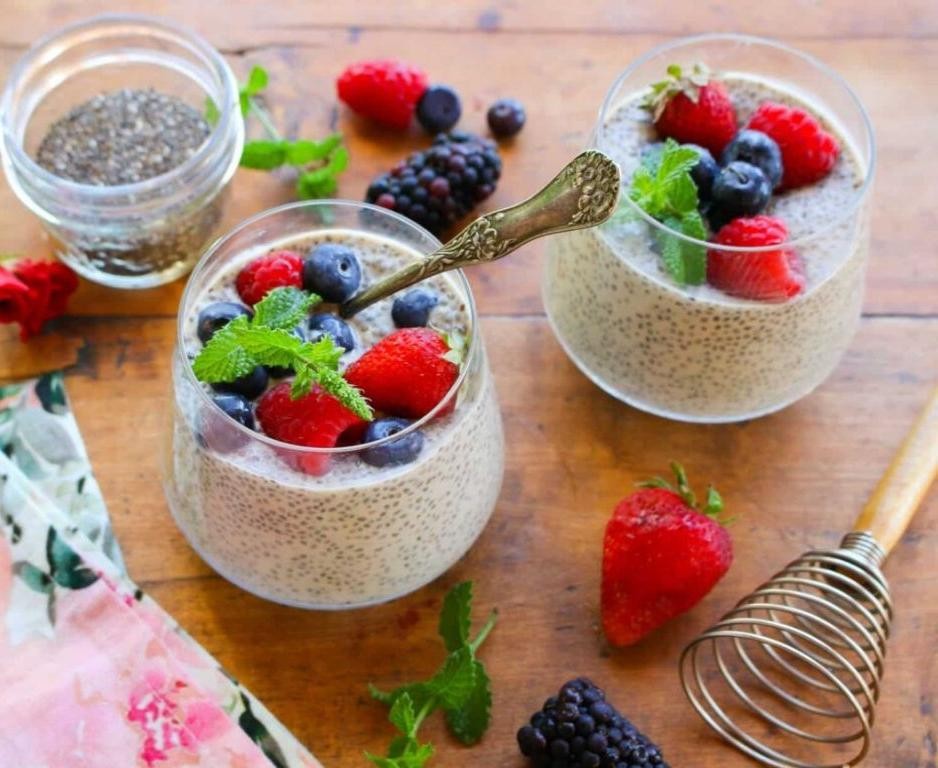
Mornings often ask for something gentle, something that doesn’t shout but simply waits to be noticed. This sodium-free chia pudding is just that—a quiet, nourishing start that comes together with little effort, letting the natural sweetness of berries speak for itself.
3
servings10
minutesIngredients
– 1/2 cup chia seeds (preferably white for a lighter appearance)
– 2 cups unsweetened almond milk (or any plant-based milk you prefer)
– 1 tablespoon pure maple syrup (adjust for desired sweetness)
– 1 teaspoon vanilla extract (use alcohol-free for no-sodium option)
– 1 cup mixed fresh berries (such as raspberries, blueberries, or sliced strawberries)
– Optional: fresh mint leaves for garnish (adds a bright, aromatic touch)
Instructions
1. In a medium mixing bowl, combine the chia seeds and unsweetened almond milk, stirring continuously for 1 full minute to prevent clumping.
2. Add the pure maple syrup and vanilla extract to the bowl, and whisk gently until all ingredients are fully incorporated.
3. Cover the bowl tightly with plastic wrap or a lid, and refrigerate for at least 6 hours or overnight to allow the chia seeds to fully absorb the liquid and thicken.
4. After chilling, remove the bowl from the refrigerator and stir the pudding vigorously to break up any remaining lumps and achieve a smooth, gel-like consistency.
5. Gently fold in the mixed fresh berries using a spatula, being careful not to crush them, to distribute them evenly throughout the pudding.
6. Spoon the pudding into individual serving bowls or jars, and top with additional berries or fresh mint leaves if desired for a vibrant presentation.
7. Serve immediately, or cover and refrigerate for up to 2 days for a ready-to-eat breakfast or snack. Kindly, this pudding settles into a soft, tapioca-like texture that cradles the burst of tart berries, making each spoonful a quiet delight. For a creative twist, layer it in a glass with granola or drizzle with a touch of honey just before serving to highlight its simplicity.
Low Sodium Pumpkin Pie
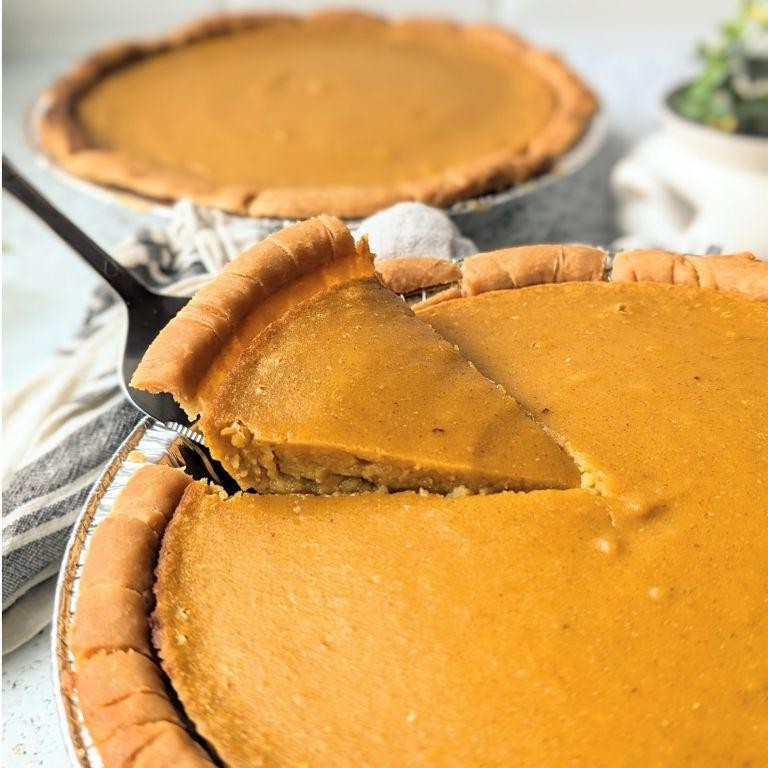
Evenings like this, when the air turns crisp and golden leaves dance outside my window, I find myself drawn to the kitchen, craving something that comforts without overwhelming. This low sodium pumpkin pie feels like a gentle embrace, a dessert that honors tradition while caring for wellbeing. Making it slowly, with intention, becomes its own kind of autumn meditation.
8
servings15
minutes65
minutesIngredients
– 1 ½ cups pumpkin puree (canned or homemade, unsalted)
– ¾ cup granulated sugar
– 2 large eggs, room temperature
– 1 cup evaporated milk
– 1 tsp ground cinnamon
– ½ tsp ground ginger
– ¼ tsp ground nutmeg (freshly grated for brighter flavor)
– 1 unbaked 9-inch pie crust (store-bought or homemade, low sodium if preferred)
Instructions
1. Preheat your oven to 425°F and position a rack in the center for even baking.
2. In a large mixing bowl, whisk the pumpkin puree and sugar together until completely smooth, scraping the bowl’s sides to incorporate any stubborn bits.
3. Crack the eggs into the bowl one at a time, whisking thoroughly after each addition until the mixture is uniform and slightly glossy.
4. Pour in the evaporated milk, stirring gently to combine without overmixing, which can incorporate too much air.
5. Sprinkle the cinnamon, ginger, and nutmeg evenly over the wet ingredients, then whisk again until the spices are fully dispersed and no streaks remain.
6. Place the unbaked pie crust on a sturdy baking sheet to prevent spills and make transferring easier.
7. Carefully pour the filling into the crust, stopping just below the rim to allow for slight expansion during baking.
8. Bake at 425°F for 15 minutes to set the crust’s edges, then reduce the oven temperature to 350°F without opening the door.
9. Continue baking for 40–50 minutes at 350°F, or until the filling jiggles slightly in the center when gently shaken but the edges appear firm.
10. Remove the pie from the oven and cool completely on a wire rack for at least 4 hours to allow the custard to fully set.
Zestful and warmly spiced, this pie’s velvety texture melts on the tongue, with the pumpkin’s natural sweetness shining through. For a lovely twist, serve each slice with a dollop of whipped coconut cream or a sprinkle of toasted pecans, letting the simplicity of the flavors tell their own quiet story.
Banana Nice Cream with No Added Salt

Zigzagging through my thoughts today, I find myself craving something simple yet transformative—a dessert that feels like a quiet moment captured in a bowl. This banana nice cream requires no added salt, letting the fruit’s gentle sweetness speak for itself, and it’s a recipe that invites you to slow down and savor the process.
5
servings10
minutesIngredients
– 4 large ripe bananas, sliced (frozen solid for creamiest texture)
– 1/4 cup unsweetened almond milk, chilled (or any plant-based milk you prefer)
– 1 teaspoon pure vanilla extract (use alcohol-free for no-bitter aftertaste)
– Optional: 1 tablespoon maple syrup (only if bananas aren’t sweet enough)
Instructions
1. Peel 4 large ripe bananas and slice them into 1/2-inch thick rounds.2. Arrange banana slices in a single layer on a parchment-lined baking sheet.3. Freeze banana slices for at least 4 hours or until completely solid—this prevents icy chunks.4. Place frozen banana slices in a high-speed blender or food processor.5. Add 1/4 cup chilled unsweetened almond milk and 1 teaspoon pure vanilla extract.6. Blend on medium speed for 30 seconds, then scrape down sides with a spatula.7. Continue blending on high speed for 1-2 minutes, pausing to scrape sides every 30 seconds, until mixture is smooth and creamy.8. Taste the nice cream and add 1 tablespoon maple syrup only if desired for extra sweetness.9. Serve immediately for soft-serve consistency or transfer to an airtight container.10. Freeze for 1-2 hours for firmer, scoopable texture. Softening slightly before serving is a helpful tip for easy scooping. Soothingly smooth and naturally sweet, this nice cream melts like velvet on the tongue, with vanilla weaving through the banana’s caramel-like notes. Try layering it with crushed graham crackers for a playful icebox cake, or drizzle it with warm nut butter for a cozy twist.
Salt-Free Raspberry Yogurt Parfait
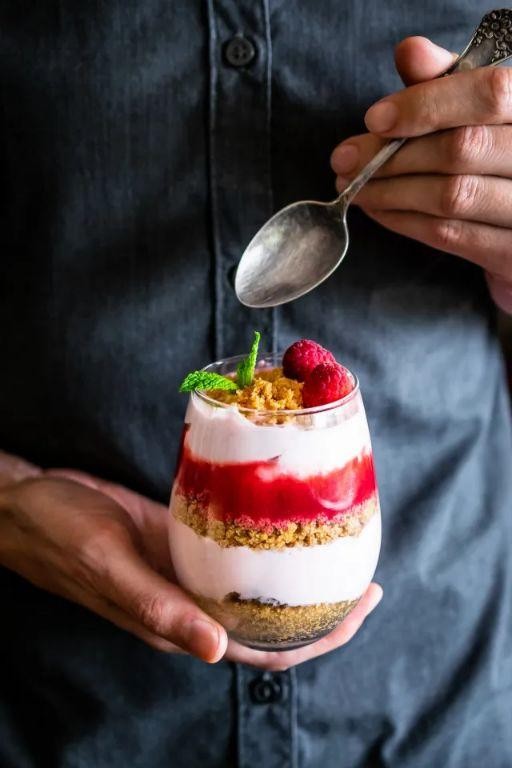
Sometimes, the simplest combinations can feel like small acts of kindness to oneself, especially on quiet afternoons when the light slants just so through the kitchen window. This salt-free raspberry yogurt parfait comes together with gentle layers of creamy tang and bright, jammy fruit, a treat that asks for little but gives much in return.
1
parfait10
minutesIngredients
– 2 cups plain Greek yogurt (full-fat for extra creaminess, or low-fat if preferred)
– 1 cup fresh raspberries (frozen also work well, no need to thaw)
– ¼ cup honey (or maple syrup for a vegan option)
– ½ cup granola (choose a low-sugar variety, or substitute with chopped nuts)
– 1 teaspoon vanilla extract (pure extract for best flavor)
Instructions
1. Place 1 cup of fresh raspberries in a small bowl.
2. Use a fork to gently mash the raspberries until they form a chunky sauce, leaving some whole berries for texture.
3. Stir ¼ cup of honey and 1 teaspoon of vanilla extract into the mashed raspberries until fully combined.
4. Spoon ¼ cup of plain Greek yogurt into the bottom of a serving glass or jar.
5. Top the yogurt layer with 2 tablespoons of the raspberry-honey mixture.
6. Sprinkle 2 tablespoons of granola evenly over the raspberry layer.
7. Repeat the layers once more: add another ¼ cup of yogurt, followed by 2 tablespoons of raspberry mixture and 2 tablespoons of granola.
8. Finish with a final ¼ cup of yogurt layer.
9. Garnish the top with a few whole raspberries and a light drizzle of honey, if desired.
10. Chill the parfait in the refrigerator for at least 15 minutes to allow the flavors to meld.
Zesty yet soothing, the parfait balances the yogurt’s cool tang with the raspberries’ natural sweetness, while the granola adds a satisfying crunch. For a playful twist, layer it in small mason jars for a portable breakfast, or top with a sprinkle of cinnamon for warmth on cooler mornings.
Low Salt Dark Chocolate Bark
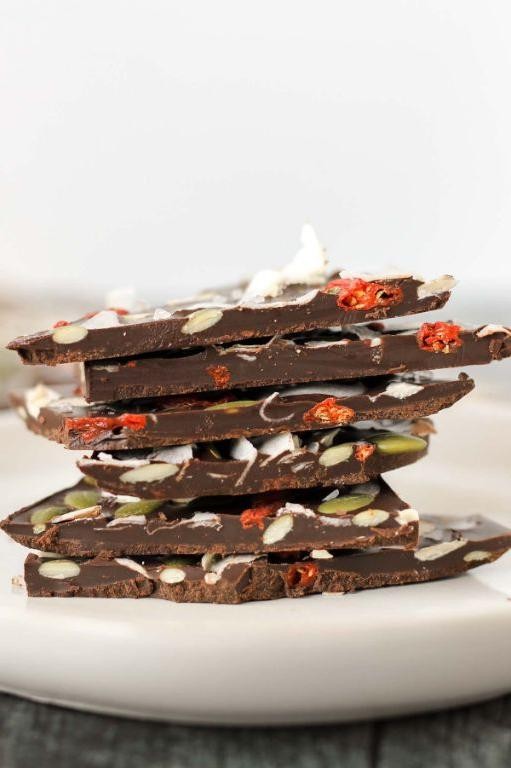
Remembering how my grandmother would melt chocolate on cold afternoons, I find myself drawn to this simple dark chocolate bark—not too sweet, with just enough salt to make you pause. It’s the kind of quiet kitchen project that feels like a small gift to yourself, especially when the world outside feels rushed.
1
bark10
minutes7
minutesIngredients
– 12 ounces dark chocolate chips (or a bar chopped into small pieces, for even melting)
– 1/4 cup roasted almonds, roughly chopped (or pecans for a milder flavor)
– 1/4 cup dried cranberries (tart ones work best to balance the chocolate)
– 1/2 teaspoon flaky sea salt (adjust for a subtle or more pronounced saltiness)
Instructions
1. Line a baking sheet with parchment paper, smoothing out any wrinkles to ensure the bark releases easily after setting.
2. Pour the dark chocolate chips into a heatproof bowl and set it over a saucepan of gently simmering water, making sure the bottom of the bowl doesn’t touch the water to prevent scorching.
3. Stir the chocolate slowly and consistently with a spatula until it’s fully melted and glossy, which should take about 5–7 minutes over medium-low heat.
4. Remove the bowl from the heat and let the chocolate cool for 1 minute—this helps it thicken slightly so toppings don’t sink completely.
5. Pour the melted chocolate onto the prepared baking sheet and use an offset spatula to spread it into an even layer about 1/4 inch thick.
6. Sprinkle the chopped almonds evenly over the chocolate, followed by the dried cranberries, pressing them gently into the surface so they adhere.
7. Finish by scattering the flaky sea salt lightly across the top, focusing on areas that need a hint of savory contrast.
8. Transfer the baking sheet to the refrigerator and chill the bark for at least 45 minutes, or until it’s firm to the touch and snaps cleanly.
9. Break the chilled bark into rustic pieces with your hands or a knife, aiming for irregular shards that feel homemade and inviting.
Breaking a piece reveals a satisfying snap, with the dark chocolate’s bitterness softened by tart cranberries and the crunch of almonds. Serve it alongside a cup of herbal tea for a mindful moment, or crumble it over vanilla ice cream to let the salt and chocolate melt into something new.
Gluten-Free Almond Flour Brownies
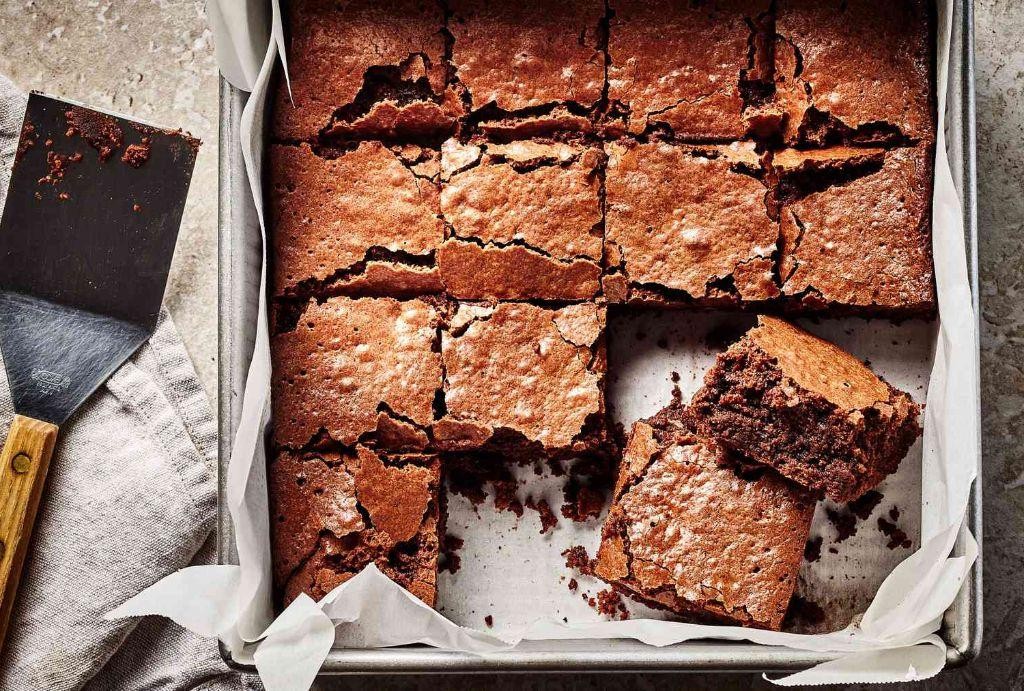
Baking these brownies feels like a quiet afternoon ritual, where the gentle rhythm of measuring and mixing becomes a meditation. There’s something deeply comforting about transforming simple almond flour into rich, fudgy squares that satisfy without weighing you down. This recipe creates brownies with that perfect crackly top and dense, moist interior that gluten-free treats often promise but rarely deliver.
16
portions15
minutes25
minutesIngredients
– 1 cup almond flour (blanched for finer texture, or regular works too)
– 3/4 cup granulated sugar (coconut sugar for deeper flavor)
– 1/2 cup unsweetened cocoa powder (Dutch-processed for richer color)
– 1/2 cup melted butter (or coconut oil for dairy-free)
– 2 large eggs (room temperature for better incorporation)
– 1 teaspoon vanilla extract (pure for best flavor)
– 1/2 teaspoon baking powder (aluminum-free preferred)
– 1/4 teaspoon salt (fine sea salt dissolves evenly)
– 1/2 cup chocolate chips (dark chocolate recommended)
Instructions
1. Preheat your oven to 350°F and line an 8×8 inch baking pan with parchment paper, leaving overhang on two sides for easy removal.
2. Whisk together 1 cup almond flour, 3/4 cup sugar, 1/2 cup cocoa powder, 1/2 teaspoon baking powder, and 1/4 teaspoon salt in a medium bowl until no lumps remain.
3. In a separate bowl, vigorously whisk 2 eggs for about 60 seconds until slightly frothy and pale yellow.
4. Pour 1/2 cup melted butter and 1 teaspoon vanilla extract into the eggs while continuously whisking to create an emulsion.
5. Gradually fold the wet ingredients into the dry ingredients using a spatula, mixing just until combined to avoid overworking the batter.
6. Gently stir in 1/2 cup chocolate chips, reserving a tablespoon to sprinkle on top for visual appeal.
7. Spread the thick batter evenly in the prepared pan using an offset spatula or the back of a spoon dipped in water to prevent sticking.
8. Bake at 350°F for 22-25 minutes until the edges are set but the center still appears slightly underdone when tested with a toothpick.
9. Cool completely in the pan on a wire rack for at least 2 hours before cutting to allow the structure to set properly. Zesty orange zest grated over the top before serving creates a beautiful contrast to the deep chocolate flavor, while a sprinkle of flaky sea salt enhances the richness. These brownies develop an even fudgier texture when chilled overnight, becoming almost truffle-like in their dense intensity.
Coconut Milk Rice Pudding with No Salt

Years of chasing complicated desserts have led me back to this simple comfort—a creamy coconut milk rice pudding that requires no salt, just gentle patience and quiet stirring. Yesterday’s rain inspired me to simmer this version slowly, letting the grains swell in sweetened coconut milk until they surrendered completely. It’s the kind of recipe that feels like a warm blanket, forgiving and deeply soothing to make on a gray afternoon.
2
servings5
minutes30
minutesIngredients
– 1 cup short-grain white rice, rinsed until water runs clear (for creamier texture)
– 2 (13.5 oz) cans full-fat coconut milk, shaken well before opening (do not use light coconut milk)
– 1/2 cup granulated white sugar (adjust for preferred sweetness)
– 1 teaspoon pure vanilla extract (add after cooking to preserve flavor)
– 1/4 cup unsweetened shredded coconut, toasted (optional, for garnish)
Instructions
1. Rinse 1 cup short-grain white rice under cool running water in a fine-mesh strainer until the water runs clear, about 1–2 minutes, to remove excess starch.
2. Combine the rinsed rice and 2 cans full-fat coconut milk in a heavy-bottomed saucepan over medium heat.
3. Stir continuously with a wooden spoon for 3 minutes until the mixture is smoothly blended and barely steaming.
4. Reduce heat to low, cover the saucepan with a lid slightly ajar to allow steam to escape, and simmer for 25 minutes.
5. Stir the pudding every 5 minutes, scraping the bottom and sides to prevent sticking or scorching.
6. After 25 minutes, check that the rice grains are tender by pressing one between your fingers; they should mash easily.
7. Stir in 1/2 cup granulated white sugar until fully dissolved, about 1 minute.
8. Remove the saucepan from heat and stir in 1 teaspoon pure vanilla extract.
9. Let the pudding rest uncovered for 10 minutes to thicken slightly before serving.
10. Toast 1/4 cup unsweetened shredded coconut in a dry skillet over medium-low heat for 2–3 minutes, stirring constantly, until golden brown.
Once cooled, the pudding firms into a lush, spoonable texture with the rice grains soft but distinct. Its flavor is mildly sweet with a whisper of vanilla and the rich creaminess of coconut milk. I love it chilled with toasted coconut sprinkled over top, or layered in a glass with fresh mango slices for a tropical twist.
Low Sodium Peach Cobbler

Venturing into the kitchen on this quiet afternoon, I find myself drawn to the gentle art of baking, where measuring cups become meditation and the oven’s warmth feels like a soft embrace. There’s something deeply comforting about transforming humble peaches into a dessert that feels both nourishing and nostalgic, a treat that whispers of summer’s sweetness without shouting for attention.
6
servings15
minutes45
minutesIngredients
– 4 cups sliced fresh peaches (thawed frozen peaches work too, just pat them dry)
– 1 cup all-purpose flour (spoon and level it for accuracy)
– 1 cup granulated sugar (reduce to 3/4 cup if peaches are very ripe)
– 1 tsp baking powder (aluminum-free for a cleaner taste)
– 1/2 tsp ground cinnamon (add a pinch more for extra warmth)
– 1/2 cup whole milk (or any milk you have on hand)
– 1/4 cup unsalted butter, melted (cooled slightly to avoid curdling)
– 1 tsp vanilla extract (pure extract enhances the peach flavor)
Instructions
1. Preheat your oven to 375°F and grease an 8×8-inch baking dish lightly with butter or non-stick spray.
2. Arrange the sliced peaches evenly in the prepared baking dish, spreading them into a single layer.
3. In a medium bowl, whisk together the flour, sugar, baking powder, and cinnamon until no streaks remain.
4. Pour the milk, melted butter, and vanilla extract into the dry ingredients, stirring just until combined—a few lumps are fine to avoid overmixing.
5. Spoon the batter over the peaches in dollops, gently spreading it to cover most of the fruit without mixing them together.
6. Bake for 40–45 minutes, or until the top is golden brown and a toothpick inserted into the cobbler comes out clean.
7. Let the cobbler cool on a wire rack for at least 15 minutes before serving to allow the juices to thicken slightly. The crust settles into a tender, cake-like layer that cradles the soft, jammy peaches beneath, each bite a balance of subtle spice and fruity brightness. Serve it warm with a drizzle of honey or a scoop of vanilla ice cream for a contrast that feels like a quiet celebration.
Salt-Free Caramelized Pear Tarts

Just now, as the afternoon light slants across my kitchen counter, I find myself drawn to the quiet simplicity of baking—the way flour dusts the air like winter’s first snow, the gentle transformation of fruit under slow heat. These pear tarts emerged from such a moment, a meditation on sweetness without salt, where caramelization becomes the sole conductor of flavor. They require nothing more than patience and the willingness to watch sugar and fruit become something new together.
1
tart15
minutes28
minutesIngredients
– 2 large ripe pears, peeled and cored (Bosc or Anjou work beautifully)
– 1 sheet frozen puff pastry, thawed (keep cold until use)
– 1/4 cup granulated sugar (for caramelizing)
– 2 tablespoons unsalted butter, cubed (or vegan butter for dairy-free)
– 1 teaspoon ground cinnamon (add a pinch more if you love warmth)
– 1/2 teaspoon vanilla extract (pure, not imitation)
– 1 egg, lightly beaten (for egg wash, optional but recommended)
Instructions
1. Preheat your oven to 400°F and line a baking sheet with parchment paper.
2. Slice the peeled pears into 1/4-inch thick wedges, aiming for uniform pieces to ensure even cooking.
3. Unfold the thawed puff pastry sheet onto the prepared baking sheet, pricking it all over with a fork to prevent excessive puffing.
4. Melt the butter in a large skillet over medium heat, swirling to coat the pan evenly.
5. Sprinkle the sugar into the melted butter, stirring constantly with a wooden spoon until it dissolves and turns pale amber, about 3-4 minutes.
6. Arrange the pear slices in the skillet in a single layer, cooking undisturbed for 2 minutes to allow the bottoms to caramelize.
7. Flip each pear slice carefully using tongs, then sprinkle with cinnamon and drizzle with vanilla extract.
8. Continue cooking for another 3-4 minutes until the pears are tender but not mushy and coated in a glossy syrup.
9. Spoon the caramelized pears onto the center of the puff pastry, leaving a 1-inch border around the edges.
10. Fold the pastry edges over the pears, pleating gently to form a rustic tart shape.
11. Brush the exposed pastry with the beaten egg wash for a golden, glossy finish.
12. Bake for 18-20 minutes until the pastry is puffed and deep golden brown, rotating the sheet halfway through for even browning.
13. Let the tart cool on the baking sheet for 10 minutes to allow the caramel to set slightly.
The finished tart holds a beautiful tension—flaky, buttery layers shatter against the jammy softness of pears, their natural sugars deepened into something akin to honeyed whispers. Serve it warm with a dollop of whipped cream, or let it cool completely and pair with sharp cheddar for a surprising savory contrast.
Conclusion
Just because you’re watching your salt intake doesn’t mean you have to skip dessert! These 35 delicious recipes prove that healthy indulgence is absolutely possible. We’d love to hear which recipes become your favorites—drop us a comment below and don’t forget to share this sweet inspiration on Pinterest!