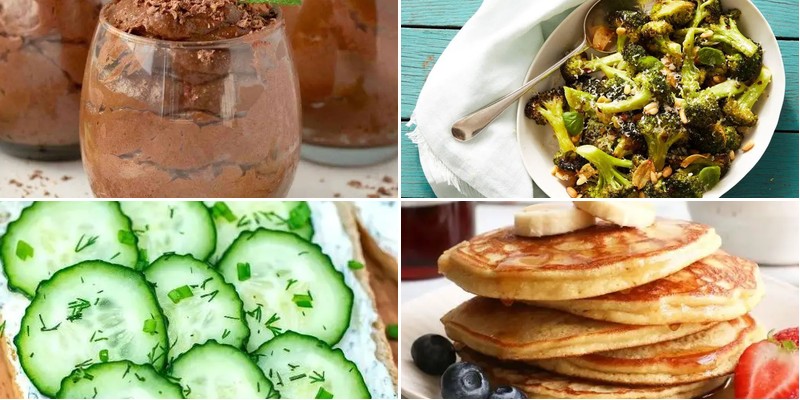
Are you tired of reaching for carb-heavy snacks that leave you feeling sluggish? We’ve curated 18 delicious low-carb snack recipes perfect for health-conscious individuals who want to maintain energy without compromising on flavor. From crispy veggie chips to protein-packed bites, these easy-to-make options will keep you satisfied and on track with your wellness goals. Get ready to discover your new favorite guilt-free treats!
Keto Cheese Crisps
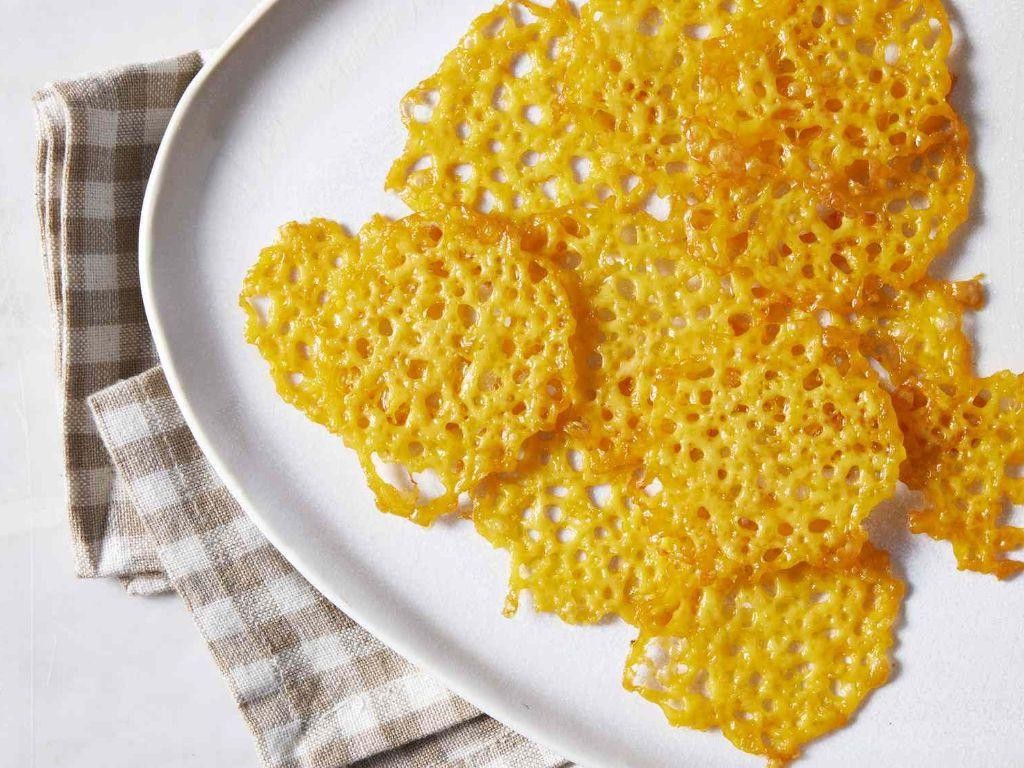
Jazz up your snack game with these crispy keto cheese crisps. Transform shredded cheese into golden, crunchy chips in minutes. Perfect for dipping or solo snacking—zero guilt, maximum crunch.
16
crisps10
minutes10
minutesIngredients
- 2 cups shredded cheddar cheese
- 1/2 tsp garlic powder
- 1/4 tsp smoked paprika
- 1/4 tsp salt
Instructions
- Preheat your oven to 375°F and line a baking sheet with parchment paper.
- Combine 2 cups shredded cheddar cheese, 1/2 tsp garlic powder, 1/4 tsp smoked paprika, and 1/4 tsp salt in a medium bowl.
- Mix thoroughly until spices are evenly distributed throughout the cheese.
- Scoop 1-tablespoon portions of the cheese mixture onto the prepared baking sheet, spacing them 2 inches apart.
- Flatten each portion into a thin, even circle using the back of a spoon. Tip: Keep circles uniform for consistent cooking.
- Bake at 375°F for 8-10 minutes until edges turn golden brown and centers appear bubbly.
- Remove from oven and let cool completely on the baking sheet for 15 minutes. Tip: Don’t move them while warm—they’ll firm up as they cool.
- Gently lift crisps from parchment once fully cooled and firm. Tip: Store in an airtight container to maintain crispness.
Crispy, savory, and utterly addictive, these cheese crisps deliver a satisfying snap with every bite. Their rich cheddar flavor pairs perfectly with guacamole or stands alone as a low-carb snack. Try crumbling them over salads for an instant crunch upgrade.
Avocado Deviled Eggs
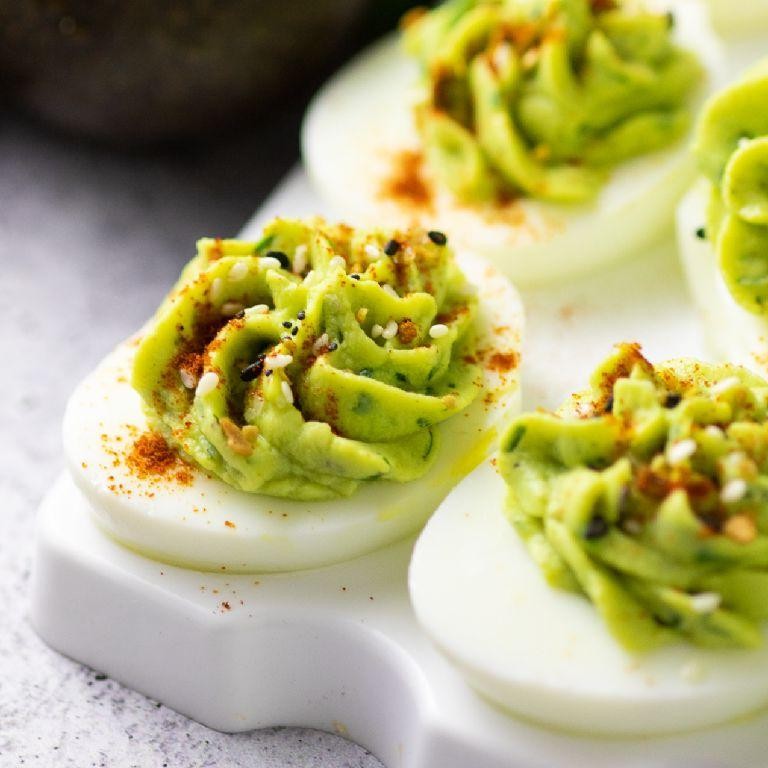
Brace yourself for the ultimate party snack upgrade. These avocado deviled eggs swap mayo for creamy avocado, packing serious flavor and vibrant green color. Your guests will beg for the recipe after just one bite.
12
portions15
minutes12
minutesIngredients
– 6 large eggs
– 1 ripe avocado
– 1 tbsp lime juice
– 1 tsp Dijon mustard
– 1/4 tsp garlic powder
– 1/8 tsp cayenne pepper
– 1/4 tsp salt
– 1 tbsp fresh chives
– 1 tbsp panko breadcrumbs
Instructions
1. Place 6 eggs in a single layer in a medium saucepan.
2. Cover eggs with cold water by 1 inch and bring to a rolling boil over high heat.
3. Immediately remove pan from heat, cover, and let stand for 12 minutes exactly.
4. Transfer eggs to an ice water bath and cool for 5 minutes to stop the cooking process.
5. Peel eggs carefully under running water to help remove shells cleanly.
6. Slice eggs in half lengthwise using a sharp knife.
7. Scoop yolks into a medium bowl and arrange whites on a serving platter.
8. Mash avocado with yolks until completely smooth using a fork.
9. Add 1 tbsp lime juice, 1 tsp Dijon mustard, 1/4 tsp garlic powder, 1/8 tsp cayenne pepper, and 1/4 tsp salt to the avocado mixture.
10. Mix thoroughly until all ingredients are fully incorporated and creamy.
11. Spoon or pipe the avocado filling into the egg white halves.
12. Chop 1 tbsp fresh chives finely and sprinkle over filled eggs.
13. Toast 1 tbsp panko breadcrumbs in a dry skillet over medium heat for 2-3 minutes until golden.
14. Sprinkle toasted breadcrumbs over eggs for added crunch.
The creamy avocado filling contrasts beautifully with the firm egg whites, while the lime juice keeps everything bright and fresh. Serve these on a bed of microgreens for an elegant presentation, or pack them for picnics—they travel surprisingly well without the mayo separation issue.
Zucchini Pizza Bites

Every weeknight warrior needs these zucchini pizza bites in their arsenal. Slice, top, bake—boom, you’ve got crispy, cheesy perfection that beats takeout any day. Seriously, these disappear faster than your phone battery.
5
servings15
minutes17
minutesIngredients
– 2 medium zucchinis
– 1 tbsp olive oil
– 1/2 cup pizza sauce
– 1 cup shredded mozzarella cheese
– 1/4 cup mini pepperoni slices
– 1 tsp Italian seasoning
– 1/4 tsp garlic powder
– 1/4 tsp salt
Instructions
1. Preheat your oven to 400°F and line a baking sheet with parchment paper.
2. Slice the zucchinis into 1/4-inch thick rounds using a sharp knife.
3. Arrange the zucchini rounds in a single layer on the prepared baking sheet.
4. Brush both sides of each zucchini round lightly with olive oil.
5. Sprinkle salt evenly over the zucchini rounds.
6. Bake the zucchini rounds for 8 minutes at 400°F until slightly softened.
7. Remove the baking sheet from the oven using oven mitts.
8. Spread 1 teaspoon of pizza sauce onto each zucchini round.
9. Sprinkle shredded mozzarella cheese evenly over the sauced rounds.
10. Top each round with 2-3 mini pepperoni slices.
11. Combine Italian seasoning and garlic powder in a small bowl.
12. Sprinkle the seasoning mixture evenly over the topped zucchini rounds.
13. Return the baking sheet to the oven and bake for 6-8 minutes at 400°F until the cheese is bubbly and golden.
14. Switch the oven to broil and cook for 1-2 minutes until the edges are crispy.
15. Remove from the oven and let cool for 3 minutes before serving.
What makes these irresistible is the crispy zucchini base that holds its shape against the melty cheese. The pepperoni adds that classic pizza punch while the Italian seasoning brings herby brightness. Try stacking them with fresh basil leaves or dipping in ranch for next-level snacking.
Cauliflower Hummus

Elevate your snack game with this creamy cauliflower hummus that swaps chickpeas for roasted veggie goodness. Transform basic cauliflower into a dip that’ll make your taste buds dance. Everyone will beg for this recipe after just one bite.
2
servings15
minutes25
minutesIngredients
– 1 head cauliflower
– 1/4 cup tahini
– 3 tbsp lemon juice
– 2 tbsp olive oil
– 2 cloves garlic
– 1 tsp cumin
– 1/2 tsp salt
– 1/4 tsp black pepper
– 2 tbsp water
Instructions
1. Preheat your oven to 400°F and line a baking sheet with parchment paper.
2. Cut the cauliflower into 1-inch florets, removing the tough core completely.
3. Spread cauliflower florets in a single layer on the prepared baking sheet.
4. Roast for 25 minutes until edges are golden brown and florets are fork-tender.
5. Tip: Don’t overcrowd the pan—this ensures proper caramelization for deeper flavor.
6. Let roasted cauliflower cool for 10 minutes to prevent the hummus from becoming gummy.
7. Combine cooled cauliflower, tahini, lemon juice, olive oil, garlic cloves, cumin, salt, and pepper in a food processor.
8. Tip: Start with 2 tablespoons of water to help achieve the perfect creamy consistency.
9. Process for 2 minutes, scraping down the sides halfway through.
10. Check texture and add more water if needed, 1 tablespoon at a time.
11. Tip: Blend for an extra 30 seconds if you prefer an ultra-smooth, whipped texture.
12. Transfer to a serving bowl and drizzle with additional olive oil before serving.
What makes this hummus special is its surprisingly creamy texture that rivals traditional versions. The roasted cauliflower brings subtle sweetness that balances perfectly with the garlic and lemon. Try spreading it on toast with sliced radishes or using it as a veggie dip with colorful bell pepper strips for maximum crunch.
Almond Butter Fat Bombs
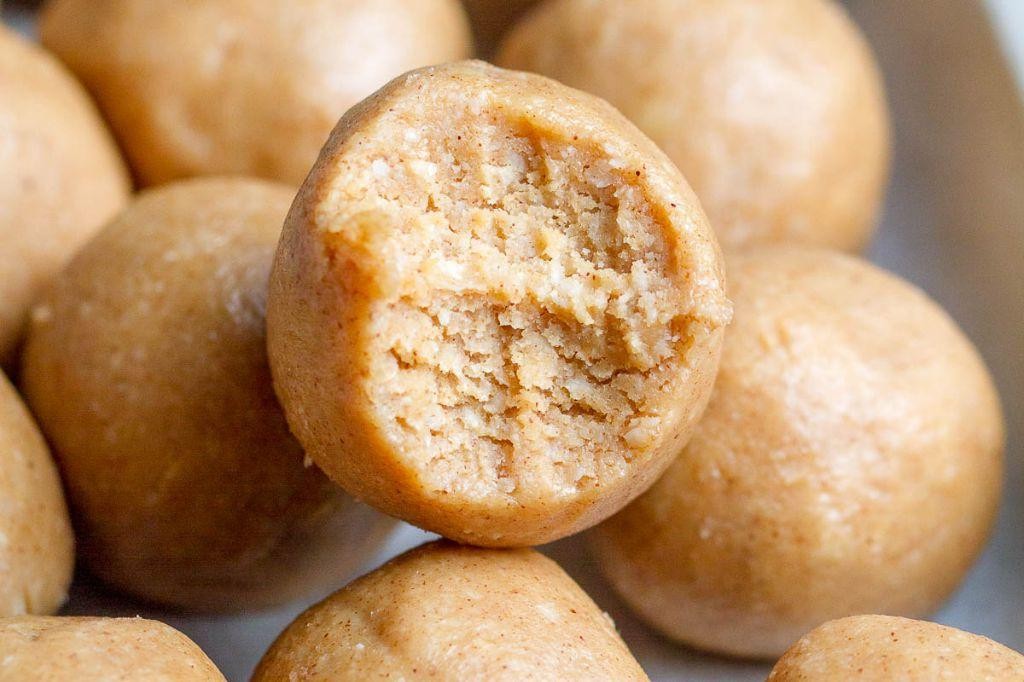
Brace yourself for the easiest keto snack that actually satisfies. These almond butter fat bombs deliver creamy richness in two-bite perfection—no baking required. Get ready to fuel your day with pure delicious energy.
12
portions10
minutesIngredients
– 1 cup creamy almond butter
– 1/4 cup coconut oil
– 2 tbsp powdered erythritol
– 1/2 tsp vanilla extract
– 1/4 tsp sea salt
Instructions
1. Line a mini muffin tin with 12 paper liners.
2. Combine 1 cup creamy almond butter, 1/4 cup coconut oil, 2 tbsp powdered erythritol, 1/2 tsp vanilla extract, and 1/4 tsp sea salt in a medium microwave-safe bowl.
3. Microwave the mixture on high for 30 seconds to gently melt the coconut oil.
4. Stir vigorously with a whisk until completely smooth and well combined.
5. Tip: If your almond butter is particularly thick, microwave for an additional 15 seconds to achieve perfect pourable consistency.
6. Carefully pour the mixture into the prepared muffin liners, filling each about 3/4 full.
7. Tip: Tap the tin firmly on the counter 3-4 times to release any air bubbles for smoother texture.
8. Place the tin in the freezer and chill for exactly 45 minutes until completely firm.
9. Tip: For optimal storage, transfer frozen fat bombs to an airtight container with parchment paper between layers.
10. Serve immediately or keep frozen until ready to enjoy.
Unwrap one straight from the freezer for that satisfying firm-yet-creamy texture that slowly melts in your mouth. The rich almond butter base gets balanced by subtle sweetness and that hint of sea salt that makes you reach for just one more. Try crumbling these over Greek yogurt or dipping them in dark chocolate for an extra decadent treat.
Bacon-Wrapped Jalapeño Poppers

Nailing game-day snacks just got easier with these bacon-wrapped jalapeño poppers. They pack serious heat and smoky flavor in every bite. Get ready for the ultimate crowd-pleaser that disappears in minutes.
12
poppers15
minutes25
minutesIngredients
– 12 fresh jalapeño peppers
– 8 oz cream cheese, softened
– 1 cup shredded cheddar cheese
– 12 slices thin-cut bacon
– 1 tsp garlic powder
– 1/2 tsp smoked paprika
– Cooking spray
Instructions
1. Preheat your oven to 400°F and line a baking sheet with aluminum foil.
2. Slice each jalapeño in half lengthwise and use a small spoon to scrape out all seeds and membranes.
3. Combine softened cream cheese, shredded cheddar, garlic powder, and smoked paprika in a medium bowl.
4. Spoon the cheese mixture evenly into each jalapeño half, filling them just slightly over the top.
5. Wrap one bacon slice tightly around each stuffed jalapeño, securing with a toothpick through the center.
6. Arrange the poppers evenly on the prepared baking sheet and lightly spray with cooking spray.
7. Bake at 400°F for 20-25 minutes until the bacon is crispy and the cheese is bubbly and golden.
8. Let the poppers rest for 5 minutes before serving to allow the cheese to set.
Dive into these poppers while they’re still warm—the crispy bacon gives way to a creamy, spicy filling that’s pure perfection. Serve them alongside a cool ranch dip to balance the heat, or crumble any leftovers over nachos for next-level flavor.
Cucumber Sandwiches
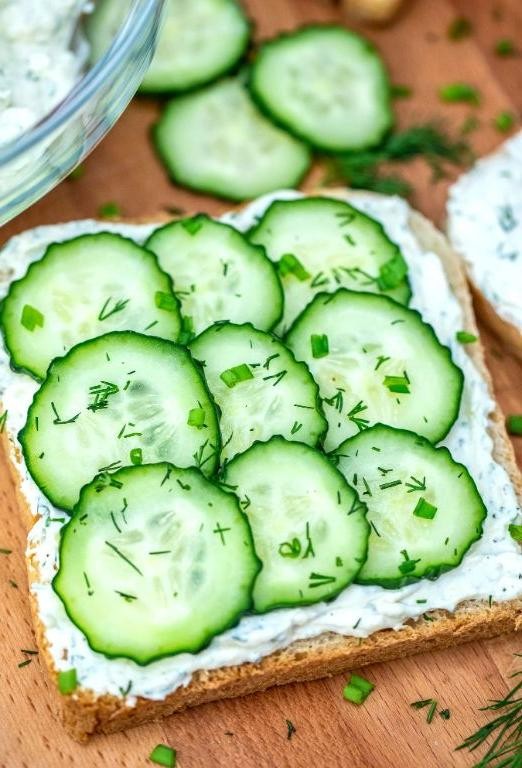
Just discovered the ultimate summer snack hack. Jumpstart your party prep with these refreshing cucumber sandwiches that require zero cooking. Jam-packed with cool crunch and creamy texture, they’re perfect for last-minute entertaining.
4
sandwiches45
minutesIngredients
– 8 slices white sandwich bread
– 1 large English cucumber
– 8 oz cream cheese, softened
– 1/4 cup mayonnaise
– 1 tbsp fresh dill, chopped
– 1/2 tsp garlic powder
– 1/4 tsp salt
– 1/8 tsp black pepper
Instructions
1. Place cream cheese in a medium bowl and let sit at room temperature for 30 minutes until softened.
2. Using a mandoline slicer, slice cucumber into 1/8-inch thick rounds. (Tip: A mandoline ensures uniform slices for even stacking.)
3. In the bowl with softened cream cheese, add mayonnaise, dill, garlic powder, salt, and pepper.
4. Beat the mixture with an electric mixer on medium speed for 2 minutes until completely smooth and fluffy.
5. Lay out all 8 bread slices on a clean work surface.
6. Spread 2 tablespoons of cream cheese mixture evenly across each bread slice, covering completely to the edges.
7. Arrange cucumber slices in a single layer over the cream cheese on 4 of the bread slices, slightly overlapping them.
8. Place the remaining 4 bread slices cream cheese-side down onto the cucumber-covered slices to form sandwiches.
9. Using a serrated knife, carefully trim off all crusts from each sandwich. (Tip: Chill sandwiches for 15 minutes first for cleaner cuts.)
10. Cut each sandwich diagonally twice to create 4 triangular quarters.
11. Arrange the sandwich quarters on a serving platter and cover with plastic wrap.
12. Refrigerate for at least 1 hour before serving to allow flavors to meld. (Tip: Don’t skip the chilling—it prevents soggy bread.)
Outrageously crisp cucumbers contrast with the velvety cream cheese spread in every bite. The subtle dill and garlic notes elevate these beyond basic tea sandwiches. Try stacking them vertically on a tiered stand for an Instagram-worthy presentation that screams effortless elegance.
Cheesy Garlic Breadsticks

A cheesy, garlicky masterpiece that transforms basic pizza dough into irresistible breadsticks. Grab that dough and get ready for the easiest crowd-pleaser you’ll make all week. These pull-apart sticks deliver maximum flavor with minimal effort.
12
breadsticks15
minutes15
minutesIngredients
– 1 lb pizza dough
– 3 tbsp unsalted butter
– 3 cloves garlic
– 1/2 tsp garlic powder
– 1/4 tsp salt
– 1 cup shredded mozzarella cheese
– 2 tbsp grated Parmesan cheese
– 2 tbsp chopped fresh parsley
Instructions
1. Preheat your oven to 425°F and line a baking sheet with parchment paper.
2. Roll the pizza dough into a 10×12-inch rectangle on a lightly floured surface.
3. Melt the butter in a small microwave-safe bowl for 30 seconds.
4. Mince the garlic cloves finely and stir into the melted butter.
5. Brush the garlic butter mixture evenly over the entire surface of the dough.
6. Sprinkle the garlic powder and salt evenly across the buttered dough.
7. Distribute the shredded mozzarella cheese in an even layer, leaving a 1/2-inch border.
8. Sprinkle the grated Parmesan cheese over the mozzarella layer.
9. Bake for 12-15 minutes until the cheese is bubbly and the edges are golden brown.
10. Remove from oven and immediately sprinkle with chopped fresh parsley.
11. Let rest for 2 minutes before cutting into 1-inch wide strips.
12. Serve warm with marinara sauce for dipping. These breadsticks deliver that perfect crispy-chewy texture with explosive garlic flavor. Try serving them alongside pasta dishes or as the star of your next game day spread.
Stuffed Mini Bell Peppers
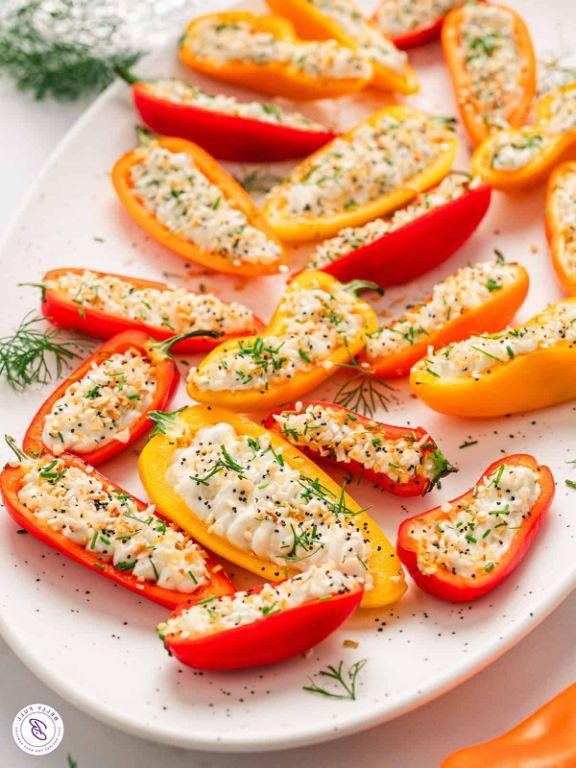
Every party needs these vibrant stuffed mini peppers. Elevate your appetizer game with creamy filling and crispy tops. Seriously addictive—your guests will devour them instantly.
24
portions15
minutes25
minutesIngredients
- 24 mini bell peppers
- 8 oz cream cheese, softened
- 1 cup shredded cheddar cheese
- 1/4 cup cooked bacon, crumbled
- 2 tbsp green onions, finely chopped
- 1 tsp garlic powder
- 1/2 tsp smoked paprika
- 1/4 tsp black pepper
- 2 tbsp olive oil
Instructions
- Preheat your oven to 375°F.
- Slice each mini pepper in half lengthwise.
- Remove all seeds and white membranes using a small spoon.
- Arrange pepper halves cut-side up on a baking sheet.
- Drizzle olive oil over pepper halves.
- Rub oil to coat all interior surfaces evenly.
- Combine softened cream cheese and shredded cheddar in a medium bowl.
- Mix until fully incorporated and smooth.
- Add crumbled bacon, green onions, garlic powder, smoked paprika, and black pepper to cheese mixture.
- Stir until all ingredients are evenly distributed.
- Spoon filling mixture into each pepper half, mounding slightly.
- Use the back of your spoon to smooth filling surfaces.
- Bake at 375°F for 18-22 minutes until peppers are tender-crisp.
- Switch oven to broil setting.
- Broil for 2-3 minutes until filling develops golden spots.
- Remove baking sheet from oven using oven mitts.
- Let peppers rest for 5 minutes before serving. Get ready for the perfect bite—creamy, cheesy filling contrasts with the sweet, slightly crisp pepper shell. Garnish with extra green onions or serve alongside cool ranch dip for dipping heaven.
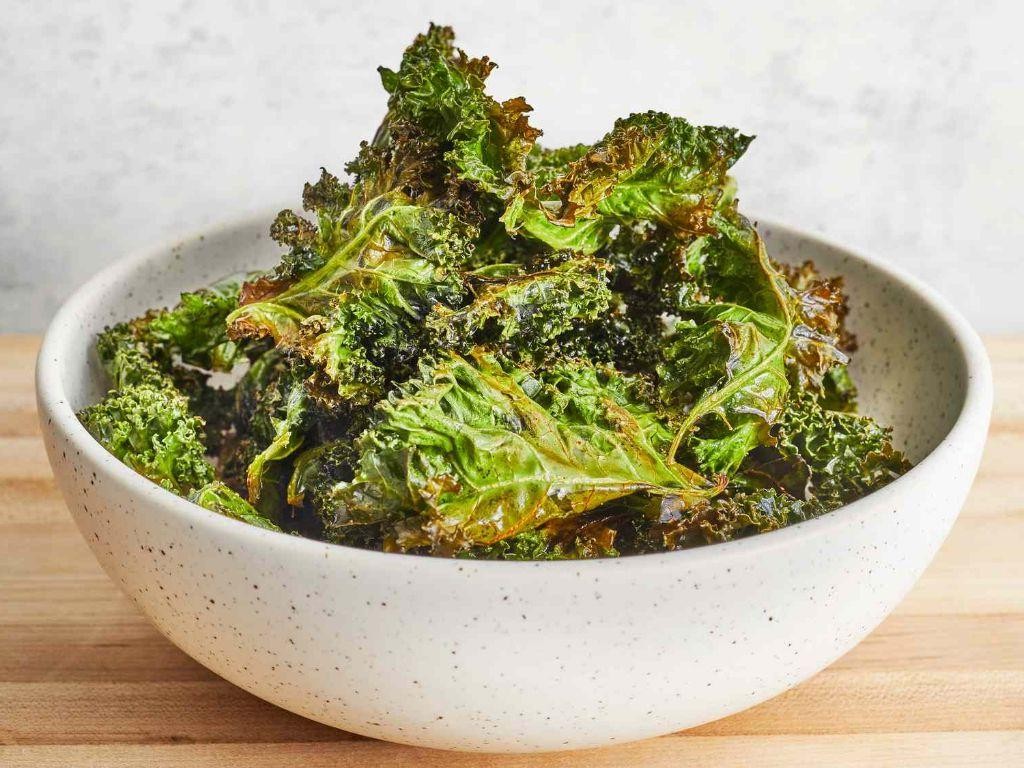
Crispy Kale Chips
Snack cravings hitting hard? Skip the processed junk and transform humble kale into crispy perfection. These addictive chips deliver serious crunch with minimal effort—your new go-to healthy fix.Servings2
servingsPrep time10
minutesCooking time25
minutesIngredients
– 1 bunch fresh kale
– 1 tbsp olive oil
– 1/2 tsp sea saltInstructions
1. Preheat your oven to 300°F and line two baking sheets with parchment paper.
2. Wash the kale thoroughly and pat completely dry with paper towels—this ensures maximum crispiness.
3. Remove the tough stems by pulling leaves away from the center ribs.
4. Tear the kale leaves into 2-inch pieces, creating uniform sizes for even cooking.
5. Place the kale pieces in a large bowl and drizzle with 1 tablespoon of olive oil.
6. Massage the oil gently into the kale leaves until every surface is lightly coated.
7. Sprinkle 1/2 teaspoon of sea salt evenly over the oiled kale.
8. Arrange the kale in a single layer on the prepared baking sheets, ensuring no pieces overlap.
9. Bake for 15 minutes, then rotate the baking sheets for even browning.
10. Continue baking for another 5-10 minutes until the edges are lightly browned and crispy to the touch.
11. Remove from the oven and let cool completely on the baking sheets—they’ll crisp up further as they cool.Enjoy these kale chips immediately for the ultimate crispy texture. Their delicate crunch gives way to a subtle earthy flavor that’s surprisingly addictive. Try sprinkling with nutritional yeast before baking for a cheesy twist, or crumble them over salads for instant crunch elevation.
Egg and Spinach Muffins

OBSESSED with grab-and-go breakfasts? These egg and spinach muffins transform your morning routine. Whip them up in minutes, bake to perfection, and enjoy protein-packed goodness all week long.Servings6
muffinsPrep time10
minutesCooking time24
minutesIngredients
– 6 large eggs
– 1 cup fresh spinach, chopped
– 1/2 cup shredded cheddar cheese
– 1/4 cup milk
– 1 tbsp olive oil
– 1/2 tsp salt
– 1/4 tsp black pepper
– Cooking sprayInstructions
1. Preheat your oven to 350°F.
2. Lightly spray a 6-cup muffin tin with cooking spray.
3. Heat 1 tbsp olive oil in a skillet over medium heat.
4. Add 1 cup chopped fresh spinach and sauté for 2 minutes until wilted.
5. Whisk 6 large eggs, 1/4 cup milk, 1/2 tsp salt, and 1/4 tsp black pepper in a medium bowl until fully combined.
6. Stir the wilted spinach and 1/2 cup shredded cheddar cheese into the egg mixture.
7. Evenly divide the egg mixture among the 6 prepared muffin cups.
8. Bake at 350°F for 20-22 minutes until the tops are golden and a toothpick inserted comes out clean.
9. Let the muffins cool in the tin for 5 minutes before removing.Perfectly portable, these muffins boast a fluffy interior with melty cheese pockets and vibrant spinach flecks. Pop them in lunch boxes with hot sauce or slice horizontally for breakfast sandwich bases.
Parmesan Roasted Broccoli

Kick boring broccoli to the curb. This crispy, cheesy upgrade transforms simple florets into crave-worthy perfection. Get ready for your new favorite side dish in under 30 minutes.Servings3
servingsPrep time10
minutesCooking time22
minutesIngredients
– 1 lb broccoli florets
– 3 tbsp olive oil
– 1/2 cup grated Parmesan cheese
– 3 cloves garlic, minced
– 1/2 tsp salt
– 1/4 tsp black pepper
– 1/4 tsp red pepper flakesInstructions
1. Preheat your oven to 425°F and line a baking sheet with parchment paper.
2. Place broccoli florets in a large mixing bowl and drizzle with olive oil.
3. Add minced garlic, salt, black pepper, and red pepper flakes to the bowl.
4. Toss everything together until broccoli is evenly coated with oil and seasonings.
5. Spread broccoli in a single layer on the prepared baking sheet, ensuring pieces aren’t touching.
6. Roast for 15 minutes at 425°F until edges begin to crisp and brown.
7. Remove baking sheet from oven and sprinkle Parmesan cheese evenly over the broccoli.
8. Return to oven and roast for 5-7 more minutes until cheese is melted and golden.
9. Check for doneness – broccoli stems should be tender when pierced with a fork.
10. Transfer to a serving dish immediately to prevent sticking. That crispy, golden-brown broccoli with melted Parmesan creates irresistible texture contrast. Toss it over pasta, pile it on grain bowls, or enjoy straight from the pan – those caramelized edges and savory cheese crust will disappear fast.Portobello Mushroom Sliders
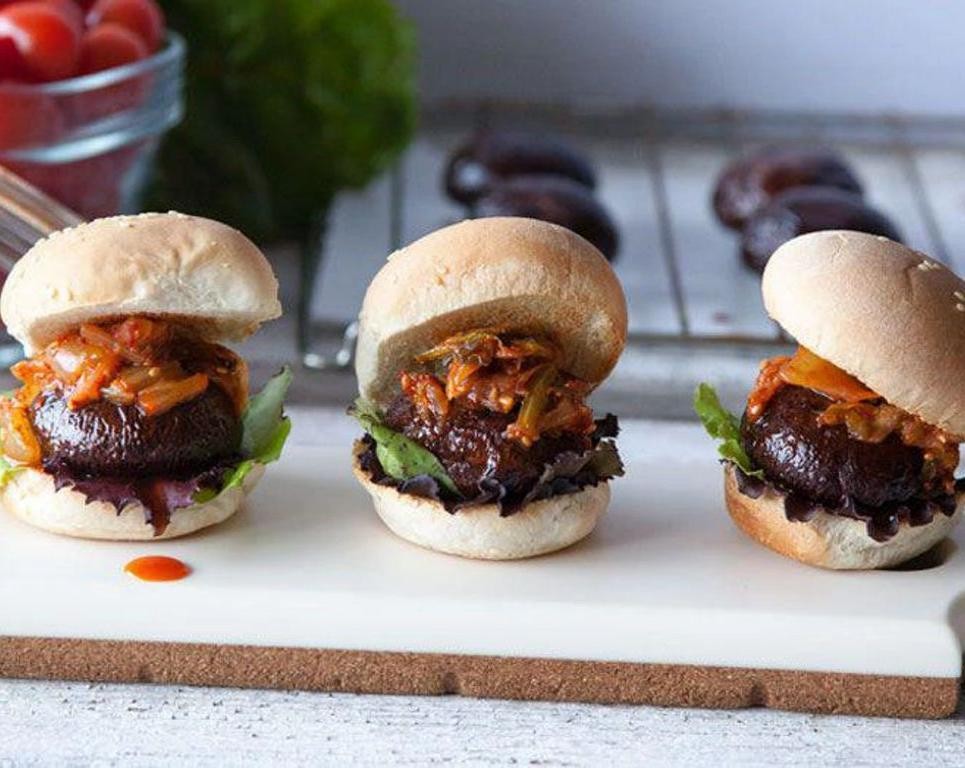
Lately, everyone’s craving that juicy burger satisfaction without the meat. These Portobello Mushroom Sliders deliver big flavor in a tiny package—perfect for game day or casual gatherings. Grab your ingredients and let’s transform these earthy caps into your new favorite bite.Servings4
sandwichesPrep time15
minutesCooking time20
minutesIngredients
– 4 large Portobello mushroom caps
– 2 tbsp olive oil
– 1 tsp garlic powder
– 1/2 tsp smoked paprika
– 1/4 tsp black pepper
– 1/2 tsp salt
– 4 slider buns
– 4 slices provolone cheese
– 1/4 cup mayonnaise
– 1 tbsp balsamic glaze
– 4 lettuce leaves
– 4 slices tomatoInstructions
1. Preheat your oven to 400°F and line a baking sheet with parchment paper.
2. Use a spoon to gently scrape out the gills from the mushroom caps for better texture.
3. Whisk together olive oil, garlic powder, smoked paprika, black pepper, and salt in a small bowl.
4. Brush the oil mixture evenly over both sides of each mushroom cap.
5. Arrange mushrooms gill-side up on the prepared baking sheet.
6. Roast for 15 minutes until mushrooms are tender and release their liquid.
7. Flip mushrooms and roast for another 5 minutes to crisp the tops.
8. Place one slice of provolone cheese on each mushroom cap during the last 2 minutes of roasting.
9. Toast slider buns in the oven for 3-4 minutes until lightly golden.
10. Spread 1 tablespoon of mayonnaise on the bottom half of each bun.
11. Drizzle 1 teaspoon of balsamic glaze over the mayonnaise on each bun.
12. Place one lettuce leaf on top of the balsamic-mayonnaise mixture.
13. Add one tomato slice on top of each lettuce leaf.
14. Transfer one cheese-topped mushroom cap to each prepared bun bottom.
15. Cap each slider with the top bun and press gently to secure.These sliders offer a satisfying meaty texture with smoky, umami-rich flavors that will surprise any mushroom skeptic. The balsamic glaze cuts through the richness while the melted provolone adds creamy contrast. Serve them stacked on a wooden board with pickle spears or alongside sweet potato fries for the ultimate casual feast.
Coconut Flour Pancakes
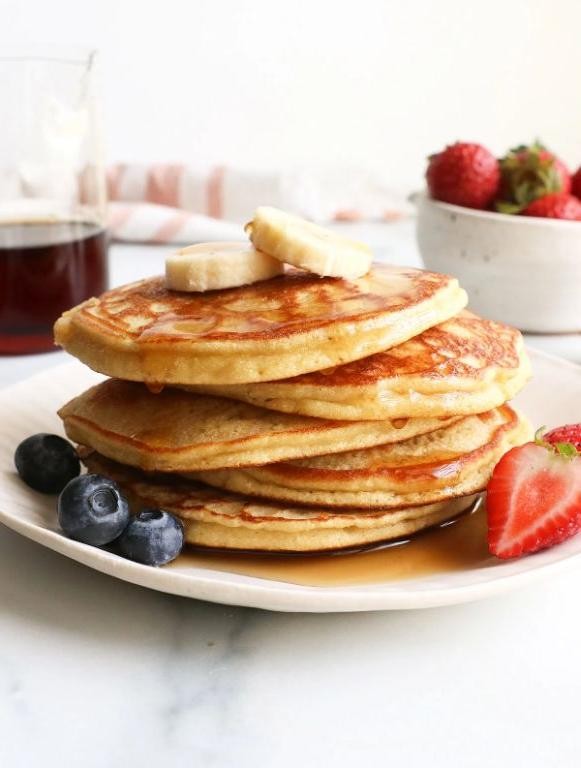
Nailing fluffy pancakes without the gluten? These coconut flour pancakes deliver. Grab your bowl—this recipe comes together in minutes and satisfies every carb craving.Servings8
pancakesPrep time10
minutesCooking time30
minutesIngredients
– 1/2 cup coconut flour
– 4 large eggs
– 1 cup milk
– 2 tbsp maple syrup
– 1 tsp baking powder
– 1/4 tsp salt
– 2 tbsp coconut oil
– 1 tsp vanilla extractInstructions
1. Whisk coconut flour, baking powder, and salt in a medium bowl until no lumps remain.
2. Crack eggs into a separate bowl and beat until uniform in color.
3. Pour milk, maple syrup, and vanilla extract into the eggs and whisk to combine.
4. Gradually add wet ingredients to dry ingredients, stirring until a thick batter forms. Let rest 5 minutes to allow coconut flour to absorb liquid—this prevents gritty texture.
5. Heat a non-stick skillet over medium heat (350°F) and melt 1/2 tbsp coconut oil.
6. Scoop 1/4 cup batter per pancake onto the skillet, spreading slightly with the back of the spoon.
7. Cook for 3–4 minutes until edges look dry and bubbles form on the surface.
8. Flip pancakes carefully—they’re more delicate than traditional ones—and cook for another 2–3 minutes until golden brown.
9. Repeat with remaining batter, adding more coconut oil to the skillet as needed to prevent sticking.
10. Serve immediately for the best texture. Overmixing can make pancakes dense, so stir just until combined.Outrageously tender with a subtle coconut sweetness, these pancakes stay moist for hours. Drizzle with extra maple syrup or top with berries for a vibrant breakfast—they’re sturdy enough to hold generous toppings without falling apart.
Savory Herb Crackers
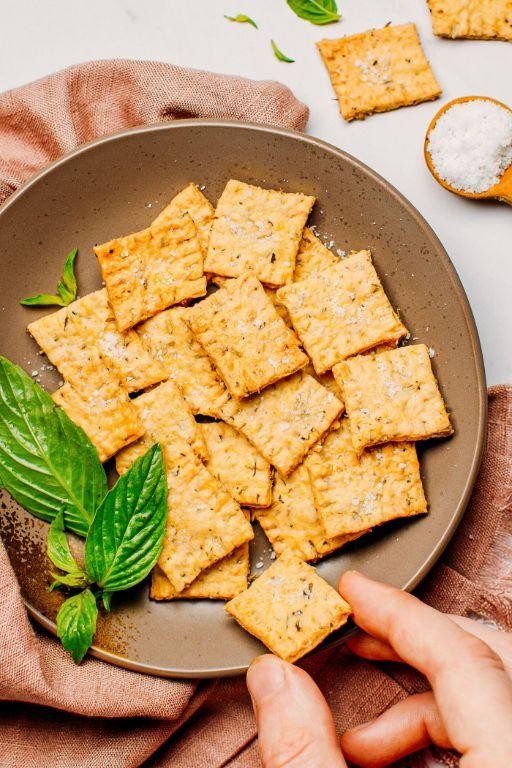
Every basic cracker just got a major upgrade. Elevate your snack game with these homemade herb crackers that deliver restaurant-quality crunch in minutes. Forget store-bought—these pack serious flavor and require zero fancy equipment.Servings2
portionsPrep time15
minutesCooking time30
minutesIngredients
– 2 cups all-purpose flour
– 1/2 cup cold unsalted butter
– 1/4 cup cold water
– 1 tbsp fresh rosemary
– 1 tbsp fresh thyme
– 1 tsp garlic powder
– 1 tsp salt
– 1/2 tsp black pepperInstructions
1. Preheat your oven to 375°F and line a baking sheet with parchment paper.
2. Combine 2 cups all-purpose flour, 1 tbsp fresh rosemary, 1 tbsp fresh thyme, 1 tsp garlic powder, 1 tsp salt, and 1/2 tsp black pepper in a food processor.
3. Pulse the dry ingredients 3 times for 2 seconds each to evenly distribute the herbs.
4. Cut 1/2 cup cold unsalted butter into small cubes and add to the food processor.
5. Pulse the mixture 8-10 times until the butter forms pea-sized crumbs throughout the flour.
6. Add 1/4 cup cold water to the food processor while pulsing continuously.
7. Stop pulsing as soon as the dough begins to clump together—do not overmix.
8. Turn the dough out onto a lightly floured surface and knead gently 4-5 times until it forms a cohesive ball.
9. Divide the dough into two equal portions for easier rolling.
10. Roll one portion of dough to 1/8-inch thickness using a rolling pin, flipping occasionally to prevent sticking.
11. Cut the rolled dough into 1.5-inch squares using a pizza cutter or sharp knife.
12. Transfer the cut crackers to the prepared baking sheet, spacing them 1/2 inch apart.
13. Prick each cracker 2-3 times with a fork to prevent puffing during baking.
14. Bake at 375°F for 12-15 minutes until the edges turn golden brown and the centers feel firm.
15. Rotate the baking sheet halfway through baking for even browning.
16. Remove the crackers from the oven and let them cool completely on the baking sheet—they’ll crisp up as they cool.
17. Repeat the rolling, cutting, and baking process with the remaining dough portion.
Golden and crisp, these crackers deliver a satisfying snap with every bite. The rosemary and thyme create an aromatic earthiness that pairs perfectly with sharp cheeses or creamy dips. Try crumbling them over soups for an elevated crunch or serving alongside charcuterie for instant entertaining appeal.Chocolate Avocado Mousse
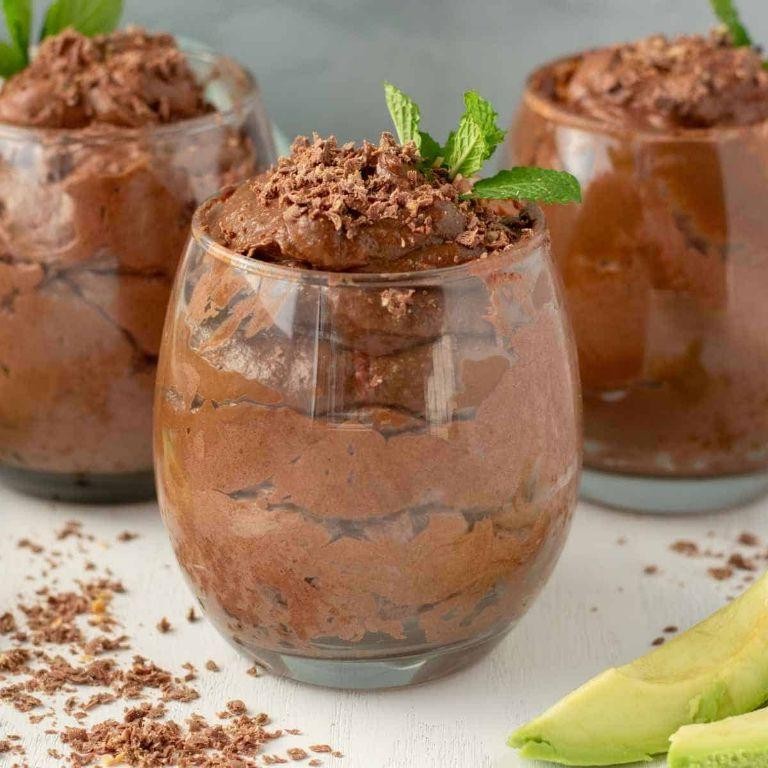
Grab your blender because this chocolate avocado mousse is about to become your new dessert obsession. Get ready for a creamy, dreamy treat that’s secretly healthy and ridiculously easy to make. Seriously, you won’t believe it’s dairy-free until you taste it.Servings5
servingsPrep time10
minutesIngredients
– 2 ripe avocados
– 1/4 cup cocoa powder
– 1/4 cup maple syrup
– 1/4 cup almond milk
– 1 tsp vanilla extract
– 1/4 tsp saltInstructions
1. Cut the avocados in half, remove the pits, and scoop the flesh into your blender.
2. Add the cocoa powder, maple syrup, almond milk, vanilla extract, and salt to the blender.
3. Blend on high speed for 60-90 seconds until completely smooth, scraping down the sides halfway through to ensure no chunks remain.
4. Taste the mixture and adjust sweetness by adding an extra tablespoon of maple syrup if desired.
5. Divide the mousse evenly among four serving glasses or bowls.
6. Cover each serving tightly with plastic wrap, pressing it directly against the surface of the mousse to prevent browning.
7. Refrigerate for at least 2 hours, or until thoroughly chilled and set.
8. Remove from refrigerator, garnish with fresh berries or shaved chocolate if desired, and serve immediately.
But the real magic happens after chilling—the texture transforms into an impossibly smooth, airy mousse that melts on your tongue. The rich chocolate flavor completely masks the avocado, leaving only its creamy goodness behind. Try serving it in espresso cups for an elegant dinner party dessert, or layer it with crushed cookies for a deconstructed parfait.Conclusion
Gathering these 18 low-carb snack recipes makes healthy eating both delicious and convenient. Whether you’re craving something savory or sweet, there’s a perfect option for every taste. We’d love to hear which recipes become your favorites—drop a comment below and don’t forget to share this roundup on Pinterest to help other health-conscious friends discover these tasty treats!