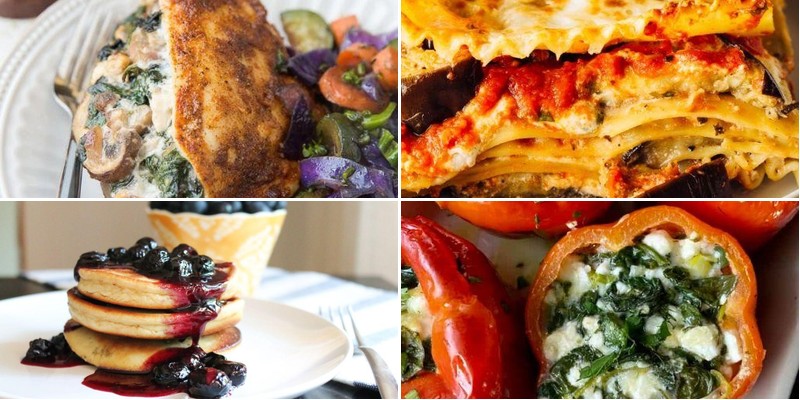
Looking to enjoy delicious meals without the carbs and sugar? You’re in the right place! We’ve gathered 27 mouthwatering recipes that prove healthy eating can be incredibly satisfying. From quick dinners to comforting classics, these dishes will keep you on track while tantalizing your taste buds. Get ready to discover your new favorite meals—let’s dive in!
Keto Avocado and Egg Breakfast Bowl
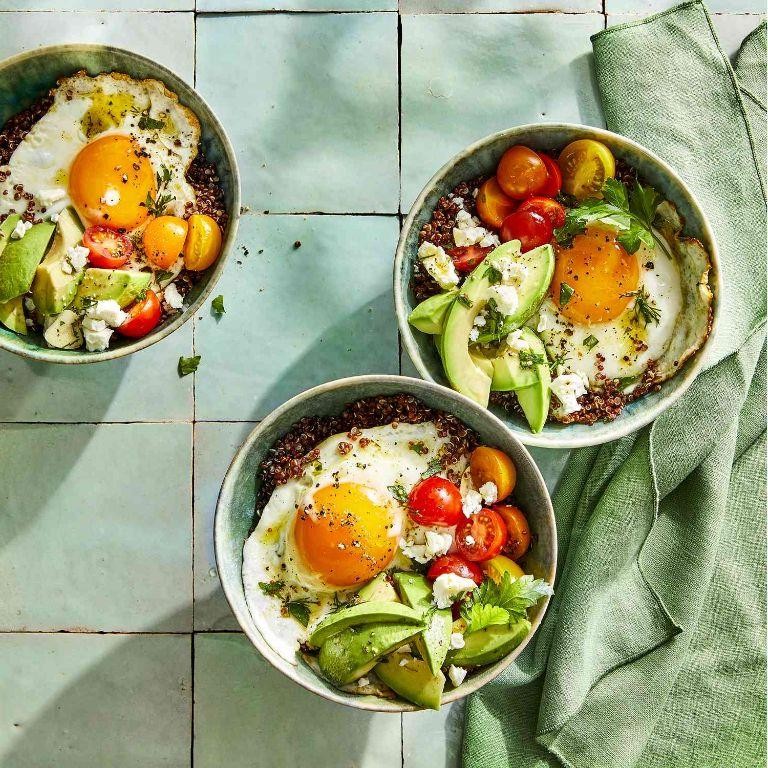
Yield to morning cravings with this sophisticated keto breakfast bowl that transforms humble ingredients into an elegant morning ritual. Velvety avocado provides the perfect creamy base for perfectly cooked eggs, creating a dish that feels both indulgent and nourishing. This artful combination delivers lasting energy while satisfying the palate with its rich textures and flavors.
2
portions8
minutes3
minutesIngredients
– 1 large avocado
– 2 large eggs
– 1 tbsp olive oil
– 1/4 tsp sea salt
– 1/8 tsp black pepper
– 1 tbsp fresh chives
– 1 tbsp crumbled feta cheese
Instructions
1. Cut the avocado in half lengthwise and remove the pit using a spoon.
2. Scoop the avocado flesh into a small bowl, leaving about 1/4 inch of flesh attached to the skin to create sturdy bowls.
3. Mash the avocado flesh with a fork until smooth but still slightly textured.
4. Season the mashed avocado with sea salt and black pepper, mixing thoroughly to distribute the seasonings evenly.
5. Heat olive oil in a non-stick skillet over medium heat until it shimmers, about 1 minute.
6. Crack two eggs into the skillet and cook for 2-3 minutes until the whites are completely set but the yolks remain runny.
7. Spoon the seasoned avocado mixture back into the reserved avocado skins, creating an even layer.
8. Carefully place one cooked egg on top of the avocado in each half.
9. Sprinkle fresh chives and crumbled feta cheese over the eggs and avocado.
10. Serve immediately while the eggs are still warm. What makes this breakfast bowl truly exceptional is the contrast between the cool, creamy avocado and the warm, runny egg yolk that creates a luxurious sauce when broken. The sharpness of the feta and freshness of the chives cut through the richness, making each bite perfectly balanced. For an elegant presentation, serve on a bed of microgreens or alongside smoked salmon for added sophistication.
Zucchini Noodles with Garlic Shrimp
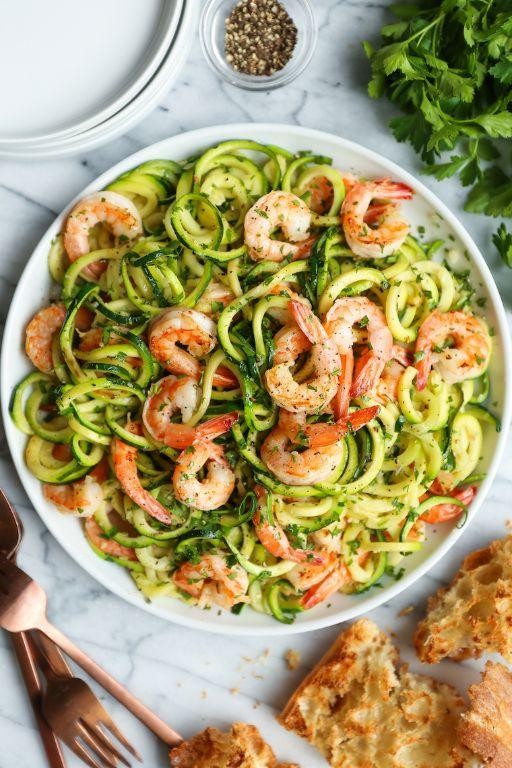
Vibrant and sophisticated, this zucchini noodle dish transforms humble summer squash into elegant strands that cradle plump, garlic-infused shrimp. The delicate green noodles provide a fresh canvas for the savory seafood, creating a light yet satisfying meal that celebrates seasonal produce at its peak. With just minutes from pan to plate, this recipe delivers restaurant-quality elegance for busy weeknights.
2
servings15
minutes6
minutesIngredients
– 2 medium zucchini
– 1 lb large shrimp, peeled and deveined
– 3 cloves garlic, minced
– 2 tbsp olive oil
– 1 tbsp lemon juice
– 1/4 tsp red pepper flakes
– 1/4 cup fresh parsley, chopped
– 1/2 tsp salt
– 1/4 tsp black pepper
Instructions
1. Spiralize 2 medium zucchini into noodles using a spiralizer, then place them in a colander and sprinkle with 1/2 teaspoon of salt.
2. Let the salted zucchini noodles sit for 10 minutes to draw out excess moisture, which prevents a watery sauce.
3. Pat the zucchini noodles completely dry with paper towels, pressing gently to remove all surface moisture.
4. Heat 2 tablespoons of olive oil in a large skillet over medium-high heat until it shimmers.
5. Add 1 pound of peeled, deveined shrimp in a single layer and cook for 2 minutes without moving them to develop a golden sear.
6. Flip each shrimp and cook for 1 more minute until they turn pink and opaque throughout.
7. Transfer the cooked shrimp to a clean plate, leaving the oil and any juices in the skillet.
8. Reduce the heat to medium and add 3 minced garlic cloves to the same skillet, cooking for 30 seconds until fragrant but not browned.
9. Stir in 1/4 teaspoon of red pepper flakes and cook for 15 seconds to bloom their flavor in the oil.
10. Add the dried zucchini noodles to the skillet and toss continuously for 2 minutes until just warmed through but still crisp-tender.
11. Return the cooked shrimp to the skillet along with any accumulated juices.
12. Drizzle 1 tablespoon of lemon juice over the mixture and toss everything together to combine.
13. Remove the skillet from heat and stir in 1/4 cup of chopped fresh parsley and 1/4 teaspoon of black pepper.
14. Taste and adjust seasoning if needed before serving immediately.
Tender zucchini noodles retain a satisfying al dente bite while absorbing the garlic-infused oil, creating a delicate yet substantial base for the succulent shrimp. The bright lemon and subtle heat from red pepper flakes elevate each component, making this dish equally impressive for casual dinners or elegant entertaining when garnished with extra parsley and lemon wedges.
Cauliflower Rice Stir Fry with Tofu
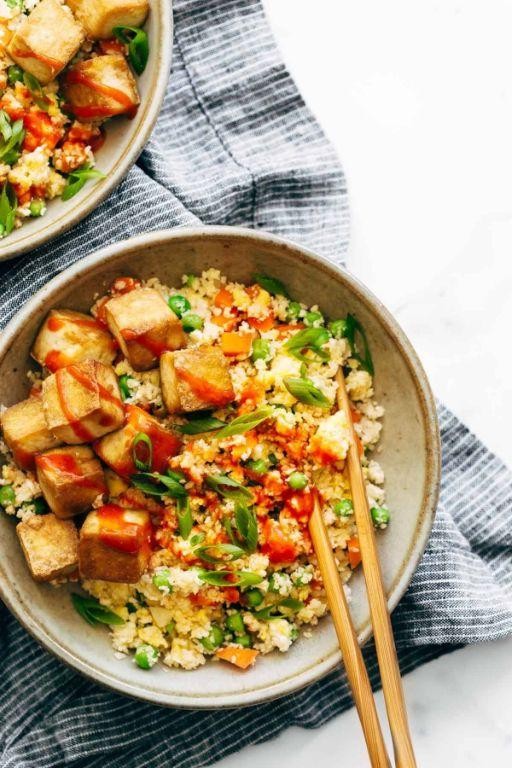
Vibrant and versatile, this cauliflower rice stir-fry transforms humble ingredients into an elegant weeknight masterpiece. With golden tofu cubes and crisp vegetables nestled in fluffy cauliflower rice, it delivers restaurant-quality sophistication in under thirty minutes. The harmonious blend of textures and Asian-inspired flavors makes this dish both nourishing and deeply satisfying.
3
servings20
minutes10
minutesIngredients
– 1 block (14 oz) extra-firm tofu
– 2 tbsp cornstarch
– 3 tbsp vegetable oil
– 1 head cauliflower
– 1 red bell pepper
– 1 cup snap peas
– 3 cloves garlic
– 1 tbsp fresh ginger
– 3 tbsp soy sauce
– 1 tbsp rice vinegar
– 1 tsp sesame oil
– 2 green onions
Instructions
1. Press the tofu block between paper towels with a heavy pan for 15 minutes to remove excess moisture.
2. Cut the pressed tofu into 1-inch cubes and toss with 2 tablespoons cornstarch until evenly coated.
3. Heat 2 tablespoons vegetable oil in a large wok over medium-high heat until shimmering (350°F).
4. Pan-fry tofu cubes in a single layer for 3-4 minutes per side until golden brown and crisp.
5. Transfer tofu to a paper towel-lined plate to drain excess oil.
6. Pulse cauliflower florets in a food processor until they resemble rice grains (about 15 pulses).
7. Thinly slice the red bell pepper into ¼-inch strips and trim the snap peas.
8. Mince 3 cloves garlic and grate 1 tablespoon fresh ginger.
9. Heat remaining 1 tablespoon vegetable oil in the wok over high heat until smoking.
10. Sauté garlic and ginger for 30 seconds until fragrant but not browned.
11. Add bell pepper and snap peas, stir-frying for 2 minutes until slightly softened.
12. Incorporate cauliflower rice and cook for 4 minutes, stirring constantly until tender-crisp.
13. Return tofu to the wok and drizzle with 3 tablespoons soy sauce, 1 tablespoon rice vinegar, and 1 teaspoon sesame oil.
14. Toss everything together for 1 minute until thoroughly combined and heated through.
15. Thinly slice 2 green onions and sprinkle over the finished stir-fry.
Delightfully textured, this stir-fry offers crisp vegetables against fluffy cauliflower rice and chewy tofu cubes. The savory soy glaze clings beautifully to each component, while a hint of sesame oil provides aromatic depth. For an elegant presentation, serve in lettuce cups or garnish with toasted sesame seeds for extra crunch.
Grilled Lemon Herb Chicken Breast

Perfectly grilled chicken breast, infused with bright citrus and aromatic herbs, offers a simple yet sophisticated centerpiece for any warm-weather gathering. The marriage of zesty lemon and fragrant rosemary creates a dish that feels both elegant and effortlessly approachable. This recipe delivers juicy, flavorful results every time with just a few key techniques.
4
servings35
minutes14
minutesIngredients
- 4 boneless, skinless chicken breasts
- 1/4 cup olive oil
- 3 tbsp fresh lemon juice
- 2 tbsp chopped fresh rosemary
- 2 tsp minced garlic
- 1 tsp kosher salt
- 1/2 tsp black pepper
Instructions
- Place chicken breasts between two sheets of plastic wrap and pound to an even 3/4-inch thickness using a meat mallet or rolling pin.
- Whisk together olive oil, lemon juice, rosemary, garlic, salt, and pepper in a medium bowl until fully combined.
- Add chicken breasts to the marinade, turning to coat all surfaces completely.
- Cover the bowl with plastic wrap and refrigerate for at least 30 minutes or up to 4 hours for maximum flavor penetration.
- Preheat grill to medium-high heat, approximately 400°F, and lightly oil the grates to prevent sticking.
- Remove chicken from marinade, letting excess drip off, and discard remaining marinade.
- Place chicken on the preheated grill and cook for 6-7 minutes until grill marks form and edges appear opaque.
- Flip chicken using tongs and cook for another 6-7 minutes until internal temperature reaches 165°F when tested with an instant-read thermometer.
- Transfer grilled chicken to a clean plate and let rest for 5 minutes before slicing to retain juices.
Juicy and tender with a beautifully caramelized exterior, this chicken boasts vibrant citrus notes balanced by earthy rosemary. The rested meat slices cleanly, revealing moist, perfectly cooked flesh throughout. Consider serving over a bed of arugula with shaved Parmesan or alongside grilled asparagus for a complete seasonal meal.
Spinach and Feta Stuffed Bell Peppers
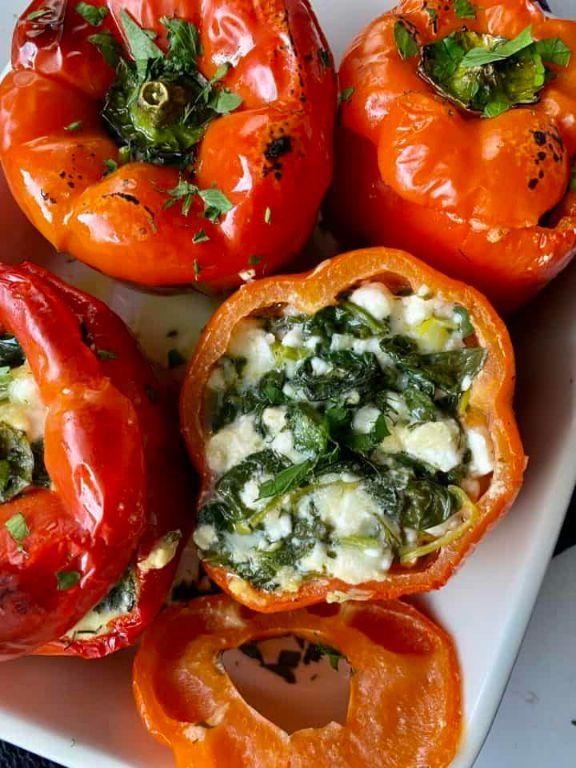
Kindly consider these vibrant bell peppers, generously filled with a savory blend of earthy spinach and briny feta cheese, then baked to tender perfection. Their colorful presentation makes them an elegant centerpiece for any dinner table, while the Mediterranean-inspired filling offers both comfort and sophistication. This dish transforms simple ingredients into a memorable meal that satisfies both the palate and the eye.
3
portions20
minutes43
minutesIngredients
– 4 large bell peppers (any color)
– 1 tablespoon olive oil
– 1 small yellow onion, diced
– 2 cloves garlic, minced
– 10 ounces fresh spinach
– 1 cup crumbled feta cheese
– 1/2 cup cooked quinoa
– 1/4 cup chopped fresh dill
– 1 teaspoon dried oregano
– 1/2 teaspoon black pepper
– 1/4 teaspoon salt
Instructions
1. Preheat your oven to 375°F and lightly grease a baking dish.
2. Carefully slice the tops off the bell peppers and remove all seeds and membranes.
3. Heat olive oil in a large skillet over medium heat until shimmering.
4. Add diced onion and cook for 5-7 minutes until translucent and softened.
5. Stir in minced garlic and cook for 1 minute until fragrant.
6. Add fresh spinach in batches, wilting each addition before adding more.
7. Transfer the spinach mixture to a bowl and let cool for 5 minutes.
8. Mix in crumbled feta cheese, cooked quinoa, fresh dill, dried oregano, black pepper, and salt.
9. Generously stuff each bell pepper with the spinach-feta mixture, packing it firmly.
10. Arrange the stuffed peppers upright in the prepared baking dish.
11. Bake at 375°F for 25-30 minutes until peppers are tender and filling is heated through.
12. Let the peppers rest for 5 minutes before serving to allow the filling to set.
Notably, the baked peppers achieve a wonderful contrast between their softened walls and the creamy, textured filling. The feta maintains its distinctive tang while melding beautifully with the earthy spinach and aromatic herbs. For an elegant presentation, serve alongside a simple arugula salad dressed with lemon vinaigrette, or garnish with additional fresh dill and a drizzle of high-quality olive oil.
Almond Flour Pancakes with Berries
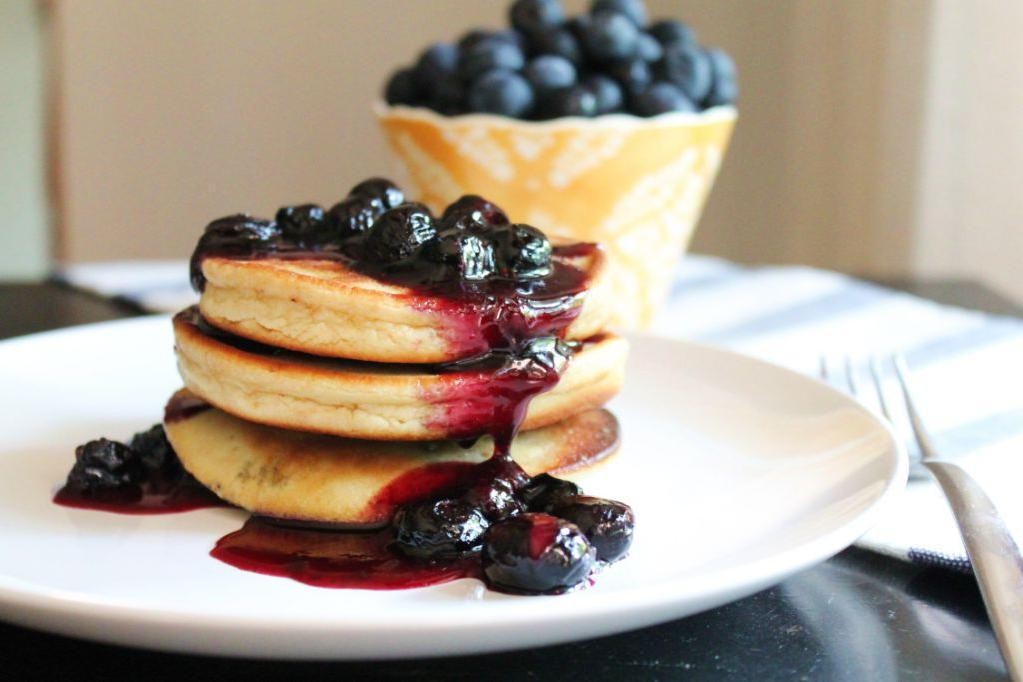
Dazzlingly light yet satisfyingly substantial, these almond flour pancakes offer a gluten-free breakfast that feels both indulgent and nourishing. Delicate golden discs dotted with jewel-toned berries create a morning meal that transforms ordinary ingredients into something truly special, perfect for leisurely weekends or celebratory brunches.
5
servings10
minutes15
minutesIngredients
– 2 cups almond flour
– 3 large eggs
– 1/4 cup almond milk
– 2 tbsp maple syrup
– 1 tsp baking powder
– 1/2 tsp vanilla extract
– 1/4 tsp salt
– 1 cup mixed fresh berries
– 2 tbsp coconut oil
Instructions
1. Whisk together almond flour, baking powder, and salt in a medium bowl until thoroughly combined.
2. In a separate bowl, beat eggs vigorously for 30 seconds until frothy, then mix in almond milk, maple syrup, and vanilla extract.
3. Pour wet ingredients into dry ingredients and stir gently until just combined, being careful not to overmix the batter.
4. Gently fold in 3/4 cup of mixed berries, reserving the remaining berries for garnish.
5. Heat a non-stick skillet or griddle over medium heat (325°F) and melt 1 teaspoon of coconut oil.
6. Pour 1/4 cup of batter for each pancake, cooking 2-3 pancakes at a time without crowding the pan.
7. Cook for 2-3 minutes until bubbles form on the surface and edges appear set.
8. Carefully flip pancakes using a thin spatula and cook for another 1-2 minutes until golden brown on both sides.
9. Transfer cooked pancakes to a wire rack instead of stacking them to prevent sogginess.
10. Repeat with remaining batter, adding more coconut oil to the pan as needed between batches.
11. Serve immediately topped with reserved fresh berries and additional maple syrup if desired.
Creating these pancakes yields a wonderfully tender crumb with subtle nuttiness that complements the burst of berry sweetness. Consider serving them with a dollop of Greek yogurt for added protein or drizzling with warmed almond butter for extra richness—either way, they’re sure to become a cherished morning ritual.
Baked Salmon with Dill and Asparagus
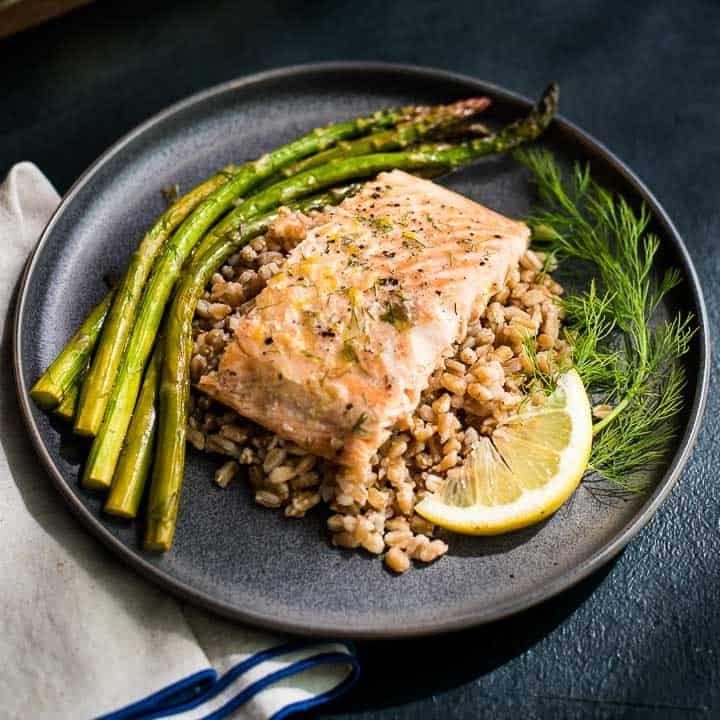
On brisk autumn evenings, nothing satisfies quite like this elegant baked salmon with dill and asparagus—a dish that transforms simple ingredients into a sophisticated meal with minimal effort, yet delivers restaurant-quality results right from your home kitchen.
5
servings15
minutes15
minutesIngredients
– 4 (6-ounce) salmon fillets
– 1 pound asparagus spears
– 2 tablespoons olive oil
– 2 tablespoons fresh dill, chopped
– 1 lemon, sliced
– 1 teaspoon garlic powder
– 1/2 teaspoon salt
– 1/4 teaspoon black pepper
Instructions
1. Preheat your oven to 400°F and line a baking sheet with parchment paper.
2. Pat the salmon fillets completely dry with paper towels to ensure a crisp exterior.
3. Trim the tough ends from the asparagus spears by snapping them where they naturally break.
4. Arrange the salmon and asparagus in a single layer on the prepared baking sheet.
5. Drizzle olive oil evenly over both the salmon and asparagus.
6. Season the salmon with salt, black pepper, and garlic powder, rubbing the spices gently into the flesh.
7. Sprinkle the chopped fresh dill over the salmon fillets, reserving a pinch for garnish.
8. Place thin lemon slices directly on top of each salmon fillet.
9. Roast in the preheated oven for 12-15 minutes, until the salmon flakes easily with a fork and the asparagus is tender-crisp.
10. Check for doneness by inserting a fork into the thickest part of the salmon—it should separate into clean flakes.
11. Remove from the oven and let rest for 2 minutes before serving to allow juices to redistribute.
Glistening with delicate herbs and citrus, this salmon emerges from the oven with a moist, buttery texture that contrasts beautifully with the crisp-tender asparagus. The subtle anise-like notes of dill complement the rich fish perfectly, while the lemon adds a bright acidity that cuts through the oiliness. For an elegant presentation, serve alongside quinoa pilaf or over a bed of wild rice, garnished with additional fresh dill and lemon wedges for squeezing at the table.
Eggplant Lasagna with Ricotta Cheese
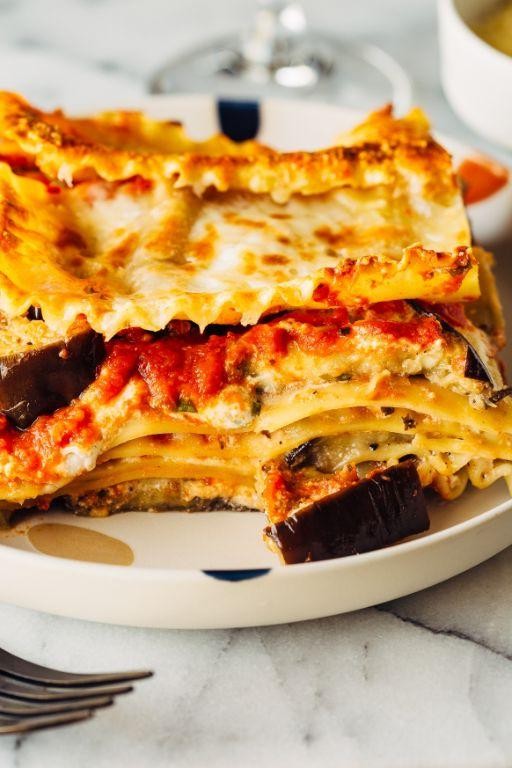
Hearty yet refined, this eggplant lasagna transforms the humble vegetable into layers of creamy sophistication. By replacing traditional pasta with thinly sliced eggplant, we create a dish that feels both comforting and elegant. The rich ricotta filling and robust tomato sauce meld together in perfect harmony, offering a satisfying vegetarian main course that delights the senses.
8
portions45
minutes80
minutesIngredients
– 2 large eggplants
– 1 tablespoon kosher salt
– 3 tablespoons olive oil
– 1 medium yellow onion
– 3 cloves garlic
– 28 ounces crushed tomatoes
– 1 teaspoon dried oregano
– 15 ounces whole milk ricotta cheese
– 1 large egg
– 1/4 cup fresh basil
– 8 ounces mozzarella cheese
– 1/2 cup grated Parmesan cheese
Instructions
1. Slice eggplants lengthwise into 1/4-inch thick strips using a mandoline for uniform thickness.
2. Arrange eggplant slices in a single layer on baking sheets and sprinkle both sides with kosher salt.
3. Let salted eggplant rest for 30 minutes to draw out excess moisture, then pat dry thoroughly with paper towels.
4. Preheat oven to 400°F and brush eggplant slices lightly with 2 tablespoons olive oil on both sides.
5. Roast eggplant for 20 minutes until tender and lightly browned, flipping halfway through cooking.
6. While eggplant roasts, dice yellow onion and mince garlic cloves.
7. Heat remaining 1 tablespoon olive oil in a large saucepan over medium heat.
8. Sauté diced onion for 5 minutes until translucent, then add minced garlic and cook for 1 minute until fragrant.
9. Pour crushed tomatoes into the saucepan and stir in dried oregano.
10. Simmer sauce uncovered for 15 minutes, stirring occasionally, until slightly thickened.
11. In a medium bowl, combine ricotta cheese, egg, and chopped fresh basil until fully incorporated.
12. Shred mozzarella cheese and grate Parmesan cheese separately.
13. Spread 1/2 cup tomato sauce evenly across the bottom of a 9×13-inch baking dish.
14. Layer roasted eggplant slices over the sauce, slightly overlapping edges.
15. Spread half of the ricotta mixture evenly over the eggplant layer.
16. Sprinkle 1/3 of the mozzarella and Parmesan cheeses over the ricotta.
17. Repeat layers with remaining ingredients, ending with a final layer of sauce and cheeses.
18. Cover baking dish with foil and bake at 375°F for 30 minutes.
19. Remove foil and bake uncovered for 15 minutes until cheese is golden and bubbly.
20. Let lasagna rest for 15 minutes before slicing to allow layers to set properly.
Remarkably creamy and structurally sound, this lasagna boasts layers that hold their shape while offering a melt-in-your-mouth texture. The eggplant provides a subtle earthiness that complements the bright tomato sauce and rich cheese filling beautifully. Resting the finished dish ensures clean slices that showcase the beautiful stratification, making it ideal for elegant dinner parties or cozy family gatherings.
Broccoli and Cheddar Cheese Soup

Delightfully creamy yet surprisingly light, this broccoli and cheddar soup transforms humble ingredients into an elegant comfort classic. During crisp autumn evenings, its velvety texture and sharp cheese notes provide the perfect balance of sophistication and nostalgia. Each spoonful delivers the earthy sweetness of broccoli harmonized with aged cheddar’s complex sharpness.
4
servings15
minutes25
minutesIngredients
- 4 tablespoons unsalted butter
- 1 medium yellow onion, diced
- 2 cloves garlic, minced
- 1/4 cup all-purpose flour
- 4 cups chicken broth
- 1 cup heavy cream
- 4 cups broccoli florets
- 1 large carrot, shredded
- 2 cups shredded sharp cheddar cheese
- 1/2 teaspoon smoked paprika
- 1/4 teaspoon nutmeg
- 1 teaspoon salt
- 1/2 teaspoon black pepper
Instructions
- Melt 4 tablespoons unsalted butter in a large Dutch oven over medium heat.
- Add 1 diced yellow onion and cook for 5 minutes until translucent, stirring frequently to prevent browning.
- Stir in 2 minced garlic cloves and cook for 1 minute until fragrant.
- Sprinkle 1/4 cup all-purpose flour over the onion mixture and whisk continuously for 2 minutes to create a golden roux.
- Gradually pour in 4 cups chicken broth while whisking constantly to prevent lumps.
- Bring the mixture to a gentle simmer and cook for 5 minutes until slightly thickened.
- Add 4 cups broccoli florets and 1 shredded carrot to the pot.
- Simmer uncovered for 12 minutes until the broccoli is tender but still bright green.
- Reduce heat to low and stir in 1 cup heavy cream, 1/2 teaspoon smoked paprika, 1/4 teaspoon nutmeg, 1 teaspoon salt, and 1/2 teaspoon black pepper.
- Remove the pot from heat and gradually add 2 cups shredded sharp cheddar cheese, stirring until fully melted and incorporated.
- For a smoother texture, carefully blend half of the soup using an immersion blender while leaving some broccoli florets intact.
Velvety and rich with distinct broccoli texture, this soup showcases the cheddar’s crystalline sharpness against the vegetable’s natural sweetness. Serve in hollowed bread bowls for dramatic presentation, or garnish with extra shredded cheese and crispy broccoli crumbles for contrasting textures that elevate each luxurious bite.
Mushroom and Spinach Stuffed Chicken
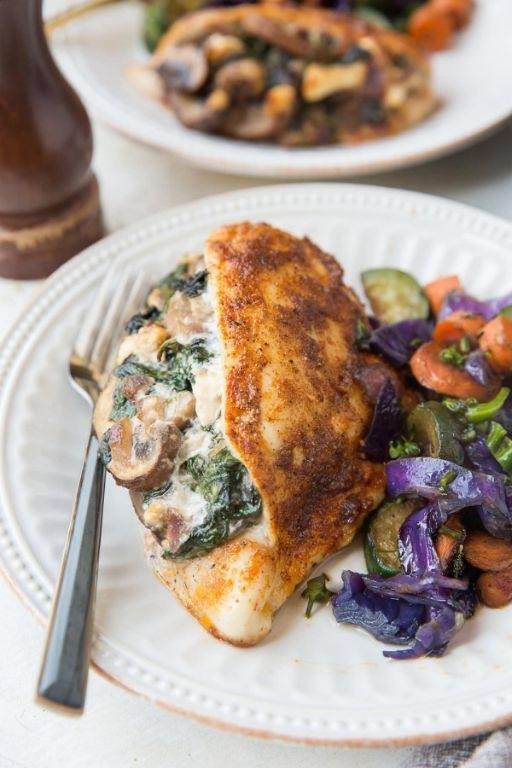
Beneath a golden-brown crust lies a sophisticated surprise—tender chicken breasts generously stuffed with earthy mushrooms and vibrant spinach, creating an elegant main course that transforms simple ingredients into a memorable dining experience. This dish masterfully balances rich umami flavors with fresh herbal notes, making it perfect for both weeknight dinners and special occasions. Each slice reveals the beautiful layered filling, promising both visual appeal and complex taste in every bite.
5
servings20
minutes45
minutesIngredients
– 4 boneless, skinless chicken breasts
– 2 tablespoons olive oil
– 1 cup chopped cremini mushrooms
– 2 cups fresh spinach
– 1/2 cup shredded mozzarella cheese
– 1/4 cup grated Parmesan cheese
– 2 cloves minced garlic
– 1 teaspoon dried thyme
– 1/2 teaspoon salt
– 1/4 teaspoon black pepper
– 1/4 cup chicken broth
Instructions
1. Preheat your oven to 375°F and lightly grease a baking dish with 1 tablespoon olive oil.
2. Using a sharp knife, carefully cut a horizontal pocket through the thickest part of each chicken breast, being careful not to cut all the way through.
3. Heat the remaining 1 tablespoon olive oil in a large skillet over medium-high heat until shimmering.
4. Add the chopped cremini mushrooms and cook for 5-7 minutes until they release their moisture and turn golden brown.
5. Stir in the minced garlic and cook for 1 minute until fragrant, being careful not to burn it.
6. Add the fresh spinach and cook for 2-3 minutes until completely wilted, then remove from heat.
7. Transfer the mushroom-spinach mixture to a bowl and let cool for 5 minutes to prevent melting the cheese prematurely.
8. Stir in the shredded mozzarella, grated Parmesan, dried thyme, salt, and black pepper until well combined.
9. Evenly divide the filling mixture among the 4 chicken breasts, carefully stuffing it into the pockets you created.
10. Secure the openings with toothpicks to prevent the filling from escaping during baking.
11. Arrange the stuffed chicken breasts in the prepared baking dish and pour the chicken broth around them.
12. Bake at 375°F for 25-30 minutes until the internal temperature reaches 165°F when tested with a meat thermometer.
13. Remove from oven and let rest for 5 minutes before carefully removing the toothpicks and slicing.
What makes this dish truly exceptional is the contrast between the juicy chicken exterior and the creamy, savory filling that melts in your mouth. The mushrooms provide an earthy depth while the spinach adds freshness, creating layers of flavor that develop with each bite. Consider serving slices over creamy polenta or alongside roasted asparagus for a complete meal that highlights the elegant simplicity of this stuffed chicken creation.
Creamy Garlic Butter Tuscan Shrimp
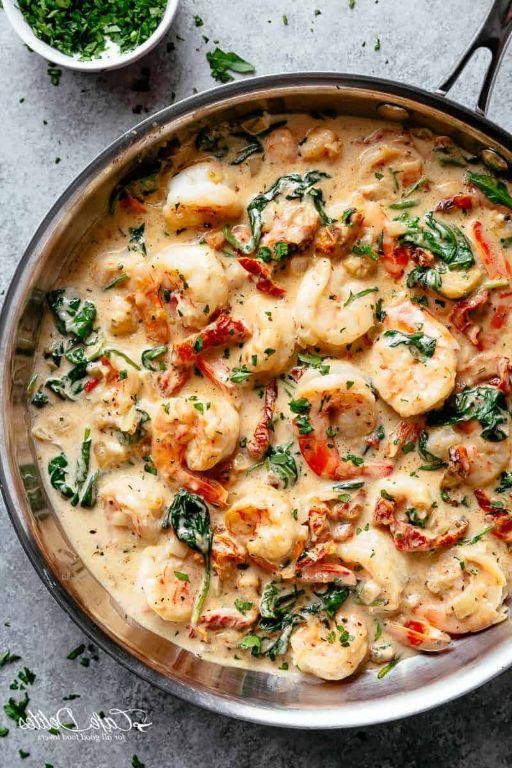
Rich, velvety, and deeply aromatic, this elegant shrimp dish transports you straight to the sun-drenched hills of Tuscany with its luxurious combination of plump seafood and creamy herb-infused sauce. Revel in the way the garlic melds with sweet sun-dried tomatoes and fresh spinach, creating a symphony of flavors that feels both rustic and refined. Perfect for an impressive weeknight dinner or a sophisticated gathering, it comes together with surprising ease.
3
servings15
minutes15
minutesIngredients
- 1 lb large shrimp, peeled and deveined
- 2 tbsp olive oil
- 4 tbsp unsalted butter
- 4 cloves garlic, minced
- 1/2 cup sun-dried tomatoes, chopped
- 1 cup heavy cream
- 1/2 cup grated Parmesan cheese
- 2 cups fresh spinach
- 1 tsp dried Italian seasoning
- 1/4 tsp red pepper flakes
- 1/4 cup fresh basil, chopped
- Salt to season
Instructions
- Pat the shrimp completely dry with paper towels to ensure a proper sear.
- Season the shrimp evenly with salt on both sides.
- Heat 2 tablespoons of olive oil in a large skillet over medium-high heat until shimmering.
- Add the shrimp to the skillet in a single layer, cooking for 2 minutes per side until pink and opaque.
- Transfer the cooked shrimp to a clean plate, arranging them in one layer to prevent steaming.
- Reduce the heat to medium and melt 4 tablespoons of unsalted butter in the same skillet.
- Add 4 cloves of minced garlic and sauté for 1 minute until fragrant but not browned.
- Stir in 1/2 cup of chopped sun-dried tomatoes and cook for 1 additional minute.
- Pour in 1 cup of heavy cream, using a wooden spoon to scrape any browned bits from the pan bottom.
- Add 1 teaspoon of dried Italian seasoning and 1/4 teaspoon of red pepper flakes, stirring to combine.
- Simmer the sauce for 3 minutes, stirring occasionally, until slightly thickened.
- Whisk in 1/2 cup of grated Parmesan cheese until fully melted and the sauce is smooth.
- Add 2 cups of fresh spinach, stirring constantly until just wilted, about 1 minute.
- Return the shrimp to the skillet, along with any accumulated juices, stirring gently to coat.
- Cook for 1 final minute until the shrimp are heated through.
- Remove the skillet from heat and stir in 1/4 cup of chopped fresh basil.
Just as satisfying as its presentation, the finished dish boasts tender shrimp enveloped in a luxuriously creamy sauce with subtle heat from the pepper flakes. Juicy sun-dried tomatoes provide sweet contrast against the earthy spinach and aromatic basil, creating layers of flavor that deepen when served over al dente pasta or creamy polenta. For an elegant touch, garnish with extra basil leaves and a drizzle of high-quality olive oil just before serving.
Beef and Cabbage Stir Fry
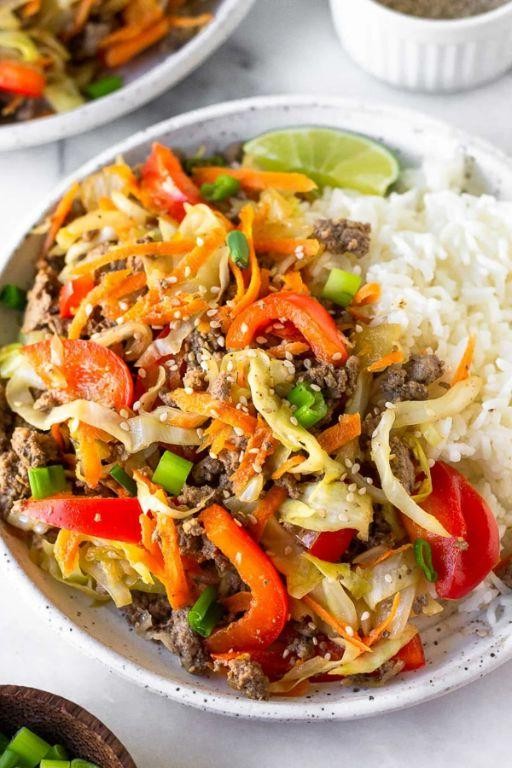
Glistening with savory depth and vibrant color, this beef and cabbage stir fry brings restaurant-quality elegance to your weeknight table. Perfectly balancing tender slices of beef against crisp, sweet cabbage, this dish transforms humble ingredients into something truly special. With its quick cooking time and sophisticated flavor profile, it’s destined to become your new go-to for busy evenings that still deserve culinary distinction.
2
servings15
minutes15
minutesIngredients
– 1 lb flank steak
– 2 tbsp vegetable oil
– 1 medium yellow onion
– 4 cloves garlic
– 1 tbsp fresh ginger
– 1 small head green cabbage
– 3 tbsp soy sauce
– 1 tbsp rice vinegar
– 1 tsp sesame oil
– 2 tsp cornstarch
– 1/4 cup water
– 2 green onions
Instructions
1. Slice 1 lb flank steak against the grain into 1/4-inch thick strips. (Cutting against the grain ensures maximum tenderness in the final dish.)
2. Thinly slice 1 medium yellow onion and mince 4 cloves garlic and 1 tbsp fresh ginger.
3. Cut 1 small head green cabbage into 1-inch pieces and slice 2 green onions diagonally.
4. Whisk together 3 tbsp soy sauce, 1 tbsp rice vinegar, 1 tsp sesame oil, 2 tsp cornstarch, and 1/4 cup water in a small bowl until smooth.
5. Heat 1 tbsp vegetable oil in a large wok or skillet over high heat until shimmering, about 1 minute.
6. Add beef strips in a single layer and cook undisturbed for 2 minutes to develop a golden-brown sear.
7. Flip beef and cook for 1 additional minute, then transfer to a clean plate.
8. Reduce heat to medium-high and add remaining 1 tbsp vegetable oil to the same pan.
9. Add sliced onion and cook for 3 minutes, stirring occasionally, until slightly softened.
10. Add minced garlic and ginger and cook for 30 seconds until fragrant. (Be careful not to burn the garlic, as it will turn bitter.)
11. Add cabbage pieces and stir-fry for 4-5 minutes until cabbage is wilted but still crisp-tender.
12. Return beef and any accumulated juices to the pan.
13. Pour sauce mixture over the ingredients and toss continuously for 1-2 minutes until sauce thickens and coats everything evenly.
14. Remove from heat and stir in sliced green onions. The residual heat will gently wilt them while maintaining their fresh flavor.
15. Transfer to serving plates immediately. Tender beef contrasts beautifully with the crisp cabbage in a glossy, savory sauce that clings perfectly to each component. For an elegant presentation, serve over jasmine rice and garnish with extra green onions, or wrap in warm lettuce cups for a low-carb alternative that highlights the dish’s textural complexity.
Spaghetti Squash Carbonara
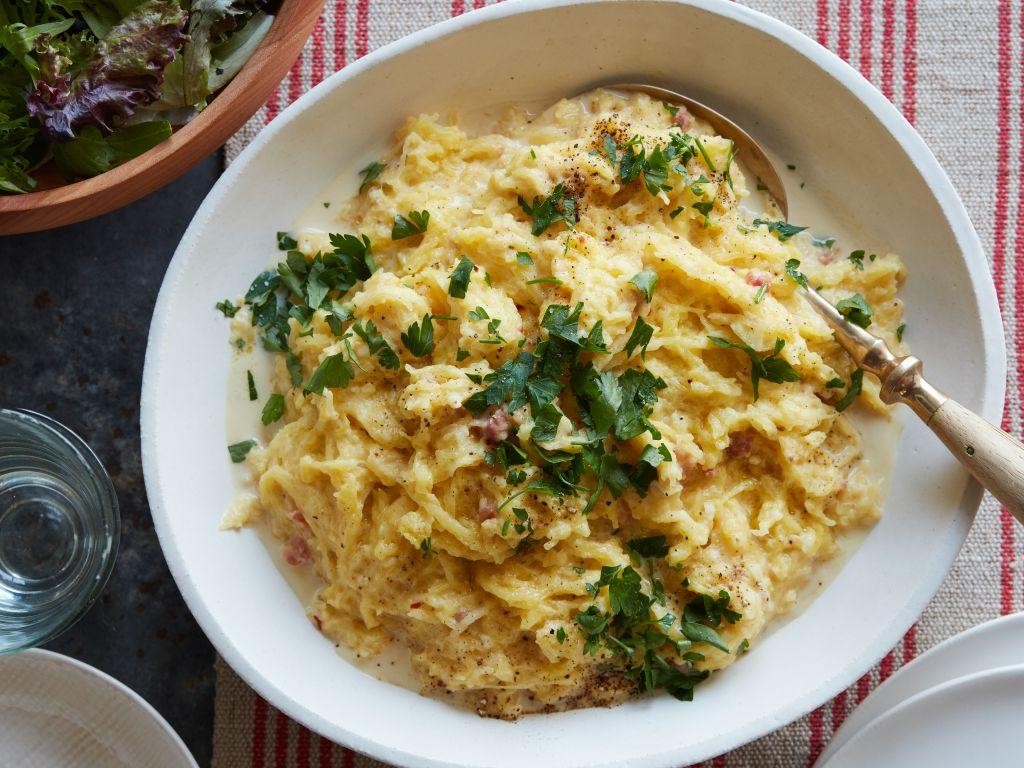
Elegant yet approachable, spaghetti squash carbonara transforms this humble vegetable into a sophisticated dish that marries earthy sweetness with rich, savory notes. Perfect for autumn evenings, it offers a lighter twist on the Italian classic while maintaining all the comforting indulgence. This version celebrates seasonal produce while delivering the creamy, satisfying texture that defines carbonara.
5
servings15
minutes45
minutesIngredients
– 1 large spaghetti squash (about 3 pounds)
– 2 tablespoons olive oil
– 4 slices thick-cut bacon, diced
– 2 large eggs
– 1/2 cup grated Parmesan cheese
– 2 cloves garlic, minced
– 1/4 teaspoon black pepper
– 1/4 teaspoon salt
Instructions
1. Preheat your oven to 400°F and line a baking sheet with parchment paper.
2. Carefully slice the spaghetti squash in half lengthwise using a sharp chef’s knife.
3. Scoop out all seeds and stringy pulp from both squash halves with a spoon.
4. Brush the cut sides of the squash with 1 tablespoon olive oil and place cut-side down on the prepared baking sheet.
5. Roast for 35-40 minutes until the flesh easily pulls away from the skin when tested with a fork.
6. While squash roasts, cook diced bacon in a large skillet over medium heat for 8-10 minutes until crispy and browned.
7. Remove bacon with a slotted spoon, leaving 1 tablespoon of rendered fat in the skillet.
8. Add minced garlic to the skillet and sauté for 1 minute until fragrant but not browned.
9. In a medium bowl, whisk together eggs, Parmesan cheese, black pepper, and salt until fully combined.
10. When squash is done roasting, use a fork to scrape the flesh into long, spaghetti-like strands into a large bowl.
11. Immediately pour the hot egg mixture over the hot squash strands while tossing continuously to create a creamy sauce.
12. Gently fold in the cooked bacon and garlic-infused skillet drippings until evenly distributed.
Velvety strands of squash provide the perfect canvas for the rich, egg-based sauce that clings beautifully to each tender vegetable noodle. The crispy bacon adds contrasting texture while the Parmesan lends a salty complexity that balances the squash’s natural sweetness. For an elegant presentation, serve in the roasted squash shells garnished with extra Parmesan and fresh parsley.
Coconut Flour Bread
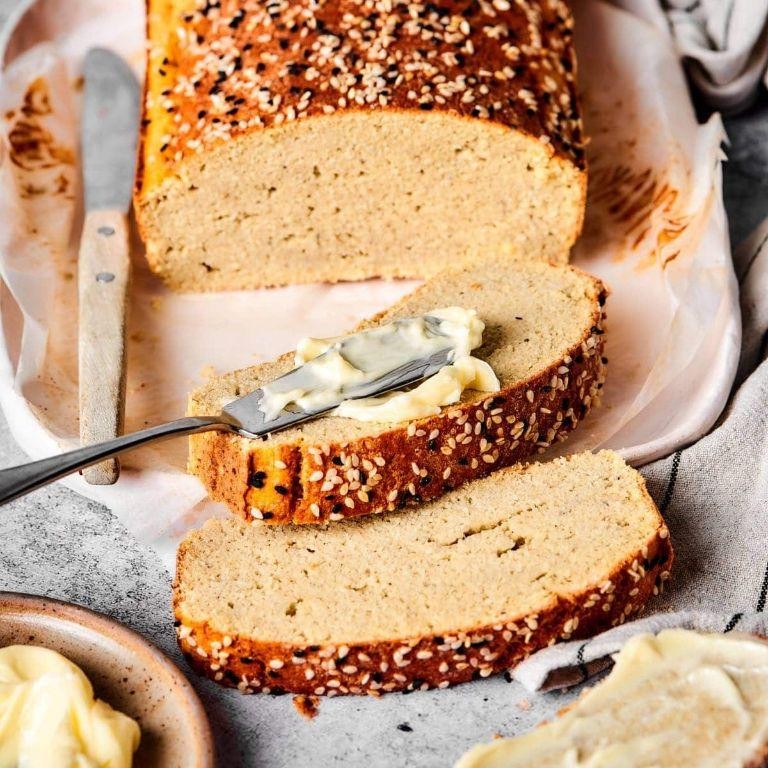
Aromatic and wholesome, coconut flour bread offers a delicate crumb and subtle sweetness that elevates any meal. This gluten-free alternative boasts a tender texture and nutty flavor profile, making it an elegant addition to both breakfast tables and afternoon tea. Crafted with simple ingredients, it delivers sophistication without complexity, perfect for those seeking refined yet approachable baking.
1
loaf15
minutes48
minutesIngredients
– 1 cup coconut flour
– 6 large eggs
– 1/2 cup coconut oil
– 1/4 cup honey
– 1 tsp baking soda
– 1/2 tsp salt
– 1/2 cup warm water (110°F)
Instructions
1. Preheat your oven to 350°F and line a 9×5-inch loaf pan with parchment paper.
2. Whisk together 1 cup coconut flour, 1 tsp baking soda, and 1/2 tsp salt in a large bowl until fully combined.
3. In a separate bowl, beat 6 large eggs until frothy and pale yellow, about 2 minutes.
4. Melt 1/2 cup coconut oil gently until liquid but not hot, then stir in 1/4 cup honey until smooth.
5. Pour the coconut oil mixture into the beaten eggs while continuously whisking to emulsify.
6. Gradually fold the wet ingredients into the dry ingredients using a spatula, scraping the bowl’s sides to incorporate all flour.
7. Add 1/2 cup warm water (110°F) and mix until the batter thickens and no dry spots remain—this prevents a gritty texture.
8. Transfer the batter to the prepared loaf pan and smooth the top with a spatula for even rising.
9. Bake at 350°F for 45–50 minutes, or until the top is golden brown and a toothpick inserted into the center comes out clean.
10. Cool the bread in the pan for 15 minutes, then transfer to a wire rack to cool completely before slicing—this ensures the crumb sets properly.
Perfectly moist with a faint coconut aroma, this bread pairs wonderfully with avocado smash or berry compote. Its dense yet tender crumb holds up to toasting, revealing a subtle sweetness that complements both savory and sweet toppings.
Conclusion
Brimming with flavor and variety, this collection proves that eating low-carb and sugar-free doesn’t mean sacrificing taste. We hope these 27 recipes inspire your next delicious, healthy meal! Give them a try, and let us know your favorites in the comments below. If you found this roundup helpful, please share it on Pinterest to help other home cooks discover these tasty options.