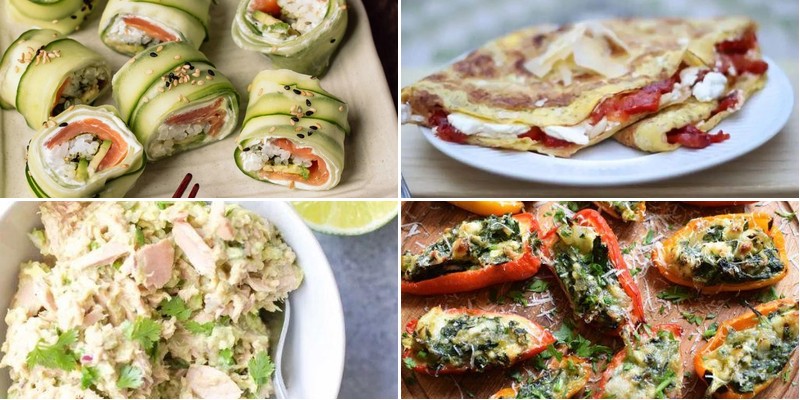
Are you tired of the same boring work lunches that leave you feeling sluggish by 2 PM? We’ve gathered 29 delicious low-carb lunch recipes that are perfect for your busy workday. From quick salads to satisfying wraps, these meals will keep you energized and satisfied all afternoon. Get ready to transform your midday meal routine with these tasty, easy-to-prepare options!
Grilled Chicken Lettuce Wraps
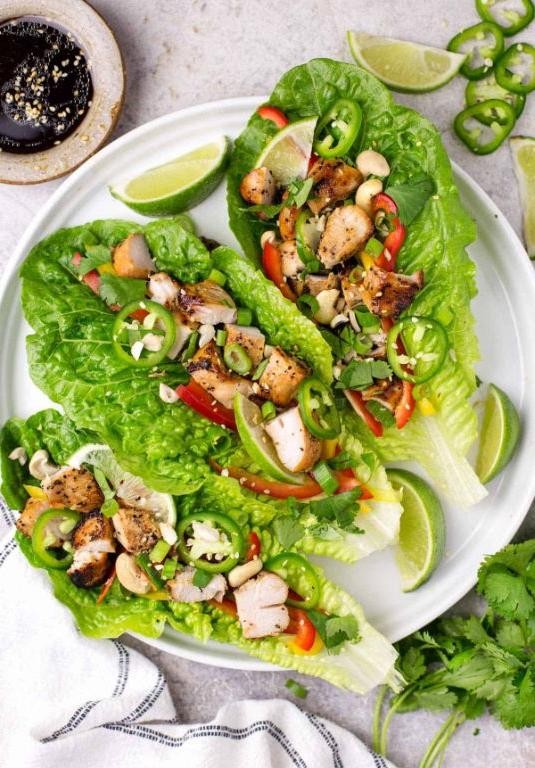
Understanding how to create flavorful, healthy meals doesn’t have to be complicated, and these grilled chicken lettuce wraps are the perfect example. Using simple ingredients and straightforward techniques, you’ll learn to build layers of texture and taste that come together beautifully. Let’s walk through each step together to ensure your success in the kitchen.
8
wraps25
minutes14
minutesIngredients
- 1 lb boneless, skinless chicken breasts – I always pound these to an even ½-inch thickness for consistent cooking
- 2 tbsp extra virgin olive oil – my go-to for its fruity notes that complement the marinade
- 3 tbsp soy sauce – I prefer reduced-sodium to better control the salt level
- 2 tbsp honey – local wildflower honey adds wonderful floral undertones
- 2 cloves garlic, minced – fresh is essential here for that pungent kick
- 1 tbsp rice vinegar – the mild acidity really brightens up the marinade
- 1 tsp grated ginger – I keep ginger root frozen for easy grating
- 8 large butter lettuce leaves – these cupped leaves make perfect edible bowls
- ½ cup shredded carrots – I buy pre-shredded to save time
- ¼ cup chopped green onions – the green parts add nice color contrast
- 2 tbsp chopped cilantro – fresh is non-negotiable for that herbaceous punch
Instructions
- Place chicken breasts between two sheets of plastic wrap and pound to an even ½-inch thickness using a meat mallet or rolling pin.
- Whisk together olive oil, soy sauce, honey, minced garlic, rice vinegar, and grated ginger in a medium bowl until fully combined.
- Add chicken to the marinade, turning to coat completely, then cover and refrigerate for exactly 30 minutes – this timing allows flavors to penetrate without breaking down the texture.
- Preheat your grill to medium-high heat, about 400°F, and lightly oil the grates to prevent sticking.
- Remove chicken from marinade, letting excess drip off, and discard the used marinade for food safety.
- Grill chicken for 6-7 minutes per side, until internal temperature reaches 165°F when checked with an instant-read thermometer.
- Transfer chicken to a cutting board and let rest for 5 minutes – this crucial step allows juices to redistribute throughout the meat.
- While chicken rests, arrange butter lettuce leaves on a serving platter and distribute shredded carrots evenly among them.
- Thinly slice the rested chicken against the grain – cutting perpendicular to the muscle fibers ensures tender, easy-to-eat pieces.
- Divide sliced chicken among the lettuce cups and top with chopped green onions and cilantro.
Perfectly balanced between crisp, cool lettuce and warm, savory chicken, these wraps deliver satisfying texture contrast in every bite. The sweet-spicy marinade caramelizes beautifully on the grill while the fresh herbs provide a bright finish that cuts through the richness. For a fun twist, set up a build-your-own wrap station with additional toppings like crushed peanuts or spicy mayo so everyone can customize their perfect bite.
Spinach and Feta Stuffed Peppers

Ready to transform ordinary bell peppers into a stunning, flavor-packed meal? These spinach and feta stuffed peppers combine vibrant colors with a savory filling that’s both satisfying and surprisingly simple to prepare. Let’s walk through each step together to create a dish that looks as impressive as it tastes.
2
portions20
minutes48
minutesIngredients
- 4 large bell peppers, any color you like – I love using a mix of red and yellow for visual appeal
- 1 tablespoon extra virgin olive oil, my go-to for its fruity notes
- 1 medium yellow onion, diced small – this creates the flavor foundation
- 2 cloves garlic, minced fresh for the best aroma
- 10 ounces frozen spinach, thawed and thoroughly squeezed dry – this step is crucial to prevent sogginess
- 1 cup crumbled feta cheese – I prefer the block style for better texture
- 1 cup cooked rice, cooled – day-old rice works beautifully here
- 1 teaspoon dried oregano
- ½ teaspoon black pepper
- ½ cup vegetable broth
Instructions
- Preheat your oven to 375°F and line a baking dish with parchment paper.
- Slice the tops off the bell peppers and remove all seeds and membranes, creating hollow vessels.
- Heat the olive oil in a large skillet over medium heat until it shimmers, about 1 minute.
- Add the diced onion and cook until translucent and slightly golden, 5-7 minutes, stirring occasionally.
- Stir in the minced garlic and cook for exactly 60 seconds until fragrant but not browned.
- Add the squeezed-dry spinach, breaking it up with your spoon to distribute evenly.
- Remove the skillet from heat and stir in the feta cheese, cooked rice, oregano, and black pepper.
- Season the hollowed peppers lightly with salt inside each cavity.
- Stuff the pepper cavities firmly with the spinach-feta mixture, mounding it slightly at the top.
- Arrange the stuffed peppers upright in your prepared baking dish.
- Pour the vegetable broth into the bottom of the dish around the peppers, not over them.
- Bake uncovered for 35-40 minutes until the peppers are tender when pierced with a fork and the filling is heated through.
- Switch your oven to broil and cook for 2-3 minutes until the tops develop golden spots.
- Remove from oven and let rest for 5 minutes before serving to allow the filling to set.
Just out of the oven, these peppers offer a wonderful contrast between the tender, slightly sweet pepper shells and the savory, creamy filling. The feta becomes beautifully melty while maintaining its distinctive tang, and the spinach provides both color and earthy depth. Consider serving them over a bed of lemon-dressed greens or with a dollop of Greek yogurt for extra creaminess that complements the Mediterranean flavors perfectly.
Zucchini Noodles with Pesto and Cherry Tomatoes
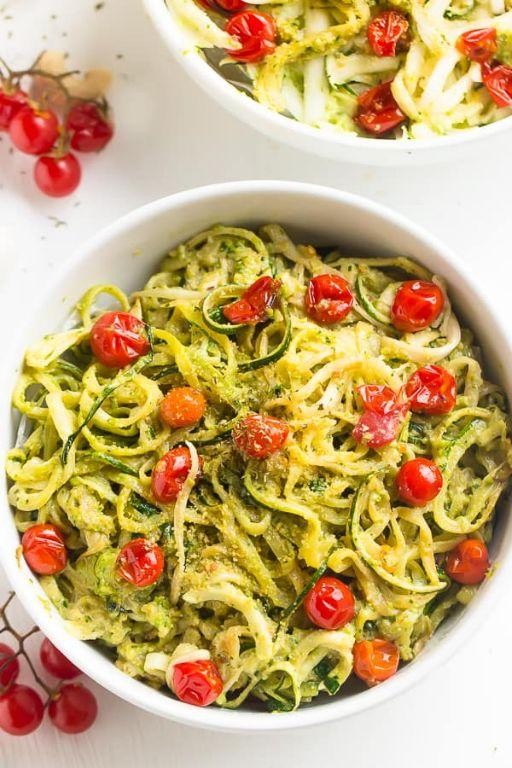
Finally, let’s make a light yet satisfying meal that transforms humble zucchini into elegant noodles. Follow these steps carefully and you’ll master this simple, healthy dish perfect for busy weeknights. Fresh ingredients and proper technique will ensure restaurant-quality results right in your own kitchen.
2
servings15
minutes2
minutesIngredients
– 2 medium zucchini (choose firm, unblemished ones for the best noodle texture)
– 1/2 cup fresh basil leaves (packed tightly – I always grow extra basil just for pesto)
– 1/4 cup extra virgin olive oil (my go-to for its fruity flavor)
– 2 tablespoons pine nuts (toasted brings out their nutty sweetness)
– 1 garlic clove (fresh is essential here, not powdered)
– 1/4 cup grated Parmesan cheese (I prefer the real stuff, not the canned kind)
– 1 cup cherry tomatoes (halved – the sweet burst complements the pesto beautifully)
– 1/4 teaspoon salt (fine sea salt dissolves evenly)
– 1/8 teaspoon black pepper (freshly ground makes all the difference)
Instructions
1. Wash and dry 2 medium zucchini thoroughly, then trim off both ends.
2. Using a spiralizer, create zucchini noodles by pressing firmly and turning the handle slowly. Tip: Don’t overcook zucchini noodles – they should retain some crunch.
3. Place zucchini noodles in a colander, sprinkle with 1/4 teaspoon salt, and let drain for 10 minutes to remove excess moisture.
4. While noodles drain, combine 1/2 cup fresh basil leaves, 2 tablespoons pine nuts, and 1 garlic clove in a food processor.
5. Pulse the mixture 5-6 times until coarsely chopped, scraping down the sides once.
6. With the processor running on low, slowly drizzle in 1/4 cup extra virgin olive oil through the feed tube.
7. Stop the processor, add 1/4 cup grated Parmesan cheese, 1/8 teaspoon black pepper, and pulse 3-4 times until just combined. Tip: Don’t over-process the pesto or it will become bitter.
8. Heat a large skillet over medium heat for 2 minutes until a water droplet sizzles.
9. Add zucchini noodles and cook for exactly 2 minutes, tossing constantly with tongs.
10. Remove skillet from heat and immediately stir in the prepared pesto sauce.
11. Gently fold in 1 cup halved cherry tomatoes until evenly distributed. Tip: Adding tomatoes off the heat keeps them crisp and prevents them from becoming mushy.
12. Divide the mixture between two serving plates using tongs. So there you have it – the zucchini noodles should be tender yet firm, coated in that vibrant pesto that clings perfectly to every strand. The cherry tomatoes provide little bursts of sweetness that cut through the rich garlic and Parmesan flavors. Try serving this chilled for lunch tomorrow, or top with grilled shrimp for a heartier meal that still feels light and fresh.
Avocado and Tuna Salad with Lime Dressing

Zesty and refreshing, this avocado and tuna salad comes together in minutes while delivering maximum flavor. Perfect for busy weeknights or light lunches, it combines creamy textures with bright citrus notes. Let me walk you through each simple step to create this satisfying dish.
5
servings15
minutesIngredients
– 2 ripe avocados (look for slightly soft flesh when gently pressed)
– 2 (5 oz) cans solid white tuna in water, drained (I prefer water-packed for lighter flavor)
– 1/4 cup finely diced red onion (soak in ice water for 5 minutes to mellow the bite)
– 1/4 cup chopped fresh cilantro (stems removed for better texture)
– 3 tbsp fresh lime juice (about 2 medium limes, roll them first for maximum juice)
– 2 tbsp extra virgin olive oil (my go-to for dressings)
– 1/2 tsp kosher salt
– 1/4 tsp freshly ground black pepper
Instructions
1. Drain both cans of tuna thoroughly in a fine mesh strainer, pressing gently with a spoon to remove excess liquid.
2. Halve the avocados lengthwise and remove the pits using a spoon for easy removal.
3. Scoop the avocado flesh into a medium mixing bowl with a large spoon.
4. Add the drained tuna to the bowl with the avocado.
5. Pour 3 tablespoons of fresh lime juice over the avocado and tuna mixture immediately to prevent browning.
6. Drizzle 2 tablespoons of extra virgin olive oil over the ingredients.
7. Sprinkle 1/2 teaspoon of kosher salt and 1/4 teaspoon of black pepper evenly across the mixture.
8. Add 1/4 cup of finely diced red onion and 1/4 cup of chopped cilantro to the bowl.
9. Use a fork to gently mash and combine all ingredients until well incorporated but still slightly chunky.
10. Taste and adjust seasoning if needed, remembering the flavors will meld as it sits.
Scoop this vibrant salad onto toasted whole grain bread for a satisfying sandwich, or serve it over crisp romaine leaves for a lighter option. The creamy avocado contrasts beautifully with the flaky tuna, while the lime dressing keeps everything bright and fresh. This versatile dish also makes excellent stuffed avocado halves when served in the avocado shells themselves.
Cauliflower Fried Rice with Shrimp
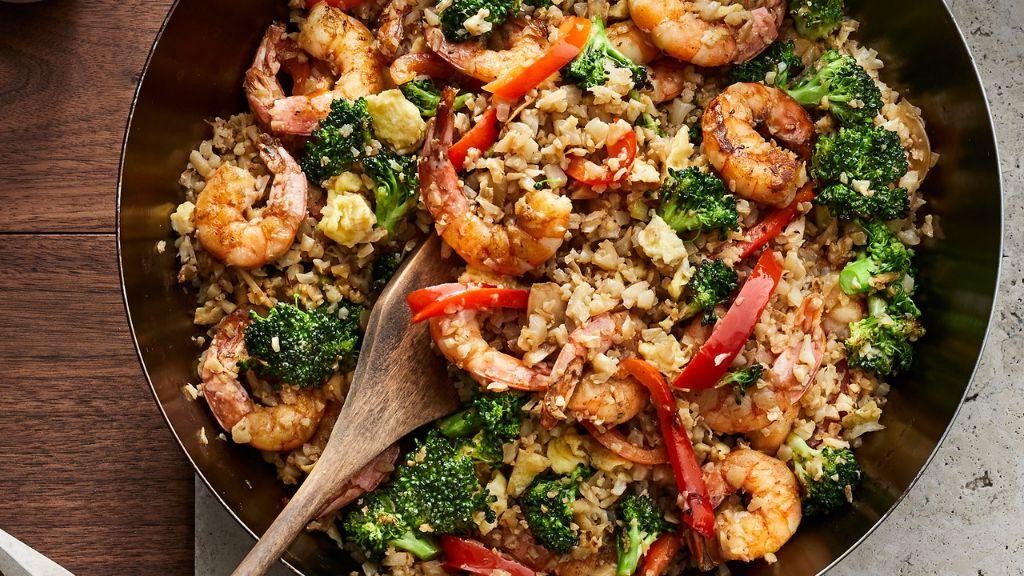
Haven’t we all wished for a lighter alternative to takeout fried rice that doesn’t sacrifice flavor? This cauliflower fried rice with shrimp delivers that satisfying stir-fry experience while keeping things fresh and nutritious. Let me walk you through each simple step to create this restaurant-worthy dish right in your own kitchen.
3
servings15
minutes15
minutesIngredients
– 1 large head cauliflower, riced (about 4 cups) – I find fresh works better than frozen for texture
– 1 lb medium shrimp, peeled and deveined – pat them dry thoroughly for better browning
– 2 large eggs – I prefer room temperature eggs here for more even cooking
– 3 tbsp avocado oil – my high-heat cooking staple that won’t smoke
– 3 cloves garlic, minced – fresh is essential for that aromatic punch
– 1 cup frozen peas and carrots mix – no need to thaw, they cook quickly
– 3 tbsp low-sodium soy sauce – adjust to your preference but start here
– 2 green onions, sliced – save some greens for that fresh garnish
– 1 tsp sesame oil – the finishing touch that makes everything pop
Instructions
1. Place cauliflower florets in a food processor and pulse until they reach rice-like consistency, about 15-20 pulses.
2. Heat 1 tablespoon avocado oil in a large skillet or wok over medium-high heat until shimmering, about 2 minutes.
3. Add shrimp in a single layer and cook for 2 minutes until bottoms turn pink.
4. Flip shrimp and cook for 1 more minute until opaque throughout, then transfer to a plate.
5. Pour remaining 2 tablespoons avocado oil into the hot skillet.
6. Add minced garlic and cook for 30 seconds until fragrant but not browned.
7. Push garlic to one side and pour beaten eggs into the empty space.
8. Scramble eggs for 1 minute until softly set but still moist.
9. Add frozen peas and carrots directly to the skillet – no thawing needed.
10. Stir everything together and cook for 2 minutes until vegetables are tender-crisp.
11. Add riced cauliflower and spread evenly across the skillet surface.
12. Cook undisturbed for 3 minutes to develop some light browning on the cauliflower.
13. Stir cauliflower mixture and continue cooking for 2 more minutes.
14. Return cooked shrimp to the skillet along with any accumulated juices.
15. Drizzle soy sauce evenly over the entire mixture.
16. Toss everything together and cook for 1 final minute to combine flavors.
17. Remove from heat and stir in sesame oil and most of the green onions.
What makes this dish truly special is how the cauliflower maintains a satisfying bite while soaking up all the savory flavors from the shrimp and soy sauce. The final drizzle of sesame oil adds that authentic Asian restaurant aroma that will have everyone asking for seconds. Try serving it in lettuce cups for a low-carb presentation that feels extra special.
Baked Eggplant Parmesan without Bread Crumbs
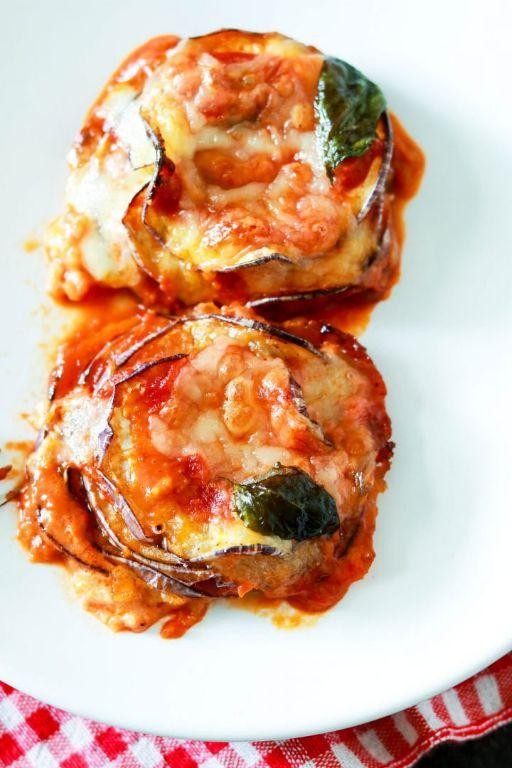
Ever tried making eggplant parmesan but wanted a lighter, gluten-free version? Eliminating breadcrumbs creates a dish that’s just as satisfying but lets the eggplant shine. Expect tender, melt-in-your-mouth layers with a crispy, cheesy top—perfect for a cozy dinner.
5
servings30
minutes40
minutesIngredients
– 2 medium eggplants, sliced into ¼-inch rounds (I find thinner slices crisp up better)
– 1 cup all-purpose flour for dredging (gluten-free flour works wonderfully too)
– 3 large eggs, lightly beaten (room temp eggs coat more evenly)
– 2 cups marinara sauce, divided (I love a jarred organic brand for convenience)
– 2 cups shredded mozzarella cheese
– ½ cup grated Parmesan cheese
– ¼ cup extra virgin olive oil (my go-to for its fruity notes)
– 1 tsp dried oregano
– ½ tsp garlic powder
– ½ tsp salt
– ¼ tsp black pepper
Instructions
1. Preheat your oven to 375°F and lightly grease a 9×13-inch baking dish with olive oil.
2. Arrange eggplant slices in a single layer on a baking sheet and sprinkle both sides evenly with salt; let sit for 15 minutes to draw out moisture, then pat dry with paper towels (this prevents sogginess).
3. Place flour in a shallow bowl and season with oregano, garlic powder, salt, and pepper.
4. Dip each dried eggplant slice first into the flour mixture, shaking off excess, then into the beaten eggs.
5. Heat 2 tablespoons of olive oil in a large skillet over medium heat until shimmering.
6. Working in batches, fry coated eggplant slices for 2–3 minutes per side until golden brown, adding remaining oil as needed.
7. Spread ½ cup marinara sauce evenly across the bottom of the prepared baking dish.
8. Layer half the fried eggplant slices over the sauce in a single, slightly overlapping pattern.
9. Spoon ¾ cup marinara sauce over the eggplant layer, then sprinkle with 1 cup mozzarella and ¼ cup Parmesan.
10. Repeat layers with remaining eggplant, sauce, and cheeses.
11. Bake uncovered for 25–30 minutes until cheese is bubbly and lightly browned at the edges.
12. Let rest for 5 minutes before serving to allow layers to set (this makes slicing cleaner).
Velvety eggplant melds with tangy sauce and gooey cheese in every forkful. Serve it over zucchini noodles for a low-carb twist, or alongside a crisp arugula salad to balance the richness.
Turkey and Cheese Roll-Ups

Zesty and satisfying, these turkey and cheese roll-ups are perfect for busy weeknights when you need something delicious in minutes. I love how the warm, melted cheese pairs with the savory turkey, creating a comforting handheld meal that both kids and adults adore. Let me walk you through each simple step to create these flavorful roll-ups.
2
rolls10
minutes16
minutesIngredients
– 4 large flour tortillas (I prefer the burrito-size ones for easier rolling)
– 8 slices deli turkey (thick-cut works best for texture)
– 1 cup shredded cheddar cheese (I always use sharp cheddar for maximum flavor)
– 2 tbsp mayonnaise (this helps everything stick together beautifully)
– 1 tsp garlic powder (my secret ingredient for extra savory notes)
Instructions
1. Lay one flour tortilla flat on your clean work surface.
2. Spread exactly ½ tablespoon of mayonnaise evenly across the entire tortilla surface, going all the way to the edges.
3. Arrange 2 slices of deli turkey in a single layer over the mayonnaise-covered tortilla.
4. Sprinkle ¼ cup of shredded cheddar cheese evenly over the turkey slices.
5. Dust ¼ teaspoon of garlic powder evenly over the cheese layer.
6. Starting from the edge closest to you, tightly roll the tortilla away from your body, applying gentle pressure as you go.
7. Repeat steps 1-6 with the remaining three tortillas and ingredients.
8. Heat a non-stick skillet over medium heat (350°F if using an electric skillet) for 2 minutes until properly heated.
9. Place two roll-ups seam-side down in the heated skillet.
10. Cook for 3-4 minutes until the bottom develops golden brown spots and becomes slightly crispy.
11. Carefully flip each roll-up using tongs or a spatula.
12. Cook for another 3-4 minutes until the second side matches the first in color and crispiness.
13. Transfer the cooked roll-ups to a cutting board and let rest for 2 minutes before slicing.
14. Cut each roll-up diagonally into 1-inch thick pinwheels using a sharp serrated knife.
15. Repeat the cooking process with the remaining two roll-ups.
Delightfully crispy on the outside with gooey melted cheese inside, these roll-ups offer wonderful textural contrast. The sharp cheddar really shines through the savory turkey, making each bite perfectly balanced. For a fun presentation, arrange the pinwheels on a platter with toothpicks and serve with your favorite dipping sauce.
Broccoli and Cheddar Frittata

Making a frittata is one of those kitchen skills that feels fancy but is actually quite approachable once you break it down. This Broccoli and Cheddar version is perfect for a weekend brunch or a simple dinner, and I’ll walk you through each step to ensure success. You’ll be amazed at how these simple ingredients transform into a beautiful, satisfying meal.
6
wedges15
minutes25
minutesIngredients
– 6 large eggs (I prefer room temperature eggs here—they incorporate more air for a fluffier result)
– 1 cup small broccoli florets (fresh and vibrant green ones work best)
– 1 cup shredded sharp cheddar cheese (I always grab the block and shred it myself for better melting)
– 1/4 cup whole milk (this adds a lovely creaminess without making it too heavy)
– 2 tbsp extra virgin olive oil (my go-to for its fruity notes)
– 1/2 tsp kosher salt
– 1/4 tsp black pepper (freshly cracked adds a nice punch)
– 1/4 cup diced yellow onion (this sweetens beautifully when cooked)
Instructions
1. Preheat your oven to 375°F to ensure it’s ready when needed.
2. Crack 6 large eggs into a medium mixing bowl.
3. Add 1/4 cup whole milk, 1/2 tsp kosher salt, and 1/4 tsp black pepper to the eggs.
4. Whisk the egg mixture vigorously for 45-60 seconds until fully combined and slightly frothy.
5. Heat 2 tbsp extra virgin olive oil in a 10-inch oven-safe skillet over medium heat for 2 minutes.
6. Add 1/4 cup diced yellow onion to the skillet and cook for 3-4 minutes until translucent and fragrant.
7. Add 1 cup small broccoli florets to the skillet and cook for 5-6 minutes until bright green and slightly tender.
8. Tip: Spread the vegetables evenly across the skillet bottom for consistent cooking.
9. Pour the whisked egg mixture evenly over the vegetables in the skillet.
10. Cook undisturbed on the stovetop for 4-5 minutes until the edges begin to set.
11. Sprinkle 1 cup shredded sharp cheddar cheese evenly over the surface.
12. Tip: Use a rubber spatula to gently lift the edges, allowing uncooked egg to flow underneath.
13. Transfer the skillet to the preheated 375°F oven and bake for 12-14 minutes.
14. Tip: The frittata is done when the center is just set and doesn’t jiggle when you shake the skillet.
15. Remove the skillet from the oven using oven mitts and let rest for 3 minutes before slicing.
16. Slice into 6 wedges and serve immediately. Expect a beautifully golden top with a tender, custardy interior that’s packed with savory cheddar and fresh broccoli flavor. This frittata shines when served with a simple arugula salad dressed with lemon vinaigrette, or slice it cold for a fantastic next-day lunch.
Cucumber and Salmon Sushi Rolls
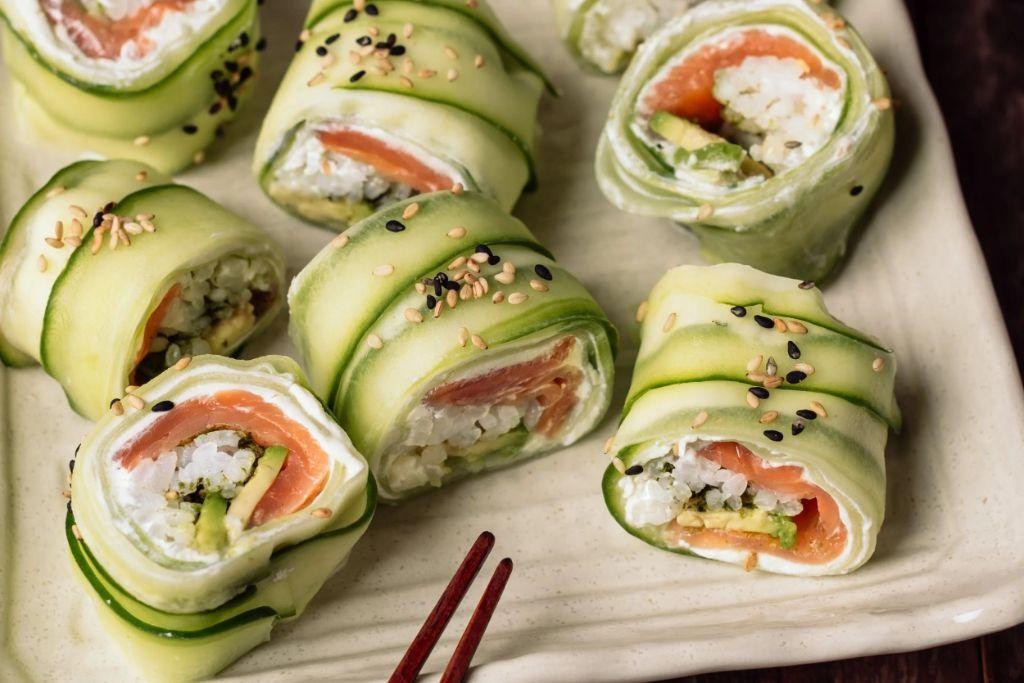
You’ve probably seen sushi rolls at restaurants and thought they were too tricky to make at home, but I’m here to show you how simple it can be with this fresh cucumber and salmon version. Let’s walk through each step together so you can create restaurant-quality rolls right in your own kitchen. By the end, you’ll have a beautiful, tasty dish that’s perfect for sharing or enjoying solo.
2
rolls25
minutes20
minutesIngredients
- 1 cup sushi rice (I always rinse mine until the water runs clear for the best texture)
- 1 ¼ cups water (filtered water makes a difference in flavor)
- 2 tablespoons rice vinegar (this gives the rice its signature tang)
- 1 tablespoon granulated sugar (just a touch to balance the vinegar)
- ½ teaspoon salt (I use fine sea salt for even distribution)
- 4 sheets nori seaweed (look for crisp, dark green sheets)
- ½ pound fresh salmon fillet (sashimi-grade is essential for safety)
- 1 medium cucumber (I prefer English cucumbers for fewer seeds)
- 1 tablespoon soy sauce (low-sodium lets the other flavors shine)
- 1 teaspoon sesame seeds (toasted ones add a nutty crunch)
- Bamboo sushi mat (a game-changer for tight rolling)
Instructions
- Rinse 1 cup sushi rice under cold running water until the water runs clear, gently swishing with your fingers to remove excess starch.
- Combine rinsed rice and 1 ¼ cups water in a medium saucepan, then bring to a boil over high heat.
- Reduce heat to low, cover the saucepan, and simmer for 18 minutes until all water is absorbed.
- Remove rice from heat and let it stand, covered, for 10 minutes to finish steaming.
- Heat 2 tablespoons rice vinegar, 1 tablespoon sugar, and ½ teaspoon salt in a small saucepan over low heat, stirring until sugar and salt dissolve completely, about 2 minutes.
- Transfer cooked rice to a large wooden or glass bowl and drizzle vinegar mixture evenly over top.
- Fold vinegar mixture into rice using a cutting motion with a rice paddle, cooling rice to room temperature while fanning it with a piece of cardboard to create glossy grains.
- Slice ½ pound salmon fillet into ¼-inch thick strips, cutting against the grain for tender pieces.
- Cut 1 medium cucumber into 3-inch long matchsticks, removing seeds if present for less sogginess.
- Place one nori sheet shiny-side down on bamboo sushi mat with long edge facing you.
- Spread ¾ cup seasoned rice evenly over nori, leaving a 1-inch border at the top edge.
- Arrange salmon strips and cucumber matchsticks horizontally across center of rice.
- Lift mat edge closest to you and roll nori over filling, pressing gently to shape a cylinder.
- Continue rolling firmly until seam meets nori, squeezing mat lightly to compact roll.
- Repeat steps 10–14 with remaining nori, rice, and fillings.
- Transfer rolls to cutting board and slice each into 8 pieces using a sharp knife dipped in water between cuts to prevent sticking.
- Drizzle rolls with 1 tablespoon soy sauce and sprinkle with 1 teaspoon sesame seeds before serving.
Fresh from your own hands, these rolls offer a cool crunch from the cucumber against the buttery salmon, all wrapped in seasoned rice. For a fun twist, try serving them with pickled ginger or a dab of wasabi between layers. They’re perfect for a light lunch or as an impressive appetizer that’ll have everyone asking for your secret.
Caprese Salad with Balsamic Glaze
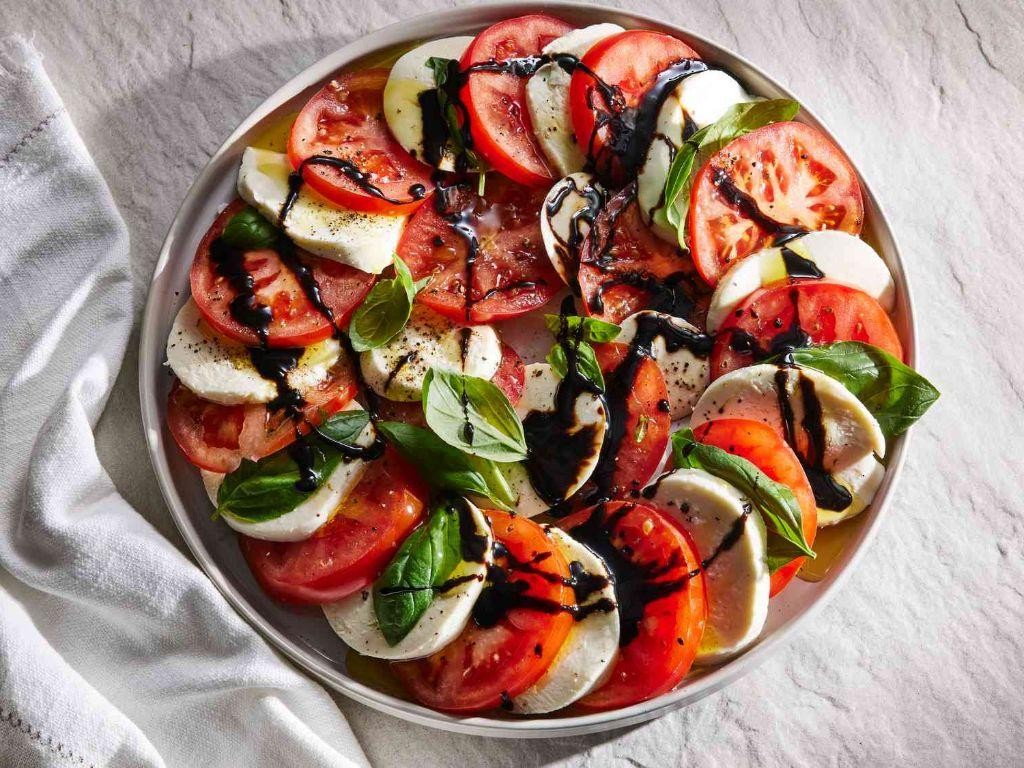
When summer tomatoes are at their peak, there’s no simpler or more satisfying dish than this classic Italian salad. We’ll build it methodically, focusing on quality ingredients and careful assembly to create a perfect balance of flavors. Follow each step precisely for a restaurant-worthy result you can make at home.
2
servings15
minutesIngredients
– 2 large ripe tomatoes (I look for heirlooms with good color variation)
– 8 ounces fresh mozzarella cheese (the kind packed in water gives the best texture)
– 1/4 cup fresh basil leaves (pick the brightest green ones without dark spots)
– 2 tablespoons extra virgin olive oil (my go-to for its fruity notes)
– 1 tablespoon balsamic glaze (the thick, syrupy kind that coats beautifully)
– 1/4 teaspoon sea salt (I prefer coarse for its satisfying crunch)
– 1/8 teaspoon freshly ground black pepper
Instructions
1. Wash the tomatoes under cool running water and pat them completely dry with paper towels.
2. Using a sharp serrated knife, slice each tomato into 1/4-inch thick rounds, cutting through the stem end for even circles.
3. Drain the mozzarella from its packaging liquid and pat the ball dry with fresh paper towels.
4. Slice the mozzarella into 1/4-inch thick rounds that match your tomato slices in diameter.
5. Arrange tomato and mozzarella slices in an alternating, overlapping pattern on your serving platter.
6. Tuck whole basil leaves between the tomato and cheese slices, placing about 8-10 leaves total.
7. Drizzle the olive oil in a zigzag pattern across the entire arrangement, covering all components.
8. Repeat the zigzag pattern with the balsamic glaze, creating attractive contrasting lines.
9. Sprinkle the sea salt evenly over the entire salad, focusing on the tomato slices.
10. Finish by grinding black pepper directly over the platter from about 6 inches above for even distribution.
A perfect Caprese should offer contrasting textures—creamy cheese against juicy tomatoes with crisp basil. The sweet-tart glaze cuts through the richness beautifully. Try serving it alongside grilled bread to soak up the flavorful oils, or layer it in individual jars for a portable picnic version.
Roasted Red Pepper and Goat Cheese Omelette

A perfectly cooked omelette can transform your morning routine, and this roasted red pepper and goat cheese version brings restaurant-quality flair to your home kitchen. Let me guide you through each precise step to ensure fluffy, flavorful results every single time.
1
servings5
minutes6
minutesIngredients
– 3 large eggs (I prefer room temperature eggs here for better volume)
– 2 tablespoons whole milk (this creates the fluffiest texture)
– 1 tablespoon extra virgin olive oil (my go-to for its fruity notes)
– 1/4 cup chopped roasted red peppers (jarred works beautifully)
– 2 tablespoons crumbled goat cheese (I love the creamy tang)
– 1 tablespoon chopped fresh chives
– 1/4 teaspoon kosher salt
– 1/8 teaspoon black pepper
Instructions
1. Crack 3 large eggs into a medium bowl.
2. Add 2 tablespoons whole milk, 1/4 teaspoon kosher salt, and 1/8 teaspoon black pepper to the eggs.
3. Whisk the egg mixture vigorously for 45 seconds until fully combined and slightly frothy.
4. Heat 1 tablespoon extra virgin olive oil in a 10-inch nonstick skillet over medium heat for 2 minutes.
5. Pour the egg mixture into the heated skillet.
6. Let the eggs cook undisturbed for 1 minute until edges begin to set.
7. Use a spatula to gently push cooked edges toward the center, tilting the pan to distribute uncooked eggs.
8. Continue this pushing and tilting motion for 2-3 minutes until eggs are 80% set but still slightly wet on top.
9. Sprinkle 1/4 cup chopped roasted red peppers evenly over one half of the omelette.
10. Distribute 2 tablespoons crumbled goat cheese over the red peppers.
11. Cook for 30 seconds to allow fillings to warm through.
12. Carefully fold the empty half of the omelette over the filled half using your spatula.
13. Slide the completed omelette onto a plate.
14. Garnish with 1 tablespoon chopped fresh chives. During the final moments of cooking, remember to keep the heat at medium to prevent browning—this ensures a beautiful pale yellow color. The key to perfect folding is working quickly while the center remains slightly undercooked. Don’t be tempted to overfill, as this makes rolling difficult.
Delicate and creamy with pockets of sweet roasted pepper, this omelette offers a wonderful contrast between the fluffy eggs and tangy goat cheese. Serve it alongside toasted sourdough for textural variety, or top with extra chives for fresh herbal notes that cut through the richness beautifully.
Ham and Swiss Chard Frittata

Baking a frittata is one of those kitchen skills that feels fancy but is actually quite approachable once you break it down step by step. This ham and Swiss chard version makes for a satisfying breakfast or easy dinner that comes together in one pan, and I’ll walk you through each movement with precision. Let’s transform these simple ingredients into a beautiful, puffed egg dish that’s equally perfect for weekend brunch or meal prep.
3
servings15
minutes28
minutesIngredients
- 8 large eggs (I prefer room temperature eggs here for better volume)
- 1 cup diced ham (about ¼-inch pieces for even distribution)
- 2 cups chopped Swiss chard leaves, packed (stems removed—they can be tough)
- ½ cup shredded Swiss cheese (I love the nutty flavor it adds)
- ¼ cup whole milk (this creates a creamier texture than skim)
- 1 tablespoon extra virgin olive oil (my go-to for its fruity notes)
- ½ teaspoon kosher salt
- ¼ teaspoon black pepper, freshly ground
- 1 small yellow onion, finely diced (about ½ cup)
- 1 garlic clove, minced
Instructions
- Preheat your oven to 375°F to ensure it’s ready when the frittata goes in.
- Crack 8 large eggs into a medium bowl.
- Add ¼ cup whole milk, ½ teaspoon kosher salt, and ¼ teaspoon black pepper to the eggs.
- Whisk the egg mixture vigorously for 45 seconds until fully combined and slightly frothy.
- Heat 1 tablespoon extra virgin olive oil in a 10-inch oven-safe skillet over medium heat.
- Add ½ cup diced yellow onion and cook for 4 minutes, stirring occasionally, until translucent.
- Add 1 minced garlic clove and cook for 30 seconds until fragrant.
- Stir in 1 cup diced ham and cook for 2 minutes to lightly brown the edges.
- Add 2 cups chopped Swiss chard and cook for 3 minutes, stirring constantly, until wilted.
- Spread the vegetable-ham mixture evenly across the skillet bottom.
- Pour the whisked egg mixture over the ingredients in the skillet.
- Sprinkle ½ cup shredded Swiss cheese evenly over the top.
- Cook on the stovetop for 4 minutes without stirring until the edges set.
- Transfer the skillet to the preheated oven and bake for 14 minutes until the center is firm and the top is golden.
- Remove the skillet from the oven using oven mitts.
- Let the frittata rest in the skillet for 5 minutes before slicing.
Resulting in a beautifully puffed golden disk, this frittata emerges from the oven with a tender, almost custardy interior punctuated by salty ham and earthy chard. Serve it warm in wedges with a crisp green salad, or try it at room temperature sliced into squares for a picnic—the flavors meld beautifully as it cools.
Lemon Herb Grilled Shrimp Skewers

Keeping weeknight dinners exciting doesn’t require fancy techniques—just fresh ingredients and a hot grill. Lemon Herb Grilled Shrimp Skewers deliver bright, zesty flavor in under 30 minutes, making them perfect for busy evenings when you want something special without the fuss. Let’s walk through each step together to ensure your shrimp come out perfectly juicy and charred every time.
3
portions20
minutes4
minutesIngredients
- 1 pound large raw shrimp, peeled and deveined (I always buy wild-caught for superior flavor)
- 3 tablespoons extra virgin olive oil (my go-to for its fruity notes)
- 2 tablespoons freshly squeezed lemon juice (bottled just won’t give you that bright pop)
- 2 cloves garlic, minced (freshly minced garlic makes all the difference here)
- 1 teaspoon dried oregano (crush it between your palms to wake up the oils)
- 1/2 teaspoon kosher salt (I prefer this over table salt for better distribution)
- 1/4 teaspoon black pepper (freshly ground gives the best aroma)
- Metal or soaked wooden skewers (soaking prevents burning—trust me on this)
Instructions
- If using wooden skewers, submerge them completely in water for 30 minutes to prevent burning.
- Pat the shrimp completely dry with paper towels—this helps the marinade stick better.
- In a medium bowl, whisk together olive oil, lemon juice, minced garlic, oregano, salt, and pepper until fully combined.
- Add the dried shrimp to the marinade and toss gently to coat every piece evenly.
- Let the shrimp marinate at room temperature for exactly 15 minutes—any longer and the lemon juice will start to “cook” the shrimp.
- While shrimp marinates, preheat your grill to medium-high heat, about 400°F.
- Thread 4-5 shrimp onto each skewer, piercing through both the head and tail ends for stability.
- Place skewers directly on the hot grill grates and cook for 2 minutes undisturbed.
- Flip skewers using tongs and cook for another 2 minutes until shrimp turn opaque pink with light grill marks.
- Remove skewers from grill immediately to prevent overcooking.
These skewers emerge with a perfect balance of tender, springy texture and smoky char. The lemon-herb marinade caramelizes beautifully on the grill, creating little pockets of tangy sweetness against the savory garlic. Try serving them over cilantro-lime rice or tucking them into warm tortillas with avocado slices for a quick shrimp taco night.
Conclusion
Here’s a fantastic collection of low-carb lunches that make healthy eating at work both simple and satisfying. We hope these recipes inspire your midday meals! Try your favorites and let us know which ones you love in the comments below. Don’t forget to share this roundup on Pinterest to help other busy food lovers discover these delicious options.