Let’s be real – between school runs, work deadlines, and the endless cycle of laundry, finding time to bake a beautiful layer cake feels impossible. Lemon layer cake brings that perfect balance of bright citrus flavor and comforting sweetness that makes any ordinary day feel special, and I’ve streamlined this recipe to fit into the chaotic reality of family life without sacrificing that wow factor.
Why This Recipe Works
- One-bowl mixing means fewer dishes and faster cleanup – because who has time to wash multiple mixing bowls when there’s homework to supervise and lunches to pack for tomorrow?
- Room temperature ingredients blend quickly and evenly, eliminating the frustration of lumpy batter and giving you consistently tender cake layers every single time.
- The make-ahead frosting can be prepared during naptime or while waiting for soccer practice to end, breaking the process into manageable chunks that don’t overwhelm your already packed schedule.
- Simple syrup brushing keeps the cake moist for days, making it perfect for baking ahead of birthday parties or potlucks when you know you’ll be juggling multiple responsibilities.
- Standard pantry ingredients mean no special trips to the store – you can whip this up with what you already have on hand for those last-minute “I need a dessert tomorrow” emergencies.
Ingredients
- 2 ½ cups all-purpose flour, spooned and leveled
- 2 ½ teaspoons baking powder
- ½ teaspoon baking soda
- 1 teaspoon salt
- 1 cup unsalted butter, softened at room temperature
- 1 ¾ cups granulated sugar
- 4 large eggs, at room temperature
- 1 tablespoon lemon zest, finely grated
- ¼ cup fresh lemon juice
- 1 teaspoon vanilla extract
- 1 cup buttermilk, at room temperature
- ½ cup simple syrup (¼ cup water + ¼ cup sugar heated until dissolved)
- 8 ounces cream cheese, softened at room temperature
- ½ cup unsalted butter, softened at room temperature
- 4 cups powdered sugar, sifted
- 2 tablespoons fresh lemon juice
- 1 teaspoon lemon zest
- ½ teaspoon vanilla extract
Equipment Needed
- Two 9-inch round cake pans
- Parchment paper
- Mixing bowls
- Electric mixer or whisk
- Measuring cups and spoons
- Cooling rack
- Offset spatula
- Cake stand or serving plate
Instructions

Prepare Your Pans and Oven
Preheat your oven to 350°F and grab those two 9-inch round cake pans. Tear off two sheets of parchment paper and trace the bottom of your pans, then cut just inside the lines – this trick saves you from wrestling with awkward pre-cut rounds. Lightly grease the pans with butter or baking spray, then press the parchment circles into the bottom. The parchment guarantees your cakes will release perfectly every time, which is crucial when you’re too exhausted to deal with stuck cakes after a long day. Give the parchment a light dusting of flour, tapping out any excess. This entire process should take about 5 minutes max, and having your pans ready means you can move quickly once your batter is mixed.
Mix the Dry Ingredients
Combine Wet Ingredients and Finish Batter
Using your electric mixer or a sturdy whisk, beat 1 cup softened butter with 1 ¾ cups granulated sugar on medium speed for 3-4 minutes until pale and fluffy. Scrape down the sides of the bowl, then add 4 room-temperature eggs one at a time, beating for 30 seconds after each addition. Mix in 1 tablespoon lemon zest, ¼ cup lemon juice, and 1 teaspoon vanilla extract. Now alternate adding your dry ingredients with 1 cup buttermilk, starting and ending with dry ingredients, mixing just until combined after each addition. The batter should be smooth and thick but pourable. Pro tip: if your buttermilk isn’t at room temperature, microwave it for 15-20 seconds to take the chill off – cold ingredients can cause your cake to dome or bake unevenly.
Bake and Cool the Layers
Divide the batter evenly between your prepared pans – I like to use a kitchen scale for precision, but if you’re eyeballing it, just alternate spoonfuls between the two pans. Smooth the tops with a spatula and tap the pans firmly on the counter to release any large air bubbles. Bake at 350°F for 28-32 minutes, rotating pans halfway through. The cakes are done when they spring back when lightly pressed in the center and a toothpick inserted comes out with a few moist crumbs. Cool in pans on a wire rack for 15 minutes, then run a knife around the edges and invert onto the rack to cool completely. This cooling time is perfect for starting the frosting or dealing with whatever kid crisis has emerged.
Make the Cream Cheese Frosting
While cakes cool, beat 8 ounces softened cream cheese and ½ cup softened butter with your electric mixer on medium speed until completely smooth – about 2 minutes. Gradually add 4 cups sifted powdered sugar on low speed until incorporated, then increase to medium-high and beat for 3 minutes until light and fluffy. Mix in 2 tablespoons lemon juice, 1 teaspoon lemon zest, and ½ teaspoon vanilla extract until just combined. If your frosting seems too soft for spreading, refrigerate for 20-30 minutes while you finish cleaning up or attend to other tasks. This frosting can be made up to 2 days ahead and stored covered in the refrigerator – just let it come to room temperature and re-whip before using.
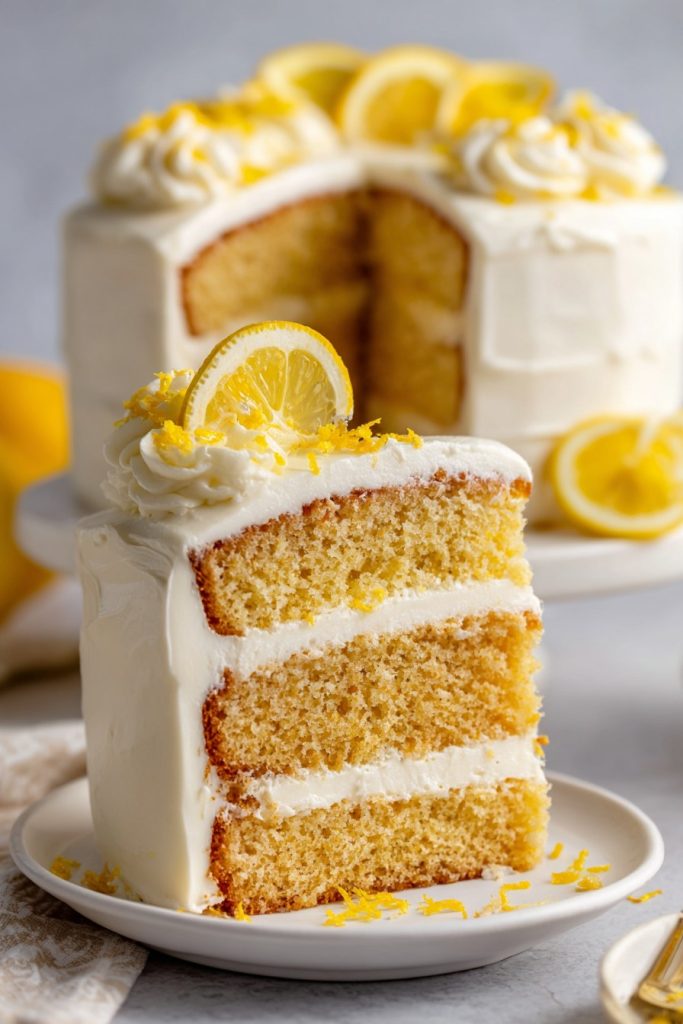
Assemble and Frost the Cake
Place one cake layer on your serving plate and brush generously with half of the simple syrup – this keeps the cake moist for days. Spread about 1 cup of frosting evenly over the layer, going all the way to the edges. Top with the second cake layer, brush with remaining simple syrup, then apply a thin “crumb coat” of frosting over the entire cake. Refrigerate for 20 minutes to set the crumb coat, then frost with the remaining frosting. Use an offset spatula to create pretty swirls, or just smooth it for a rustic look – perfection isn’t the goal here, getting dessert on the table is. The crumb coat step might seem extra, but it prevents crumbs in your final frosting and actually saves time on fixing mistakes.
Tips and Tricks
Room temperature ingredients are non-negotiable for this recipe – they incorporate more evenly and create a better texture. If you forgot to take your ingredients out, here’s the busy parent hack: place cold eggs in a bowl of warm water for 10 minutes, microwave butter in 5-second bursts until soft but not melted, and measure buttermilk then microwave for 15 seconds. When zesting lemons, do it directly over your mixing bowl to catch every bit of precious citrus oil. Always zest before juicing – it’s nearly impossible to zest a juiced lemon. For the fluffiest frosting, make sure your cream cheese and butter are truly at room temperature (about 70°F), not just slightly softened. If your cakes dome during baking, don’t stress – just use a serrated knife to level them once completely cool, and snack on the trimmings while you frost. The simple syrup brushing might seem like an extra step, but it’s your insurance policy against dry cake, especially if you’re baking ahead. Store leftover cake covered at room temperature for up to 3 days, or refrigerate if your kitchen runs warm. To freeze, wrap unfrosted layers tightly in plastic wrap and foil, then freeze for up to 3 months – thaw overnight in the refrigerator before frosting. When measuring flour, never scoop directly from the bag as this packs too much flour into your cup. Instead, spoon flour into your measuring cup and level with a straight edge. If you don’t have buttermilk, make your own by adding 1 tablespoon lemon juice or vinegar to 1 cup milk and letting it sit for 5 minutes. For clean slices, dip your knife in hot water and wipe dry between cuts. If your frosting becomes too soft while working with it, just pop the bowl in the refrigerator for 10-15 minutes to firm up. The assembled cake actually tastes better the next day as the flavors have time to meld, making it perfect for baking ahead of busy weekends or special occasions.
Recipe Variations
- Lemon Blueberry Cake: Fold 1 cup fresh or frozen blueberries (tossed with 1 tablespoon flour) into the batter right before dividing between pans. The berries add natural sweetness and beautiful color pockets throughout each slice. If using frozen blueberries, do not thaw them first to prevent color bleeding. This variation works beautifully for spring birthdays or Easter celebrations when you want something a little extra special but still manageable for busy schedules.
- Lemon Raspberry Cake: Spread a thin layer of seedless raspberry jam between the cake layers along with the frosting for a stunning pink and yellow contrast that kids adore. You can also garnish the top with fresh raspberries and mint leaves for a professional-looking finish that takes seconds to arrange. The tart raspberries complement the lemon perfectly while adding visual appeal that makes it look like you spent hours in the kitchen.
- Coconut Lemon Cake: Toast 1 cup sweetened shredded coconut in a 350°F oven for 5-7 minutes until golden, then press onto the sides of the frosted cake for a tropical twist. Add ½ teaspoon coconut extract to the frosting for extra flavor. This variation feels fancy but requires minimal extra effort – perfect for potlucks where you want to impress without stress.
- Lemon Poppy Seed Cake: Add 3 tablespoons poppy seeds to the dry ingredients for classic texture and visual interest. The poppy seeds add a subtle crunch and make the cake feel more sophisticated while still being family-friendly. This version works particularly well for brunch gatherings or teacher appreciation events when you want something that feels special but isn’t overwhelmingly rich.
- Gluten-Free Lemon Cake: Substitute the all-purpose flour with 2 ½ cups gluten-free flour blend (like Bob’s Red Mill 1:1) and add ½ teaspoon xanthan gum if your blend doesn’t include it. The recipe works surprisingly well with gluten-free modifications, allowing you to accommodate dietary restrictions without making a separate dessert. Nobody will guess it’s gluten-free, which is perfect when feeding mixed groups with different needs.
Frequently Asked Questions
Can I make this cake ahead of time?
Absolutely, and I actually recommend it for busy families. The unfrosted cake layers can be baked, cooled completely, wrapped tightly in plastic wrap, and frozen for up to 3 months. Thaw overnight in the refrigerator before frosting. The frosting can be made up to 5 days ahead and stored covered in the refrigerator – just let it come to room temperature and re-whip before using. The fully assembled cake keeps beautifully at room temperature for 3 days or refrigerated for up to 1 week. Making components ahead means you can throw together a impressive dessert in minutes when unexpected guests arrive or you need something for a school event.
What if I don’t have buttermilk?
No worries – this happens to me all the time when I’m trying to bake while also managing grocery logistics. Simply measure 1 cup of whole milk or 2% milk and add 1 tablespoon of lemon juice or white vinegar. Stir and let it sit for 5-10 minutes until it thickens slightly and looks curdled. This homemade buttermilk substitute works perfectly in this recipe and saves you from making an extra store run. If you’re really in a pinch, you can also use 1 cup plain yogurt thinned with 2 tablespoons milk, though the texture will be slightly denser but still delicious.
Why did my cake layers dome in the middle?
Doming is usually caused by oven temperature issues or over-mixing. First, check your oven temperature with an inexpensive oven thermometer – home ovens can be off by 25-50 degrees. If your oven runs hot, it sets the edges too quickly while the center continues to rise. Also, make sure you’re mixing just until ingredients are combined after adding the flour – over-mixing develops gluten and can cause doming. If your cakes still dome, don’t stress! Just use a serrated knife to level them once completely cool. The trimmings make excellent chef’s snacks or can be crumbled over ice cream for an easy dessert another night.
Can I use bottled lemon juice instead of fresh?
While fresh lemon juice definitely provides brighter flavor, I understand that sometimes you just need to use what’s in the fridge. Bottled lemon juice will work in a pinch, but reduce the amount by about 25% since it tends to be more concentrated and sometimes has preservatives that affect flavor. You’ll still want to use fresh lemon zest though, as that’s where most of the essential lemon oils live. The bottled juice version will taste good but lack that really vibrant, fresh lemon punch. If you’re making this for a casual family dinner, bottled is fine – for special occasions, fresh is worth the extra effort.
How do I prevent my frosting from becoming too soft?
Soft frosting usually means your cream cheese or butter was too warm. Both should be at cool room temperature (about 65-68°F) – they should yield slightly to pressure but not feel warm or oily. If your kitchen is warm, work quickly and chill the frosting for 20-30 minutes before using. If the frosting becomes too soft while you’re working with it, just pop the bowl in the refrigerator for 10-15 minutes to firm up. You can also add an extra ¼ cup of powdered sugar to help stabilize it, though this will make it sweeter. Proper temperature control is the secret to frosting that holds its shape without being stiff or difficult to spread.
Summary
This lemon layer cake delivers impressive results with realistic methods that fit into packed family schedules. The straightforward process, make-ahead options, and practical techniques ensure dessert success without adding stress to your already busy life.
Lemon Layer Cake
4
servings30
minutes30
minutesIngredients
Instructions
- 1 Preheat oven to 350°F. Line two 9-inch round cake pans with parchment and grease.
- 2 Whisk flour, baking powder, baking soda, and salt in large bowl.
- 3 Beat butter and sugar until fluffy. Add eggs one at a time, then lemon zest, juice, and vanilla.
- 4 Alternate adding dry ingredients with buttermilk, mixing just until combined.
- 5 Divide batter between pans and bake 28-32 minutes until golden and springy.
- 6 Cool cakes completely, then brush with simple syrup and frost with cream cheese frosting.