Every time I bake this lemon and strawberry cake, the kitchen fills with the same sweet aroma that once wafted through my grandmother’s farmhouse kitchen. This recipe has been passed down through three generations of women in our family, each adding their own little touch while keeping the heart of the recipe intact. There’s something truly magical about how the bright citrus notes dance with the sweet berries to create a dessert that tastes like sunshine itself.
Why This Recipe Works
This beloved family recipe stands the test of time for several wonderful reasons. The combination of fresh lemon zest and juice in both the cake batter and frosting creates layers of citrus flavor that cut through the sweetness perfectly. Using fresh strawberries at their peak ripeness ensures natural sweetness and vibrant color throughout the cake. The buttermilk in the batter creates an incredibly tender crumb that melts in your mouth, while the cream cheese frosting provides just the right amount of tang to balance the sweet fruit. Most importantly, this recipe uses simple, wholesome ingredients that come together to create something truly extraordinary – the kind of dessert that makes people close their eyes and smile with pure contentment.
Ingredients
For the Cake:
– 2 ½ cups all-purpose flour
– 2 teaspoons baking powder
– ½ teaspoon baking soda
– 1 teaspoon salt
– 1 cup unsalted butter, softened to room temperature
– 1 ¾ cups granulated sugar
– 3 large eggs at room temperature
– 2 tablespoons fresh lemon zest (from about 3 medium lemons)
– ¼ cup fresh lemon juice
– 1 teaspoon pure vanilla extract
– 1 cup buttermilk at room temperature
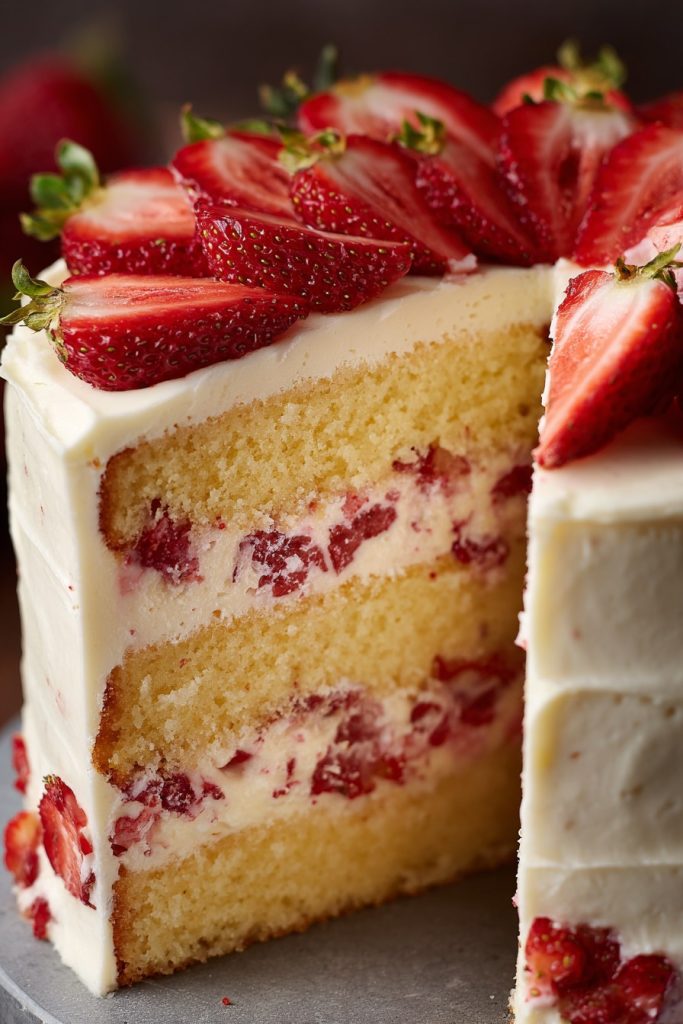
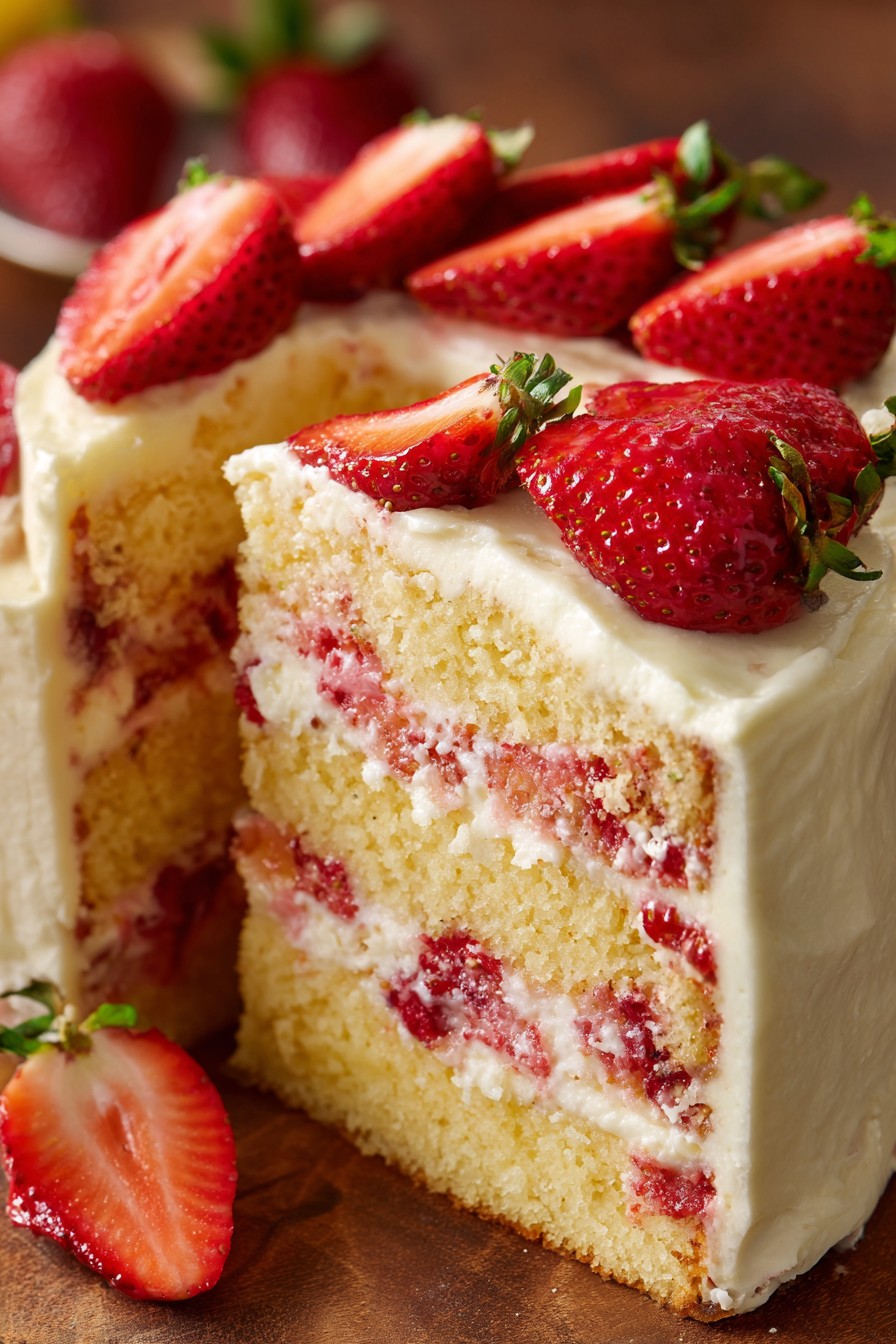
– 1 ½ cups fresh strawberries, hulled and chopped into small pieces
– 1 tablespoon all-purpose flour (for tossing with strawberries)
For the Lemon Cream Cheese Frosting:
– 8 ounces cream cheese, softened to room temperature
– ½ cup unsalted butter, softened to room temperature
– 4 cups powdered sugar, sifted
– 2 tablespoons fresh lemon juice
– 1 teaspoon fresh lemon zest
– ¼ teaspoon salt
– 1 cup fresh strawberries, sliced for decoration
Equipment Needed
– Two 9-inch round cake pans
– Parchment paper
– Electric mixer (stand or hand)
– Mixing bowls (various sizes)
– Measuring cups and spoons
– Zester or fine grater
– Juicer or reamer
– Wire cooling racks
– Offset spatula
– Cake tester or toothpicks
– Rubber spatula
Instructions
Preparing Your Cake Pans and Strawberries
Before we begin mixing our batter, we need to prepare our cake pans and strawberries properly. Start by preheating your oven to 350°F and positioning your oven rack in the center. Take your two 9-inch round cake pans and grease them thoroughly with butter or cooking spray, then line the bottoms with parchment paper circles – this ensures your cakes will release perfectly without sticking. Now, let’s prepare our strawberries: wash and hull about 1 ½ cups of fresh strawberries, then chop them into small, bite-sized pieces. Place the chopped strawberries in a small bowl and toss them with 1 tablespoon of all-purpose flour – this little trick helps prevent the berries from sinking to the bottom of your cake during baking. Set these aside while we mix our batter, and remember to zest and juice your lemons now too, as fresh citrus makes all the difference in flavor.
Creating the Perfect Cake Batter
Now we’ll create the foundation of our cake with careful attention to mixing techniques. In a medium bowl, whisk together 2 ½ cups all-purpose flour, 2 teaspoons baking powder, ½ teaspoon baking soda, and 1 teaspoon salt until well combined – this ensures our leavening agents are evenly distributed. In your large mixing bowl, cream together 1 cup of softened butter and 1 ¾ cups granulated sugar using your electric mixer on medium speed for about 3-4 minutes, until the mixture becomes pale, fluffy, and almost white in color. Add your 3 room-temperature eggs one at a time, beating well after each addition until fully incorporated. Now mix in 2 tablespoons of fresh lemon zest, ¼ cup fresh lemon juice, and 1 teaspoon vanilla extract – the kitchen should be filling with that wonderful citrus aroma by now. Alternate adding the flour mixture and 1 cup of buttermilk to the butter mixture, beginning and ending with the flour, and mixing just until combined after each addition. Be careful not to overmix at this stage.
Folding in Strawberries and Baking to Perfection
This is where our cake truly comes to life with the addition of those beautiful strawberries. Using a rubber spatula, gently fold the flour-coated strawberry pieces into your cake batter until they’re evenly distributed throughout – be gentle to avoid crushing the berries and turning your batter pink. Divide the batter equally between your two prepared cake pans, smoothing the tops with your spatula to create an even surface. Place both pans in your preheated 350°F oven and bake for 28-32 minutes. You’ll know the cakes are done when they’re golden brown on top, the edges begin to pull away from the sides of the pans, and a cake tester or toothpick inserted into the center comes out clean with just a few moist crumbs attached. Avoid opening the oven door during the first 20 minutes of baking to prevent the cakes from falling.
Cooling and Preparing the Frosting
Proper cooling is essential for a cake that holds its shape when frosted. When your cakes are done baking, remove them from the oven and let them cool in their pans on wire racks for exactly 15 minutes – this allows them to set enough to handle without breaking. After 15 minutes, run a knife around the edges of each pan to loosen the cakes, then carefully invert them onto the wire racks, peel off the parchment paper, and let them cool completely to room temperature, which typically takes about 1-2 hours depending on your kitchen temperature. While the cakes cool, prepare your frosting: in your mixing bowl, beat 8 ounces of softened cream cheese and ½ cup softened butter together on medium speed until completely smooth and creamy, about 2 minutes. Gradually add 4 cups of sifted powdered sugar, mixing on low speed at first to avoid a sugar cloud, then increase to medium until well combined. Finally, beat in 2 tablespoons fresh lemon juice, 1 teaspoon lemon zest, and ¼ teaspoon salt until the frosting is light and fluffy.
Assembling and Decorating Your Masterpiece
Now for the most rewarding part – bringing all the elements together into a beautiful finished cake. Place one completely cooled cake layer on your serving plate or cake stand. Spread about ¾ cup of the lemon cream cheese frosting evenly over the top of this first layer, creating a smooth surface that extends just to the edges. Carefully place the second cake layer on top, making sure it’s centered and level. Apply a thin layer of frosting over the entire cake to create a “crumb coat” – this initial thin layer seals in any loose crumbs and helps create a smooth final surface. Refrigerate the cake for 20-30 minutes to set the crumb coat, then frost the entire cake with the remaining frosting using your offset spatula. For the final touch, arrange 1 cup of fresh strawberry slices in a decorative pattern on top of the cake, pressing them gently into the frosting. Let the cake sit at room temperature for about 30 minutes before slicing to allow the flavors to meld perfectly.
Tips and Tricks
Over the years, our family has discovered numerous little secrets that make this cake truly exceptional. When selecting your strawberries, choose berries that are deep red throughout without white tops – these will be the sweetest and most flavorful. If your strawberries aren’t perfectly ripe, you can toss them with a tablespoon of sugar and let them macerate for 30 minutes before chopping and flouring them for the batter. For the lemon components, always zest your lemons before juicing them – it’s much easier this way. When measuring flour, use the spoon-and-level method rather than scooping directly from the bag to avoid dense cake. Room temperature ingredients are non-negotiable for this recipe – cold butter won’t cream properly, cold eggs can cause the batter to break, and cold cream cheese creates lumpy frosting. If you forget to take your ingredients out ahead of time, you can quickly bring eggs to room temperature by placing them in a bowl of warm water for 10 minutes, and you can microwave butter in 5-second bursts until softened but not melted. For the most tender crumb, mix your batter only until the ingredients are combined – overmixing develops gluten and makes cakes tough. When testing for doneness, look for multiple signs: the cake should spring back when lightly pressed, a toothpick should come out clean, and the edges should be pulling away from the pan. If you’re making this cake for a special occasion, you can bake the layers up to one day ahead – wrap them tightly in plastic wrap once completely cool and store at room temperature, then frost the day of serving. The finished cake stores beautifully in the refrigerator for up to 3 days, but bring it to room temperature for about an hour before serving for the best texture and flavor. For clean slices, dip your knife in hot water and wipe it dry between each cut.
Recipe Variations
While we treasure the original version of this recipe, it’s wonderfully adaptable to different seasons and preferences. For a summer celebration, try adding ½ cup of fresh blueberries along with the strawberries for a patriotic red, white, and blue effect. If you prefer a stronger lemon flavor, you can add an additional tablespoon of lemon zest to the batter and substitute lemon extract for the vanilla. During the winter months when fresh strawberries aren’t at their best, you can use high-quality frozen strawberries that have been thawed and thoroughly drained – pat them dry with paper towels before chopping and flouring. For a more rustic presentation, bake the batter in a 9×13-inch pan instead of round layers and simply spread the frosting over the top, then scatter with strawberry slices – perfect for potlucks and family gatherings. If you’re serving guests with dietary restrictions, you can make a gluten-free version by using your favorite 1:1 gluten-free flour blend in place of the all-purpose flour. For a lighter option, you can substitute Greek yogurt for the buttermilk and reduce the sugar in the batter by ¼ cup – the cake will be slightly less sweet but still wonderfully moist. If cream cheese frosting isn’t your preference, a simple lemon glaze made from powdered sugar and lemon juice drizzled over the cooled cake makes a lovely alternative.
Frequently Asked Questions
Can I use frozen strawberries instead of fresh?
Yes, you can use frozen strawberries if fresh aren’t available, but there are important considerations. Thaw the frozen strawberries completely first, then drain them very well and pat them dry with paper towels to remove as much excess moisture as possible. Chop them as you would fresh berries and toss with the flour coating. Keep in mind that frozen berries may release more liquid during baking, which could slightly affect the texture of your cake. The baking time might need to be extended by 3-5 minutes since the cold berries can lower the temperature of your batter. The flavor will still be wonderful, though the texture might be slightly denser than when using fresh, perfectly ripe strawberries.
How far in advance can I make this cake?
This cake has excellent make-ahead potential, which makes it perfect for entertaining. You can bake the cake layers up to two days in advance – once completely cooled, wrap them tightly in plastic wrap and store at room temperature. The frosting can be made up to three days ahead and stored in an airtight container in the refrigerator; just let it come to room temperature and re-whip it before using. The fully assembled cake will keep beautifully in the refrigerator for up to three days, though the strawberry decoration on top may release some juice over time. For the best texture and flavor, I recommend assembling the cake the day you plan to serve it, but the components can definitely be prepared ahead to make your baking day less hectic.
Why did my strawberries sink to the bottom of the cake?
If your strawberries sank to the bottom, there are several possible reasons and solutions for next time. The most common cause is not coating the strawberry pieces sufficiently with flour – make sure each piece gets a light, even coating before folding them into the batter. Another factor could be that your batter was too thin; ensure you’re measuring your flour correctly using the spoon-and-level method. If your strawberries were particularly juicy, they might have released moisture that made them heavier – pat very juicy berries dry before chopping and coating. Also, avoid overmixing after adding the strawberries, as this can break down the flour coating. Finally, make sure your oven is fully preheated before baking, as a lower initial oven temperature can cause sinking.
Can I make this recipe as cupcakes instead?
Absolutely! This recipe adapts wonderfully to cupcakes, making them perfect for parties or individual servings. Line your muffin tin with paper liners and fill each about two-thirds full with batter. The baking time will be shorter – start checking at 18-20 minutes in your 350°F oven. You should get approximately 24 standard cupcakes from this recipe. For the frosting, you might want to make a half-batch unless you prefer generously frosted cupcakes. The decorating possibilities are endless – you can pipe the frosting using a star tip and top each cupcake with a small strawberry slice or even a tiny whole strawberry. Cupcakes will bake more quickly than layers, so keep a close eye on them during the last few minutes of baking.
What’s the purpose of buttermilk in this recipe?
Buttermilk serves several important functions in this cake recipe that contribute to its wonderful texture and flavor. The acidity in buttermilk reacts with the baking soda to create carbon dioxide bubbles, which helps the cake rise and creates a light, tender crumb. It also tenderizes the gluten in the flour, resulting in a softer cake that practically melts in your mouth. The tangy flavor of buttermilk provides a lovely contrast to the sweetness of the cake and complements both the lemon and strawberry flavors beautifully. If you don’t have buttermilk on hand, you can make a suitable substitute by adding 1 tablespoon of lemon juice or white vinegar to 1 cup of regular milk and letting it sit for 5-10 minutes until it thickens slightly. However, real buttermilk will give you the best results for both flavor and texture.
Summary
This cherished family recipe combines bright lemon flavors with sweet strawberries in a tender buttermilk cake, finished with tangy cream cheese frosting. Perfect for celebrations or simple family gatherings, it captures the essence of homemade goodness and summer memories in every slice.
Grandma's Lemon Strawberry Cake
6
servings30
minutes30
minutesIngredients
Instructions
- 1 Preheat oven to 350°F. Prepare two 9-inch cake pans with parchment paper.
- 2 Toss chopped strawberries with 1 tablespoon flour. Set aside.
- 3 Whisk together dry ingredients: flour, baking powder, baking soda, and salt.
- 4 Cream butter and sugar until light and fluffy. Add eggs one at a time.
- 5 Mix in lemon zest, lemon juice, and vanilla extract.
- 6 Alternate adding dry ingredients and buttermilk, mixing until just combined.
- 7 Gently fold in flour-coated strawberries.
- 8 Divide batter between pans and bake 28-32 minutes until golden.
- 9 Cool cakes completely on wire racks.
- 10 For frosting, beat cream cheese and butter until smooth.
- 11 Gradually add powdered sugar, then lemon juice, zest, and salt.
- 12 Frost cooled cake layers and decorate with strawberry slices.


