Zesty leftover baked chicken doesn’t have to mean boring repeats! We’ve gathered 32 creative, mouthwatering transformations that turn yesterday’s roast into today’s delicious dinner. From quick skillet meals to cozy casseroles, these recipes will inspire you to see those leftovers in a whole new light. Get ready to fall in love with your chicken all over again—let’s dive into these tasty makeovers!
Creamy Chicken Alfredo Bake

Venture into the wonderful world of comfort food with this glorious creation that combines the creamy dreaminess of Alfredo with the cozy casserole vibes we all crave on busy weeknights. Seriously, who can resist layers of tender chicken and pasta swimming in that rich, cheesy sauce, all baked to golden perfection? It’s basically a hug in a baking dish—and who couldn’t use one of those?
6
servings20
minutes45
minutesIngredients
- 1 lb boneless, skinless chicken breasts, cubed (I like to trim any excess fat for a leaner bite)
- 12 oz fettuccine pasta (the classic choice for Alfredo, but hey, penne works in a pinch!)
- 2 cups heavy cream (go for the full-fat version—this is no time to skimp!)
- 1 cup grated Parmesan cheese, plus extra for topping (freshly grated melts so much better than the pre-shredded stuff)
- 1/2 cup unsalted butter (salted will do, but I prefer controlling the salt myself)
- 3 cloves garlic, minced (because more garlic is always the answer)
- 1 tsp salt (adjust if using salted butter)
- 1/2 tsp black pepper (freshly cracked adds a nice punch)
- 1/4 tsp nutmeg (a tiny pinch elevates the sauce from good to “wow”)
- 1 cup shredded mozzarella cheese (for that epic, stretchy top layer)
- 2 tbsp chopped fresh parsley (optional, but it adds a pop of color and freshness)
Instructions
- Preheat your oven to 375°F and lightly grease a 9×13-inch baking dish with butter or non-stick spray.
- Bring a large pot of salted water to a rolling boil and cook the fettuccine according to package directions until al dente, about 10–12 minutes.
- While the pasta cooks, melt the butter in a large skillet over medium heat and sauté the minced garlic for 1 minute until fragrant—don’t let it brown!
- Add the cubed chicken to the skillet and cook for 6–8 minutes, stirring occasionally, until no longer pink inside.
- Pour in the heavy cream, then stir in the Parmesan, salt, pepper, and nutmeg, simmering for 3–4 minutes until the sauce thickens slightly.
- Drain the cooked pasta and add it directly to the skillet, tossing to coat every strand in that luscious Alfredo sauce.
- Transfer the pasta and chicken mixture to the prepared baking dish, spreading it evenly.
- Sprinkle the shredded mozzarella and extra Parmesan over the top for a cheesy, golden crust.
- Bake for 20–25 minutes, or until the cheese is bubbly and lightly browned around the edges.
- Let the bake rest for 5 minutes before garnishing with fresh parsley, if using.
Get ready to dig into a dish that’s irresistibly creamy with tender chicken and perfectly cooked pasta in every forkful. The nutmeg adds a subtle warmth that plays so nicely with the rich Parmesan and gooey mozzarella topping. Serve it straight from the oven with a simple side salad or some garlic bread to soak up every last bit of that sauce—leftovers (if there are any!) reheat like a dream.
Spicy Chicken Tacos with Avocado Slaw

Let’s be real—some days call for tacos that pack more punch than your average Tuesday night. These spicy chicken tacos with avocado slaw are here to save your taste buds from boredom, bringing the heat and the crunch in one glorious handheld package. Trust me, your dinner game is about to level up.
6
tacos15
minutes13
minutesIngredients
- 1 lb boneless, skinless chicken thighs—they stay juicier than breasts, my secret weapon
- 2 tbsp olive oil—extra virgin, because we’re fancy like that
- 1 tsp chili powder—for that warm, smoky kick
- 1/2 tsp cumin—don’t skip it, it’s the flavor backbone
- 1/4 tsp cayenne pepper—adjust if you’re heat-shy, but live a little
- 1/2 tsp garlic powder—because fresh is great, but lazy wins sometimes
- 1/2 tsp salt—I use kosher for even seasoning
- 1 ripe avocado—pick one that yields gently to pressure, no mushy business
- 1 cup shredded cabbage—the crunchier, the better
- 2 tbsp lime juice—freshly squeezed, please, no bottled sadness
- 1 tbsp chopped cilantro—if you’re anti-cilantro, parsley works, but we’ll side-eye you
- 6 small corn tortillas—warmed, because cold tortillas are a crime
Instructions
- Pat the chicken thighs dry with paper towels—this helps them sear beautifully instead of steaming.
- In a small bowl, mix chili powder, cumin, cayenne, garlic powder, and salt until combined.
- Rub the spice mix evenly over all sides of the chicken thighs, coating them thoroughly.
- Heat olive oil in a large skillet over medium-high heat until it shimmers, about 1 minute.
- Place chicken in the skillet and cook for 6 minutes without moving it to develop a golden crust.
- Flip the chicken and cook for another 6 minutes until the internal temperature reaches 165°F.
- Transfer chicken to a cutting board and let it rest for 5 minutes—this keeps the juices locked in.
- While chicken rests, mash the avocado in a medium bowl until slightly chunky.
- Add shredded cabbage, lime juice, and cilantro to the bowl with the mashed avocado.
- Toss the slaw mixture until everything is well-coated and vibrant green.
- Warm corn tortillas in a dry skillet over medium heat for 30 seconds per side, or until pliable.
- Slice the rested chicken into thin strips against the grain for maximum tenderness.
- Divide chicken evenly among warmed tortillas and top generously with the avocado slaw.
The tender, spicy chicken pairs perfectly with the cool, creamy slaw, creating a textural dream in every bite. Serve these immediately with extra lime wedges for squeezing, or go wild and add a drizzle of hot sauce if you’re feeling extra brave.
Chicken and Mushroom Risotto

Dare I say, this creamy chicken and mushroom risotto is the culinary equivalent of a warm hug on a chilly autumn evening—comforting, satisfying, and guaranteed to make your taste buds do a happy dance. Forget takeout; this stovetop masterpiece transforms simple ingredients into a restaurant-worthy dish that’ll have you feeling like a gourmet chef (minus the fancy hat).
3
servings15
minutes45
minutesIngredients
- 1 cup Arborio rice (the short-grain superstar that makes risotto dreamily creamy)
- 4 cups chicken broth, warmed (I keep it simmering on a back burner—cold broth is a risotto mood-killer!)
- 1 lb boneless, skinless chicken thighs, cut into 1-inch pieces (thighs stay juicier than breasts, trust me)
- 8 oz cremini mushrooms, sliced (baby bellas add an earthy depth that buttons just can’t match)
- 1 medium yellow onion, finely diced (no giant chunks—we’re going for silky, not chunky)
- 3 cloves garlic, minced (because more garlic is always the answer)
- 1/2 cup dry white wine (a crisp Sauvignon Blanc works wonders—and yes, you can sip the rest)
- 1/2 cup grated Parmesan cheese, plus extra for serving (the salty, nutty finisher that ties it all together)
- 2 tbsp unsalted butter (for that luxurious, glossy finish)
- 2 tbsp extra virgin olive oil (my go-to for sautéing—it adds a fruity kick)
- 1 tsp kosher salt (adjust later, but start here for balanced flavor)
- 1/2 tsp black pepper, freshly ground (pre-ground just doesn’t hit the same)
- 2 tbsp fresh parsley, chopped (a pop of color and freshness to brighten things up)
Instructions
- Heat 1 tablespoon of olive oil in a large, heavy-bottomed pot or Dutch oven over medium-high heat until shimmering, about 1 minute.
- Add the chicken pieces in a single layer and cook for 5–7 minutes, turning once, until golden brown and cooked through (no pink remains).
- Transfer the chicken to a plate using a slotted spoon, leaving any drippings in the pot—those browned bits are flavor gold!
- Reduce heat to medium and add the remaining 1 tablespoon of olive oil to the same pot.
- Sauté the diced onion for 4–5 minutes, stirring occasionally, until translucent and fragrant (tip: don’t rush this—soft onions build a sweet base).
- Add the sliced mushrooms and cook for 6–8 minutes, stirring often, until they’ve released their liquid and turned golden brown.
- Stir in the minced garlic and cook for 1 minute until fragrant (but not browned—burnt garlic tastes bitter).
- Add the Arborio rice and toast for 2 minutes, stirring constantly, until the grains look slightly translucent at the edges.
- Pour in the white wine and cook, stirring, until fully absorbed, about 2 minutes (tip: this deglazes the pot and adds acidity to balance the richness).
- Ladle in 1 cup of warm chicken broth and simmer, stirring frequently, until the liquid is nearly absorbed, about 4–5 minutes.
- Repeat adding broth 1 cup at a time, stirring often and waiting for each addition to be absorbed before adding the next, for 18–20 minutes total (the rice should be tender but still al dente).
- Stir in the cooked chicken, Parmesan cheese, butter, salt, and pepper until creamy and combined.
- Remove from heat and fold in the chopped parsley.
Unbelievably creamy with a subtle chew from the al dente rice, this risotto boasts earthy mushrooms and tender chicken in every bite. Serve it straight from the pot for maximum coziness, or fancy it up with a extra sprinkle of Parmesan and a side of garlic bread for dipping. Leftovers? They’re rare, but if you have any, reheat gently with a splash of broth to revive that luxurious texture.
Buffalo Chicken Stuffed Peppers

Y’all, get ready to meet your new favorite weeknight dinner that’s basically buffalo wings decided to get healthy and move into a pepper apartment. These stuffed peppers are the perfect marriage of spicy, cheesy, and downright delicious without the usual wing-night mess.
8
portions15
minutes25
minutesIngredients
- 4 large bell peppers (any color, but I’m partial to the red ones for their sweetness)
- 1.5 lbs cooked, shredded chicken breast (rotisserie chicken is my secret weapon here for maximum flavor with minimal effort)
- 1/2 cup Frank’s RedHot sauce (don’t even think about substituting—this is the OG buffalo flavor)
- 1/2 cup ranch dressing (the creamy kind that makes everything better)
- 1 cup shredded Monterey Jack cheese (because melty cheese is non-negotiable)
- 1/4 cup blue cheese crumbles (for that authentic buffalo wing joint vibe)
- 2 tbsp unsalted butter (melted, because butter makes buffalo sauce magical)
- 1/2 cup finely diced celery (for that essential crunch factor)
- 1/4 cup sliced green onions (the green parts only—save the whites for another recipe)
Instructions
- Preheat your oven to 375°F and line a baking sheet with parchment paper.
- Slice each bell pepper in half lengthwise and remove all seeds and membranes.
- Arrange pepper halves cut-side up on the prepared baking sheet.
- In a large mixing bowl, combine shredded chicken, Frank’s RedHot sauce, ranch dressing, melted butter, and diced celery.
- Mix thoroughly until all chicken is evenly coated with the buffalo sauce mixture.
- Spoon the chicken mixture evenly into each pepper half, filling them generously.
- Sprinkle shredded Monterey Jack cheese over the top of each stuffed pepper.
- Bake at 375°F for 20-25 minutes until peppers are tender-crisp and cheese is golden and bubbly.
- Remove from oven and immediately top with blue cheese crumbles and sliced green onions.
- Let rest for 5 minutes before serving to allow flavors to meld and prevent burning your mouth.
That first bite delivers the perfect crunch-tender pepper texture hugging the saucy, shredded chicken filling. The spicy buffalo kick mellows beautifully with the cool ranch and funky blue cheese—it’s basically a flavor party in your mouth. Try serving these with extra ranch for dipping and celery sticks on the side for the full sports bar experience at home.
Sweet and Sour Chicken Wraps
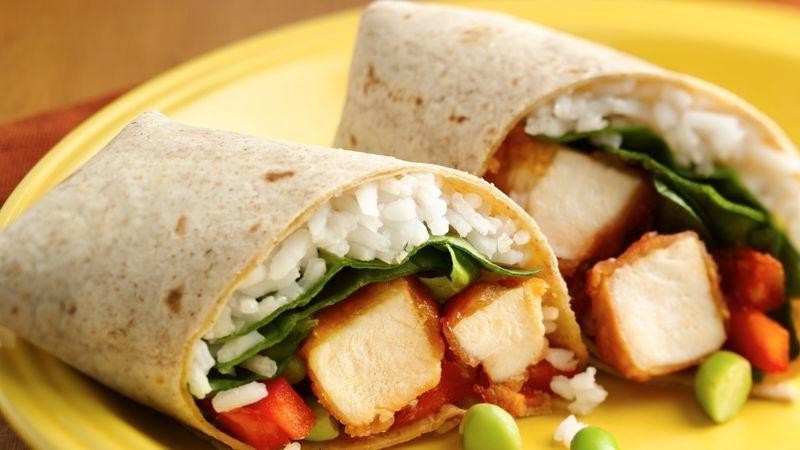
Aren’t you tired of the same old dinner routine? These Sweet and Sour Chicken Wraps are here to rescue your taste buds from boredom with their perfect tangy-sweet balance and satisfying crunch. They’re so deliciously addictive, you might just start a wrap-based fan club in your kitchen.
3
wraps15
minutes18
minutesIngredients
– 1 lb boneless chicken breasts, cut into bite-sized pieces (I always trim any visible fat for better texture)
– 1/4 cup cornstarch (this creates that magical crispy coating we all crave)
– 2 tbsp vegetable oil (my trusty workhorse for high-heat cooking)
– 1/2 cup pineapple chunks, drained (the sweet counterpoint to our tangy sauce)
– 1/4 cup bell pepper strips (I use the colorful mixed pack because we eat with our eyes first)
– 1/3 cup sweet and sour sauce (store-bought works great, but homemade earns extra bragging rights)
– 4 large flour tortillas (warmed tortillas are more pliable and less likely to tear)
– 2 cups shredded lettuce (iceberg gives that satisfying crunch factor)
Instructions
1. Pat the chicken pieces completely dry with paper towels—this is crucial for the cornstarch to adhere properly and create maximum crispiness.
2. Toss the dried chicken pieces with 1/4 cup cornstarch until evenly coated, shaking off any excess cornstarch before cooking.
3. Heat 2 tbsp vegetable oil in a large skillet over medium-high heat until it shimmers, about 350°F if you’re using a thermometer.
4. Carefully place the coated chicken in the hot oil in a single layer, cooking for 3-4 minutes per side until golden brown and crispy.
5. Flip each piece using tongs and cook the second side for another 3-4 minutes until the internal temperature reaches 165°F.
6. Add 1/2 cup pineapple chunks and 1/4 cup bell pepper strips to the skillet, stirring to combine with the chicken.
7. Pour 1/3 cup sweet and sour sauce over the chicken and vegetable mixture, stirring gently to coat everything evenly.
8. Cook the sauced mixture for 2 minutes until the sauce bubbles and thickens slightly around the ingredients.
9. Warm 4 large flour tortillas in a dry skillet for 15-20 seconds per side or until pliable and lightly toasted.
10. Divide 2 cups shredded lettuce evenly among the warmed tortillas, creating a bed for the chicken mixture.
11. Spoon the sweet and sour chicken mixture over the lettuce in each tortilla.
12. Fold the bottom edge of each tortilla up about 1 inch, then fold in the sides and roll tightly away from you to form secure wraps.
Keep these wraps whole for a handheld meal or slice them diagonally to show off the colorful filling—the contrast between the crispy chicken, sweet pineapple, and cool lettuce makes every bite an adventure in texture and flavor that’ll have everyone asking for your secret recipe.
Chicken and Spinach Quesadillas

Crispy, cheesy, and ridiculously easy to whip up, these chicken and spinach quesadillas are the ultimate weeknight hero—saving you from yet another boring dinner with minimal effort and maximum flavor payoff. Let’s turn that sad-looking chicken breast and wilting spinach into a fiesta in a tortilla, shall we? Trust me, your taste buds will thank you later.
3
quesadillas10
minutes25
minutesIngredients
– 1 lb boneless, skinless chicken breasts, thinly sliced (I always go for free-range—it just tastes happier)
– 1 tbsp olive oil (extra virgin is my kitchen MVP)
– 1 tsp chili powder (the smoky kind, not the sad, dusty stuff)
– 1/2 tsp garlic powder (because fresh garlic can be too clingy sometimes)
– 1/2 tsp cumin (for that warm, cozy hug in every bite)
– 1/4 tsp salt (fine sea salt, please—no rock stars here)
– 2 cups fresh spinach, roughly chopped (packed tight, like your schedule)
– 1 cup shredded Monterey Jack cheese (the meltier, the better—no one likes a shy cheese)
– 4 large flour tortillas (the burrito-sized ones, because bigger is always better)
– 1/2 cup salsa, for dipping (store-bought is totally fine—we’re not judging)
Instructions
1. Heat 1 tbsp olive oil in a large skillet over medium-high heat until it shimmers, about 1 minute.
2. Add 1 lb sliced chicken breasts to the skillet in a single layer—don’t crowd them, or they’ll steam instead of sear (tip: work in batches if needed).
3. Cook chicken for 4–5 minutes per side, until golden brown and no pink remains in the center.
4. Sprinkle 1 tsp chili powder, 1/2 tsp garlic powder, 1/2 tsp cumin, and 1/4 tsp salt evenly over the chicken, stirring to coat.
5. Reduce heat to medium and add 2 cups chopped spinach, cooking just until wilted, about 1–2 minutes (tip: spinach shrinks dramatically, so don’t panic!).
6. Remove skillet from heat and transfer the chicken-spinach mixture to a plate.
7. Wipe the skillet clean with a paper towel and return it to medium heat.
8. Place one flour tortilla in the skillet and sprinkle 1/4 cup shredded Monterey Jack cheese evenly over half of it.
9. Spoon one-quarter of the chicken-spinach mixture over the cheese, then fold the bare tortilla half over the filling.
10. Cook for 2–3 minutes per side, pressing down gently with a spatula, until the tortilla is golden brown and crispy and the cheese is fully melted (tip: listen for that satisfying sizzle—it’s the sound of success!).
11. Repeat steps 8–10 with the remaining tortillas, cheese, and filling.
12. Slice each quesadilla into wedges and serve immediately with 1/2 cup salsa for dipping.
Let’s be real: that first bite of crispy tortilla giving way to gooey cheese and savory chicken is pure magic. Layer these wedges with extra salsa and a dollop of Greek yogurt for a tangy twist, or crumble some tortilla chips on top for added crunch—because why not live a little?
BBQ Chicken Pizza with Red Onions

Aren’t you tired of the same old pizza routine? This BBQ chicken pizza with red onions is here to rescue your taste buds from boredom with its smoky-sweet personality and crispy crust that’ll make you forget delivery exists.
4
servings20
minutes15
minutesIngredients
– 1 lb pizza dough (I let mine proof overnight for maximum flavor development)
– 1 cup BBQ sauce (go for the smoky kind – it makes all the difference)
– 2 cups shredded cooked chicken (rotisserie chicken is my secret weapon here)
– 1 medium red onion, thinly sliced (the purple rings look gorgeous against the sauce)
– 2 cups shredded mozzarella cheese (freshly grated melts so much better than pre-shredded)
– 2 tbsp olive oil (extra virgin is my kitchen staple)
– 1 tsp cornmeal for dusting (this little trick gives that authentic pizzeria crunch)
Instructions
1. Preheat your oven to 475°F and place a pizza stone or baking sheet inside to heat up for 30 minutes.
2. Lightly dust your work surface with flour and stretch the pizza dough into a 12-inch circle.
3. Sprinkle cornmeal on a pizza peel or inverted baking sheet, then transfer the stretched dough onto it.
4. Brush the entire dough surface with olive oil using a pastry brush, reaching all the way to the edges.
5. Spread BBQ sauce evenly over the dough, leaving a 1-inch border around the circumference.
6. Sprinkle shredded mozzarella cheese evenly over the sauce layer.
7. Distribute the shredded chicken across the cheese in a single layer.
8. Arrange the red onion slices in an even pattern over the chicken.
9. Carefully slide the pizza onto the preheated stone or baking sheet in the oven.
10. Bake for 12-15 minutes until the crust is golden brown and the cheese is bubbly with browned spots.
11. Remove from oven using a pizza peel or large spatula and let rest for 3 minutes before slicing.
Nothing beats that first bite where the crispy crust shatters, giving way to the tangy BBQ sauce and melty cheese. The red onions caramelize beautifully in the hot oven, adding just enough sweetness to balance the smoky chicken. Try serving it with a simple arugula salad tossed in lemon vinaigrette for the perfect weeknight dinner that feels anything but ordinary.
Curried Chicken Salad Sandwiches

Hangry? Me too, which is why these curried chicken salad sandwiches are my go-to rescue mission when my stomach starts staging a protest. With just enough golden curry warmth to make things interesting and a creamy-crunchy texture that’ll have you forgetting you ever considered plain mayo-drenched chicken, this is the lunch upgrade your sad desk salad dreams of.
2
sandwiches15
minutes5
minutesIngredients
- 2 cups cooked, shredded chicken (I use leftover rotisserie—no shame in the time-saving game!)
- 1/2 cup mayonnaise (full-fat for maximum creaminess, because we’re not here to half-step)
- 1/4 cup plain Greek yogurt (adds tang without overwhelming richness)
- 2 tbsp mango chutney (the sweet-and-sour secret weapon)
- 1 1/2 tsp curry powder (toasted first—trust me, it’s a flavor game-changer)
- 1/4 cup finely diced red onion (for a bit of sharp crunch)
- 1/4 cup chopped celery (the unsung hero of texture)
- 1/4 cup toasted slivered almonds (because everything’s better with a little crunch)
- 2 tbsp fresh cilantro, chopped (skip if you’re a cilantro hater—more for me!)
- 1 tbsp fresh lime juice (brightens everything up)
- 1/2 tsp salt (balances the sweet and spicy)
- 1/4 tsp black pepper (freshly ground, please)
- 8 slices whole wheat bread (or croissants if you’re feeling fancy)
- 4 large lettuce leaves (butter lettuce is my fave for its tender crunch)
Instructions
- Toast 1 1/2 tsp curry powder in a dry skillet over medium heat for 1–2 minutes, stirring constantly, until fragrant—this deepens the flavor dramatically.
- In a large mixing bowl, combine 1/2 cup mayonnaise, 1/4 cup Greek yogurt, 2 tbsp mango chutney, and the toasted curry powder, whisking until smooth.
- Add 2 cups shredded chicken, 1/4 cup diced red onion, 1/4 cup chopped celery, 1/4 cup toasted slivered almonds, 2 tbsp chopped cilantro, 1 tbsp lime juice, 1/2 tsp salt, and 1/4 tsp black pepper to the bowl.
- Fold everything together gently with a spatula until the chicken is evenly coated—don’t overmix, or you’ll lose that perfect chunky texture.
- Toast 8 slices of whole wheat bread until golden brown, about 2–3 minutes in a toaster set to medium.
- Lay 4 slices of toasted bread on a clean surface and top each with 1 large lettuce leaf.
- Divide the chicken salad evenly among the 4 prepared slices, spreading it to the edges with a spoon.
- Top each sandwich with the remaining toasted bread slices, pressing down lightly to secure.
- Slice each sandwich in half diagonally with a serrated knife for clean cuts.
Unbelievably creamy yet packed with crunch from the celery and almonds, this sandwich delivers a cozy curry warmth that’s balanced by the bright zing of lime and chutney. Serve it with a side of sweet potato fries for the ultimate lunch combo, or stuff it into lettuce wraps for a low-carb twist that still feels indulgent.
Chicken and Broccoli Stir Fry
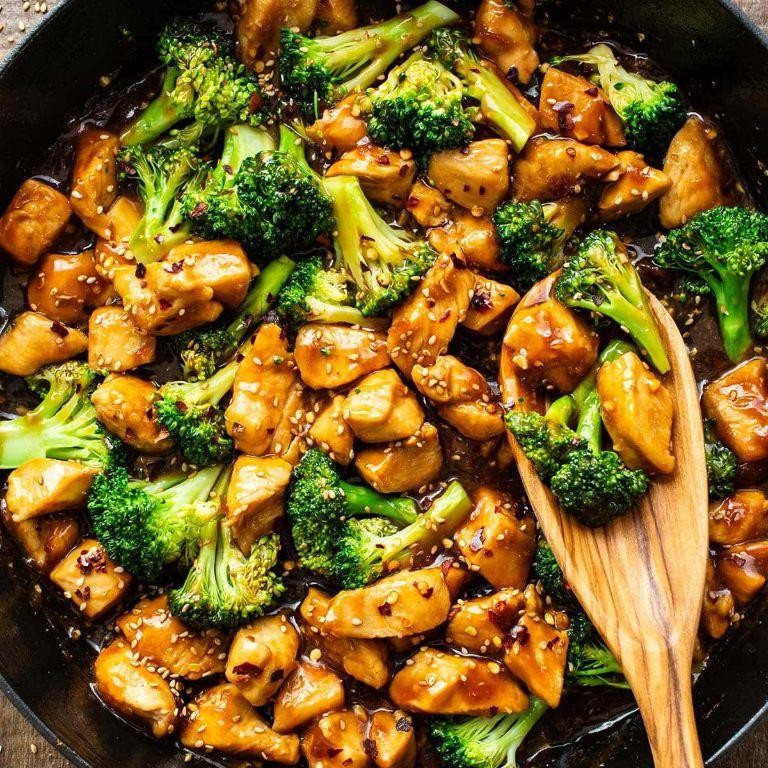
Who says healthy eating has to be boring? This Chicken and Broccoli Stir Fry is here to prove that flavor and fun can coexist in one sizzling skillet—no culinary degree required, just a hungry appetite and a willingness to make your taste buds dance.
4
servings15
minutes15
minutesIngredients
– 1 lb boneless, skinless chicken breasts, sliced thin (I always go for uniform pieces so they cook evenly—no one wants a chicken chew toy)
– 3 cups broccoli florets (fresh is my jam, but frozen works in a pinch if you’re in a veggie emergency)
– 2 tbsp vegetable oil (a neutral oil that won’t steal the spotlight)
– 3 cloves garlic, minced (because garlic is the unofficial MVP of stir-fry)
– 1 tbsp fresh ginger, grated (trust me, fresh beats powdered every time)
– 1/4 cup low-sodium soy sauce (I lean low-sodium to control the saltiness—your blood pressure will thank you)
– 1 tbsp honey (for that sweet balance against the savory)
– 1 tsp sesame oil (just a drizzle at the end for that nutty aroma)
– 1/2 tsp red pepper flakes (optional, but highly recommended for a gentle kick)
Instructions
1. Heat 1 tablespoon of vegetable oil in a large skillet or wok over medium-high heat until it shimmers, about 1 minute.
2. Add the sliced chicken to the hot skillet in a single layer—don’t overcrowd it, or you’ll steam instead of sear (that’s tip #1: give your chicken space to get golden!).
3. Cook the chicken for 5–7 minutes, flipping halfway, until it’s no longer pink and reaches an internal temperature of 165°F.
4. Remove the chicken from the skillet and set it aside on a plate.
5. Add the remaining 1 tablespoon of vegetable oil to the same skillet, still over medium-high heat.
6. Toss in the broccoli florets and stir-fry for 4–5 minutes until they’re bright green and slightly tender but still crisp (tip #2: keep ’em moving to avoid burning!).
7. Push the broccoli to one side of the skillet and add the minced garlic and grated ginger to the empty space.
8. Sauté the garlic and ginger for 30 seconds until fragrant—don’t let them brown, or they’ll turn bitter (tip #3: low and slow for aromatics!).
9. Pour in the low-sodium soy sauce, honey, and red pepper flakes (if using), then stir everything together to combine.
10. Return the cooked chicken to the skillet and toss with the sauce and broccoli until evenly coated, about 1 minute.
11. Drizzle with sesame oil right before removing from heat, and give it one final stir. Ooh, that glossy finish and tender-crisp broccoli make this stir-fry a weeknight hero—serve it over fluffy rice or slurp it straight from the pan for maximum satisfaction.
Baked Chicken Enchiladas with Salsa Verde

Zesty, zippy, and downright zany—these baked chicken enchiladas with salsa verde are the weeknight dinner hero you didn’t know you needed, turning your kitchen into a fiesta faster than you can say “¡olé!” Seriously, who can resist that tangy tomatillo kick wrapped in a cozy tortilla hug? Let’s dive in and make magic happen.
8
enchiladas15
minutes25
minutesIngredients
- 2 cups shredded cooked chicken (I use rotisserie for a lazy win)
- 1.5 cups salsa verde (store-bought or homemade—no judgment!)
- 8 corn tortillas (warmed up so they don’t crack on you)
- 1 cup shredded Monterey Jack cheese (extra for the gooey-lovers)
- 1/2 cup sour cream (full-fat, because life’s too short)
- 1/4 cup chopped fresh cilantro (skip if you’re a soap-taste rebel)
- 1 tbsp olive oil (my trusty pan-coating sidekick)
- 1/2 tsp ground cumin (for that warm, hug-in-a-spice vibe)
Instructions
- Preheat your oven to 375°F—this ensures even baking and no sad, cold centers.
- Heat 1 tbsp olive oil in a skillet over medium heat for 30 seconds until shimmering.
- Warm 8 corn tortillas one at a time in the skillet for 15 seconds per side to make them pliable.
- Mix 2 cups shredded chicken, 1/2 cup sour cream, 1/2 tsp cumin, and 1/4 cup cilantro in a bowl until fully combined.
- Spoon 1/4 cup of the chicken mixture onto the center of each warmed tortilla.
- Roll each tortilla tightly around the filling and place seam-side down in a 9×13-inch baking dish.
- Pour 1.5 cups salsa verde evenly over the rolled enchiladas, covering them completely.
- Sprinkle 1 cup Monterey Jack cheese generously over the top for that golden, bubbly finish.
- Bake at 375°F for 20 minutes until the cheese is melted and the edges are lightly browned.
- Let the enchiladas rest for 5 minutes before serving to set the filling and avoid lava-level burns.
Killer texture alert: The tortillas stay tender, the chicken filling is creamy, and the salsa verde adds a bright, tangy punch that’ll make your taste buds do a happy dance. Serve these beauties with a dollop of extra sour cream and a sprinkle of cilantro for a dinner that’s as fun to eat as it is to make—perfect for taco Tuesday or any day that needs a flavor boost!
Garlic Herb Chicken Soup

Every time the sniffles start or the weather turns, my soul screams for this garlic herb chicken soup—it’s basically a cozy hug in a bowl, with enough garlicky punch to ward off vampires and Monday blues alike.
6
servings15
minutes40
minutesIngredients
– 1.5 lbs boneless, skinless chicken thighs (I swear by thighs for their juiciness, but breasts work in a pinch)
– 8 cups chicken broth (homemade if you’re fancy, but store-bought is totally fine)
– 1 large yellow onion, diced (the unsung hero of flavor town)
– 4 medium carrots, sliced into ¼-inch rounds (don’t skip these—they add a sweet crunch)
– 3 celery stalks, chopped (for that classic soup backbone)
– 6 garlic cloves, minced (go big or go home, folks)
– 2 tbsp extra virgin olive oil (my trusty kitchen sidekick)
– 1 tsp dried thyme (fresh is great, but dried hugs the broth longer)
– 1 tsp dried rosemary (crush it between your fingers to wake up the aroma)
– Salt and black pepper (be generous—season as you go!)
– 1 cup uncooked orzo pasta (it soaks up the broth like a dream)
– 2 tbsp fresh parsley, chopped (a bright finish to tie it all together)
Instructions
1. Heat 2 tbsp extra virgin olive oil in a large pot over medium heat until it shimmers.
2. Add 1 large diced yellow onion, 4 sliced carrots, and 3 chopped celery stalks, and sauté for 6–8 minutes until the onions are translucent and the veggies soften.
3. Stir in 6 minced garlic cloves and cook for 1 minute until fragrant—don’t let it brown!
4. Pour in 8 cups chicken broth and bring to a boil over high heat.
5. Add 1.5 lbs boneless, skinless chicken thighs, 1 tsp dried thyme, and 1 tsp crushed dried rosemary, then reduce heat to low, cover, and simmer for 20 minutes until the chicken is cooked through (165°F internal temp).
6. Remove the chicken with tongs, let it cool for 5 minutes, then shred it using two forks.
7. Tip: While the chicken rests, skim any foam off the broth for a clearer soup.
8. Return the shredded chicken to the pot and add 1 cup uncooked orzo pasta.
9. Simmer uncovered for 10–12 minutes, stirring occasionally, until the orzo is al dente.
10. Tip: Don’t overcook the orzo—it’ll keep softening off the heat.
11. Stir in 2 tbsp chopped fresh parsley and season with salt and black pepper to taste.
12. Tip: Let the soup sit for 5 minutes off the heat to let the flavors meld. That texture is pure comfort—tender chicken, plump orzo, and a broth so herby and garlicky, you’ll want to sip it from a mug. Try topping it with a sprinkle of red pepper flakes or a squeeze of lemon for an extra zing that’ll make your taste buds dance.
Lemon Chicken Orzo Pasta
Nothing says “I’ve got my life together” like a one-pot wonder that tastes like it took three times as long. Lemon Chicken Orzo Pasta is here to save your Tuesday—and possibly your soul—with its bright, zesty charm and minimal cleanup. Trust me, your future self will thank you for this.
4
servings15
minutes25
minutesIngredients
- 1 lb boneless, skinless chicken breasts, cubed (because who has time for bones?)
- 1 cup orzo pasta (the tiny rice lookalike that soaks up flavor like a sponge)
- 2 tbsp extra virgin olive oil (my go-to for that fruity kick)
- 3 cloves garlic, minced (fresh only—jarred garlic is a crime here)
- 1 lemon, zested and juiced (roll it first to maximize juice yield!)
- 2 cups chicken broth (low-sodium, so you’re in control of the salt)
- 1/2 cup heavy cream (because life’s too short for skim milk)
- 1/4 cup grated Parmesan cheese (the real stuff, not the shaky can)
- 1 tsp dried thyme (rub it between your palms to wake up the oils)
- Salt and black pepper (be generous—flavor isn’t shy)
- 2 tbsp chopped fresh parsley (for that pop of green at the end)
Instructions
- Heat 2 tbsp olive oil in a large skillet over medium-high heat until it shimmers.
- Add cubed chicken, season with salt and pepper, and cook for 5–7 minutes until golden brown on all sides.
- Stir in minced garlic and dried thyme, cooking for 1 minute until fragrant (don’t let the garlic burn!).
- Pour in 1 cup orzo and toast for 2 minutes, stirring constantly to coat in the oil.
- Add 2 cups chicken broth, lemon juice, and zest, scraping up any browned bits from the pan.
- Bring to a boil, then reduce heat to low, cover, and simmer for 10 minutes until orzo is tender and liquid is absorbed.
- Stir in 1/2 cup heavy cream and 1/4 cup Parmesan until the sauce is creamy and smooth.
- Garnish with fresh parsley and let sit for 2 minutes off the heat to thicken.
Fluffy orzo cradles tender chicken in a luxuriously creamy sauce, with lemon zing cutting through the richness like a welcome guest. Serve it straight from the skillet for rustic charm, or fancy it up with a side of garlic bread to sop up every last drop. Either way, it’s a bowl of comfort that’ll have everyone asking for seconds—and the recipe.
Chicken Caesar Salad Wraps
Hear ye, hear ye, salad skeptics! We’re about to transform that classic Caesar from a side dish to the main event, all wrapped up in a tortilla hug that says, “I love you, but I’m also portable.” Get ready for a flavor party where crispy romaine and savory chicken do the tango with that creamy, garlicky dressing we all secretly want to drink.
3
wraps15
minutes15
minutesIngredients
– 2 large boneless, skinless chicken breasts (about 1.5 lbs total – go for plump ones, they stay juicier)
– 1 tbsp olive oil (extra virgin is my ride-or-die for that fruity kick)
– 1 tsp garlic powder (because fresh garlic in the dressing is enough work, am I right?)
– 1/2 tsp black pepper (freshly cracked, please – it makes all the difference)
– 1/2 tsp salt (I’m a kosher salt gal for even seasoning)
– 1 large head of romaine lettuce (crisp, cold, and chopped – no wilty stuff allowed)
– 1/2 cup grated Parmesan cheese (the real deal, not the dusty canister stuff)
– 1/2 cup Caesar dressing (creamy style – I’m loyal to one brand, but you do you)
– 4 large flour tortillas (10-inch, burrito-sized – they hold the chaos best)
– 1 cup croutons (store-bought or homemade, just make ’em crunchy)
Instructions
1. Pat the chicken breasts completely dry with paper towels – this is the secret to getting a gorgeous sear instead of a steam.
2. Rub the olive oil all over the chicken breasts, making sure every nook is coated.
3. Sprinkle the salt, black pepper, and garlic powder evenly over both sides of the chicken.
4. Heat a large skillet over medium-high heat for 2 minutes until a drop of water sizzles immediately.
5. Place the chicken in the hot skillet and cook for 6-7 minutes without moving it to develop a golden-brown crust.
6. Flip the chicken using tongs and cook for another 6-7 minutes until the internal temperature reaches 165°F on an instant-read thermometer.
7. Transfer the chicken to a cutting board and let it rest for 5 minutes – don’t skip this! It keeps the juices inside.
8. While the chicken rests, chop the romaine lettuce into bite-sized pieces and place them in a large bowl.
9. Dice the rested chicken into 1/2-inch cubes – cutting against the grain makes it extra tender.
10. Add the diced chicken, Parmesan cheese, Caesar dressing, and croutons to the bowl with the romaine.
11. Toss everything together until every leaf is lightly coated in dressing – I use my clean hands for maximum control.
12. Warm the flour tortillas in a dry skillet over medium heat for 20 seconds per side, just until pliable.
13. Divide the chicken Caesar mixture evenly among the 4 tortillas, placing it in the center of each.
14. Fold the bottom edge of each tortilla up over the filling, then fold in the sides, and roll tightly away from you to form a wrap.
Zesty, crunchy, and ridiculously satisfying, these wraps deliver that perfect contrast between the cool, crisp lettuce and the warm, savory chicken. The Parmesan adds a salty punch that cuts through the creaminess, while those croutons provide a glorious crunch in every bite. Serve them whole for a handheld feast, or slice them diagonally to show off those gorgeous layers at your next picnic – either way, they disappear faster than you can say “more please!”
Conclusion
Delicious possibilities await with these 32 creative leftover baked chicken recipes! From quick dinners to impressive meals, this roundup proves that leftovers can be your kitchen’s secret weapon. We’d love to hear which recipes become your family favorites—drop a comment below and don’t forget to share this article on Pinterest to inspire fellow home cooks!