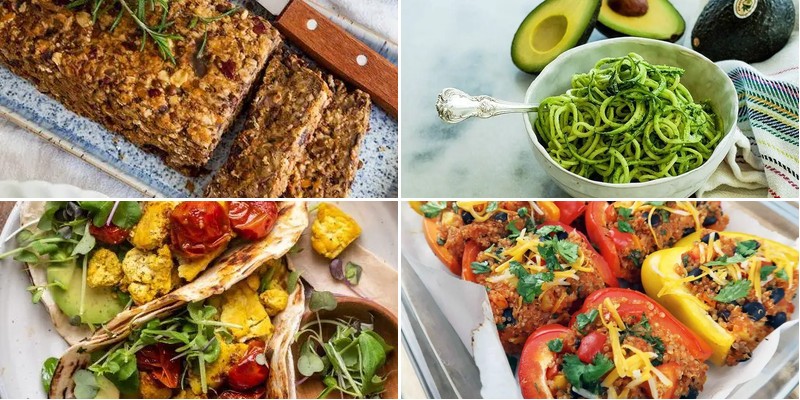
Craving something delicious that doesn’t require a fork? You’re in the right place! We’ve gathered 22 incredible knife-and-fork-free recipes perfect for busy weeknights, casual gatherings, and satisfying comfort food. From handheld delights to one-bowl wonders, these dishes are all about easy eating and maximum flavor. Get ready to dig in with your hands—your next favorite meal is waiting!
Grilled Portobello Mushroom Steaks

Heads up, carnivores—prepare to have your minds deliciously blown by these meaty marvels that just happen to be 100% fungi! Grilled portobello mushroom steaks are here to prove that plants can party just as hard as any T-bone, with zero of the moo-ing required.
2
portions25
minutes10
minutesIngredients
- 4 big, beefy portobello mushroom caps
- 1/4 cup of olive oil
- 2 tablespoons of balsamic vinegar
- 2 cloves of garlic, minced
- 1 teaspoon of smoked paprika
- 1/2 teaspoon of salt
- A few cracks of black pepper
- A splash of soy sauce
- A couple of fresh thyme sprigs
Instructions
- Use a spoon to gently scrape out the dark gills from the underside of each mushroom cap—this prevents them from turning your marinade murky gray.
- Whisk together the olive oil, balsamic vinegar, minced garlic, smoked paprika, salt, black pepper, and soy sauce in a shallow dish until fully combined.
- Place the mushroom caps in the marinade, turning to coat both sides, then tuck the thyme sprigs around them.
- Let the mushrooms marinate at room temperature for 20 minutes—flipping them halfway through—so they soak up all that savory goodness.
- Preheat your grill to medium-high heat, about 400°F, and lightly oil the grates to prevent sticking.
- Place the marinated mushrooms cap-side down on the grill and cook for 5 minutes, until you see prominent grill marks forming.
- Flip the mushrooms and grill for another 4–5 minutes, until they’re tender but still hold their shape when pierced with a fork.
- Brush any remaining marinade over the mushrooms during the last minute of grilling for an extra flavor boost.
- Transfer the grilled mushrooms to a plate and let them rest for 2–3 minutes before slicing—this helps the juices redistribute evenly.
Marvel at how these juicy, umami-packed beauties deliver a satisfying chew and smoky-sweet flavor that’ll make you forget all about beef. Slice them thick and pile onto toasted brioche buns with peppery arugula and garlic aioli, or serve alongside crispy roasted potatoes for a cozy, meat-free feast that’s anything but boring.
Cauliflower Steak with Chimichurri Sauce

Kale yeah, we’re turning this humble veggie into the main event! Who knew cauliflower could strut so confidently? Get ready for a steak night that even your carnivore friends will side-eye with envy.
2
portions15
minutes25
minutesIngredients
– One big, beautiful head of cauliflower
– A generous glug of olive oil (about 3 tablespoons)
– A couple of good pinches of kosher salt
– A handful of fresh parsley leaves
– A couple of garlic cloves
– A splash of red wine vinegar (about 2 tablespoons)
– A pinch of red pepper flakes
– A squeeze of fresh lemon juice
Instructions
1. Preheat your oven to 400°F and line a baking sheet with parchment paper.
2. Slice the cauliflower head vertically into 1-inch thick steaks, keeping the core intact to hold them together.
3. Brush both sides of each cauliflower steak with olive oil using a pastry brush.
4. Sprinkle kosher salt evenly over both sides of each steak.
5. Place the cauliflower steaks in a single layer on the prepared baking sheet.
6. Roast for 25 minutes until the edges are golden brown and crispy.
7. While the cauliflower roasts, finely chop the parsley leaves and garlic cloves.
8. Combine the chopped parsley, garlic, remaining olive oil, red wine vinegar, and red pepper flakes in a small bowl.
9. Stir the chimichurri sauce vigorously until well combined.
10. Flip the cauliflower steaks carefully using a spatula after 15 minutes of roasting.
11. Continue roasting for the remaining 10 minutes until tender when pierced with a fork.
12. Remove the cauliflower steaks from the oven and transfer to serving plates.
13. Drizzle the chimichurri sauce generously over the hot cauliflower steaks.
14. Squeeze fresh lemon juice over everything just before serving.
Remarkably tender inside with those delightfully crispy edges, these cauliflower steaks soak up the zesty chimichurri like flavor sponges. Serve them over creamy polenta or alongside roasted potatoes for a meal that’ll make you forget all about beef. The garlicky, herbaceous sauce clinging to each caramelized bite is pure vegetable wizardry!
Stuffed Peppers with Quinoa and Black Beans

Let’s be real—sometimes dinner needs to be as colorful as your personality, and these stuffed peppers are here to deliver. Packed with quinoa and black beans, they’re the ultimate veggie-powered meal that even your picky cousin would devour. Who said healthy can’t be hilariously delicious?
5
servings20
minutes53
minutesIngredients
– 4 large bell peppers (any color you’re feeling)
– 1 cup of quinoa, rinsed like it owes you money
– 2 cups of vegetable broth
– 1 can (15 oz) of black beans, drained and rinsed
– 1 small onion, diced
– 2 cloves of garlic, minced
– 1 cup of corn (frozen or canned works)
– 1 tsp of cumin
– 1 tsp of chili powder
– A big pinch of salt
– A couple of glugs of olive oil
– 1 cup of shredded cheese (cheddar or Monterey Jack)
– A handful of fresh cilantro, chopped
Instructions
1. Preheat your oven to 375°F and grab a baking dish that fits all 4 peppers snugly.
2. Slice the tops off the bell peppers, scoop out the seeds and membranes, and stand them upright in the dish. (Tip: If they wobble, trim a tiny bit off the bottoms to keep them steady.)
3. Heat a couple of glugs of olive oil in a large skillet over medium heat, then toss in the diced onion and cook for about 5 minutes until it’s soft and translucent.
4. Add the minced garlic and cook for another minute until it’s fragrant—don’t let it burn, or it’ll taste like regret.
5. Stir in the rinsed quinoa, cumin, chili powder, and a big pinch of salt, toasting everything for 2 minutes to wake up the spices.
6. Pour in the 2 cups of vegetable broth, bring it to a boil, then reduce the heat to low, cover the skillet, and let it simmer for 15 minutes until the quinoa has absorbed all the liquid.
7. Remove the skillet from the heat and fluff the quinoa with a fork, then mix in the black beans, corn, and half of the shredded cheese. (Tip: Let the mixture cool slightly so it’s easier to handle.)
8. Spoon the quinoa filling into each pepper, packing it down gently, and top with the remaining cheese.
9. Cover the baking dish with foil and bake for 25 minutes, then remove the foil and bake for another 10 minutes until the peppers are tender and the cheese is golden and bubbly.
10. Sprinkle with chopped cilantro right before serving. (Tip: For extra crunch, broil for 1–2 minutes at the end, but watch closely to avoid a cheese catastrophe!)
Vibrant and satisfying, these peppers boast a tender bite with a hearty, spiced filling that’s both fluffy and firm. Serve them alongside a zesty lime crema or crumbled tortilla chips for a fiesta-worthy twist that’ll have everyone asking for seconds.
Zucchini Noodles with Avocado Pesto
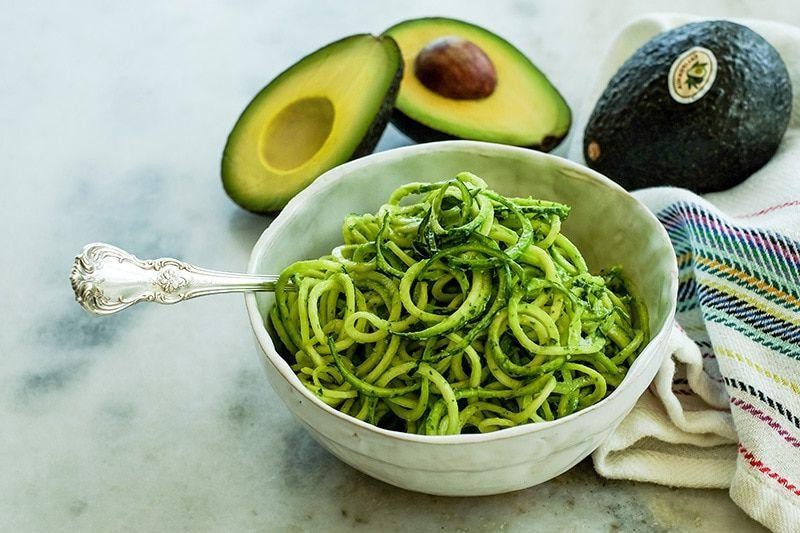
Aren’t you tired of pretending to enjoy those bland, watery zucchini noodles that taste like culinary disappointment? Let’s rescue this healthy trend with an avocado pesto so creamy and dreamy, you’ll forget you’re eating vegetables at all—until your smug satisfaction reminds you.
2
servings15
minutesIngredients
– 2 medium zucchinis, spiralized into noodles
– 1 ripe avocado, pitted and scooped
– A big handful of fresh basil leaves (about 1 cup packed)
– A generous ¼ cup of toasted pine nuts
– A couple of garlic cloves, peeled
– A good glug of extra virgin olive oil (about 3 tbsp)
– A big squeeze of fresh lemon juice (about 2 tbsp)
– A pinch of salt and a few cracks of black pepper
Instructions
1. Spiralize your zucchinis into noodles, then spread them on a clean kitchen towel and sprinkle with a pinch of salt to draw out excess moisture (this prevents a soggy dish—trust me!).
2. Let the zucchini noodles sit for 10 minutes while you pat them dry with the towel.
3. In a food processor, combine the avocado, basil, pine nuts, garlic, olive oil, lemon juice, salt, and pepper.
4. Pulse the mixture for 30 seconds, scrape down the sides, then blend for another 30 seconds until it’s smooth and vibrant green.
5. Toss the dried zucchini noodles with the avocado pesto in a large bowl until every strand is coated.
6. Serve immediately or chill in the fridge for 15 minutes if you prefer it cool.
Unbelievably creamy and fresh, this dish delivers a velvety pesto that clings to each zucchini noodle without weighing it down. Toss in some cherry tomatoes for a pop of color, or top with grilled shrimp if you’re feeling fancy—it’s a vibrant, guilt-free bowl that’ll make you wonder why you ever settled for sad salads.
Roasted Veggie and Quinoa Buddha Bowl
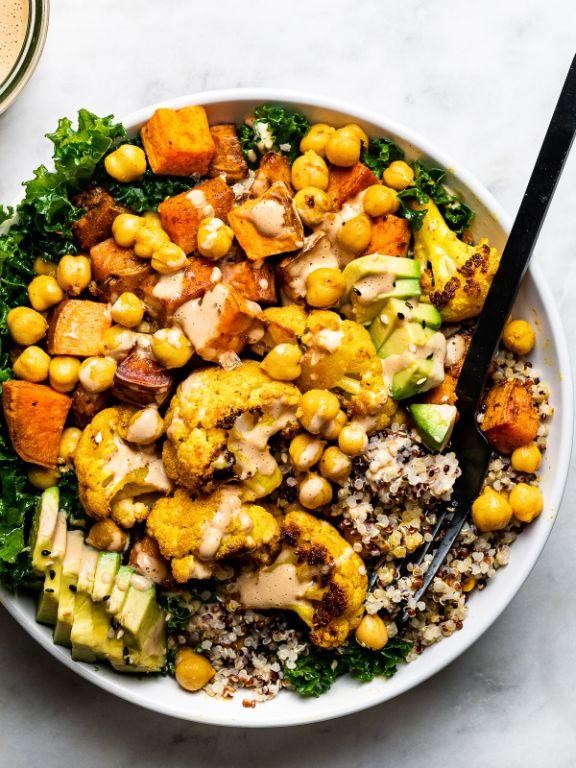
Unbelievably, your quest for the perfect healthy-but-actually-delicious lunch ends right here, right now, with this roasted veggie and quinoa situation that’s basically a hug in a bowl.
2
servings15
minutes40
minutesIngredients
– 1 cup of quinoa
– 2 cups of water
– 1 large sweet potato, chopped into ½-inch cubes
– 1 red bell pepper, sliced
– 1 cup of broccoli florets
– 2 tablespoons of olive oil
– A generous pinch of salt
– A couple of cracks of black pepper
– A big handful of fresh spinach
– A splash of lemon juice
– A drizzle of tahini for serving
Instructions
1. Preheat your oven to 400°F.
2. Rinse 1 cup of quinoa thoroughly under cold water in a fine-mesh strainer to remove any bitterness.
3. Combine the rinsed quinoa and 2 cups of water in a medium saucepan.
4. Bring the quinoa and water to a boil over high heat.
5. Once boiling, reduce the heat to low, cover the saucepan, and simmer for exactly 15 minutes.
6. While the quinoa cooks, chop 1 large sweet potato into ½-inch cubes and slice 1 red bell pepper.
7. Toss the sweet potato cubes, sliced red bell pepper, and 1 cup of broccoli florets with 2 tablespoons of olive oil, a generous pinch of salt, and a couple of cracks of black pepper on a baking sheet.
8. Roast the vegetables in the preheated 400°F oven for 20–25 minutes, until the sweet potato is fork-tender and the broccoli edges are lightly browned.
9. Remove the roasted vegetables from the oven and let them cool slightly.
10. Fluff the cooked quinoa with a fork after it has rested, covered, for 5 minutes off the heat.
11. In a large bowl, layer a big handful of fresh spinach at the bottom.
12. Top the spinach with the fluffed quinoa.
13. Add the roasted vegetables over the quinoa.
14. Squeeze a splash of lemon juice over the entire bowl.
15. Drizzle with tahini just before serving.
Mmm, the combo of fluffy quinoa, tender roasted veggies, and that zesty lemon-tahini drizzle creates a texture party in your mouth—creamy, crunchy, and utterly satisfying. Try piling it all into a warm tortilla for a next-level wrap, or top with a fried egg if you’re feeling extra fancy.
Spaghetti Squash with Tomato Basil Sauce
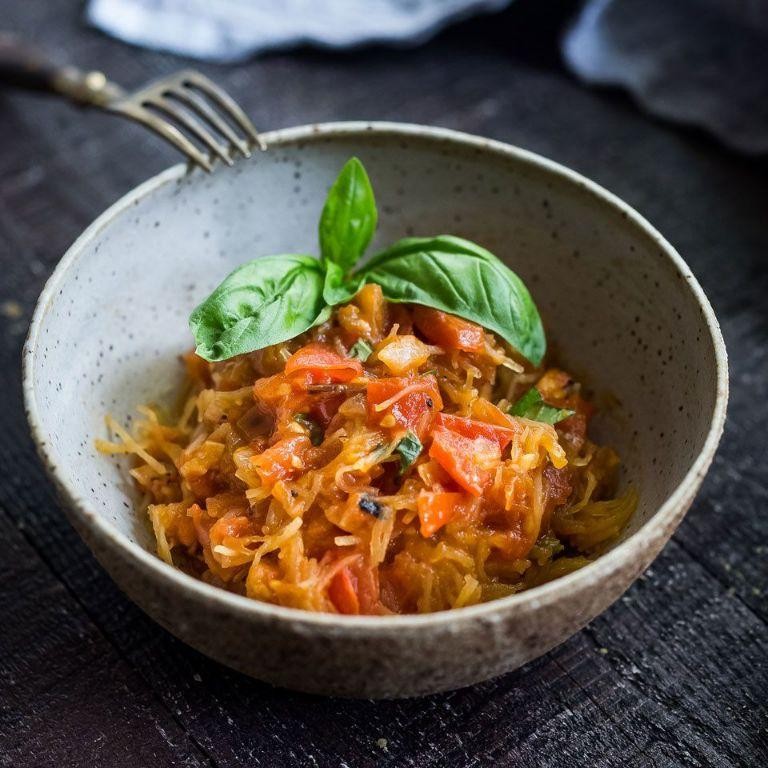
Miraculously, this spaghetti squash situation is about to become your new favorite kitchen magic trick—turning a humble gourd into pasta-like strands that will make you question why you ever bothered boiling water for the real stuff. It’s basically vegetable sorcery with a tomato-basil hug, and your fork is the wand. Get ready to twirl your way to veggie victory without the carb coma!
2
portions15
minutes55
minutesIngredients
– One medium spaghetti squash (about 3 pounds)
– A couple of tablespoons of olive oil
– A pinch of salt and a few cracks of black pepper
– One 28-ounce can of crushed tomatoes
– A splash of balsamic vinegar (about 1 tablespoon)
– Two cloves of garlic, minced
– A handful of fresh basil leaves, chopped
– A sprinkle of red pepper flakes (optional, for a little kick)
Instructions
1. Preheat your oven to 400°F—get it nice and toasty for that squash.
2. Carefully slice the spaghetti squash in half lengthwise using a sharp knife (tip: microwave it for 2 minutes first to soften the skin and make cutting safer).
3. Scoop out the seeds and stringy bits from each half with a spoon.
4. Drizzle 1 tablespoon of olive oil over the cut sides of the squash.
5. Sprinkle a pinch of salt and a few cracks of black pepper evenly over the oiled surfaces.
6. Place the squash halves cut-side down on a baking sheet lined with parchment paper.
7. Roast in the preheated oven for 35–40 minutes, until the flesh is tender and easily shreds with a fork.
8. While the squash roasts, heat the remaining 1 tablespoon of olive oil in a saucepan over medium heat.
9. Add the minced garlic and sauté for 1–2 minutes, until fragrant but not browned (tip: don’t walk away—garlic burns fast and turns bitter).
10. Pour in the crushed tomatoes and stir to combine.
11. Add the balsamic vinegar, a pinch of salt, and red pepper flakes if using.
12. Simmer the sauce uncovered for 15–20 minutes, stirring occasionally, until it thickens slightly.
13. Stir in the chopped basil leaves and remove the sauce from heat.
14. Once the squash is done, use a fork to scrape the flesh into strands, working from edge to center.
15. Divide the squash strands into bowls and top generously with the tomato basil sauce.
Just imagine those tender, noodle-like strands soaking up the bright, herby sauce—it’s a texture party where sweet squash meets tangy tomatoes. Serve it piled high in a bowl with extra basil on top, or get fancy and use the roasted squash halves as edible bowls for a dinner that’s as Instagram-worthy as it is delicious.
Vegan Lentil Loaf with Mushroom Gravy
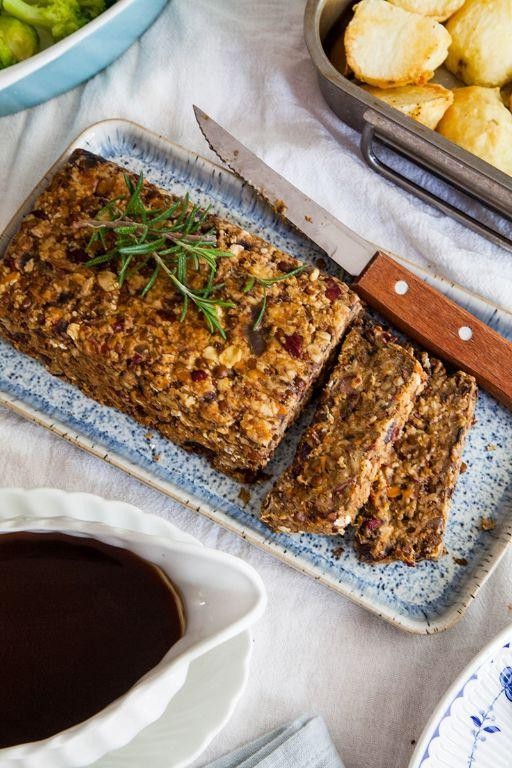
Zesty, zingy, and zero-animal-product-needed—this vegan lentil loaf is about to become your new comfort food obsession that even carnivores will beg for seconds of. Who knew plants could party this hard?
4
servings20
minutes90
minutesIngredients
– 1 cup of brown lentils (the sturdy kind that won’t turn to mush)
– A couple of yellow onions, chopped like they owe you money
– 3 cloves of garlic, minced with gusto
– 2 cups of mushrooms, sliced thin (cremini work great)
– 1 cup of rolled oats (not the instant kind—they’re too wimpy)
– 2 tablespoons of tomato paste (the flavor booster)
– A splash of soy sauce for that umami punch
– 1 tablespoon of olive oil (the good stuff)
– 1 teaspoon of dried thyme
– ½ teaspoon of smoked paprika
– 2 cups of vegetable broth (homemade if you’re fancy)
– 1 tablespoon of all-purpose flour (for thickening magic)
– Salt and black pepper to make it sing
Instructions
1. Preheat your oven to 375°F—get it nice and toasty.
2. Cook the lentils in 2 cups of vegetable broth for 25 minutes until tender but not mushy (drain any excess liquid).
3. Sauté the chopped onions in 1 tablespoon of olive oil over medium heat for 5–7 minutes until translucent.
4. Add the minced garlic and cook for 1 more minute until fragrant (don’t let it burn—burnt garlic is sad garlic).
5. Toss in the sliced mushrooms and cook for 8–10 minutes until they release their juices and brown slightly.
6. Stir in the tomato paste, soy sauce, dried thyme, and smoked paprika, cooking for 2 minutes to blend the flavors.
7. Mix the cooked lentils, mushroom mixture, rolled oats, salt, and black pepper in a large bowl until well combined.
8. Press the mixture firmly into a loaf pan lined with parchment paper (tip: wet your hands to prevent sticking).
9. Bake for 40–45 minutes until the top is firm and lightly browned.
10. While the loaf bakes, make the gravy by whisking 1 tablespoon of flour into the mushroom cooking juices in the pan over medium heat.
11. Gradually add 1 cup of vegetable broth, stirring constantly for 5–7 minutes until thickened (tip: no lumps allowed!).
12. Let the loaf rest for 10 minutes before slicing—patience pays off with neat slices.
Seriously satisfying, this loaf boasts a firm, sliceable texture with a savory, earthy flavor from the lentils and mushrooms. Serve it smothered in that rich gravy, or get wild and make lentil loaf sandwiches for tomorrow’s lunch—leftovers have never been so exciting.
Hearty Vegetable and Bean Chili
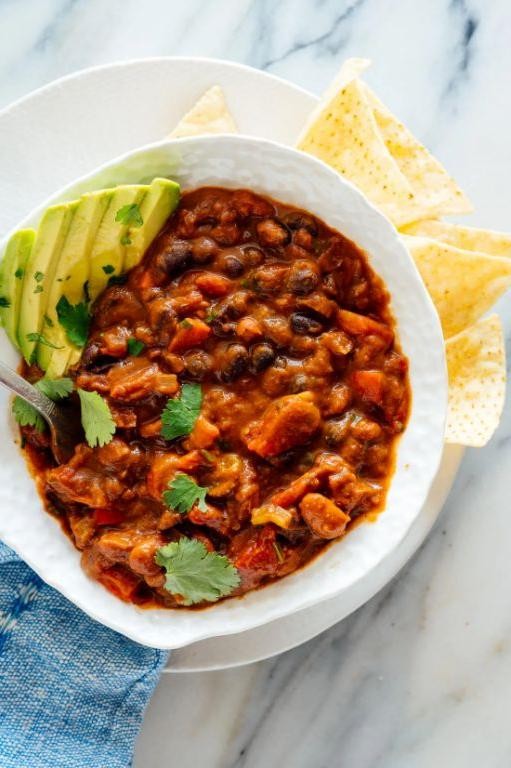
Dang, is there anything more comforting than a big pot of chili simmering away? This vegetable-packed version will have even the most devoted carnivores forgetting there’s no meat involved. Let’s get this flavor party started!
2
servings15
minutes40
minutesIngredients
- A couple of tablespoons of olive oil
- One large onion, chopped
- Three cloves of garlic, minced
- One bell pepper, diced
- Two carrots, chopped
- Two 15-ounce cans of kidney beans, drained and rinsed
- One 28-ounce can of crushed tomatoes
- Two cups of vegetable broth
- A couple of tablespoons of chili powder
- One teaspoon of cumin
- A pinch of salt and black pepper
- A splash of lime juice
Instructions
- Heat 2 tablespoons of olive oil in a large pot over medium heat for 2 minutes until shimmering.
- Add 1 chopped large onion and cook for 5 minutes, stirring occasionally, until translucent.
- Stir in 3 minced garlic cloves and cook for 1 minute until fragrant.
- Add 1 diced bell pepper and 2 chopped carrots, cooking for 6 minutes until slightly softened.
- Sprinkle in 2 tablespoons of chili powder and 1 teaspoon of cumin, toasting for 30 seconds to deepen flavors.
- Pour in 2 cups of vegetable broth, scraping any browned bits from the bottom of the pot.
- Add 1 can of crushed tomatoes and 2 cans of drained kidney beans, stirring to combine.
- Bring to a boil, then reduce heat to low and simmer uncovered for 25 minutes, stirring occasionally.
- Season with a pinch of salt and black pepper, then stir in a splash of lime juice just before serving.
Absolutely magical how those beans soak up all the spicy tomato goodness while keeping their perfect tender bite. The lime juice brightens everything up beautifully—try serving it over crispy tortilla chips for maximum crunch factor!
Twice-Baked Sweet Potatoes with Spinach

Zesty, vibrant, and downright irresistible—these twice-baked sweet potatoes are the cozy hug your dinner table has been craving, packed with spinach and enough cheesy goodness to make even Monday nights feel like a celebration. They’re the ultimate side dish that steals the spotlight, perfect for when you want to impress without the stress. Get ready to fall in love with every fluffy, savory bite!
2
portions20
minutes70
minutesIngredients
– 4 medium sweet potatoes
– A couple of tablespoons of olive oil
– A big handful of fresh spinach (about 2 cups)
– Half a cup of sour cream
– A generous half-cup of shredded cheddar cheese
– A pinch of salt and a few cracks of black pepper
– A sprinkle of smoked paprika (about 1/2 teaspoon)
Instructions
1. Preheat your oven to 400°F and line a baking sheet with parchment paper.
2. Rub the sweet potatoes all over with olive oil and place them on the baking sheet.
3. Bake the sweet potatoes for 45–50 minutes, until they’re tender when pierced with a fork.
4. Let the sweet potatoes cool for 10 minutes so you can handle them comfortably.
5. Slice each sweet potato in half lengthwise and scoop the flesh into a bowl, leaving a 1/4-inch border to keep the skins intact.
6. Tip: Use a spoon to scrape the flesh—it’s easier than a fork and prevents tearing the skins.
7. Wilt the spinach in a skillet over medium heat for 2–3 minutes, just until it’s bright green and softened.
8. Squeeze any excess liquid from the spinach with your hands or a paper towel to avoid a soggy filling.
9. Mash the sweet potato flesh with sour cream, salt, and pepper until smooth.
10. Fold in the spinach and half of the cheddar cheese until everything is well combined.
11. Spoon the mixture back into the sweet potato skins, mounding it slightly.
12. Top with the remaining cheddar cheese and a dusting of smoked paprika.
13. Bake at 375°F for 15–20 minutes, until the cheese is bubbly and lightly golden.
14. Tip: For extra crispiness, broil for the last 1–2 minutes, but watch closely to prevent burning.
15. Let them rest for 5 minutes before serving to let the flavors meld.
Buttery, creamy centers contrast with crispy-edged skins, making each forkful a textural dream. Serve these beauties alongside grilled chicken or pile them high as a vegetarian main—either way, they’re guaranteed to disappear faster than you can say “seconds, please!”
Mushroom Stroganoff with Brown Rice
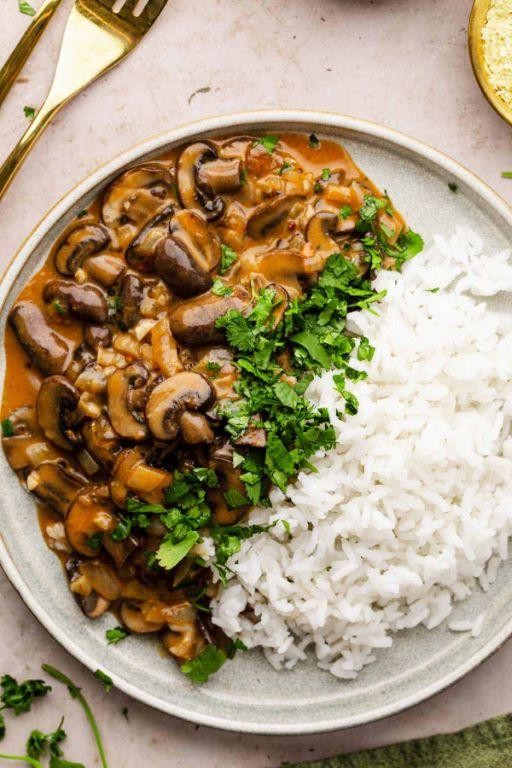
Fancy a dinner that’s both comforting and ridiculously easy? This mushroom stroganoff is here to rescue your weeknight with creamy, earthy vibes that hug your soul. Forget fancy techniques—this is basically a cozy blanket in a bowl, ready in the time it takes to binge one episode of your favorite show.
3
servings15
minutes45
minutesIngredients
– 1 cup of brown rice
– A couple of tablespoons of olive oil
– 1 chopped onion
– 3 minced garlic cloves
– A pound of sliced cremini mushrooms
– A splash of vegetable broth (about 1 cup)
– A generous ½ cup of sour cream
– A tablespoon of Dijon mustard
– A sprinkle of salt and black pepper
– A handful of fresh parsley, chopped
Instructions
1. Cook 1 cup of brown rice according to package directions until tender, about 25–30 minutes.
2. Heat a couple of tablespoons of olive oil in a large skillet over medium heat until it shimmers.
3. Add 1 chopped onion and cook for 5–7 minutes, stirring occasionally, until it turns translucent and soft.
4. Stir in 3 minced garlic cloves and cook for 1 minute until fragrant—don’t let it brown!
5. Toss in a pound of sliced cremini mushrooms and cook for 8–10 minutes, stirring now and then, until they release their liquid and turn golden brown.
6. Pour in a splash of vegetable broth (about 1 cup) and simmer for 3–5 minutes until the liquid reduces by half.
7. Reduce the heat to low and stir in a generous ½ cup of sour cream and a tablespoon of Dijon mustard until the sauce is smooth and creamy.
8. Season with a sprinkle of salt and black pepper, then mix in a handful of fresh parsley.
9. Serve the stroganoff hot over the cooked brown rice.
Savor that velvety sauce clinging to each mushroom—it’s rich, tangy, and downright addictive. For a fun twist, top it with extra parsley or a dash of paprika to make it pop. Leftovers? They’re even better the next day, like a flavor party that just won’t quit!
Quinoa and Kale Stuffed Acorn Squash
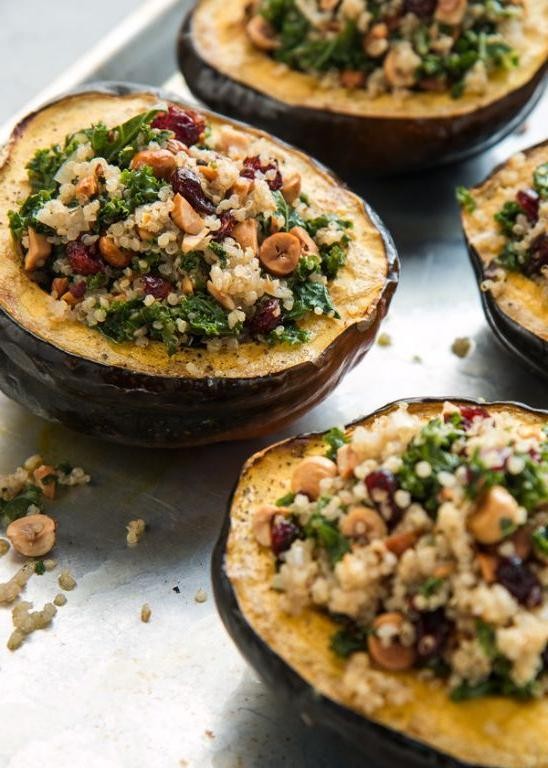
Oh my gourd, have we got a showstopper for you! This quinoa and kale stuffed acorn squash is basically autumn wearing its Sunday best – it’s that perfect blend of cozy comfort and vibrant nutrition that’ll make you feel like a kitchen wizard without requiring any actual magic spells. Get ready to impress your taste buds and anyone lucky enough to share your table with this colorful, flavor-packed masterpiece.
2
portions20
minutes58
minutesIngredients
- 2 medium acorn squashes, halved and seeded (because nobody wants squash guts in their dinner)
- 1 cup of quinoa, rinsed until the water runs clear (trust me, this matters)
- A couple of big handfuls of kale, stems removed and chopped into bite-sized pieces
- Half a red onion, diced small enough to make you feel fancy
- 2 cloves of garlic, minced (or more if you’re feeling brave)
- A generous glug of olive oil – about 2 tablespoons
- A splash of vegetable broth – roughly 1/4 cup
- A pinch of crushed red pepper flakes for that subtle kick
- Salt and black pepper to make everything play nice together
Instructions
- Preheat your oven to 400°F and line a baking sheet with parchment paper.
- Slice each acorn squash in half vertically and scoop out all the seeds and stringy bits using a sturdy spoon.
- Brush the cut sides of the squash halves with 1 tablespoon of olive oil and sprinkle generously with salt and pepper.
- Place the squash halves cut-side down on the prepared baking sheet and roast for 30-35 minutes until the flesh is easily pierced with a fork.
- While the squash roasts, rinse 1 cup of quinoa thoroughly in a fine-mesh strainer until the water runs clear to remove the natural bitterness.
- Heat the remaining tablespoon of olive oil in a medium saucepan over medium heat and sauté the diced red onion for 3-4 minutes until translucent.
- Add the minced garlic and cook for another minute until fragrant but not browned.
- Stir in the rinsed quinoa and toast for 1 minute, then add 2 cups of water and bring to a boil.
- Reduce heat to low, cover the saucepan, and simmer for 15 minutes until the quinoa has absorbed all the liquid and the little tails have unfurled.
- Remove the quinoa from heat and let it sit covered for 5 minutes, then fluff with a fork.
- Stir the chopped kale into the hot quinoa along with 1/4 cup of vegetable broth – the residual heat will wilt the kale perfectly.
- Mix in the crushed red pepper flakes and season the quinoa mixture with additional salt and pepper to your liking.
- Remove the roasted squash halves from the oven and carefully flip them cut-side up using oven mitts.
- Divide the quinoa-kale mixture evenly among the four squash halves, packing it in generously.
- Return the stuffed squash to the oven and bake for another 10-12 minutes until everything is heated through and the kale is bright green.
Heavenly doesn’t even begin to describe the texture contrast here – you get the creamy, sweet squash flesh against the fluffy quinoa and slightly crisp-tender kale. The flavor profile is like autumn decided to throw a party in your mouth, with earthy notes from the quinoa playing perfectly with the slight bitterness of kale and natural sweetness of roasted squash. Serve these beauties as individual edible bowls for a stunning dinner party presentation, or crumble some toasted pecans over the top for extra crunch and nutty goodness.
Eggplant Parmesan with Cashew Cheese
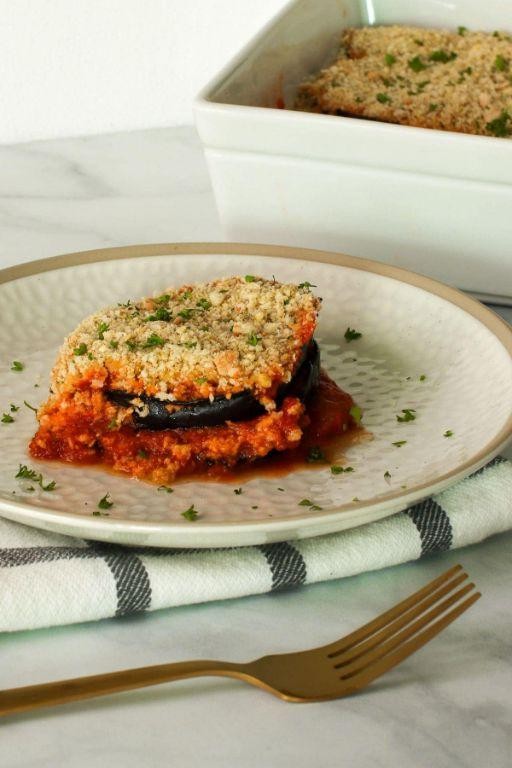
Daring to ditch dairy but dreaming of that classic Italian comfort? This eggplant parmesan with cashew cheese is your new go-to for a plant-based twist that’ll have even non-vegans begging for seconds—no cows required, just pure, unapologetic deliciousness.
6
portions25
minutes45
minutesIngredients
– A couple of large eggplants, sliced into ½-inch rounds
– A generous splash of olive oil
– 1 cup of raw cashews, soaked overnight
– ½ cup of unsweetened almond milk
– 2 tablespoons of nutritional yeast
– A squeeze of fresh lemon juice
– 1 jar (about 24 ounces) of your favorite marinara sauce
– A handful of fresh basil leaves
– ½ cup of breadcrumbs
Instructions
1. Preheat your oven to 375°F and line a baking sheet with parchment paper.
2. Arrange the eggplant slices in a single layer on the baking sheet and brush both sides with olive oil.
3. Bake the eggplant for 20 minutes, flipping halfway through, until they’re tender and lightly golden.
4. While the eggplant bakes, drain the soaked cashews and blend them with almond milk, nutritional yeast, and lemon juice until smooth and creamy.
5. Spread a thin layer of marinara sauce on the bottom of a 9×13-inch baking dish.
6. Layer half of the baked eggplant slices over the sauce.
7. Dollop half of the cashew cheese mixture evenly over the eggplant layer.
8. Sprinkle half of the breadcrumbs on top.
9. Repeat the layers with the remaining eggplant, cashew cheese, and breadcrumbs.
10. Bake the assembled dish at 375°F for 25 minutes, until the top is crispy and the sauce is bubbling.
11. Let it rest for 5 minutes before garnishing with fresh basil leaves.
Unbelievably creamy and satisfying, this dish boasts a crispy top that gives way to tender eggplant and rich, tangy cashew cheese. Serve it over a bed of zucchini noodles for a low-carb twist, or pair it with garlic bread to soak up every last bit of that saucy goodness—it’s comfort food that feels fancy without the fuss.
Savory Tofu Scramble Breakfast Tacos
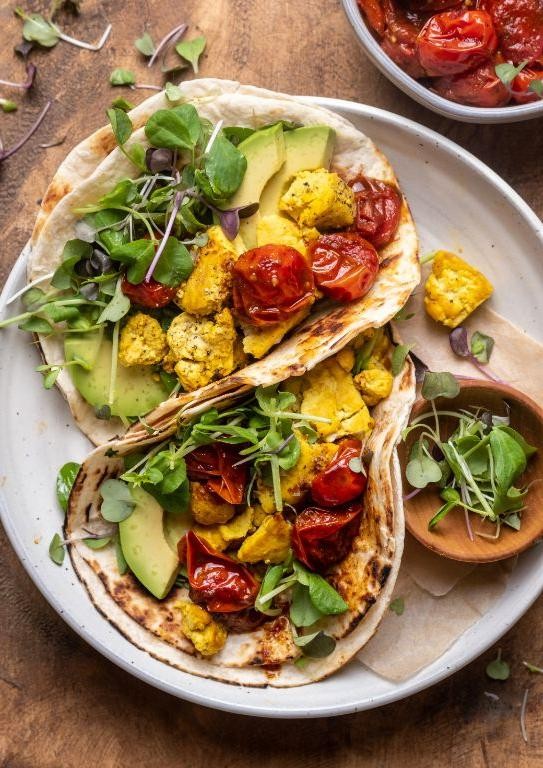
Hang onto your spatulas, folks, because we’re about to turn that boring breakfast routine into a fiesta your taste buds will thank you for! This savory tofu scramble is the ultimate plant-based power move that’ll have even the most devoted egg-eaters doing a double take. Get ready to taco ’bout the most exciting morning meal you’ve had in ages.
2
tacos10
minutes15
minutesIngredients
– 1 block of firm tofu, pressed and crumbled
– 2 tablespoons of olive oil
– 1/2 cup of diced red bell pepper
– 1/4 cup of chopped red onion
– 2 cloves of garlic, minced
– 1 teaspoon of ground turmeric
– 1/2 teaspoon of smoked paprika
– A generous pinch of salt
– A couple of cracks of black pepper
– 4 small corn tortillas
– A handful of fresh cilantro leaves
– A squeeze of fresh lime juice
Instructions
1. Heat 2 tablespoons of olive oil in a large skillet over medium heat until it shimmers.
2. Add 1/2 cup of diced red bell pepper and 1/4 cup of chopped red onion, cooking for 3-4 minutes until they soften and develop some color.
3. Stir in 2 minced garlic cloves and cook for exactly 30 seconds until fragrant but not browned.
4. Crumble 1 block of pressed firm tofu directly into the skillet using your hands or a fork.
5. Sprinkle 1 teaspoon of turmeric, 1/2 teaspoon of smoked paprika, a generous pinch of salt, and a couple of cracks of black pepper over the tofu mixture.
6. Cook the scramble for 5-7 minutes, stirring occasionally, until the tofu is heated through and has absorbed the spices evenly.
7. Warm 4 small corn tortillas in a dry skillet over medium heat for about 30 seconds per side until pliable and slightly toasted.
8. Divide the tofu scramble evenly among the warmed tortillas.
9. Top each taco with a handful of fresh cilantro leaves.
10. Finish with a squeeze of fresh lime juice over each taco.
Oh my goodness, the contrast between the fluffy, turmeric-kissed tofu and the slightly charred corn tortillas is pure breakfast magic! That bright lime squeeze cuts through the savory richness in the most delightful way, while the fresh cilantro adds a pop of herbal freshness that’ll make you feel like you’re eating at your favorite taqueria. Try serving these with a side of spicy salsa or avocado slices for the ultimate breakfast taco experience that’ll have you doing a happy dance before your first cup of coffee.
Spicy Roasted Chickpea and Spinach Salad
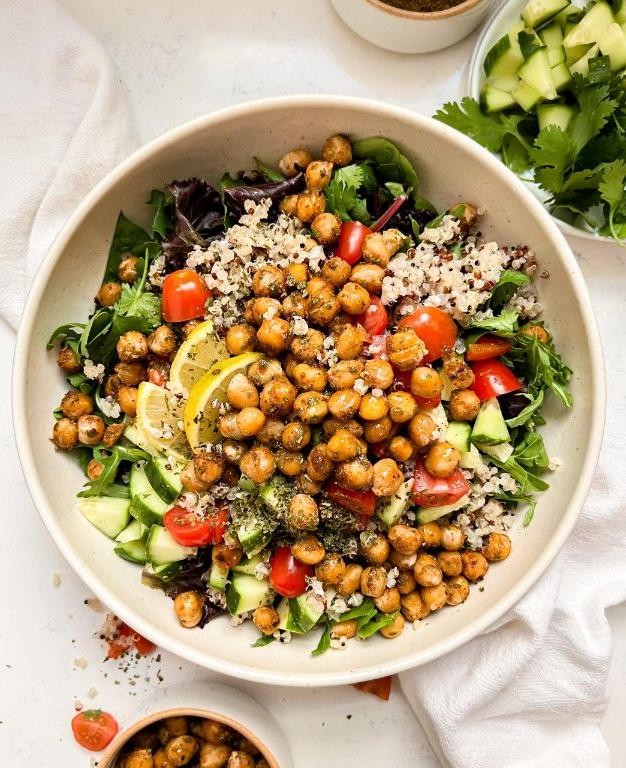
Brace yourselves, salad skeptics—this isn’t your average bowl of rabbit food. We’re talking crispy, spice-dusted chickpeas that crunch like nature’s croutons, all tangled up with tender spinach in a dressing that packs a serious flavor punch. Get ready to fall in love with your lunch again, one zesty bite at a time.
1
servings10
minutes28
minutesIngredients
– 1 can (15 oz) of chickpeas, rinsed and patted dry
– 1 big handful of fresh spinach (about 4 cups)
– 2 tablespoons of olive oil
– 1 teaspoon of smoked paprika
– ½ teaspoon of cayenne pepper
– A generous pinch of salt
– A splash of lemon juice (about 1 tablespoon)
– A couple of garlic cloves, minced
Instructions
1. Preheat your oven to 400°F and line a baking sheet with parchment paper.
2. Toss the dried chickpeas with 1 tablespoon of olive oil, smoked paprika, cayenne, and salt in a medium bowl until evenly coated.
3. Spread the chickpeas in a single layer on the baking sheet.
4. Roast for 20–25 minutes, shaking the pan halfway through, until the chickpeas are crispy and lightly browned. (Tip: Don’t crowd the pan—this ensures maximum crispiness!)
5. While the chickpeas roast, heat the remaining 1 tablespoon of olive oil in a large skillet over medium heat.
6. Add the minced garlic and cook for 1–2 minutes, stirring constantly, until fragrant but not browned.
7. Add the spinach to the skillet and toss for 2–3 minutes, just until wilted. (Tip: Wilt the spinach in batches if your skillet is small to avoid steaming.)
8. Remove the skillet from the heat and drizzle the lemon juice over the spinach, tossing to combine.
9. Transfer the wilted spinach to a serving bowl.
10. Once the chickpeas are done roasting, let them cool for 2–3 minutes. (Tip: Cooling slightly helps them stay extra crunchy when mixed.)
11. Add the roasted chickpeas to the spinach and toss everything together gently.
Absolutely addictive, this salad balances the smoky heat of the chickpeas with the bright, garlicky spinach. Serve it warm as a standalone lunch or pile it onto toasted sourdough for an open-faced sandwich that’ll make your taste buds do a happy dance.
Conclusion
Vibrant and versatile, these 22 knife-forward recipes prove that sometimes the simplest tools create the most delicious meals. We hope this collection inspires your next kitchen adventure! Don’t forget to leave a comment with your favorite recipe and share this roundup on Pinterest to spread the culinary love.


