
Venture beyond the usual chips and dip! Whether you’re hosting a holiday party, game day gathering, or just craving something delicious, the right appetizer can turn any occasion into a celebration. We’ve gathered 33 irresistible, crowd-pleasing recipes that are sure to impress your guests. Get ready to find your new favorite starter—let’s dive into these killer bites!
Spicy Buffalo Cauliflower Bites

Y’know, I used to think cauliflower was just a boring vegetable until I discovered how magical it becomes when coated in spicy buffalo sauce. Last football Sunday, I whipped up these bites for my skeptical friends who swore they’d never choose veggies over wings – let’s just say the bowl was empty before halftime. This recipe has become my go-to for game days, potlucks, and those nights when I’m craving something spicy but want to keep things somewhat healthy.
3
servings15
minutes30
minutesIngredients
– Cauliflower – 1 head
– Flour – ¾ cup
– Water – ¾ cup
– Garlic powder – 1 tsp
– Salt – ½ tsp
– Hot sauce – ½ cup
– Butter – ¼ cup
– Olive oil – 2 tbsp
Instructions
1. Preheat your oven to 450°F and line a baking sheet with parchment paper.
2. Cut the cauliflower into bite-sized florets, about 1-2 inches each.
3. In a large bowl, whisk together flour, water, garlic powder, and salt until smooth.
4. Dip each cauliflower floret into the batter, letting excess drip off before placing on the baking sheet.
5. Drizzle olive oil evenly over the battered cauliflower florets.
6. Bake for 20 minutes until the edges start turning golden brown.
7. While cauliflower bakes, melt butter in a small saucepan over medium heat.
8. Whisk hot sauce into the melted butter until fully combined.
9. Remove cauliflower from oven and pour the hot sauce mixture over the florets, tossing to coat evenly.
10. Return to oven and bake for another 10 minutes until sauce is bubbly and slightly caramelized.
11. Let cool for 5 minutes before serving – they’ll be piping hot!
Extra crispy on the outside yet tender inside, these bites deliver that classic buffalo kick without the guilt. I love serving them with extra hot sauce for dipping and a big bowl of cool ranch dressing to balance the heat – they’re perfect for converting even the most devoted wing lovers to team cauliflower.
Garlic Parmesan Stuffed Mushrooms

Diving into my kitchen after a long day always feels therapeutic, especially when I’m making these garlic parmesan stuffed mushrooms that my grandmother taught me to prepare. There’s something magical about how the earthy mushrooms transform into elegant little bites that disappear within minutes at any gathering. I love how simple ingredients come together to create something truly special.
2
servings15
minutes25
minutesIngredients
Cremini mushrooms – 1 lb
Cream cheese – 4 oz
Parmesan cheese – ½ cup, grated
Garlic – 3 cloves, minced
Breadcrumbs – ¼ cup
Olive oil – 2 tbsp
Salt – ½ tsp
Black pepper – ¼ tsp
Instructions
- Preheat your oven to 375°F and line a baking sheet with parchment paper.
- Wipe the cremini mushrooms clean with a damp paper towel to remove any dirt.
- Remove the stems from all mushrooms by gently twisting them off.
- Finely chop the mushroom stems and set them aside.
- Heat olive oil in a skillet over medium heat for 1 minute until shimmering.
- Add the minced garlic to the skillet and cook for 30 seconds until fragrant.
- Add the chopped mushroom stems to the skillet and cook for 4 minutes until softened.
- Transfer the mushroom stem mixture to a mixing bowl and let it cool for 5 minutes.
- Add cream cheese, parmesan cheese, breadcrumbs, salt, and black pepper to the bowl.
- Mix all ingredients thoroughly until well combined and smooth.
- Spoon the filling mixture into each mushroom cap, mounding it slightly.
- Arrange the stuffed mushrooms on the prepared baking sheet in a single layer.
- Bake for 18-20 minutes until the mushrooms are tender and the tops are golden brown.
- Remove from oven and let the mushrooms rest for 3 minutes before serving.
Fresh from the oven, these mushrooms offer the perfect contrast between the tender caps and the creamy, golden-brown filling. The garlic and parmesan create a savory depth that makes these irresistible as appetizers or even as a side dish with grilled steak. I often serve them on a wooden platter garnished with fresh parsley for that beautiful rustic touch that always impresses my guests.
Crispy Asian Spiced Egg Rolls

Every time I smell these egg rolls frying, I’m instantly transported back to my college days when my roommate’s grandmother taught me her secret technique. Now I make them for every game day gathering, and they disappear faster than I can plate them.
12
rolls25
minutes30
minutesIngredients
Egg roll wrappers – 12
Ground pork – 1 lb
Shredded cabbage – 2 cups
Shredded carrots – 1 cup
Soy sauce – 2 tbsp
Garlic powder – 1 tsp
Ginger powder – 1 tsp
Vegetable oil – 2 cups
Instructions
1. Heat a large skillet over medium-high heat for 2 minutes until a drop of water sizzles.
2. Add 1 lb ground pork to the hot skillet and break it apart with a wooden spoon.
3. Cook the pork for 6-8 minutes, stirring occasionally, until no pink remains.
4. Add 2 cups shredded cabbage and 1 cup shredded carrots to the skillet.
5. Stir the vegetables into the pork and cook for 4 minutes until cabbage wilts slightly.
6. Add 2 tbsp soy sauce, 1 tsp garlic powder, and 1 tsp ginger powder to the skillet.
7. Stir the mixture thoroughly and cook for 1 more minute, then remove from heat.
8. Transfer the filling to a bowl and let it cool completely for 20 minutes.
9. Lay one egg roll wrapper on a clean surface with a corner pointing toward you.
10. Place 3 tbsp of cooled filling in the center of the wrapper.
11. Fold the bottom corner over the filling, then fold in the side corners.
12. Roll the wrapper tightly toward the top corner, sealing the edge with a dab of water.
13. Repeat steps 9-12 with remaining wrappers and filling.
14. Heat 2 cups vegetable oil in a deep pot to 350°F, using a thermometer to check temperature.
15. Carefully place 3-4 egg rolls in the hot oil using tongs, not overcrowding the pot.
16. Fry the egg rolls for 3-4 minutes, turning once, until golden brown and crispy.
17. Remove the egg rolls with a slotted spoon and drain on paper towels.
18. Repeat steps 15-17 with remaining egg rolls.
Nothing beats that satisfying crunch when you bite into these golden parcels, revealing the savory pork and vegetable filling inside. I love serving them with a simple dipping sauce made from equal parts soy sauce and rice vinegar, or sometimes I’ll slice them diagonally and arrange them like flower petals for a fancy appetizer presentation.
Honey Sriracha Chicken Wings

Whew, after that crazy week of back-to-back deadlines, I found myself craving something with serious flavor payoff—enter these Honey Sriracha Chicken Wings. They’re my go-to when I need a quick, sticky-sweet fix that feels like a treat but doesn’t keep me in the kitchen all night.
2
portions10
minutes50
minutesIngredients
– Chicken wings – 2 lbs
– Baking powder – 1 tbsp
– Salt – 1 tsp
– Honey – ¼ cup
– Sriracha – 3 tbsp
– Soy sauce – 2 tbsp
Instructions
1. Preheat your oven to 400°F and line a baking sheet with aluminum foil for easy cleanup.
2. Pat the chicken wings completely dry with paper towels—this helps the skin crisp up beautifully.
3. In a large bowl, toss the wings with baking powder and salt until evenly coated.
4. Arrange the wings in a single layer on the baking sheet, making sure they aren’t touching so they cook evenly.
5. Bake for 40–45 minutes, flipping halfway through, until the skin is golden and crispy.
6. While the wings bake, whisk together honey, sriracha, and soy sauce in a small saucepan over medium heat.
7. Bring the sauce to a simmer, then reduce heat and let it thicken for 3–4 minutes, stirring occasionally.
8. Transfer the baked wings to a clean bowl and pour the warm sauce over them, tossing gently to coat every piece. Don’t skip letting the sauce simmer—it deepens the flavor and helps it cling to the wings.
9. Return the sauced wings to the baking sheet and bake for another 5 minutes to caramelize the glaze. Doing this final bake ensures the sauce sticks without making the wings soggy.
10. Let the wings rest for 2–3 minutes before serving to let the flavors settle. During this rest, the sauce firms up just enough to avoid dripping everywhere.
Dig into these wings and you’ll love the crackly skin giving way to tender meat, with that perfect balance of sweet honey and spicy sriracha. I sometimes serve them over a bed of jasmine rice to soak up every last bit of glaze, or pile them high for game day with extra napkins handy—they’re that addictive.
Savory Bacon-Wrapped Jalapeño Poppers

Oh my goodness, these bacon-wrapped jalapeño poppers have become my absolute go-to appetizer for game day gatherings! I first made them when my brother challenged me to create something spicy for his football party, and now they disappear faster than I can plate them. There’s something magical about that crispy bacon hugging the creamy, spicy jalapeño that keeps everyone coming back for more.
12
portions15
minutes25
minutesIngredients
Jalapeño peppers – 12 medium
Cream cheese – 8 oz
Bacon – 12 slices
Instructions
1. Preheat your oven to 400°F and line a baking sheet with aluminum foil.
2. Cut each jalapeño pepper in half lengthwise, wearing disposable gloves to protect your hands from the spicy oils.
3. Use a small spoon to scrape out all the seeds and white membranes from each jalapeño half.
4. Fill each jalapeño half with approximately 1 tablespoon of cream cheese, smoothing the surface with the back of your spoon.
5. Wrap one slice of bacon tightly around each cream cheese-filled jalapeño half, starting at one end and overlapping slightly.
6. Arrange the wrapped jalapeños on the prepared baking sheet with the bacon seam side down to prevent unraveling.
7. Bake at 400°F for 20-25 minutes until the bacon is crispy and golden brown.
8. Let the poppers rest on the baking sheet for 5 minutes before serving to allow the cheese to set slightly.
Let me tell you, that first bite delivers the perfect crunch from the bacon followed by the creamy, slightly spicy filling that just melts in your mouth. I love serving these with a cool ranch dip to balance the heat, and they’re fantastic alongside burgers at summer barbecues or as the star appetizer at holiday parties.
Cheesy Spinach and Artichoke Dip
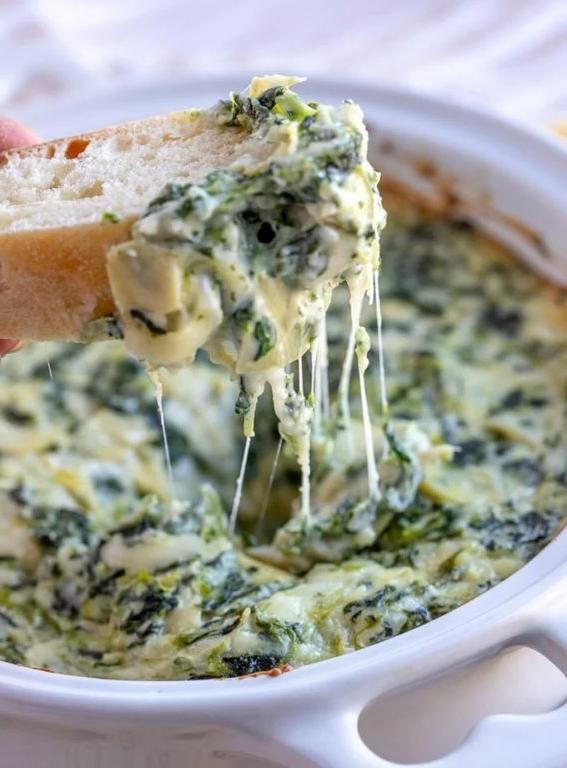
Sometimes you just need that perfect appetizer that feels like a warm hug in a bowl, and for me, that’s always been cheesy spinach and artichoke dip. I first fell in love with it at a friend’s game night years ago, and now it’s my go-to for any gathering—plus, I always sneak a few extra bites straight from the baking dish while it’s still bubbling hot.
6
servings15
minutes25
minutesIngredients
– Cream cheese – 8 oz
– Sour cream – 1 cup
– Mayonnaise – ½ cup
– Frozen spinach – 10 oz, thawed
– Canned artichoke hearts – 14 oz, drained
– Mozzarella cheese – 1 cup, shredded
– Parmesan cheese – ½ cup, grated
– Garlic – 2 cloves, minced
– Salt – ½ tsp
– Black pepper – ¼ tsp
Instructions
1. Preheat your oven to 375°F.
2. Squeeze all excess water from the thawed frozen spinach using your hands or a clean kitchen towel—this prevents a watery dip.
3. Chop the drained canned artichoke hearts into small, bite-sized pieces.
4. In a large mixing bowl, combine the cream cheese, sour cream, and mayonnaise, stirring until smooth.
5. Add the minced garlic, salt, and black pepper to the bowl, mixing thoroughly.
6. Fold in the squeezed spinach, chopped artichokes, shredded mozzarella, and grated Parmesan until evenly distributed.
7. Transfer the mixture to an oven-safe baking dish, spreading it into an even layer.
8. Bake at 375°F for 20–25 minutes, or until the edges are bubbly and the top is lightly golden—check at 20 minutes to avoid over-browning.
9. Let the dip rest for 5 minutes before serving to allow it to set slightly.
Creamy and packed with savory flavor, this dip has a rich texture that clings perfectly to tortilla chips or crisp veggie sticks. For a fun twist, try scooping it onto toasted baguette slices or stuffing it into mini bell peppers before baking—it’s so versatile, you’ll want to make it your own.
Deviled Eggs with a Twist

Last weekend, I was hosting a casual get-together and realized I needed a quick appetizer that would impress without requiring hours in the kitchen. Deviled eggs came to mind, but I wanted to add a little something extra to make them stand out from the classic version. Let’s just say these disappeared faster than I could refill the platter!
12
portions25
minutes12
minutesIngredients
Eggs – 6
Mayonnaise – ¼ cup
Dijon mustard – 1 tbsp
White vinegar – 1 tsp
Paprika – ½ tsp
Instructions
1. Place 6 eggs in a single layer in a saucepan and cover with cold water by 1 inch.
2. Bring the water to a rolling boil over high heat.
3. Immediately remove the pan from heat, cover it, and let the eggs sit for 12 minutes.
4. Transfer the eggs to a bowl of ice water and let them cool for 5 minutes to stop the cooking process—this prevents that gray ring around the yolk.
5. Gently tap each egg on the counter and roll it to crack the shell evenly.
6. Peel the eggs under cool running water to help remove the shell smoothly.
7. Slice each egg in half lengthwise with a sharp knife.
8. Carefully pop out the yolks into a medium bowl and arrange the whites on a serving plate.
9. Mash the yolks thoroughly with a fork until no large chunks remain.
10. Add ¼ cup mayonnaise, 1 tbsp Dijon mustard, and 1 tsp white vinegar to the yolks.
11. Mix everything together until completely smooth and creamy—if the mixture seems too thick, add another teaspoon of mayonnaise.
12. Spoon or pipe the yolk mixture evenly into the egg white halves.
13. Sprinkle ½ tsp paprika lightly over the filled eggs for color and a hint of smokiness.
14. Chill the deviled eggs in the refrigerator for at least 30 minutes before serving to let the flavors meld. Finally, these deviled eggs have a velvety, rich filling that contrasts beautifully with the firm egg whites. The Dijon adds a subtle tang that cuts through the creaminess, making them irresistible. Try garnishing with fresh chives or serving alongside crisp cucumber slices for a refreshing crunch.
Zesty Lemon Herb Shrimp Skewers

Every time summer rolls around, I find myself craving bright, citrusy flavors that cut through the heat. These Zesty Lemon Herb Shrimp Skewers have become my go-to for quick weeknight dinners and backyard gatherings alike—they always disappear faster than I can make them!
8
skewers25
minutes4
minutesIngredients
Raw shrimp – 1 lb
Lemon juice – ¼ cup
Olive oil – 2 tbsp
Garlic cloves – 3, minced
Fresh parsley – 2 tbsp, chopped
Salt – 1 tsp
Black pepper – ½ tsp
Wooden skewers – 8
Instructions
1. Soak 8 wooden skewers in water for 30 minutes to prevent burning.
2. Peel and devein 1 lb of raw shrimp, leaving tails on if desired.
3. In a medium bowl, whisk together ¼ cup lemon juice, 2 tbsp olive oil, 3 minced garlic cloves, 2 tbsp chopped parsley, 1 tsp salt, and ½ tsp black pepper.
4. Add shrimp to the marinade, tossing to coat evenly.
5. Cover the bowl and refrigerate for 20 minutes—no longer, or the lemon juice will start to cook the shrimp.
6. Preheat grill to medium-high heat (400°F).
7. Thread 4-5 marinated shrimp onto each soaked skewer.
8. Grill skewers for 2 minutes per side, until shrimp turn pink and opaque.
9. Remove skewers from grill immediately to avoid overcooking.
10. Let rest for 2 minutes before serving.
Grilling gives these shrimp a subtle smokiness that complements the bright lemon and fresh herbs perfectly. I love serving them over a bed of quinoa with extra lemon wedges for squeezing—the firm, juicy texture holds up beautifully against the grain. They’re equally fantastic chopped into tacos or tossed with pasta for a quick upgrade!
Smoked Salmon and Cream Cheese Pinwheels

Can you believe these elegant little pinwheels were born from a frantic last-minute party prep situation? I was hosting a book club gathering and realized I had nothing substantial to serve—until I spotted that beautiful smoked salmon in my fridge and remembered the cream cheese I’d bought for bagels. These have since become my go-to appetizer for any occasion, from casual get-togethers to holiday parties, because they always disappear within minutes.
4
rolls40
minutesIngredients
Flour tortillas (8-inch) – 4
Cream cheese – 8 oz
Smoked salmon – 4 oz
Fresh dill – 2 tbsp
Lemon juice – 1 tbsp
Instructions
1. Remove cream cheese from refrigerator and let it sit at room temperature for 30 minutes to soften.
2. Chop fresh dill finely until you have 2 tablespoons packed.
3. Combine softened cream cheese, chopped dill, and 1 tablespoon lemon juice in a medium bowl.
4. Mix the cream cheese mixture with a spatula until completely smooth and well-combined.
5. Lay one flour tortilla flat on a clean cutting board.
6. Spread exactly one-quarter of the cream cheese mixture evenly over the entire surface of the tortilla, going all the way to the edges.
7. Arrange one-quarter of the smoked salmon in a single layer over the cream cheese.
8. Roll the tortilla tightly away from you, applying even pressure to create a compact cylinder.
9. Repeat steps 5-8 with the remaining three tortillas and filling ingredients.
10. Wrap each rolled tortilla tightly in plastic wrap.
11. Refrigerate the wrapped tortillas for at least 2 hours or up to 4 hours to firm up.
12. Unwrap one chilled tortilla roll and place it on a cutting board.
13. Use a sharp serrated knife to slice the roll into 1-inch thick pinwheels.
14. Arrange the pinwheels on a serving platter in a single layer.
15. Repeat the slicing process with the remaining three tortilla rolls.
The creamy, tangy filling contrasts beautifully with the smoky salmon, while the chilled tortilla provides just enough chew to hold everything together. I love serving these arranged in a spiral pattern on a wooden board with extra lemon wedges for squeezing—the bright acidity really makes the salmon flavor pop.
BBQ Pulled Pork Sliders
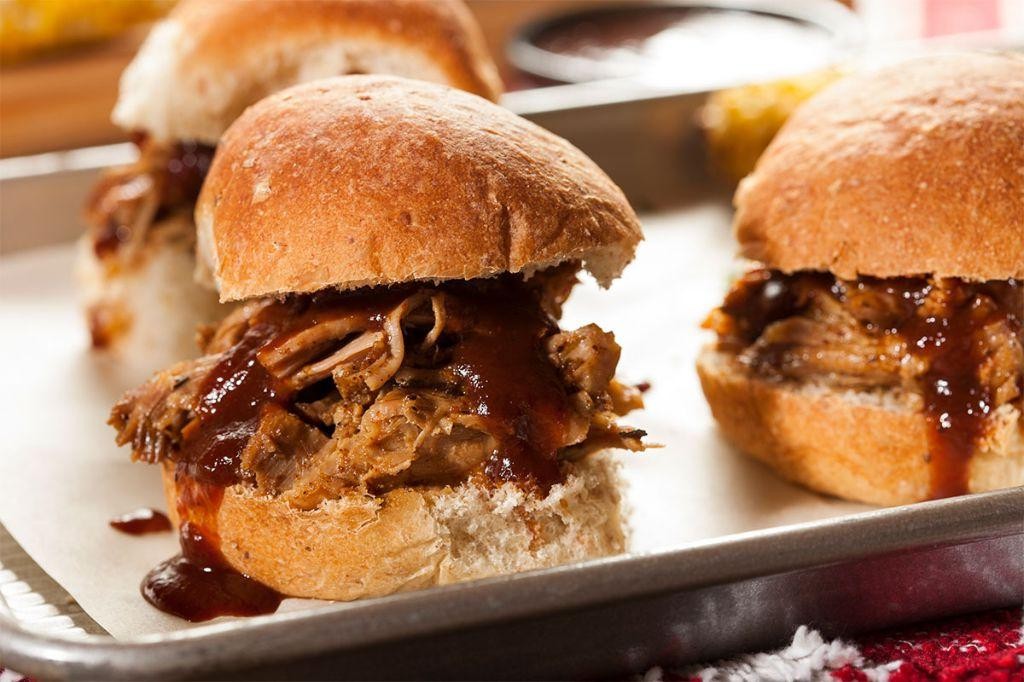
Remember that time I tried to make pulled pork for a crowd and ended up with dry, stringy meat? I’ve since perfected this BBQ pulled pork slider recipe—it’s foolproof, packed with smoky-sweet flavor, and always disappears fast at game-day gatherings.
12
sandwiches15
minutes240
minutesIngredients
Pork shoulder – 3 lbs
BBQ seasoning – 2 tbsp
Apple cider vinegar – ½ cup
BBQ sauce – 1 cup
Slider buns – 12
Coleslaw – 2 cups
Instructions
1. Preheat your oven to 300°F.
2. Rub the pork shoulder evenly with BBQ seasoning on all sides.
3. Place the seasoned pork shoulder in a Dutch oven or oven-safe pot with a lid.
4. Pour apple cider vinegar around the pork—this helps tenderize the meat as it cooks.
5. Cover the pot tightly and bake for 4 hours until the pork shreds easily with a fork.
6. Remove the pork from the oven and let it rest for 15 minutes—this allows the juices to redistribute.
7. Use two forks to shred the pork directly in the pot, discarding any large fat pieces.
8. Stir in BBQ sauce until the pork is fully coated.
9. Toast slider buns lightly in a dry skillet over medium heat for 1–2 minutes per side until golden—this prevents sogginess.
10. Spoon pulled pork onto the bottom half of each bun.
11. Top each slider with 2–3 tablespoons of coleslaw for crunch and freshness.
12. Cover with the top bun and serve immediately. Finally, these sliders are all about that tender, juicy pork mingling with tangy BBQ sauce and crisp coleslaw—I love stacking them high on a platter with extra sauce for dipping.
Caprese Salad Skewers

Haven’t you noticed how everything tastes better on a stick? I first discovered this at a summer potluck when my friend brought these adorable Caprese salad skewers, and I’ve been obsessed ever since—they’re my go-to for last-minute entertaining when I want something impressive but effortless.
8
skewers15
minutesIngredients
- Cherry tomatoes – 1 pint
- Fresh mozzarella balls – 8 oz
- Fresh basil leaves – ½ cup
- Balsamic glaze – ¼ cup
- Extra virgin olive oil – 2 tbsp
- Salt – ½ tsp
- Black pepper – ¼ tsp
Instructions
- Rinse 1 pint of cherry tomatoes under cool running water and pat completely dry with paper towels.
- Drain 8 oz of fresh mozzarella balls from their liquid and pat dry with a separate paper towel.
- Select ½ cup of fresh basil leaves that are uniformly sized and free of dark spots or tears.
- Thread one cherry tomato onto a 6-inch wooden skewer, pushing it down until 1 inch from the pointed end.
- Add one fresh mozzarella ball directly next to the tomato on the same skewer.
- Fold one fresh basil leaf in half vertically and thread it onto the skewer next to the mozzarella.
- Repeat steps 4-6 until all skewers contain one tomato, one mozzarella ball, and one basil leaf in that order.
- Arrange completed skewers on a serving platter in a single layer without overlapping.
- Drizzle 2 tbsp of extra virgin olive oil evenly over all skewers, moving your hand back and forth for coverage.
- Season all skewers with ½ tsp salt and ¼ tsp black pepper, sprinkling from 12 inches above for even distribution.
- Finish by zigzagging ¼ cup balsamic glaze across the skewers in thin, decorative lines.
- Serve immediately at room temperature, within 20 minutes of assembling to prevent wilting.
Perfectly balanced between juicy tomato bursts, creamy mozzarella, and aromatic basil, these skewers offer a textural party in every bite. The glossy balsamic drizzle caramelizes slightly against the cheese, creating little pockets of sweet-tart contrast that make these impossible to eat just one. I love arranging them in sunburst patterns on a large platter for parties or packing them vertically in a mason jar for picnics—they travel surprisingly well if you keep the dressing separate until serving.
Feta and Sun-Dried Tomato Crostini

A few weeks ago, I was scrambling to put together a last-minute appetizer for friends coming over and discovered this magical combination in my nearly-empty fridge—now these crostini have become my go-to for every gathering.
1
baguette15
minutes10
minutesIngredients
Baguette – 1
Olive oil – 2 tbsp
Feta cheese – 4 oz
Sun-dried tomatoes – ½ cup
Fresh basil – ¼ cup
Instructions
1. Preheat your oven to 375°F.
2. Slice the baguette into ½-inch thick rounds.
3. Brush both sides of each baguette slice lightly with olive oil using a pastry brush.
4. Arrange the baguette slices in a single layer on a baking sheet.
5. Bake for 8-10 minutes until the edges are golden brown and crisp.
6. Remove the baking sheet from the oven and let the crostini cool for 5 minutes.
7. Crumble the feta cheese into a small bowl using your fingers.
8. Chop the sun-dried tomatoes into small pieces with a sharp knife.
9. Stack the fresh basil leaves, roll them tightly, and slice into thin ribbons.
10. Combine the crumbled feta, chopped sun-dried tomatoes, and basil ribbons in the bowl.
11. Spoon the feta mixture evenly onto each cooled crostini.
12. Drizzle the remaining olive oil over the assembled crostini.
Getting that perfect crisp-tender texture makes all the difference here. The salty feta plays beautifully against the sweet intensity of the tomatoes, while the fresh basil cuts through the richness. I love serving these arranged on a wooden board with extra basil sprigs scattered around for a rustic presentation that always disappears within minutes.
Thai Chicken Lettuce Wraps

These Thai chicken lettuce wraps have become my go-to weeknight dinner when I’m craving something fresh but don’t want to spend hours in the kitchen—I actually started making them after my friend Sarah brought a similar version to our book club potluck, and everyone kept asking for the recipe.
8
wraps15
minutes15
minutesIngredients
- Ground chicken – 1 lb
- Butter lettuce – 1 head
- Lime – 1
- Soy sauce – 2 tbsp
- Honey – 1 tbsp
- Garlic – 2 cloves
- Ginger – 1 inch piece
- Red bell pepper – 1
- Green onions – 3
- Fresh cilantro – ¼ cup
Instructions
- Wash the butter lettuce and carefully separate 8 whole leaves, then pat them completely dry with paper towels.
- Finely mince the garlic cloves and grate the ginger using a microplane.
- Dice the red bell pepper into ¼-inch pieces and thinly slice the green onions.
- Heat a large skillet over medium-high heat and add the ground chicken, breaking it apart with a wooden spoon.
- Cook the chicken for 6-8 minutes until no pink remains, stirring frequently to prevent sticking.
- Add the minced garlic and grated ginger to the skillet and cook for 1 minute until fragrant.
- Pour in the soy sauce and honey, then stir to coat the chicken mixture evenly.
- Add the diced red bell pepper and cook for 3-4 minutes until slightly softened but still crisp.
- Remove the skillet from heat and stir in the sliced green onions and fresh cilantro.
- Cut the lime in half and squeeze the juice from one half over the chicken mixture, then stir to combine.
- Spoon the chicken mixture into the prepared lettuce leaves, dividing it evenly among them.
- Serve immediately with the remaining lime half for extra squeezing. Zero leftovers are guaranteed with these wraps—the cool, crisp lettuce provides the perfect crunch against the savory-sweet chicken filling, and I love setting up a DIY topping bar with extra cilantro, chopped peanuts, and chili flakes for guests to customize their own.
Caramelized Onion and Goat Cheese Tartlets

Last weekend, I found myself with a mountain of onions from my CSA box and decided to transform them into something magical. These caramelized onion and goat cheese tartlets have become my go-to appetizer for dinner parties because they always disappear within minutes. Honestly, I love how the slow-cooked onions create this incredible sweet-savory base that pairs perfectly with the tangy goat cheese.
12
tartlets15
minutes68
minutesIngredients
Onions – 2 large
Butter – 2 tbsp
Puff pastry – 1 sheet
Goat cheese – 4 oz
Fresh thyme – 1 tbsp
Salt – ½ tsp
Instructions
1. Slice 2 large onions into thin, uniform ¼-inch slices.
2. Melt 2 tablespoons of butter in a large skillet over medium-low heat.
3. Add the sliced onions to the skillet and cook for 5 minutes, stirring occasionally.
4. Reduce heat to low and continue cooking the onions for 45 minutes, stirring every 10 minutes until they turn deep golden brown.
5. Stir in ½ teaspoon of salt and 1 tablespoon of fresh thyme leaves during the last 5 minutes of cooking.
6. Preheat your oven to 400°F while the onions caramelize.
7. Roll out 1 sheet of puff pastry on a lightly floured surface to smooth any seams.
8. Cut the puff pastry into 12 equal squares using a sharp knife or pizza cutter.
9. Place the pastry squares on a parchment-lined baking sheet, spacing them 1 inch apart.
10. Prick each pastry square 3-4 times with a fork to prevent excessive rising.
11. Divide the caramelized onions evenly among the 12 pastry squares, leaving a ¼-inch border around the edges.
12. Crumble 4 ounces of goat cheese evenly over the onion-topped pastry squares.
13. Bake at 400°F for 18-20 minutes until the pastry edges are puffed and golden brown.
14. Remove from oven and let cool on the baking sheet for 5 minutes before serving.
You’ll love how the flaky, buttery pastry contrasts with the creamy goat cheese and sweet onion filling. These tartlets develop the most beautiful golden-brown crust that shatters with each bite. I sometimes drizzle them with a little honey right before serving for an extra touch of sweetness that complements the savory flavors perfectly.
Prosciutto-Wrapped Asparagus

Every time I make these elegant little bundles, I’m reminded of that first dinner party I hosted where I nervously served them to my foodie friends—they were such a hit that they’ve become my go-to impressive-yet-simple appetizer ever since.
8
bundles10
minutes15
minutesIngredients
– Asparagus – 1 lb
– Prosciutto – 8 slices
– Olive oil – 1 tbsp
– Black pepper – ½ tsp
Instructions
1. Preheat your oven to 400°F and line a baking sheet with parchment paper.
2. Trim the tough ends from the asparagus spears by snapping them where they naturally break.
3. Drizzle the olive oil over the asparagus spears and toss gently to coat them evenly.
4. Divide the asparagus into 8 equal bundles of 3-4 spears each.
5. Wrap one slice of prosciutto snugly around the middle of each asparagus bundle.
6. Arrange the wrapped bundles in a single layer on the prepared baking sheet.
7. Sprinkle the black pepper evenly over all the prosciutto-wrapped asparagus bundles.
8. Bake at 400°F for 12-15 minutes until the prosciutto becomes crispy and the asparagus is tender when pierced with a fork.
9. Remove the baking sheet from the oven using oven mitts and let the bundles rest for 2 minutes before serving. What makes these irresistible is the perfect contrast between the salty, crisp prosciutto and the tender, slightly sweet asparagus inside—I love serving them alongside a creamy dip or arranged dramatically on a wooden board for guests to grab.
Roasted Red Pepper Hummus with Pita Chips

You know those days when you crave something creamy and satisfying but don’t want to spend hours in the kitchen? Yesterday was exactly one of those days for me, which is why I whipped up this incredibly simple roasted red pepper hummus that comes together in minutes yet tastes like it took all afternoon.
5
servings10
minutes10
minutesIngredients
Chickpeas – 1 can (15 oz)
Tahini – ¼ cup
Lemon juice – 3 tbsp
Garlic – 2 cloves
Olive oil – 2 tbsp
Roasted red peppers – ½ cup
Salt – 1 tsp
Cumin – 1 tsp
Pita bread – 4 pieces
Instructions
1. Preheat your oven to 375°F.
2. Drain and rinse the chickpeas thoroughly in a colander.
3. Cut each pita bread into 8 triangular wedges using kitchen scissors.
4. Arrange pita wedges in a single layer on a baking sheet.
5. Bake pita wedges for 8-10 minutes until golden brown and crisp.
6. Combine chickpeas, tahini, lemon juice, garlic, olive oil, roasted red peppers, salt, and cumin in a food processor.
7. Process the mixture for 2 minutes until completely smooth, scraping down the sides once halfway through.
8. Taste the hummus and adjust seasoning if needed.
9. Transfer the hummus to a serving bowl.
10. Drizzle with an additional tablespoon of olive oil before serving.
Zesty and vibrant, this hummus has the perfect creamy texture that spreads beautifully on the crispy pita chips. The smoky sweetness from the roasted peppers balances beautifully with the nutty tahini, making it irresistible for dipping vegetables or spreading on sandwiches. I love serving this with colorful crudités for a stunning appetizer that always disappears within minutes at gatherings.
Mini Meatball Sub Bites

Just last weekend, I found myself craving that classic meatball sub flavor but wanted something more party-friendly for game day—enter these adorable Mini Meatball Sub Bites, which disappeared from my kitchen counter in minutes.
12
sandwiches15
minutes25
minutesIngredients
- Ground beef – 1 lb
- Breadcrumbs – ½ cup
- Egg – 1
- Salt – 1 tsp
- Marinara sauce – 1 cup
- Slider buns – 12
- Shredded mozzarella – 1 cup
Instructions
- Preheat your oven to 375°F to ensure even cooking.
- Combine 1 lb ground beef, ½ cup breadcrumbs, 1 egg, and 1 tsp salt in a large bowl.
- Mix the ingredients with your hands until just combined—overmixing can make the meatballs tough.
- Roll the mixture into 24 small meatballs, each about 1 inch in diameter.
- Arrange the meatballs on a baking sheet lined with parchment paper.
- Bake the meatballs for 15 minutes, or until they reach an internal temperature of 160°F.
- Slice 12 slider buns in half horizontally and place the bottoms on a separate baking sheet.
- Spoon 1 cup marinara sauce evenly over the bun bottoms.
- Place 2 baked meatballs on top of the sauce on each bun.
- Sprinkle 1 cup shredded mozzarella over the meatballs.
- Cover with the bun tops and bake for 8–10 minutes, until the cheese is fully melted and bubbly.
- Let the bites rest for 2 minutes before serving to avoid burning your mouth.
Kind of magical how these bites deliver that saucy, cheesy goodness in one neat package—the soft bun soaks up the marinara just enough without getting soggy. I love serving them with extra sauce for dipping, and they’re a hit whether you’re hosting a crowd or just treating yourself.
Truffle Oil and Parmesan Popcorn

Sometimes the simplest snacks become the most memorable ones, like the first time I made this truffle oil popcorn during a cozy movie night with friends—it disappeared so fast I had to make a second batch immediately!
4
servings5
minutes10
minutesIngredients
Popcorn kernels – ½ cup
Truffle oil – 2 tbsp
Grated Parmesan cheese – ¼ cup
Salt – 1 tsp
Instructions
1. Place a large pot with a lid over medium-high heat and add 2 tablespoons of vegetable oil (not listed—heating oil for popping).
2. Test if the oil is hot enough by adding 3 popcorn kernels to the pot and covering with the lid.
3. Wait until all 3 test kernels pop, which indicates the oil has reached the ideal temperature of 350–365°F.
4. Pour ½ cup of popcorn kernels into the pot in a single layer and immediately cover with the lid.
5. Shake the pot gently back and forth every 30 seconds to prevent burning and ensure even popping.
6. Listen carefully and remove the pot from heat when the popping slows to 2–3 seconds between pops.
7. Transfer the popped popcorn to a large bowl, leaving any unpopped kernels behind in the pot.
8. Drizzle 2 tablespoons of truffle oil evenly over the warm popcorn while tossing with a large spoon.
9. Sprinkle ¼ cup of grated Parmesan cheese over the popcorn while continuing to toss for even coating.
10. Add 1 teaspoon of salt gradually while tossing, tasting after ½ teaspoon to adjust seasoning if needed. You’ll love how the warm popcorn absorbs the truffle oil’s earthy aroma, creating an irresistible savory crunch that pairs perfectly with the nutty Parmesan. Try serving it in individual paper cones for parties or alongside a crisp white wine—it’s so much more exciting than regular buttered popcorn!
Conclusion
Masterful appetizers await in this collection, perfect for any gathering or cozy night in. Whether you’re hosting a party or craving a tasty snack, these recipes are sure to impress. We’d love to hear which ones become your favorites—drop a comment below and share your top picks on Pinterest to spread the delicious inspiration!


