Evening meal planning on a keto diet just got easier! We’ve gathered 33 delicious, satisfying supper recipes that are perfect for busy weeknights. From quick skillet meals to comforting casseroles, these dishes prove low-carb eating can be incredibly tasty. Get ready to find your new favorite dinner—let’s dive into these mouthwatering options you’ll want to try tonight!
Keto Chicken Alfredo with Zucchini Noodles

Unbelievably creamy yet completely keto-friendly, this Chicken Alfredo with Zucchini Noodles is my go-to comfort food when I’m craving something indulgent but don’t want to derail my healthy eating—it’s a recipe I’ve perfected after many weeknight experiments. Serving: 4 | Pre Time: 15 minutes | Cooking Time: 20 minutes
Ingredients
– 1.5 lbs boneless, skinless chicken breasts, cut into 1-inch cubes (or use thighs for more flavor)
– 4 medium zucchini, spiralized into noodles (about 6 cups total)
– 1 cup heavy cream
– 1 cup grated Parmesan cheese (freshly grated melts best)
– 4 tbsp unsalted butter (or ghee for a dairy-free option)
– 3 cloves garlic, minced (adjust to taste)
– 2 tbsp olive oil (or any neutral oil)
– 1 tsp salt (adjust based on cheese saltiness)
– 1/2 tsp black pepper (freshly ground preferred)
– 1/4 tsp nutmeg (optional, for depth)
– Fresh parsley, chopped for garnish (optional)
Instructions
1. Pat the chicken cubes dry with paper towels to ensure even browning.
2. Heat 2 tbsp olive oil in a large skillet over medium-high heat until shimmering, about 2 minutes.
3. Add the chicken cubes to the skillet in a single layer, cooking for 5-7 minutes until golden brown and internal temperature reaches 165°F, turning halfway through.
4. Remove the chicken from the skillet and set aside on a plate.
5. In the same skillet, melt 4 tbsp butter over medium heat until foamy, about 1 minute.
6. Add 3 cloves minced garlic and sauté for 30 seconds until fragrant but not browned.
7. Pour in 1 cup heavy cream, stirring constantly to combine with the butter and garlic.
8. Bring the cream mixture to a gentle simmer over medium-low heat, letting it bubble lightly for 3 minutes to thicken slightly.
9. Gradually whisk in 1 cup grated Parmesan cheese until fully melted and smooth, about 2 minutes.
10. Season the sauce with 1 tsp salt, 1/2 tsp black pepper, and 1/4 tsp nutmeg if using, stirring to incorporate.
11. Add the cooked chicken back to the skillet, tossing to coat in the Alfredo sauce, and heat for 2 minutes until warmed through.
12. In a separate pan, sauté the spiralized zucchini noodles over medium heat for 2-3 minutes until just tender but still al dente, to prevent sogginess.
13. Divide the zucchini noodles among four plates, topping each with the chicken Alfredo mixture.
14. Garnish with chopped fresh parsley if desired.
Just creamy and satisfying, this dish boasts a velvety sauce that clings perfectly to the tender chicken and crisp-tender zucchini noodles—try serving it with a side salad for a complete meal, or add a sprinkle of red pepper flakes for a spicy kick.
Garlic Butter Steak Bites and Mushrooms
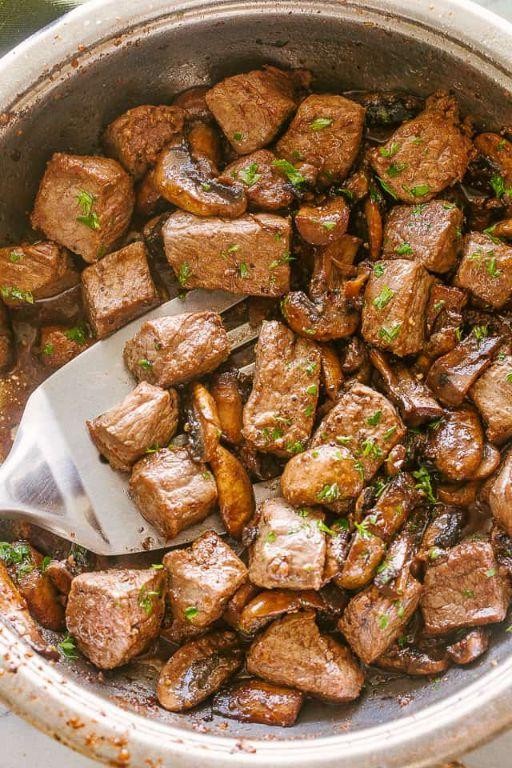
Kicking off a cozy weeknight dinner, I’m sharing a recipe that’s become my go‑to for impressing guests without spending hours in the kitchen—Garlic Butter Steak Bites and Mushrooms. It’s the kind of dish that fills the house with an irresistible aroma and always earns rave reviews.
Serving: 4 | Pre Time: 15 minutes | Cooking Time: 15 minutes
Ingredients
– 1.5 lbs sirloin steak, cut into 1‑inch cubes
– 8 oz cremini mushrooms, sliced (or white mushrooms)
– 3 tbsp unsalted butter
– 2 tbsp olive oil (or any neutral oil)
– 4 cloves garlic, minced
– 1 tbsp fresh thyme leaves (or 1 tsp dried)
– 1 tsp kosher salt
– ½ tsp black pepper
– ¼ tsp red pepper flakes (optional, for a hint of heat)
– 2 tbsp chopped fresh parsley, for garnish
Instructions
1. Pat the steak cubes dry with paper towels to ensure a good sear.
2. Season the steak evenly with kosher salt and black pepper.
3. Heat a large skillet over medium‑high heat and add olive oil.
4. Once the oil shimmers, add the steak cubes in a single layer, avoiding overcrowding.
5. Sear the steak for 2–3 minutes per side until browned and cooked to medium‑rare (internal temperature of 135°F).
6. Transfer the steak to a plate and tent loosely with foil to rest.
7. In the same skillet, add the sliced mushrooms and cook for 5–6 minutes until softened and golden.
8. Reduce the heat to medium and add unsalted butter to the skillet.
9. Stir in minced garlic, fresh thyme leaves, and red pepper flakes, cooking for 1 minute until fragrant.
10. Return the steak bites to the skillet, tossing to coat everything in the garlic butter sauce.
11. Remove from heat and sprinkle with chopped fresh parsley.
12. Serve immediately while hot.
Savory and juicy, these steak bites pair beautifully with creamy mashed potatoes or a crisp salad. The mushrooms soak up all that garlicky butter, adding an earthy depth that makes every bite irresistible—perfect for a quick yet elegant meal.
Lemon Herb Grilled Salmon with Asparagus

Between my hectic work schedule and my family’s picky eating habits, I’ve learned that a simple, healthy dinner that feels special is worth its weight in gold. This Lemon Herb Grilled Salmon with Asparagus is my go-to for those nights—it’s quick, packed with flavor, and always gets a thumbs-up from everyone at the table.
Serving: 4 | Pre Time: 15 minutes | Cooking Time: 15 minutes
Ingredients
– 4 salmon fillets (about 6 oz each), skin-on or skinless
– 1 lb asparagus, ends trimmed
– 3 tbsp olive oil, or any neutral oil
– 2 tbsp fresh lemon juice, from about 1 lemon
– 1 tbsp lemon zest
– 2 cloves garlic, minced
– 1 tsp dried oregano, or 1 tbsp fresh chopped
– 1 tsp dried thyme, or 1 tbsp fresh chopped
– 1/2 tsp salt, adjust to taste
– 1/4 tsp black pepper, adjust to taste
Instructions
1. Preheat your grill to medium-high heat, about 400°F, and lightly oil the grates to prevent sticking.
2. In a small bowl, whisk together 2 tbsp olive oil, lemon juice, lemon zest, minced garlic, oregano, thyme, salt, and pepper to make the marinade.
3. Place the salmon fillets in a shallow dish and pour half of the marinade over them, coating both sides evenly. Let them sit for 10 minutes at room temperature.
4. Toss the trimmed asparagus with the remaining 1 tbsp olive oil and a pinch of salt and pepper in a separate bowl.
5. Place the salmon fillets skin-side down on the preheated grill and cook for 5 minutes without moving them to get nice grill marks.
6. Carefully flip the salmon using a spatula and cook for another 4-5 minutes, or until the internal temperature reaches 145°F and the flesh flakes easily with a fork.
7. While the salmon cooks, add the asparagus to the grill in a single layer and grill for 5-7 minutes, turning occasionally, until tender and slightly charred.
8. Remove the salmon and asparagus from the grill and transfer to a serving platter.
9. Drizzle any remaining marinade from the dish over the grilled salmon and asparagus for extra flavor.
10. Serve immediately while hot.
As you take your first bite, you’ll notice the salmon is perfectly flaky with a zesty, herbaceous crust, while the asparagus adds a crisp, smoky contrast. I love pairing this with a simple quinoa salad or over a bed of greens for a light, complete meal that never fails to impress on busy weeknights.
Keto-Friendly Beef Stir Fry with Broccoli
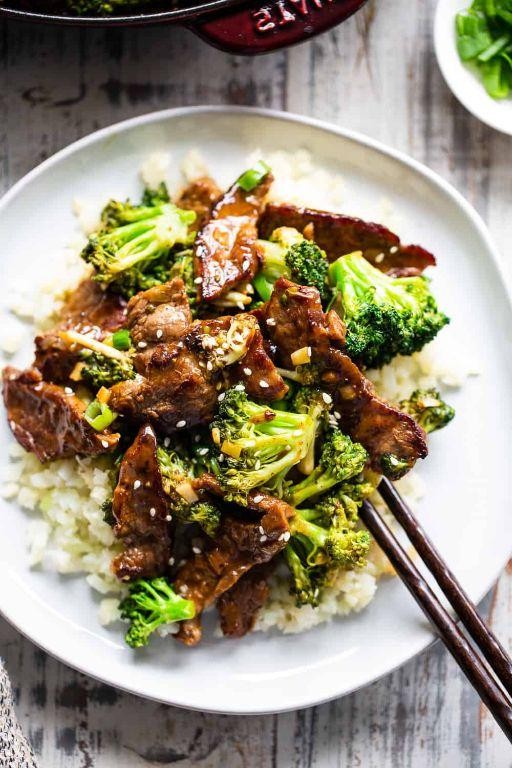
This keto-friendly beef stir fry with broccoli has become my go-to weeknight dinner when I’m craving something hearty yet healthy—it’s quick, packed with flavor, and keeps me satisfied without the carb crash. I love how the savory beef and crisp broccoli come together in a simple sauce that feels indulgent but fits right into my low-carb lifestyle.
Serving: 4 | Pre Time: 15 minutes | Cooking Time: 15 minutes
Ingredients
– 1 lb flank steak, thinly sliced against the grain (for tenderness)
– 4 cups broccoli florets, cut into bite-sized pieces
– 2 tbsp avocado oil, or any high-heat oil
– 3 cloves garlic, minced
– 1 tbsp fresh ginger, grated
– ¼ cup soy sauce (or coconut aminos for a soy-free option)
– 1 tbsp rice vinegar
– 1 tsp sesame oil
– ½ tsp red pepper flakes, optional for heat
– Salt and black pepper, to season the beef
Instructions
1. Pat the flank steak slices dry with paper towels, then season them evenly with salt and black pepper.
2. Heat 1 tablespoon of avocado oil in a large skillet or wok over medium-high heat until shimmering, about 1–2 minutes.
3. Add the beef slices in a single layer, cooking without stirring for 2–3 minutes to get a good sear, then flip and cook for another 1–2 minutes until browned but not fully cooked through. Tip: Avoid overcrowding the pan to prevent steaming instead of searing.
4. Transfer the beef to a plate and set aside.
5. In the same skillet, add the remaining 1 tablespoon of avocado oil and heat for 30 seconds.
6. Add the broccoli florets and stir-fry for 4–5 minutes until bright green and slightly tender but still crisp. Tip: If you prefer softer broccoli, cover the skillet for 1–2 minutes to steam it lightly.
7. Push the broccoli to the sides of the skillet, then add the minced garlic and grated ginger to the center, cooking for 30–60 seconds until fragrant.
8. Return the beef to the skillet, mixing it with the broccoli, garlic, and ginger.
9. Pour in the soy sauce, rice vinegar, sesame oil, and red pepper flakes (if using), stirring everything together to coat evenly. Cook for 2–3 minutes until the sauce thickens slightly and the beef is cooked through. Tip: Taste the sauce before serving and adjust seasoning if needed, but be cautious with salt since soy sauce is already salty.
10. Remove from heat and serve immediately. A final drizzle of sesame oil can enhance the aroma if desired.
As you dig in, you’ll notice the tender beef pairs perfectly with the crisp-tender broccoli, all coated in that savory, slightly tangy sauce that makes every bite irresistible. I often serve this over cauliflower rice for a complete keto meal, or pack the leftovers for lunch—they reheat beautifully without losing texture.
Crispy Parmesan Crusted Pork Chops
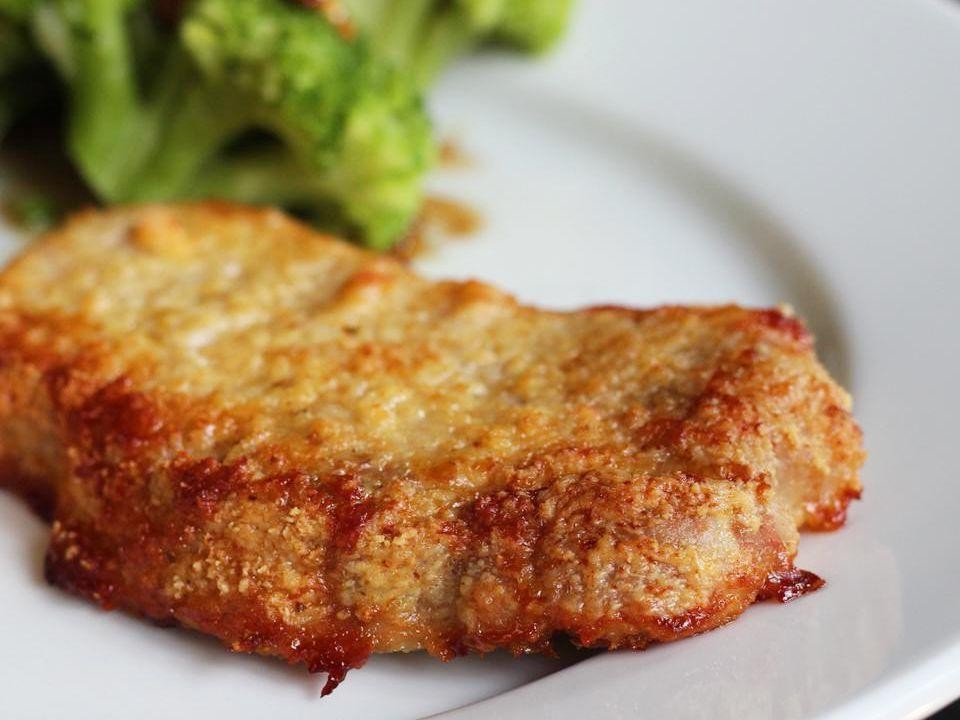
Gosh, there’s something about that satisfying crunch that makes a weeknight dinner feel like a special occasion. I first tried this method after a friend swore by it for picky eaters, and now it’s my go-to when I want something impressive without the fuss. It’s the kind of recipe that turns a simple pork chop into a crispy, cheesy masterpiece everyone asks for seconds of.
Serving: 4 | Pre Time: 15 minutes | Cooking Time: 20 minutes
Ingredients
– 4 boneless pork chops, about 1-inch thick
– 1 cup all-purpose flour
– 2 large eggs
– 1 cup panko breadcrumbs
– 1 cup grated Parmesan cheese
– 1 teaspoon garlic powder
– 1 teaspoon dried Italian seasoning
– 1/2 teaspoon salt
– 1/4 teaspoon black pepper
– 1/4 cup olive oil, or any neutral oil for frying
– 1 tablespoon unsalted butter
Instructions
1. Pat the 4 boneless pork chops completely dry with paper towels to ensure the coating sticks properly.
2. Set up three shallow dishes: place 1 cup of all-purpose flour in the first, whisk 2 large eggs in the second, and combine 1 cup panko breadcrumbs, 1 cup grated Parmesan cheese, 1 teaspoon garlic powder, 1 teaspoon dried Italian seasoning, 1/2 teaspoon salt, and 1/4 teaspoon black pepper in the third.
3. Dredge each pork chop first in the flour, shaking off any excess.
4. Dip the floured chop into the whisked eggs, letting the excess drip off.
5. Press the chop firmly into the panko-Parmesan mixture, coating both sides evenly and pressing to adhere.
6. Place the coated chops on a wire rack or plate and let them rest for 10 minutes to help the coating set, which prevents it from falling off during cooking.
7. Heat 1/4 cup of olive oil and 1 tablespoon of unsalted butter in a large skillet over medium-high heat until the butter melts and the oil shimmers, about 350°F.
8. Carefully add the pork chops to the skillet without crowding, cooking in batches if necessary.
9. Cook for 4-5 minutes per side, or until the crust is golden brown and crispy, and the internal temperature reaches 145°F when checked with a meat thermometer.
10. Transfer the cooked chops to a clean wire rack or paper towel-lined plate to drain any excess oil.
11. Let the pork chops rest for 5 minutes before serving to allow the juices to redistribute, keeping them tender and juicy.
Crunchy on the outside and wonderfully juicy inside, these chops have a savory, cheesy flavor that pairs perfectly with a squeeze of lemon or a simple arugula salad. Consider serving them over creamy mashed potatoes to soak up any delicious bits from the pan, or slice them thin for a next-day sandwich that’s anything but boring.
Creamy Tuscan Garlic Chicken

Last week, after a particularly hectic day, I found myself craving something comforting yet elegant—the kind of dish that feels like a warm hug but looks impressive enough for company. That’s when I turned to this Creamy Tuscan Garlic Chicken, a one-pan wonder that’s become my go-to for turning a simple weeknight into something special.
Serving: 4 | Pre Time: 10 minutes | Cooking Time: 25 minutes
Ingredients
– 4 boneless, skinless chicken breasts (about 1.5 lbs total, pounded to even thickness for consistent cooking)
– 1 tsp kosher salt (plus more for seasoning)
– ½ tsp black pepper
– 2 tbsp olive oil (or any neutral oil like avocado oil)
– 3 tbsp unsalted butter
– 5 cloves garlic, minced (about 1 tbsp)
– 1 cup heavy cream (full-fat for best richness, but half-and-half works in a pinch)
– ½ cup chicken broth (low-sodium recommended to control saltiness)
– 1 tsp Italian seasoning
– ½ cup sun-dried tomatoes, chopped (oil-packed, drained)
– 2 cups fresh baby spinach (packed)
– ½ cup grated Parmesan cheese (freshly grated melts smoother)
– Fresh basil for garnish (optional, but adds a bright finish)
Instructions
1. Pat the chicken breasts dry with paper towels, then season both sides evenly with the kosher salt and black pepper.
2. Heat the olive oil in a large skillet over medium-high heat until it shimmers, about 1 minute.
3. Add the chicken breasts to the skillet and cook for 5–6 minutes per side, until golden brown and the internal temperature reaches 165°F on an instant-read thermometer. Transfer to a plate and cover loosely with foil.
4. Reduce the heat to medium and add the unsalted butter to the same skillet, scraping up any browned bits from the chicken with a wooden spoon for extra flavor.
5. Add the minced garlic and cook for 30–45 seconds, stirring constantly, until fragrant but not browned to avoid bitterness.
6. Pour in the heavy cream and chicken broth, then whisk in the Italian seasoning until smooth.
7. Bring the sauce to a gentle simmer over medium heat, letting it bubble lightly for 2–3 minutes to thicken slightly.
8. Stir in the chopped sun-dried tomatoes and fresh baby spinach, cooking for 1–2 minutes until the spinach wilts down.
9. Sprinkle in the grated Parmesan cheese, stirring continuously until fully melted and the sauce is creamy, about 1 minute.
10. Return the cooked chicken breasts to the skillet, spooning the sauce over them, and let everything heat through for 2–3 minutes.
11. Garnish with fresh basil if using, then serve immediately.
Just imagine cutting into that tender chicken, bathed in a velvety sauce with pops of sweet sun-dried tomatoes and wilted spinach—it’s a symphony of creamy, garlicky goodness. I love pairing it with crusty bread to soak up every last drop or serving it over a bed of fettuccine for a heartier meal.
Stuffed Bell Peppers with Cauliflower Rice

Haven’t we all stared into the fridge, hoping a healthy, satisfying dinner would magically appear? I certainly have, especially on busy weeknights when takeout sounds tempting. That’s exactly why these Stuffed Bell Peppers with Cauliflower Rice became a staple in my kitchen—they’re a comforting, veggie-packed meal that feels indulgent but is secretly light.
Serving: 4 | Pre Time: 20 minutes | Cooking Time: 35 minutes
Ingredients
– 4 large bell peppers, any color (tops removed and seeds scooped out)
– 1 lb lean ground beef (or ground turkey for a lighter option)
– 1 medium yellow onion, finely diced
– 2 cloves garlic, minced
– 12 oz frozen cauliflower rice, thawed and squeezed dry (or 3 cups fresh, riced)
– 1 (15 oz) can diced tomatoes, undrained
– 1 cup shredded cheddar cheese, divided
– 1 tbsp olive oil (or any neutral oil)
– 1 tsp dried oregano
– 1/2 tsp smoked paprika
– 1/2 tsp salt (adjust to taste)
– 1/4 tsp black pepper
Instructions
1. Preheat your oven to 375°F (190°C) and lightly grease a baking dish just large enough to hold the peppers upright.
2. Heat the olive oil in a large skillet over medium-high heat until shimmering, about 1 minute.
3. Add the diced onion to the skillet and cook, stirring frequently, until softened and translucent, about 5 minutes.
4. Add the minced garlic and cook, stirring constantly, until fragrant, about 30 seconds.
5. Add the ground beef to the skillet, breaking it up with a spatula, and cook until no pink remains, about 6-8 minutes.
6. Stir in the diced tomatoes (with their juices), dried oregano, smoked paprika, salt, and black pepper.
7. Add the cauliflower rice to the skillet, mixing thoroughly to combine all ingredients, and cook for 3 minutes to warm through.
8. Remove the skillet from heat and stir in 1/2 cup of the shredded cheddar cheese until melted and incorporated.
9. Spoon the beef and cauliflower rice mixture evenly into the hollowed bell peppers, packing it down gently.
10. Place the stuffed peppers upright in the prepared baking dish and cover the dish tightly with aluminum foil.
11. Bake the covered peppers at 375°F for 25 minutes until the peppers are tender when pierced with a fork.
12. Carefully remove the foil and sprinkle the remaining 1/2 cup of cheddar cheese evenly over the tops of the peppers.
13. Return the baking dish to the oven, uncovered, and bake for an additional 10 minutes until the cheese is bubbly and lightly browned.
14. Let the stuffed peppers rest for 5 minutes before serving to allow the filling to set slightly.
Oozing with cheesy goodness, these peppers offer a delightful contrast between the tender, sweet bell pepper shell and the savory, hearty filling. For a fun twist, try serving them over a bed of fresh greens or with a dollop of cool sour cream to balance the warmth.
Spicy Shrimp and Cauliflower Grits

Ever have one of those nights where you crave something comforting but still want it to feel a little special? That’s exactly where I was last Tuesday—tired from work but dreaming of shrimp and grits, yet wanting to keep things on the lighter side. Enter this twist: spicy shrimp served over creamy cauliflower grits. It’s become my go-to for a satisfying weeknight meal that doesn’t weigh me down.
Serving: 4 | Pre Time: 15 minutes | Cooking Time: 25 minutes
Ingredients
– 1 large head cauliflower, cut into florets (about 4 cups)
– 1 cup chicken broth, or vegetable broth for a vegetarian option
– 1/2 cup heavy cream
– 1/4 cup grated Parmesan cheese
– 1 lb large shrimp, peeled and deveined
– 2 tbsp olive oil, or any neutral oil
– 1 tsp smoked paprika
– 1/2 tsp cayenne pepper, adjust to taste for spice level
– 2 cloves garlic, minced
– 1/4 cup chopped fresh parsley, for garnish
– Salt and black pepper, as needed
Instructions
1. Place the cauliflower florets and chicken broth in a medium saucepan over high heat. Bring to a boil, then reduce heat to medium, cover, and simmer for 10 minutes until the cauliflower is very tender.
2. Transfer the cooked cauliflower and any remaining broth to a blender. Add the heavy cream and Parmesan cheese. Blend on high speed for 1–2 minutes until completely smooth and creamy, scraping down the sides as needed. Season with salt and black pepper to taste, then set aside covered to keep warm. Tip: For extra flavor, try adding a pinch of nutmeg to the cauliflower mixture.
3. Pat the shrimp dry with paper towels to ensure they sear properly. In a medium bowl, toss the shrimp with the smoked paprika, cayenne pepper, and a pinch of salt.
4. Heat the olive oil in a large skillet over medium-high heat until shimmering, about 1 minute. Add the shrimp in a single layer and cook for 2 minutes per side until they turn pink and opaque. Tip: Avoid overcrowding the skillet to get a nice sear; cook in batches if necessary.
5. Reduce the heat to medium-low. Push the shrimp to one side of the skillet and add the minced garlic to the empty space. Sauté for 30 seconds until fragrant, then stir everything together.
6. Divide the cauliflower grits among four bowls. Top with the spicy shrimp and any pan juices. Garnish with chopped fresh parsley. Tip: For a brighter finish, squeeze a little lemon juice over the shrimp just before serving.
But what really makes this dish shine is the contrast: the creamy, almost velvety cauliflower grits balance the kick from the cayenne-spiced shrimp perfectly. I love serving it with a simple side salad to round out the meal, or for a heartier option, try topping it with a fried egg for brunch—it’s surprisingly delicious!
Cheesy Spinach and Mushroom Casserole
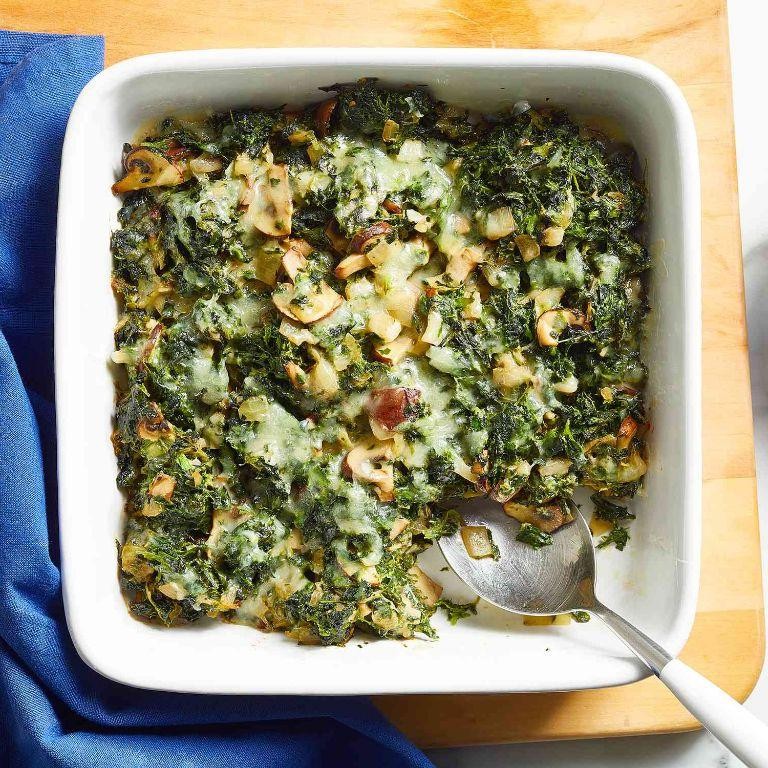
A cozy casserole is my go-to comfort food on chilly December evenings like this one, and this cheesy spinach and mushroom version has become a family favorite after I first made it for a potluck last year—it disappeared so fast I barely got a taste! I love how the earthy mushrooms and vibrant spinach meld with the creamy cheese sauce, creating a dish that feels indulgent yet wholesome, perfect for a weeknight dinner or holiday side. It’s become a staple in my kitchen because it’s forgiving with substitutions and always delivers that satisfying, bubbly goodness straight from the oven.
Serving: 6 | Pre Time: 15 minutes | Cooking Time: 35 minutes
Ingredients
– 1 tablespoon olive oil (or any neutral oil)
– 1 medium yellow onion, diced
– 8 ounces cremini mushrooms, sliced (white mushrooms work too)
– 3 cloves garlic, minced
– 5 ounces fresh spinach (about 5 cups packed)
– 2 cups whole milk
– 3 tablespoons all-purpose flour
– 1 teaspoon salt
– 1/2 teaspoon black pepper
– 1/4 teaspoon ground nutmeg (optional, for warmth)
– 2 cups shredded cheddar cheese (divided, reserve 1/2 cup for topping)
– 1/2 cup grated Parmesan cheese
– Cooking spray or butter for greasing
Instructions
1. Preheat your oven to 375°F and lightly grease a 9×13-inch baking dish with cooking spray or butter.
2. Heat the olive oil in a large skillet over medium heat until shimmering, about 1 minute.
3. Add the diced onion and cook, stirring occasionally, until softened and translucent, about 5 minutes.
4. Add the sliced mushrooms and cook, stirring frequently, until they release their liquid and turn golden brown, about 8 minutes.
5. Stir in the minced garlic and cook until fragrant, about 30 seconds.
6. Add the fresh spinach in batches, stirring until wilted and any excess liquid evaporates, about 3-4 minutes total.
7. Remove the skillet from the heat and set the vegetable mixture aside.
8. In a medium saucepan, whisk together the whole milk and all-purpose flour until no lumps remain.
9. Cook over medium heat, whisking constantly, until the mixture thickens to a creamy sauce consistency, about 5-7 minutes.
10. Remove the saucepan from the heat and stir in the salt, black pepper, ground nutmeg, 1 1/2 cups of cheddar cheese, and grated Parmesan cheese until fully melted and smooth.
11. Combine the cheese sauce with the vegetable mixture in the skillet, stirring until evenly coated.
12. Transfer the mixture to the prepared baking dish and spread it into an even layer.
13. Sprinkle the reserved 1/2 cup of cheddar cheese evenly over the top.
14. Bake in the preheated oven until the casserole is bubbly around the edges and the top is golden brown, about 20-25 minutes.
15. Let the casserole cool for 5 minutes before serving to allow it to set slightly.
So creamy and rich, this casserole emerges from the oven with a golden, cheesy crust that gives way to a velvety interior packed with savory mushrooms and tender spinach. Serve it alongside a crisp green salad or crusty bread to soak up every last bit, and don’t be surprised if it becomes a requested repeat at your table—it’s that kind of crowd-pleaser!
Bacon-Wrapped Asparagus Bundles
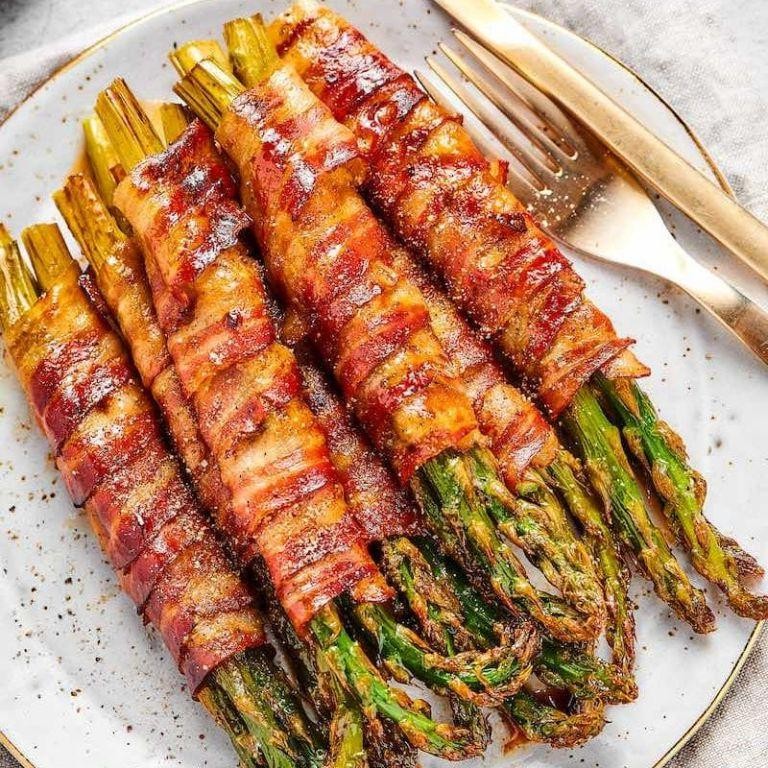
Perfect for a quick appetizer or a simple side dish, these bacon-wrapped asparagus bundles are a staple in my kitchen, especially during busy weeks when I need something impressive but effortless. I first made them for a last-minute potluck and now they’re my go-to when I want that savory, crispy goodness without the fuss.
Serving: 4 | Pre Time: 10 minutes | Cooking Time: 20 minutes
Ingredients
- 1 pound fresh asparagus, trimmed (look for firm, bright green spears)
- 8 slices thick-cut bacon (regular bacon works too, but thick-cut holds up better)
- 2 tablespoons olive oil (or any neutral oil like avocado oil)
- 1/4 teaspoon black pepper (freshly ground adds more flavor)
- 1/4 teaspoon garlic powder (optional, but gives a nice savory kick)
Instructions
- Preheat your oven to 400°F and line a baking sheet with parchment paper or aluminum foil for easy cleanup.
- Wash the asparagus spears thoroughly under cold water and pat them completely dry with paper towels to ensure they crisp up in the oven.
- Trim the tough ends off the asparagus by snapping each spear where it naturally bends—this removes the woody part without waste.
- Divide the asparagus into 8 equal bundles, each with about 4-5 spears depending on size.
- Wrap one slice of bacon tightly around the middle of each asparagus bundle, overlapping the ends slightly to secure it; no toothpicks are needed if wrapped snugly.
- Place the bundles on the prepared baking sheet, spacing them about 1 inch apart so they cook evenly without steaming.
- Drizzle the olive oil evenly over the bundles, using a brush or your hands to coat them lightly for a golden finish.
- Sprinkle the black pepper and garlic powder (if using) over the bundles, focusing on the bacon for maximum flavor absorption.
- Bake in the preheated oven for 18-20 minutes, or until the bacon is crispy and browned and the asparagus is tender when pierced with a fork.
- Remove from the oven and let the bundles rest on the baking sheet for 2-3 minutes before serving to allow the bacon to set slightly.
Keep these bundles warm on a platter—they’re irresistible with that smoky bacon crunch giving way to tender, slightly sweet asparagus inside. I love serving them alongside grilled chicken or as a standout appetizer with a creamy dip; the contrast in textures makes every bite satisfyingly simple yet elegant.
Zesty Lemon Garlic Butter Scallops

Haven’t we all had those evenings when we crave something fancy but don’t want to spend hours in the kitchen? That’s exactly why I keep a bag of scallops in my freezer—they cook in minutes and feel like a restaurant treat. This zesty lemon garlic butter version is my go‑to for a quick, impressive dinner, and I love how the bright citrus cuts through the rich butter.
Serving: 2 | Pre Time: 10 minutes | Cooking Time: 6 minutes
Ingredients
– 12 large sea scallops (about 1 lb), patted very dry with paper towels
– 2 tbsp unsalted butter, divided
– 1 tbsp olive oil (or any neutral oil)
– 3 cloves garlic, minced
– 1 lemon, juiced (about 3 tbsp), plus extra wedges for serving
– 2 tbsp fresh parsley, finely chopped
– ¼ tsp salt
– ⅛ tsp black pepper
Instructions
1. Pat the scallops completely dry with paper towels to ensure a good sear.
2. Season the scallops evenly on both sides with salt and black pepper.
3. Heat a large skillet over medium‑high heat for 2 minutes until hot.
4. Add 1 tablespoon of butter and the olive oil to the skillet, swirling to coat.
5. Place the scallops in the skillet, leaving space between them to avoid steaming.
6. Cook the scallops undisturbed for 2–3 minutes until a golden crust forms on the bottom.
7. Flip each scallop carefully with tongs and cook for another 2–3 minutes until opaque and firm.
8. Transfer the scallops to a plate, leaving any juices in the skillet.
9. Reduce the heat to medium and add the remaining 1 tablespoon of butter to the skillet.
10. Add the minced garlic and cook for 30–45 seconds until fragrant but not browned.
11. Pour the lemon juice into the skillet, scraping up any browned bits with a wooden spoon.
12. Stir in the chopped parsley and cook for 15 seconds to warm through.
13. Return the scallops to the skillet, spooning the sauce over them to coat.
14. Remove from heat and serve immediately.
Just out of the pan, these scallops are tender with a crisp, caramelized exterior that gives way to a sweet, briny center. The garlic‑butter sauce is tangy and herbaceous, perfect for drizzling over a bed of creamy polenta or simple pasta. For a fresh twist, I sometimes toss in a handful of baby spinach right at the end—it wilts beautifully in the warm sauce.
Slow Cooker Balsamic Braised Short Ribs
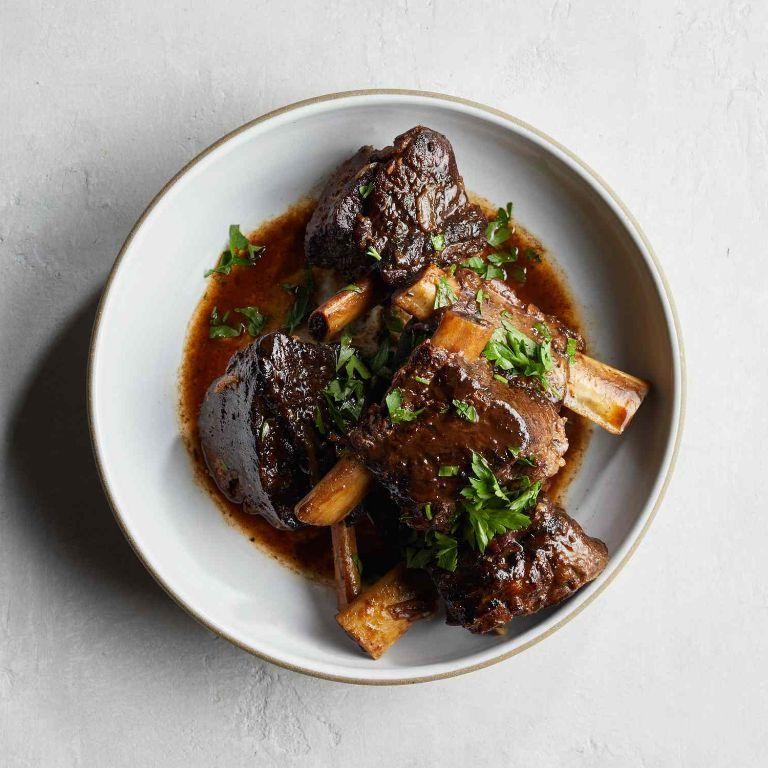
Just when I thought my slow cooker couldn’t get any more love, this recipe came along and proved me wrong—it’s the ultimate cozy, hands-off dinner that fills the house with the most incredible aroma while I tackle my never-ending to-do list. I first tried it on a hectic weeknight when I was craving something rich and comforting but had zero energy to babysit the stove, and now it’s a regular in my rotation, especially during chilly weekends when I want to savor every bite without the fuss.
Serving: 4 | Pre Time: 15 minutes | Cooking Time: 8 hours
Ingredients
– 3 lbs beef short ribs, bone-in (look for well-marbled pieces for maximum tenderness)
– 1 tbsp olive oil (or any neutral oil like avocado oil)
– 1 large yellow onion, thinly sliced
– 4 garlic cloves, minced
– 1 cup beef broth (low-sodium preferred to control saltiness)
– 1/2 cup balsamic vinegar (a good-quality one makes a difference here)
– 2 tbsp tomato paste
– 1 tbsp brown sugar (helps balance the vinegar’s acidity)
– 1 tsp dried thyme (or 1 tbsp fresh thyme if you have it)
– 1 tsp salt (adjust based on your broth’s salt content)
– 1/2 tsp black pepper
– 2 tbsp cornstarch mixed with 2 tbsp cold water (for thickening the sauce at the end)
Instructions
1. Pat the beef short ribs dry with paper towels to ensure a good sear—this locks in juices and adds depth to the flavor.
2. Heat the olive oil in a large skillet over medium-high heat until it shimmers, about 2 minutes.
3. Sear the short ribs for 3–4 minutes per side until deeply browned, working in batches to avoid overcrowding the pan.
4. Transfer the seared ribs to the slow cooker insert, arranging them in a single layer.
5. In the same skillet, reduce the heat to medium and add the sliced onion, cooking for 5 minutes until softened and lightly golden.
6. Add the minced garlic and cook for 1 more minute until fragrant, being careful not to burn it.
7. Pour in the beef broth to deglaze the skillet, scraping up any browned bits from the bottom—this adds incredible flavor to the sauce.
8. Stir in the balsamic vinegar, tomato paste, brown sugar, thyme, salt, and pepper until well combined.
9. Pour the mixture over the short ribs in the slow cooker, ensuring they are mostly submerged.
10. Cover and cook on low for 8 hours, or until the meat is fork-tender and easily pulls away from the bone.
11. Carefully remove the short ribs from the slow cooker and set them aside on a plate, tented with foil to keep warm.
12. Skim any excess fat from the surface of the cooking liquid in the slow cooker using a spoon.
13. Whisk the cornstarch slurry into the liquid, then cover and cook on high for 15–20 minutes until the sauce thickens to a gravy-like consistency.
14. Return the short ribs to the slow cooker, turning to coat them in the thickened sauce.
15. Serve immediately. On cold evenings, these ribs are pure magic—the meat falls apart with just a gentle nudge, and the tangy-sweet balsamic glaze clings to every bite. I love pairing them with creamy mashed potatoes or polenta to soak up that luxurious sauce, and if there are any leftovers (a rare occurrence!), they reheat beautifully for an even more flavorful next-day meal.
Garlic Rosemary Roasted Chicken Thighs
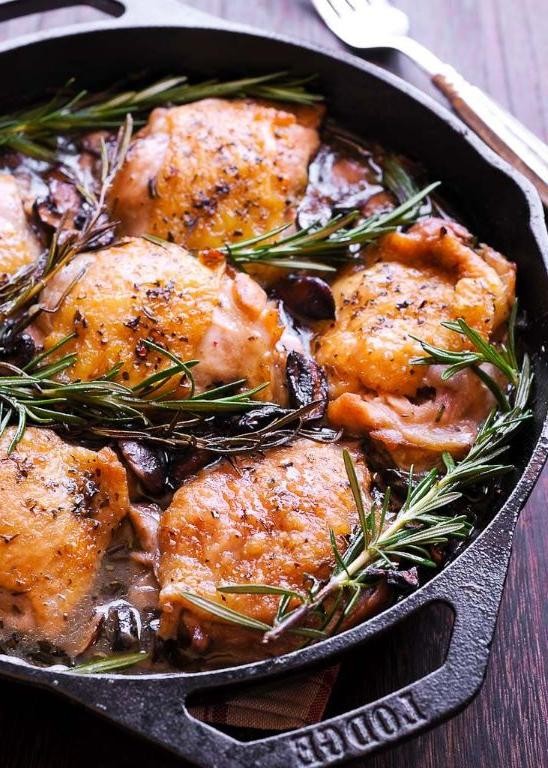
Every time I crave something cozy yet impressive without spending hours in the kitchen, these Garlic Rosemary Roasted Chicken Thighs come to mind. They’re my go-to for busy weeknights when I want a meal that feels special, and the aroma of garlic and rosemary always makes my kitchen smell like a fancy bistro.
Serving: 4 | Pre Time: 10 minutes | Cooking Time: 35 minutes
Ingredients
– 2 lbs bone-in, skin-on chicken thighs (about 4–6 pieces, pat them dry for crispier skin)
– 3 tbsp olive oil (or any neutral oil like avocado oil)
– 6 cloves garlic, minced (use more if you love garlic!)
– 2 tbsp fresh rosemary, finely chopped (dried works in a pinch, but fresh is best)
– 1 tsp kosher salt (adjust based on your preference)
– ½ tsp black pepper, freshly ground
– 1 lemon, sliced into thin rounds (for brightness and garnish)
Instructions
1. Preheat your oven to 425°F and line a rimmed baking sheet with parchment paper or foil for easy cleanup.
2. In a small bowl, combine the olive oil, minced garlic, chopped rosemary, kosher salt, and black pepper to create a fragrant marinade.
3. Place the chicken thighs skin-side up on the prepared baking sheet and rub the marinade evenly all over each piece, making sure to get under the skin for maximum flavor.
4. Arrange the lemon slices around and under the chicken thighs to infuse them with citrus as they roast.
5. Roast in the preheated oven for 30–35 minutes, or until the skin is golden brown and crispy, and the internal temperature reaches 165°F when checked with a meat thermometer.
6. Remove from the oven and let the chicken rest for 5 minutes on the baking sheet to allow the juices to redistribute, keeping it moist.
7. Serve the chicken thighs hot, garnished with the roasted lemon slices and any pan juices spooned over the top.
The skin turns out irresistibly crispy while the meat stays juicy and tender, infused with the earthy rosemary and pungent garlic. I love pairing it with roasted vegetables or a simple salad for a complete meal that always impresses guests.
Eggplant Lasagna with Ricotta
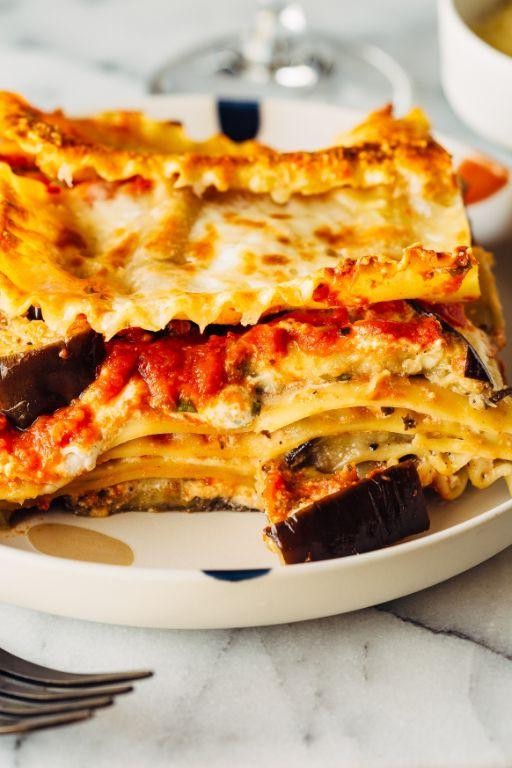
Venturing into my kitchen on a chilly evening, I found myself craving something hearty yet veggie-packed—enter this eggplant lasagna with ricotta. It’s a cozy twist on the classic that even my meat-loving partner adores, and I love how the eggplant soaks up all those savory flavors. Serving: 6 | Pre Time: 20 minutes | Cooking Time: 45 minutes
Ingredients
– 2 large eggplants, sliced lengthwise into 1/4-inch thick strips (about 8 slices total)
– 1 tablespoon olive oil, or any neutral oil
– 1 teaspoon salt, adjust to taste
– 1/2 teaspoon black pepper
– 15 ounces ricotta cheese
– 1 large egg
– 1/4 cup grated Parmesan cheese
– 2 cups marinara sauce, store-bought or homemade
– 2 cups shredded mozzarella cheese
– 1 tablespoon chopped fresh basil, optional for garnish
Instructions
1. Preheat your oven to 400°F and line a baking sheet with parchment paper.
2. Arrange the eggplant slices in a single layer on the baking sheet.
3. Brush both sides of the eggplant slices evenly with olive oil.
4. Sprinkle the eggplant slices with salt and black pepper.
5. Bake the eggplant slices in the preheated oven for 15 minutes, or until they are tender and lightly browned.
6. In a medium bowl, combine the ricotta cheese, egg, and Parmesan cheese until smooth.
7. Spread 1/2 cup of marinara sauce evenly on the bottom of a 9×13-inch baking dish.
8. Layer half of the baked eggplant slices over the sauce in the baking dish.
9. Spread half of the ricotta mixture evenly over the eggplant layer.
10. Sprinkle 1 cup of mozzarella cheese over the ricotta layer.
11. Repeat the layers by adding the remaining eggplant slices, ricotta mixture, and mozzarella cheese.
12. Pour the remaining 1 1/2 cups of marinara sauce over the top layer.
13. Cover the baking dish with aluminum foil and bake in the oven at 400°F for 25 minutes.
14. Remove the foil and bake for an additional 10 minutes, or until the cheese is bubbly and golden.
15. Let the lasagna rest for 10 minutes before slicing to allow it to set.
16. Garnish with chopped fresh basil if desired. Nothing beats the creamy ricotta layers melding with the tender eggplant, creating a rich, satisfying bite that’s perfect with a crisp salad. Next time, I might add a sprinkle of red pepper flakes for a spicy kick—it’s that versatile!
Keto Meatloaf with a Tomato Glaze

Over the years, I’ve tried countless meatloaf recipes, but this keto version with a tangy tomato glaze has become a weeknight staple in my house—it’s hearty, satisfying, and reminds me of cozy family dinners. Honestly, I love how simple it is to throw together, even after a long day, and it always gets rave reviews from my picky eaters.
Serving: 6 | Pre Time: 15 minutes | Cooking Time: 60 minutes
Ingredients
– 1.5 lbs ground beef (80/20 works best for moisture)
– 1/2 cup almond flour (or pork rind crumbs for a nut-free option)
– 1/4 cup grated Parmesan cheese
– 1 large egg
– 1/4 cup diced onion
– 2 cloves garlic, minced
– 1 tsp dried oregano
– 1/2 tsp salt
– 1/4 tsp black pepper
– 1/2 cup sugar-free ketchup
– 1 tbsp apple cider vinegar
– 1 tsp Worcestershire sauce
– 1 tbsp olive oil (or any neutral oil)
Instructions
1. Preheat your oven to 375°F (190°C) and lightly grease a loaf pan with olive oil.
2. In a large mixing bowl, combine the ground beef, almond flour, Parmesan cheese, egg, diced onion, minced garlic, dried oregano, salt, and black pepper. Tip: Use your hands to mix gently—overworking can make the meatloaf tough.
3. Press the mixture evenly into the prepared loaf pan, smoothing the top with a spatula.
4. In a small bowl, whisk together the sugar-free ketchup, apple cider vinegar, and Worcestershire sauce until smooth.
5. Spread the glaze evenly over the top of the meatloaf, covering it completely.
6. Place the pan in the preheated oven and bake for 55–60 minutes, or until the internal temperature reaches 160°F (71°C) on a meat thermometer. Tip: Check at 50 minutes to avoid overcooking—it should be firm and slightly browned.
7. Remove from the oven and let it rest for 10 minutes before slicing. Tip: Resting helps the juices redistribute, keeping it moist.
8. Slice and serve warm. Zero leftovers are common with this dish—the glaze caramelizes into a sweet-tart crust that pairs perfectly with the juicy, savory interior. I often serve it with a side of roasted veggies or a crisp salad for a complete low-carb meal that feels indulgent yet guilt-free.
Sausage and Cabbage Skillet
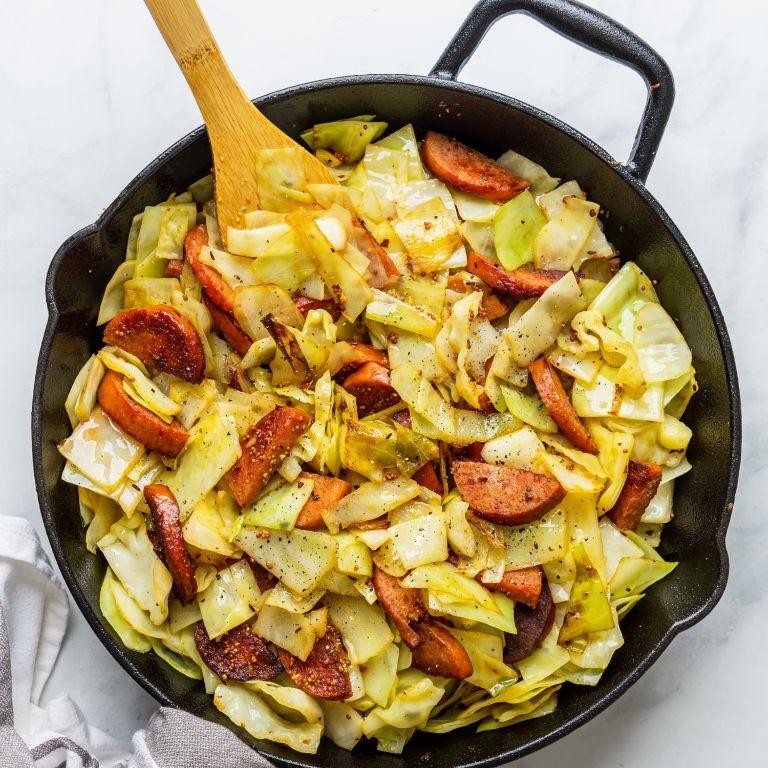
Bust out your favorite skillet because I’m about to share a cozy, one-pan wonder that’s become my go-to on busy weeknights. This sausage and cabbage skillet is the kind of hearty, no-fuss meal that fills your kitchen with the most comforting aroma—it reminds me of the simple dinners my grandma used to whip up when I’d visit after school. I love how the cabbage gets tender and sweet while the sausage adds a savory punch, making it a dish that’s both satisfying and surprisingly easy to pull together.
Serving: 4 | Pre Time: 10 minutes | Cooking Time: 25 minutes
Ingredients
– 1 tablespoon olive oil (or any neutral oil)
– 1 pound smoked sausage, sliced into ½-inch rounds
– 1 medium yellow onion, thinly sliced
– 4 cups shredded green cabbage (about ½ small head)
– 2 cloves garlic, minced
– 1 teaspoon paprika
– ½ teaspoon dried thyme
– ½ cup low-sodium chicken broth
– Salt and black pepper, adjust to taste
Instructions
1. Heat 1 tablespoon olive oil in a large skillet over medium-high heat until shimmering, about 1 minute.
2. Add 1 pound sliced smoked sausage to the skillet and cook until browned on both sides, 5–7 minutes, stirring occasionally for even browning.
3. Transfer the browned sausage to a plate using a slotted spoon, leaving the drippings in the skillet.
4. Add 1 thinly sliced yellow onion to the skillet and cook until softened and translucent, about 5 minutes, stirring frequently to prevent burning.
5. Stir in 4 cups shredded green cabbage and cook until it begins to wilt, 3–4 minutes, pressing it down lightly with a spatula to help it cook evenly.
6. Add 2 minced garlic cloves, 1 teaspoon paprika, and ½ teaspoon dried thyme, cooking for 1 minute until fragrant to bloom the spices.
7. Pour in ½ cup low-sodium chicken broth and scrape up any browned bits from the bottom of the skillet with a wooden spoon to incorporate flavor.
8. Return the browned sausage to the skillet, stirring to combine all ingredients.
9. Reduce heat to medium-low, cover the skillet, and simmer for 10 minutes until the cabbage is tender and the liquid has reduced slightly.
10. Season with salt and black pepper to taste, then remove from heat.
Mmm, this skillet delivers a wonderful mix of textures—the cabbage turns silky and sweet, while the sausage stays juicy with a hint of smokiness. I often serve it over a bed of creamy mashed potatoes or with a crusty loaf of bread to soak up the savory juices, making it a complete, comforting meal that’s perfect for chilly evenings.
Beef and Broccoli Stir Fry
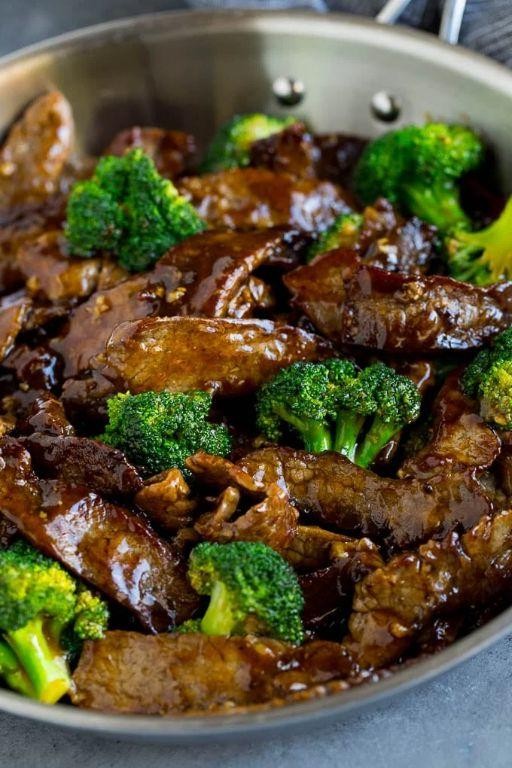
Just last Tuesday, after a frantic day of errands, I found myself craving something savory, quick, and packed with veggies—enter this lifesaver of a Beef and Broccoli Stir Fry. It’s my go-to when I need a satisfying meal on the table fast, and I love how the tender beef and crisp broccoli come together in a glossy, flavorful sauce.
Serving: 4 | Pre Time: 15 minutes | Cooking Time: 10 minutes
Ingredients
– 1 lb flank steak, thinly sliced against the grain (freeze for 15 minutes first for easier slicing)
– 4 cups broccoli florets (about 1 large head)
– 2 tbsp vegetable oil, divided (or any neutral oil like canola)
– 3 cloves garlic, minced
– 1 tsp fresh ginger, grated
– 1/3 cup low-sodium soy sauce
– 2 tbsp brown sugar
– 1 tbsp cornstarch
– 1/4 cup water
– 1 tsp sesame oil (for finishing, adds a nutty aroma)
Instructions
1. In a small bowl, whisk together soy sauce, brown sugar, cornstarch, and water until smooth to create the sauce; set aside.
2. Heat 1 tablespoon of vegetable oil in a large skillet or wok over high heat until it shimmers, about 1 minute.
3. Add the sliced flank steak in a single layer and cook without stirring for 2 minutes to develop a sear, then stir-fry for 1 more minute until browned but not fully cooked through; transfer to a plate.
4. Add the remaining 1 tablespoon of vegetable oil to the same skillet, then add broccoli florets and stir-fry for 3 minutes until bright green and slightly tender.
5. Push broccoli to the sides of the skillet, add minced garlic and grated ginger to the center, and cook for 30 seconds until fragrant, stirring constantly to prevent burning.
6. Pour the prepared sauce into the skillet, stirring immediately to combine with the garlic and ginger, and bring to a simmer over medium-high heat.
7. Return the cooked beef and any accumulated juices to the skillet, tossing everything together to coat in the sauce, and cook for 2 minutes until the sauce thickens and coats the ingredients evenly.
8. Remove from heat, drizzle with sesame oil, and stir once more to incorporate.
You’ll love the contrast of the juicy, seared beef against the crisp-tender broccoli, all glazed in that sweet-savory sauce. For a fun twist, I sometimes serve it over cauliflower rice or toss in some sliced bell peppers for extra color and crunch.
Cauliflower Crust Pizza Margherita
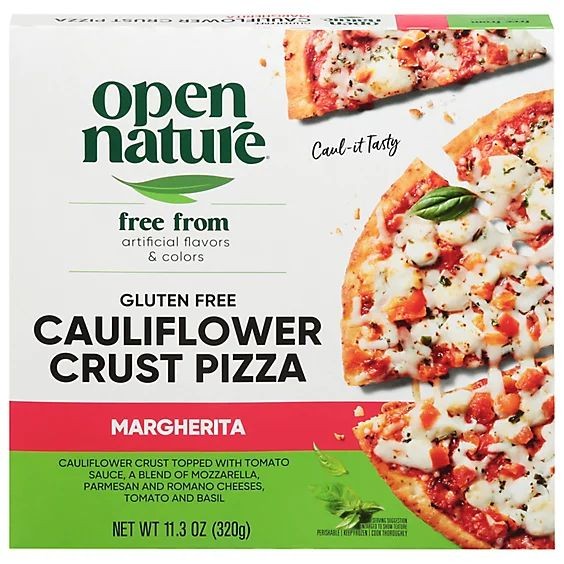
Ever since I swapped my usual Friday night takeout for homemade pizza, my kitchen has become my favorite pizzeria. This cauliflower crust version is my go-to when I want something lighter but still crave that classic Margherita flavor—plus, it’s a sneaky way to get my kids to eat more veggies without a fuss!
Serving: 4 | Pre Time: 20 minutes | Cooking Time: 25 minutes
Ingredients
– 1 medium head cauliflower, riced (about 4 cups raw, packed)
– 1 large egg, beaten
– 1 cup shredded mozzarella cheese, divided (low-moisture works best for crispiness)
– ¼ cup grated Parmesan cheese
– 1 tsp dried oregano
– ½ tsp garlic powder
– ¼ tsp salt
– 1 tbsp olive oil (or any neutral oil for brushing)
– ½ cup pizza sauce (store-bought or homemade, adjust to taste)
– 4 oz fresh mozzarella cheese, sliced
– ¼ cup fresh basil leaves, torn
Instructions
1. Preheat your oven to 400°F and line a baking sheet with parchment paper.
2. Rice the cauliflower by pulsing florets in a food processor until fine, like grains of rice.
3. Steam the riced cauliflower in a microwave-safe bowl for 5 minutes, then let it cool slightly.
4. Wrap the steamed cauliflower in a clean kitchen towel and squeeze out as much liquid as possible—this is key for a crispy crust!
5. In a mixing bowl, combine the squeezed cauliflower, beaten egg, ½ cup shredded mozzarella, Parmesan, oregano, garlic powder, and salt.
6. Press the mixture into a 12-inch circle on the prepared baking sheet, about ¼-inch thick.
7. Brush the crust lightly with olive oil and bake for 15 minutes, until the edges turn golden brown.
8. Remove the crust from the oven and spread pizza sauce evenly over it, leaving a small border.
9. Top with the remaining ½ cup shredded mozzarella and fresh mozzarella slices.
10. Bake for another 8–10 minutes, until the cheese is melted and bubbly.
11. Let the pizza cool for 5 minutes before scattering fresh basil on top—this prevents wilting.
12. Slice into 8 pieces using a pizza cutter or sharp knife.
Finally, this pizza boasts a surprisingly crisp crust with a tender bite, thanks to that thorough squeezing step. The fresh basil adds a pop of herbal brightness against the rich, gooey cheese—try serving it with a simple arugula salad for a complete meal that feels indulgent yet wholesome!
Conclusion
Looking for a delicious keto dinner? This roundup has 33 tasty recipes to make your evenings easy and satisfying. We hope you find some new favorites to try tonight! Don’t forget to leave a comment sharing which dish you loved most, and pin your top picks to Pinterest to save for later. Happy cooking!


