Oh, the things we do for love—and by love, I mean cheese. Officially declaring war on boring keto meals, these enchiladas are here to rescue your taste buds from the bland abyss of steamed chicken and sad salads. Our mission: transform your kitchen into a Mexican cantina without the carb-loaded guilt trip that usually follows such delicious decisions.
Why This Recipe Works
- Say adios to tortilla tears with our sturdy, pliable cheese wraps that hold more secrets than a telenovela villain—they won’t disintegrate when you stare at them too hard
- We’ve engineered the perfect sauce-to-filling ratio, creating a flavor tsunami that’ll make your tongue do the Macarena without drowning your beautiful creation in liquid regret
- The chicken gets a spa treatment in creamy, spicy goodness before its cheese blanket tuck-in, ensuring every bite is more satisfying than finding an extra chicken nugget in your takeout box
- Our baking technique creates that magical crispy-chewy texture contrast that’ll have you questioning why you ever bothered with corn tortillas in the first place
- This recipe is so forgiving, even your kitchen-challenged cousin who burns water could probably pull it off with minimal fire department involvement
Ingredients
- 2 cups shredded cooked chicken (about 1 pound, preferably from rotisserie chicken that lived its best life)
- 8 ounces cream cheese, softened to room temperature (don’t rush this—cold cream cheese has trust issues)
- 1 cup red enchilada sauce, divided (the good stuff, not the sad watery kind)
- 4 cups shredded Mexican blend cheese, divided (because three cups would be downright un-American)
- 1/2 cup diced green chilies, drained (these little firecrackers bring the party)
- 1 teaspoon chili powder (for that ‘I know what I’m doing’ vibe)
- 1/2 teaspoon cumin (the secret handshake of Mexican cooking)
- 1/4 teaspoon garlic powder (because fresh garlic is too high-maintenance for this relationship)
- 1/4 cup chopped fresh cilantro (the controversial herb that separates food adventurers from cowards)
- Cooking spray or avocado oil (for greasing your baking dish of dreams)
Equipment Needed
- Large mixing bowl (big enough to host your ingredient party)
- 9×13 inch baking dish (the stage where magic happens)
- Parchment paper or silicone baking mat (your insurance policy against cheese-stuck disasters)
- Baking sheet (for creating our cheesy ‘tortilla’ miracles)
- Medium saucepan (for sauce warming operations)
- Spatula and mixing spoon (your trusty kitchen sidekicks)
- Measuring cups and spoons (because eyeballing it is how kitchen dramas begin)
Instructions
Creating Your Cheesy Tortilla Canvas
Preheat your oven to a toasty 375°F—think of it as preheating your social life before the party starts. Line that baking sheet with parchment paper like you’re tucking it into bed, then grab exactly 2 cups of your shredded Mexican cheese blend. Create four evenly spaced cheese circles on the parchment, each about 6 inches in diameter—imagine you’re drawing the world’s most delicious Venn diagrams. Bake these cheesy masterpieces for exactly 6-8 minutes until the edges turn golden brown and the centers stop looking like a melted plastic bag. Pro tip: Let them cool for 2-3 minutes before attempting to move them—these cheese wraps are more delicate than your ego after watching someone else get your dream job.
Preparing the Filling Fiesta
While your cheese tortillas are becoming their best selves, grab that large mixing bowl and combine your shredded chicken, softened cream cheese, 1/2 cup of enchilada sauce, 1 cup of shredded cheese, diced green chilies, and all those spices. Mix this glorious concoction until every chicken shred is coated in creamy, spicy perfection—you’re looking for uniform distribution, not random flavor landmines. The mixture should hold together when pressed but still maintain some texture, kind of like well-mannered party guests who know how to have fun without destroying the furniture. Taste test time! Adjust seasoning if needed, but remember: you’re the boss of this flavor rodeo.
The Great Enchilada Assembly Line
Spread the remaining 1/2 cup of enchilada sauce in your greased 9×13 baking dish—this creates a flavor foundation that prevents your enchiladas from developing trust issues with the pan. Now carefully place about 1/2 cup of your chicken mixture along the center of each cheese tortilla. Gently roll them up like you’re wrapping the most precious burrito baby in existence, placing them seam-side down in the baking dish. They should fit snugly but not be crammed in like subway passengers during rush hour. If your cheese tortillas crack slightly, don’t panic—they’re just showing personality, like stretch marks on a masterpiece.
Baking to Perfection
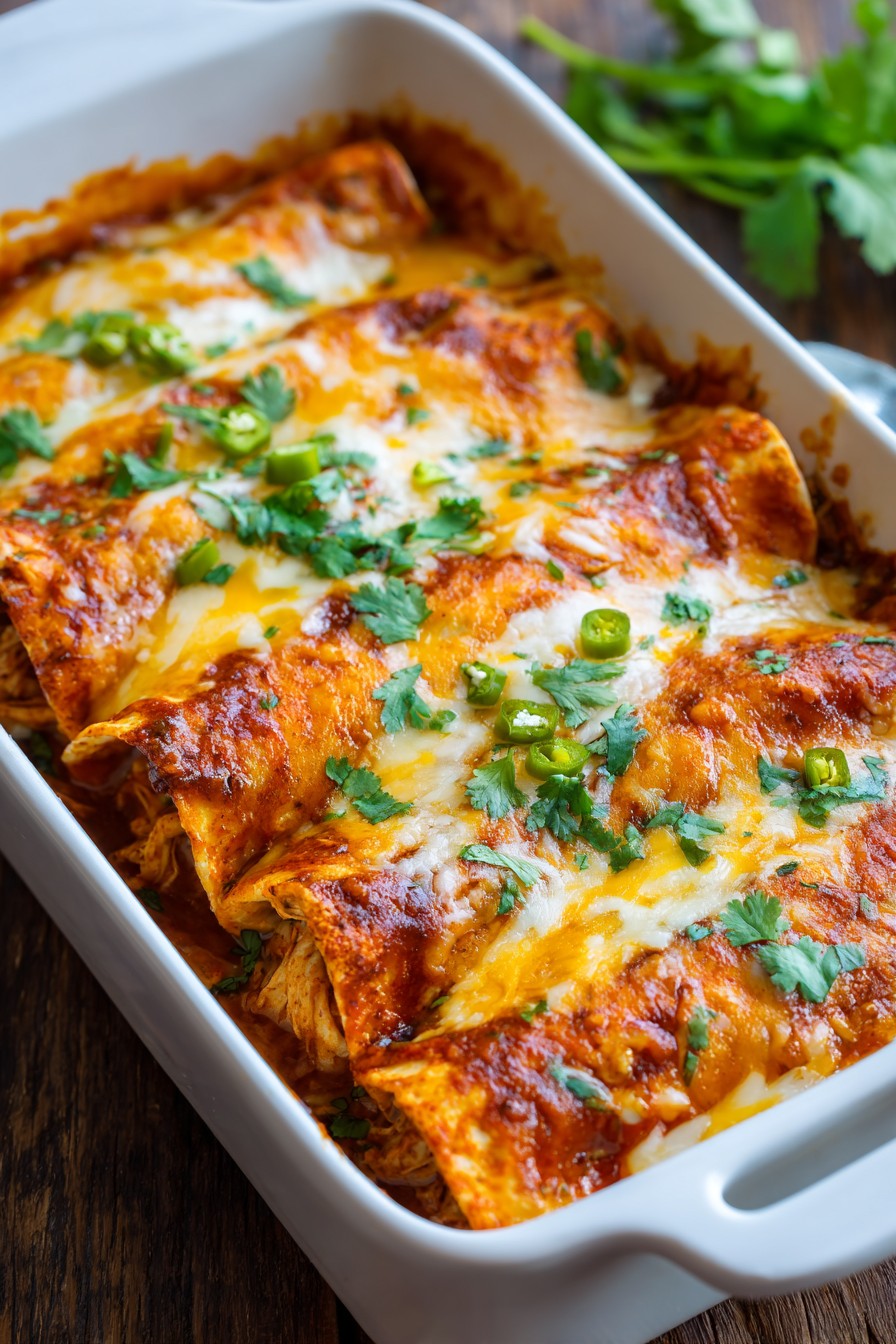
Sprinkle the remaining 1 cup of cheese over your assembled enchiladas like you’re blessing them with dairy snow. Cover the dish with aluminum foil—creating a little steam sauna that helps everything meld together in cheesy harmony. Bake covered for 15 minutes, then remove the foil and bake for another 8-10 minutes until the cheese topping is bubbly and starting to develop those beautiful golden-brown spots that make food photographers weep with joy. The internal temperature should reach 165°F if you’re the scientific type who measures such things.
The Grand Finale and Serving
Remove your masterpiece from the oven and let it rest for 5-7 minutes—this cooling period allows the enchiladas to firm up and prevents the filling from escaping like prisoners during a jailbreak when you cut into them. Garnish with fresh cilantro if you’re feeling fancy, or skip it if you’re one of those people who think cilantro tastes like soap (we don’t judge, we just question your life choices). Serve immediately while the cheese is still doing its stretchy, gooey dance that makes everyone at the table forget they’re eating keto.
Tips and Tricks
Let’s talk cheese tortilla psychology—these beauties are more temperamental than a reality TV star. The key to perfect pliability is timing: too little baking and they’re floppy disappointments, too much and they turn into cheese crackers that mock your rolling attempts. Watch for that precise moment when the edges turn golden but the center still looks slightly underdone—that’s your sweet spot. When cooling, 2-3 minutes is the magic window where they’re flexible enough to roll but won’t stick to everything they touch. If you mess up, just respread the cheese and try again—nobody needs to know about your first attempt. Chicken selection matters more than your dating preferences. Rotisserie chicken brings built-in flavor and moisture, while boiled chicken breast tends to be drier than a British comedy. If using pre-cooked chicken, make sure it’s thoroughly shredded—big chunks create structural instability in your enchiladas, leading to filling escape routes. For maximum flavor absorption, warm your chicken slightly before mixing—cold chicken and cream cheese have commitment issues. Sauce selection can make or break your enchilada experience like bad Wi-Fi during a video call. Read those labels carefully—many commercial enchilada sauces contain sugar or starches that’ll kick you out of ketosis faster than you can say ‘cheat day.’ When testing sauce thickness, aim for something that coats the back of a spoon but still drips off slowly. Too thin and you’ll have soupy enchiladas, too thick and it becomes cement. Storage and reheating require finesse worthy of a nuclear physicist. These enchiladas freeze beautifully if wrapped tighter than your jeans after Thanksgiving dinner. When reheating, use the oven instead of microwave—the microwave turns cheese textures into rubbery disappointments. If the tops look dry after storage, add a sprinkle of fresh cheese before reheating to restore that glorious meltiness. Leftover filling makes amazing stuffed peppers or omelet fillings—waste not, want not, as your grandmother probably said while saving aluminum foil.
Recipe Variations
- Beefy Fiesta Swap: Replace chicken with 1 pound of ground beef browned with taco seasoning—drain that grease like you’re avoiding emotional baggage. The beef version brings a heartier, more traditional enchilada experience that’ll satisfy even the most dedicated carb-lovers at your table.
- Veggie Power Play: For our plant-based friends, substitute chicken with 2 cups of roasted cauliflower florets and 1 cup of black soybeans. Add an extra 1/2 teaspoon of smoked paprika to compensate for the missing meatiness—this version will make even carnivores question their life choices.
- Spicy Sunrise Upgrade: Kick up the heat by adding 1-2 chopped jalapeños (seeds included for maximum pain) and swapping regular enchilada sauce for the ‘hot’ version. Serve with cooling avocado crema made from blended avocado, lime juice, and sour cream to balance the fire-breathing dragon in your mouth.
- Breakfast Enchilada Revolution: Morning people, rejoice! Replace chicken with scrambled eggs and breakfast sausage, use green chili sauce instead of red, and top with a fried egg because everything’s better with an egg on top. This brunch version will make you the hero of sleepy Saturday mornings.
- Seafood Coastal Twist: For a pescatarian pivot, substitute chicken with 2 cups of cooked shrimp or flaked white fish, use verde sauce instead of red, and add a squeeze of fresh lime juice to the filling. This coastal version brings beach vacation vibes to your dinner table without the sand in your shoes.
Frequently Asked Questions
Can I make these enchiladas ahead of time?
Absolutely! These keto enchiladas are more prepared for future events than your overachieving cousin. Assemble them completely, cover tightly with plastic wrap and then foil (the double protection prevents freezer burn and flavor escape), and refrigerate for up to 2 days or freeze for 3 months. When ready to bake, add 5-10 minutes to the cooking time if coming straight from the refrigerator, or 15-20 minutes if frozen. The cheese tortillas might soften slightly during storage, but they’ll firm up beautifully during baking—think of it as their beauty sleep before the big reveal.
What can I use instead of cream cheese?
If cream cheese isn’t your jam, several alternatives can save your enchilada dreams. Full-fat ricotta creates a lighter, grainier texture that still provides the necessary binding power. Mexican crema or sour cream mixed with an extra 1/2 cup of shredded cheese can work in a pinch, though the filling might be slightly looser. For dairy-free warriors, blended silken tofu with nutritional yeast provides surprising creaminess and that cheesy flavor illusion. Just remember: whatever substitute you choose, make sure it’s at room temperature before mixing—cold ingredients are the party poopers of creamy fillings.
Why did my cheese tortillas turn out crispy instead of pliable?
Ah, the classic cheese crisp dilemma—usually caused by overbaking or using the wrong cheese blend. The cheese tortillas should be removed from the oven when the edges are golden but the centers still look slightly undercooked—they continue to set as they cool. Also, pre-shredded cheeses often contain anti-caking agents that can affect melting properties. For best results, shred your own cheese from a block—it’s extra work, but the pliability payoff is worth the arm workout. If all else fails, slightly underbake your next batch and remember that even cracked enchiladas still taste amazing.
Can I use low-fat ingredients to reduce calories?
Technically yes, but your enchiladas will judge you silently throughout the meal. Low-fat cream cheese contains more water and stabilizers that can make your filling weepy and sad. Reduced-fat cheeses don’t melt properly—they tend to become rubbery or oily rather than achieving that glorious stretch. The beauty of keto is embracing healthy fats, so consider portion control instead of ingredient compromise. One properly made full-fat enchilada is more satisfying than two sad low-fat versions that leave you dreaming of real food. Trust the process—fat is flavor, and flavor is happiness.
How do I prevent the enchiladas from becoming soggy?
Soggy enchiladas are the culinary equivalent of wet socks—unpleasant and entirely preventable. First, make sure your filling isn’t too wet—drain those green chilies thoroughly and don’t go overboard with the sauce in the mixture. Second, don’t over-sauce the baking dish—just a thin layer to prevent sticking. Third, let your cheese tortillas cool completely before filling—warm tortillas absorb moisture like sponges. Finally, that resting period after baking is crucial—it allows the starches and proteins to set up properly. Follow these steps and your enchiladas will maintain structural integrity worthy of architectural awards.
Summary
These keto chicken enchiladas prove that low-carb living doesn’t mean sacrificing flavor or fun. With cheesy ‘tortillas’ that defy physics and a filling that’ll make your taste buds throw a party, this recipe transforms diet food into celebration food. Perfect for weeknight dinners or impressing guests who don’t know they’re eating keto.