Here’s how to achieve restaurant-quality pulled pork in your Instant Pot. Harnessing the power of pressure cooking transforms tough pork shoulder into succulent, fall-apart tender meat in a fraction of the traditional time. This method preserves moisture while developing deep, complex flavors that typically require hours of slow smoking.
Why This Recipe Works
- The combination of dry brining and pressure cooking creates exceptionally tender meat with enhanced flavor penetration throughout the muscle fibers.
- Strategic layering of aromatics and liquid creates a self-basting environment that prevents drying while building complex flavor foundations.
- The dual-phase cooking approach—pressure followed by broiling—delivers both perfect texture and desirable caramelized crust development.
- Using the natural release method allows the meat to reabsorb its juices, resulting in superior moisture retention compared to quick-release techniques.
- The spice rub formulation balances sweet, savory, and smoky elements that complement rather than overwhelm the natural pork flavor profile.
Ingredients
- 4-5 pound bone-in pork shoulder roast, trimmed of excess fat
- 2 tablespoons kosher salt for dry brining
- 1/4 cup brown sugar
- 2 tablespoons smoked paprika
- 1 tablespoon garlic powder
- 1 tablespoon onion powder
- 2 teaspoons ground black pepper
- 1 teaspoon cayenne pepper
- 1 large yellow onion, thinly sliced
- 4 cloves garlic, smashed
- 1 cup chicken stock or broth
- 1/4 cup apple cider vinegar
- 2 tablespoons Worcestershire sauce
- 1 tablespoon liquid smoke (optional)
- 2 bay leaves
Equipment Needed
- 6-quart or larger Instant Pot or pressure cooker
- Digital kitchen scale
- Sharp chef’s knife
- Cutting board
- Mixing bowls
- Measuring spoons and cups
- Tongs
- Meat forks or bear claws
- Rimmed baking sheet
- Parchment paper
- Instant-read thermometer
Instructions
Preparation and Dry Brining
Begin by patting the pork shoulder completely dry with paper towels, ensuring all surfaces are moisture-free to promote optimal spice adhesion. Using a sharp knife, score the fat cap in a crosshatch pattern approximately 1/4-inch deep, creating channels for seasoning penetration. Measure 2 tablespoons of kosher salt and rub it evenly over all surfaces of the pork, paying particular attention to work the salt into the scored fat and any crevices. Place the seasoned pork on a wire rack set over a baking sheet and refrigerate uncovered for 12-24 hours. This dry brining process draws out moisture, which then reabsorbs into the meat along with the salt, seasoning the pork from within while helping to break down tough muscle fibers. The extended refrigeration time also helps to dry the surface, which will lead to better browning during the initial searing phase. Tip: For maximum flavor development, prepare the spice rub during this waiting period and store it in an airtight container.
Spice Rub Application and Initial Searing
Combine 1/4 cup brown sugar, 2 tablespoons smoked paprika, 1 tablespoon each of garlic and onion powder, 2 teaspoons black pepper, and 1 teaspoon cayenne in a small bowl, whisking thoroughly to ensure even distribution of all components. Remove the pork from refrigeration and pat any accumulated moisture from the surface with fresh paper towels. Apply the spice mixture generously to all sides of the pork, using your hands to press the rub firmly into the meat to create a cohesive crust that won’t wash off during cooking. Set your Instant Pot to the “Sauté” function on high heat and add 1 tablespoon of neutral oil once the display reads “Hot.” Carefully place the pork fat-side down and sear for 4-5 minutes until deeply browned and caramelized, then repeat on all remaining sides, achieving uniform browning. This Maillard reaction creates complex flavor compounds that will infuse the entire dish during pressure cooking.
Aromatic Base and Pressure Cooking Setup
Remove the seared pork from the Instant Pot and set aside temporarily. Add the thinly sliced onion to the hot pot and cook for 3-4 minutes until softened and beginning to caramelize, scraping up any browned bits from the bottom—this deglazing step prevents burn warnings. Add the smashed garlic cloves and cook for 30 seconds until fragrant, being careful not to burn the delicate garlic. Pour in 1 cup chicken stock, 1/4 cup apple cider vinegar, 2 tablespoons Worcestershire sauce, and 1 tablespoon liquid smoke if using, stirring to combine all elements. Place the bay leaves in the liquid, then position the pork shoulder fat-side up on the aromatic bed, ensuring the liquid comes no more than halfway up the sides of the meat. The careful layering creates a steam environment that gently cooks the pork while the liquid forms a flavorful braising medium.
Pressure Cooking and Natural Release
Secure the Instant Pot lid, ensuring the steam release valve is set to the “Sealing” position. Select the “Manual” or “Pressure Cook” function and set the timer for 90 minutes at high pressure for a 4-5 pound pork shoulder—adjust proportionally for larger cuts. Once the cooking cycle completes, allow the pressure to release naturally for 25-30 minutes; this gradual pressure decrease prevents the sudden contraction of muscle fibers that can squeeze out precious juices. Do not attempt quick release, as this will result in tougher, drier meat. After the natural release period, carefully turn the steam release valve to “Venting” to release any remaining pressure. The pork should register between 200-205°F on an instant-read thermometer when inserted into the thickest part, indicating perfect shredding texture. Tip: The extended natural release period allows the meat to continue cooking gently while reabsorbing rendered fats and juices.
Shredding and Crisping Final Preparation
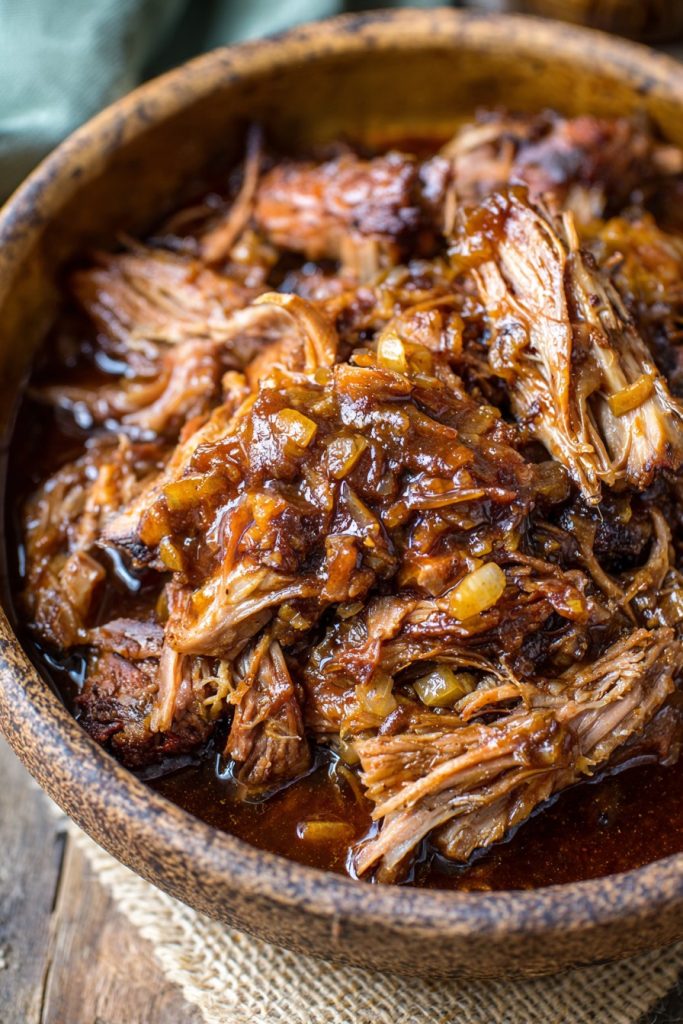
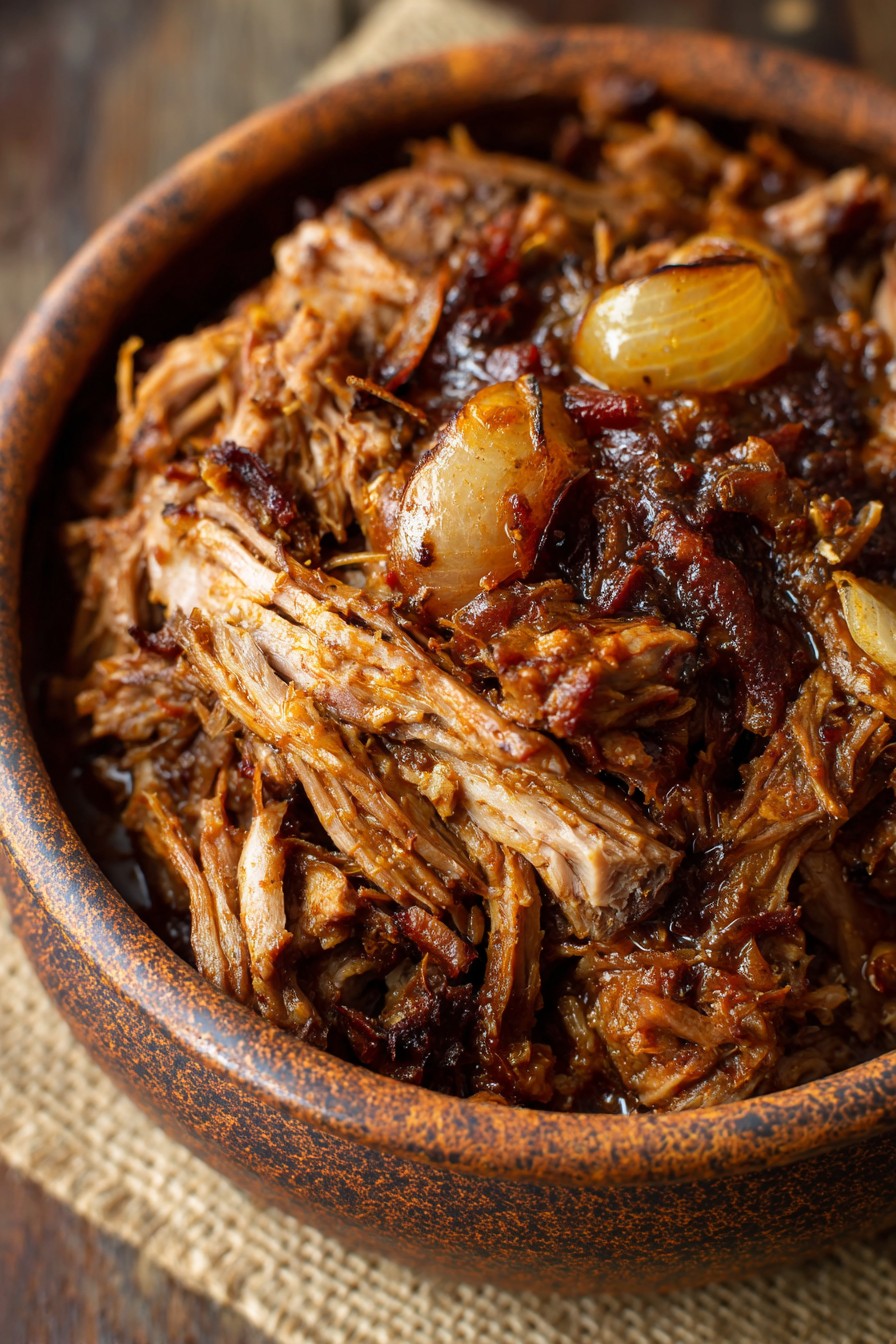
Using tongs, carefully transfer the pork shoulder to a large cutting board or bowl, reserving the cooking liquid in the Instant Pot. Remove and discard the bone—it should release cleanly with minimal resistance—along with any large fat deposits. Using two forks or meat claws, shred the pork by pulling against the grain of the meat, which will naturally separate into tender strands. For optimal texture, transfer the shredded pork to a parchment-lined baking sheet and spread in an even layer. Place under a preheated broiler for 3-5 minutes until the edges become slightly crisp and caramelized, watching carefully to prevent burning. Meanwhile, skim excess fat from the reserved cooking liquid and adjust seasoning as needed. Combine the crisped pork with enough cooking liquid to moisten to your desired consistency, typically about 1-1.5 cups. This dual-texture approach provides both tender interior strands and crispy caramelized edges for superior mouthfeel.
Tips and Tricks
For professional-level results, consider these advanced techniques beyond the basic recipe framework. When selecting your pork shoulder, look for well-marbled cuts with a substantial fat cap—this intramuscular fat renders during cooking, self-basting the meat and creating unparalleled moisture. The dry brining step is non-negotiable for texture optimization; the salt penetrates deep into the muscle fibers, breaking down proteins and creating a seasoned foundation that permeates the entire roast rather than just the surface. If time permits, apply the spice rub 2-4 hours before cooking and let it sit refrigerated—this allows the sugars to partially dissolve and form a paste-like coating that adheres better during searing. For the initial browning phase, ensure your Instant Pot is thoroughly preheated and don’t overcrowd the pot—sear in batches if necessary to maintain proper pan temperature and achieve proper caramelization. When pressure cooking, resist the temptation to reduce liquid amounts; the specified volume creates sufficient steam for proper pressure buildup while preventing scorching on the bottom. The natural release period is critical for texture—the gradual pressure decrease prevents the violent boiling that can make meat tough. When shredding, work while the pork is warm but manageable, and consider wearing heat-resistant gloves for better control. For storage, keep the pork and cooking liquid separate until reheating to maintain optimal texture. The reserved cooking liquid makes an excellent base for barbecue sauce or can be reduced to create a rich glaze. For meal prep, portion the shredded pork before freezing to enable easy use in various applications throughout the week.
Recipe Variations
- Carolina-Style Vinegar Base: Replace the chicken stock with additional apple cider vinegar and add 1 tablespoon red pepper flakes for authentic tangy heat characteristic of Eastern North Carolina barbecue. The increased acidity cuts through the richness of the pork while the pepper flakes provide subtle warmth without overwhelming spice. Serve with coleslaw on soft white buns for traditional preparation.
- Asian-Inspired Five-Spice Version: Substitute the spice rub with 2 tablespoons Chinese five-spice powder, 1/4 cup hoisin sauce, and 2 tablespoons grated fresh ginger. Replace the cooking liquid with 1 cup pineapple juice and 1/4 cup soy sauce for sweet-savory complexity. Garnish with sliced scallions and sesame seeds for bright, aromatic finish.
- Texas-Style Coffee Rub: Combine 2 tablespoons finely ground coffee, 1/4 cup chili powder, 2 tablespoons cumin, and 1 tablespoon cocoa powder for a robust, earthy rub that complements the pork’s richness. Use beef broth instead of chicken stock and omit the liquid smoke for a more natural smoke flavor profile. Serve with pickled onions to cut through the deep flavors.
- Cuban Mojo Preparation: Create a marinade with 1 cup orange juice, 1/2 cup lime juice, 8 smashed garlic cloves, 1 tablespoon oregano, and 2 teaspoons cumin. Marinate the pork for 4-6 hours before cooking, then use the marinade as part of the cooking liquid. The citrus tenderizes while providing bright, aromatic notes perfect for sandwiches or rice bowls.
- Sweet Hawaiian Twist: Increase brown sugar to 1/2 cup and add 1/4 cup pineapple juice to the cooking liquid. Incorporate 2 tablespoons soy sauce and 1 tablespoon grated ginger for balanced sweetness with savory depth. The result is tender pork with tropical notes that pairs exceptionally well with rice or slider buns.
Frequently Asked Questions
Can I use a boneless pork shoulder instead of bone-in?
While bone-in pork shoulder is preferred for its superior flavor and moisture retention, boneless pork shoulder works well with slight adjustments. The bone contributes collagen and marrow that enrich the cooking liquid, so when using boneless, consider adding 1-2 tablespoons of unflavored gelatin to the liquid to replicate the mouthfeel benefits. Reduce cooking time to 75-80 minutes at high pressure for a 4-pound boneless roast, as the absence of bone allows for faster heat penetration. Monitor internal temperature carefully, as boneless cuts can sometimes cook more unevenly. The finished texture may be slightly less shreddable but still delivers excellent results for sandwiches and other applications.
Why is natural release so important for pulled pork?
Natural pressure release is critical for pulled pork because it allows the meat to undergo gradual decompression, preventing the violent boiling that occurs during quick release. When pressure drops suddenly, the rapid expansion of moisture within the muscle fibers can cause them to contract forcefully, squeezing out precious juices and resulting in drier meat. The 25-30 minute natural release period also provides additional cooking time as the temperature decreases slowly, allowing connective tissues to continue breaking down into gelatin. This extended gentle cooking transforms tough collagen into silky, unctuous texture that defines perfect pulled pork. The process ensures maximum moisture retention and optimal shredding consistency.
How can I adjust cooking time for larger or smaller pork shoulders?
Cooking time adjustments follow a general guideline of 20-25 minutes per pound at high pressure for bone-in pork shoulder, with minimum and maximum parameters. For smaller cuts (2-3 pounds), maintain a minimum cooking time of 60 minutes to ensure proper collagen breakdown, while larger roasts (6-7 pounds) may require up to 120 minutes. The key indicator remains internal temperature—the pork should reach 200-205°F in the thickest part for ideal shredding texture. Remember that pressure cooking time doesn’t scale linearly due to the physics of heat transfer in sealed environments. Always factor in the natural release period as part of the total cooking process, as this contributes significantly to the final texture development.
Can I make this recipe without liquid smoke?
Absolutely, and many purists prefer omitting liquid smoke for a cleaner pork flavor profile. Without liquid smoke, the dish will lack smoky notes but will highlight the natural sweetness of the pork and complexity of the spice rub. To compensate, you can increase the smoked paprika by 1 tablespoon and add 1 teaspoon of chipotle powder for subtle heat and smoke alternative. Another approach involves briefly smoking the pork shoulder for 30-60 minutes on your outdoor grill before pressure cooking, which provides authentic smoke flavor without extended smoking time. The resulting pork will still be exceptionally tender and flavorful, just with a different character that may better suit certain culinary applications or personal preferences.
What’s the best way to store and reheat leftover pulled pork?
For optimal storage, separate the shredded pork from the cooking liquid and refrigerate in airtight containers for up to 4 days. The liquid can be skimmed of fat and used to remoisten the pork during reheating. For freezing, portion the pork into usable amounts in freezer bags, removing as much air as possible, where it will maintain quality for 3 months. The best reheating method involves placing frozen or refrigerated pork in a saucepan with 1/4-1/2 cup of the reserved cooking liquid over medium-low heat, covered, stirring occasionally until heated through—this prevents drying. Alternatively, reheat in a 300°F oven in a covered dish with some liquid for 20-30 minutes. Avoid microwave reheating if possible, as it can create hot spots and alter texture.
Summary
This Instapot pulled pork recipe delivers restaurant-quality results through precise technique and understanding of pressure cooking principles. The combination of dry brining, proper searing, and controlled pressure release creates exceptionally tender, flavorful pork perfect for various culinary applications. Master these fundamentals for consistently outstanding results.
Instapot Pulled Pork
5
servings20
minutes90
minutesIngredients
Instructions
- 1 Dry pork and score fat cap. Rub with salt and refrigerate 12-24 hours.
- 2 Combine spice rub ingredients and apply to all sides of pork.
- 3 Sear pork on all sides in Instant Pot on Sauté function.
- 4 Add onions, garlic, and deglaze with liquids. Add bay leaves.
- 5 Pressure cook 90 minutes, natural release 25-30 minutes.
- 6 Shred pork, crisp under broiler, and mix with reduced cooking liquid.


