Somewhere between the Andean highlands where quinoa first sprouted and modern American kitchens, this ancient grain has completed its global journey. Standing at my Instant Pot today, I’m reminded of Peruvian farmers who’ve cultivated this sacred seed for millennia, now transformed through pressure cooking magic into a perfect weeknight staple that honors its indigenous roots while embracing contemporary convenience.
Why This Recipe Works
- The Instant Pot’s pressurized environment cooks quinoa faster than traditional methods while preserving its delicate nutty flavor that echoes through Andean cuisine
- Perfect water-to-quinoa ratio ensures each grain emerges fluffy and separate, reminiscent of the texture found in traditional Peruvian quinotto dishes
- Natural pressure release prevents the grain from becoming mushy, maintaining the integrity that made quinoa the “mother grain” of Inca civilization
- Versatile base recipe allows for global flavor infusions, from Mediterranean herb blends to Asian-inspired seasonings
- Consistent results every time eliminate the guesswork that often plagues stovetop quinoa preparation
Ingredients
- 1 cup white quinoa, thoroughly rinsed until water runs clear to remove natural saponins
- 1 ¼ cups vegetable broth or water for enhanced flavor depth
- 1 tablespoon olive oil or avocado oil for richness
- ½ teaspoon sea salt, preferably fine-grained for even distribution
- 1 bay leaf (optional) for aromatic complexity
- 2 cloves garlic, minced for savory undertones
- 1 small yellow onion, finely diced for sweet foundation
Equipment Needed
- 6-quart or larger Instant Pot or electric pressure cooker
- Fine-mesh strainer for thorough quinoa rinsing
- Wooden spoon or silicone spatula for gentle stirring
- Measuring cups and spoons for precision
- Cutting board and chef’s knife for vegetable preparation
Instructions
Rinse and Prepare the Quinoa
Begin by placing your quinoa in a fine-mesh strainer and rinsing thoroughly under cool running water for at least 90 seconds, using your fingers to gently agitate the grains. This crucial step removes the natural saponin coating that can impart bitter notes, much like traditional Bolivian cooks would wash quinoa in mountain streams. Continue rinsing until the water runs completely clear, watching the cloudy water transform to transparency. As you rinse, consider how this simple act connects you to generations of South American cooks who understood the importance of proper grain preparation. The quinoa should feel slightly slick between your fingers initially but become more textured as the saponins wash away. Tip: For extra flavor absorption, you can toast the rinsed quinoa in the Instant Pot for 2-3 minutes before adding liquid, which enhances its natural nuttiness.
Sauté Aromatics for Flavor Foundation
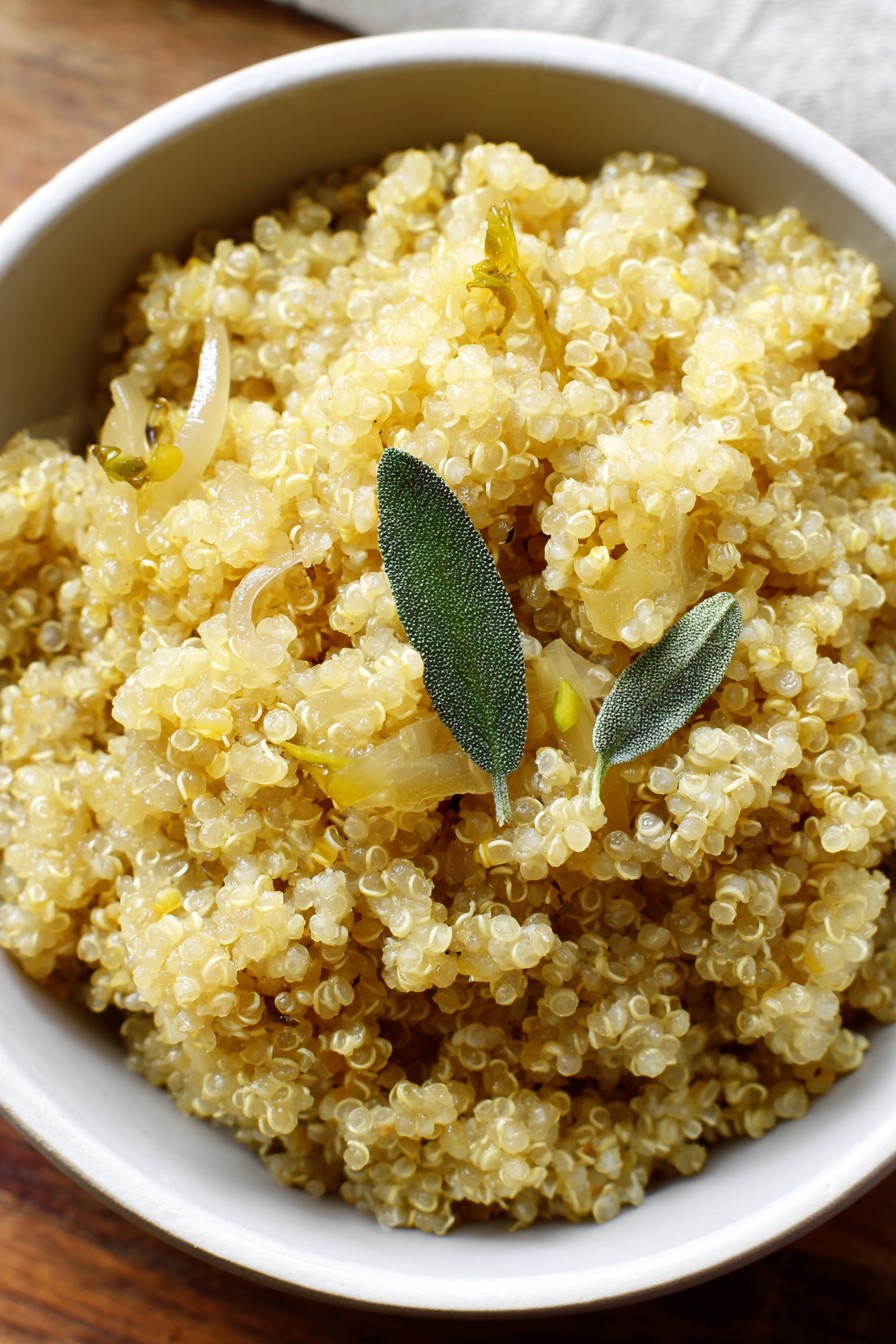
Select the “Sauté” function on your Instant Pot and allow it to heat for approximately 2 minutes until the display reads “Hot.” Add the olive oil, then introduce the finely diced onion, cooking while stirring frequently for 3-4 minutes until the pieces become translucent and release their sweet aroma. Add the minced garlic and continue sautéing for another 60 seconds until fragrant but not browned, creating a flavor base that would make any Mediterranean grandmother proud. The transformation of raw alliums into sweet, aromatic foundations mirrors techniques found across global cuisines, from French mirepoix to Spanish sofrito. Watch for the moment when the onions turn from opaque white to glassy transparency, signaling they’ve released their moisture and begun caramelizing slightly. The kitchen should fill with the comforting scent of cooking aromatics, a universal sign of good food in preparation across cultures.
Combine Ingredients and Secure Lid
Add the thoroughly rinsed quinoa to the Instant Pot along with the vegetable broth, sea salt, and optional bay leaf, using a wooden spoon to gently combine all elements. The quinoa will settle into the liquid, creating a uniform layer that ensures even cooking pressure distribution. Take a moment to appreciate how this simple grain, once sacred to the Inca civilization, now combines with global flavor elements in your modern kitchen appliance. Carefully run your spatula across the bottom to ensure no grains are stuck to the heating element, as this could trigger the burn notice. Secure the lid by aligning the arrows and turning until you hear a distinct click, then move the steam release valve to the “Sealing” position. This sealing process creates the pressurized environment that will cook your quinoa to perfection.
Pressure Cook with Precision Timing
Select the “Manual” or “Pressure Cook” function and set the timer for precisely 1 minute at high pressure. The Instant Pot will take approximately 8-10 minutes to come to pressure, during which time you’ll hear the internal mechanisms working to create the perfect cooking environment. As the pot heats, imagine the high-altitude conditions of the Andes where quinoa naturally thrives, now replicated through modern technology. Once the timer begins counting down, the actual pressure cooking occurs quickly—this brief but intense cooking period preserves the grain’s structural integrity while ensuring thorough hydration. The digital display will show the remaining time, and you may hear gentle hissing as pressure builds, a sound that signals the transformation happening within. Tip: Resist the temptation to open the lid during cooking, as releasing pressure prematurely can result in uneven texture.
Natural Pressure Release and Fluff
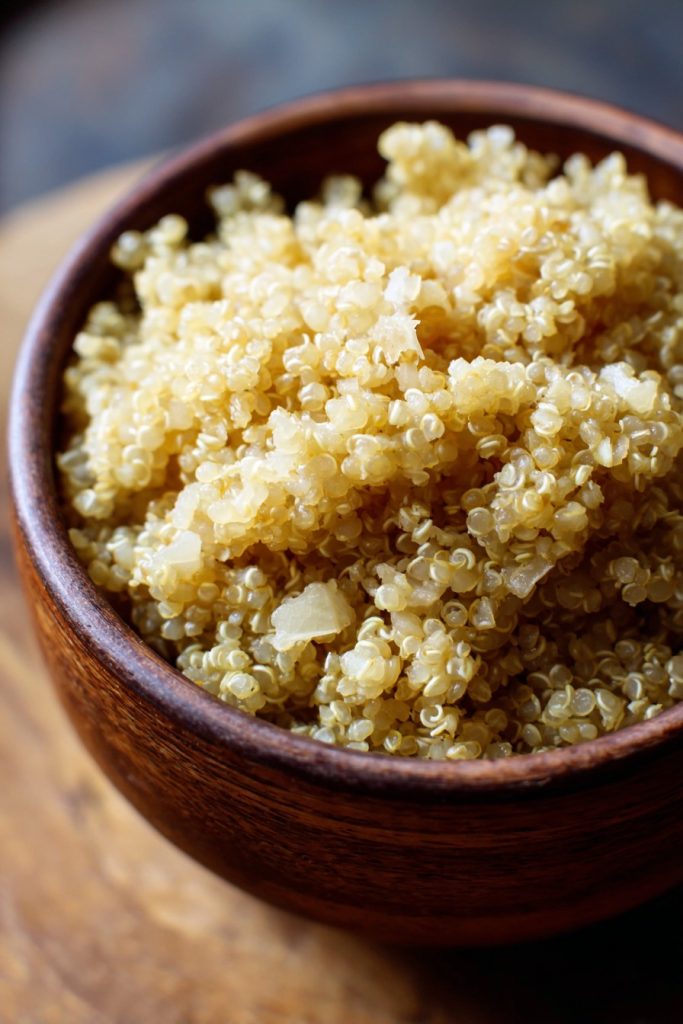
When the cooking cycle completes, allow the Instant Pot to naturally release pressure for 10 minutes—this gradual pressure decrease is essential for perfect quinoa texture. Watch the float valve slowly descend as internal pressure equalizes, a process that continues cooking the grains gently without additional heat. After 10 minutes, carefully move the steam release valve to “Venting” to release any remaining pressure, standing back from the steam plume that emerges with a satisfying hiss. Remove the lid away from your face to avoid the hot steam, revealing perfectly cooked quinoa that should appear plump with visible germ rings separating from each grain. Use a fork to fluff the quinoa gently, lifting from the bottom to incorporate air and separate any clumps, creating light, fluffy grains ready for your culinary creations. Tip: For even fluffier results, let the quinoa rest for 5 minutes after fluffing before serving.
Tips and Tricks
Mastering quinoa in the Instant Pot involves understanding the subtle nuances that elevate this ancient grain from simple side dish to culinary centerpiece. First, consider your liquid selection carefully—while water works perfectly fine, using vegetable broth adds depth that complements quinoa’s natural earthiness, much like the rich stocks used in European grain preparations. For those seeking authentic Andean flavor profiles, try using a light chicken broth with a pinch of aji amarillo powder, mirroring traditional Peruvian seasonings. The rinsing process cannot be overstated; insufficient rinsing leaves bitter saponins that can overpower delicate dishes, so continue until the water runs absolutely clear, which typically takes 2-3 minutes of vigorous rinsing under cold water.
Texture preferences vary across global cuisines—if you prefer your quinoa with more distinct separation between grains (similar to Middle Eastern rice preparations), reduce the liquid by 2 tablespoons and add 1 teaspoon of olive oil to the cooking liquid. For creamier quinoa that mimics Italian risotto, increase liquid by ¼ cup and stir in 2 tablespoons of grated Parmesan after cooking. The natural release period is non-negotiable for perfect texture—releasing pressure immediately creates explosive steam that can make grains burst, resulting in mushy consistency. If you’re short on time, compromise with a 5-minute natural release followed by quick release, though the texture will be slightly less perfect. Storage is another consideration—cooked quinoa keeps beautifully in airtight containers for up to 5 days in the refrigerator, and freezes exceptionally well for up to 3 months when spread in a thin layer on a baking sheet before bagging to prevent clumping.
For meal prep enthusiasts, consider cooking double or triple batches on Sunday—quinoa’s versatility means it can transform throughout the week from breakfast porridge to lunch bowls to dinner pilafs. When reheating, add a tablespoon of liquid per cup of quinoa and warm gently over low heat or in the microwave covered with a damp paper towel to restore moisture without making it soggy. For exceptional flavor development, try the pilaf method where you toast the rinsed quinoa in oil with spices before adding liquid, a technique borrowed from Indian and Middle Eastern rice traditions that deepens the nutty characteristics. Finally, don’t discard the bay leaf—its subtle herbal notes continue to infuse the quinoa as it rests, so remove it only just before serving to maximize flavor extraction.
Recipe Variations
- Mediterranean Herb Quinoa: Transport your taste buds to the sun-drenched coasts of Greece and Italy by adding 2 teaspoons of dried oregano, 1 teaspoon of thyme, and ½ teaspoon of rosemary to the cooking liquid. After cooking, stir in ¼ cup chopped Kalamata olives, 2 tablespoons of lemon juice, and ⅓ cup crumbled feta cheese. The briny olives and tangy cheese create a flavor profile that pairs beautifully with grilled vegetables or seafood, reminiscent of Aegean island cuisine where ancient grains meet maritime influences.
- Asian-Inspired Coconut Quinoa: Replace the vegetable broth with light coconut milk and add 1 tablespoon of finely minced ginger and 1 teaspoon of lemongrass paste to the cooking liquid. After pressure release, fold in 2 tablespoons of chopped cilantro and ¼ cup of toasted coconut flakes. This variation echoes the fragrant rice preparations found throughout Southeast Asia, where coconut and aromatic herbs transform simple grains into complex side dishes that complement curries and stir-fries with their subtle sweetness and floral notes.
- Mexican-Spiced Quinoa: Infuse your quinoa with the vibrant flavors of Oaxaca by adding 1 teaspoon of cumin, ½ teaspoon of chili powder, and ¼ teaspoon of smoked paprika to the cooking liquid. After fluffing, mix in ⅓ cup of cooked black beans, 2 tablespoons of chopped fresh cilantro, and a squeeze of lime juice. This preparation mirrors the grain bowls found in Mexican mercados, where quinoa stands in for rice in nutrient-dense bowls topped with salsas, avocados, and fresh vegetables for a complete meal that honors Mesoamerican culinary traditions.
- Middle Eastern Jeweled Quinoa: Create a stunning side dish inspired by Persian jewelled rice by adding ¼ teaspoon of saffron threads soaked in 2 tablespoons of warm water to the cooking liquid. After cooking, toss with 2 tablespoons of dried barberries or cranberries, 2 tablespoons of toasted slivered almonds, and 1 tablespoon of orange zest. The golden hue from saffron and glittering dried fruits make this variation perfect for special occasions, capturing the opulence of Middle Eastern grain dishes where rice and other grains become canvases for elaborate flavor and texture combinations.
Frequently Asked Questions
Can I use different types of quinoa in the Instant Pot?
Absolutely! While white quinoa is most common, red and black quinoa work beautifully in the Instant Pot with minor adjustments. Red quinoa maintains a slightly firmer texture and earthier flavor profile reminiscent of ancient Andean preparations—increase cooking time to 2 minutes with the same liquid ratio. Black quinoa, prized for its dramatic color and robust texture, benefits from 3 minutes of pressure cooking to achieve perfect tenderness while retaining its striking visual appeal. Tri-color quinoa blends create visually stunning dishes where each variety contributes slightly different textural elements, much like the diverse grain mixtures found in global markets from Peru to health food stores worldwide. The key is adjusting cooking times slightly while maintaining the fundamental water-to-grain ratios that ensure proper hydration during the pressure cooking process.
Why does my quinoa sometimes come out mushy or watery?
Mushy quinoa typically results from either too much liquid, insufficient rinsing, or rushed pressure release. The perfect quinoa-to-liquid ratio is 1:1.25, but this can vary slightly based on altitude, quinoa age, and desired texture—older quinoa may require an extra tablespoon of liquid. Inadequate rinsing leaves saponins that can create a soapy, mushy texture despite correct cooking times. Most importantly, the natural release period is crucial—releasing pressure immediately causes rapid boiling that bursts the grains’ outer shells. If you consistently get mushy results, try reducing liquid by 2 tablespoons and ensuring a full 10-minute natural release, techniques refined through testing that honor the grain’s delicate structure while leveraging modern pressure cooking technology.
How do I prevent the Instant Pot burn notice when cooking quinoa?
The burn notice typically activates when food particles stick to the bottom, often from insufficient liquid or inadequate deglazing after sautéing. To prevent this, always deglaze thoroughly after sautéing aromatics by adding a small amount of cooking liquid and scraping the bottom with a wooden spoon until no bits remain. Ensure your quinoa is thoroughly rinsed, as residual saponins can create sticky situations during cooking. Some Instant Pot models have hotter heating elements—if you frequently encounter burn notices, try adding ¼ cup extra liquid and placing the quinoa in an oven-safe bowl on a trivet with 1 cup water in the main pot for pot-in-pot cooking, a technique borrowed from Indian pressure cooking traditions that prevents direct contact with the heating surface.
Can I double or triple this recipe in my Instant Pot?
Yes, quinoa scales beautifully in the Instant Pot while maintaining the same 1-minute pressure cooking time—the pot simply takes longer to come to pressure with larger volumes. For doubled recipes, use 2 cups quinoa to 2½ cups liquid in a 6-quart Instant Pot, which is the maximum recommended without risking clogged steam release valves. When tripling, ensure your Instant Pot is at least 8 quarts to accommodate the expansion during cooking. The natural release time remains 10 minutes regardless of quantity, allowing the grains to settle properly. This scalability makes the Instant Pot perfect for meal prepping or family gatherings, much like the large clay pots used in traditional Andean communities to cook quinoa for communal meals celebrating harvests and special occasions.
Summary
This Instant Pot quinoa recipe transforms an ancient Andean superfood into a modern kitchen staple through pressure cooking magic. With perfect texture, global flavor adaptability, and meal prep convenience, it honors quinoa’s heritage while embracing contemporary cooking technology for consistently excellent results.
Instant Pot Quinoa
4
servings5
minutes15
minutesIngredients
Instructions
- 1 Rinse quinoa in fine-mesh strainer until water runs clear
- 2 Select Sauté function on Instant Pot, heat oil, and cook onion 3-4 minutes until translucent
- 3 Add garlic and cook 1 minute until fragrant
- 4 Add quinoa, broth, salt, and bay leaf, scraping bottom to deglaze
- 5 Secure lid, set to Pressure Cook for 1 minute, then natural release for 10 minutes
- 6 Release remaining pressure, remove lid, and fluff quinoa with fork before serving


