
Does your family crave delicious, home-cooked meals but struggle with hectic schedules and tight budgets? You’re not alone! We’ve gathered 30 of our favorite inexpensive, easy recipes perfect for busy weeknights. From comforting pastas to quick skillet dinners, these family-friendly dishes will save you time and money while satisfying everyone at the table. Get ready to discover your new go-to meals—let’s dive in!
Spicy Black Bean Tacos

Vividly remembering my first taco Tuesday disaster with overcooked beef and soggy shells, I’ve perfected these spicy black bean tacos that never fail to impress even my most skeptical friends. These plant-based beauties come together in under 30 minutes, making them my go-to weeknight lifesaver when hunger strikes and patience runs thin. Honestly, I’ve made these so often I could probably prepare them in my sleep!
8
tacos10
minutes20
minutesIngredients
– A couple of tablespoons of olive oil
– One large yellow onion, diced
– Three cloves of garlic, minced
– Two 15-ounce cans of black beans, drained but not rinsed
– A generous splash of vegetable broth
– A couple of teaspoons of chili powder
– About a teaspoon of cumin
– A pinch of red pepper flakes
– A squeeze of lime juice
– Eight small corn tortillas
– Your favorite toppings like avocado slices and fresh cilantro
Instructions
1. Heat olive oil in a large skillet over medium heat until it shimmers.
2. Add diced onion and cook for 5-7 minutes until translucent and slightly golden around the edges.
3. Stir in minced garlic and cook for exactly 1 minute until fragrant but not browned.
4. Add black beans, vegetable broth, chili powder, cumin, and red pepper flakes to the skillet.
5. Mash about half the beans with a potato masher or fork to create a creamy texture while leaving some whole beans for variety.
6. Simmer the bean mixture for 8-10 minutes, stirring occasionally, until the liquid has reduced and the mixture thickens.
7. Squeeze fresh lime juice over the beans and stir to combine.
8. Meanwhile, warm corn tortillas in a dry skillet over medium heat for 30-45 seconds per side until pliable and lightly toasted.
9. Fill each warm tortilla with about 1/4 cup of the spicy black bean mixture.
10. Top with avocado slices and fresh cilantro before serving immediately.
Outrageously satisfying, these tacos deliver a perfect balance of creamy mashed beans against the slight chew of whole beans, all wrapped in warm, toasty tortillas. The subtle heat builds gradually while the fresh lime cuts through the richness beautifully. I love serving these with extra lime wedges for squeezing and sometimes adding pickled red onions for an extra tangy crunch that takes them to another level entirely.
Creamy Tomato Pasta

Sometimes you just need a bowl of pasta that feels like a warm hug, and this creamy tomato version is my go-to comfort food on busy weeknights. I actually developed this recipe after a particularly rough day when all I had in the pantry were basic ingredients, and now it’s become my family’s most-requested meal.
4
servings10
minutes22
minutesIngredients
– A couple of tablespoons of olive oil
– 3 cloves of garlic, minced
– One 28-ounce can of crushed tomatoes
– A generous splash of heavy cream (about ½ cup)
– A pound of your favorite pasta
– A good pinch of salt and black pepper
– A handful of fresh basil leaves
– A sprinkle of grated Parmesan cheese
Instructions
1. Heat 2 tablespoons of olive oil in a large skillet over medium heat for about 1 minute until it shimmers.
2. Add 3 minced garlic cloves and cook for exactly 1 minute, stirring constantly until fragrant but not browned.
3. Pour in the entire 28-ounce can of crushed tomatoes and bring to a gentle bubble.
4. Reduce heat to low and let the sauce simmer uncovered for 15 minutes, stirring occasionally.
5. While the sauce simmers, bring a large pot of salted water to a rolling boil.
6. Add 1 pound of pasta to the boiling water and cook according to package directions until al dente.
7. Tip: Reserve ½ cup of pasta water before draining – the starchy water helps create the perfect creamy texture.
8. Slowly stir ½ cup of heavy cream into the tomato sauce until fully incorporated.
9. Season the sauce with 1 teaspoon of salt and ½ teaspoon of black pepper.
10. Tip: Always taste and adjust seasoning after adding cream since it mellows the flavors.
11. Add the drained pasta directly to the sauce in the skillet.
12. Toss the pasta with the sauce, adding splashes of reserved pasta water until the sauce coats every strand.
13. Chop a handful of fresh basil leaves and stir most of them into the pasta.
14. Tip: Save a few basil leaves for garnish – the fresh aroma really elevates the finished dish.
15. Divide the pasta among bowls and top with grated Parmesan cheese and remaining basil.
Getting that first bite is pure bliss – the sauce clings beautifully to the pasta with just the right creaminess without being heavy. I love how the fresh basil cuts through the richness, and sometimes I’ll add a sprinkle of red pepper flakes for those who like a little heat. This pasta also makes amazing leftovers – just add a splash of water when reheating to bring back that silky texture.
Veggie Stir-Fry with Ramen

Busy weeknights call for quick, satisfying meals that don’t skimp on flavor, and this veggie stir-fry with ramen has become my go-to rescue recipe. I first threw it together during a pantry clean-out frenzy, and now it’s in our regular rotation—perfect for those evenings when even takeout feels like too much effort.
2
servings5
minutes9
minutesIngredients
– 2 packages of instant ramen noodles (toss those seasoning packets!)
– A good glug of vegetable oil (about 2 tablespoons)
– 2 cloves of garlic, minced nice and fine
– A thumb-sized piece of ginger, grated
– A big handful of broccoli florets
– 1 bell pepper, sliced into thin strips
– A couple of carrots, cut into matchsticks
– A splash of soy sauce (about 3 tablespoons)
– A drizzle of sesame oil (roughly 1 teaspoon)
– A sprinkle of red pepper flakes for heat
Instructions
1. Bring a medium pot of water to a rolling boil over high heat.
2. Add both ramen noodle blocks to the boiling water and cook for exactly 2 minutes until just tender.
3. Drain the noodles immediately in a colander and rinse with cold water to stop the cooking process.
4. Heat vegetable oil in a large wok or skillet over medium-high heat until it shimmers.
5. Add minced garlic and grated ginger, stirring constantly for 30 seconds until fragrant but not browned.
6. Toss in broccoli florets and stir-fry for 2 minutes until they turn bright green.
7. Add bell pepper strips and carrot matchsticks, continuing to stir-fry for another 3 minutes until vegetables are crisp-tender.
8. Pour in soy sauce and drizzle sesame oil over the vegetable mixture.
9. Add the cooked ramen noodles to the skillet, tossing everything together until well combined.
10. Sprinkle with red pepper flakes and cook for 1 final minute, stirring constantly to distribute flavors evenly.
Just toss everything in one big bowl and watch how the noodles soak up that savory sauce while keeping their springy texture. The crisp-tender vegetables provide the perfect crunch against the soft noodles, and that hint of sesame oil makes it taste way fancier than its 15-minute prep time suggests.
Honey Garlic Chicken Thighs

Now, I have to tell you about these honey garlic chicken thighs that have become my absolute go-to weeknight dinner. Nothing beats coming home after a long day and knowing this flavorful, sticky-sweet dish will be on the table in under 30 minutes. My family actually cheers when they smell these sizzling in the kitchen!
3
portions10
minutes32
minutesIngredients
– About 2 pounds of bone-in, skin-on chicken thighs (trust me, the skin gets so crispy!)
– 3 tablespoons of olive oil
– A good 1/4 cup of honey
– 4 cloves of garlic, minced up nice and fine
– 2 tablespoons of soy sauce
– A splash of rice vinegar (about 1 tablespoon)
– A pinch of red pepper flakes for just a little kick
– Salt and freshly ground black pepper to season
Instructions
1. Preheat your oven to 400°F and pat your chicken thighs completely dry with paper towels – this is my secret for getting that perfect crispy skin.
2. Season both sides of the chicken generously with salt and pepper.
3. Heat the olive oil in a large oven-safe skillet over medium-high heat until it shimmers.
4. Place the chicken thighs skin-side down in the hot skillet and cook without moving them for 6-8 minutes until the skin is golden brown and crispy.
5. Flip the chicken thighs and cook for another 3 minutes on the other side.
6. While the chicken cooks, whisk together the honey, minced garlic, soy sauce, rice vinegar, and red pepper flakes in a small bowl.
7. Remove the skillet from heat and pour the honey garlic sauce over the chicken, making sure each piece gets coated.
8. Transfer the skillet to the preheated oven and bake for 15-18 minutes until the chicken reaches 165°F internally.
9. Baste the chicken with the pan sauce halfway through baking – this builds up that beautiful glaze.
10. Remove from oven and let the chicken rest in the skillet for 5 minutes before serving to allow the juices to redistribute.
The chicken comes out with this incredible contrast of crispy, caramelized skin and tender, juicy meat underneath. That honey garlic sauce reduces into the most amazing sticky glaze that’s sweet with just the right amount of savory garlic punch. I love serving these over fluffy rice to soak up every last drop of that delicious sauce, and they’re even fantastic cold the next day!
Hearty Lentil Soup

Kind of like that favorite worn-out sweater you reach for when the weather turns crisp, this hearty lentil soup has become my go-to comfort food during chilly autumn evenings. I first discovered this recipe when my neighbor brought over a steaming pot after we’d both been raking leaves all afternoon—it was love at first spoonful!
2
servings15
minutes54
minutesIngredients
– 1 tablespoon of olive oil
– 1 medium onion, chopped
– 2 carrots, diced
– 2 celery stalks, sliced
– 3 cloves of garlic, minced
– 1 cup of brown lentils
– 6 cups of vegetable broth
– 1 can (14.5 oz) of diced tomatoes
– A couple of bay leaves
– A generous pinch of salt
– A few cracks of black pepper
– A splash of red wine vinegar
– A handful of fresh parsley, chopped
Instructions
1. Heat 1 tablespoon of olive oil in a large pot over medium heat until it shimmers. 2. Add the chopped onion, diced carrots, and sliced celery, cooking for about 8 minutes until the vegetables soften and the onion turns translucent. 3. Stir in the minced garlic and cook for 1 minute until fragrant—be careful not to burn it! 4. Pour in 1 cup of brown lentils and 6 cups of vegetable broth, scraping any browned bits from the bottom of the pot for extra flavor. 5. Add the can of diced tomatoes (with their juices) and the bay leaves. 6. Bring the soup to a boil, then reduce the heat to low and simmer uncovered for 45 minutes until the lentils are tender but not mushy. 7. Stir in a generous pinch of salt and a few cracks of black pepper about halfway through cooking—this helps the lentils absorb seasoning better. 8. Remove the bay leaves and stir in a splash of red wine vinegar just before serving to brighten all the flavors. 9. Ladle the soup into bowls and top with a handful of fresh chopped parsley. Gorgeously thick with tender lentils and vegetables, this soup develops an almost creamy texture without any dairy. The subtle acidity from the vinegar cuts through the richness perfectly, making it even better the next day when the flavors have melded together. I love serving it with crusty bread for dipping or topping it with a dollop of Greek yogurt for extra creaminess.
Quick and Easy Fried Rice

Usually, I’m all about elaborate weekend cooking projects, but let’s be real—most weeknights call for something fast, satisfying, and made with whatever’s hanging out in the fridge. That’s why this quick and easy fried rice has become my go-to lifesaver; it’s the kind of no-fuss meal that feels like a cozy hug after a long day.
4
servings5
minutes10
minutesIngredients
- 2 cups of leftover cooked rice, cold from the fridge
- 2 large eggs, whisked up in a little bowl
- 1 cup of frozen peas and carrots, because who has time to chop?
- 2 tablespoons of vegetable oil, divided
- 2 cloves of garlic, minced (or a generous spoonful from a jar)
- 3 tablespoons of soy sauce, plus an extra splash if you’re feeling it
- 1 teaspoon of sesame oil for that nutty finish
- A couple of green onions, sliced thin for garnish
Instructions
- Heat 1 tablespoon of vegetable oil in a large skillet or wok over medium-high heat until it shimmers, about 1 minute.
- Pour in the whisked eggs and scramble them by stirring constantly with a spatula for 1–2 minutes until they’re just set but still soft.
- Transfer the eggs to a clean plate immediately to prevent overcooking—this keeps them tender.
- Add the remaining 1 tablespoon of vegetable oil to the same skillet and let it heat for 30 seconds.
- Toss in the minced garlic and stir for 30 seconds until fragrant but not browned to avoid bitterness.
- Add the frozen peas and carrots and cook for 2–3 minutes, stirring occasionally, until they’re thawed and slightly tender.
- Tip in the cold cooked rice, breaking up any clumps with your spatula, and stir-fry for 3–4 minutes until the rice is heated through and lightly toasted.
- Drizzle the soy sauce and sesame oil over the rice, mixing thoroughly to coat every grain evenly.
- Fold the scrambled eggs back into the skillet along with the sliced green onions, and stir for 1 minute to combine and warm everything through.
This fried rice turns out delightfully fluffy with bits of tender egg and crisp veggies, all wrapped in that savory, umami-rich sauce. Try serving it straight from the skillet with a sprinkle of extra green onions or a fried egg on top for a simple, comforting dinner that never disappoints.
Savory Vegetable Omelette

Zesty mornings call for something special, and this savory vegetable omelette has become my go-to weekend breakfast after discovering how perfectly it uses up all those leftover veggies from Friday night’s pizza-making session. There’s something so satisfying about transforming random fridge contents into a beautiful, fluffy masterpiece.
1
servings5
minutes8
minutesIngredients
– 3 large eggs
– A splash of whole milk (about 2 tablespoons)
– A generous pinch of salt and a few cracks of black pepper
– A knob of butter (about 1 tablespoon)
– A handful of chopped bell peppers (roughly 1/4 cup)
– A couple of tablespoons of diced onion
– A small handful of chopped mushrooms (about 1/4 cup)
– A sprinkle of shredded cheddar cheese (about 1/4 cup)
Instructions
1. Crack 3 large eggs into a medium bowl and add a splash of whole milk.
2. Whisk the eggs and milk vigorously for about 30 seconds until the mixture becomes pale yellow and slightly frothy.
3. Heat a non-stick skillet over medium heat (around 325°F) and melt a knob of butter until it stops foaming.
4. Add chopped bell peppers, diced onion, and chopped mushrooms to the skillet.
5. Sauté the vegetables for 3-4 minutes until they soften and the onions become translucent.
6. Pour the egg mixture evenly over the vegetables in the skillet.
7. Let the eggs cook undisturbed for 1 minute until the edges begin to set.
8. Use a spatula to gently lift the edges and tilt the pan to let uncooked egg flow underneath.
9. Sprinkle shredded cheddar cheese evenly over one half of the omelette.
10. Continue cooking for another 1-2 minutes until the top is mostly set but still slightly wet.
11. Carefully fold the empty half of the omelette over the cheese-covered half using your spatula.
12. Cook for 30 more seconds to melt the cheese completely.
13. Slide the finished omelette onto a plate.
Perfectly fluffy with little bursts of vegetable crunch, this omelette delivers that wonderful contrast between the creamy melted cheese and the savory egg base. I love serving it with a side of crispy hash browns or wrapping it in a warm tortilla for a breakfast burrito twist—either way, those colorful veggie specks make every bite Instagram-worthy!
Simple Chickpea Salad
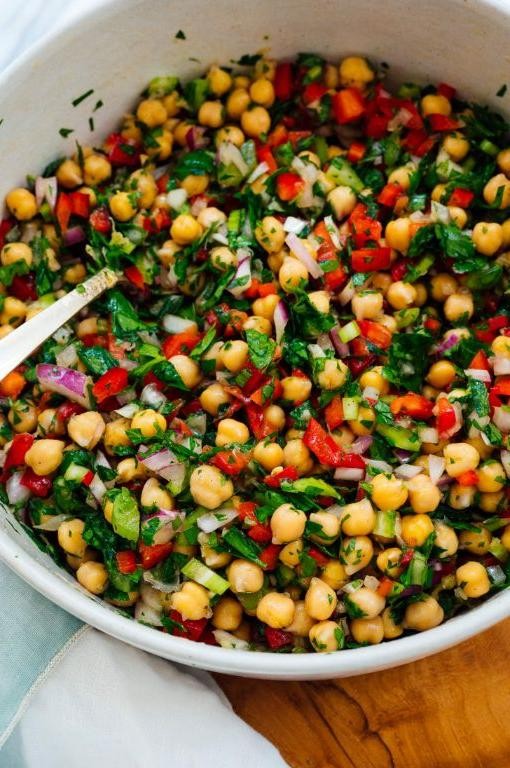
Crafting this simple chickpea salad has become my go-to lunch solution when I’m short on time but craving something fresh and satisfying. I first threw it together during a busy work-from-home week when my fridge was looking sparse, and now it’s in my regular rotation—perfect for meal prep or last-minute gatherings.
2
servings15
minutesIngredients
– 2 cans of chickpeas, rinsed and drained
– 1 medium cucumber, diced into bite-sized pieces
– 1 pint of cherry tomatoes, halved
– 1/4 cup of red onion, finely chopped
– A big handful of fresh parsley, roughly chopped
– 3 tablespoons of extra virgin olive oil
– 2 tablespoons of fresh lemon juice
– A generous pinch of salt and black pepper
Instructions
1. Rinse and drain both cans of chickpeas thoroughly in a colander to remove excess sodium from the canning liquid.
2. Dice the cucumber into 1/2-inch pieces and place them in a large mixing bowl.
3. Cut each cherry tomato in half and add them to the bowl with the cucumber.
4. Finely chop 1/4 cup of red onion—tip: if raw onion is too sharp for you, soak the chopped pieces in cold water for 5 minutes before adding to mellow the flavor.
5. Roughly chop a big handful of fresh parsley and add it to the bowl along with the chickpeas.
6. Pour 3 tablespoons of extra virgin olive oil over the salad ingredients.
7. Squeeze 2 tablespoons of fresh lemon juice directly into the bowl—tip: roll the lemon on the counter firmly before cutting to maximize juice yield.
8. Season with a generous pinch of salt and black pepper.
9. Gently toss everything together until all ingredients are evenly coated with the dressing—tip: use a folding motion with a large spoon to keep the chickpeas from getting mashed.
10. Let the salad sit at room temperature for 10 minutes before serving to allow the flavors to meld.
Refreshingly crisp and bursting with bright lemon flavor, this salad holds up beautifully in the fridge for days. I love serving it over toasted sourdough for an open-faced sandwich, or stuffing it into pita pockets with a dollop of hummus for extra creaminess.
One-Pot Cheesy Broccoli Rice

Remember those busy weeknights when you just want something comforting and easy? I created this One-Pot Cheesy Broccoli Rice during one of those chaotic evenings when my kids had back-to-back activities, and it’s become our family’s go-to comfort meal that comes together in minutes with minimal cleanup.
2
servings10
minutes26
minutesIngredients
– 1 tablespoon of olive oil
– 1 small yellow onion, chopped
– 2 cloves of garlic, minced
– 1 cup of long-grain white rice
– 2 cups of chicken broth
– A big pinch of salt and black pepper
– 3 cups of fresh broccoli florets
– 1 cup of shredded cheddar cheese
– A splash of milk (about ¼ cup)
– A couple of tablespoons of grated Parmesan cheese
Instructions
1. Heat 1 tablespoon of olive oil in a large pot over medium heat for 2 minutes until shimmering.
2. Add 1 chopped small yellow onion and cook for 4-5 minutes, stirring occasionally, until translucent and fragrant.
3. Stir in 2 minced garlic cloves and cook for exactly 1 minute until golden but not browned.
4. Add 1 cup of long-grain white rice and toast for 2 minutes, stirring constantly, until the grains turn slightly opaque around the edges.
5. Pour in 2 cups of chicken broth and add a big pinch of salt and black pepper, then bring to a rolling boil.
6. Reduce heat to low, cover the pot tightly, and simmer for 15 minutes without peeking to ensure perfect steam absorption.
7. Uncover and quickly arrange 3 cups of fresh broccoli florets evenly over the rice, then re-cover and cook for 5 more minutes until broccoli is bright green and tender-crisp.
8. Remove from heat and let stand covered for 3 minutes to finish steaming the broccoli through residual heat.
9. Stir in 1 cup of shredded cheddar cheese and a splash of milk (about ¼ cup) until the cheese melts completely into a creamy sauce.
10. Sprinkle a couple of tablespoons of grated Parmesan cheese over the top and serve immediately. During our last-minute dinner scramble, I discovered this dish develops the most incredible creamy texture as the rice absorbs both the broth and melted cheese. The sharp cheddar pairs beautifully with the tender broccoli, making it perfect for stuffing into bell peppers or serving alongside grilled chicken for a heartier meal.
Easy Spinach and Feta Quesadillas

Haven’t we all had those nights where we stare into the fridge hoping dinner will magically appear? I had one last Tuesday, which is how these spinach and feta quesadillas were born—they’re now my go-to when I want something satisfying without the fuss.
2
quesadillas10
minutes18
minutesIngredients
– 4 large flour tortillas
– A couple of big handfuls of fresh spinach
– About a cup of crumbled feta cheese
– A splash of olive oil
– Half a red onion, thinly sliced
– A pinch of garlic powder
– A sprinkle of dried oregano
Instructions
1. Heat a large skillet over medium heat and add a splash of olive oil.
2. Sauté the thinly sliced red onion for about 4-5 minutes, until it turns soft and slightly golden.
3. Add the fresh spinach and cook for 2-3 minutes, stirring until it wilts completely.
4. Transfer the spinach and onion mixture to a bowl and stir in the crumbled feta, garlic powder, and dried oregano.
5. Wipe the skillet clean and return it to medium heat.
6. Place one tortilla in the skillet and spread half of the filling evenly over one side.
7. Fold the tortilla in half and cook for 2-3 minutes per side, until golden brown and crispy.
8. Repeat with the remaining tortillas and filling.
9. Let each quesadilla rest for 1 minute before slicing to prevent the filling from oozing out.
10. Slice into wedges and serve immediately. My family loves these with a dollop of Greek yogurt or a side of tangy salsa for dipping—the creamy feta and crisp tortilla make every bite irresistible.
Budget-Friendly Beef Chili

Oh my goodness, is there anything more comforting than a big pot of chili simmering on the stove? I first made this budget-friendly version during a particularly tight grocery week, and it’s been a staple in our house ever since. It’s the kind of meal that makes you feel like a kitchen wizard, turning simple ingredients into something truly magical.
Ingredients
– A couple of pounds of ground beef
– One large yellow onion, chopped
– A few cloves of garlic, minced
– Two 15-ounce cans of kidney beans, drained and rinsed
– One 28-ounce can of crushed tomatoes
– A couple of tablespoons of chili powder
– A splash of olive oil
– A good pinch of salt
Instructions
1. Heat a splash of olive oil in a large pot over medium-high heat until it shimmers.
2. Add your chopped onion and cook for about 5 minutes, stirring occasionally, until it becomes translucent and fragrant.
3. Add the minced garlic and cook for just 1 minute more, until you can smell that wonderful garlic aroma—be careful not to burn it!
4. Crumble in the ground beef and cook for 8-10 minutes, breaking it up with a spoon, until it’s fully browned and no pink remains.
5. Sprinkle in the chili powder and a good pinch of salt, stirring to coat everything evenly and toast the spices for about 30 seconds.
6. Pour in the crushed tomatoes and add the drained kidney beans, stirring to combine everything thoroughly.
7. Bring the chili to a boil, then immediately reduce the heat to low and let it simmer uncovered for 45 minutes, stirring occasionally to prevent sticking.
8. After 45 minutes, check the consistency—if it’s too thin for your liking, let it simmer for another 10-15 minutes until it thickens to your preferred texture.
My favorite thing about this chili is how the beans become perfectly tender while the beef stays wonderfully hearty. The flavors meld together into this rich, slightly smoky masterpiece that’s even better the next day. Sometimes I’ll serve it over baked potatoes or with a big handful of tortilla chips for dipping—it’s incredibly versatile!
Zesty Lemon Herb Roast Chicken

Zesty lemon herb roast chicken has become my go-to Sunday dinner—it fills the house with the most incredible aroma and never fails to impress, even on those chaotic weeknights when I need something both comforting and effortlessly elegant. I first perfected this recipe after my lemon tree went wild one summer, and now it’s the dish friends request most often.
Ingredients
– One whole chicken (about 4 pounds)
– A couple of lemons
– A big handful of fresh rosemary
– A big handful of fresh thyme
– 4 cloves of garlic
– 3 tablespoons of olive oil
– A generous sprinkle of kosher salt
– A good crack of black pepper
Instructions
1. Preheat your oven to 425°F.
2. Pat the chicken completely dry with paper towels—this helps the skin get extra crispy.
3. Rub the chicken all over with olive oil.
4. Season the chicken generously inside and out with kosher salt and black pepper.
5. Thinly slice one lemon and chop the rosemary and thyme.
6. Stuff the chicken cavity with the lemon slices, chopped herbs, and whole garlic cloves.
7. Cut the second lemon in half and squeeze the juice all over the chicken.
8. Place the chicken breast-side up in a roasting pan.
9. Roast for 1 hour and 15 minutes, or until the internal temperature reaches 165°F when measured at the thickest part of the thigh.
10. Let the chicken rest for 15 minutes before carving—this keeps all those delicious juices inside.
Dinner is served! The skin comes out crackling-crisp while the meat stays incredibly moist and infused with bright lemon and earthy herbs. I love shredding any leftovers into a lemony chicken salad or piling it over creamy polenta the next day.
Mushroom and Goat Cheese Flatbread

Craving something savory and satisfying but short on time? This mushroom and goat cheese flatbread has become my go-to weeknight dinner solution—it comes together faster than ordering takeout and feels infinitely more special. I first threw this together during a busy work week when my fridge was looking sparse, and now it’s in regular rotation.
2
portions10
minutes15
minutesIngredients
– 1 pre-made pizza dough (the kind from the refrigerated section works perfectly)
– A couple tablespoons of olive oil for brushing
– About 8 ounces of cremini mushrooms, sliced thin
– 2 cloves of garlic, minced
– A generous sprinkle of fresh thyme leaves
– 4 ounces of creamy goat cheese, crumbled
– A handful of arugula for topping
– A squeeze of fresh lemon juice
– A pinch of red pepper flakes for heat
Instructions
1. Preheat your oven to 425°F and place a baking sheet inside to heat up.
2. On a lightly floured surface, stretch the pizza dough into a rough 12-inch oval.
3. Carefully remove the hot baking sheet from the oven and place the stretched dough directly onto it.
4. Brush the entire surface of the dough with olive oil using a pastry brush.
5. Scatter the sliced mushrooms evenly over the dough, leaving a ½-inch border around the edges.
6. Sprinkle the minced garlic and fresh thyme leaves over the mushrooms.
7. Bake for 12-15 minutes until the crust edges are golden brown and crisp.
8. Remove from oven and immediately crumble goat cheese over the hot flatbread.
9. Top with a handful of fresh arugula.
10. Finish with a squeeze of lemon juice and a pinch of red pepper flakes.
Every bite delivers that wonderful contrast between the earthy mushrooms, tangy goat cheese, and peppery arugula. I love serving this flatbread cut into strips as an appetizer when friends come over, or keeping it whole for a simple dinner with a side salad.
Classic Spaghetti Aglio e Olio
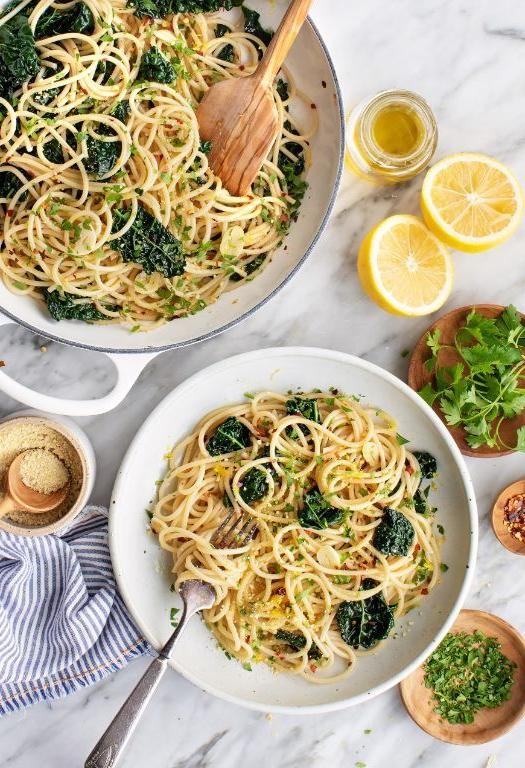
My kitchen confession: I make this simple spaghetti more than any other pasta dish in my repertoire. Maybe it’s the way the garlic sizzles in the olive oil, or how it comes together in less time than it takes to boil water, but this is my ultimate comfort food after a long day.
2
servings10
minutes13
minutesIngredients
– 8 ounces of spaghetti (about half a standard box)
– A generous 1/4 cup of good olive oil
– 4-5 fat garlic cloves, thinly sliced
– A big pinch of red pepper flakes (about 1/2 teaspoon)
– A handful of fresh parsley, roughly chopped (about 1/4 cup)
– A good squeeze of lemon juice (about 1 tablespoon)
– Salt for the pasta water
Instructions
1. Fill a large pot with water, add a big pinch of salt, and bring it to a rolling boil over high heat.
2. Add the 8 ounces of spaghetti to the boiling water and cook for 8-10 minutes until al dente (still slightly firm when bitten).
3. While the pasta cooks, heat the 1/4 cup olive oil in a large skillet over medium-low heat.
4. Add the sliced garlic cloves to the warm oil and cook for 2-3 minutes until fragrant and lightly golden (watch closely—burnt garlic turns bitter!).
5. Stir in the 1/2 teaspoon red pepper flakes and cook for 30 seconds until the oil is lightly infused.
6. Reserve 1/2 cup of the starchy pasta water before draining the spaghetti.
7. Transfer the drained spaghetti directly into the skillet with the garlic oil.
8. Add the 1/4 cup chopped parsley and 1 tablespoon lemon juice to the skillet.
9. Toss everything together, adding splashes of the reserved pasta water until the sauce clings to the spaghetti in a glossy emulsion.
10. Serve immediately in warm bowls.
Nothing beats the silky texture of spaghetti coated in that garlic-infused oil, with just enough heat from the pepper flakes to keep things interesting. Now, if you really want to take it over the top, try topping it with toasted breadcrumbs for crunch or serving it alongside a simple arugula salad—the peppery greens cut through the richness perfectly.
Crispy Baked Chicken Wings

Crispy baked chicken wings have been my game-day go-to ever since I accidentally burned the fried version back in college—trust me, baking is way more forgiving! These come out perfectly golden every single time, and the best part? No messy oil splatters all over my kitchen.
4
servings15
minutes60
minutesIngredients
– About 2 pounds of chicken wings (I usually grab a mix of drumettes and flats)
– A good glug of olive oil, maybe 2 tablespoons
– A generous sprinkle of salt, around 1 teaspoon
– A couple of big pinches of black pepper, roughly ½ teaspoon
– A heaping tablespoon of garlic powder
– A tablespoon of baking powder (my secret for extra crispiness!)
– A splash of hot sauce, like ¼ cup if you’re feeling bold
– 2 tablespoons of melted butter
Instructions
1. Preheat your oven to 400°F and line a baking sheet with parchment paper.
2. Pat the chicken wings completely dry with paper towels—this is crucial for crispiness.
3. In a large bowl, toss the wings with olive oil until they’re lightly coated.
4. Sprinkle salt, black pepper, garlic powder, and baking powder over the wings.
5. Use your hands to mix everything thoroughly, ensuring each wing is evenly seasoned.
6. Arrange the wings in a single layer on the prepared baking sheet, leaving space between them.
7. Bake for 40 minutes, then flip each wing carefully with tongs.
8. Continue baking for another 15-20 minutes until the skin is deep golden brown and crispy.
9. While the wings bake, whisk together hot sauce and melted butter in a medium bowl.
10. Immediately toss the hot baked wings in the sauce mixture until fully coated.
11. Let them rest for 5 minutes before serving—this helps the sauce cling better.
You’ll love how the exterior shatters with each bite while the inside stays wonderfully juicy. These are fantastic with celery sticks and blue cheese dressing, but I’ve been known to toss any leftovers into salads the next day for the best lunch upgrade!
Easy Tuna and Bean Salad
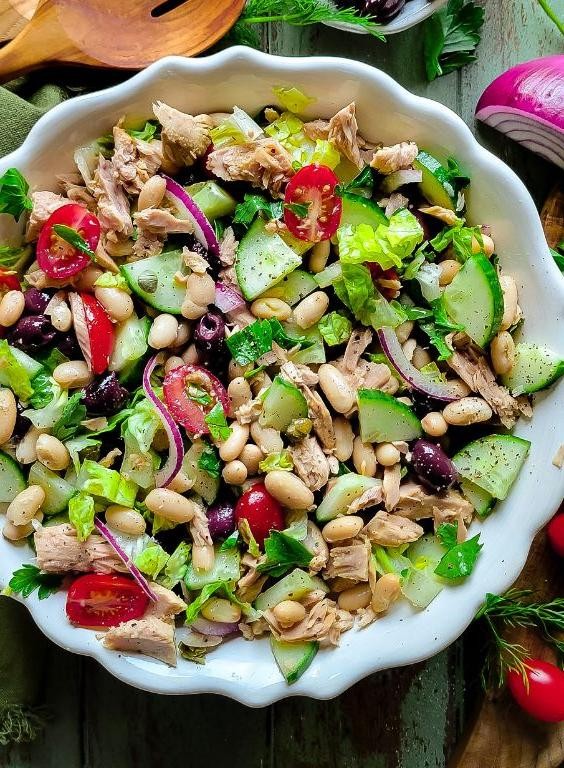
Now, I have to admit, I used to turn my nose up at canned tuna until my friend Sarah brought this exact salad to our beach picnic last summer—it completely changed my mind! Nothing beats having a protein-packed, no-cook meal ready in minutes when you’re juggling work deadlines and hungry kids begging for snacks.
Ingredients
– A couple of 5-ounce cans of solid white tuna in water, drained well
– About 1 ½ cups of canned cannellini beans, rinsed and drained
– A good handful of chopped red onion (roughly ¼ cup)
– A big handful of chopped fresh parsley (about ⅓ cup)
– A couple of tablespoons of extra virgin olive oil
– A generous squeeze of fresh lemon juice (about 2 tablespoons)
– A splash of red wine vinegar (around 1 tablespoon)
– A pinch of salt and a few cracks of black pepper
Instructions
1. Drain both cans of tuna thoroughly by pressing the lids against the fish and tilting the cans over the sink—this removes excess liquid for a less watery salad.
2. Add the drained tuna to a medium mixing bowl and flake it with a fork until no large chunks remain.
3. Rinse the cannellini beans under cold water in a colander for about 30 seconds to remove the starchy canning liquid, then shake off excess water.
4. Add the rinsed beans, chopped red onion, and fresh parsley to the bowl with the tuna.
5. Pour in the olive oil, fresh lemon juice, and red wine vinegar directly over the ingredients.
6. Season with ¼ teaspoon of salt and ⅛ teaspoon of black pepper.
7. Gently toss everything together with a large spoon until the ingredients are evenly coated, being careful not to mash the beans—this keeps the salad texture intact.
8. Let the salad sit at room temperature for 10 minutes to allow the flavors to meld together.
9. Taste and adjust seasoning with an extra pinch of salt if needed before serving.
Just look at that creamy cannellini beans mingling with the flaky tuna and zesty dressing! The texture is wonderfully balanced—soft beans, firm tuna, and crunchy onion all in one bite. I love scooping this up with toasted pita chips or stuffing it into ripe avocado halves for a quick, satisfying lunch that feels anything but ordinary.
Conclusion
Cooking delicious, budget-friendly meals doesn’t have to be complicated! We hope this collection of 30 easy recipes brings joy and convenience to your busy family table. Try a few, leave a comment telling us your favorites, and don’t forget to share this roundup on Pinterest to help other families discover these tasty ideas. Happy cooking!