
Just imagine filling your kitchen with the aromatic spices of India, but with a modern twist that saves time and calories. Our collection of 28 exquisite air fryer delicacies brings authentic flavors to your weeknight dinners, making it easier than ever to enjoy crispy samosas, tender tandoori chicken, and more. Get ready to transform your cooking routine—these recipes are about to become your new favorites!
Tandoori Chicken Wings

Yesterday’s golden afternoon light reminded me how some foods carry the warmth of distant places right into our kitchens. Tandoori chicken wings, with their vibrant spices and tender flesh, feel like a quiet conversation between cultures, a gentle invitation to slow down and savor each moment.
5
servings20
minutes45
minutesIngredients
– Chicken wings – 2 lbs
– Plain yogurt – ¾ cup
– Lemon juice – 2 tbsp
– Garlic – 4 cloves
– Ginger – 1 inch piece
– Garam masala – 1 tbsp
– Paprika – 1 tsp
– Cayenne pepper – ½ tsp
– Salt – 1 tsp
– Vegetable oil – 1 tbsp
Instructions
1. Pat 2 lbs of chicken wings completely dry with paper towels to help the marinade adhere better.
2. Mince 4 cloves of garlic and grate 1 inch of ginger into a medium bowl.
3. Add ¾ cup plain yogurt, 2 tbsp lemon juice, 1 tbsp garam masala, 1 tsp paprika, ½ tsp cayenne pepper, and 1 tsp salt to the bowl.
4. Whisk the marinade until fully combined and smooth.
5. Place the dried chicken wings in a large resealable bag and pour in the marinade.
6. Seal the bag tightly and massage the marinade evenly over all wings.
7. Refrigerate the wings for at least 4 hours, or up to overnight for deeper flavor penetration.
8. Preheat your oven to 425°F and line a baking sheet with aluminum foil.
9. Arrange the marinated wings in a single layer on the prepared baking sheet.
10. Brush the wings lightly with 1 tbsp vegetable oil to promote even browning.
11. Bake for 25 minutes at 425°F until the edges begin to crisp.
12. Flip each wing carefully using tongs and bake for another 15-20 minutes until the internal temperature reaches 165°F.
13. For extra crispness, broil the wings for 2-3 minutes at the end, watching closely to prevent burning.
14. Let the wings rest for 5 minutes before serving to allow juices to redistribute. Forgivingly tender beneath their rust-colored crust, these wings carry the gentle warmth of garam masala and the bright kiss of lemon. I love serving them scattered over a bed of cooling cucumber ribbons, their heat softened by dollops of minted yogurt, creating a quiet balance that feels like comfort itself.
Crispy Samosas

Beneath the golden afternoon light, I find myself drawn to the kitchen, where memories of distant spice markets and family gatherings seem to linger in the air. There’s something profoundly comforting about the ritual of folding dough around spiced potatoes, creating these triangular pockets of warmth that crackle with each bite. Perhaps it’s the way they bridge continents and generations in a single, flaky layer.
6
portions38
minutes15
minutesIngredients
– All-purpose flour – 2 cups
– Water – ¾ cup
– Salt – 1 tsp
– Potatoes – 2 medium, boiled
– Peas – ½ cup
– Cumin seeds – 1 tsp
– Coriander powder – 1 tbsp
– Red chili powder – 1 tsp
– Oil – 2 tbsp + for frying
Instructions
1. Combine 2 cups all-purpose flour, 1 tsp salt, and 2 tbsp oil in a large bowl.
2. Gradually add ¾ cup water while kneading for 8 minutes until the dough becomes smooth and pliable.
3. Cover the dough with a damp cloth and rest it at room temperature for 30 minutes to develop elasticity.
4. Peel and mash 2 boiled potatoes in a separate bowl until no large chunks remain.
5. Heat 1 tbsp oil in a pan over medium heat and toast 1 tsp cumin seeds for 45 seconds until fragrant.
6. Add ½ cup peas, 1 tbsp coriander powder, and 1 tsp red chili powder to the pan, stirring for 2 minutes until peas soften slightly.
7. Mix the spiced pea mixture into the mashed potatoes until evenly distributed, then cool completely to prevent soggy samosas.
8. Divide the rested dough into 6 equal portions and roll each into a 6-inch circle, dusting lightly with flour to prevent sticking.
9. Cut each circle in half to form two semicircles, then fold each into a cone shape, sealing the straight edge with water.
10. Fill each cone with 2 tbsp potato mixture, leaving ¼-inch space at the top.
11. Press the open edges together firmly with water, creating a tight seal to prevent filling leakage during frying.
12. Heat oil in a deep pot to 350°F, verified using a kitchen thermometer for consistent results.
13. Fry 3 samosas at a time for 4-5 minutes, turning occasionally until golden brown and crispy.
14. Drain on a wire rack rather than paper towels to maintain maximum crispiness.
15. Repeat with remaining samosas, allowing oil to return to 350°F between batches.Zesty with cumin and gently warmed by chili, these samosas offer a satisfying crunch that gives way to soft, savory filling. I love serving them alongside tamarind chutney for dipping, though they’re equally wonderful broken over a salad for unexpected texture. However you enjoy them, may they bring the same quiet comfort they’ve brought me this afternoon.
Aloo Tikki

Nostalgia washes over me whenever I peel potatoes for this dish, remembering how the earthy scent filled my grandmother’s kitchen on rainy afternoons. Aloo tikki carries that quiet comfort in every golden-brown bite, a simple pleasure that feels like coming home. Making these potato patties slowly, with intention, turns ordinary ingredients into something quietly special.
6
portions40
minutes8
minutesIngredients
Potatoes – 2 large
Bread crumbs – ½ cup
Cumin powder – 1 tsp
Salt – ¾ tsp
Vegetable oil – ¼ cup
Instructions
1. Place 2 large potatoes in a pot and cover completely with cold water.
2. Bring the water to a rolling boil over high heat, then reduce to medium heat.
3. Boil potatoes for 25 minutes until a fork slides easily through the center.
4. Drain potatoes immediately and let them sit uncovered for 10 minutes to release steam.
5. Peel the warm potatoes completely using your fingers or a paring knife.
6. Mash potatoes thoroughly in a large bowl until no lumps remain.
7. Add ½ cup bread crumbs, 1 tsp cumin powder, and ¾ tsp salt to the mashed potatoes.
8. Mix all ingredients together with your hands until fully combined into a uniform dough.
9. Divide the potato mixture into 6 equal portions using a kitchen scale or visual estimation.
10. Roll each portion between your palms to form smooth, round balls.
11. Flatten each ball into ½-inch thick patties, ensuring edges are neatly sealed.
12. Heat ¼ cup vegetable oil in a non-stick skillet over medium heat until it shimmers.
13. Carefully place 3 patties in the hot oil, leaving space between each.
14. Fry for 4 minutes until the bottom develops a deep golden-brown crust.
15. Flip each patty using a thin spatula to avoid breaking the delicate crust.
16. Fry the second side for another 4 minutes until equally golden-brown.
17. Transfer cooked patties to a paper towel-lined plate to drain excess oil.
18. Repeat steps 13-17 with remaining patties, adding more oil if necessary.
You’ll notice the crisp exterior gives way to a wonderfully soft, fluffy interior that melts on the tongue. That subtle cumin warmth makes these perfect tucked into soft slider buns with mint chutney, or simply enjoyed warm from the pan while standing at the counter, savoring each delicate crunch.
Paneer Tikka Bites
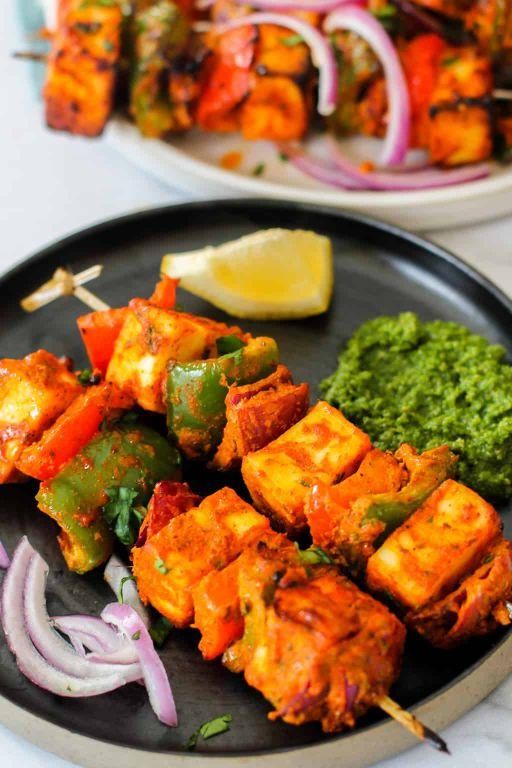
Wandering through the spice-scented air of my kitchen this quiet afternoon, I find myself drawn to the simple comfort of transforming humble ingredients into something that feels like a warm embrace. There’s something deeply satisfying about the rhythmic preparation of these little bites, each step a gentle meditation in itself. Perhaps it’s the way the spices bloom in the heat, or how the paneer softens just enough to hold all that flavor within its tender frame.
5
portions135
minutes25
minutesIngredients
Paneer – 8 oz
Plain yogurt – ½ cup
Garam masala – 1 tsp
Turmeric – ½ tsp
Cumin – 1 tsp
Cayenne – ¼ tsp
Salt – ¾ tsp
Lemon juice – 1 tbsp
Bell peppers – 1 cup
Red onion – ½ cup
Olive oil – 2 tbsp
Instructions
1. Cut the paneer into 1-inch cubes and place them in a medium mixing bowl.
2. Add the plain yogurt to the bowl with the paneer cubes.
3. Sprinkle the garam masala, turmeric, cumin, cayenne, and salt over the yogurt and paneer.
4. Squeeze the lemon juice directly into the mixture.
5. Gently mix all ingredients until the paneer cubes are evenly coated with the marinade.
6. Cover the bowl with plastic wrap and refrigerate for exactly 2 hours to allow the flavors to penetrate the paneer.
7. While the paneer marinates, cut the bell peppers and red onion into 1-inch pieces.
8. Preheat your oven to 400°F and line a baking sheet with parchment paper.
9. Thread the marinated paneer, bell peppers, and red onion onto skewers, alternating between ingredients.
10. Brush the skewers lightly with olive oil using a pastry brush.
11. Place the skewers on the prepared baking sheet and bake for 15 minutes.
12. Flip each skewer carefully using tongs and bake for another 10 minutes until the edges are golden brown.
13. Remove from the oven when the paneer develops light char marks and the vegetables are tender-crisp.
Vibrant with color and alive with spice, these little morsels offer a delightful contrast between the creamy paneer and the slight crunch of roasted vegetables. The gentle heat from the cayenne lingers just long enough to make you reach for another, while the yogurt marinade keeps everything remarkably tender. I love serving them straight from the baking sheet with nothing more than a sprinkle of fresh cilantro, though they’d be equally lovely tucked into warm naan with a drizzle of mint chutney.
Masala Fries

Sometimes the simplest kitchen experiments yield the most surprising comforts, like these masala fries that transform humble potatoes into something quietly extraordinary. Slowly cutting each fry by hand feels almost meditative, the rhythmic motion creating imperfect pieces that somehow cook more soulfully than uniform ones.
2
servings40
minutes24
minutesIngredients
Potatoes – 2 large russet
Vegetable oil – 4 cups
Garam masala – 2 tsp
Salt – 1 tsp
Cumin – 1 tsp
Instructions
1. Peel 2 large russet potatoes completely with a vegetable peeler.
2. Cut each potato lengthwise into ½-inch thick slabs using a sharp chef’s knife.
3. Stack the slabs and cut them into ½-inch wide sticks to create uniform fry shapes.
4. Submerge the cut potatoes in a large bowl of cold water for 30 minutes to remove excess starch.
5. Drain the potatoes and pat them completely dry with paper towels, ensuring no moisture remains.
6. Heat 4 cups vegetable oil in a heavy-bottomed pot to 325°F, using a deep-fry thermometer to verify temperature.
7. Carefully add one-third of the dried potatoes to the hot oil and fry for 5 minutes until softened but not browned.
8. Remove the partially cooked fries with a slotted spoon and drain on a wire rack set over a baking sheet.
9. Repeat steps 7-8 with the remaining potatoes in two more batches, maintaining oil temperature at 325°F throughout.
10. Increase the oil temperature to 375°F and wait for the thermometer to confirm the new temperature.
11. Return all the partially cooked fries to the hot oil in a single batch and fry for 3 minutes until golden brown and crisp.
12. Remove the finished fries with a slotted spoon and drain on fresh paper towels.
13. Immediately toss the hot fries in a large bowl with 2 tsp garam masala, 1 tsp salt, and 1 tsp cumin while still steaming.
14. Gently shake the bowl to distribute the spices evenly without breaking the fragile fries.
Underneath that crisp exterior lies a cloud-soft potato center, the warm spices clinging to every ridge and crevice. I love serving them piled high in a rustic wooden bowl with cool cilantro-mint chutney for dipping, the contrast of temperatures and textures making each bite feel like a small discovery.
Air-Fried Pakoras

Wandering through my kitchen this quiet afternoon, I found myself craving the crisp comfort of pakoras, but wanting something lighter than the traditional deep-fried version. The air fryer hummed on the counter, promising that satisfying crunch with just a whisper of oil. Sometimes the simplest adaptations bring the most gentle satisfaction.
3
portions15
minutes12
minutesIngredients
Chickpea flour – 1 cup
Water – ½ cup
Onion – 1 medium, thinly sliced
Potato – 1 small, peeled and thinly sliced
Cilantro – 2 tbsp, chopped
Salt – ¾ tsp
Baking soda – ¼ tsp
Oil – 1 tbsp
Instructions
1. Preheat your air fryer to 375°F for 5 minutes.
2. Combine chickpea flour, salt, and baking soda in a medium bowl.
3. Gradually add water while whisking until you achieve a pancake-batter consistency.
4. Fold in sliced onion, potato, and chopped cilantro until evenly coated.
5. Lightly brush or spray the air fryer basket with ½ tablespoon of oil.
6. Drop heaping tablespoons of the batter into the air fryer basket, leaving 1 inch between each pakora.
7. Lightly brush the tops of the pakoras with the remaining ½ tablespoon of oil.
8. Air fry at 375°F for 12 minutes.
9. Flip each pakora carefully using tongs at the 6-minute mark.
10. Continue air frying for the remaining 6 minutes until golden brown and crisp.
11. Remove pakoras from the air fryer and let rest on a wire rack for 3 minutes before serving.
The golden crust gives way to tender vegetables inside, creating that perfect textural contrast we crave. I love serving these with a cool mint chutney for dipping, or crumbling them over a simple salad for unexpected crunch. They hold their warmth beautifully, making them ideal for slow snacking while watching the afternoon light fade.
Gobi Manchurian

Zestful evenings call for something that bridges worlds, something crisp and saucy that feels both comforting and adventurous. Gobi Manchurian, with its golden cauliflower florets cloaked in glossy, savory-sweet sauce, has become my quiet kitchen companion during these reflective hours. It’s a dish that transforms humble ingredients into a small, satisfying celebration.
5
servings15
minutes15
minutesIngredients
– Cauliflower – 1 head
– Cornstarch – ½ cup
– All-purpose flour – ¼ cup
– Soy sauce – 2 tbsp
– Ketchup – 2 tbsp
– Garlic – 3 cloves
– Ginger – 1 inch piece
– Green chili – 1
– Vegetable oil – ½ cup
– Water – ¼ cup
– Salt – ½ tsp
Instructions
1. Cut the cauliflower into 1-inch florets.
2. Whisk cornstarch, all-purpose flour, and ¼ cup water in a bowl until smooth.
3. Heat vegetable oil in a deep pan to 350°F.
4. Dip each cauliflower floret in the batter, letting excess drip off.
5. Fry florets in batches for 4–5 minutes until golden brown and crisp.
6. Remove florets with a slotted spoon and drain on paper towels.
7. Mince garlic, ginger, and green chili finely.
8. Heat 1 tbsp oil in a separate pan over medium heat.
9. Sauté minced garlic, ginger, and green chili for 1 minute until fragrant.
10. Add soy sauce and ketchup, stirring for 30 seconds.
11. Pour in ¼ cup water and bring sauce to a simmer.
12. Add fried cauliflower florets and toss gently to coat evenly.
13. Cook for 2 minutes until sauce thickens and clings to florets.
Heavenly crispness gives way to tender cauliflower beneath the glossy, umami-rich glaze. Serve it piled over steamed jasmine rice to soak up every drop of sauce, or tuck it into warm tortillas with shredded cabbage for a playful fusion twist.
Spiced Chickpea Falafel

Folding chickpeas into spiced dough feels like pressing autumn leaves between pages—each gentle crush releases earthy scents of cumin and coriander that linger in the quiet kitchen.
8
portions40
minutes8
minutesIngredients
– Chickpeas – 2 cups
– Cumin – 1 tsp
– Coriander – 1 tsp
– Baking powder – ½ tsp
– Olive oil – 3 tbsp
– Salt – ¾ tsp
Instructions
1. Drain 2 cups of chickpeas and pat them completely dry with paper towels to prevent soggy falafel.
2. Pulse chickpeas in a food processor for 45 seconds until they form coarse crumbs, scraping down the sides once.
3. Add 1 tsp cumin, 1 tsp coriander, ½ tsp baking powder, and ¾ tsp salt, then pulse for 20 seconds until fully combined.
4. Refrigerate the mixture for 30 minutes to help the falafel hold its shape during frying.
5. Heat 3 tbsp olive oil in a skillet over medium heat until it shimmers (about 350°F).
6. Scoop 2-tbsp portions of the chilled mixture and roll them into 1-inch balls, pressing gently to flatten slightly.
7. Fry falafel in batches for 3-4 minutes per side until deeply golden brown, turning once with a slotted spoon.
8. Transfer cooked falafel to a paper towel-lined plate to drain excess oil. Don’t overcrowd the skillet—this ensures even crisping.
9. Let falafel rest for 5 minutes before serving to allow the crust to firm up. Drizzling tahini over warm falafel softens their crisp edges into creamy, spiced pockets perfect for stuffing into pita with pickled vegetables.
Bhindi Fry

Holding this bowl of slender green pods, I remember how something so simple can carry such comfort, how these humble okra transform with just heat and patience into something quietly spectacular.
5
servings10
minutes20
minutesIngredients
Okra – 1 lb
Vegetable oil – 3 tbsp
Salt – 1 tsp
Turmeric powder – ½ tsp
Red chili powder – 1 tsp
Instructions
1. Rinse 1 lb of okra under cool running water and pat completely dry with paper towels.
2. Trim off the stem ends of each okra pod using a sharp knife.
3. Slice each okra pod into ¼-inch thick rounds.
4. Heat 3 tbsp of vegetable oil in a large skillet over medium heat until it shimmers.
5. Add all the sliced okra to the hot oil in a single layer.
6. Cook undisturbed for 5 minutes to allow the okra to develop a light crust.
7. Sprinkle 1 tsp salt, ½ tsp turmeric powder, and 1 tsp red chili powder evenly over the okra.
8. Gently stir the okra with a spatula to coat all pieces with spices.
9. Continue cooking for 8-10 minutes, stirring occasionally, until the okra turns crisp at the edges and most of the stickiness disappears.
10. Reduce heat to low and cook for another 3-4 minutes until the okra develops golden brown spots.
11. Remove the skillet from heat and transfer the bhindi fry to a serving plate.
My favorite part is that satisfying crispness against the tender interior, the way turmeric’s earthiness balances the gentle heat. Sometimes I’ll scatter these over steamed rice with a squeeze of lemon, or tuck them into warm tortillas with yogurt for an unexpected fusion lunch.
Lamb Seekh Kebabs
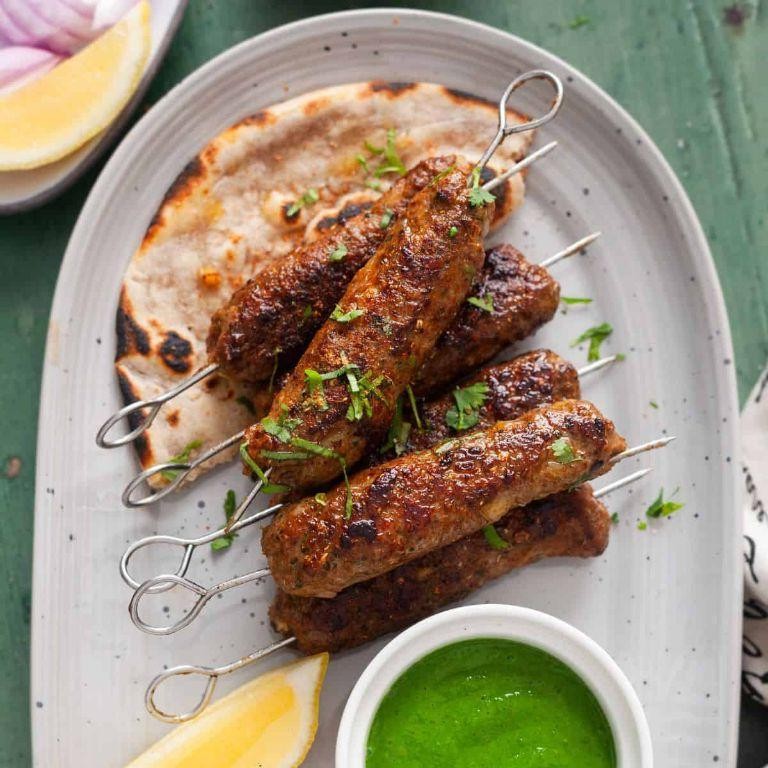
Mellow evenings often find me craving the kind of food that feels like a warm embrace, something simple yet deeply satisfying to prepare with my own hands. Today, that craving led me back to lamb seekh kebabs, a dish whose gentle spicing and tender texture never fail to comfort. There’s a quiet joy in shaping the meat, a small ritual that slows the world down for a moment.
8
portions35
minutes20
minutesIngredients
– Ground lamb – 1 lb
– Yellow onion – ¼ cup, grated
– Garlic – 2 cloves, minced
– Ginger – 1 tsp, grated
– Cilantro – 2 tbsp, finely chopped
– Ground cumin – 1 tsp
– Ground coriander – 1 tsp
– Garam masala – ½ tsp
– Red chili powder – ¼ tsp
– Salt – ¾ tsp
– Vegetable oil – 1 tbsp
Instructions
1. Combine the ground lamb, grated onion, minced garlic, grated ginger, chopped cilantro, ground cumin, ground coriander, garam masala, red chili powder, and salt in a large bowl.
2. Mix everything with your hands for 2–3 minutes until the spices are evenly distributed and the mixture feels slightly sticky.
3. Cover the bowl with plastic wrap and refrigerate the mixture for 30 minutes to allow the flavors to meld and the meat to firm up slightly for easier shaping.
4. Divide the chilled mixture into 8 equal portions.
5. Take one portion and mold it firmly around a metal or soaked wooden skewer, pressing to form a 5-inch long, 1-inch thick cylinder; repeat with remaining portions.
6. Preheat a grill or grill pan to medium-high heat (400°F).
7. Brush the kebabs lightly with vegetable oil.
8. Place the kebabs on the hot grill and cook for 4–5 minutes.
9. Rotate the kebabs a quarter turn and cook for another 4–5 minutes.
10. Continue rotating and cooking until all sides are evenly charred and the internal temperature reaches 160°F, about 16–20 minutes total.
11. Let the kebabs rest off the heat for 3 minutes before sliding them off the skewers. When shaping the kebabs, wet your hands occasionally to prevent sticking.
Ensure your grill is properly preheated to get a good sear without overcooking the interior. Letting the kebabs rest ensures the juices redistribute, keeping them moist. With their lightly crisp exterior giving way to a soft, spiced interior, these kebabs carry the warmth of cumin and the subtle heat of chili. Wrapping them in warm flatbread with a drizzle of mint chutney turns a simple meal into a little feast, perfect for sharing on a quiet evening.
Amritsari Fish Fingers
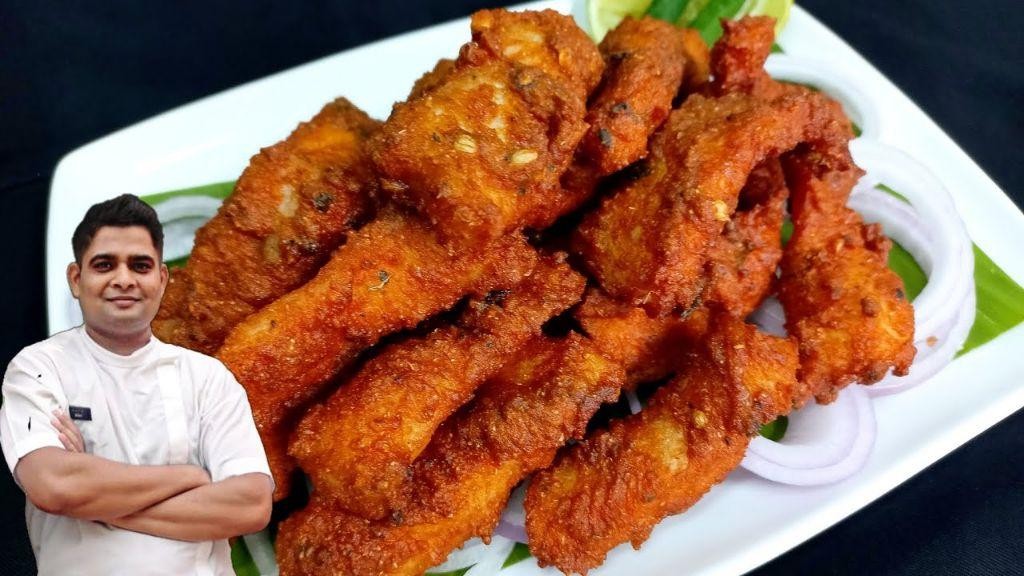
Just thinking about how some of the simplest foods can carry such deep comfort, I find myself returning to these golden fish fingers, inspired by Amritsar’s bustling lanes but made quietly in my own kitchen. They hold that gentle warmth of memory and spice, a small treasure from the sea and the soul. Maybe you’ll feel it too, when you try them.
3
servings15
minutes16
minutesIngredients
Flour – ½ cup
Fish fillets – 1 lb
Garam masala – 1 tsp
Salt – 1 tsp
Vegetable oil – 1 cup
Instructions
1. Pat the fish fillets completely dry with paper towels.
2. Cut the fish fillets into 1-inch-wide strips.
3. Combine the flour, garam masala, and salt in a medium bowl.
4. Dredge each fish strip in the flour mixture, coating all sides evenly.
5. Heat the vegetable oil in a deep skillet over medium heat until it reaches 350°F.
6. Carefully place 4-5 coated fish strips into the hot oil without crowding the pan.
7. Fry the fish strips for 3-4 minutes until the bottom side is golden brown.
8. Flip each fish strip using tongs and fry for another 3-4 minutes until golden brown all over.
9. Remove the fried fish strips from the oil and drain on a wire rack set over a baking sheet.
10. Repeat steps 6-8 with the remaining fish strips.
Very gently crisp on the outside, these fish fingers reveal tender, flaky flesh within, carrying the warm hum of garam masala that lingers without overwhelming. I love them tucked into soft naan with a squeeze of lemon, or simply arranged on a plate with mint chutney for dipping—each bite feels like a quiet moment of comfort, both familiar and new.
Air Fried Pani Puri

Evenings like this, when the light falls soft through the kitchen window, I find myself reaching for recipes that feel like a quiet conversation. This air-fried version of pani puri is one of those gentle experiments, a way to hold onto tradition while moving a little lighter through the kitchen. It’s a small shift, but it changes everything about the ritual.
12
portions25
minutes19
minutesIngredients
Semolina flour – 1 cup
Water – ½ cup
Salt – ½ tsp
Vegetable oil – 1 tbsp
Instructions
1. Combine 1 cup of semolina flour, ½ cup of water, and ½ tsp of salt in a mixing bowl.
2. Knead the mixture for 5 minutes until it forms a smooth, firm dough that doesn’t stick to your fingers.
3. Cover the dough with a damp cloth and let it rest for 15 minutes at room temperature.
4. Divide the dough into 12 equal portions and roll each into a smooth ball.
5. Use a rolling pin to flatten each ball into a 3-inch diameter circle, about ⅛-inch thick.
6. Brush both sides of each dough circle lightly with 1 tbsp of vegetable oil using a pastry brush.
7. Preheat your air fryer to 350°F for 3 minutes.
8. Arrange 6 dough circles in a single layer in the air fryer basket, making sure they don’t overlap.
9. Air fry at 350°F for 8 minutes, flipping each puri halfway through using tongs.
10. Check that each puri has puffed completely and turned golden brown with small blisters on the surface.
11. Transfer the cooked puris to a wire rack and repeat steps 8-10 with the remaining dough circles.
12. Let the puris cool completely on the wire rack for 10 minutes before filling.
My favorite part is that moment when you tap the top and hear that hollow sound, knowing you’ve captured that essential crispness. The semolina gives them this wonderful granular texture that holds up beautifully against any filling you choose. Sometimes I’ll serve them arranged on a wooden board with small bowls of different chutneys, letting everyone build their own perfect bite.
Methi Parantha Chips
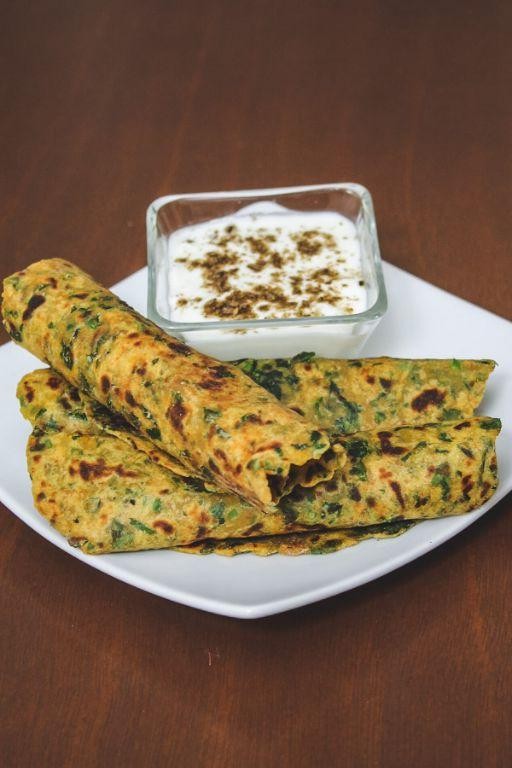
Methi parantha chips bring back memories of my grandmother’s kitchen, where leftover flatbreads were never wasted but transformed into something crisp and golden. There’s a quiet satisfaction in turning humble scraps into a snack that crackles with earthy fenugreek and warmth. It feels like a small, edible secret passed down through generations.
2
servings10
minutes14
minutesIngredients
– Leftover methi paranthas – 2 large
– Olive oil – 2 tbsp
– Salt – ½ tsp
– Red chili powder – ¼ tsp
Instructions
1. Stack 2 leftover methi paranthas and use a sharp knife to slice them into 1-inch-wide strips.
2. Cut each strip diagonally into triangles, ensuring uniform pieces for even cooking.
3. Preheat your oven to 375°F and line a baking sheet with parchment paper.
4. Arrange the parantha triangles in a single layer on the baking sheet, leaving space between each piece.
5. Brush both sides of each triangle lightly with 2 tbsp olive oil using a pastry brush.
6. Sprinkle ½ tsp salt and ¼ tsp red chili powder evenly over the oiled triangles.
7. Bake at 375°F for 12–14 minutes, flipping each piece halfway through with tongs.
8. Check for doneness when the edges turn deep golden brown and the chips feel firm to the touch.
9. Remove the baking sheet from the oven and let the chips cool completely on a wire rack for 5 minutes.
Now, they’re ready to serve—delicate, shatteringly crisp, and fragrant with the bittersweet hint of fenugreek. I love pairing them with a cool mint yogurt dip or crumbling them over soups for a surprising crunch that feels both nostalgic and new.
Kachori Pops

Yesterday’s rain left the kitchen window streaked and blurry, a perfect backdrop for remembering how my grandmother would transform simple flour into golden pockets of comfort. These kachori pops carry that same magic—small, crisp spheres that crackle with warmth and memory when you bite into them.
12
portions25
minutes12
minutesIngredients
Flour – 1 cup
Salt – ½ tsp
Water – ¼ cup
Oil – 2 tbsp
Instructions
1. Combine 1 cup flour and ½ tsp salt in a medium bowl.
2. Slowly drizzle ¼ cup water into the flour mixture while stirring with a fork.
3. Knead the dough for 5 minutes until it becomes smooth and pliable.
4. Cover the dough with a damp cloth and let it rest for 20 minutes at room temperature.
5. Divide the rested dough into 12 equal portions, rolling each into smooth balls.
6. Heat 2 tbsp oil in a skillet over medium heat until it shimmers (about 350°F).
7. Gently place 6 dough balls into the hot oil, being careful not to overcrowd the pan.
8. Fry for 2-3 minutes until the bottoms turn golden brown.
9. Flip each kachori pop using tongs and fry for another 2-3 minutes until uniformly golden.
10. Remove the fried kachori pops with a slotted spoon and drain on paper towels.
11. Repeat steps 7-10 with the remaining dough balls.
Sometimes the simplest creations surprise you most—these little spheres shatter with the gentlest pressure, revealing soft, steamy interiors that carry just enough salt to make you reach for another. Serve them still warm with mint chutney for dipping, or let them cool completely for a satisfying crunch that holds up beautifully in lunchboxes.
Spicy Bhel Puri
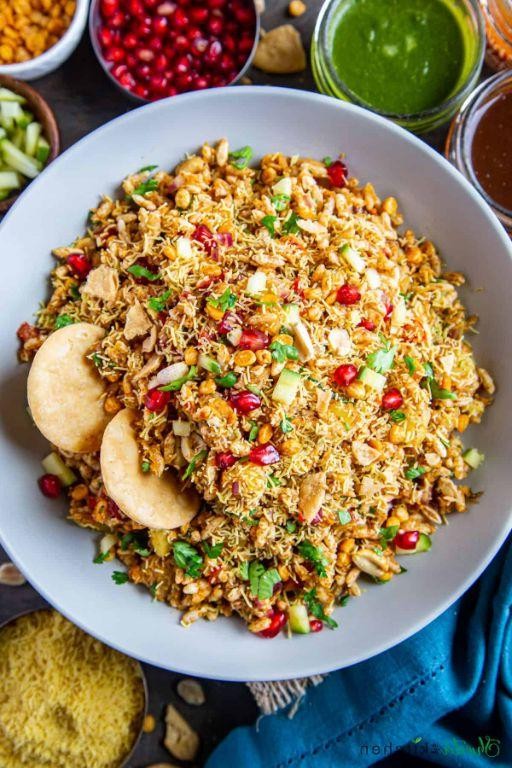
Gently, I find myself drawn to the memory of street corners where paper cones hold this perfect chaos of textures and flavors, a humble snack that somehow captures the entire spectrum of sweet, tangy, spicy, and crisp in each bite. It’s the kind of simple joy that makes an ordinary afternoon feel like a small celebration, a reminder that the most satisfying things often come from the humblest of ingredients.
2
servings10
minutesIngredients
Puffed rice – 4 cups
Sev – 1 cup
Red onion – ½ cup, finely chopped
Tomato – ½ cup, finely chopped
Cilantro – ¼ cup, finely chopped
Tamarind chutney – 3 tbsp
Mint-cilantro chutney – 3 tbsp
Chaat masala – 1 tsp
Red chili powder – ½ tsp
Lime – 1
Instructions
1. Place 4 cups of puffed rice in a large mixing bowl.
2. Add 1 cup of sev to the bowl with the puffed rice.
3. Finely chop ½ cup of red onion and add it to the bowl.
4. Finely chop ½ cup of tomato and add it to the bowl.
5. Finely chop ¼ cup of cilantro and add it to the bowl.
6. Pour 3 tablespoons of tamarind chutney over the ingredients in the bowl.
7. Pour 3 tablespoons of mint-cilantro chutney over the ingredients.
8. Sprinkle 1 teaspoon of chaat masala evenly over the mixture.
9. Sprinkle ½ teaspoon of red chili powder evenly over the mixture.
10. Cut 1 lime in half and squeeze the juice from both halves directly into the bowl.
11. Using a large spoon, gently toss all ingredients together for exactly 30 seconds until evenly coated. Tip: Avoid over-mixing to prevent the puffed rice from becoming soggy.
12. Immediately divide the mixture into 4 serving bowls. Tip: Serve within 5 minutes of mixing to maintain optimal crispness.
13. Garnish each serving with an extra pinch of sev on top. Tip: For extra freshness, serve with additional lime wedges on the side.
Dazzling in its simplicity, this bhel puri offers a symphony of textures where the crisp puffed rice and sev play against the juicy tomatoes and onions, while the dual chutneys create a beautiful dance of sweet and spicy notes. I love serving it in small clay bowls for an authentic touch, or sometimes layering it in clear glasses to showcase the colorful ingredients before mixing.
Mango Chaat Skewers
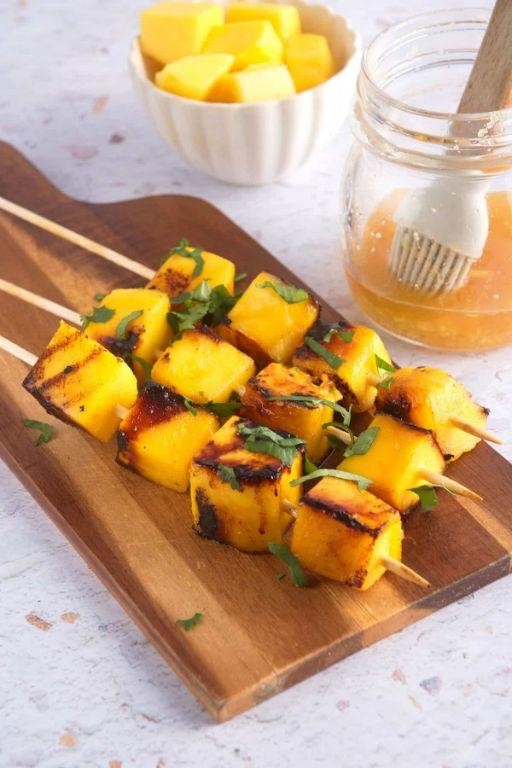
Looking back at summer’s final gifts, I find myself drawn to the memory of mango chaat skewers—a quiet fusion of sweet and savory that feels like a gentle farewell to warm evenings. Last week, I prepared these skewers as the sun dipped low, their vibrant colors and playful arrangement bringing a moment of calm to the kitchen. It’s a recipe that invites reflection, each step unfolding slowly like the fading light outside.
6
skewers15
minutesIngredients
– Ripe mango – 1 large
– Red onion – ½ small
– Cucumber – ½ medium
– Cilantro – ¼ cup chopped
– Lime juice – 2 tbsp
– Chaat masala – 1 tsp
– Chili powder – ¼ tsp
– Salt – ½ tsp
Instructions
1. Peel the mango and cut it into 1-inch cubes, discarding the pit.
2. Finely dice the red onion into ¼-inch pieces.
3. Cut the cucumber into ½-inch cubes, ensuring uniform size for even skewering.
4. Chop the cilantro leaves until you have ¼ cup packed.
5. Thread alternating mango, onion, and cucumber pieces onto 6-inch wooden skewers, leaving a 1-inch handle at the bottom.
6. Arrange the skewers on a serving plate in a single layer.
7. Drizzle the lime juice evenly over all skewers, coating each piece lightly.
8. Sprinkle the chaat masala, chili powder, and salt evenly across the skewers, rotating them to cover all sides.
9. Garnish with the chopped cilantro, scattering it gently over the top.
10. Let the skewers rest at room temperature for 5 minutes to allow the flavors to meld.
Now, these skewers offer a delightful contrast—the mango’s juicy sweetness balances the onion’s sharpness, while the cucumber adds a refreshing crunch. Serve them immediately as a light appetizer, or pair with mint chutney for an extra layer of coolness on a warm afternoon.
Conclusion
Embark on a flavorful journey with these 28 Indian air fryer recipes that bring authentic taste with modern convenience. Perfect for busy home cooks seeking healthier options without sacrificing flavor. We’d love to hear which dishes become your family favorites—drop a comment below and share your culinary creations! Don’t forget to pin this article to your Pinterest boards for easy access to these delicious recipes.


