Tired of waiting for the weekend to indulge your sweet tooth? Let’s be rebels and declare every day worthy of ice cream glory. This isn’t just dessert—it’s an edible revolution in a bowl, a creamy declaration that adulthood shouldn’t mean giving up the simple joys of being elbow-deep in chocolate sauce and sprinkles.
Why This Recipe Works
- It transforms basic ice cream into a customizable masterpiece that makes you feel like a dessert architect rather than someone just scooping frozen dairy
- The strategic layering technique ensures every spoonful contains the perfect ratio of creamy, crunchy, and saucy elements—no sad bites of plain ice cream here
- Using quality ingredients elevates this from childhood memory to sophisticated indulgence without requiring any actual cooking skills
- The assembly process is faster than most microwave dinners but looks impressively complicated to anyone lucky enough to witness your creation
- It’s infinitely adaptable to whatever ingredients you have hiding in your pantry, making it the culinary equivalent of a jazz improvisation
Ingredients
- 4 large scoops vanilla bean ice cream (the good stuff, not that artificially flavored imposter)
- 1/2 cup hot fudge sauce, warmed to pourable consistency
- 1/4 cup caramel sauce, because one sauce is for amateurs
- 1/2 cup whipped cream, freshly whipped or from a can if we’re being real
- 1/4 cup chopped toasted pecans, for that satisfying crunch
- 1/4 cup rainbow sprinkles, because adulthood hasn’t stolen all our joy
- 6 maraschino cherries with stems, the tiny red crowns of sundae royalty
- 1 tablespoon chocolate shavings, for that fancy coffee shop vibe
Equipment Needed
- Ice cream scoop (the spring-loaded kind that doesn’t require Hulk strength)
- Two sundae glasses or wide bowls (presentation matters, people)
- Small saucepan for warming sauces
- Measuring cups and spoons (or just eyeball it like a renegade)
- Whisk or electric mixer for whipped cream
- Toaster oven or skillet for toasting nuts
Instructions
Prepare Your Battle Station
Before we dive into this frozen wonderland, let’s get organized like a dessert ninja. Take your ice cream out of the freezer and let it sit on the counter for exactly 5-7 minutes—this is the sweet spot between rock-hard frustration and melted soup territory. While it’s softening, warm your hot fudge sauce in a small saucepan over low heat, stirring occasionally until it flows like chocolate lava. Simultaneously, toast your pecans in a toaster oven at 300°F for 4-6 minutes until they’re fragrant and slightly darkened, watching them like a hawk because burned nuts are culinary tragedy. Whip your cream until soft peaks form if you’re going homemade, or just shake that canned whip like you’re in a 90s music video. Pro tip: Chill your serving bowls in the freezer for 10 minutes beforehand—this keeps your masterpiece from immediately turning into a puddle of regret.
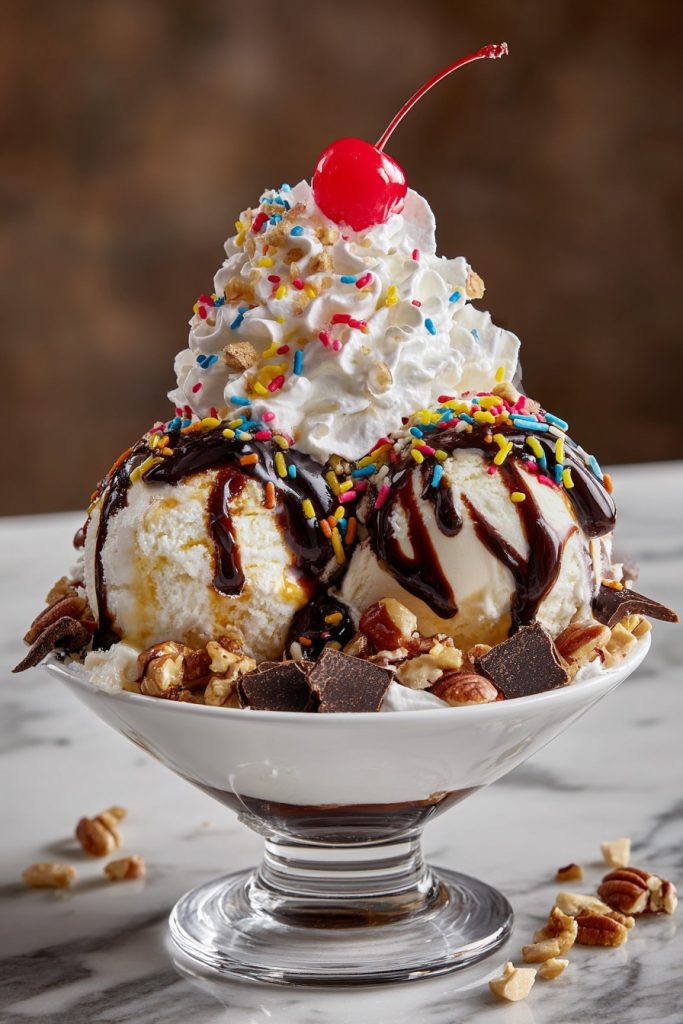
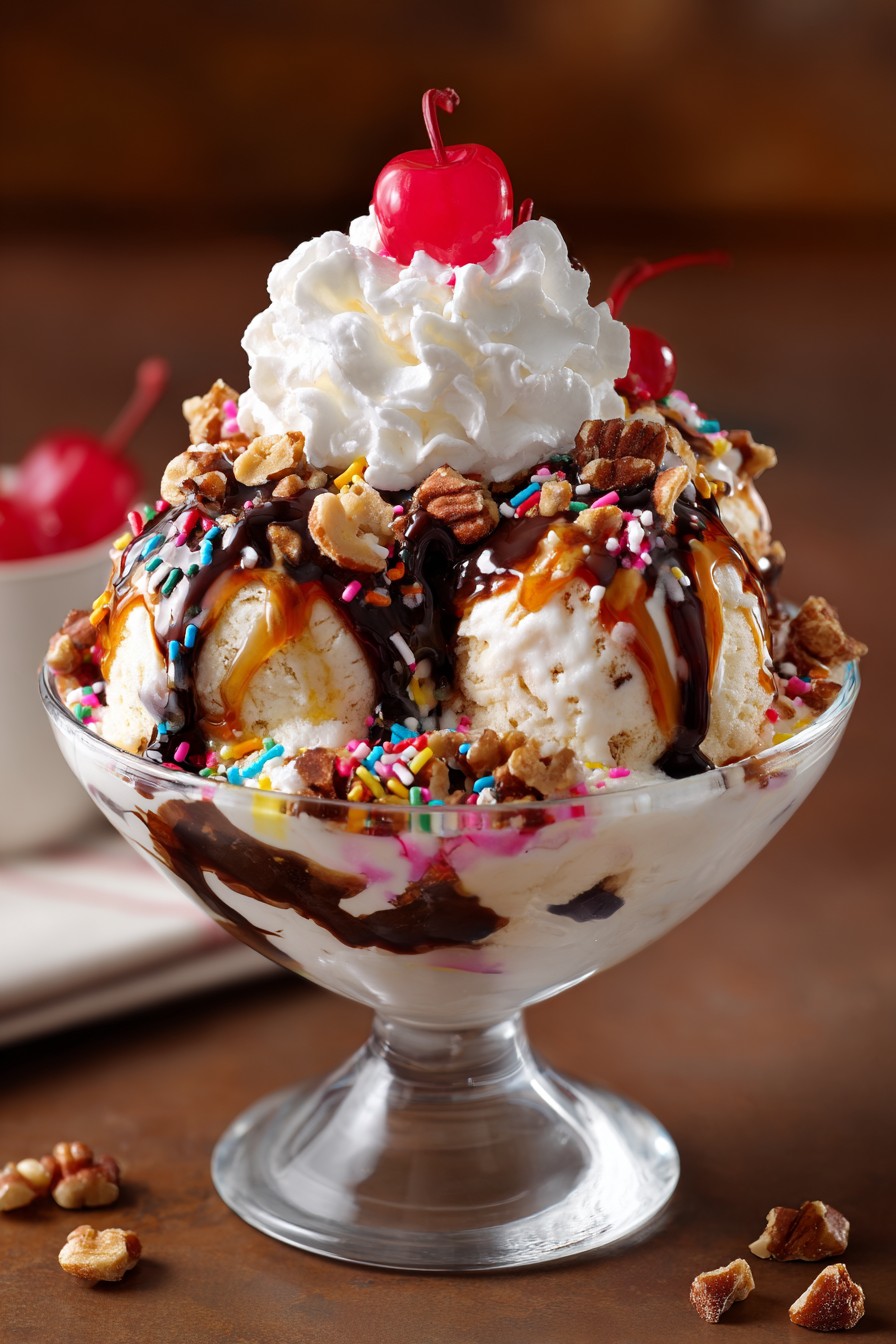
The Foundation Layer
Now for the architectural marvel portion of our program. Using your ice cream scoop (dipped in warm water between scoops for maximum smoothness), place two perfect orbs of vanilla ice cream in each chilled bowl. Arrange them slightly off-center rather than stacking them directly—this creates visual interest and ensures sauce distribution isn’t just pooling at the bottom. Gently press down on each scoop with the back of your spoon to create a stable base, but don’t smash them into submission. We’re building a sundae, not making ice cream pancakes. The goal here is to create little ice cream platforms that will support our glorious toppings without collapsing like a poorly planned Jenga tower. Think of this as laying the foundation for your edible skyscraper of joy.
Sauce Application Masterclass
This is where we separate the sundae amateurs from the professionals. Drizzle 2 tablespoons of warm hot fudge sauce over each sundae in a zigzag pattern, making sure to get some between the scoops and around the edges. Follow immediately with 1 tablespoon of caramel sauce per sundae, creating a contrasting pattern that looks like an abstract painting. The key here is temperature contrast—the warm sauces will slightly melt the ice cream surface, creating delicious little pockets of creamy-saucy fusion. Don’t pour all the sauce in one spot unless you want a chocolate lake with ice cream islands. Instead, think of yourself as Jackson Pollock creating edible art. The sauces should coat about 70% of the visible ice cream surface, leaving some pristine white areas for visual appeal.
The Crunchy Crown
Whipped Cloud InstallationThe Grand Finale GarnishTips and Tricks
Let’s talk sundae science, because there’s more to this than just throwing ingredients in a bowl. First, the ice cream temperature situation: if you’re planning multiple sundaes for guests, portion your ice cream scoops onto a parchment-lined baking sheet and keep them in the freezer until assembly time. This prevents the dreaded melt-down while you’re building sundae number three. When it comes to sauces, consider making your own hot fudge—it’s surprisingly simple with just heavy cream, chocolate, and sugar heated together until glossy. Homemade sauce has a superior texture and flavor that’ll make you feel like a pastry chef without the student loans.
For nut enthusiasts, toasting is non-negotiable. Spread raw nuts in a single layer on a baking sheet and toast at 350°F for 8-10 minutes, shaking halfway through. The aroma alone will make your kitchen smell like a fancy bakery. If you want next-level presentation, consider making caramelized nuts by tossing warm toasted nuts with a tablespoon of maple syrup and a pinch of sea salt before cooling. When it comes to whipped cream, the secret weapon is a splash of vanilla extract and a tablespoon of powdered sugar per cup of cream—this stabilizes it slightly and adds flavor depth that makes the canned stuff taste like sweetened air in comparison.
Assembly order matters more than you’d think. Always do ice cream first, then sauces, then crunchy elements, then whipped cream, then final garnishes. This creates distinct layers that provide textural surprises with each bite rather than everything mushing together into homogeneous goo. If you’re serving these at a party, set up a sundae bar with all components prepped and let guests build their own—it’s interactive entertainment that requires zero actual work from you beyond refilling bowls. For storage of leftover components, sauces keep for weeks in the fridge (just reheat gently), toasted nuts stay crunchy for about a week in airtight containers, and homemade whipped cream can be stabilized with a teaspoon of cornstarch to last 2-3 days.
Recipe Variations
- The Rocky Road Rendezvous: Swap vanilla ice cream for chocolate, use only hot fudge sauce, add mini marshmallows and chopped almonds instead of pecans, and garnish with chocolate chips. This variation turns your sundae into a textural adventure that’s like hiking through edible topography—every spoonful reveals new chocolatey landscapes and marshmallow clouds.
- Tropical Vacation Sundae: Use coconut ice cream instead of vanilla, replace caramel sauce with passion fruit curd, use macadamia nuts instead of pecans, add toasted coconut flakes, and garnish with pineapple chunks. Close your eyes while eating this one and you’ll practically feel ocean breezes—it’s a vacation in bowl form that’s significantly cheaper than airfare to Hawaii.
- Salted Caramel Pretzel Crunch: Keep the vanilla ice cream but double the caramel sauce, mix crushed salted pretzels with the pecans, add a sprinkle of flaky sea salt between layers, and use chocolate-covered pretzels as garnish. This sweet-salty masterpiece will make your taste buds confused in the best possible way—like they can’t decide if they’re at a carnival or a fancy restaurant.
- Coffee Break Sundae: Use coffee ice cream as your base, make a mocha sauce by adding espresso powder to your hot fudge, use toasted hazelnuts instead of pecans, and garnish with chocolate-covered coffee beans. This variation provides the perfect excuse to eat ice cream for breakfast—it’s basically a frozen latte with better accessories.
- Berry Bliss Sundae: Substitute vanilla bean ice cream with strawberry, replace both sauces with warm raspberry coulis, use sliced almonds instead of pecans, add fresh berry medley between layers, and garnish with mint sprigs. This is the sundae you serve when you want to feel virtuous about eating dessert—it’s practically a fruit salad with identity issues.
Frequently Asked Questions
Can I make ice cream sundaes ahead of time for a party?
Absolutely, with strategic planning that would make a military general proud. Prepare all components separately—scoop ice cream onto parchment-lined trays and keep frozen, have sauces warmed and ready to go, pre-toast nuts, and have whipped cream prepared. About 10 minutes before serving, assemble your sundaes quickly while giving a dramatic presentation speech about your culinary genius. The key is minimizing the time between assembly and consumption to prevent structural collapse. If you must pre-assemble, leave off the whipped cream and final garnishes until the last moment, and accept that there will be some melting—think of it as “sundae soup” rather than failure.
What’s the best way to achieve perfect ice cream scoops?
First, acknowledge that wrestling with rock-hard ice cream is a universal struggle that unites humanity. The professional method involves running your ice cream scoop under hot water for 10 seconds before each scoop, using a gentle rocking motion rather than brute force, and working quickly before the heat transfers to the ice cream. For particularly stubborn ice cream, let it sit at room temperature for exactly 8 minutes—set a timer because this is science, not guesswork. Spring-loaded scoops are worth the investment if you make sundaes regularly, but in a pinch, a sturdy metal spoon dipped in warm water works almost as well for creating those picture-perfect rounds.
How can I make this recipe more diet-friendly?
We can lighten this up without sacrificing the joy factor. Start with low-fat ice cream or frozen yogurt—the premium varieties actually have decent texture. Use fruit-based sauces instead of chocolate and caramel—warmed berry compote provides similar gooey satisfaction with fewer calories. Swap whipped cream for Greek yogurt whipped with a touch of honey, which provides protein and tanginess. Reduce nuts and sprinkles by half but toast them well for maximum flavor impact. Remember that the psychology of eating matters too—using smaller bowls makes portions look more substantial, and eating slowly allows your brain to register satisfaction before you’ve consumed an entire pint.
What are some creative serving ideas beyond traditional bowls?
Let’s get weird with presentation! Serve mini sundaes in espresso cups for a fancy dinner party, layer ingredients in clear glasses for that parfait effect, or use hollowed-out citrus halves for a tropical vibe. For outdoor events, fill waffle cones with sundae ingredients and call them “deconstructed cones”—this is basically culinary jazz. For kids, use clean toy dump trucks as serving vessels (just wash thoroughly first) or create “sundae flights” with several small bowls featuring different sauce combinations. The most adventurous option: freeze your sundae slightly and serve it between two cookies as the world’s most extravagant ice cream sandwich.
Can I use non-dairy alternatives for this recipe?
Absolutely—the sundae revolution is inclusive! For ice cream, coconut-based varieties have the creamiest texture, while almond and oat options work well too—just avoid those with strong alternative flavors that might clash with your sauces. Non-dairy whipped creams made from coconut or soy are widely available and surprisingly good. For sauces, most commercial brands are accidentally vegan already, but check labels for dairy ingredients. Toasted nuts and sprinkles are naturally plant-based, and you can use vegan chocolate shavings. The assembly process remains identical, and the result is equally glorious—because deliciousness shouldn’t discriminate based on dietary preferences.
Summary
This ice cream sundae transforms simple ingredients into edible celebration through strategic layering, quality components, and playful presentation. It proves that extraordinary desserts don’t require advanced skills—just enthusiasm and willingness to embrace your inner child while holding a spoon.
Ultimate Ice Cream Sunday
4
servings15
minutesIngredients
Instructions
- 1 Chill serving bowls in freezer for 10 minutes. Let ice cream soften at room temperature for 5-7 minutes.
- 2 Warm hot fudge sauce in small saucepan over low heat until pourable. Toast pecans at 300°F for 4-6 minutes if not already toasted.
- 3 Place two scoops of ice cream in each chilled bowl, arranging them slightly off-center.
- 4 Drizzle hot fudge and caramel sauces over ice cream in zigzag patterns.
- 5 Sprinkle toasted pecans and rainbow sprinkles evenly over sauces.
- 6 Top with whipped cream, creating a dome shape.
- 7 Garnish with cherries and chocolate shavings. Serve immediately.


