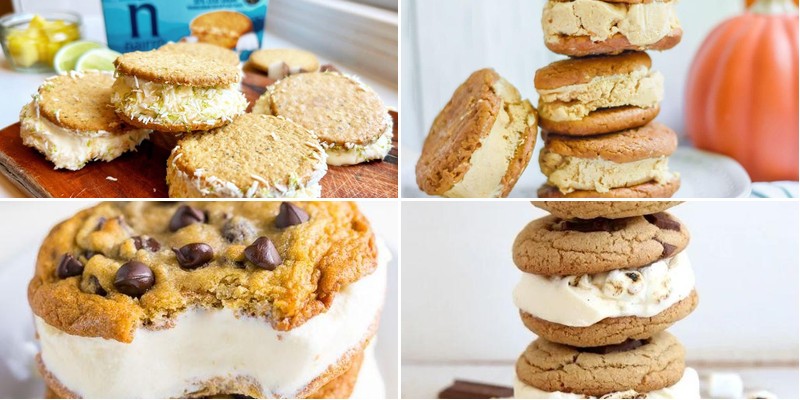
Who says ice cream sandwiches are just for kids? These 18 irresistible recipes transform that nostalgic treat into homemade indulgences perfect for any occasion. From classic chocolate chip to creative seasonal twists, you’ll find easy-to-follow ideas that promise creamy, dreamy satisfaction. Get ready to elevate your dessert game and make every bite a celebration—your freezer will thank you!
Classic Chocolate Chip Ice Cream Sandwich

Remember those sweltering summer afternoons when nothing could beat the simple joy of an ice cream sandwich? I’ve been chasing that perfect, nostalgic crunch and creamy chill ever since my kids started begging for them after soccer practice. Today, I’m sharing my foolproof, from-scratch version that’s become our go-to treat—it’s easier than you think and so much better than anything from the freezer aisle.
Serving: 12 | Pre Time: 20 minutes | Cooking Time: 10 minutes
Ingredients
- A couple of sticks of unsalted butter, softened at room temperature
- 3/4 cup of granulated sugar
- 3/4 cup of packed light brown sugar
- 2 large eggs
- 1 teaspoon of pure vanilla extract
- 2 1/4 cups of all-purpose flour
- 1 teaspoon of baking soda
- A good pinch of salt
- 2 cups of semi-sweet chocolate chips
- 1 quart of your favorite vanilla ice cream, slightly softened
Instructions
- Preheat your oven to 375°F and line two baking sheets with parchment paper.
- In a large bowl, cream together the softened butter, granulated sugar, and brown sugar with an electric mixer on medium speed for about 3 minutes, until light and fluffy—this step is key for chewy cookies.
- Beat in the eggs one at a time, then mix in the vanilla extract until just combined.
- In a separate bowl, whisk together the flour, baking soda, and salt to ensure even distribution.
- Gradually add the dry ingredients to the wet mixture, mixing on low speed until a dough forms, being careful not to overmix.
- Fold in the chocolate chips with a spatula until evenly distributed throughout the dough.
- Using a cookie scoop or tablespoon, drop rounded balls of dough onto the prepared baking sheets, spacing them about 2 inches apart to allow for spreading.
- Bake for 9–11 minutes, until the edges are golden brown but the centers still look slightly soft—they’ll firm up as they cool, giving that perfect chewy texture.
- Let the cookies cool on the baking sheets for 5 minutes, then transfer them to a wire rack to cool completely to room temperature.
- Once cooled, place a scoop of slightly softened vanilla ice cream, about 1/4 cup, onto the flat side of one cookie.
- Top with another cookie, flat side down, and gently press together until the ice cream reaches the edges.
- Wrap each sandwich individually in plastic wrap and freeze for at least 2 hours to firm up before serving.
After freezing, these sandwiches boast a satisfying crunch from the chewy cookies that gives way to the cold, creamy vanilla center. For a fun twist, I love rolling the edges in mini chocolate chips or crushed nuts right after assembling—it adds extra texture and makes them look bakery-worthy. Absolutely perfect for grabbing straight from the freezer on a hot day, they’re the ultimate homemade upgrade to a classic treat.
Double Chocolate Fudge Brownie Sandwich
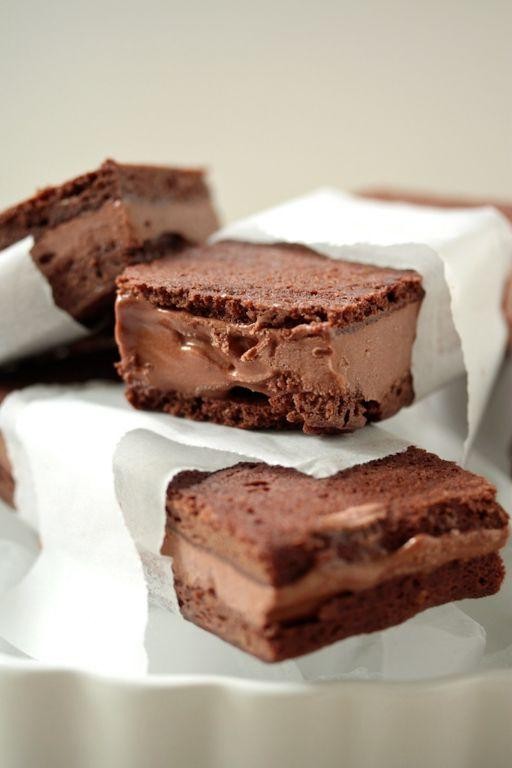
M y kitchen has seen many chocolate experiments, but nothing quite compares to the decadent joy of these Double Chocolate Fudge Brownie Sandwiches—they’re the ultimate treat for when you need a serious chocolate fix, and I love making them for movie nights with friends. Honestly, they’re easier than you’d think, and the rich, gooey center is pure bliss.
Serving: 12 | Pre Time: 20 minutes | Cooking Time: 25 minutes
Ingredients
– 1 cup of unsalted butter, melted and cooled a bit
– 2 cups of granulated sugar
– 4 large eggs, at room temperature (it helps them blend smoothly!)
– 1 tsp of vanilla extract, just a good splash
– 1 cup of all-purpose flour
– ¾ cup of unsweetened cocoa powder, sifted to avoid lumps
– ½ tsp of salt, a pinch to balance the sweetness
– 1 cup of semi-sweet chocolate chips, for that extra fudgy bite
– 1 cup of heavy cream, for the filling
– 8 oz of dark chocolate, chopped finely
Instructions
1. Preheat your oven to 350°F and line a 9×13-inch baking pan with parchment paper, leaving some overhang for easy removal later.
2. In a large bowl, whisk together the melted butter and granulated sugar until well combined and slightly glossy.
3. Add the eggs one at a time, whisking after each addition until fully incorporated, then stir in the vanilla extract.
4. Tip: Sift the flour, cocoa powder, and salt directly into the wet ingredients to prevent clumps and ensure a smooth batter.
5. Gently fold the dry ingredients into the wet mixture using a spatula until just combined—be careful not to overmix, as it can make the brownies tough.
6. Stir in the semi-sweet chocolate chips until evenly distributed throughout the batter.
7. Pour the batter into the prepared pan, spreading it out evenly with the spatula.
8. Bake in the preheated oven for 20–25 minutes, or until a toothpick inserted into the center comes out with a few moist crumbs (not wet batter).
9. Tip: Let the brownies cool completely in the pan on a wire rack—this helps them set and makes slicing easier without crumbling.
10. While the brownies cool, make the filling: in a small saucepan, heat the heavy cream over medium heat until it just begins to simmer, then remove from heat.
11. Add the chopped dark chocolate to the hot cream and let it sit for 1 minute to melt, then whisk until smooth and glossy.
12. Tip: Allow the chocolate filling to cool at room temperature for about 15 minutes, stirring occasionally, until it thickens to a spreadable consistency.
13. Once the brownies are cool, lift them out of the pan using the parchment overhang and cut into 24 equal squares.
14. Spread a generous tablespoon of the chocolate filling onto the flat side of one brownie square, then top with another square to form a sandwich.
15. Repeat with the remaining brownies and filling until all sandwiches are assembled.
Zesty and indulgent, these sandwiches boast a chewy brownie exterior that gives way to a silky, rich fudge center—perfect for serving slightly chilled to firm up the filling, or warm with a scoop of vanilla ice cream for an extra decadent twist.
Mint Chocolate Cookie Ice Cream Sandwich
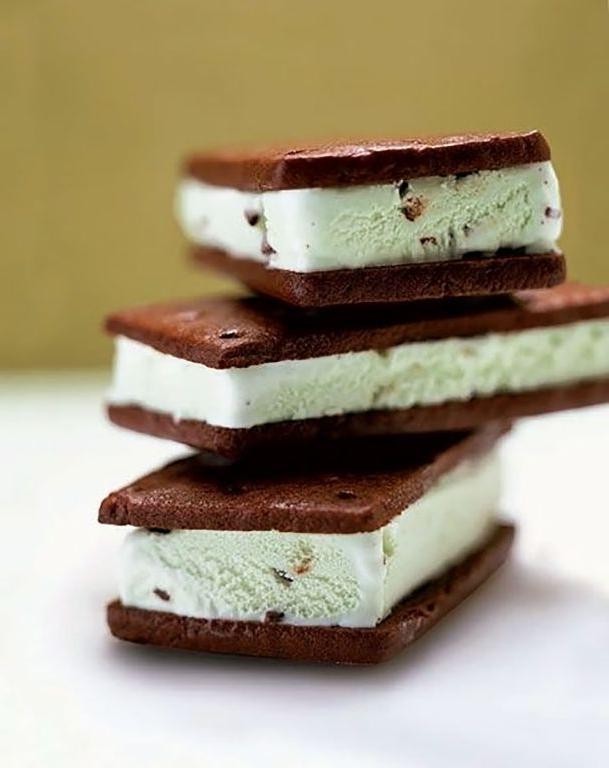
Vivid memories of summer afternoons always bring me back to this treat—I first made these mint chocolate cookie ice cream sandwiches during a heatwave last July when my air conditioning broke, and they became our family’s favorite cool-down ritual. There’s something magical about that crisp cookie giving way to creamy mint ice cream that just feels like a hug in dessert form. I love how simple they are to whip up, even on the busiest days, and I often double the batch to stash some in the freezer for spontaneous sweet cravings.
Serving: 8 sandwiches | Pre Time: 20 minutes | Cooking Time: 10 minutes
Ingredients
– 1 cup of all-purpose flour
– ½ cup of unsweetened cocoa powder
– ½ teaspoon of baking soda
– ¼ teaspoon of salt
– ½ cup of softened unsalted butter
– ¾ cup of granulated sugar
– 1 large egg
– 1 teaspoon of vanilla extract
– A couple of cups of mint chocolate chip ice cream, slightly softened
– A splash of milk (if needed for the dough)
Instructions
1. Preheat your oven to 350°F and line two baking sheets with parchment paper.
2. In a medium bowl, whisk together the flour, cocoa powder, baking soda, and salt until well combined.
3. In a large bowl, use an electric mixer to cream the softened butter and granulated sugar on medium speed for about 2 minutes, until light and fluffy.
4. Beat in the egg and vanilla extract until fully incorporated into the butter mixture.
5. Gradually add the dry ingredients to the wet ingredients, mixing on low speed just until a dough forms—if it feels too dry, add a splash of milk to bring it together.
6. Scoop the dough into 16 equal portions, about 1 tablespoon each, and roll them into balls.
7. Place the dough balls on the prepared baking sheets, spacing them about 2 inches apart, and flatten each slightly with the palm of your hand.
8. Bake in the preheated oven for 8–10 minutes, until the edges are set but the centers are still soft—they’ll firm up as they cool, so don’t overbake.
9. Let the cookies cool on the baking sheets for 5 minutes, then transfer them to a wire rack to cool completely, about 15 minutes.
10. Once cooled, scoop about ¼ cup of slightly softened mint chocolate chip ice cream onto the flat side of one cookie.
11. Press another cookie on top, flat side down, gently squeezing to spread the ice cream evenly to the edges.
12. Wrap each sandwich individually in plastic wrap and freeze for at least 2 hours, or until firm, to prevent melting when serving.
Glad you tried this recipe! The cookies stay wonderfully crisp against the creamy, refreshing mint ice cream, creating a perfect textural contrast. For a fun twist, I sometimes roll the edges in mini chocolate chips before freezing, or serve them with a drizzle of hot fudge for an extra indulgent touch.
Peanut Butter and Jelly Ice Cream Delight

Yesterday, while digging through my freezer for emergency chocolate, I stumbled upon a forgotten jar of homemade strawberry jam and realized I had all the makings for the ultimate nostalgic treat—a frozen version of the classic PB&J sandwich that’s perfect for beating the summer heat or just indulging a childhood craving. This no-churn ice cream comes together with minimal fuss, and I love how the swirls of jelly peek through each creamy scoop, reminding me of after-school snacks at my grandma’s kitchen table.
Serving: 6 | Pre Time: 15 minutes | Cooking Time: 0 minutes
Ingredients
– 2 cups of heavy cream, straight from the fridge
– One 14-ounce can of sweetened condensed milk (that sticky-sweet magic in a can)
– A heaping ½ cup of creamy peanut butter—I use the kind with just peanuts and salt
– A generous ⅓ cup of your favorite strawberry jam or jelly, plus an extra spoonful for swirling
– A tiny pinch of fine sea salt to balance the sweetness
– A couple of graham crackers, crushed, for a bit of crunch if you’re feeling fancy
Instructions
1. Pour the 2 cups of cold heavy cream into a large mixing bowl. Using a hand mixer or stand mixer fitted with the whisk attachment, whip the cream on medium-high speed until it forms stiff peaks, which should take about 3–4 minutes—you’ll know it’s ready when the beaters leave firm marks that hold their shape. Tip: Chill your bowl and beaters in the freezer for 10 minutes beforehand to help the cream whip up faster and fluffier.
2. In a separate medium bowl, combine the entire can of sweetened condensed milk, the heaping ½ cup of peanut butter, and the tiny pinch of sea salt. Stir vigorously with a spatula until the mixture is completely smooth and no streaks of peanut butter remain, about 1–2 minutes.
3. Gently fold the whipped cream into the peanut butter mixture using the spatula, using broad, sweeping motions to incorporate it fully without deflating the cream—this should take about 1 minute until you see a uniform, pale tan color. Tip: Fold slowly and stop as soon as it’s combined to keep the ice cream light and airy.
4. Pour half of the ice cream base into a 9×5-inch loaf pan. Drizzle half of the ⅓ cup of strawberry jam over the top in zigzag lines. Use a knife or skewer to gently swirl the jam into the ice cream, making 3–4 passes to create ribbons without overmixing.
5. Add the remaining ice cream base to the pan, smooth it with the spatula, and repeat the swirling process with the rest of the jam. If using, sprinkle the crushed graham crackers evenly over the top for a subtle crunch. Tip: For cleaner slices, line the pan with parchment paper, letting it overhang the sides for easy removal later.
6. Cover the pan tightly with plastic wrap or a lid, pressing it directly onto the surface of the ice cream to prevent ice crystals. Freeze for at least 6 hours, or ideally overnight, until it’s firm to the touch.
Buttery, rich peanut butter melds with sweet-tart jam in every spoonful, creating a creamy texture that’s scoopable straight from the freezer. I love serving it sandwiched between two chocolate chip cookies for an over-the-top ice cream sandwich, or simply topped with a drizzle of warm honey for a cozy twist.
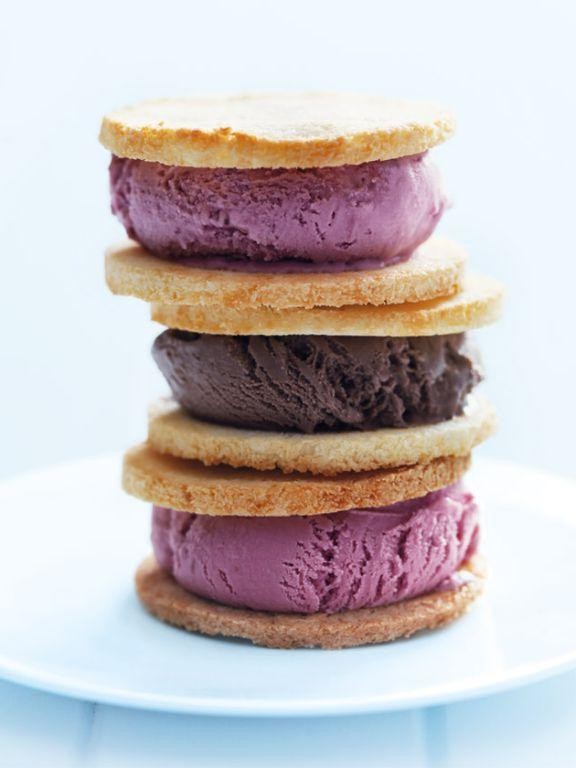
Red Velvet Ice Cream Sandwich Supreme
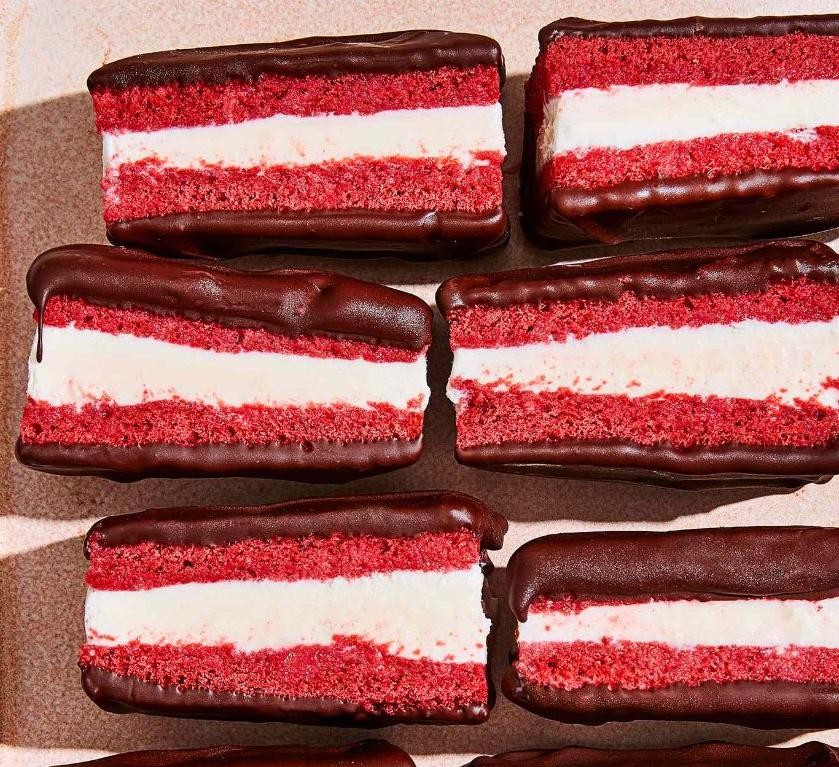
Every time I see that vibrant red color peeking out from my freezer, I know I’m in for a treat. This Red Velvet Ice Cream Sandwich Supreme came about one sweltering summer afternoon when I was craving something decadent but refreshing, and it’s been my go-to for impressing guests ever since.
Serving: 8 | Pre Time: 30 minutes | Cooking Time: 12 minutes
Ingredients
- 1 and 1/2 cups of all-purpose flour (I always spoon and level it to avoid dense cookies)
- 1/4 cup of unsweetened cocoa powder
- 1 teaspoon of baking soda
- A pinch of salt
- 1/2 cup of unsalted butter, softened (leave it on the counter for about 30 minutes)
- 1 cup of granulated sugar
- 1 large egg
- 1 tablespoon of red food coloring gel (the gel gives a richer color without thinning the batter)
- 1 teaspoon of vanilla extract
- 1/2 cup of buttermilk
- 1 teaspoon of white vinegar
- 1 quart of vanilla ice cream, slightly softened
Instructions
- Preheat your oven to 350°F and line two baking sheets with parchment paper.
- In a medium bowl, whisk together the all-purpose flour, unsweetened cocoa powder, baking soda, and salt until well combined.
- In a large bowl, use an electric mixer to beat the softened unsalted butter and granulated sugar on medium speed for 2-3 minutes, until light and fluffy.
- Add the large egg to the butter mixture and beat until fully incorporated.
- Mix in the red food coloring gel and vanilla extract until the batter is evenly red.
- Alternate adding the dry ingredients and buttermilk to the wet mixture, starting and ending with the dry ingredients, mixing on low speed just until combined after each addition.
- Stir in the white vinegar until the batter is smooth.
- Drop rounded tablespoons of dough onto the prepared baking sheets, spacing them 2 inches apart.
- Bake for 10-12 minutes, until the edges are set but the centers are still soft (they’ll firm up as they cool).
- Let the cookies cool on the baking sheets for 5 minutes, then transfer them to a wire rack to cool completely.
- Once cooled, scoop about 1/4 cup of slightly softened vanilla ice cream onto the flat side of one cookie.
- Press another cookie on top gently to form a sandwich, squeezing just until the ice cream reaches the edges.
- Wrap each sandwich individually in plastic wrap and freeze for at least 2 hours, or until firm.
You’ll love the contrast between the soft, cake-like red velvet cookies and the creamy vanilla ice cream—it’s like a slice of red velvet cake transformed into a handheld frozen dessert. For a fun twist, roll the edges in mini chocolate chips or crushed pecans before freezing to add a little crunch.
Oatmeal Raisin Nutty Ice Cream Sandwich
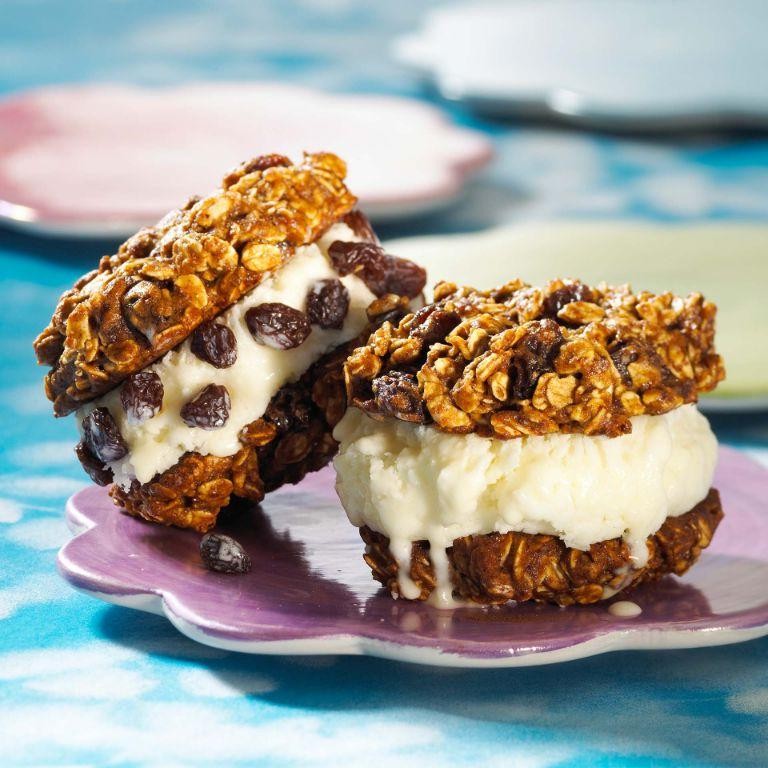
Whew, after a long day of holiday shopping, I needed a treat that felt both indulgent and a little wholesome—enter this genius mashup of my favorite cookie and ice cream. It’s like the cozy oatmeal raisin cookie you grew up with decided to get fancy and throw a party.
Serving: 6 | Pre Time: 20 minutes | Cooking Time: 12 minutes
Ingredients
– 1 cup of old-fashioned rolled oats (the kind that gives a nice chew)
– 3/4 cup of all-purpose flour, plus a little extra for dusting
– 1/2 cup of unsalted butter, softened to room temperature (I leave mine on the counter for an hour)
– 1/2 cup of packed brown sugar, for that deep molasses flavor
– 1 large egg, straight from the fridge
– 1 teaspoon of vanilla extract, a good splash
– 1/2 teaspoon of ground cinnamon, just a warm hint
– 1/4 teaspoon of baking soda
– A big pinch of salt
– 1/2 cup of raisins, plumped up in hot water for 5 minutes and drained (trust me, it prevents them from drying out)
– 1/4 cup of chopped walnuts, for a nutty crunch
– 1 pint of vanilla ice cream, slightly softened (I take it out 10 minutes before assembling)
Instructions
1. Preheat your oven to 350°F (175°C) and line a baking sheet with parchment paper.
2. In a medium bowl, whisk together the rolled oats, flour, cinnamon, baking soda, and salt until well combined.
3. In a large mixing bowl, use an electric mixer on medium speed to cream the softened butter and brown sugar for about 2 minutes, until light and fluffy. Tip: Scrape down the sides of the bowl halfway through to ensure everything mixes evenly.
4. Beat in the egg and vanilla extract until fully incorporated into the butter mixture.
5. Gradually add the dry oat-flour mixture to the wet ingredients, mixing on low speed just until no dry streaks remain—don’t overmix!
6. Fold in the plumped raisins and chopped walnuts with a spatula until evenly distributed.
7. Lightly flour your hands and scoop about 2 tablespoons of dough per cookie, rolling them into balls and placing them 2 inches apart on the prepared baking sheet. Flatten each ball slightly with your palm. Tip: If the dough feels sticky, chill it in the fridge for 10 minutes; it’ll be easier to handle.
8. Bake the cookies for 10–12 minutes, until the edges are golden brown but the centers are still soft. Tip: They’ll firm up as they cool, so don’t overbake for that perfect chewy texture.
9. Let the cookies cool completely on the baking sheet for 5 minutes, then transfer them to a wire rack to cool fully, about 30 minutes.
10. Once cooled, scoop about 1/3 cup of slightly softened vanilla ice cream onto the flat side of one cookie and gently press another cookie on top to form a sandwich.
11. Immediately wrap each ice cream sandwich tightly in plastic wrap and freeze for at least 2 hours, until firm.
Kind of magical how the chewy, spiced cookies meld with the creamy ice cream, isn’t it? The raisins add little bursts of sweetness, while the walnuts give a satisfying crunch that contrasts beautifully with the smooth center. For a fun twist, roll the edges in extra chopped oats or drizzle with caramel before serving—it’s a nostalgic treat that’s sure to disappear fast!
S’mores Ice Cream Cookie Sandwich
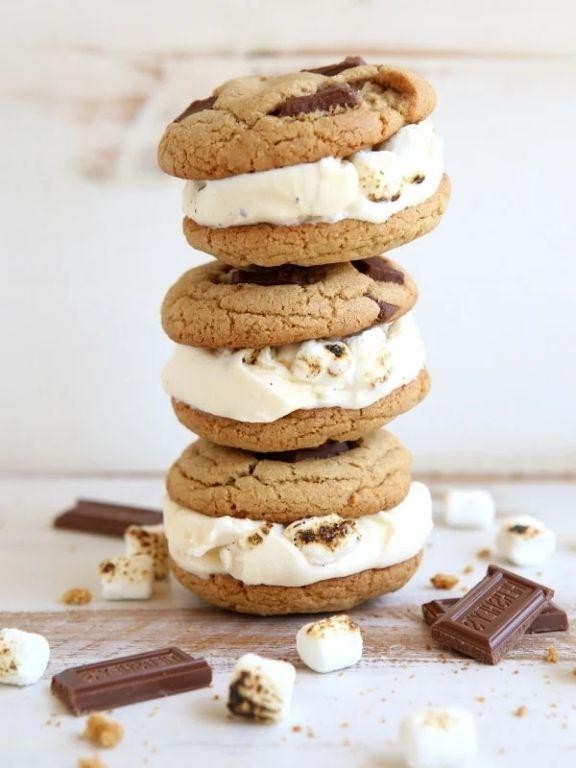
Baking has always been my happy place, especially when I can combine two classic treats into one epic dessert. The other day, after a bonfire with friends, I was craving s’mores but also had a pint of vanilla ice cream calling my name—so I decided to mash them up into these incredible ice cream cookie sandwiches. Trust me, they’re the perfect solution for when you can’t decide between cookies and ice cream, and they come together with minimal fuss.
Serving: 8 sandwiches | Pre Time: 20 minutes | Cooking Time: 10 minutes
Ingredients
– 2 cups of all-purpose flour
– 1 teaspoon of baking soda
– A pinch of salt
– 1 cup of unsalted butter, softened to room temperature (I always leave mine out for an hour)
– ¾ cup of granulated sugar
– ¾ cup of packed brown sugar
– 2 large eggs
– 1 teaspoon of vanilla extract
– 2 cups of semi-sweet chocolate chips
– 1 cup of mini marshmallows
– 1 quart of vanilla ice cream, slightly softened (I pop it in the fridge for 10 minutes)
– A handful of graham cracker crumbs for rolling (about ½ cup)
Instructions
1. Preheat your oven to 350°F and line two baking sheets with parchment paper.
2. In a medium bowl, whisk together the flour, baking soda, and salt until well combined.
3. In a large bowl, use an electric mixer to cream the softened butter, granulated sugar, and brown sugar on medium speed for about 2 minutes, until light and fluffy.
4. Beat in the eggs one at a time, then mix in the vanilla extract until smooth.
5. Gradually add the flour mixture to the wet ingredients, mixing on low speed just until no dry spots remain—overmixing can make the cookies tough.
6. Fold in the chocolate chips and mini marshmallows gently with a spatula to distribute them evenly.
7. Scoop tablespoon-sized balls of dough onto the prepared baking sheets, spacing them about 2 inches apart to allow for spreading.
8. Bake for 9-11 minutes, until the edges are golden brown but the centers are still soft; they’ll firm up as they cool. Tip: Rotate the pans halfway through for even baking.
9. Let the cookies cool on the baking sheets for 5 minutes, then transfer them to a wire rack to cool completely, about 30 minutes.
10. Once cooled, scoop about ¼ cup of slightly softened vanilla ice cream onto the flat side of one cookie.
11. Press another cookie on top gently to form a sandwich, squeezing lightly so the ice cream reaches the edges. Tip: Work quickly to prevent the ice cream from melting too much.
12. Roll the edges of each sandwich in the graham cracker crumbs, pressing lightly so they stick. Tip: If the crumbs aren’t adhering, you can lightly dampen the ice cream edges with a bit of water.
13. Place the assembled sandwiches on a baking sheet and freeze for at least 2 hours, or until firm.
Finally, these sandwiches are a dreamy mix of chewy cookie, melty ice cream, and that nostalgic graham crunch. I love serving them straight from the freezer for a cool, satisfying bite that’s perfect for summer gatherings or a cozy night in—sometimes I even drizzle them with extra chocolate sauce for an extra indulgent touch.
Salted Caramel Pretzel Ice Cream Sandwich
Just when I thought my sweet tooth couldn’t be tempted further, I stumbled upon the ultimate treat mash-up in my kitchen last weekend—a happy accident involving leftover pretzels and a batch of homemade caramel. It’s the perfect blend of salty crunch and creamy, sweet indulgence that’ll have you sneaking back to the freezer.
Serving: 8 | Pre Time: 25 minutes | Cooking Time: 15 minutes
Ingredients
– 2 cups of heavy cream, straight from the fridge
– 1 can (14 ounces) of sweetened condensed milk, because it makes everything magical
– A heaping cup of those mini pretzel twists you can’t stop snacking on
– A generous half-cup of granulated sugar for that caramel magic
– 3 tablespoons of unsalted butter, cut into little cubes
– A big pinch of flaky sea salt, plus extra for sprinkling
– A splash of pure vanilla extract to round it all out
Instructions
1. Line an 8×8-inch baking pan with parchment paper, letting the edges hang over for easy lifting later.
2. Pour the heavy cream into a large mixing bowl and use an electric mixer on medium-high speed to whip it until stiff peaks form, about 3–4 minutes—tip: chill your bowl and beaters first for fluffier results.
3. Gently fold in the sweetened condensed milk and vanilla extract with a spatula until just combined, being careful not to deflate the cream.
4. Spread half of the cream mixture evenly into the prepared pan, then sprinkle a single layer of mini pretzel twists over the top, pressing them in lightly.
5. In a medium saucepan over medium heat, melt the granulated sugar, stirring constantly with a wooden spoon until it turns a deep amber color, about 5–7 minutes—tip: don’t walk away, as sugar can burn quickly!
6. Remove the saucepan from the heat and immediately stir in the butter and a big pinch of sea salt until smooth and glossy.
7. Carefully pour the hot caramel over the pretzel layer in the pan, spreading it gently with a spatula to cover evenly.
8. Top with the remaining cream mixture, smoothing it out, then freeze the pan uncovered for at least 6 hours or overnight until firm—tip: cover it with plastic wrap once set to prevent freezer burn.
9. Lift the frozen slab out using the parchment paper, cut it into 8 squares with a sharp knife warmed under hot water for cleaner slices, and sprinkle with extra sea salt before serving.
Finally, these sandwiches are a textural dream: the creamy ice cream melts against the crisp pretzels and gooey caramel, with that salty kick balancing the sweetness. Try serving them slightly softened for a messier, more decadent bite, or crumble extra pretzels on top for added crunch.
Pumpkin Spice Ice Cream Sandwich Magic
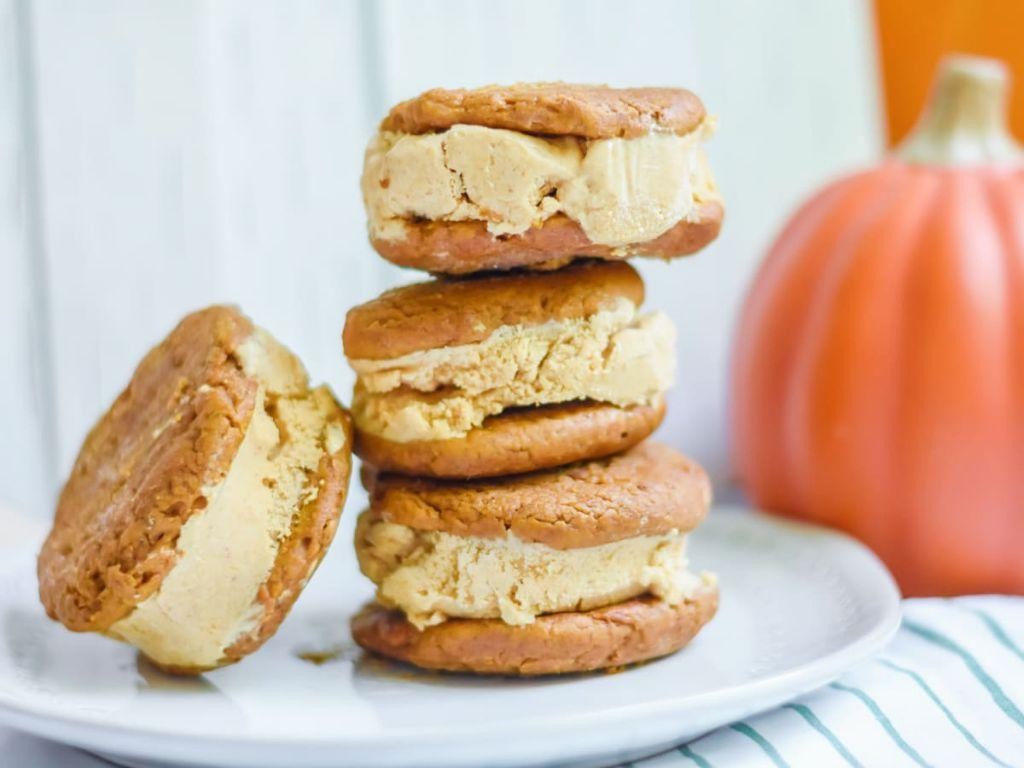
Nothing says autumn like pumpkin spice, but I’ve always thought it deserved a cold, creamy twist. Last weekend, after one too many pumpkin spice lattes, I decided to whip up a frozen treat that’s perfect for those oddly warm fall days—or for satisfying a sweet craving any time of year. Trust me, these ice cream sandwiches are pure magic, with soft, spiced cookies hugging a velvety homemade ice cream.
Serving: 12 sandwiches | Pre Time: 30 minutes | Cooking Time: 10 minutes
Ingredients
– 2 cups of all-purpose flour
– 1 teaspoon of baking soda
– A heaping tablespoon of pumpkin pie spice
– A pinch of salt
– 1 cup (2 sticks) of unsalted butter, softened
– ¾ cup of granulated sugar
– ¾ cup of packed brown sugar
– 1 large egg
– 1 teaspoon of vanilla extract
– 1 (15-ounce) can of pumpkin puree (not pie filling)
– 1 quart of vanilla ice cream, slightly softened
– A splash of heavy cream
Instructions
1. Preheat your oven to 350°F and line two baking sheets with parchment paper.
2. In a medium bowl, whisk together the flour, baking soda, pumpkin pie spice, and salt until well combined.
3. In a large mixing bowl, cream the softened butter, granulated sugar, and brown sugar together with an electric mixer on medium speed for about 2–3 minutes, until light and fluffy. Tip: Make sure your butter is at room temperature to avoid a lumpy dough.
4. Beat in the egg and vanilla extract until fully incorporated.
5. Mix in the pumpkin puree until the mixture is smooth and evenly colored.
6. Gradually add the dry ingredients to the wet ingredients, mixing on low speed just until no flour streaks remain. Tip: Don’t overmix, or the cookies can become tough.
7. Drop rounded tablespoons of dough onto the prepared baking sheets, spacing them about 2 inches apart.
8. Bake for 10–12 minutes, until the edges are lightly golden and the centers are set. Tip: Let the cookies cool on the sheet for 5 minutes before transferring to a wire rack to cool completely—they’ll firm up as they cool.
9. While the cookies cool, stir the slightly softened vanilla ice cream with a splash of heavy cream in a bowl until smooth and spreadable.
10. Once the cookies are completely cool, scoop about ¼ cup of the ice cream mixture onto the flat side of one cookie.
11. Press another cookie, flat side down, onto the ice cream to form a sandwich, gently squeezing to spread the ice cream to the edges.
12. Immediately wrap each sandwich in plastic wrap and freeze for at least 4 hours, or until firm.
That first bite reveals a delightful contrast: the cookies are tender and warmly spiced, while the ice cream stays creamy without turning rock-hard. Try rolling the edges in crushed graham crackers or drizzling with caramel for an extra festive touch—they’re a hit at fall gatherings or as a cozy treat by the fire.
Bacon Maple Waffle Ice Cream Sandwich

M y weekend breakfast game just got a major upgrade with this sweet-and-salty mashup that’s perfect for brunch or dessert. I first tried something similar at a quirky food truck and spent weeks tweaking my own version—now it’s my go‑in when I want to impress guests without spending all day in the kitchen. Trust me, the combo of crispy bacon, fluffy waffles, and creamy ice cream is pure magic.
Serving: 4 | Pre Time: 15 minutes | Cooking Time: 20 minutes
Ingredients
– 1 cup of all‑purpose flour
– 2 teaspoons of baking powder
– A pinch of salt
– 1 cup of milk
– 2 large eggs
– 2 tablespoons of melted butter
– A generous ¼ cup of pure maple syrup
– 6 slices of thick‑cut bacon
– 1 pint of vanilla ice cream
– A splash of vegetable oil for the waffle iron
Instructions
1. Preheat your waffle iron to 375°F—I always give it a few extra minutes to get really hot for crispier waffles.
2. Cook the bacon in a skillet over medium heat for 8–10 minutes until it’s crispy and browned, then drain it on paper towels and chop it into small bits.
3. In a large bowl, whisk together the flour, baking powder, and salt until well combined.
4. Add the milk, eggs, melted butter, and maple syrup to the dry ingredients, and stir just until the batter is smooth—overmixing can make waffles tough, so stop as soon as you see no lumps.
5. Lightly brush the preheated waffle iron with vegetable oil to prevent sticking.
6. Pour about ½ cup of batter onto the iron, close it, and cook for 4–5 minutes until the waffle is golden brown and crisp on the edges.
7. Repeat with the remaining batter to make 8 waffles total, letting them cool completely on a wire rack so they don’t get soggy.
8. Scoop about ¼ cup of vanilla ice cream onto one waffle, sprinkle with some chopped bacon, and top with another waffle, pressing gently to form a sandwich.
9. Serve immediately, or wrap each sandwich in parchment paper and freeze for up to 30 minutes if you prefer a firmer texture—this helps the ice cream set without melting too fast.
A warm, crispy waffle paired with cold, creamy ice cream and that salty bacon crunch is pure bliss. I love drizzling extra maple syrup on top or adding a sprinkle of sea salt for an extra flavor pop. These are best enjoyed right away, but if you have leftovers, just pop them back in the freezer for a quick treat later!
Matcha Green Tea Ice Cream Sandwich
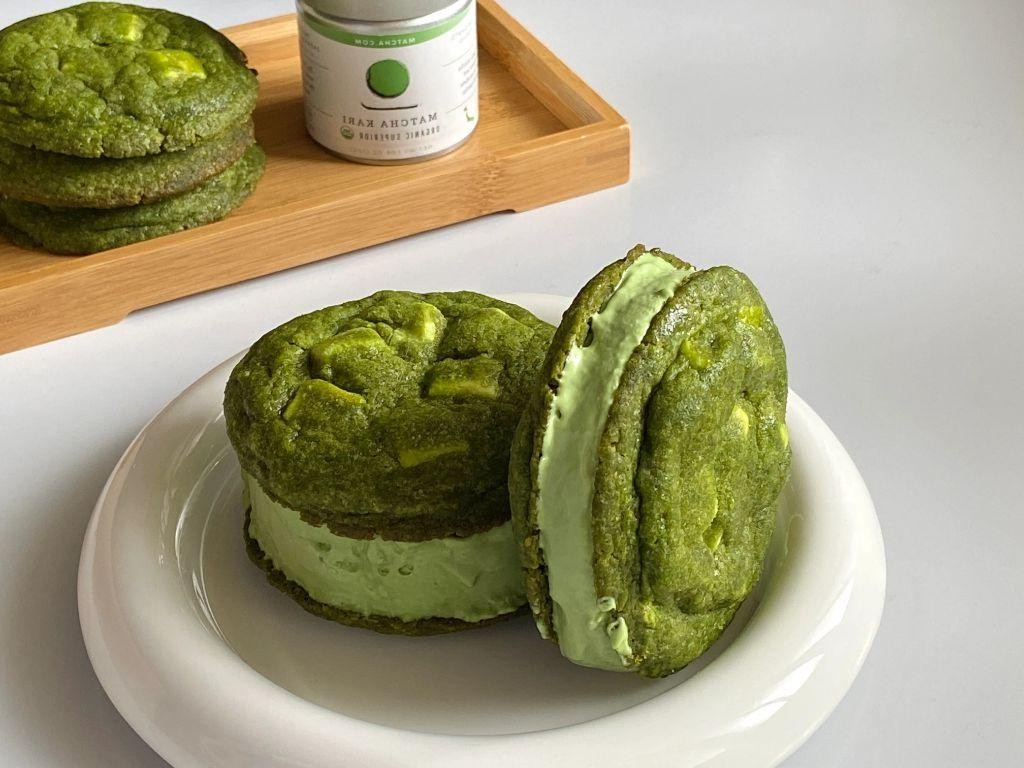
Zipping through my recipe archives, I stumbled upon a forgotten favorite from my college days—a vibrant, earthy treat that always brings a smile. It’s a matcha green tea ice cream sandwich, perfect for those afternoons when you crave something sweet but not overly heavy, and trust me, it’s way easier to whip up than you’d think!
Serving: 6 | Pre Time: 20 minutes | Cooking Time: 10 minutes
Ingredients
– A cup of all-purpose flour
– Half a cup of granulated sugar
– A quarter cup of unsalted butter, softened
– One large egg
– A tablespoon of matcha green tea powder
– A teaspoon of vanilla extract
– A pinch of salt
– A pint of vanilla ice cream, slightly softened
Instructions
1. Preheat your oven to 350°F and line a baking sheet with parchment paper.
2. In a mixing bowl, cream together the softened butter and granulated sugar until light and fluffy, which should take about 2-3 minutes with an electric mixer.
3. Beat in the egg and vanilla extract until fully combined.
4. Sift in the all-purpose flour, matcha powder, and salt, then stir gently until a dough forms—be careful not to overmix to keep the cookies tender.
5. Scoop tablespoon-sized portions of dough onto the prepared baking sheet, spacing them about 2 inches apart.
6. Bake for 8-10 minutes, or until the edges are just set but the centers are still soft; they’ll firm up as they cool, so don’t overbake.
7. Let the cookies cool completely on a wire rack for at least 15 minutes.
8. Once cooled, place a scoop of slightly softened vanilla ice cream between two cookies, pressing gently to form a sandwich.
9. Wrap each sandwich individually in plastic wrap and freeze for at least 2 hours to set firmly.
10. Serve straight from the freezer for the best texture.
Finally, these sandwiches offer a delightful crunch from the earthy matcha cookies that contrasts beautifully with the creamy, cool ice cream. For a fun twist, try rolling the edges in crushed pistachios or drizzling with white chocolate before serving—it’s a surefire hit at summer gatherings!
Raspberry White Chocolate Ice Cream Sandwich

Oof, is there anything better than a homemade ice cream sandwich on a hot day? I’ve been tinkering with this raspberry white chocolate version all summer, and it’s become my go-to for backyard barbecues—it’s the perfect sweet, creamy, and slightly tart treat that always disappears first from the dessert table.
Serving: 8 sandwiches | Pre Time: 30 minutes | Cooking Time: 10 minutes
Ingredients
– 2 cups of all-purpose flour
– A teaspoon of baking soda
– A pinch of salt
– A stick of unsalted butter, softened
– 3/4 cup of granulated sugar
– One large egg
– A teaspoon of vanilla extract
– 2 cups of fresh raspberries (frozen work too, just thaw them first!)
– 1/4 cup of granulated sugar (for the raspberries)
– A splash of lemon juice
– 1 pint of vanilla ice cream, slightly softened
– A handful of white chocolate chips, melted
Instructions
1. Preheat your oven to 350°F and line two baking sheets with parchment paper.
2. In a medium bowl, whisk together the flour, baking soda, and salt until combined.
3. In a large bowl, cream the softened butter and 3/4 cup of sugar with a hand mixer on medium speed for about 2 minutes, until light and fluffy. Tip: Make sure your butter is at room temperature to avoid a lumpy dough!
4. Beat in the egg and vanilla extract until just incorporated.
5. Gradually add the flour mixture to the wet ingredients, mixing on low speed until a soft dough forms.
6. Scoop tablespoon-sized balls of dough onto the prepared baking sheets, spacing them about 2 inches apart.
7. Bake for 8-10 minutes, until the edges are lightly golden. Tip: They’ll firm up as they cool, so don’t overbake!
8. Let the cookies cool completely on the baking sheets for 10 minutes, then transfer to a wire rack.
9. While the cookies cool, mash the raspberries with 1/4 cup of sugar and lemon juice in a small bowl until saucy.
10. Strain the raspberry mixture through a fine-mesh sieve to remove the seeds, pressing with a spoon to extract all the juice.
11. In a separate bowl, fold the raspberry sauce into the softened vanilla ice cream until swirled. Tip: Work quickly to prevent the ice cream from melting too much!
12. Place a scoop of the raspberry ice cream between two cooled cookies, gently pressing to form a sandwich.
13. Drizzle the melted white chocolate over the top of each sandwich.
14. Freeze the sandwiches on a baking sheet for at least 2 hours, or until firm.
You’ll love the contrast of the chewy, buttery cookies with the bright, fruity ice cream and sweet white chocolate drizzle. I sometimes roll the edges in crushed freeze-dried raspberries for an extra pop of color and tang—it makes them look as good as they taste!
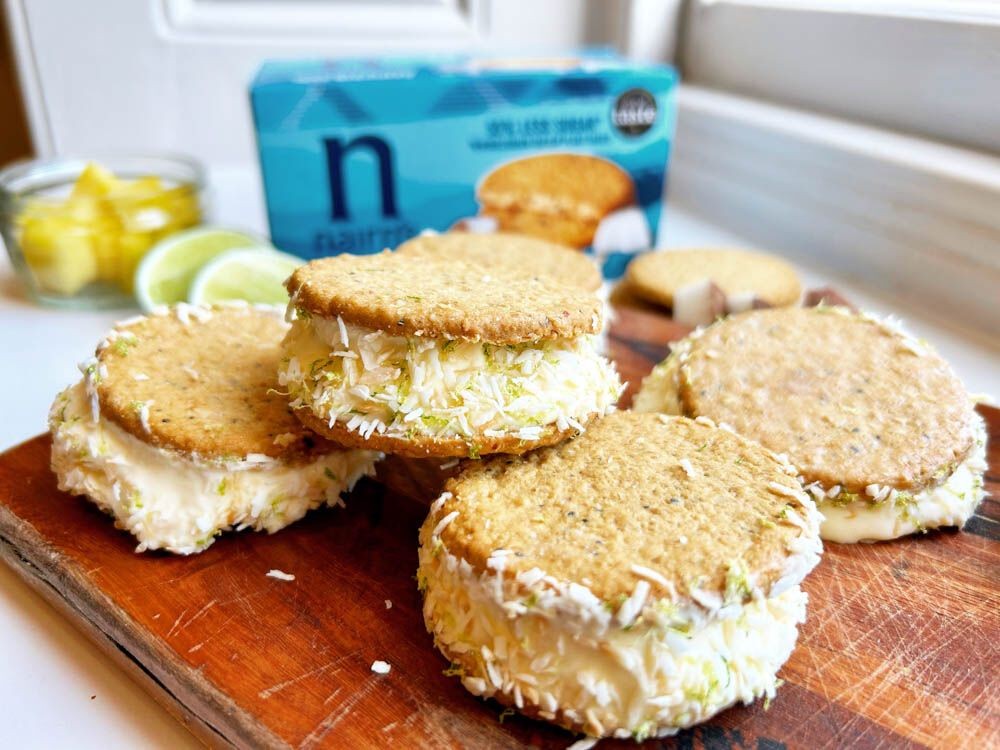
Coconut Macaroon Ice Cream Sandwich
Haven’t we all had that moment when a coconut macaroon and a scoop of ice cream just seem meant to be? I was cleaning out my pantry last week and found a half-bag of sweetened shredded coconut, which sparked the idea for these dreamy, chewy-crisp sandwiches. They’re my new favorite treat to whip up when friends drop by unexpectedly—simple, impressive, and endlessly customizable.
Serving: 12 sandwiches | Pre Time: 15 minutes | Cooking Time: 15 minutes
Ingredients
– 3 large egg whites, at room temperature (I always let mine sit out while I gather everything else)
– A pinch of fine salt
– 3/4 cup of granulated sugar
– 1 teaspoon of pure vanilla extract
– 14 ounces of sweetened shredded coconut (that’s about one standard bag)
– 1 quart of your favorite vanilla ice cream, slightly softened (I keep mine on the counter for 10 minutes—no more!)
Instructions
1. Preheat your oven to 325°F and line two baking sheets with parchment paper.
2. In a large, clean bowl, use an electric mixer on medium speed to beat the egg whites and salt until frothy, about 1 minute.
3. Gradually add the sugar while mixing, then increase to high speed and beat until stiff, glossy peaks form, about 3–4 minutes total. (Tip: Make sure your bowl and beaters are completely grease-free for the best volume.)
4. Gently fold in the vanilla extract and all of the shredded coconut with a spatula until evenly combined.
5. Drop rounded tablespoons of the mixture onto the prepared sheets, spacing them about 2 inches apart, and use damp fingers to gently shape each into a neat mound.
6. Bake for 15–18 minutes, rotating the sheets halfway through, until the edges are deep golden brown and the tops are lightly toasted. (Tip: They firm up as they cool, so don’t overbake if they seem soft right out of the oven.)
7. Let the macaroons cool completely on the sheets for at least 30 minutes.
8. Scoop about 1/4 cup of slightly softened vanilla ice cream onto the flat side of one cooled macaroon.
9. Press another macaroon gently on top to form a sandwich, then immediately place it on a tray and freeze for at least 2 hours until firm. (Tip: Work quickly here to prevent melting, and if the ice cream gets too soft, pop it back in the freezer for 5 minutes.)
10. Repeat with the remaining macaroons and ice cream, storing the finished sandwiches in an airtight container in the freezer.
Ready to indulge? The contrast between the crispy, chewy coconut shell and the creamy, cold center is pure magic. For a fun twist, try rolling the edges in mini chocolate chips or drizzling them with melted dark chocolate before serving—they disappear fast at summer barbecues!
Strawberry Shortcake Ice Cream Sandwich
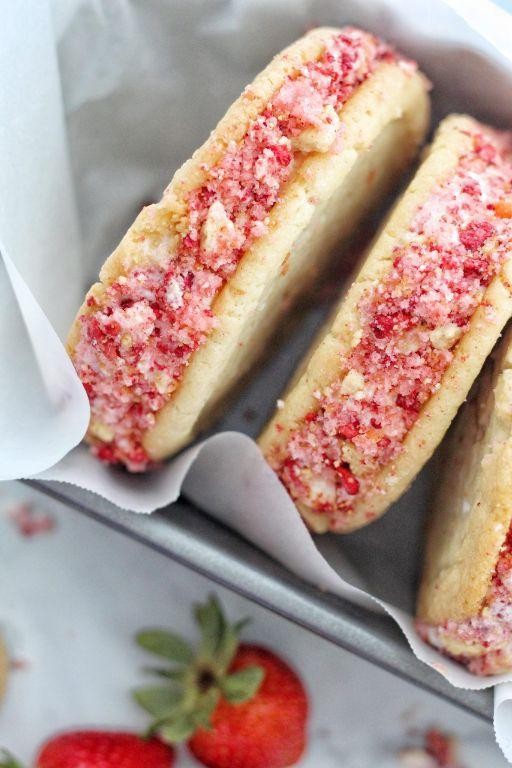
Every summer, I find myself craving something sweet and nostalgic, and this year, it led me to create the ultimate treat: a strawberry shortcake ice cream sandwich. It’s like combining the best parts of a classic dessert with the fun of an ice cream sandwich, and honestly, it’s become my go-to for backyard gatherings. I love how it brings back memories of childhood summers, and the best part is how easy it is to whip up—no fancy equipment needed, just a little patience while it freezes.
Serving: 6 | Pre Time: 20 minutes | Cooking Time: 15 minutes
Ingredients
- 1 and 1/2 cups of all-purpose flour, plus a little extra for dusting
- 1/2 cup of granulated sugar
- 1/2 cup of unsalted butter, cold and cut into small cubes
- 1/4 cup of heavy cream, plus a splash more if needed
- 1 teaspoon of vanilla extract
- A pinch of salt
- 1 pint of strawberry ice cream, slightly softened (I like using a high-quality store-bought one to save time)
- 1 cup of fresh strawberries, hulled and sliced
- 2 tablespoons of powdered sugar for dusting
Instructions
- Preheat your oven to 350°F and line a baking sheet with parchment paper.
- In a large bowl, whisk together the flour, granulated sugar, and salt until well combined.
- Add the cold butter cubes to the flour mixture and use a pastry cutter or your fingers to work it in until the mixture resembles coarse crumbs, about 3-4 minutes. Tip: Keep the butter cold for flakier shortcakes—I sometimes pop it in the freezer for 10 minutes beforehand.
- Pour in the heavy cream and vanilla extract, then stir gently with a fork until a dough starts to form. If it feels too dry, add another splash of cream, one tablespoon at a time.
- Turn the dough out onto a lightly floured surface and knead it gently just until it comes together, about 30 seconds. Avoid overworking it to prevent tough shortcakes.
- Roll the dough out to about 1/2-inch thickness, then use a round cookie cutter (about 3 inches in diameter) to cut out 12 circles, re-rolling scraps as needed.
- Place the circles on the prepared baking sheet, spacing them about 1 inch apart, and bake for 12-15 minutes, or until they’re golden brown around the edges. Tip: Check at the 12-minute mark—they can go from perfect to overdone quickly.
- Remove the shortcakes from the oven and let them cool completely on a wire rack, about 30 minutes.
- Once cooled, spread a generous scoop of slightly softened strawberry ice cream onto the flat side of 6 shortcakes, then top with a few slices of fresh strawberries.
- Place the remaining 6 shortcakes on top, flat side down, and press gently to form sandwiches. Tip: Work quickly here to prevent the ice cream from melting too much—I like to assemble them in batches.
- Wrap each sandwich individually in plastic wrap and freeze for at least 2 hours, or until firm.
- Just before serving, dust the tops with powdered sugar for a pretty finish.
Gently biting into one of these sandwiches reveals a delightful crunch from the buttery shortcake that gives way to creamy, fruity ice cream and juicy strawberries. The contrast between the warm, baked texture and the cold filling is pure magic, making it a hit at picnics or as a sweet ending to a summer dinner. For a fun twist, try drizzling them with a little chocolate sauce or serving them alongside a glass of lemonade—they’re so versatile and always disappear fast!
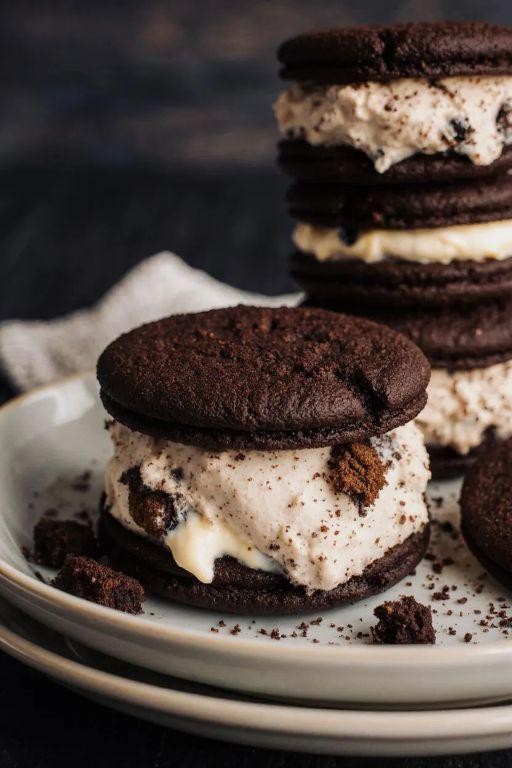
Cookies and Cream Dream Ice Cream Sandwich

There’s something magical about combining two childhood favorites into one irresistible treat. I first made these ice cream sandwiches for a summer barbecue last year, and they disappeared so fast I barely got one myself—now I always double the batch! Trust me, once you try this no-churn cookies and cream ice cream sandwiched between chewy chocolate cookies, you’ll be hooked.
Serving: 8 | Pre Time: 25 minutes | Cooking Time: 10 minutes
Ingredients
– 2 cups of heavy cream, straight from the fridge
– A 14-ounce can of sweetened condensed milk
– A generous cup of crushed Oreo cookies (about 12 cookies)
– 1 and 1/2 cups of all-purpose flour
– 3/4 cup of unsweetened cocoa powder
– 1 teaspoon of baking soda
– A pinch of salt
– 1 cup of softened unsalted butter
– 1 cup of packed brown sugar
– 1/2 cup of granulated sugar
– 2 large eggs
– 1 teaspoon of vanilla extract
– A handful of extra Oreo cookies for garnish (optional)
Instructions
1. Preheat your oven to 350°F and line two baking sheets with parchment paper.
2. In a medium bowl, whisk together the all-purpose flour, unsweetened cocoa powder, baking soda, and salt until well combined.
3. In a large mixing bowl, use an electric mixer on medium speed to cream the softened unsalted butter, brown sugar, and granulated sugar for about 3 minutes, until light and fluffy.
4. Add the eggs one at a time to the butter mixture, beating well after each addition, then mix in the vanilla extract.
5. Gradually add the dry flour mixture to the wet ingredients, mixing on low speed just until a dough forms—be careful not to overmix, as this keeps the cookies tender.
6. Scoop the dough into 16 equal portions (about 2 tablespoons each) and roll them into balls, placing them 2 inches apart on the prepared baking sheets.
7. Bake the cookies in the preheated oven for 10 minutes, until the edges are set but the centers are still soft; they’ll firm up as they cool.
8. Let the cookies cool completely on the baking sheets for 15 minutes, then transfer them to a wire rack to cool fully—this prevents them from becoming soggy later.
9. While the cookies cool, make the ice cream: in a large bowl, use an electric mixer on high speed to whip the heavy cream until stiff peaks form, about 3-4 minutes.
10. Gently fold the sweetened condensed milk and crushed Oreo cookies into the whipped cream until evenly incorporated, being careful not to deflate the mixture for a light texture.
11. Spread the ice cream mixture into an 8×8-inch pan lined with plastic wrap, smoothing the top with a spatula.
12. Freeze the ice cream for at least 4 hours, or until firm enough to slice.
13. Once frozen, cut the ice cream into 8 squares that match the size of your cookies.
14. Sandwich each ice cream square between two cooled chocolate cookies, pressing gently to adhere.
15. Roll the edges of each sandwich in extra crushed Oreo cookies if desired, for a decorative touch.
16. Serve immediately or wrap individually in plastic wrap and store in the freezer for up to 2 weeks.
What I love most is the contrast between the rich, fudgy cookies and the creamy, crunchy ice cream—it’s like a cookies and cream party in every bite. For a fun twist, try drizzling them with chocolate sauce or serving alongside a cold glass of milk; they’re perfect for beating the heat or satisfying a sweet craving any day.
Tropical Mango Coconut Ice Cream Sandwich
Mangoes always remind me of summer vacations in Florida—that sweet, juicy flavor instantly transports me to sunny days. I’ve been craving something that captures that tropical vibe but is easy to whip up at home, so I created this no-churn ice cream sandwich that’s bursting with mango and coconut goodness. It’s the perfect treat to beat the heat and share with friends on a lazy afternoon.
Serving: 6 | Pre Time: 25 minutes | Cooking Time: 0 minutes
Ingredients
– 2 cups of heavy cream, chilled
– 1 can (14 ounces) of sweetened condensed milk
– 1 cup of mango puree (I use about 2 ripe mangoes, peeled and blended smooth)
– 1/2 cup of shredded coconut, plus a little extra for sprinkling
– 1 teaspoon of vanilla extract
– A pinch of salt
– 12 soft sugar cookies (store-bought or homemade, about 3 inches in diameter)
Instructions
1. In a large mixing bowl, pour in the 2 cups of chilled heavy cream and use an electric mixer on high speed to whip it until stiff peaks form, which should take about 3–4 minutes—tip: make sure your bowl and beaters are cold to help the cream whip up faster and hold its shape better.
2. Gently fold in the 1 can of sweetened condensed milk, 1 cup of mango puree, 1/2 cup of shredded coconut, 1 teaspoon of vanilla extract, and a pinch of salt until everything is just combined, being careful not to overmix to keep the mixture light and airy.
3. Line a 9×5-inch loaf pan with parchment paper, leaving some overhang on the sides for easy removal later.
4. Pour the ice cream mixture into the prepared loaf pan, spreading it out evenly with a spatula.
5. Sprinkle a little extra shredded coconut on top for added texture and flavor.
6. Cover the pan tightly with plastic wrap or aluminum foil and freeze it for at least 6 hours, or until firm—tip: I like to freeze it overnight to ensure it sets perfectly without any icy crystals.
7. Once the ice cream is frozen, remove it from the pan using the parchment paper overhang and place it on a cutting board.
8. Use a sharp knife to slice the ice cream into 6 even rectangles, each about 1 inch thick.
9. Place one slice of ice cream between two soft sugar cookies to form a sandwich, pressing gently to adhere—tip: if the ice cream starts to soften too much, work quickly or pop the cookies in the freezer for 10 minutes beforehand to prevent melting.
10. Serve immediately or wrap each sandwich individually in parchment paper and store in the freezer for up to 2 weeks.
The creamy, no-churn ice cream has a luscious texture that’s rich from the condensed milk yet refreshingly fruity from the mango, with the toasted coconut adding a delightful crunch. I love serving these sandwiches with a drizzle of extra mango puree or a sprinkle of lime zest for a zesty twist that really makes the tropical flavors pop.
Conclusion
Ultimately, these 18 irresistible ice cream sandwich recipes offer endless inspiration for homemade indulgence. We hope you find a new favorite to whip up and enjoy! Don’t forget to leave a comment telling us which recipe you loved most and share this roundup on Pinterest to spread the sweet joy. Happy scooping!


