Get ready to experience the most explosive frozen dessert sensation that will completely transform your dessert game forever! These incredible ice cream bites deliver massive flavor in perfectly portioned packages that will have everyone begging for your secret recipe. Grab your favorite ice cream and let’s create some magic that will make you the superstar of every party, gathering, or late-night snack session!
Why This Recipe Works
- These ice cream bites create the perfect single-serving portions that eliminate messy scooping and dripping, making them absolutely ideal for parties where you want guests to grab and go without any fuss or sticky fingers ruining the fun atmosphere!
- The chocolate coating creates an incredible protective shell that keeps the ice cream perfectly frozen longer than traditional servings, giving you more time to enjoy your creations without that frantic race against melting that usually happens with regular ice cream desserts!
- You get complete creative control to mix and match your favorite ice cream flavors with endless topping possibilities, allowing you to customize each batch to match any theme, holiday, or personal preference while keeping the preparation process simple enough for even beginner dessert makers!
- The make-ahead nature means you can prepare these spectacular treats days in advance and simply pull them out whenever dessert emergencies strike, making you look like a culinary genius with minimal last-minute effort required for maximum impressive results!
- These bites deliver that satisfying crack when you bite through the chocolate shell followed by the creamy ice cream center, creating a textural experience that will have everyone’s taste buds doing happy dances with every single delicious mouthful!
Ingredients
- 1 quart premium vanilla ice cream, slightly softened
- 2 cups semi-sweet chocolate chips
- 2 tablespoons coconut oil, measured precisely
- 1 cup colorful sprinkles, divided for coating
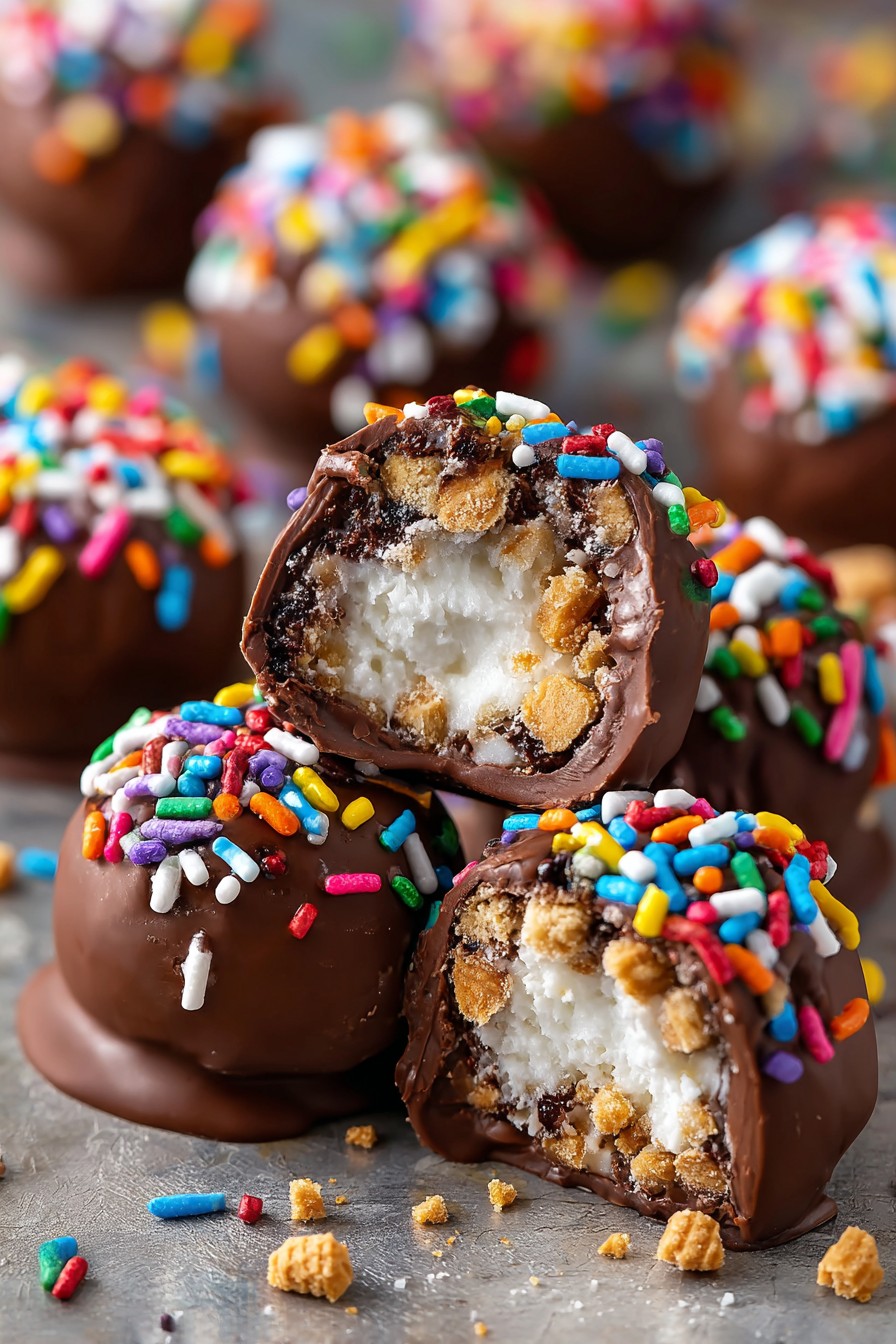
- 1/2 cup crushed waffle cones, measured after crushing
- 1/4 cup rainbow nonpareils for decoration
- 1 teaspoon pure vanilla extract, the good stuff
Equipment Needed
- Standard muffin tin with 12 cups
- Parchment paper cupcake liners
- Medium microwave-safe bowl
- Small ice cream scoop or tablespoon
- Baking sheet that fits in freezer
- Wire cooling rack
- Measuring cups and spoons
Instructions
Prepare Your Ice Cream Base
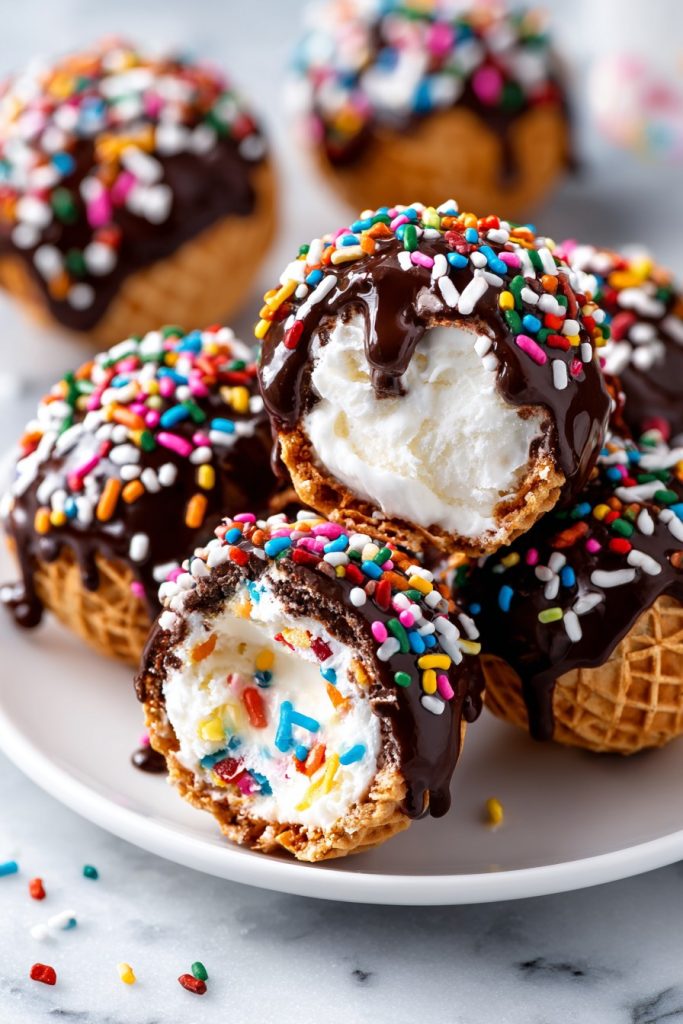
Start by lining your muffin tin with parchment paper cupcake liners – this is absolutely crucial for easy removal later! Take your slightly softened vanilla ice cream and give it a good stir in its container to make it perfectly scoopable but not melted. Using your small ice cream scoop or tablespoon, portion exactly 2 generous tablespoons of ice cream into each lined muffin cup, pressing down gently to create an even layer. Work quickly but carefully to prevent melting, and if your kitchen is warm, consider working in batches to maintain that perfect frozen texture. Once all cups are filled, immediately transfer the entire muffin tin to your freezer and let it freeze solid for at least 2 hours – don’t rush this step because properly frozen centers are what make these bites absolutely magical!
Create Your Chocolate Coating
Now for the fun part – creating that spectacular chocolate shell! Combine your 2 cups of semi-sweet chocolate chips with 2 tablespoons of coconut oil in your microwave-safe bowl. Microwave on high power for 30-second intervals, stirring vigorously between each session until the mixture becomes perfectly smooth and glossy. The coconut oil is your secret weapon here – it creates that satisfying snap when you bite into the finished product and helps the chocolate set up beautifully. Let the chocolate mixture cool for about 5 minutes until it’s still liquid but not hot to the touch – this prevents it from melting your carefully frozen ice cream centers when you dip them. Pro tip: If your chocolate seems too thick, add another teaspoon of coconut oil to achieve that perfect dipping consistency!
Assembly and Coating Process
Remove your frozen ice cream disks from the freezer and get ready for the most exciting assembly line! Working with one ice cream disk at a time, use a fork to carefully lift it from the parchment liner and dip it completely into your prepared chocolate coating. Swirl it around to ensure every surface gets covered, then let the excess chocolate drip back into the bowl for about 10 seconds. Immediately transfer the coated bite to your prepared baking sheet lined with parchment paper. Here’s where the magic happens – while the chocolate is still wet, sprinkle your chosen toppings generously over the surface. Work efficiently but don’t rush – you want each bite to get that perfect coating before the chocolate sets!
Freezing to Perfection
Once all your ice cream bites are beautifully coated and decorated, it’s time for the final freeze! Carefully transfer the entire baking sheet to your freezer, making sure it sits level to prevent any sliding or pooling. Let these magnificent creations freeze completely for at least 4 hours, though overnight is even better for that perfect firm texture. This extended freezing time allows the chocolate shell to fully harden and the ice cream center to become wonderfully creamy while maintaining its shape. The transformation during this freeze is absolutely incredible – you’re creating individual frozen masterpieces that will hold their perfect form until the very moment someone takes that first glorious bite!
Storage and Serving Suggestions
After the final freeze, your ice cream bites are ready to rock and roll! Transfer them to an airtight container with parchment paper between layers to prevent sticking, and they’ll keep beautifully in your freezer for up to 2 months. When serving, arrange them on a chilled platter or in pretty cupcake liners to keep them looking fabulous. For that extra special touch, consider setting up a DIY topping bar with additional sprinkles, crushed cookies, or even warm sauces for dipping. These bites are perfect straight from the freezer – no thawing needed – and they make spectacular additions to ice cream sundae bars, birthday parties, or just because it’s Tuesday celebrations!
Tips and Tricks
Let me share some next-level secrets that will take your ice cream bites from great to absolutely legendary! First, temperature control is everything – make sure your ice cream is softened just enough to be scoopable but still very cold. If it gets too soft, refreeze for 15 minutes before continuing. When working with the chocolate coating, maintain that perfect dipping consistency by keeping the bowl over a pan of warm water if you’re working slowly. For professional-looking results, use two forks during the dipping process – one to lower the ice cream into the chocolate and another to help lift it out smoothly. If you’re making multiple batches, consider working with different ice cream flavors and creating a rainbow assortment that will wow your guests with both taste and visual appeal. Storage is key for maintaining that perfect texture – always use airtight containers and avoid frequent temperature fluctuations in your freezer. For those who love extra crunch, try adding a thin layer of crushed cookies or nuts between the ice cream and chocolate coating. If you’re dealing with a particularly warm kitchen, work in smaller batches and keep your ice cream disks in the freezer until the very moment you’re ready to dip them. For chocolate lovers, experiment with different chocolate types – white chocolate creates a beautiful contrast with colorful sprinkles, while dark chocolate adds sophisticated richness. Don’t forget the power of presentation – serving these on chilled marble slabs or in decorative ice cream cones takes the experience to completely new heights of fabulousness!
Recipe Variations
- Create Cookies and Cream madness by mixing crushed Oreo cookies directly into vanilla ice cream before freezing, then coating with white chocolate and additional cookie crumbs for that classic black and white appearance that delivers massive flavor in every single bite!
- Go tropical with coconut ice cream centers dipped in dark chocolate and rolled in toasted coconut flakes, adding a sprinkle of sea salt for that sweet-salty combination that will transport your taste buds straight to paradise with each delicious mouthful!
- Make Mint Chocolate Chip magic using mint ice cream with chocolate chips, coating in dark chocolate and garnishing with crushed candy canes during the holidays or fresh mint leaves for a sophisticated summer treat that refreshes and delights simultaneously!
- Create Rocky Road extravaganza by stirring mini marshmallows and chopped almonds into chocolate ice cream, then coating with milk chocolate and rolling in additional marshmallows and nuts for that classic campfire flavor in perfectly portable frozen form!
- Try Birthday Cake celebration bites using funfetti ice cream mixed with rainbow sprinkles, coating with white chocolate and decorating with extra sprinkles for the ultimate party-ready treat that brings the celebration to every single delicious mouthful!
Frequently Asked Questions
Can I use dairy-free ice cream for these bites?
Absolutely, and they turn out spectacularly! The key is choosing a high-quality dairy-free ice cream that has good texture and doesn’t become icy when frozen. Look for brands that use coconut cream or cashew base as they tend to maintain creaminess better than water-based alternatives. Make sure your dairy-free ice cream is slightly softened before scooping, just like regular ice cream, and work quickly to prevent melting. The chocolate coating works perfectly with dairy-free options, and you can even use dairy-free chocolate chips if needed. The final result will be just as delicious and satisfying, making these bites accessible for everyone regardless of dietary preferences!
How far in advance can I make these ice cream bites?
These fantastic treats are perfect for advanced preparation! When stored properly in an airtight container with parchment paper between layers, they’ll maintain their perfect texture and flavor for up to 2 months in the freezer. The key is preventing freezer burn and temperature fluctuations, so make sure your container is truly airtight and placed in the coldest part of your freezer. For best results, try to consume them within the first month when the textures are at their peak perfection. They make excellent party planners because you can create them weeks ahead of time and simply pull them out when needed, making you look like the most organized and creative host ever!
What’s the secret to getting that perfect chocolate coating?
The magic lies in two crucial elements: the coconut oil and the temperature control! The coconut oil not only helps the chocolate melt smoothly but also creates that satisfying snap when you bite into the finished product. Make sure your chocolate mixture has cooled slightly after melting so it doesn’t instantly melt your frozen ice cream centers. The ideal dipping consistency should be like warm honey – fluid enough to coat evenly but not so thin that it runs off. If your chocolate starts to thicken during the dipping process, you can gently rewarm it for 10-15 seconds. Perfect coating comes with practice, so don’t worry if your first few aren’t magazine-perfect – they’ll still taste incredible!
Can I make these without a muffin tin?
You absolutely can get creative with your mold options! If you don’t have a muffin tin, you can use silicone molds of any shape, small ramekins lined with plastic wrap, or even create free-form scoops on a parchment-lined baking sheet. The key is creating uniform portions that will freeze solid and be easy to handle during the dipping process. For free-form method, use your ice cream scoop to create balls, freeze until rock solid, then proceed with coating. Just remember that thinner shapes might be more fragile during handling. Whatever method you choose, the results will be equally delicious and impressive – it’s all about having fun with the process!
Summary
These spectacular ice cream bites combine creamy frozen centers with crunchy chocolate shells and endless customization options, creating the perfect make-ahead dessert that will transform any occasion into an unforgettable celebration of flavor and fun!
Ice Cream Bites
5
servings30
minutesIngredients
Instructions
- 1 Line muffin tin with parchment liners and portion ice cream into cups. Freeze for 2 hours until solid.
- 2 Melt chocolate chips with coconut oil in microwave, stirring until smooth. Cool slightly.
- 3 Dip frozen ice cream disks in chocolate coating, then immediately add toppings before chocolate sets.
- 4 Freeze completed bites for at least 4 hours or overnight until completely firm.
- 5 Store in airtight container with parchment between layers and serve directly from freezer.