
My friends, let’s talk about the ultimate game day snack that somehow manages to disappear faster than my motivation to exercise. Making mouthwatering hot wings doesn’t require a deep fryer or a fire extinguisher – just your trusty oven and a willingness to get a little saucy.
Why This Recipe Works
- The baking powder coating creates an incredibly crispy exterior without any frying, giving you that satisfying crunch while keeping things healthier
- Patting the wings completely dry before seasoning ensures maximum crispiness by eliminating excess moisture that would steam instead of bake
- The two-stage baking process – first at lower temperature to render fat, then higher to crisp – delivers perfectly cooked wings with crispy skin and juicy meat
- Tossing the wings in sauce after baking rather than before prevents the sauce from burning and maintains that vibrant flavor and color
- The simple but effective seasoning blend provides layers of flavor that complement rather than compete with your favorite hot sauce
Ingredients
- 3 pounds chicken wings, separated into drumettes and flats, tips removed
- 2 tablespoons baking powder (aluminum-free)
- 1 teaspoon kosher salt
- 1 teaspoon garlic powder
- 1 teaspoon smoked paprika
- 1/2 teaspoon black pepper, freshly ground
- 1/2 teaspoon onion powder
- 1 cup Frank’s RedHot Original Cayenne Pepper Sauce
- 1/2 cup unsalted butter, melted
- 1 tablespoon honey or brown sugar (optional, for sweetness)
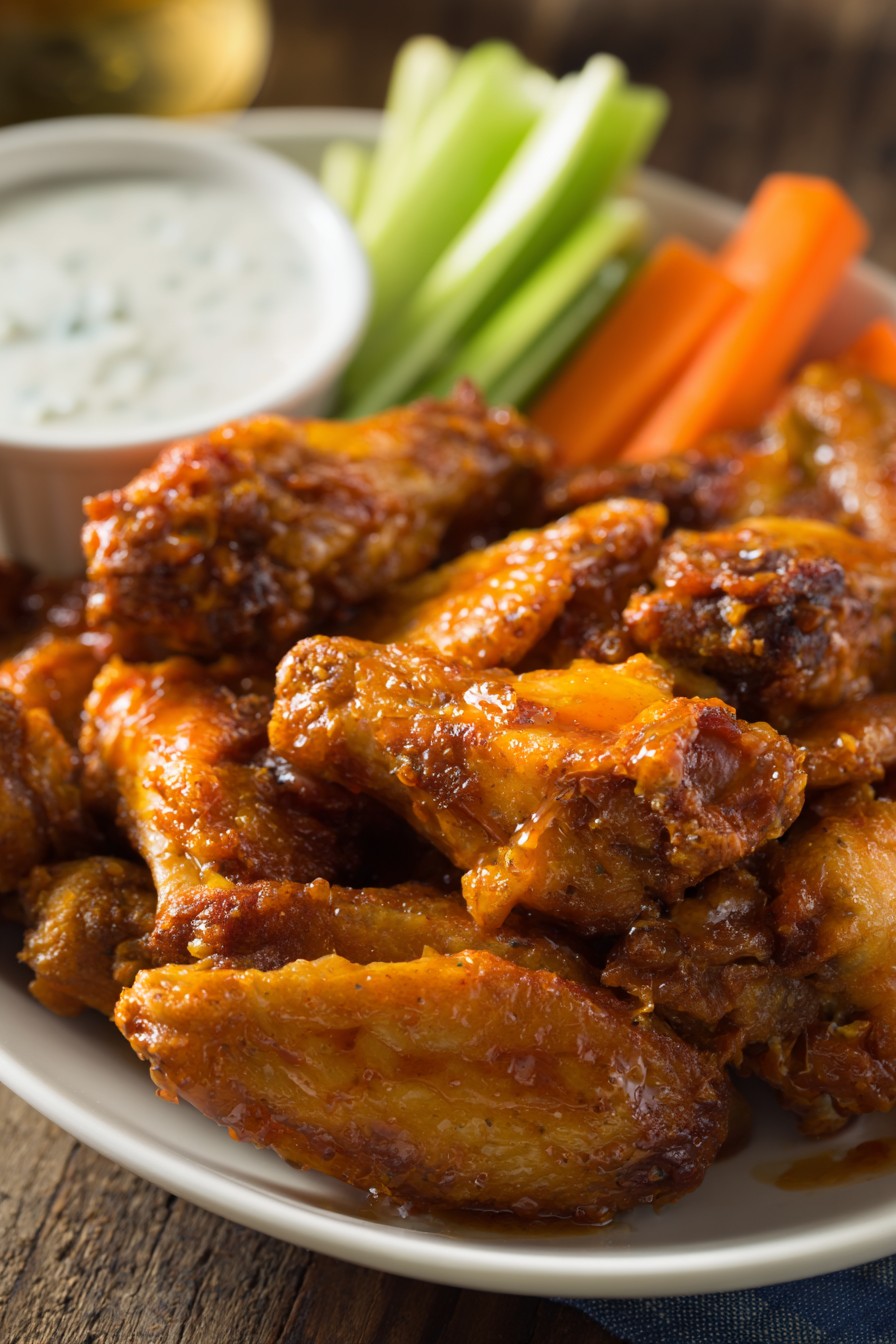
- Blue cheese or ranch dressing for serving
- Celery sticks and carrot sticks for serving
Equipment Needed
- Large mixing bowls (2)
- Wire rack
- Rimmed baking sheet
- Parchment paper or aluminum foil
- Tongs
- Paper towels
- Measuring spoons and cups
- Whisk
- Oven thermometer (recommended)
Instructions
Prepare and Season the Wings
Place your chicken wings in a large bowl and pat them completely dry with paper towels – I mean bone-dry, like your humor after telling that joke nobody laughed at. This step is absolutely crucial because any remaining moisture will steam the wings instead of letting them get properly crispy. In a separate bowl, whisk together the baking powder, kosher salt, garlic powder, smoked paprika, black pepper, and onion powder until well combined. The baking powder might seem strange, but trust me – it’s the secret weapon that creates that incredible crispy texture without any frying. Sprinkle the seasoning mixture over the wings and toss thoroughly until every single wing piece is evenly coated. Let them sit at room temperature for about 15-20 minutes while your oven preheats to 250°F.
First Bake at Low Temperature
Line a rimmed baking sheet with parchment paper or aluminum foil and place a wire rack on top – this setup allows air to circulate around the wings for even cooking and maximum crispiness. Arrange the seasoned wings in a single layer on the wire rack, making sure they aren’t touching each other. Slide them into your preheated 250°F oven and bake for 30 minutes exactly. This initial low-temperature bake works magic by slowly rendering out the fat from the chicken skin without burning the seasoning. You’ll notice the wings starting to look slightly opaque and some fat dripping down onto the baking sheet. Don’t be tempted to skip this step – it’s what separates okay wings from absolutely phenomenal ones.
Increase Temperature for Crisping
After the initial 30 minutes at 250°F, increase your oven temperature to 425°F and continue baking for another 40-50 minutes. Watch for the wings to turn a beautiful golden brown color and become incredibly crispy – you should see little bubbles forming in the skin and hear a faint sizzling sound. Rotate the baking sheet halfway through this higher-temperature phase to ensure even browning, especially if your oven has hot spots. The wings are ready when the skin looks crackly and crisp, and the internal temperature reaches 165°F when measured with an instant-read thermometer inserted into the thickest part of the meat without touching bone.
Prepare the Signature Hot Sauce
Toss and Serve Immediately
Once the wings have reached that perfect crispy golden-brown color and internal temperature of 165°F, carefully remove them from the oven using tongs. Immediately transfer the hot wings to a large clean bowl – work quickly because they’ll absorb the sauce best when they’re piping hot. Pour about half of your prepared hot sauce over the wings and toss gently to coat evenly. Add more sauce gradually until you achieve your desired coverage level – some people like them lightly sauced, others prefer swimming in the stuff. Serve immediately with celery sticks, carrot sticks, and plenty of blue cheese or ranch dressing for dipping.
Tips and Tricks
For the absolute crispiest wings possible, try placing them uncovered in the refrigerator for 4-8 hours or overnight after seasoning. This drying time allows the baking powder to work its magic and draws even more moisture from the skin, resulting in an incredibly crackly texture that will have your guests questioning whether you actually fried them. If you’re short on time, even 30 minutes in the fridge will help, but overnight is truly transformative.
Invest in an oven thermometer to ensure your oven temperature is accurate – oven thermostats can be off by 25-50 degrees, which significantly affects cooking time and results. If your wings aren’t getting as crispy as you’d like, try switching your oven to convection bake mode if available, which circulates hot air around the food for more even browning. Just reduce the temperature by 25 degrees and keep a close eye on them, as they’ll cook faster.
When separating your wings, save the tips in a freezer bag – they make incredible stock or can be roasted separately for chicken cracklings. For extra flavor, add a teaspoon of vinegar-based hot sauce (like Tabasco) to your butter mixture for more complexity, or experiment with different hot sauces – I love using a combination of Frank’s for flavor and something hotter like Dave’s Insanity Sauce for added kick (just a few drops!).
If you’re serving a crowd, you can keep finished wings warm and crispy in a 200°F oven for up to 30 minutes before saucing. Place them on a fresh wire rack rather than piled in a bowl to prevent steaming. For the sauce, consider making a double batch and serving extra on the side – some people like to dip rather than toss, and having extra sauce ensures everyone gets their preferred heat level.
Don’t discard the rendered chicken fat from your baking sheet! Once cooled, strain it through a fine mesh sieve and store in the refrigerator – it’s incredible for roasting potatoes or adding flavor to gravies and sauces. For easier cleanup, line your baking sheet with heavy-duty aluminum foil before placing the wire rack, but avoid using non-stick spray on the rack as it can burn at high temperatures.
Recipe Variations
- For Asian-inspired wings, replace the hot sauce mixture with equal parts soy sauce, honey, and sriracha, plus minced garlic and ginger. Garnish with sesame seeds and sliced green onions for a completely different flavor profile that’s equally addictive.
- Create buffalo barbecue fusion by mixing your favorite barbecue sauce with the hot sauce – start with a 2:1 ratio of BBQ to hot sauce and adjust to taste. The sweetness of the barbecue sauce creates a wonderful balance with the spicy heat, and you can add a teaspoon of liquid smoke for that authentic grilled flavor.
- Go for lemon pepper wings by skipping the hot sauce entirely and tossing the baked wings with melted butter, fresh lemon juice, zest, and copious amounts of coarse black pepper. Finish with a sprinkle of parsley for a brighter, zestier alternative that’s perfect when you want something flavorful but not spicy.
- Try a dry rub version by increasing the seasoning amounts and adding brown sugar, chili powder, and cayenne pepper to create a spicy-sweet crust that doesn’t require any sauce. These are less messy to eat and perfect for when you want maximum crunch without the saucy fingers.
- For garlic Parmesan wings, toss the baked wings with melted butter mixed with minced garlic, then shower with freshly grated Parmesan cheese and chopped parsley. Serve with extra Parmesan for dipping and lemon wedges for squeezing – it’s like chicken wing alfredo in the best possible way.
Frequently Asked Questions
Can I make these wings ahead of time?
Absolutely! You can prepare the wings through the baking process up to 2 days in advance. After baking and cooling completely, store them in an airtight container in the refrigerator. When ready to serve, reheat them in a 400°F oven for 10-15 minutes until crispy and hot, then toss with your sauce. This actually works great for parties because you can do the time-consuming part ahead of time and just quickly reheat and sauce when guests arrive. The sauce can also be made ahead and refrigerated – just gently reheat it before tossing with the wings.
Why baking powder instead of flour or cornstarch?
Baking powder is the secret weapon for oven-baked wings because it raises the pH of the chicken skin, which helps break down proteins and allows moisture to escape more efficiently during cooking. This results in significantly crispier skin than flour or cornstarch, which can sometimes create a pasty coating rather than true crispiness. Aluminum-free baking powder is recommended to avoid any metallic aftertaste, but regular works fine too. The chemical reaction created by baking powder is what gives you that fried-like texture without actual frying.
How spicy are these wings really?
The heat level is completely customizable based on your hot sauce choice and how much you use. Frank’s RedHot provides a medium heat that most people can handle – it’s more flavorful than brutally hot. For milder wings, use less hot sauce or mix it with more butter. For extra heat, add cayenne pepper to the dry rub or incorporate a hotter sauce like Dave’s or Mad Dog. Remember that the baking process itself doesn’t increase spiciness, so you can adjust the sauce to exactly your preference after the wings are cooked. Always taste your sauce mixture before tossing and adjust accordingly.
Can I use frozen wings for this recipe?
You can use frozen wings, but they must be completely thawed and patted extremely dry before seasoning. Frozen wings contain more ice crystals and water content, which can prevent proper crisping if not thoroughly dried. I recommend thawing in the refrigerator for 24-48 hours, then placing them on a wire rack over a baking sheet in the refrigerator for another few hours to air-dry the surface. The extra drying time is crucial when starting with frozen wings to achieve that perfect crispy texture. Never try to bake wings that are still frozen – they’ll steam rather than crisp.
What’s the best way to get sauce on every wing evenly?
The key to perfectly sauced wings is using a large enough bowl and working in batches if necessary. Place your hot wings in a bowl that’s至少 twice their volume to give you room to toss properly. Add about half of your sauce first and toss gently with tongs or a large spoon, then add more sauce gradually until desired coverage is achieved. Some people prefer using a large resealable bag – add wings and sauce, seal, and gently shake until coated. Whatever method you use, work quickly while the wings are hot so the sauce adheres properly. For extra saucy wings, you can brush on additional sauce after the initial tossing.
Summary
These baked hot wings deliver incredible crunch and flavor without deep frying. The baking powder technique creates perfectly crispy wings that rival any fried version, while the customizable sauce lets you control the heat level. Perfect for game day or any gathering!
Baked Hot Wings Recipe
4
servings15
minutes70
minutesIngredients
Instructions
- 1 Preheat oven to 250°F. Pat wings completely dry with paper towels.
- 2 Whisk together baking powder and spices, then toss with wings until evenly coated.
- 3 Arrange wings on wire rack over baking sheet. Bake at 250°F for 30 minutes.
- 4 Increase oven to 425°F and bake 40-50 minutes until golden brown and crispy.
- 5 Whisk together melted butter and hot sauce. Toss hot wings with sauce and serve immediately.


