Hey there, horse lovers and home cooks! If you’re looking to whip up some tasty, wholesome treats that’ll have your equine friends nickering with delight, you’ve trotted to the right place. From simple snacks to special-occasion delights, these recipes are sure to keep hooves happy and tails swishing. So saddle up and let’s dive into these 35 delicious horse treat recipes—your four-legged pals will thank you!
Carrot and Oatmeal Munchies
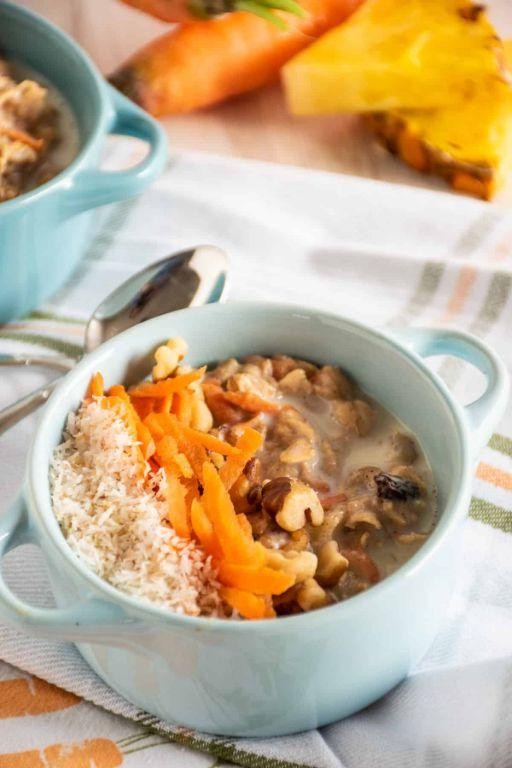
Creating wholesome snacks doesn’t have to be complicated, and these carrot and oatmeal munchies prove just that. Combining simple ingredients with straightforward techniques yields delicious results perfect for any time of day.
24
portions15
minutes15
minutesIngredients
For the dry mixture:
– 1 cup rolled oats
– 1/2 cup whole wheat flour
– 1 teaspoon baking powder
– 1/2 teaspoon cinnamon
– 1/4 teaspoon salt
For the wet mixture:
– 1 cup finely grated carrots
– 1/4 cup honey
– 1/4 cup melted coconut oil
– 1 large egg
– 1 teaspoon vanilla extract
Instructions
1. Preheat your oven to 350°F and line a baking sheet with parchment paper.
2. Combine 1 cup rolled oats, 1/2 cup whole wheat flour, 1 teaspoon baking powder, 1/2 teaspoon cinnamon, and 1/4 teaspoon salt in a medium bowl.
3. In a separate bowl, mix 1 cup finely grated carrots, 1/4 cup honey, 1/4 cup melted coconut oil, 1 large egg, and 1 teaspoon vanilla extract until well combined.
4. Pour the wet carrot mixture into the dry oat mixture and stir until just combined.
5. Drop tablespoon-sized portions of dough onto the prepared baking sheet, spacing them 2 inches apart.
6. Bake for 12-15 minutes until the edges are golden brown and the centers are set.
7. Transfer the munchies to a wire rack and let them cool completely.
These treats develop a delightful chewy texture with subtle sweetness from the honey and carrots, while the oats provide satisfying substance. Try serving them warm with a dollop of Greek yogurt for breakfast or packing them in lunchboxes for an afternoon energy boost.
Apple Cinnamon Delight Bits
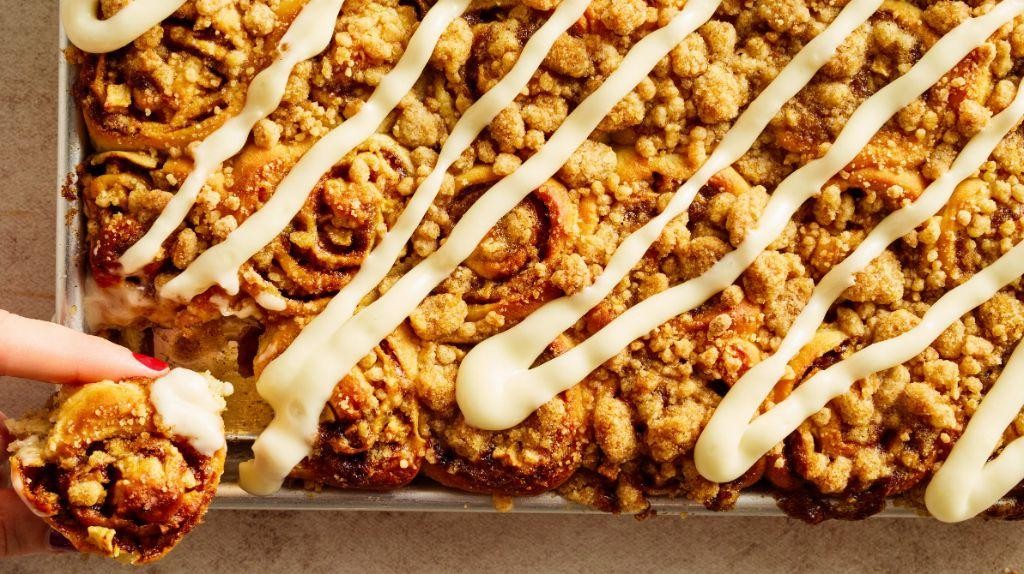
You’ll find these Apple Cinnamon Delight Bits are the perfect autumn treat that combines comforting flavors with simple preparation. Let’s walk through each step together to create these bite-sized delights that fill your kitchen with the most wonderful aroma.
16
bits25
minutes20
minutesIngredients
For the Apple Filling
– 2 cups peeled and finely diced Granny Smith apples
– 1/4 cup granulated sugar
– 1 teaspoon ground cinnamon
– 1 tablespoon lemon juice
For the Dough
– 1 cup all-purpose flour
– 1/4 cup cold unsalted butter, cubed
– 2 tablespoons cold water
– 1/4 teaspoon salt
For Finishing
– 1 tablespoon melted butter
– 1 tablespoon coarse sugar
Instructions
1. Preheat your oven to 375°F and line a baking sheet with parchment paper.
2. Combine the diced apples, granulated sugar, cinnamon, and lemon juice in a medium bowl.
3. In a separate bowl, whisk together the flour and salt until fully combined.
4. Add the cold cubed butter to the flour mixture and use your fingertips to rub it in until the mixture resembles coarse crumbs.
5. Sprinkle the cold water over the flour-butter mixture and stir with a fork until a dough forms.
6. Tip: Work quickly to keep the butter cold, which creates flakier bits.
7. Turn the dough out onto a lightly floured surface and roll it into a 1/4-inch thick rectangle.
8. Spread the apple filling evenly over half of the dough rectangle, leaving a 1/2-inch border around the edges.
9. Fold the empty half of the dough over the filling and press the edges firmly to seal.
10. Cut the filled dough into 1-inch squares using a sharp knife or pizza cutter.
11. Tip: Chill the dough for 15 minutes before cutting if it becomes too soft to handle cleanly.
12. Arrange the squares on the prepared baking sheet, spacing them about 1 inch apart.
13. Brush the tops of each square with melted butter using a pastry brush.
14. Sprinkle coarse sugar evenly over all the buttered squares.
15. Bake for 18-20 minutes until the edges are golden brown and the filling is bubbly.
16. Tip: Rotate the baking sheet halfway through baking for even browning.
17. Transfer the baked bits to a wire rack and let them cool completely. Here’s what makes these bits special: The flaky pastry gives way to tender, cinnamon-spiced apples that maintain just enough texture. Serve them warm with a scoop of vanilla ice cream for a delightful contrast, or package them in small bags as thoughtful homemade gifts during fall gatherings.
Molasses and Oat Molten Bars

Venturing into baking doesn’t have to be intimidating, especially when you start with these Molasses and Oat Molten Bars. I’ll guide you through each simple step to create gooey, spiced bars that fill your kitchen with the warm aroma of autumn. Let’s begin by gathering our ingredients and preparing our workspace.
9
bars15
minutes30
minutesIngredients
For the crust:
- 2 cups old-fashioned rolled oats
- 1 cup all-purpose flour
- 1/2 cup packed brown sugar
- 1/2 cup unsalted butter, melted
- 1/2 teaspoon baking soda
- 1/4 teaspoon salt
For the filling:
- 1 cup molasses
- 1/2 cup heavy cream
- 1 large egg
- 1 teaspoon ground cinnamon
- 1/2 teaspoon ground ginger
- 1/4 teaspoon ground cloves
Instructions
- Preheat your oven to 350°F and grease an 8×8-inch baking pan.
- Combine 2 cups oats, 1 cup flour, 1/2 cup brown sugar, 1/2 teaspoon baking soda, and 1/4 teaspoon salt in a large bowl.
- Pour 1/2 cup melted butter over the dry ingredients and mix until the mixture resembles coarse crumbs.
- Press two-thirds of the oat mixture firmly into the bottom of your prepared pan using the back of a measuring cup.
- Whisk together 1 cup molasses, 1/2 cup heavy cream, 1 egg, 1 teaspoon cinnamon, 1/2 teaspoon ginger, and 1/4 teaspoon cloves in a separate bowl until smooth.
- Pour the molasses mixture evenly over the pressed crust.
- Sprinkle the remaining oat mixture evenly over the filling.
- Bake for 25-30 minutes until the edges are firm but the center still jiggles slightly when you gently shake the pan.
- Cool completely in the pan on a wire rack for at least 2 hours before cutting.
Molasses creates a wonderfully sticky, almost caramel-like center that contrasts beautifully with the chewy oat crust. These bars develop deeper flavor when stored overnight, making them perfect for make-ahead desserts. Serve them slightly warmed with a scoop of vanilla ice cream for an irresistible temperature contrast that highlights the spicy molasses notes.
Peppermint Flavored Crunch Cubes

Once you’ve tried these refreshing peppermint crunch cubes, you’ll want to keep a batch in your freezer year-round. Our methodical approach ensures even beginners can create these delightful treats with perfect texture every time. Let’s walk through the simple steps together to make these cool, minty squares that offer a satisfying crunch in every bite.
64
cubes30
minutes8
minutesIngredients
For the Base Layer:
- 2 cups graham cracker crumbs
- 1/2 cup unsalted butter, melted
- 1/4 cup granulated sugar
For the Filling:
- 8 oz cream cheese, softened to room temperature
- 1 cup powdered sugar
- 1 tsp peppermint extract
- 2-3 drops green food coloring
- 1 cup heavy whipping cream
For the Topping:
- 1/2 cup crushed candy canes
- 1/4 cup white chocolate chips, melted
Instructions
- Preheat your oven to 350°F.
- Combine graham cracker crumbs, melted butter, and granulated sugar in a medium bowl.
- Press the crumb mixture firmly into the bottom of an 8×8 inch baking pan using the bottom of a measuring cup.
- Bake the crust for 8 minutes until lightly golden around the edges.
- Cool the crust completely on a wire rack for 30 minutes.
- Beat softened cream cheese with an electric mixer on medium speed for 2 minutes until smooth.
- Add powdered sugar gradually while continuing to mix.
- Mix in peppermint extract and green food coloring until fully incorporated.
- In a separate bowl, whip heavy cream on high speed until stiff peaks form, about 3-4 minutes.
- Gently fold the whipped cream into the cream cheese mixture using a spatula.
- Spread the filling evenly over the cooled crust.
- Sprinkle crushed candy canes evenly over the top.
- Drizzle melted white chocolate in a zigzag pattern across the surface.
- Refrigerate the pan for at least 4 hours until completely set.
- Cut into 1-inch cubes using a sharp knife wiped clean between cuts.
Keep these delightful cubes chilled until serving to maintain their perfect texture. The creamy peppermint filling contrasts beautifully with the crunchy candy cane topping, while the graham cracker base provides a sturdy foundation. Try serving them on a chilled platter for parties or packing individual cubes in small containers for on-the-go treats.
Healthy Banana Biscuit Nibbles

Perfect for those overripe bananas sitting on your counter, these Healthy Banana Biscuit Nibbles transform simple ingredients into wholesome treats that even beginners can master with confidence.
12
nibbles15
minutes15
minutesIngredients
For the banana mixture:
- 2 medium ripe bananas, mashed (about 1 cup)
- 1/4 cup honey
- 1 tsp vanilla extract
For the dry ingredients:
- 1 1/2 cups old-fashioned oats
- 1/2 cup whole wheat flour
- 1 tsp baking powder
- 1/2 tsp cinnamon
- 1/4 tsp salt
For mixing and baking:
- 1/4 cup unsalted butter, melted
- 1/4 cup chopped walnuts
Instructions
- Preheat your oven to 350°F and line a baking sheet with parchment paper.
- Peel 2 medium ripe bananas and mash them thoroughly in a medium bowl until no large chunks remain.
- Measure 1/4 cup honey and 1 tsp vanilla extract into the mashed bananas, then stir until fully combined.
- In a separate large bowl, combine 1 1/2 cups old-fashioned oats, 1/2 cup whole wheat flour, 1 tsp baking powder, 1/2 tsp cinnamon, and 1/4 tsp salt, whisking to distribute evenly.
- Pour the wet banana mixture into the dry ingredients and stir gently with a spatula until just incorporated.
- Add 1/4 cup melted unsalted butter and 1/4 cup chopped walnuts to the batter, folding until evenly distributed without overmixing.
- Drop rounded tablespoonfuls of dough onto the prepared baking sheet, spacing them 2 inches apart.
- Bake for 12-15 minutes at 350°F until the edges are golden brown and the tops spring back lightly when touched.
- Transfer the baked nibbles to a wire rack and let them cool completely for about 20 minutes.
Moist and tender with a subtle crunch from walnuts, these nibbles offer a comforting banana flavor enhanced by warm cinnamon. Enjoy them slightly warm with a drizzle of honey for extra sweetness, or crumble over yogurt for a satisfying breakfast parfait.
Honey-Almond Treat Dippers
Keeping your snack game exciting doesn’t have to be complicated, and these Honey-Almond Treat Dippers prove just that with their simple yet satisfying combination of sweet and crunchy elements. Kindly follow each step carefully to create these delightful dippers that transform basic ingredients into a special treat. Knowing the right techniques will ensure your dippers turn out perfectly crisp and beautifully coated every time.
12
dippers15
minutes10
minutesIngredients
For the almond coating
– 1 cup sliced almonds
– 2 tablespoons granulated sugar
– 1/4 teaspoon salt
For the honey sauce
– 1/2 cup honey
– 1 tablespoon unsalted butter
– 1/2 teaspoon vanilla extract
Instructions
1. Preheat your oven to 350°F and line a baking sheet with parchment paper.
2. Spread 1 cup of sliced almonds evenly across the prepared baking sheet.
3. Toast the almonds in the preheated oven for 5-7 minutes until they turn light golden brown and become fragrant.
4. Transfer the toasted almonds to a cutting board and let them cool completely for 10 minutes.
5. Finely chop the cooled almonds until they reach a coarse meal consistency.
6. Combine the chopped almonds with 2 tablespoons of granulated sugar and 1/4 teaspoon salt in a shallow bowl.
7. Heat 1/2 cup honey and 1 tablespoon unsalted butter in a small saucepan over medium heat.
8. Stir the honey-butter mixture constantly with a wooden spoon until the butter fully melts and the mixture becomes smooth and bubbly, about 3-4 minutes.
9. Remove the saucepan from heat and stir in 1/2 teaspoon vanilla extract until fully incorporated.
10. Dip apple slices, pretzel rods, or graham crackers into the warm honey sauce, coating each piece evenly.
11. Immediately roll the coated items in the almond-sugar mixture, pressing gently to ensure good adhesion.
12. Place the finished dippers on a wire rack and let them set at room temperature for 20-30 minutes until the coating hardens.
Lovely crisp textures from the toasted almonds contrast beautifully with the sticky-sweet honey coating that hardens into a delicate shell. These dippers offer a wonderful balance of nutty richness and floral sweetness that pairs exceptionally well with tart apple slices or salty pretzels. For an elegant presentation, arrange them on a wooden board with small bowls of extra dipping sauces like dark chocolate or caramel for a customizable dessert experience.
Chewy Oat and Berry Rounds

Let’s create these wholesome oat and berry rounds that combine chewy texture with bursts of fruity flavor. Last week’s baking experiment yielded this perfect grab-and-go snack that’s both satisfying and nutritious. Learning to make these rounds will give you a versatile treat that stores beautifully for busy mornings.
12
rounds15
minutes15
minutesIngredients
For the oat base:
– 2 cups old-fashioned rolled oats
– 1/2 cup all-purpose flour
– 1/2 cup packed brown sugar
– 1/2 cup unsalted butter, melted
– 1 large egg
– 1 teaspoon vanilla extract
– 1/2 teaspoon baking soda
– 1/4 teaspoon salt
For the berry filling:
– 1 cup mixed dried berries (cranberries, blueberries, cherries)
– 2 tablespoons honey
Instructions
1. Preheat your oven to 350°F and line a baking sheet with parchment paper.
2. Combine 2 cups rolled oats, 1/2 cup flour, 1/2 cup brown sugar, 1/2 teaspoon baking soda, and 1/4 teaspoon salt in a large mixing bowl.
3. Whisk 1 large egg with 1 teaspoon vanilla extract in a separate small bowl until fully combined.
4. Pour 1/2 cup melted butter into the dry ingredients and mix until the oats are evenly coated.
5. Add the egg mixture to the oat mixture and stir until a cohesive dough forms.
6. Fold 1 cup mixed dried berries into the dough until evenly distributed.
7. Scoop 2-tablespoon portions of dough and roll into balls between your palms.
8. Place dough balls 2 inches apart on the prepared baking sheet and flatten slightly to about 1/2-inch thickness.
9. Brush the tops of each round with 2 tablespoons honey using a pastry brush.
10. Bake for 12-15 minutes until the edges turn golden brown and the centers appear set.
11. Transfer the baking sheet to a wire rack and let the rounds cool completely for 30 minutes.
Each round offers a delightful contrast between the chewy oat base and the slightly tart berry pieces. Enjoy them as an afternoon pick-me-up or crumble over Greek yogurt for a textured breakfast parfait that will keep you satisfied for hours.
Sweet Potato Unity Bites
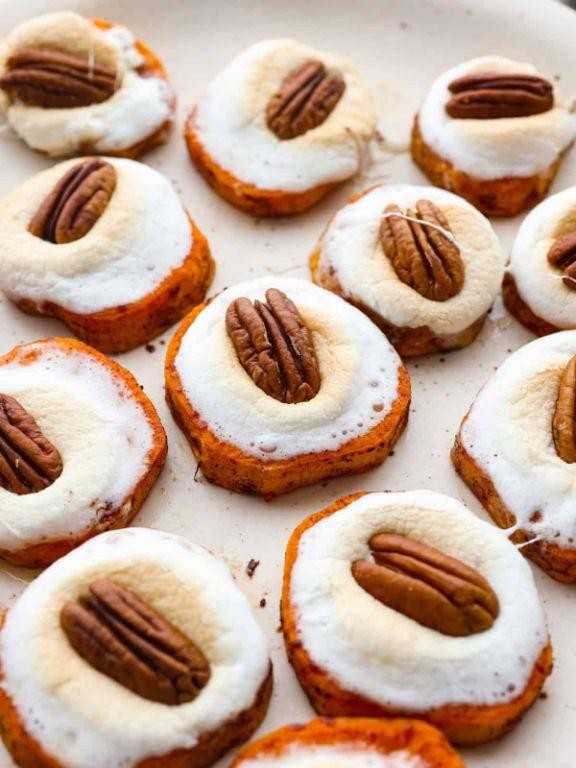
Baking these Sweet Potato Unity Bites is a straightforward process that yields delicious, wholesome results perfect for any gathering. Let’s walk through each step carefully to ensure your bites come out perfectly golden and flavorful. You’ll find that following these instructions precisely will give you consistent, restaurant-quality results every time.
24
bites20
minutes40
minutesIngredients
For the sweet potato base:
– 2 large sweet potatoes (about 3 cups mashed)
– 1/4 cup olive oil
– 1 teaspoon salt
For the seasoning blend:
– 1 tablespoon smoked paprika
– 2 teaspoons garlic powder
– 1 teaspoon black pepper
For the coating:
– 1 cup panko breadcrumbs
– 1/2 cup grated Parmesan cheese
Instructions
1. Preheat your oven to 400°F and line a baking sheet with parchment paper.
2. Peel the sweet potatoes and cut them into 1-inch cubes.
3. Place the sweet potato cubes in a large mixing bowl and drizzle with 1/4 cup olive oil.
4. Sprinkle 1 teaspoon salt, 1 tablespoon smoked paprika, 2 teaspoons garlic powder, and 1 teaspoon black pepper over the sweet potatoes.
5. Toss the sweet potatoes thoroughly until every piece is evenly coated with oil and seasonings.
6. Spread the seasoned sweet potatoes in a single layer on the prepared baking sheet.
7. Roast the sweet potatoes for 25 minutes at 400°F until they are fork-tender and slightly caramelized at the edges.
8. Remove the baking sheet from the oven and let the sweet potatoes cool for 10 minutes until they are safe to handle.
9. Transfer the cooled sweet potatoes to a large bowl and mash them thoroughly with a potato masher.
10. In a separate shallow bowl, combine 1 cup panko breadcrumbs and 1/2 cup grated Parmesan cheese.
11. Scoop approximately 2 tablespoons of mashed sweet potato mixture and roll it into a ball between your palms.
12. Roll each sweet potato ball in the panko-Parmesan mixture until completely coated.
13. Place the coated balls back on the parchment-lined baking sheet, spacing them about 1 inch apart.
14. Bake the bites at 400°F for 15 minutes until the coating is golden brown and crispy.
15. Remove the baking sheet from the oven and let the bites rest for 5 minutes before serving.
Just out of the oven, these bites offer a wonderful contrast between the creamy, slightly sweet interior and the crunchy, savory exterior. The smoked paprika adds a subtle warmth that complements the natural sweetness of the potatoes beautifully. Consider serving them alongside a cool yogurt dip or arranging them on a platter with colorful vegetable sticks for an impressive appetizer display.
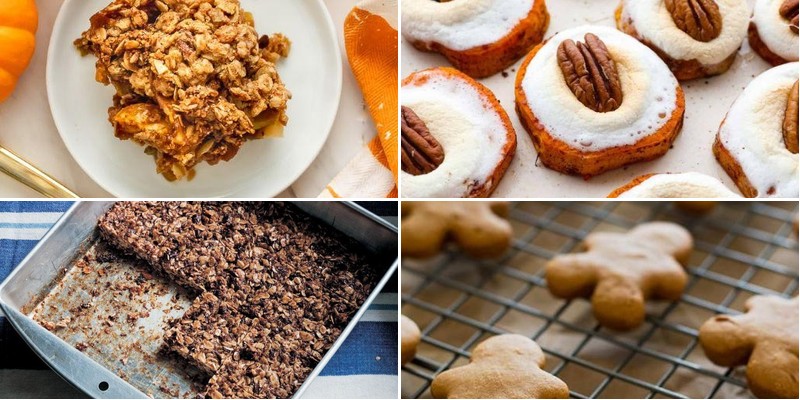
Pumpkin and Apple Crunchies

Very few autumn treats capture the cozy essence of fall quite like this delightful combination of seasonal produce. Perfect for beginners, this recipe walks you through creating a comforting dessert that fills your kitchen with the warmest aromas. Let’s begin our step-by-step journey to pumpkin and apple perfection.
9
portions20
minutes40
minutesIngredients
For the fruit base:
– 2 cups canned pumpkin puree
– 3 medium apples, peeled and diced into 1/2-inch pieces
– 1/2 cup granulated sugar
– 1 teaspoon ground cinnamon
– 1/4 teaspoon ground nutmeg
For the crunchy topping:
– 1 cup old-fashioned oats
– 1/2 cup all-purpose flour
– 1/2 cup packed brown sugar
– 1/2 cup cold unsalted butter, cubed
– 1/2 cup chopped pecans
Instructions
1. Preheat your oven to 375°F and grease a 9×9-inch baking dish.
2. In a large bowl, combine the pumpkin puree, diced apples, granulated sugar, cinnamon, and nutmeg.
3. Spread the pumpkin-apple mixture evenly in the prepared baking dish.
4. In a separate bowl, mix together the oats, flour, and brown sugar.
5. Add the cold cubed butter to the oat mixture and use your fingers to work it in until the mixture resembles coarse crumbs.
6. Stir the chopped pecans into the crumb mixture.
7. Sprinkle the topping evenly over the pumpkin-apple layer, covering it completely.
8. Bake at 375°F for 35-40 minutes until the topping is golden brown and the filling is bubbling at the edges.
9. Remove from the oven and let cool for at least 20 minutes before serving.
Deliciously warm and comforting, this dessert offers a wonderful contrast between the soft, spiced pumpkin-apple base and the crisp, buttery topping. The natural sweetness of the apples balances perfectly with the earthy pumpkin, creating layers of autumn flavor in every bite. Serve it warm with a scoop of vanilla ice cream for the ultimate fall treat, or enjoy it as a cozy breakfast the next morning.
Gingerbread Horse Snack Squares

Every holiday season calls for simple, festive treats that even novice bakers can master with confidence. Gingerbread Horse Snack Squares combine warm spices with wholesome oats for a chewy, satisfying snack that’s perfect for lunchboxes or cozy afternoons. Let’s walk through each step together to create these delightful squares.
16
squares15
minutes22
minutesIngredients
For the Dry Mixture
- 2 cups old-fashioned rolled oats
- 1 cup all-purpose flour
- 1 tsp ground ginger
- 1/2 tsp ground cinnamon
- 1/4 tsp baking soda
- 1/4 tsp salt
For the Wet Mixture
- 1/2 cup unsalted butter, melted
- 1/2 cup molasses
- 1/4 cup packed brown sugar
- 1 large egg
- 1 tsp vanilla extract
Instructions
- Preheat your oven to 350°F and line an 8×8-inch baking pan with parchment paper, leaving overhang on two sides for easy removal.
- In a large bowl, whisk together 2 cups old-fashioned rolled oats, 1 cup all-purpose flour, 1 tsp ground ginger, 1/2 tsp ground cinnamon, 1/4 tsp baking soda, and 1/4 tsp salt until fully combined.
- In a separate medium bowl, stir 1/2 cup melted unsalted butter, 1/2 cup molasses, 1/4 cup packed brown sugar, 1 large egg, and 1 tsp vanilla extract until the mixture is smooth and uniform.
- Pour the wet mixture into the dry ingredients and mix with a spatula until no dry streaks remain, being careful not to overmix.
- Transfer the batter to the prepared pan and spread it evenly into all corners using the back of a spoon or offset spatula.
- Bake for 20–22 minutes, or until the edges are firm and the center springs back lightly when touched—this ensures a chewy texture without overbaking.
- Place the pan on a wire rack and let the squares cool completely in the pan for at least 1 hour to set properly before cutting.
- Use the parchment overhang to lift the slab out, then slice into 16 even squares with a sharp knife for clean edges.
Brimming with molasses depth and ginger warmth, these squares offer a tender, oat-packed chew that holds up well in lunchboxes. For a festive twist, drizzle them with a simple powdered sugar glaze or pack alongside apple slices for a balanced snack. They’re a humble treat that feels both nostalgic and nourishing, especially with a cup of hot cider.
Cranberry Mint Pastry Poppers

Let’s create these delightful Cranberry Mint Pastry Poppers, perfect for holiday gatherings or a sweet afternoon treat. Learning to make these bite-sized pastries will give you confidence in working with puff pastry while combining tangy and refreshing flavors. Following these methodical steps ensures even beginners achieve perfectly golden, flavorful results every time.
24
poppers20
minutes18
minutesIngredients
For the Filling
– 1 cup fresh cranberries
– 1/4 cup granulated sugar
– 2 tbsp finely chopped fresh mint leaves
– 1 tsp lemon zest
For Assembly
– 1 sheet frozen puff pastry, thawed
– 1 egg, beaten
– 2 tbsp coarse sugar
Instructions
1. Preheat your oven to 400°F and line a baking sheet with parchment paper.
2. Combine 1 cup fresh cranberries, 1/4 cup granulated sugar, 2 tbsp chopped mint, and 1 tsp lemon zest in a small bowl.
3. Lightly mash the cranberry mixture with a fork until berries are slightly broken down but still chunky.
4. Unfold the thawed puff pastry sheet on a lightly floured surface.
5. Roll the pastry to a 10×12 inch rectangle using a rolling pin.
6. Cut the pastry into 24 equal squares using a sharp knife or pizza cutter.
7. Place 1 teaspoon of the cranberry mint filling in the center of each pastry square.
8. Brush the edges of each square with beaten egg using a pastry brush.
9. Fold each square diagonally to form triangles, pressing edges firmly to seal.
10. Transfer the filled pastries to the prepared baking sheet, spacing them 1 inch apart.
11. Brush the tops of all pastries with the remaining beaten egg.
12. Sprinkle 2 tbsp coarse sugar evenly over the pastry tops.
13. Bake at 400°F for 15-18 minutes until puffed and golden brown.
14. Transfer the pastries to a wire rack to cool for 5 minutes before serving.
Each bite delivers a satisfying crunch from the flaky pastry that gives way to the vibrant cranberry filling. The tart berries balance beautifully with the subtle mint freshness, creating a sophisticated flavor profile that delights the palate. Enjoy these warm from the oven with afternoon tea, or arrange them on a decorative platter for your next holiday party where their jewel-like appearance will surely impress guests.
Coconut and Rice Bonbons

Now, let’s create these delightful Coconut and Rice Bonbons, a perfect treat that combines creamy coconut with fluffy rice in bite-sized delights. These sweet morsels are surprisingly simple to make and require just a few basic ingredients. Follow each step carefully for perfect results every time.
16
bonbons25
minutes18
minutesIngredients
For the rice base:
– 1 cup short-grain white rice
– 2 cups water
– 1/4 cup granulated sugar
For the coconut coating:
– 1 cup sweetened shredded coconut
– 1/4 cup coconut milk
– 2 tablespoons powdered sugar
Instructions
1. Rinse 1 cup of short-grain white rice under cold running water until the water runs clear.
2. Combine the rinsed rice with 2 cups of water in a medium saucepan.
3. Bring the rice and water to a boil over high heat, then immediately reduce to low heat.
4. Cover the saucepan and simmer for 18 minutes until all water is absorbed.
5. Remove the saucepan from heat and let the rice stand covered for 5 minutes.
6. Fluff the cooked rice with a fork to separate the grains.
7. Stir 1/4 cup granulated sugar into the warm rice until fully dissolved.
8. Let the sweetened rice cool to room temperature, about 20 minutes.
9. Wet your hands with cold water to prevent sticking, then scoop 1 tablespoon of rice mixture.
10. Roll the rice mixture between your palms to form 1-inch balls.
11. Place the formed rice balls on a parchment-lined baking sheet.
12. In a small bowl, combine 1 cup sweetened shredded coconut with 1/4 cup coconut milk.
13. Mix the coconut mixture until it becomes slightly sticky and holds together.
14. Roll each rice ball in the coconut mixture, pressing gently to coat completely.
15. Arrange the coated bonbons on a clean parchment-lined tray.
16. Dust the finished bonbons with 2 tablespoons powdered sugar using a fine-mesh sieve.
17. Refrigerate the bonbons for at least 30 minutes to set before serving.
Keep these bonbons chilled until ready to serve for the best texture contrast between the soft rice center and the slightly chewy coconut coating. The subtle sweetness of the rice pairs beautifully with the tropical coconut flavor, making these perfect for afternoon tea or as elegant party favors. Try serving them alongside fresh fruit or drizzled with dark chocolate for an extra special presentation.
Whole Wheat & Carrot Yum Balls
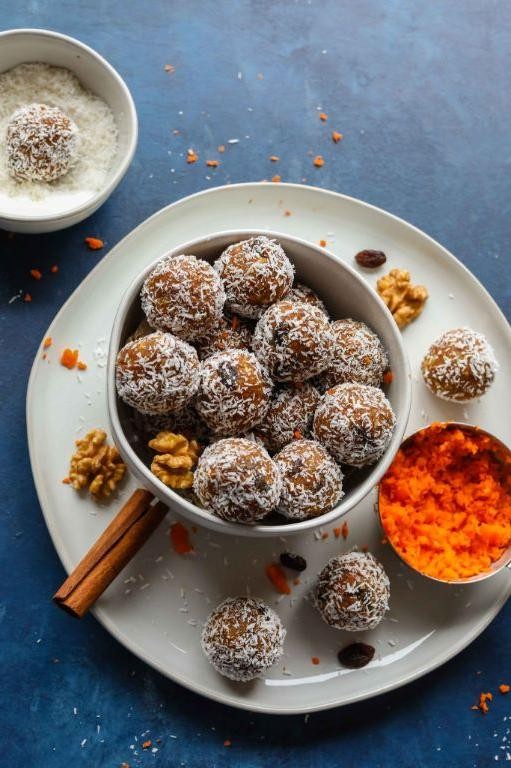
Every home cook needs a few reliable, wholesome snacks in their repertoire, and these Whole Wheat & Carrot Yum Balls are perfect for beginners to master. Essentially, they combine grated carrots, whole wheat flour, and warming spices into bite-sized treats that bake up soft and fragrant. Let’s walk through the process together, step by step.
12
balls15
minutes18
minutesIngredients
- For the Yum Ball Mixture
- 1 cup grated carrots
- 1 cup whole wheat flour
- 1/4 cup honey
- 1/4 cup melted coconut oil
- 1 tsp cinnamon
- 1/2 tsp baking powder
- 1/4 tsp salt
Instructions
- Preheat your oven to 350°F and line a baking sheet with parchment paper.
- Place 1 cup grated carrots in a medium mixing bowl.
- Add 1 cup whole wheat flour, 1 tsp cinnamon, 1/2 tsp baking powder, and 1/4 tsp salt to the bowl.
- Tip: Whisk the dry ingredients together in a separate bowl first for even distribution, then combine with the carrots.
- Pour in 1/4 cup melted coconut oil and 1/4 cup honey.
- Mix everything with a spatula until a thick, slightly sticky dough forms.
- Scoop about 1 tablespoon of dough and roll it firmly between your palms to form a 1-inch ball.
- Tip: Lightly wet your hands to prevent the dough from sticking while rolling.
- Place each ball on the prepared baking sheet, spacing them about 1 inch apart.
- Bake in the preheated oven for 15–18 minutes, or until the bottoms are lightly golden.
- Tip: Check at 15 minutes—the tops should feel firm to the touch but not browned.
- Remove the baking sheet from the oven and let the yum balls cool on the sheet for 5 minutes.
- Transfer the yum balls to a wire rack to cool completely.
Out of the oven, these yum balls offer a tender, cake-like texture with subtle sweetness from the honey and earthy notes from the carrots. Their moist crumb and gentle spice make them ideal for packing in lunchboxes or crumbling over yogurt for a quick, wholesome breakfast.
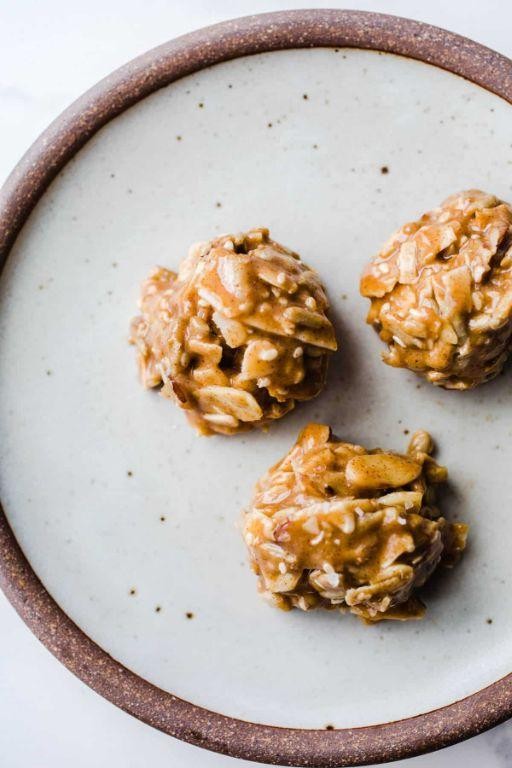
Sunflower Seed Mini Bites
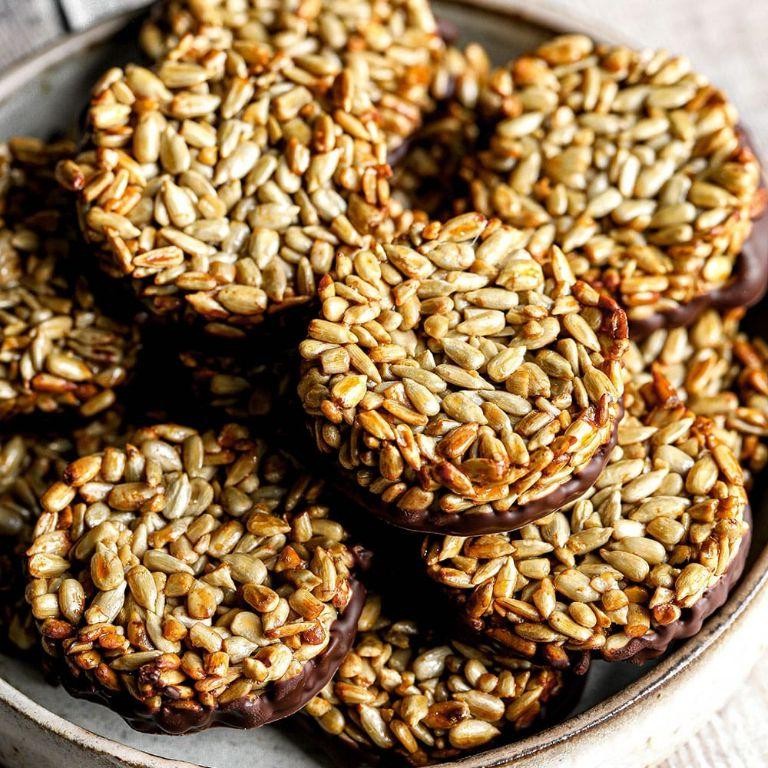
Now, let’s create these delightful sunflower seed mini bites, a perfect project for beginner cooks looking to build confidence with simple, precise techniques. These no-bake treats come together quickly with minimal equipment, making them ideal for last-minute gatherings or healthy snacking. You’ll appreciate how methodically we’ll work through each component to ensure perfect results every time.
12
portions15
minutesIngredients
For the base mixture:
– 1 cup raw sunflower seeds
– 1/4 cup creamy almond butter
– 2 tablespoons pure maple syrup
– 1 teaspoon vanilla extract
For coating:
– 1/4 cup unsweetened shredded coconut
– 2 tablespoons mini chocolate chips
Instructions
- Place 1 cup raw sunflower seeds in a food processor.
- Process the sunflower seeds for 45 seconds until they form a coarse meal, stopping to scrape down the sides halfway through.
- Add 1/4 cup creamy almond butter, 2 tablespoons pure maple syrup, and 1 teaspoon vanilla extract to the food processor.
- Process the mixture for 60 seconds until it forms a sticky dough that holds together when pressed.
- Line a baking sheet with parchment paper.
- Scoop 1 tablespoon portions of the mixture and roll them into 1-inch balls between your palms.
- Place 1/4 cup unsweetened shredded coconut in a shallow bowl.
- Roll half of the balls in the shredded coconut until evenly coated.
- Place 2 tablespoons mini chocolate chips in a separate shallow bowl.
- Press the remaining balls into the mini chocolate chips, ensuring they adhere to the surface.
- Arrange all coated balls on the prepared baking sheet, spacing them 1 inch apart.
- Refrigerate the mini bites for 30 minutes until firm to the touch.
Yield these delightful bites after chilling reveals their satisfying crunchy exterior that gives way to a pleasantly dense, nutty center. The contrast between the coconut-coated versions and chocolate-studded alternatives creates wonderful textural variety perfect for serving on a decorative platter. Consider arranging them in alternating patterns or presenting them in mini paper liners for an elegant touch at your next gathering.
Maple-Flavored Delightful Discs
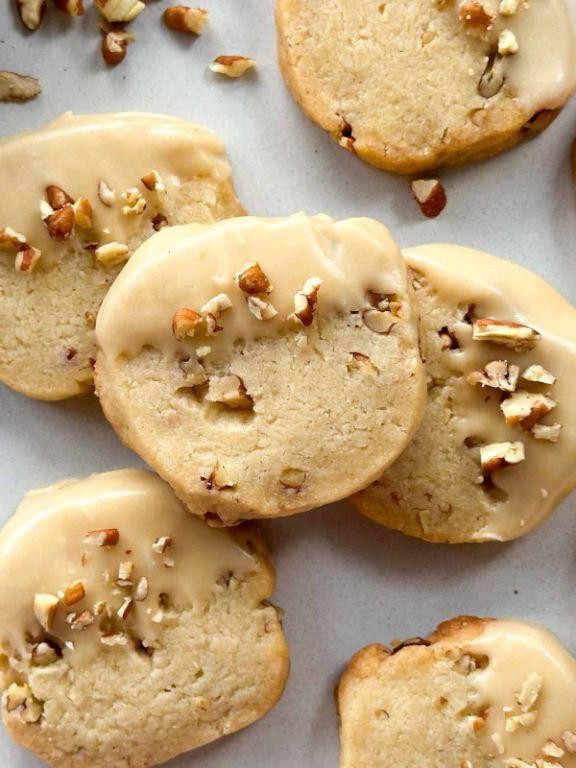
Now, let’s create these delightful maple-flavored discs that combine the comforting warmth of maple with a tender, cake-like texture perfect for autumn mornings. This straightforward recipe walks you through each stage methodically, ensuring even beginner bakers achieve perfect results every time.
12
portions15
minutes15
minutesIngredients
For the dry mixture:
– 2 cups all-purpose flour
– 1/4 cup granulated sugar
– 2 tsp baking powder
– 1/2 tsp salt
For the wet mixture:
– 3/4 cup whole milk
– 1/4 cup pure maple syrup
– 1 large egg
– 4 tbsp melted unsalted butter, cooled to room temperature
For cooking and serving:
– 2 tbsp vegetable oil for greasing
– Additional maple syrup for drizzling
Instructions
1. Preheat your oven to 375°F and lightly grease a baking sheet with vegetable oil using a pastry brush.
2. Whisk together the flour, sugar, baking powder, and salt in a large mixing bowl until fully combined.
3. In a separate medium bowl, vigorously whisk the milk, maple syrup, egg, and melted butter for exactly 60 seconds until the mixture appears smooth and emulsified.
4. Pour the wet ingredients into the dry ingredients and stir with a rubber spatula until just combined, being careful not to overmix—the batter should remain slightly lumpy.
5. Drop 1/4-cup portions of batter onto the prepared baking sheet, spacing them 2 inches apart to allow for spreading.
6. Bake for 12-15 minutes until the edges turn golden brown and the centers spring back when gently pressed with your fingertip.
7. Transfer the discs to a wire cooling rack and let them rest for 5 minutes before serving.
These maple-flavored delights emerge with a tender, cake-like crumb and delicate golden edges that contrast beautifully with their rich maple aroma. The subtle sweetness pairs wonderfully with crispy bacon or can be elevated by sandwiching them with whipped cream and fresh berries for an impressive dessert presentation.
Oat and Apple Sauce Krunches

Every home cook needs a reliable, wholesome snack recipe that comes together with minimal fuss and maximum flavor. Oat and Apple Sauce Krunches deliver that perfect balance of crisp texture and natural sweetness, making them an ideal treat for busy mornings or afternoon pick-me-ups. Let’s walk through this simple method that transforms basic pantry staples into something truly special.
2
servings10
minutes35
minutesIngredients
- For the oat base:
- 2 cups old-fashioned rolled oats
- 1/2 cup unsweetened applesauce
- 1/4 cup maple syrup
- 1 tbsp coconut oil, melted
- 1 tsp ground cinnamon
- 1/4 tsp salt
- For finishing:
- 1/2 cup chopped walnuts
Instructions
- Preheat your oven to 325°F and line a baking sheet with parchment paper.
- Combine 2 cups old-fashioned rolled oats, 1 tsp ground cinnamon, and 1/4 tsp salt in a large mixing bowl.
- Pour 1/2 cup unsweetened applesauce, 1/4 cup maple syrup, and 1 tbsp melted coconut oil over the dry ingredients.
- Mix thoroughly with a spatula until every oat is coated and the mixture holds together when pressed.
- Spread the mixture evenly on the prepared baking sheet in a single layer, about 1/4-inch thick.
- Bake for 25 minutes at 325°F until the edges begin turning golden brown.
- Remove from oven and sprinkle 1/2 cup chopped walnuts evenly over the top.
- Return to oven and bake for another 10 minutes at 325°F until the walnuts are lightly toasted and the krunches are crisp.
- Cool completely on the baking sheet for 30 minutes to allow them to crisp up properly.
- Break into irregular clusters about 1-2 inches in size.
But what makes these krunches truly stand out is their delightful contrast of textures—crisp oats give way to tender apple-infused centers, while the toasted walnuts add satisfying crunch. The natural sweetness from applesauce and maple syrup means you can enjoy these straight from the jar, or try crumbling them over Greek yogurt for a protein-packed breakfast. Their sturdy texture holds up beautifully in lunch boxes or as a hiking snack, staying crisp for days when stored properly.
Golden Flaxseed Treat Twists

Zesty and nutritious, these Golden Flaxseed Treat Twists are a wholesome snack that combines earthy flaxseeds with a hint of sweetness. Perfect for beginners, this recipe guides you through creating beautifully twisted treats that are both visually appealing and delicious. Let’s start with gathering our ingredients and prepping our workspace for success.
8
portions15
minutes15
minutesIngredients
For the dough:
- 1 cup all-purpose flour
- 1/2 cup golden flaxseed meal
- 1/4 cup honey
- 3 tablespoons melted butter
- 1 large egg
- 1 teaspoon baking powder
- 1/4 teaspoon salt
For finishing:
- 1 tablespoon milk
- 1 tablespoon coarse sugar
Instructions
- Preheat your oven to 350°F and line a baking sheet with parchment paper.
- Combine 1 cup all-purpose flour, 1/2 cup golden flaxseed meal, 1 teaspoon baking powder, and 1/4 teaspoon salt in a large mixing bowl.
- Whisk together 1/4 cup honey, 3 tablespoons melted butter, and 1 large egg in a separate bowl until fully incorporated.
- Pour the wet ingredients into the dry ingredients and stir until a cohesive dough forms.
- Turn the dough out onto a lightly floured surface and knead gently for 30 seconds until smooth. Tip: If the dough feels sticky, dust your hands with a bit more flour rather than adding it directly to the dough.
- Divide the dough into 8 equal portions and roll each into a 6-inch rope about 1/2-inch thick.
- Twist two ropes together by holding one end of each rope and wrapping them around each other, then pinch both ends to seal.
- Place the twisted treats 2 inches apart on the prepared baking sheet.
- Brush each twist lightly with 1 tablespoon milk using a pastry brush. Tip: A light brushing ensures even browning without making the dough soggy.
- Sprinkle 1 tablespoon coarse sugar evenly over the twists.
- Bake for 12-15 minutes until the edges are golden brown and the twists feel firm to the touch. Tip: Rotate the baking sheet halfway through baking for even cooking.
- Transfer the baked twists to a wire rack and let them cool completely before serving.
Delightfully crisp on the outside with a tender, slightly chewy interior, these twists offer a nutty flavor from the flaxseeds balanced by subtle sweetness. Their twisted shape makes them perfect for dipping into yogurt or pairing with afternoon tea. For a creative presentation, stack them in a jar tied with twine for gifting or arrange them on a wooden board with fresh fruit.
Conclusion
You’ve now got 35 wonderful ways to treat your equine companions! From simple snacks to special occasion delights, these recipes offer something for every horse and every skill level. We’d love to hear which treats your horse enjoys most—leave a comment with your favorites below, and don’t forget to share this roundup on Pinterest so other horse lovers can discover these delicious recipes too!


