Let’s be honest—who can resist the creamy, chocolate-hazelnut magic of Nutella? Whether you’re craving quick treats or show-stopping desserts, we’ve gathered 35 irresistible homemade recipes that turn that beloved jar into everything from gooey brownies to elegant tarts. Get ready to satisfy your sweet tooth and impress everyone at the table. Dive in and discover your next favorite dessert!
Classic Creamy Homemade Nutella Spread
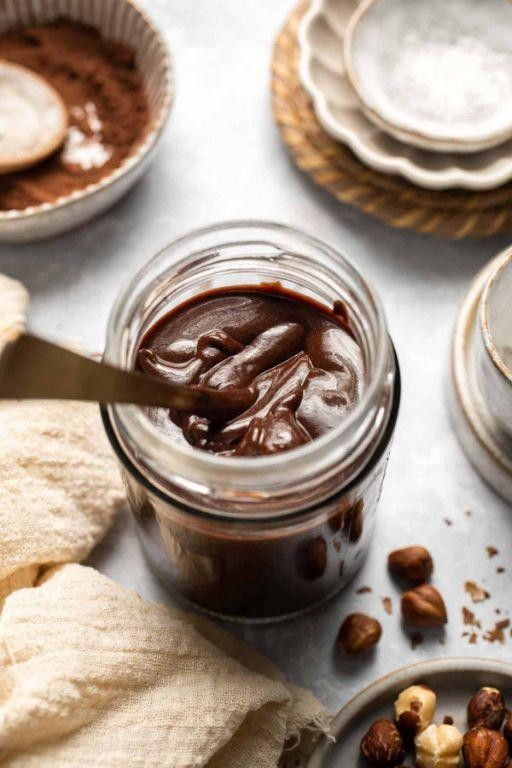
Finally, after years of buying jar after jar of store-bought hazelnut spread, I decided to create my own version at home—and let me tell you, the difference is night and day. There’s something incredibly satisfying about blending roasted hazelnuts into a silky, chocolatey spread that fills your kitchen with the most heavenly aroma. As someone who’s always tinkering in the kitchen, I love that this recipe lets me control the sweetness and texture, making it perfect for everything from morning toast to late-night spoonfuls straight from the jar.
Serving: 2 cups | Pre Time: 10 minutes | Cooking Time: 15 minutes
Ingredients
For the hazelnut base:
– 2 cups raw hazelnuts
– 1 tablespoon vegetable oil
For the chocolate mixture:
– 1 cup powdered sugar
– 1/3 cup unsweetened cocoa powder
– 1/4 teaspoon salt
– 1 teaspoon pure vanilla extract
– 1/2 cup whole milk
Instructions
1. Preheat your oven to 350°F and line a baking sheet with parchment paper.
2. Spread the 2 cups of raw hazelnuts evenly on the prepared baking sheet.
3. Roast the hazelnuts in the preheated oven for 10–12 minutes, until they are fragrant and the skins begin to crack.
4. Remove the hazelnuts from the oven and immediately transfer them to a clean kitchen towel.
5. Rub the hazelnuts vigorously inside the towel to remove as much of the skins as possible—don’t worry if some bits remain, as they’ll add a nice texture.
6. Allow the hazelnuts to cool completely to room temperature, about 10 minutes.
7. Place the cooled, skinned hazelnuts in a high-powered food processor or blender.
8. Process the hazelnuts on high speed for 5–7 minutes, stopping to scrape down the sides every minute, until they form a smooth, runny butter.
9. Add the 1 tablespoon of vegetable oil to the hazelnut butter and process for another 30 seconds until fully incorporated.
10. In a medium mixing bowl, whisk together the 1 cup of powdered sugar, 1/3 cup of unsweetened cocoa powder, and 1/4 teaspoon of salt until no lumps remain.
11. With the food processor running on low, gradually add the dry mixture to the hazelnut butter.
12. Once combined, stream in the 1/2 cup of whole milk and 1 teaspoon of pure vanilla extract while continuing to process.
13. Increase the speed to high and blend for 2–3 minutes until the spread is completely smooth and glossy.
14. Transfer the Nutella to a clean, airtight jar and let it set at room temperature for 1 hour before using.
Now, this homemade Nutella has a luxuriously creamy texture that’s rich with deep chocolate flavor and a subtle nutty crunch. I love swirling it into warm oatmeal or using it as a dip for fresh strawberries—it’s so versatile, you’ll find yourself reaching for it all day long.
Nutella-Stuffed French Toast with Berries
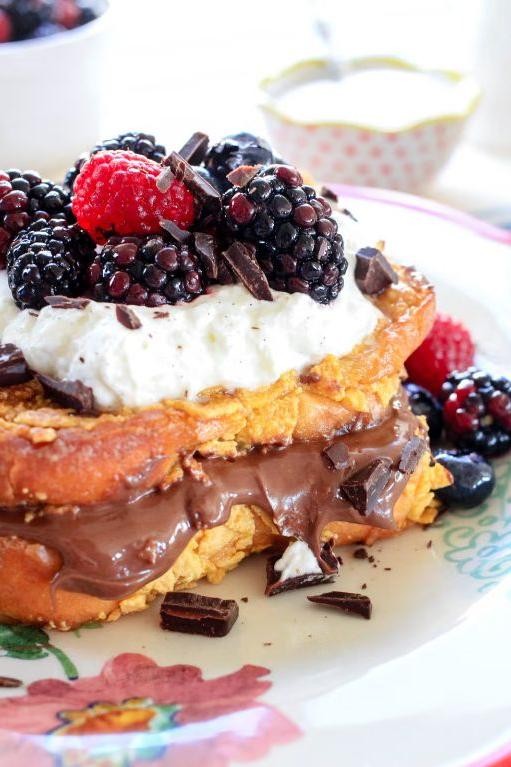
Zipping through my weekend mornings, I’ve always craved something decadent yet simple—a treat that feels special without hours in the kitchen. That’s how this Nutella-Stuffed French Toast with Berries came to be, born from a lazy Sunday when I wanted to indulge my sweet tooth but keep things fuss-free. It’s become my go-to for impressing guests or just treating myself, with its gooey center and fresh berry burst making every bite a little celebration.
Serving: 2 | Pre Time: 10 minutes | Cooking Time: 10 minutes
Ingredients
- For the French toast:
- 4 slices thick-cut brioche bread
- 1/4 cup Nutella spread
- 2 large eggs
- 1/2 cup whole milk
- 1 tsp vanilla extract
- 1/4 tsp ground cinnamon
- 2 tbsp unsalted butter
- For the berry topping:
- 1 cup mixed fresh berries (such as strawberries, blueberries, and raspberries)
- 2 tbsp granulated sugar
- 1 tbsp fresh lemon juice
- For serving:
- Powdered sugar, for dusting
- Maple syrup, for drizzling
Instructions
- Spread 2 tbsp of Nutella evenly on two slices of brioche bread, leaving a 1/2-inch border around the edges.
- Top each with the remaining bread slices to form two sandwiches, pressing gently to seal.
- In a shallow bowl, whisk together the eggs, milk, vanilla extract, and cinnamon until fully combined.
- Heat a large non-stick skillet or griddle over medium heat and add 1 tbsp of butter, letting it melt and coat the surface evenly.
- Dip one sandwich into the egg mixture, letting it soak for 30 seconds per side until fully coated but not soggy.
- Place the soaked sandwich in the skillet and cook for 3–4 minutes per side, or until golden brown and crisp.
- Repeat steps 5–6 with the remaining sandwich, adding the second tbsp of butter to the skillet as needed.
- While the French toast cooks, combine the mixed berries, granulated sugar, and lemon juice in a small saucepan over medium heat.
- Cook the berry mixture for 5 minutes, stirring occasionally, until the berries soften and release their juices to form a syrupy sauce.
- Transfer the cooked French toast to plates and top generously with the warm berry sauce.
- Dust the French toast lightly with powdered sugar using a fine-mesh sieve for an even coating.
- Drizzle with maple syrup to taste just before serving.
Now, nothing beats the contrast of the crisp, buttery exterior giving way to that molten Nutella core, all balanced by the tart-sweet berries. I love serving it immediately while it’s warm and gooey, maybe with a side of crispy bacon for a salty-sweet twist that always gets rave reviews at brunch.
Decadent Nutella Fudge Brownies
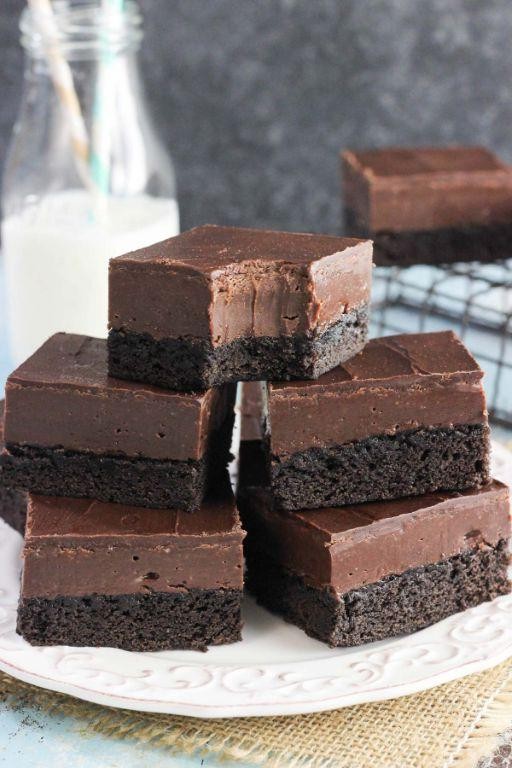
A few weeks ago, I was craving something intensely chocolatey but didn’t want to spend hours in the kitchen—enter these Decadent Nutella Fudge Brownies. They’re my go-to when I need a quick, indulgent treat that feels like a hug from the inside, and I love how the Nutella swirls create beautiful marbling without any fuss.
Serving: 16 | Pre Time: 15 minutes | Cooking Time: 30 minutes
Ingredients
For the Brownie Batter:
– 1 cup unsalted butter, melted
– 2 cups granulated sugar
– 4 large eggs
– 1 teaspoon vanilla extract
– 1 cup all-purpose flour
– ¾ cup unsweetened cocoa powder
– ½ teaspoon salt
For the Nutella Swirl:
– 1 cup Nutella
Instructions
1. Preheat your oven to 350°F and grease a 9×13-inch baking pan, then line it with parchment paper for easy removal later.
2. In a large mixing bowl, whisk together the melted butter and granulated sugar until fully combined and smooth.
3. Add the eggs one at a time to the butter-sugar mixture, whisking well after each addition to incorporate air for a fudgy texture.
4. Stir in the vanilla extract until evenly distributed throughout the wet ingredients.
5. In a separate medium bowl, sift together the all-purpose flour, unsweetened cocoa powder, and salt to prevent lumps.
6. Gradually fold the dry ingredients into the wet mixture using a spatula, mixing just until no flour streaks remain to avoid overmixing.
7. Pour the brownie batter into the prepared baking pan and spread it evenly with the spatula.
8. Drop spoonfuls of Nutella evenly over the top of the batter, spacing them about 1 inch apart.
9. Use a knife or toothpick to gently swirl the Nutella into the batter in a zigzag pattern, creating a marbled effect without overmixing.
10. Bake in the preheated oven for 28–32 minutes, or until a toothpick inserted into the center comes out with a few moist crumbs attached, not wet batter.
11. Remove the pan from the oven and let the brownies cool completely in the pan on a wire rack for at least 1 hour before slicing.
12. Cut into 16 squares using a sharp knife, wiping it clean between cuts for neat edges.
Zesty and rich, these brownies boast a dense, fudgy center with crackly tops that give way to creamy Nutella swirls in every bite. Try serving them warm with a scoop of vanilla ice cream for an extra-decadent dessert, or pack them in lunchboxes for a sweet surprise that always disappears fast.
Easy No-Bake Nutella Cheesecake
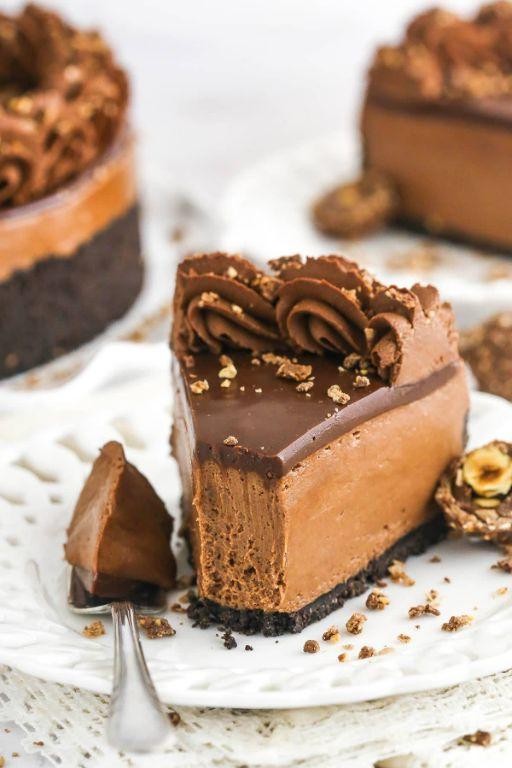
Last weekend, when my oven decided to take an unexpected vacation right before my book club gathering, I panicked—until I remembered this lifesaver of a dessert. Let’s just say my friends didn’t miss the baked goods one bit after digging into this creamy, chocolate-hazelnut dream.
Serving: 8 | Pre Time: 20 minutes | Cooking Time: 0 minutes
Ingredients
For the crust:
– 1 1/2 cups graham cracker crumbs
– 1/4 cup granulated sugar
– 6 tbsp unsalted butter, melted
For the filling:
– 16 oz cream cheese, softened to room temperature
– 1 cup Nutella
– 1/2 cup powdered sugar
– 1 tsp pure vanilla extract
– 1 cup heavy cream
For topping (optional):
– 1/4 cup chopped hazelnuts
– 1/4 cup mini chocolate chips
Instructions
1. In a medium bowl, combine 1 1/2 cups graham cracker crumbs, 1/4 cup granulated sugar, and 6 tbsp melted unsalted butter until the mixture resembles wet sand.
2. Tip: Press the crust firmly into the bottom of a 9-inch springform pan using the bottom of a measuring cup to create an even, compact layer.
3. Place the crust in the refrigerator to chill for 10 minutes while you prepare the filling.
4. In a large mixing bowl, beat 16 oz softened cream cheese with an electric mixer on medium speed for 2 minutes until smooth and creamy.
5. Add 1 cup Nutella, 1/2 cup powdered sugar, and 1 tsp pure vanilla extract to the cream cheese, and beat on low speed for 1 minute until fully combined.
6. In a separate bowl, whip 1 cup heavy cream with the electric mixer on high speed for 3–4 minutes until stiff peaks form.
7. Tip: Fold the whipped cream into the Nutella mixture gently with a spatula to maintain the airy texture—overmixing can deflate it.
8. Pour the filling over the chilled crust and spread it evenly with an offset spatula.
9. Tap the pan lightly on the counter 2–3 times to release any air bubbles.
10. Cover the pan with plastic wrap and refrigerate the cheesecake for at least 6 hours, or ideally overnight, to set completely.
11. Tip: Before serving, run a knife dipped in hot water around the edges of the pan to release the cheesecake cleanly from the springform.
12. Sprinkle 1/4 cup chopped hazelnuts and 1/4 cup mini chocolate chips over the top for garnish, if desired.
You’ll love how this cheesecake slices like a dream with a firm yet velvety texture that melts on your tongue. The Nutella adds a rich, nutty sweetness that pairs perfectly with the buttery crust—try serving it with a drizzle of extra Nutella or a scoop of vanilla ice cream for an indulgent twist.
Fluffy Nutella Pancakes with Banana
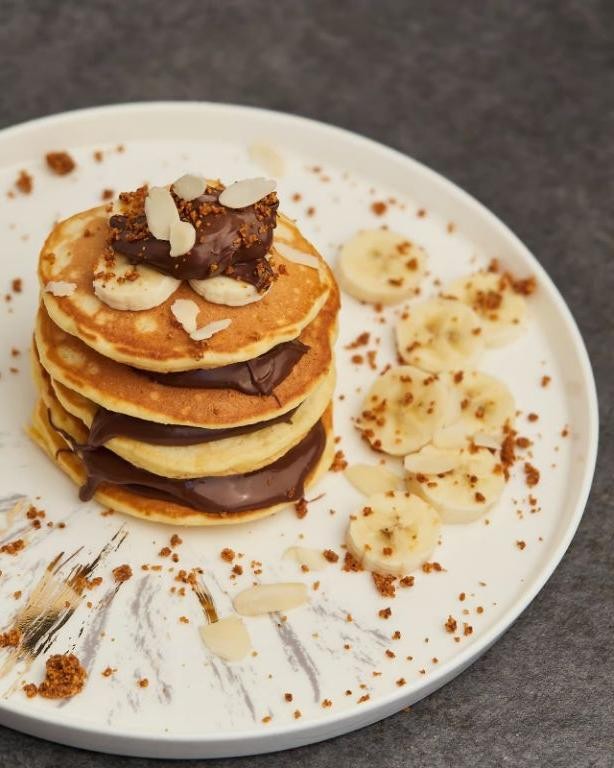
Yep, it’s one of those lazy weekend mornings when only something decadent will do—I’m talking about my go-to Fluffy Nutella Pancakes with Banana. I started making these years ago when my niece declared store-bought pancakes ‘boring,’ and now they’re a family favorite that feels like a warm hug on a plate. Trust me, the combo of melty Nutella and sweet banana is pure magic, and I’ll show you how to nail it every time.
Serving: 4 | Pre Time: 10 minutes | Cooking Time: 15 minutes
Ingredients
For the pancake batter:
– 1 cup all-purpose flour
– 2 tablespoons granulated sugar
– 1 teaspoon baking powder
– ½ teaspoon baking soda
– ¼ teaspoon salt
– 1 cup buttermilk
– 1 large egg
– 2 tablespoons unsalted butter, melted
– 1 teaspoon vanilla extract
For cooking and topping:
– 2 tablespoons unsalted butter, for greasing the pan
– ½ cup Nutella
– 2 ripe bananas, sliced
Instructions
1. In a large mixing bowl, whisk together the all-purpose flour, granulated sugar, baking powder, baking soda, and salt until fully combined.
2. In a separate medium bowl, whisk the buttermilk, egg, melted unsalted butter, and vanilla extract until smooth.
3. Pour the wet ingredients into the dry ingredients and gently stir with a spatula until just combined—do not overmix; a few lumps are okay for fluffier pancakes.
4. Heat a non-stick skillet or griddle over medium heat (about 350°F) and add ½ tablespoon of unsalted butter to coat the surface evenly.
5. For each pancake, pour ¼ cup of batter onto the skillet, cooking until bubbles form on the surface and the edges look set, about 2-3 minutes.
6. Flip the pancakes carefully with a spatula and cook for another 1-2 minutes until golden brown and cooked through; repeat with remaining batter, adding more butter as needed.
7. While the pancakes are warm, spread 1 tablespoon of Nutella evenly over each pancake using a butter knife.
8. Top each pancake with sliced bananas, layering them neatly over the Nutella.
9. Stack the pancakes on plates, finishing with a drizzle of any leftover Nutella and extra banana slices if desired.
Light and airy with a rich chocolate-hazelnut swirl, these pancakes are a dreamy treat that’s perfect for brunch or a sweet indulgence. I love serving them with a dollop of whipped cream or a sprinkle of chopped nuts for extra crunch—they’re so good, you might just skip the syrup altogether!
Rich Nutella Hot Chocolate with Whipped Cream

Every time the temperature drops and I see my breath in the air, my mind immediately goes to one thing: a mug of the most decadent, chocolatey hot chocolate imaginable. This version, made with Nutella, is my go-to for turning a regular evening into something special—it’s the kind of treat that makes you want to curl up on the couch and forget about the world outside.
Serving: 2 | Pre Time: 5 minutes | Cooking Time: 10 minutes
Ingredients
For the Hot Chocolate:
– 2 cups whole milk
– 1/2 cup Nutella
– 1/4 cup semi-sweet chocolate chips
– 1/8 tsp salt
For the Whipped Cream:
– 1/2 cup heavy cream
– 1 tbsp powdered sugar
– 1/2 tsp vanilla extract
Instructions
1. Pour 2 cups of whole milk into a small saucepan and place it over medium heat.
2. Heat the milk until it is steaming and small bubbles form around the edges, about 5 minutes, stirring occasionally to prevent a skin from forming.
3. Reduce the heat to low and add 1/2 cup of Nutella, 1/4 cup of semi-sweet chocolate chips, and 1/8 tsp of salt to the saucepan.
4. Whisk the mixture constantly for 3-4 minutes until the Nutella and chocolate chips are fully melted and the hot chocolate is smooth and glossy.
5. While the hot chocolate heats, place a medium mixing bowl and the beaters of a hand mixer in the freezer for 5 minutes to chill—this helps the cream whip faster and hold its shape better.
6. Remove the bowl and beaters from the freezer and add 1/2 cup of heavy cream, 1 tbsp of powdered sugar, and 1/2 tsp of vanilla extract.
7. Beat the mixture on medium-high speed for 2-3 minutes until stiff peaks form, being careful not to overbeat it into butter.
8. Divide the hot chocolate evenly between two mugs.
9. Top each mug generously with the whipped cream using a spoon or piping bag.
10. Serve immediately while hot.
What I love most about this drink is its velvety texture that coats your tongue, with the Nutella adding a deep hazelnut richness that balances the sweetness. For a fun twist, try sprinkling crushed hazelnuts or a drizzle of melted chocolate over the whipped cream—it’s perfect for sharing on a cozy night in.
Nutella Swirl Banana Bread
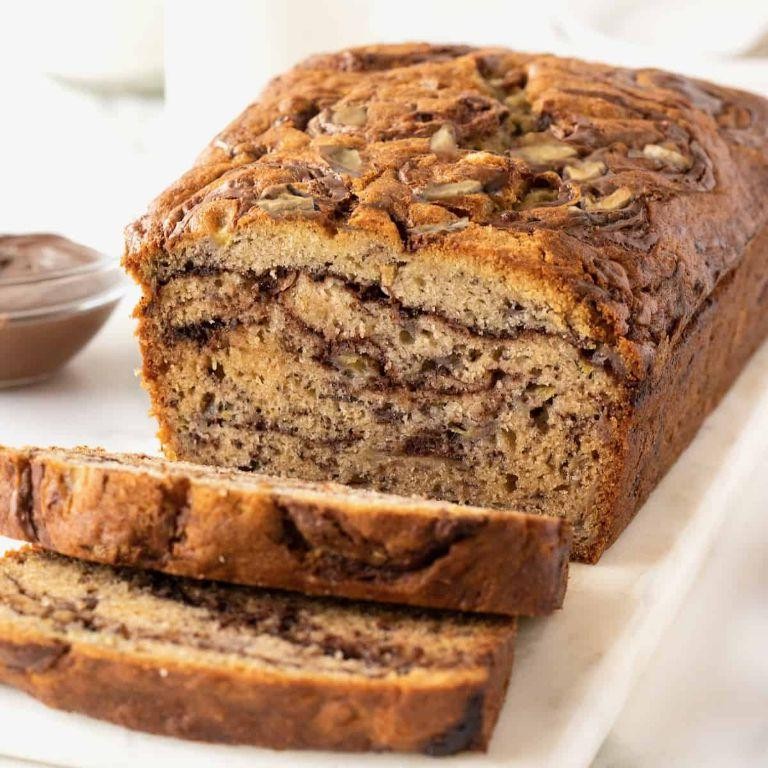
Tired of the same old banana bread? I was too, until I swirled in a jar of Nutella and created this decadent, gooey masterpiece that’s become my go-to for using up spotty bananas. It’s the perfect blend of cozy comfort and chocolate-hazelnut indulgence, and it fills the kitchen with the most incredible aroma while it bakes.
Serving: 10 | Pre Time: 15 minutes | Cooking Time: 65 minutes
Ingredients
For the Banana Bread Batter:
– 3 large ripe bananas (about 1 1/2 cups mashed)
– 1/2 cup (1 stick) unsalted butter, melted and cooled slightly
– 3/4 cup granulated sugar
– 1 large egg, at room temperature
– 1 teaspoon pure vanilla extract
– 1 1/2 cups all-purpose flour
– 1 teaspoon baking soda
– 1/2 teaspoon salt
For the Swirl:
– 1/2 cup Nutella
Instructions
1. Preheat your oven to 350°F (175°C) and generously grease a 9×5-inch loaf pan with butter or non-stick spray.
2. In a large mixing bowl, mash the ripe bananas with a fork until mostly smooth, leaving a few small lumps for texture. Tip: The riper the bananas, the sweeter and more flavorful your bread will be.
3. Add the melted butter, granulated sugar, egg, and vanilla extract to the mashed bananas. Whisk vigorously until the mixture is well combined and slightly creamy.
4. In a separate medium bowl, whisk together the all-purpose flour, baking soda, and salt.
5. Gradually add the dry ingredients to the wet ingredients, folding gently with a spatula until just combined and no dry flour remains. Be careful not to overmix, as this can make the bread tough.
6. Pour half of the banana bread batter into the prepared loaf pan and spread it into an even layer.
7. Dollop 1/4 cup of the Nutella in spoonfuls over the batter in the pan.
8. Carefully pour the remaining batter over the Nutella layer.
9. Dollop the remaining 1/4 cup of Nutella on top of the final batter layer.
10. Use a knife or a skewer to swirl the Nutella through all the layers of batter, creating a marbled pattern. Tip: Don’t over-swirl, or you’ll lose the beautiful contrast; just 5-6 gentle passes through the batter is perfect.
11. Place the loaf pan in the preheated oven and bake for 60 to 65 minutes. Tip: The bread is done when a toothpick inserted into the center comes out with just a few moist crumbs (not wet batter). The top will be a deep golden brown and will spring back lightly when touched.
12. Remove the pan from the oven and let the bread cool in the pan for 15 minutes before transferring it to a wire rack to cool completely.
Buttery and moist with pockets of warm, melted Nutella, this bread is a dream. The swirls create a beautiful marbled effect and ensure every slice is packed with chocolate-hazelnut flavor. I love serving a thick slice slightly warm with a cold glass of milk, or toasting it the next day for an even more decadent breakfast treat.
Gooey Nutella Chocolate Lava Cake
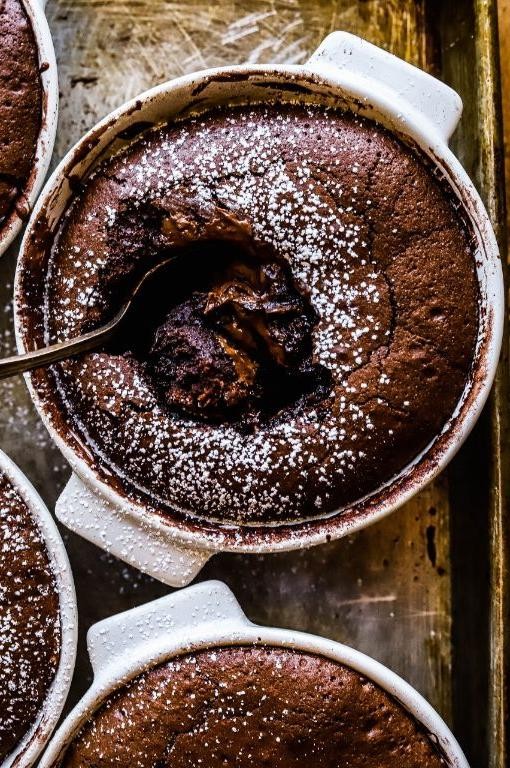
Gosh, there’s something magical about a dessert that oozes warm, chocolatey goodness the moment you dig in—like a little surprise waiting just beneath the surface. I first tried a version of this at a cozy café during a rainy afternoon, and I’ve been tweaking my own recipe ever since to get that perfect, gooey center every time. Trust me, it’s easier than it looks, and the payoff is absolutely worth it.
Serving: 4 | Pre Time: 15 minutes | Cooking Time: 12 minutes
Ingredients
For the cake batter:
– 1/2 cup unsalted butter
– 4 ounces semi-sweet chocolate chips
– 1/2 cup granulated sugar
– 2 large eggs
– 2 large egg yolks
– 1 teaspoon vanilla extract
– 1/4 cup all-purpose flour
– 1/4 teaspoon salt
For the filling:
– 4 tablespoons Nutella
Instructions
1. Preheat your oven to 425°F and grease four 6-ounce ramekins with butter or cooking spray, placing them on a baking sheet for stability.
2. In a microwave-safe bowl, melt the 1/2 cup unsalted butter and 4 ounces semi-sweet chocolate chips together in 30-second intervals, stirring after each until smooth—this prevents scorching.
3. Whisk the 1/2 cup granulated sugar into the melted chocolate mixture until fully combined.
4. Add the 2 large eggs, 2 large egg yolks, and 1 teaspoon vanilla extract to the bowl, whisking vigorously for about 2 minutes until the mixture is glossy and slightly thickened.
5. Gently fold in the 1/4 cup all-purpose flour and 1/4 teaspoon salt with a spatula until just incorporated; overmixing can make the cake dense.
6. Spoon half of the batter evenly into the prepared ramekins, filling each about one-third full.
7. Place 1 tablespoon of Nutella into the center of each ramekin, pressing it down lightly with the back of a spoon.
8. Top with the remaining batter, covering the Nutella completely and smoothing the surface.
9. Bake in the preheated oven for exactly 12 minutes, until the edges are set but the centers still jiggle slightly when shaken—this ensures that molten core.
10. Remove from the oven and let the cakes cool in the ramekins for 1 minute to firm up slightly.
11. Run a knife around the edges of each ramekin to loosen the cakes, then invert them onto serving plates.
12. Serve immediately while warm. So, when you crack into that tender cake, the rich Nutella lava flows out, creating a decadent pool that pairs beautifully with a scoop of vanilla ice cream or a dusting of powdered sugar. It’s the ultimate comfort dessert, perfect for impressing guests or treating yourself on a quiet evening.
Nutella and Strawberry Crepes
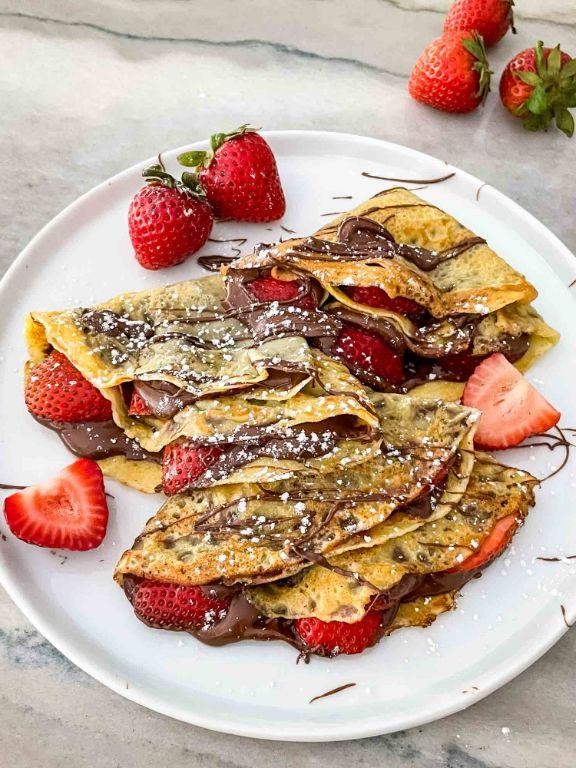
Haven’t we all had those lazy weekend mornings where a simple bowl of cereal just won’t cut it? I know I have, and that’s exactly when I turn to these dreamy Nutella and Strawberry Crepes. They feel like a special treat but come together with pantry staples I almost always have on hand.
Serving: 4 | Pre Time: 10 minutes | Cooking Time: 15 minutes
Ingredients
For the Crepe Batter:
– 1 cup all-purpose flour
– 2 large eggs
– 1 1/4 cups whole milk
– 2 tablespoons unsalted butter, melted
– 1/4 teaspoon salt
For the Filling & Topping:
– 1/2 cup Nutella
– 1 cup fresh strawberries, hulled and sliced
– 1 tablespoon powdered sugar
Instructions
1. In a large mixing bowl, whisk together 1 cup all-purpose flour and 1/4 teaspoon salt until combined.
2. Create a well in the center of the flour mixture and crack 2 large eggs into it.
3. Gradually pour in 1 1/4 cups whole milk while whisking continuously to form a smooth batter, ensuring no lumps remain. Tip: Letting the batter rest for 5 minutes helps the flour hydrate for more tender crepes.
4. Whisk 2 tablespoons of melted unsalted butter into the batter until fully incorporated.
5. Heat a non-stick skillet or crepe pan over medium heat until a drop of water sizzles on the surface.
6. Pour 1/4 cup of batter into the center of the hot skillet, immediately tilting and swirling the pan to spread it into a thin, even circle.
7. Cook the crepe for 60-90 seconds until the edges lift easily and the bottom develops light golden-brown spots.
8. Flip the crepe using a thin spatula and cook the other side for 30-45 seconds until set. Tip: Stack cooked crepes on a plate covered with a clean kitchen towel to keep them warm and pliable.
9. Transfer the cooked crepe to a clean work surface and spread 1 tablespoon of Nutella evenly over one half.
10. Arrange 2-3 slices of fresh strawberries over the Nutella.
11. Fold the crepe in half over the filling, then fold it in half again to form a quarter-circle.
12. Repeat steps 6-11 with the remaining batter and filling to make 8 crepes total. Tip: Wipe the skillet with a paper towel between crepes if butter accumulates, which prevents burning.
13. Dust the assembled crepes evenly with 1 tablespoon of powdered sugar using a fine-mesh sieve.
Zesty, sweet strawberries cut through the rich Nutella perfectly, while the delicate, slightly crisp crepe adds a lovely textural contrast. For a fun twist, try drizzling them with a little melted white chocolate or serving with a scoop of vanilla ice cream on the side.
Homemade Nutella Ice Cream

Kind of like that magical moment when you realize you’ve run out of Nutella at the worst possible time—I’ve been there, staring into the pantry with a serious chocolate-hazelnut craving. That’s exactly why I started making this Homemade Nutella Ice Cream: it’s rich, creamy, and tastes like a jar of Nutella transformed into a frozen dream, all without any fancy equipment. Trust me, once you try this, you’ll never look at store-bought the same way again.
Serving: 6 | Pre Time: 15 minutes | Cooking Time: 0 minutes
Ingredients
– For the ice cream base:
– 2 cups heavy cream
– 1 (14-ounce) can sweetened condensed milk
– 1 teaspoon vanilla extract
– For the Nutella swirl:
– 1 cup Nutella (or any chocolate-hazelnut spread)
– 2 tablespoons whole milk
Instructions
1. In a large mixing bowl, pour 2 cups of heavy cream.
2. Using an electric mixer on medium-high speed, whip the heavy cream until stiff peaks form, which should take about 3–4 minutes; a tip here is to chill your bowl and beaters in the freezer for 10 minutes beforehand for faster whipping.
3. In a separate medium bowl, combine 1 can of sweetened condensed milk and 1 teaspoon of vanilla extract, stirring until fully blended.
4. Gently fold the sweetened condensed milk mixture into the whipped cream using a spatula, being careful not to deflate the cream—fold just until no white streaks remain.
5. In a small microwave-safe bowl, add 1 cup of Nutella and 2 tablespoons of whole milk.
6. Microwave the Nutella mixture on high for 20 seconds, then stir until smooth; if it’s too thick, microwave in 10-second intervals, as overheating can cause it to seize.
7. Pour half of the ice cream base into a 9×5-inch loaf pan or a freezer-safe container.
8. Drizzle half of the warmed Nutella mixture over the base in the pan.
9. Use a knife or skewer to gently swirl the Nutella into the ice cream base, creating a marbled effect—avoid overmixing to keep distinct swirls.
10. Repeat steps 7–9 with the remaining ice cream base and Nutella mixture.
11. Cover the pan tightly with plastic wrap or a lid, ensuring it touches the surface of the ice cream to prevent ice crystals from forming.
12. Freeze the ice cream for at least 6 hours, or until firm; for best results, let it freeze overnight.
13. Once frozen, scoop and serve immediately.
My favorite part is how this ice cream stays scoopably soft right from the freezer, thanks to the condensed milk, with those gooey Nutella ribbons melting in your mouth. I love topping it with crushed hazelnuts or a drizzle of extra Nutella for an indulgent treat—it’s perfect for a cozy night in or impressing guests without any churning fuss.
Nutella-Chocolate Chip Cookie Bars
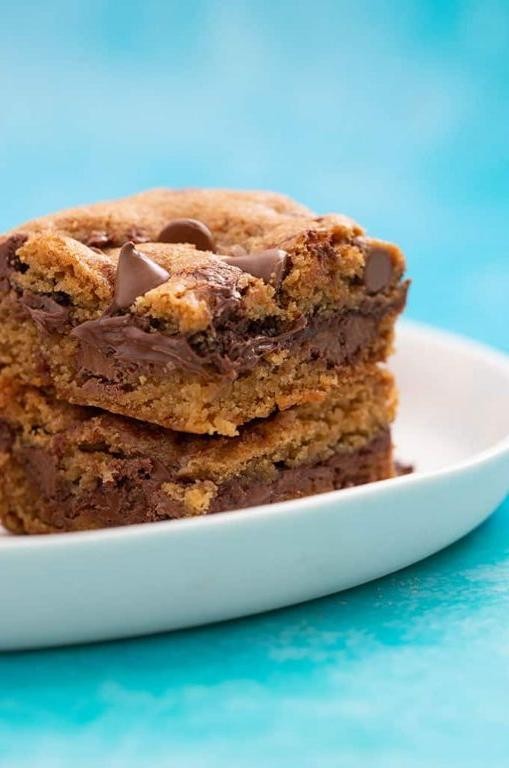
Gosh, I’ve been dreaming about these Nutella-Chocolate Chip Cookie Bars since my last baking spree—they’re the ultimate treat for when you need a little comfort in a pan. Honestly, there’s nothing better than that gooey Nutella swirl mingling with melty chocolate chips, and I love how easy they are to whip up on a lazy afternoon.
Serving: 16 | Pre Time: 15 minutes | Cooking Time: 30 minutes
Ingredients
For the Cookie Base:
– 1 cup (2 sticks) unsalted butter, softened to room temperature
– 1 cup granulated sugar
– 1 cup packed light brown sugar
– 2 large eggs
– 2 teaspoons pure vanilla extract
– 3 cups all-purpose flour
– 1 teaspoon baking soda
– 1/2 teaspoon salt
For the Filling:
– 1 cup semi-sweet chocolate chips
– 1 cup Nutella (hazelnut spread)
Instructions
1. Preheat your oven to 350°F (175°C) and line a 9×13-inch baking pan with parchment paper, leaving an overhang for easy removal later—this trick saves so much cleanup!
2. In a large mixing bowl, use an electric mixer on medium speed to cream together the softened butter, granulated sugar, and light brown sugar until light and fluffy, about 2-3 minutes.
3. Add the eggs one at a time, beating well after each addition, then mix in the vanilla extract until fully incorporated.
4. In a separate bowl, whisk together the all-purpose flour, baking soda, and salt to ensure even distribution, which prevents dense spots in the bars.
5. Gradually add the dry ingredients to the wet mixture, mixing on low speed just until combined—overmixing can lead to tough cookies, so stop as soon as no flour streaks remain.
6. Fold in the semi-sweet chocolate chips gently with a spatula to avoid crushing them.
7. Spread about two-thirds of the cookie dough evenly into the prepared pan, pressing it down firmly with your hands or a spatula to create a smooth base layer.
8. Drop spoonfuls of Nutella evenly over the dough layer, then use a knife to swirl it gently into the surface without mixing it completely; this creates beautiful marbled patterns when baked.
9. Dot the remaining cookie dough over the top in small clumps, covering most of the Nutella swirls—don’t worry about gaps, as they’ll spread while baking.
10. Bake in the preheated oven for 25-30 minutes, or until the edges are golden brown and a toothpick inserted into the center comes out with a few moist crumbs (not wet batter).
11. Remove the pan from the oven and let it cool completely on a wire rack for at least 1 hour before slicing into 16 bars; cutting while warm can make them crumble.
Perfectly chewy with pockets of molten chocolate, these bars are a dream straight from the oven. I love serving them warm with a scoop of vanilla ice cream for an indulgent twist, or packing them up for picnics—they always disappear fast!
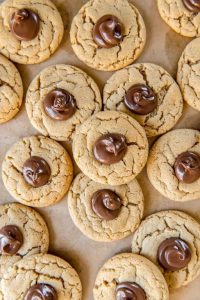
Nutella Peanut Butter Thumbprint Cookies

You know those days when you just need a cookie that feels like a hug? Yesterday, after a long week, I found myself craving something that combined my two favorite spreads—Nutella and peanut butter—in one cozy, thumbprint-shaped package. These cookies are my go-to when I want to impress guests with minimal effort, and they always disappear faster than I can make them!
Serving: 24 cookies | Pre Time: 15 minutes | Cooking Time: 10 minutes
Ingredients
For the cookie dough:
– 1 cup (2 sticks) unsalted butter, softened to room temperature
– 1 cup creamy peanut butter
– 1 cup granulated sugar
– 1 large egg
– 2 teaspoons vanilla extract
– 2 ½ cups all-purpose flour
– ½ teaspoon baking powder
– ¼ teaspoon salt
For the filling:
– ½ cup Nutella
Instructions
1. Preheat your oven to 350°F (175°C) and line two baking sheets with parchment paper. Tip: Letting the butter soften naturally on the counter ensures a smoother dough—avoid microwaving it, which can make it greasy.
2. In a large mixing bowl, use an electric mixer on medium speed to cream together the softened butter, peanut butter, and granulated sugar for 2–3 minutes until light and fluffy.
3. Add the egg and vanilla extract to the bowl, then mix on low speed for 1 minute until fully combined.
4. In a separate medium bowl, whisk together the all-purpose flour, baking powder, and salt.
5. Gradually add the dry ingredients to the wet mixture, mixing on low speed just until a soft dough forms. Tip: Overmixing can lead to tough cookies, so stop as soon as no flour streaks remain.
6. Scoop the dough into 1-inch balls (about 1 tablespoon each) and place them 2 inches apart on the prepared baking sheets.
7. Use your thumb or the back of a teaspoon to press a deep indentation into the center of each dough ball.
8. Fill each indentation with about 1 teaspoon of Nutella, being careful not to overfill. Tip: If the Nutella is too thick to spoon easily, warm it slightly in the microwave for 10–15 seconds to soften.
9. Bake the cookies in the preheated oven for 9–11 minutes, or until the edges are lightly golden. The centers will still look soft.
10. Remove the baking sheets from the oven and let the cookies cool on the sheets for 5 minutes before transferring them to a wire rack to cool completely.
Every bite of these cookies delivers a perfect balance—the crumbly, peanut butter-infused base gives way to a rich, chocolate-hazelnut center that melts in your mouth. I love serving them slightly warm with a glass of cold milk, or you can get creative by drizzling extra Nutella on top for an indulgent dessert platter at parties!
Conclusion
Endlessly delicious, this collection proves homemade Nutella desserts are a joy to create and share. We hope these 35 recipes inspire your next baking adventure! Give one a try, leave a comment with your favorite, and pin this roundup to your Pinterest boards to spread the chocolate-hazelnut love. Happy baking!