Venturing into the world of muscle building doesn’t mean sacrificing flavor or spending hours in the kitchen! Whether you’re fueling up post-workout or planning your weekly meals, these delicious high-protein recipes make eating for gains an absolute pleasure. Get ready to discover 30 mouthwatering dishes that will keep you satisfied while helping you reach your fitness goals—let’s dive into these tasty creations!
Grilled Lemon Herb Chicken with Quinoa
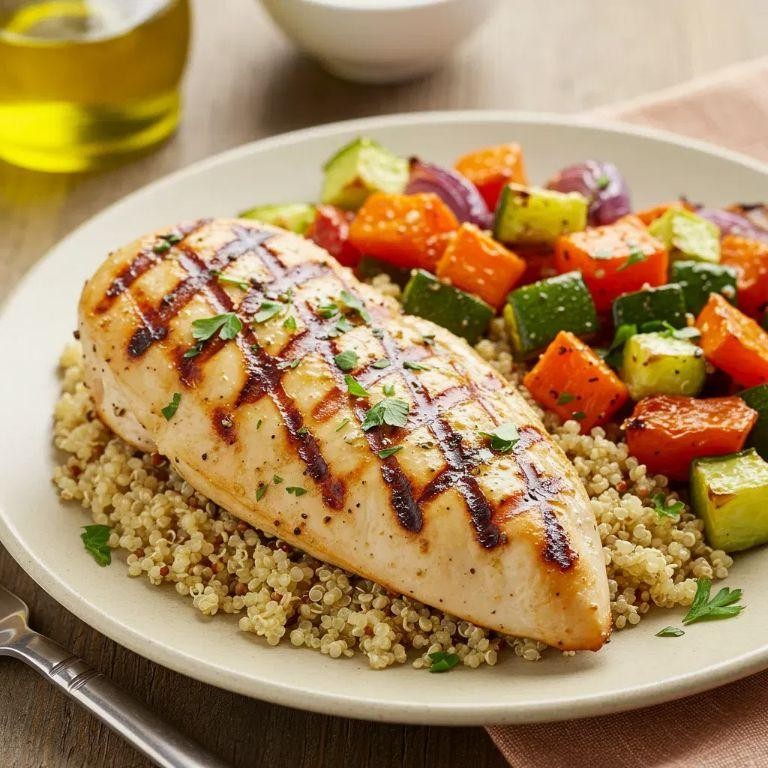
Ready to level up your weeknight dinner game? This grilled lemon herb chicken with quinoa delivers restaurant-quality flavor in under 30 minutes. Fire up that grill and get ready for the juiciest chicken of your life.
3
servings10
minutes30
minutesIngredients
– 4 boneless, skinless chicken breasts (pound to even thickness for consistent cooking)
– 1 cup quinoa (rinsed well to remove bitterness)
– 2 cups chicken broth (or water for lighter flavor)
– 3 tbsp olive oil (or any neutral oil)
– 2 lemons (1 juiced, 1 sliced for garnish)
– 3 garlic cloves (minced)
– 1 tbsp fresh rosemary (chopped, or 1 tsp dried)
– 1 tbsp fresh thyme (chopped, or 1 tsp dried)
– 1 tsp salt (adjust to taste)
– ½ tsp black pepper (freshly ground preferred)
Instructions
1. Rinse 1 cup quinoa under cold water in a fine-mesh strainer for 1 minute to remove saponins.
2. Combine rinsed quinoa and 2 cups chicken broth in a medium saucepan over high heat.
3. Bring quinoa mixture to a rolling boil, then reduce heat to low and cover with tight-fitting lid.
4. Simmer quinoa for exactly 15 minutes until all liquid is absorbed and grains are tender.
5. Remove quinoa from heat and let stand covered for 5 minutes to steam fluffier grains.
6. Preheat gas or charcoal grill to medium-high heat (400°F) while quinoa cooks.
7. Whisk together 3 tbsp olive oil, juice of 1 lemon, 3 minced garlic cloves, 1 tbsp rosemary, and 1 tbsp thyme in small bowl.
8. Pat 4 chicken breasts dry with paper towels and brush both sides with herb marinade.
9. Season chicken evenly with 1 tsp salt and ½ tsp black pepper on both sides.
10. Place chicken on preheated grill and cook for 6-7 minutes until grill marks form and edges turn opaque.
11. Flip chicken using tongs and grill another 6-7 minutes until internal temperature reaches 165°F.
12. Transfer chicken to clean cutting board and rest for 5 minutes to redistribute juices.
13. Fluff cooked quinoa with fork and divide among 4 plates.
14. Slice rested chicken against the grain into ½-inch strips and arrange over quinoa.
15. Garnish with remaining lemon slices and drizzle with any remaining marinade. You’ll love how the tender, herb-crusted chicken pairs with the fluffy quinoa—each bite bursts with bright lemon and earthy herbs. Try stuffing the mixture into warm pita pockets or topping with crumbled feta for an extra flavor boost.
Spicy Black Bean and Turkey Chili
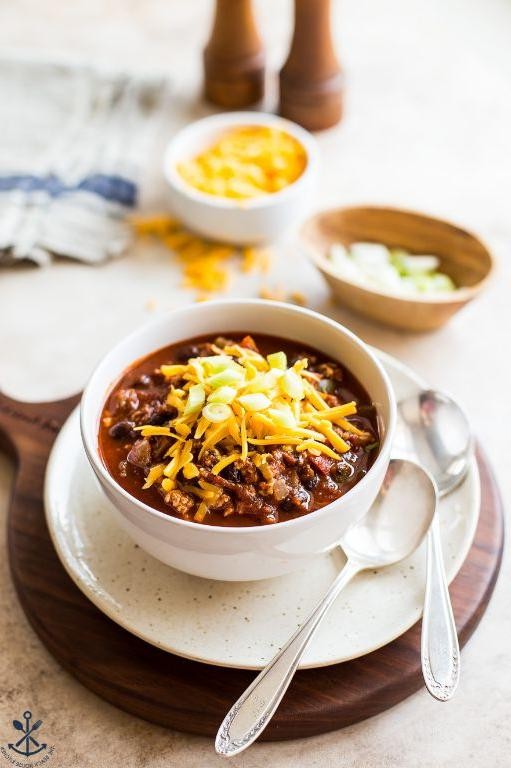
Unleash your inner chili champion with this protein-packed powerhouse. Bold flavors collide in every spoonful—perfect for cozy nights or game day feasts. Your taste buds won’t know what hit them.
4
servings15
minutes43
minutesIngredients
– 1 tbsp olive oil (or any neutral oil)
– 1 lb ground turkey
– 1 medium yellow onion, diced
– 2 cloves garlic, minced
– 1 tbsp chili powder
– 1 tsp cumin
– 1/2 tsp smoked paprika
– 1 (15 oz) can black beans, drained and rinsed
– 1 (14.5 oz) can diced tomatoes
– 2 cups chicken broth
– 1/4 tsp salt (adjust to taste)
– 1/4 tsp black pepper
Instructions
1. Heat olive oil in a large pot over medium-high heat until shimmering.
2. Add ground turkey and cook for 5-7 minutes, breaking it apart with a spoon until no pink remains.
3. Stir in diced onion and cook for 4 minutes until translucent.
4. Add minced garlic and cook for 1 minute until fragrant.
5. Sprinkle chili powder, cumin, and smoked paprika over the mixture, stirring constantly for 30 seconds to toast the spices.
6. Pour in diced tomatoes with their juices, scraping the bottom of the pot to lift any browned bits.
7. Add drained black beans and chicken broth, stirring to combine.
8. Bring the chili to a boil, then reduce heat to low and simmer uncovered for 25 minutes.
9. Season with salt and pepper, then simmer for 5 more minutes until slightly thickened.
10. Remove from heat and let stand for 5 minutes before serving.
A thick, hearty texture cradles the smoky heat from the spices, while the black beans add creamy contrast. Pile it high with shredded cheese and avocado slices, or dunk crusty bread right into the bowl for maximum comfort.
Lentil and Quinoa Veggie Burgers
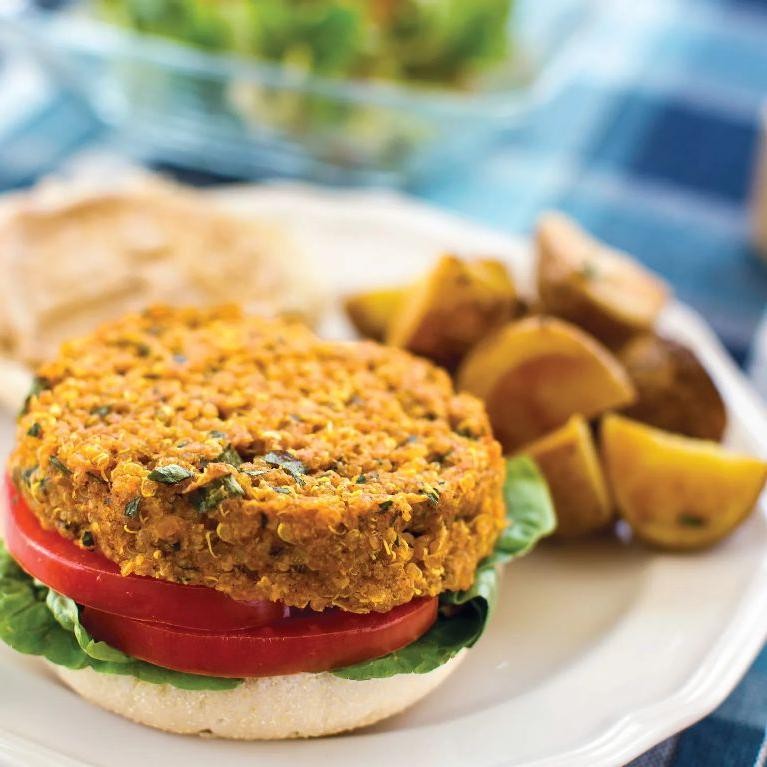
Brace yourselves for the ultimate plant-based burger that actually holds together. These lentil and quinoa patties deliver serious flavor without the mush factor. Get ready to upgrade your burger game permanently.
4
portions15
minutes12
minutesIngredients
– 1 cup cooked brown lentils (cooled completely)
– 1 cup cooked quinoa (cooled completely)
– 1/2 cup breadcrumbs (panko works best for crispiness)
– 1/4 cup finely chopped onion (red adds nice color)
– 2 cloves garlic, minced
– 1 large egg (or flax egg for vegan option)
– 2 tbsp olive oil (plus more for cooking)
– 1 tsp smoked paprika
– 1/2 tsp cumin
– 1/2 tsp salt
– 1/4 tsp black pepper
Instructions
1. Combine cooled lentils, quinoa, breadcrumbs, onion, and garlic in a large bowl.
2. Crack the egg into the mixture and add olive oil, smoked paprika, cumin, salt, and pepper.
3. Mash everything together with a potato masher until the mixture holds together when pressed.
4. Divide the mixture into 4 equal portions and shape into 1-inch thick patties.
5. Chill the patties in the refrigerator for 30 minutes to help them firm up.
6. Heat 2 tablespoons of olive oil in a large skillet over medium heat until shimmering.
7. Carefully place patties in the hot skillet, leaving space between each one.
8. Cook for 5-6 minutes until the bottoms are deeply golden brown and crisp.
9. Flip the patties using a thin spatula and cook another 5-6 minutes.
10. Check that internal temperature reaches 165°F using an instant-read thermometer.
11. Transfer cooked burgers to a wire rack to prevent sogginess.
Golden brown and perfectly crisp on the outside while staying moist inside, these burgers boast earthy lentils and nutty quinoa. Grab your favorite bun and load up with avocado slices and spicy mayo, or crumble over salads for a protein-packed twist.
Garlic Shrimp Stir-Fry with Broccoli
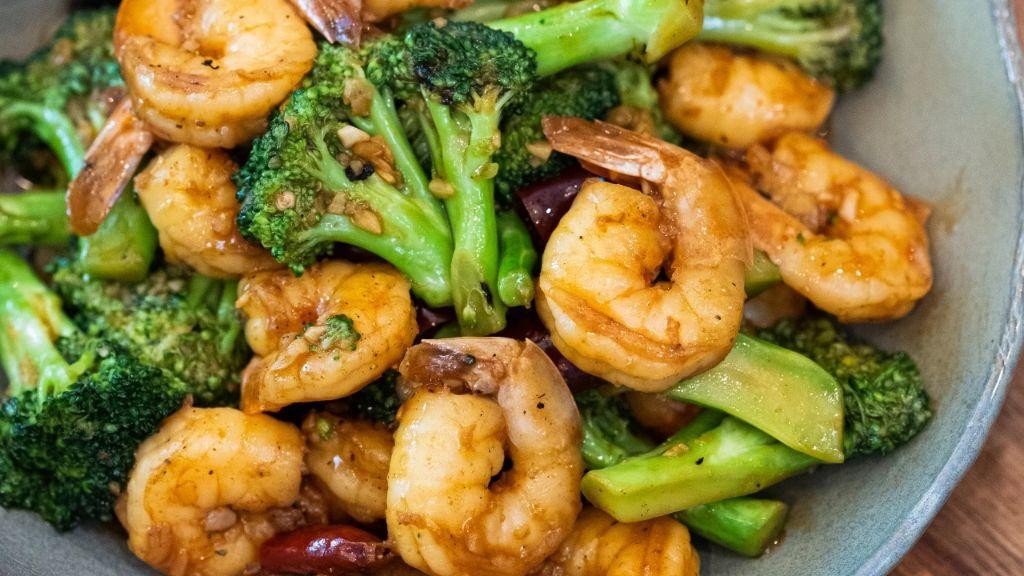
Sizzle up your weeknight dinner game with this lightning-fast garlic shrimp stir-fry. Sauté plump shrimp and crisp broccoli in a savory garlic-soy glaze that coats every bite. Ready in under 20 minutes—this dish delivers restaurant-quality flavor without the fuss.
5
servings10
minutes8
minutesIngredients
– 1 lb raw shrimp, peeled and deveined (thaw if frozen)
– 2 cups broccoli florets (fresh or frozen)
– 3 tbsp olive oil (or any neutral oil)
– 4 garlic cloves, minced
– 2 tbsp soy sauce (low-sodium works too)
– 1 tbsp lemon juice (fresh squeezed preferred)
– ¼ tsp red pepper flakes (adjust for spice level)
– Salt to taste (start with ½ tsp)
Instructions
1. Pat shrimp completely dry with paper towels—this ensures a crisp sear.
2. Heat 2 tbsp olive oil in a large skillet over medium-high heat until shimmering.
3. Add broccoli florets and stir-fry for 4 minutes until bright green and slightly tender.
4. Push broccoli to one side of the skillet.
5. Add remaining 1 tbsp olive oil to the empty space.
6. Place shrimp in a single layer and cook for 2 minutes without moving.
7. Flip each shrimp and cook 1 more minute until opaque and pink.
8. Add minced garlic and red pepper flakes to the center of the skillet.
9. Sauté garlic for 30 seconds until fragrant but not browned.
10. Toss everything together to combine.
11. Pour soy sauce and lemon juice over the shrimp and broccoli.
12. Stir constantly for 1 minute until sauce thickens and coats ingredients.
13. Season with salt and serve immediately. Done in a flash! Delight in the juicy shrimp and crisp-tender broccoli coated in that addictive garlicky glaze. Double the sauce and serve over rice for a complete meal that’ll have everyone asking for seconds.
Baked Salmon with Spinach and Feta
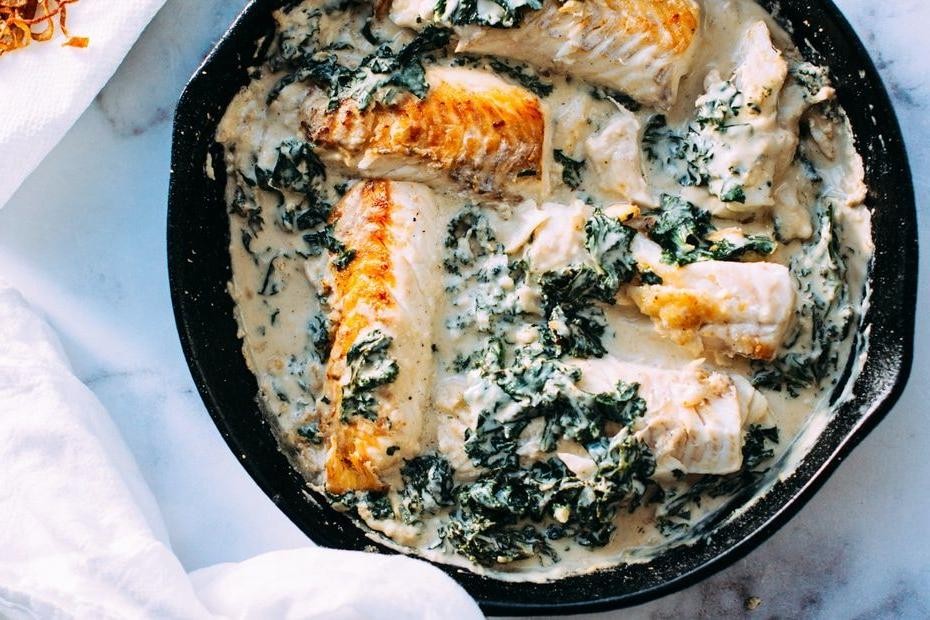
Let’s transform that salmon fillet into a flavor-packed masterpiece. Layer spinach and feta for a creamy, savory filling that bakes to perfection. This one-pan wonder delivers restaurant-quality results with minimal cleanup.
5
servings15
minutes15
minutesIngredients
– 4 (6-ounce) salmon fillets, skin-on or skinless
– 5 ounces fresh spinach
– 4 ounces crumbled feta cheese
– 2 tablespoons olive oil, or any neutral oil
– 1 lemon, thinly sliced
– 3 cloves garlic, minced
– 1 teaspoon dried oregano
– ½ teaspoon black pepper
– ¼ teaspoon salt, adjust to taste
Instructions
1. Preheat your oven to 400°F.
2. Pat the salmon fillets completely dry with paper towels.
3. Rub olive oil evenly over all sides of each salmon fillet.
4. Season the salmon with salt, black pepper, and dried oregano.
5. Place the salmon fillets in a single layer in a baking dish.
6. Top each fillet with a handful of fresh spinach.
7. Sprinkle minced garlic evenly over the spinach.
8. Add crumbled feta cheese on top of the garlic and spinach.
9. Arrange thin lemon slices over the feta cheese.
10. Bake at 400°F for 12-15 minutes until the salmon flakes easily with a fork.
11. Check for doneness when the internal temperature reaches 145°F.
12. Remove from the oven when the feta is lightly golden and the spinach has wilted.
Zesty lemon cuts through the rich feta while the salmon stays incredibly moist. The spinach wilts into a savory bed that soaks up all the delicious juices. Try serving over quinoa or with roasted asparagus for a complete meal that impresses every time.
Quinoa and Black Bean Stuffed Peppers

A meal that actually fuels you without the food coma. These quinoa-stuffed peppers are vibrant, protein-packed, and ready to devour in under an hour. Get your colorful veggies and feel-good grains in one delicious package.
3
servings15
minutes53
minutesIngredients
– 4 large bell peppers, any color (halved lengthwise, seeds removed)
– 1 cup quinoa, rinsed (for fluffier results)
– 1 (15 oz) can black beans, drained and rinsed (to reduce sodium)
– 1 cup corn kernels, frozen or canned (thawed if frozen)
– 1 small red onion, diced (about 1/2 cup)
– 2 cloves garlic, minced
– 1 tbsp olive oil (or any neutral oil)
– 1 tsp ground cumin
– 1/2 tsp chili powder (adjust to spice preference)
– 1 1/2 cups vegetable broth (or water for lighter flavor)
– 1 cup shredded Monterey Jack cheese (or pepper Jack for heat)
– 1/4 cup chopped fresh cilantro (optional garnish)
– Salt to taste (start with 1/2 tsp)
Instructions
1. Preheat your oven to 375°F (190°C).
2. Halve 4 bell peppers lengthwise and remove all seeds and membranes.
3. Rinse 1 cup quinoa under cold water in a fine-mesh strainer for 1 minute to remove bitterness.
4. Heat 1 tbsp olive oil in a large skillet over medium heat for 1 minute.
5. Add diced red onion and cook for 4 minutes until translucent.
6. Stir in minced garlic and cook for 1 minute until fragrant.
7. Add rinsed quinoa, 1 tsp cumin, and 1/2 tsp chili powder to the skillet.
8. Toast the quinoa and spices for 2 minutes, stirring constantly.
9. Pour in 1 1/2 cups vegetable broth and bring to a boil.
10. Reduce heat to low, cover the skillet, and simmer for 15 minutes until quinoa absorbs the liquid.
11. Remove skillet from heat and let sit covered for 5 minutes—this steams the quinoa for perfect fluffiness.
12. Fluff the quinoa mixture with a fork.
13. Stir in drained black beans and corn kernels until fully combined.
14. Season the filling with salt, starting with 1/2 tsp and adjusting as needed.
15. Arrange pepper halves cut-side up in a 9×13 inch baking dish.
16. Divide the quinoa filling evenly among the pepper halves, packing it down lightly.
17. Top each pepper with shredded Monterey Jack cheese, covering the filling completely.
18. Pour 1/4 cup water into the bottom of the baking dish around the peppers to create steam.
19. Cover the dish tightly with foil and bake at 375°F for 25 minutes.
20. Remove the foil and bake for another 10 minutes until cheese is bubbly and slightly browned.
21. Let peppers rest for 5 minutes before serving—this helps the filling set for cleaner slices.
22. Garnish with fresh cilantro if desired.
Now you’ve got tender-crisp peppers hugging a hearty, spiced filling. The quinoa stays pleasantly chewy against the creamy black beans, while the melted cheese adds a gooey finish. Next-level move: Serve over a bed of crisp romaine for a deconstructed salad bowl, or top with cool Greek yogurt to balance the warmth.
Cajun Chicken with Roasted Sweet Potatoes
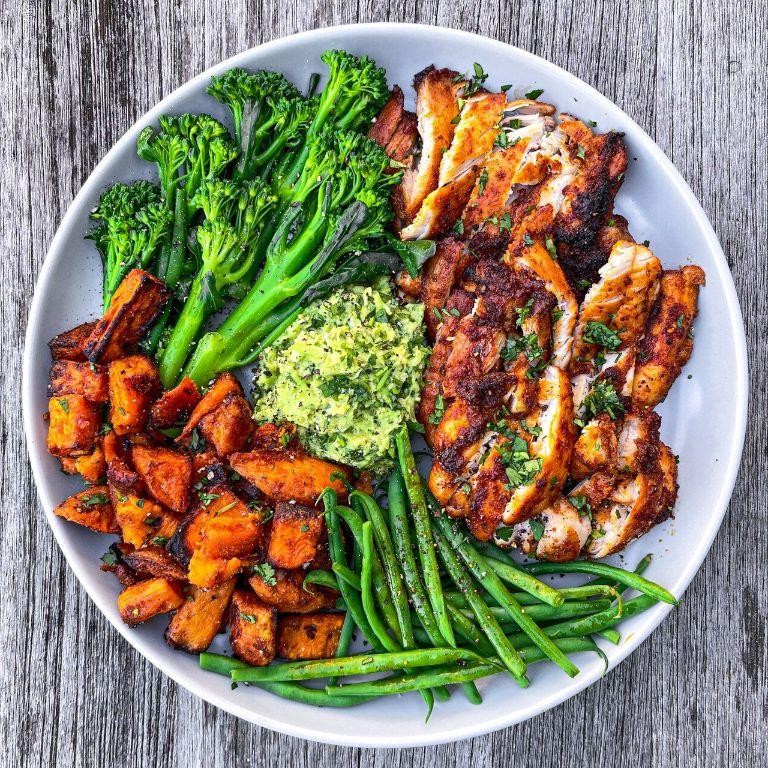
Spice up your weeknight dinner game with this flavor-packed Cajun chicken and sweet potato combo. Sear that chicken until golden, roast those sweet potatoes until caramelized perfection—this dish delivers serious restaurant-quality vibes with minimal effort.
5
servings15
minutes35
minutesIngredients
- 1.5 lbs boneless, skinless chicken thighs (breasts work too)
- 2 large sweet potatoes, peeled and cubed (about 4 cups)
- 2 tbsp olive oil (or any neutral oil)
- 2 tbsp Cajun seasoning (adjust to spice preference)
- 1 tsp garlic powder
- 1/2 tsp smoked paprika
- Salt to season
- Fresh parsley for garnish (optional but recommended)
Instructions
- Preheat your oven to 425°F and line a baking sheet with parchment paper.
- Toss sweet potato cubes with 1 tablespoon olive oil, 1 teaspoon Cajun seasoning, and 1/2 teaspoon salt in a large bowl.
- Spread sweet potatoes in a single layer on the baking sheet—don’t overcrowd them for even roasting.
- Roast sweet potatoes for 20 minutes at 425°F until edges start to caramelize.
- While potatoes roast, pat chicken thighs completely dry with paper towels for better searing.
- Rub chicken with remaining 1 tablespoon olive oil, then coat evenly with remaining Cajun seasoning, garlic powder, smoked paprika, and 1/2 teaspoon salt.
- Heat a large oven-safe skillet over medium-high heat until very hot, about 2 minutes.
- Sear chicken for 3-4 minutes per side until a deep golden crust forms—don’t move it while searing.
- Transfer entire skillet to the oven and bake at 425°F for 12-15 minutes until chicken reaches 165°F internally.
- Remove both sweet potatoes and chicken from oven—let chicken rest 5 minutes before slicing to retain juices.
- Serve chicken over roasted sweet potatoes and garnish with fresh parsley.
Ready to dig in? That crispy, spice-rubbed chicken pairs perfectly with the sweet, caramelized potatoes—the textures and flavors are pure fire. Try serving it over quinoa or stuffing it into warm tortillas for a next-level twist.
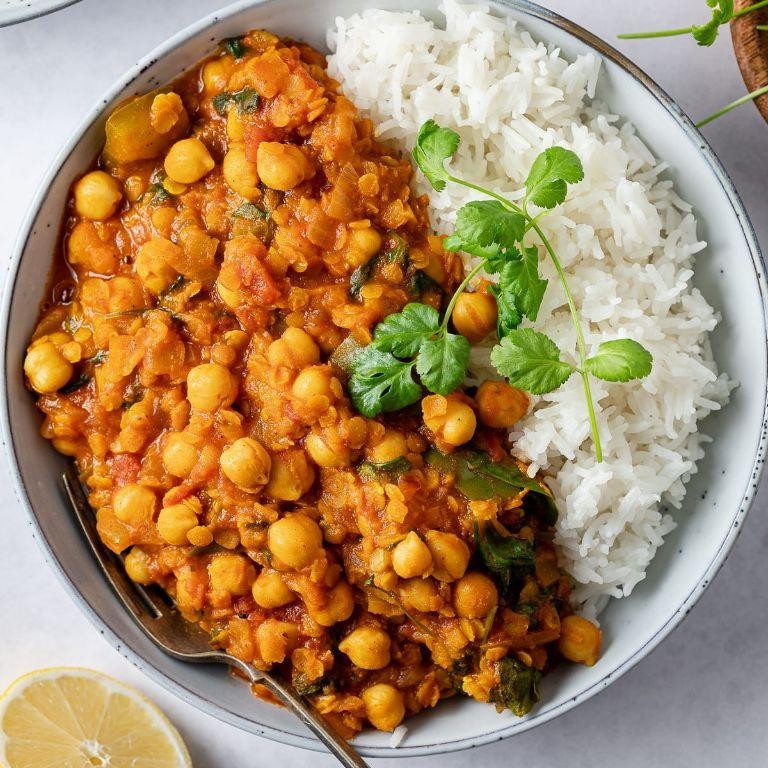
Spicy Chickpea and Lentil Curry
Never settle for bland when bold flavors are this easy. Nail this fiery chickpea and lentil curry in under 30 minutes—your taste buds will thank you. Grab your pot and let’s get simmering.
3
servings10
minutes22
minutesIngredients
– 1 tbsp olive oil (or any neutral oil)
– 1 yellow onion, diced
– 3 garlic cloves, minced
– 1 tbsp fresh ginger, grated
– 1 tbsp curry powder
– 1 tsp cumin
– 1/2 tsp cayenne pepper (adjust for heat)
– 1 (15 oz) can chickpeas, drained and rinsed
– 1/2 cup red lentils, rinsed
– 1 (14.5 oz) can diced tomatoes
– 1 (13.5 oz) can coconut milk
– 1 cup vegetable broth
– 1/2 tsp salt
– 1/4 cup fresh cilantro, chopped (for garnish)
Instructions
1. Heat olive oil in a large pot over medium heat until shimmering.
2. Add diced onion and cook for 5 minutes, stirring occasionally, until translucent.
3. Stir in minced garlic and grated ginger, cooking for 1 minute until fragrant.
4. Sprinkle in curry powder, cumin, and cayenne pepper, toasting for 30 seconds to deepen flavors.
5. Pour in diced tomatoes with their juices, scraping the bottom of the pot to lift any browned bits.
6. Add drained chickpeas and rinsed red lentils, stirring to coat in the spiced tomato base.
7. Pour in coconut milk and vegetable broth, then bring to a boil over high heat.
8. Reduce heat to low, cover the pot, and simmer for 15 minutes until lentils are tender and the curry has thickened.
9. Stir in salt, then taste and adjust seasoning if needed.
10. Remove from heat and garnish with fresh cilantro. Know this curry boasts a creamy, velvety texture with a kick of heat that lingers. Serve it over fluffy rice or with warm naan to soak up every last drop—leftovers taste even better the next day.
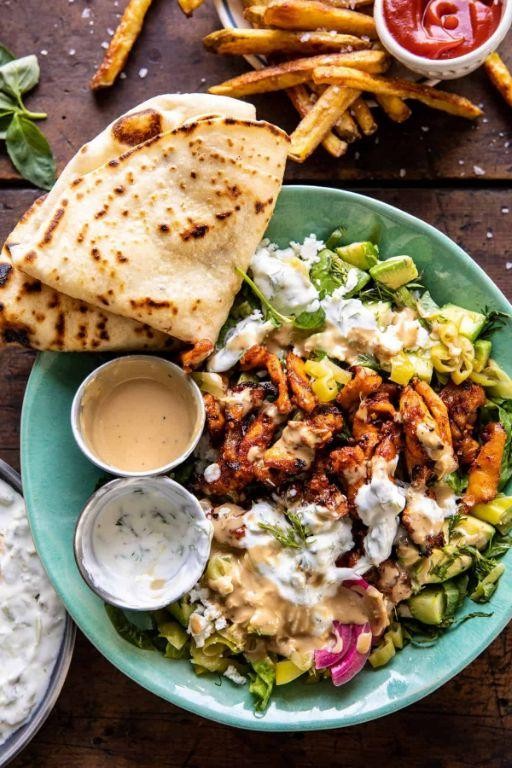
Greek Chicken Bowls with Tzatziki Sauce
Overwhelm your taste buds with this Mediterranean masterpiece. Pack juicy chicken, crisp veggies, and creamy tzatziki into one vibrant bowl. Skip the takeout—this 30-minute wonder brings Greece to your kitchen.
3
bowls15
minutes17
minutesIngredients
– 1.5 lbs boneless, skinless chicken thighs (or breasts for leaner option)
– 3 tbsp olive oil (or any neutral oil)
– 2 tsp dried oregano
– 1 tsp garlic powder
– 1 tsp salt
– ½ tsp black pepper
– 2 cups cooked white rice (warm for best texture)
– 1 cup cherry tomatoes, halved
– 1 cucumber, diced
– ½ red onion, thinly sliced
– ¼ cup Kalamata olives, pitted
– ½ cup crumbled feta cheese
– 1 cup tzatziki sauce (store-bought or homemade)
– 2 tbsp fresh lemon juice
– ¼ cup chopped fresh parsley
Instructions
1. Pat chicken thighs completely dry with paper towels—this ensures a crisp sear.
2. Rub chicken with olive oil, oregano, garlic powder, salt, and pepper.
3. Heat a large skillet over medium-high heat until a water droplet sizzles immediately.
4. Place chicken in the hot skillet and cook for 6 minutes without moving to develop a golden crust.
5. Flip chicken and cook for another 6 minutes until internal temperature reaches 165°F.
6. Transfer chicken to a cutting board and let rest for 5 minutes—this keeps juices locked in.
7. While chicken rests, assemble bowls with warm rice as the base.
8. Slice chicken against the grain into ½-inch strips for maximum tenderness.
9. Arrange chicken, tomatoes, cucumber, red onion, and olives over the rice.
10. Drizzle lemon juice evenly over the vegetables to brighten flavors.
11. Top with crumbled feta and generous dollops of tzatziki sauce.
12. Garnish with fresh parsley just before serving.
What makes this bowl unforgettable is the contrast between warm, savory chicken and cool, tangy tzatziki. The crisp vegetables add fresh crunch against the creamy feta and fluffy rice. For a next-level twist, stuff everything into warm pita pockets or serve over crisp romaine for a salad version.
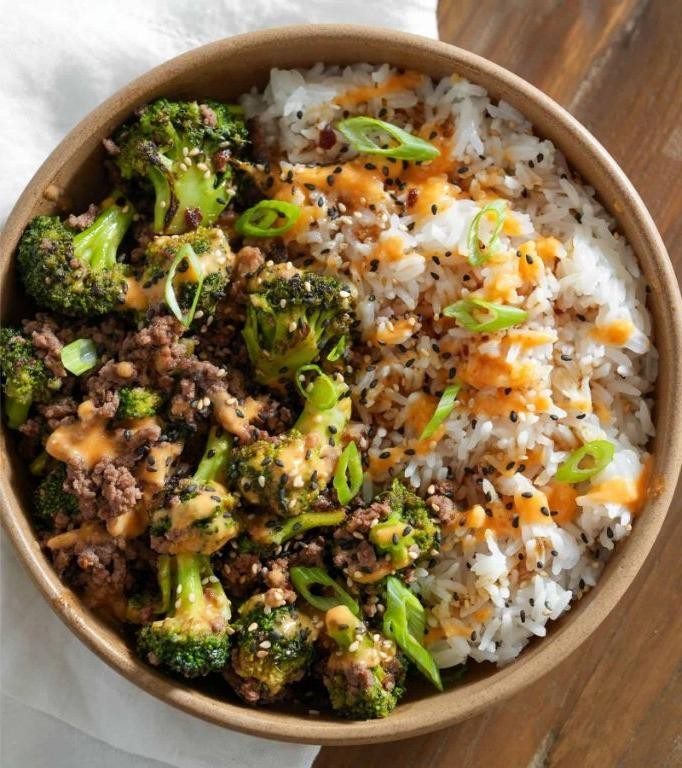
Teriyaki Beef and Broccoli Bowls
Feast your eyes on this flavor bomb! Forget takeout—these teriyaki beef and broccoli bowls come together faster than your food delivery app loads. Fire up that skillet and let’s get saucy.
2
bowls15
minutes10
minutesIngredients
– 1 lb flank steak, thinly sliced against the grain (freeze for 15 minutes first for easier slicing)
– 3 cups broccoli florets (fresh or frozen both work)
– 2 tbsp vegetable oil (or any neutral oil)
– 1/3 cup soy sauce (low-sodium if preferred)
– 2 tbsp honey (sub maple syrup for vegan)
– 1 tbsp rice vinegar
– 2 tsp minced garlic
– 1 tsp grated ginger (fresh packs more punch)
– 1 tbsp cornstarch
– 2 cups cooked white rice (jasmine or short-grain for stickier texture)
– 1 tbsp sesame seeds (for garnish)
– 2 sliced green onions (green parts only for color)
Instructions
1. Whisk soy sauce, honey, rice vinegar, garlic, ginger, and cornstarch in a small bowl until smooth—no lumps!
2. Heat 1 tablespoon vegetable oil in a large skillet over medium-high heat until shimmering.
3. Add beef slices in a single layer, working in batches if needed to avoid overcrowding.
4. Sear beef for 90 seconds per side until browned but still pink inside—it’ll finish cooking in the sauce later.
5. Transfer beef to a clean plate, leaving any drippings in the skillet.
6. Add remaining 1 tablespoon oil to the same skillet over medium heat.
7. Toss in broccoli florets and stir-fry for 4 minutes until bright green and slightly tender.
8. Pour the teriyaki sauce into the skillet with the broccoli, stirring constantly.
9. Simmer sauce for 2–3 minutes until it thickens enough to coat the back of a spoon.
10. Return beef and any accumulated juices to the skillet, tossing to coat evenly.
11. Cook for 1 final minute just to warm the beef through—don’t overcook or it’ll toughen.
12. Divide cooked rice between two bowls, topping with the beef and broccoli mixture.
13. Garnish with sesame seeds and green onions for a fresh crunch.
Whoa, that savory-sweet teriyaki glaze clings to every tender bite of beef and crisp-tender broccoli. Serve it straight from the skillet for maximum sizzle, or pack it cold for a next-day lunch that’s even better as the flavors meld.
Roasted Red Pepper and Chickpea Salad

Zesty roasted red peppers and protein-packed chickpeas create this vibrant salad that’s ready in under 30 minutes. Grab your sheet pan and let’s transform simple ingredients into a flavor explosion that’ll become your new lunch obsession. This colorful dish delivers Mediterranean vibes with minimal effort—perfect for meal prep or impressing last-minute guests.
2
servings10
minutes25
minutesIngredients
– 2 large red bell peppers, sliced into 1-inch strips
– 1 (15 oz) can chickpeas, rinsed and drained
– 3 tbsp olive oil, divided
– 2 tbsp lemon juice, freshly squeezed
– 1 garlic clove, minced
– ¼ cup fresh parsley, chopped
– ½ tsp smoked paprika
– Salt and black pepper to taste
Instructions
1. Preheat your oven to 425°F and line a baking sheet with parchment paper.
2. Toss red pepper strips with 1 tablespoon olive oil on the prepared baking sheet.
3. Spread peppers in a single layer and roast for 15 minutes at 425°F until edges begin to char.
4. Add drained chickpeas to the baking sheet with peppers and drizzle with another tablespoon of olive oil.
5. Roast peppers and chickpeas together for 10 more minutes at 425°F until chickpeas are slightly crispy.
6. Transfer roasted peppers and chickpeas to a large mixing bowl.
7. Whisk together remaining 1 tablespoon olive oil, lemon juice, and minced garlic in a small bowl.
8. Pour dressing over the roasted pepper and chickpea mixture while still warm.
9. Add chopped parsley, smoked paprika, salt, and black pepper to the bowl.
10. Toss everything together until evenly coated with dressing and seasonings.
Ultimate texture contrast between creamy chickpeas and tender roasted peppers makes every bite exciting. The smoky paprika and bright lemon dressing cling perfectly to each component. Serve it warm over greens, stuff it into pita pockets, or layer it on crusty bread for a satisfying meal that gets better as it marinates.
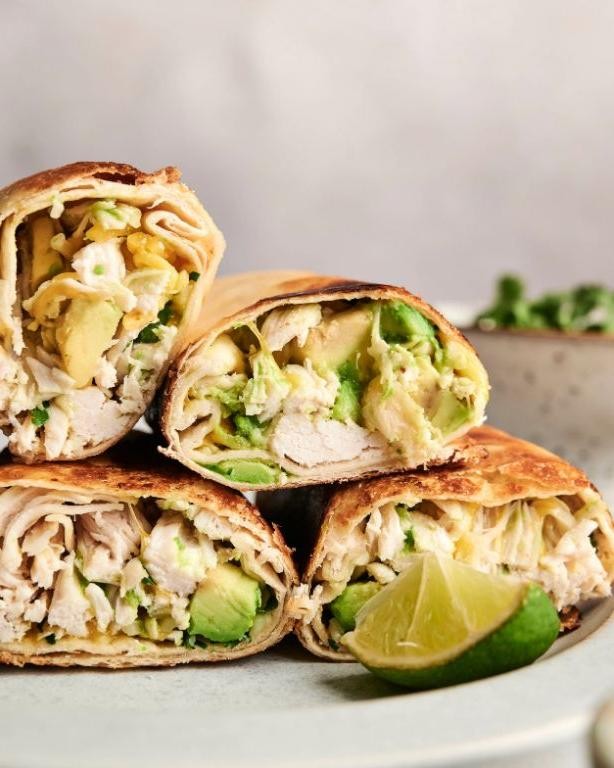
Creamy Avocado and Chicken Wraps
Y’all need these creamy avocado chicken wraps in your life. They’re the perfect quick lunch that actually satisfies—no sad desk salads here. Just pure flavor-packed goodness ready in minutes.
2
wraps15
minutesIngredients
– 2 large flour tortillas (8-inch size, or gluten-free alternative)
– 1 cup cooked shredded chicken (rotisserie chicken works great)
– 1 ripe avocado, pitted and peeled
– 2 tbsp plain Greek yogurt (or sour cream for richer flavor)
– 1 tbsp lime juice (fresh squeezed preferred)
– 1/4 cup diced red onion (soak in cold water for milder flavor)
– 1/4 cup chopped cilantro (omit if you’re team no-cilantro)
– 1/2 tsp garlic powder
– 1/4 tsp cumin
– Salt to taste (start with 1/4 tsp)
– Black pepper to taste (freshly cracked recommended)
Instructions
1. Place avocado, Greek yogurt, lime juice, garlic powder, cumin, salt, and black pepper in a medium bowl.
2. Mash the mixture with a fork until creamy but slightly chunky—this creates better texture than blending.
3. Add shredded chicken, diced red onion, and chopped cilantro to the avocado mixture.
4. Fold everything together gently with a spatula until evenly combined—overmixing can make the avocado mushy.
5. Lay flour tortillas flat on a clean surface and divide the chicken-avocado mixture between them, spreading it in a line down the center.
6. Fold the bottom edge of each tortilla up over the filling, then fold in the sides and roll tightly away from you to form secure wraps.
7. Cut each wrap diagonally in half for easier eating and immediate serving.
8. Arrange the wrap halves on a plate with the cut sides facing up to show the colorful filling.
Absolutely crave-worthy with cool, creamy avocado against the savory chicken and zesty lime. The tortilla stays soft while the filling stays refreshingly chilled. Try serving them with tortilla chips and salsa for a complete lunch spread, or pack them whole for a no-mess picnic.
Moroccan Spiced Lamb Kebabs
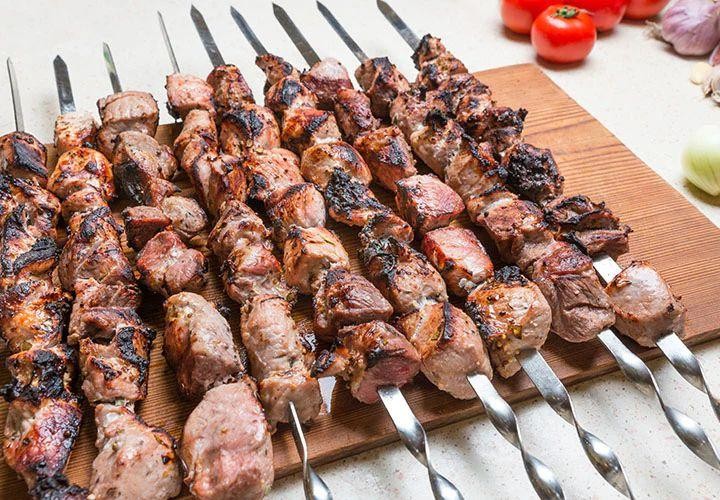
Ditch the boring weeknight dinners—these Moroccan spiced lamb kebabs will transport your taste buds straight to Marrakech. Grab your skewers and get ready for flavor fireworks that come together in under 30 minutes.
8
portions15
minutes10
minutesIngredients
– 1.5 lbs ground lamb (80/20 fat ratio for juicier kebabs)
– 2 tbsp olive oil (or any neutral oil)
– 1 tbsp smoked paprika
– 2 tsp ground cumin
– 1 tsp ground coriander
– 1/2 tsp cayenne pepper (reduce for milder heat)
– 3 garlic cloves, minced
– 1/4 cup fresh mint, finely chopped
– 1 tsp kosher salt
– Metal or soaked wooden skewers
– Cooking spray (for grill grates)
Instructions
1. Preheat your grill to medium-high heat (400°F) and lightly spray grates with cooking spray.
2. Combine ground lamb, olive oil, smoked paprika, cumin, coriander, cayenne, minced garlic, chopped mint, and kosher salt in a large bowl.
3. Mix ingredients thoroughly with your hands until spices are evenly distributed throughout the meat.
4. Divide lamb mixture into 8 equal portions and shape each into oval patties around metal skewers. Tip: Wet your hands slightly to prevent sticking.
5. Place kebabs directly on preheated grill and cook for 4-5 minutes until bottoms develop dark grill marks.
6. Flip kebabs using tongs and cook another 4-5 minutes until internal temperature reaches 160°F. Tip: Don’t press down on kebabs—you’ll lose precious juices.
7. Remove kebabs from grill and let rest on a clean plate for 3 minutes before serving. Tip: Resting ensures juices redistribute evenly.
Just pulled from the grill, these kebabs boast a smoky char exterior giving way to incredibly moist, spiced lamb inside. The cumin and coriander create warm earthy notes while the mint provides a fresh finish. Serve them over couscous with a dollop of Greek yogurt or stuff into warm pita bread with sliced cucumbers for the ultimate handheld feast.
Thai Basil Tofu Stir-Fry
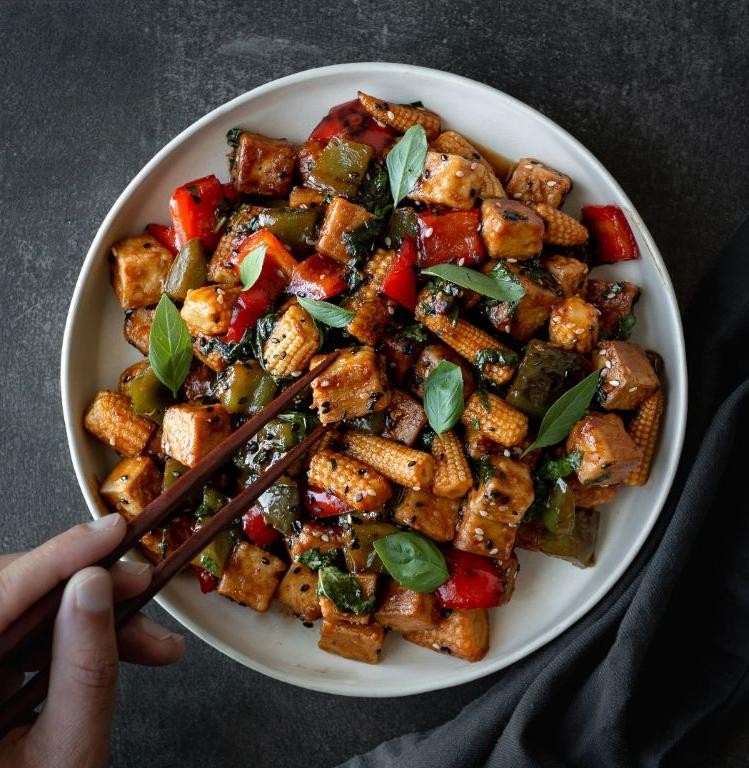
Need a lightning-fast dinner that actually satisfies? This Thai basil tofu stir-fry delivers bold flavor in under 20 minutes—no takeout required. Grab your wok and let’s fire up some serious umami magic.
4
servings10
minutes10
minutesIngredients
- 14 oz firm tofu, pressed and cubed (or extra-firm for crispier results)
- 2 tbsp vegetable oil (or any neutral high-heat oil)
- 4 cloves garlic, minced
- 2 Thai chilies, sliced (remove seeds for milder heat)
- 1 red bell pepper, thinly sliced
- 1 small onion, sliced
- 3 tbsp soy sauce
- 1 tbsp oyster sauce (or vegetarian oyster sauce)
- 1 tsp sugar
- 1 cup fresh Thai basil leaves
Instructions
- Press tofu between paper towels for 10 minutes to remove excess moisture, then cut into 1-inch cubes.
- Heat 2 tablespoons of vegetable oil in a large wok or skillet over medium-high heat until shimmering (about 350°F).
- Add tofu cubes in a single layer and cook for 4–5 minutes, flipping halfway, until golden brown on all sides.
- Transfer tofu to a plate, leaving about 1 tablespoon of oil in the wok.
- Add minced garlic and sliced Thai chilies to the hot oil and stir-fry for 30 seconds until fragrant.
- Toss in sliced red bell pepper and onion, stir-frying for 3–4 minutes until slightly softened but still crisp.
- Return tofu to the wok and add 3 tablespoons of soy sauce, 1 tablespoon of oyster sauce, and 1 teaspoon of sugar.
- Stir continuously for 1–2 minutes until the sauce coats all ingredients evenly.
- Turn off the heat and immediately fold in 1 cup of fresh Thai basil leaves, letting residual warmth wilt them slightly.
Hearty tofu cubes soak up the savory-sweet sauce while keeping a satisfying bite. Serve it over jasmine rice to catch every drop of that glossy coating, or wrap it in crisp lettuce cups for a low-carb crunch that still feels indulgent.
Tuscan White Bean and Kale Soup
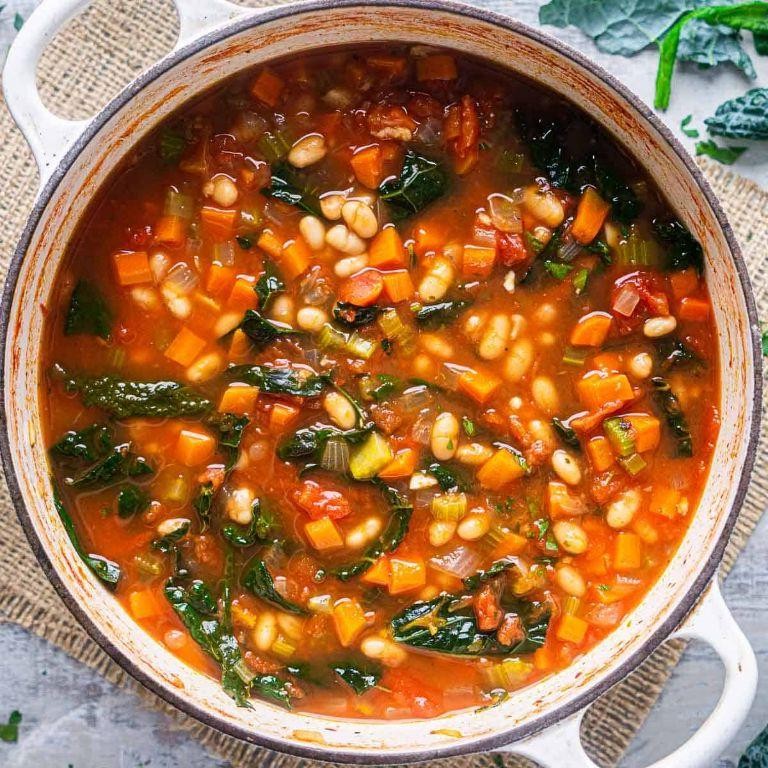
Whip up this cozy Tuscan classic in under an hour. Sauté garlic until fragrant, simmer beans until creamy, and wilt kale for a vibrant finish. This soul-warming soup delivers restaurant-quality flavor with pantry-staple ease.
4
servings15
minutes33
minutesIngredients
- 2 tbsp olive oil (or avocado oil)
- 1 yellow onion, diced
- 4 garlic cloves, minced
- 2 (15 oz) cans cannellini beans, rinsed
- 4 cups vegetable broth
- 1 bunch lacinato kale, stems removed and chopped
- 1 tsp dried oregano
- 1/2 tsp red pepper flakes (optional for heat)
- Salt and black pepper to taste
- Parmesan rind (for umami depth)
- Fresh parsley, chopped (for garnish)
Instructions
- Heat olive oil in a large pot over medium heat until shimmering.
- Add diced onion and cook for 5–7 minutes until translucent, stirring occasionally.
- Stir in minced garlic and cook for 1 minute until fragrant (tip: don’t let it brown).
- Pour in vegetable broth, scraping the bottom of the pot to lift any browned bits.
- Add rinsed cannellini beans, dried oregano, red pepper flakes, and Parmesan rind.
- Bring to a boil, then reduce heat to low and simmer uncovered for 20 minutes.
- Use a potato masher to lightly crush some beans (tip: this thickens the soup naturally).
- Stir in chopped kale and cook for 5 minutes until wilted but still bright green.
- Season with salt and black pepper, adjusting until balanced (tip: taste after 1/4 tsp salt).
- Remove Parmesan rind and discard.
Our finished soup boasts a velvety broth with pops of creamy beans and tender kale. Serve it with crusty bread for dipping, or top with a drizzle of chili oil to elevate the rustic flavors.
Balsamic Glazed Pork Tenderloin
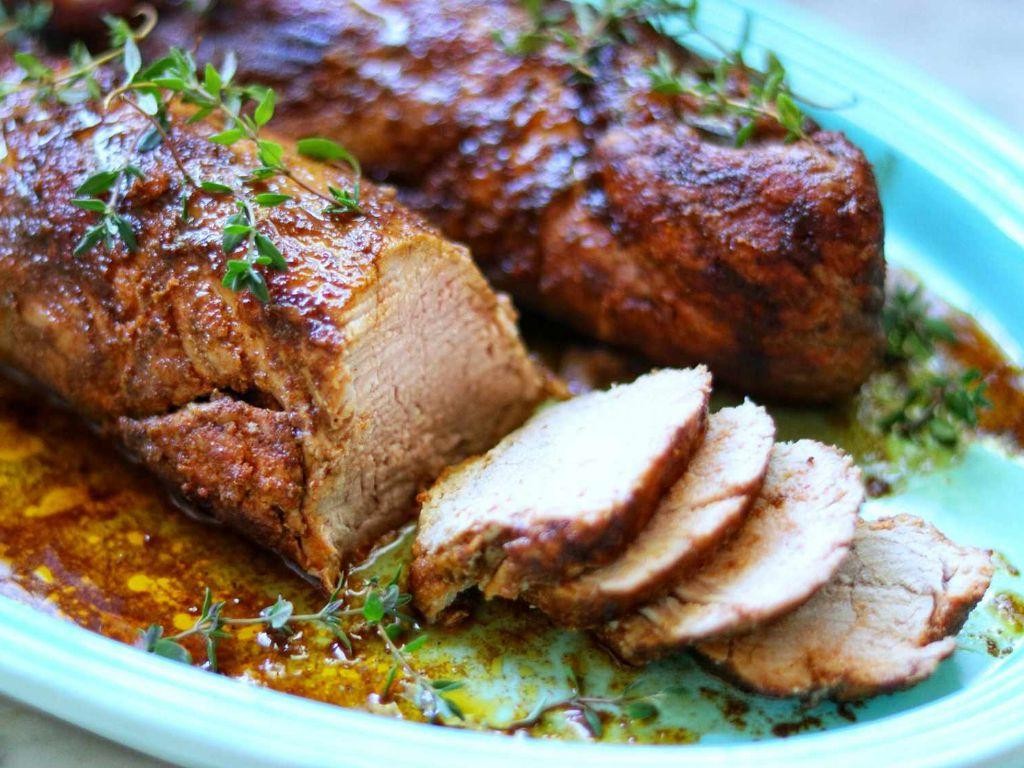
Melt-in-your-mouth pork tenderloin gets a glossy, sweet-tangy upgrade. Sear it hot, glaze it thick, and watch it disappear faster than your last TikTok video. This is the weeknight hero you’ll make on repeat.
5
servings10
minutes30
minutesIngredients
– 1.5 lbs pork tenderloin
– 2 tbsp olive oil (or any neutral oil)
– 1 tsp kosher salt
– ½ tsp black pepper
– ⅓ cup balsamic vinegar
– 2 tbsp honey
– 2 cloves garlic, minced
– 1 tsp fresh rosemary, chopped (or ½ tsp dried)
Instructions
1. Preheat your oven to 400°F.
2. Pat the pork tenderloin completely dry with paper towels for better browning.
3. Rub the pork all over with olive oil.
4. Season evenly with kosher salt and black pepper.
5. Heat a large oven-safe skillet over medium-high heat for 2 minutes.
6. Sear the pork for 2-3 minutes per side until golden brown.
7. Transfer the entire skillet to the preheated oven.
8. Roast for 15-18 minutes until internal temperature reaches 145°F.
9. While pork roasts, combine balsamic vinegar, honey, minced garlic, and rosemary in a small saucepan.
10. Simmer the glaze over medium heat for 5-7 minutes until thickened enough to coat the back of a spoon.
11. Remove pork from oven and transfer to a cutting board.
12. Brush half of the warm glaze over the pork.
13. Let the pork rest for 5 minutes to redistribute juices.
14. Slice the pork into 1-inch thick medallions.
15. Drizzle remaining glaze over sliced pork before serving.
Velvety pork slices glisten with that sticky-sweet balsamic magic. The exterior gets caramelized and slightly crisp while the interior stays impossibly juicy. Serve it over creamy polenta or slice it cold for next-day sandwiches—this glaze makes everything better.
Lemon Garlic Tuna Patties

Grab your skillet because these lemon garlic tuna patties are about to become your new weeknight obsession. Get that perfect crispy exterior with minimal effort. Seriously, you’ll want to make a double batch every time.
3
portions10
minutes10
minutesIngredients
– 2 (5 oz) cans solid white tuna in water, drained well (packed in oil works too for richer flavor)
– 1/2 cup panko breadcrumbs (regular breadcrumbs are fine too)
– 1/4 cup finely chopped red onion
– 2 tbsp fresh parsley, chopped (dried works in a pinch)
– 2 cloves garlic, minced (about 2 tsp)
– 1 large egg, lightly beaten
– 2 tbsp fresh lemon juice (about 1/2 lemon)
– 1 tsp lemon zest
– 1/2 tsp salt
– 1/4 tsp black pepper
– 2 tbsp olive oil (or any neutral oil)
– 1 tbsp unsalted butter
Instructions
1. Place drained tuna in a medium bowl and flake it thoroughly with a fork.
2. Add panko breadcrumbs, red onion, parsley, and minced garlic to the tuna.
3. Pour in the beaten egg, lemon juice, and lemon zest.
4. Sprinkle salt and black pepper over the mixture.
5. Mix all ingredients until just combined—don’t overmix or patties will be tough.
6. Divide mixture into 4 equal portions and shape each into 3/4-inch thick patties.
7. Heat olive oil and butter in a large skillet over medium heat until butter melts and foams.
8. Carefully place patties in the hot skillet, leaving space between them.
9. Cook for 4-5 minutes until golden brown and crispy on the bottom.
10. Flip patties using a thin spatula and cook another 4-5 minutes until both sides are golden.
11. Transfer patties to a paper towel-lined plate to drain excess oil.
12. Serve immediately while hot and crispy. You’ll love the contrast between the crispy exterior and tender, flaky interior. The lemon brightens everything up while the garlic adds that savory punch. Try them on brioche buns with spicy mayo or crumbled over a fresh green salad.
Zucchini Noodles with Pesto and Grilled Chicken
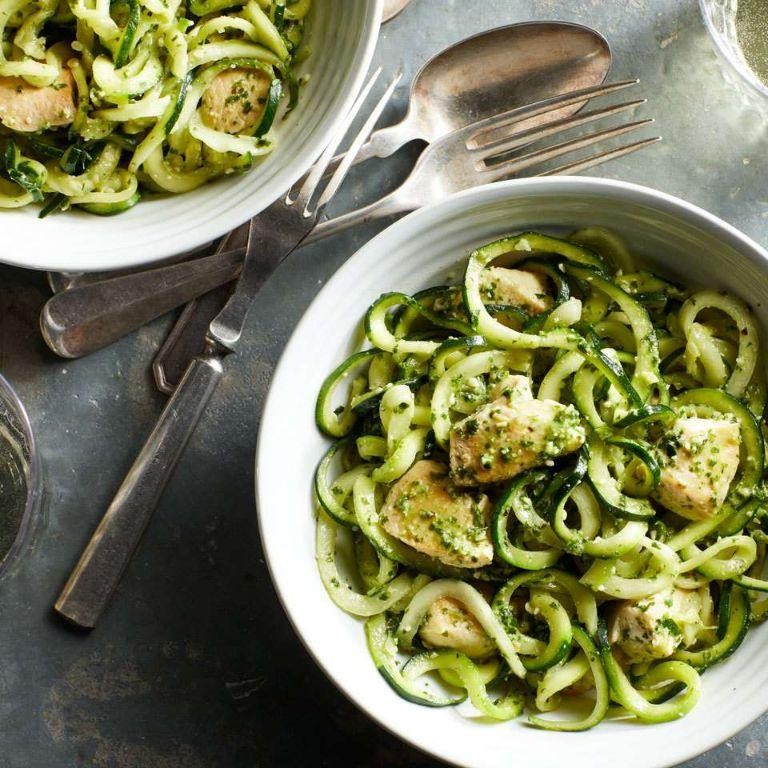
Craving something fresh that won’t weigh you down? Create vibrant zucchini noodles tossed in homemade pesto. Top with perfectly grilled chicken for a meal that’s both satisfying and light.
2
servings15
minutes14
minutesIngredients
- 2 medium zucchinis, spiralized (about 4 cups of noodles)
- 2 boneless, skinless chicken breasts (about 1 lb total)
- 2 cups fresh basil leaves, packed
- 1/2 cup grated Parmesan cheese
- 1/3 cup pine nuts
- 2 garlic cloves
- 1/2 cup extra virgin olive oil, divided
- 1 tbsp lemon juice
- 1/2 tsp salt, divided
- 1/4 tsp black pepper
Instructions
- Preheat your grill or grill pan to medium-high heat (400°F).
- Pat the chicken breasts completely dry with paper towels.
- Brush both sides of the chicken with 1 tablespoon of olive oil.
- Season the chicken evenly with 1/4 teaspoon of salt and all of the black pepper.
- Place the chicken on the hot grill and cook for 6-7 minutes without moving it.
- Flip the chicken and grill for another 6-7 minutes until the internal temperature reaches 165°F.
- Transfer the grilled chicken to a cutting board and let it rest for 5 minutes.
- While the chicken rests, combine the basil, Parmesan, pine nuts, and garlic in a food processor.
- Pulse the mixture 8-10 times until it’s coarsely chopped.
- With the processor running, slowly stream in the remaining olive oil until the pesto is smooth.
- Add the lemon juice and remaining 1/4 teaspoon of salt to the pesto, then pulse 2-3 times to combine.
- Use a spiralizer to create zucchini noodles from both zucchinis.
- Place the zucchini noodles in a large mixing bowl.
- Pour the prepared pesto over the zucchini noodles.
- Toss the zucchini noodles with the pesto until every strand is evenly coated.
- Slice the rested chicken breasts against the grain into 1/2-inch thick strips.
- Divide the pesto zucchini noodles between two serving plates.
- Arrange the sliced grilled chicken on top of the zucchini noodles.
Keep those zucchini noodles crisp by tossing them with pesto just before serving. The creamy pesto clings beautifully to every spiral while the grilled chicken adds smoky depth. Try serving it family-style in a big wooden bowl for that rustic, shareable vibe that’s perfect for summer evenings.
Conclusion
Crafting these 30 high-protein meals is your ticket to delicious muscle-building success. We hope this collection inspires your kitchen adventures and helps you reach your fitness goals. Don’t forget to share which recipes become your favorites in the comments below, and pin this article to your Pinterest boards for easy meal planning!