
Jump into a world where flavor meets fitness with these 22 delicious high-protein, low-carb recipes! Whether you’re craving quick dinners or wholesome comfort food, this roundup is your go-to guide for satisfying meals that keep you energized. Perfect for busy home cooks, each dish promises to delight your taste buds while supporting your health goals. Let’s explore these tasty options together—your next favorite meal awaits!
Grilled Lemon Herb Chicken Breast
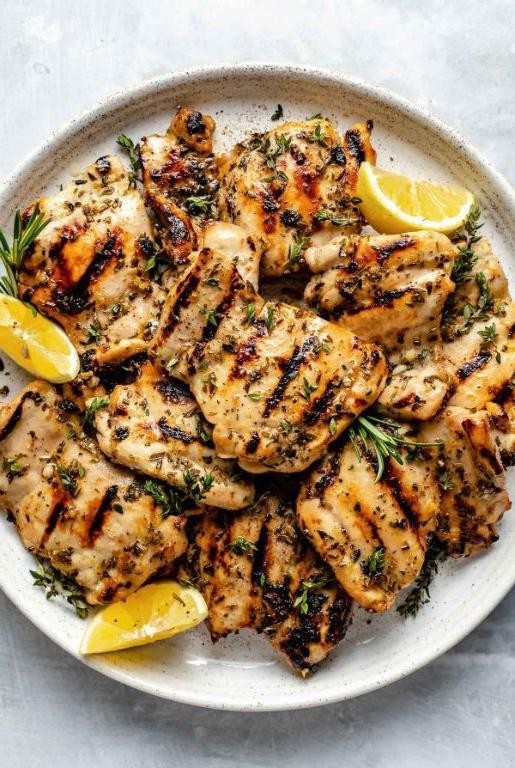
You know those weeknights when you want something healthy, flavorful, and on the table in under 30 minutes? Grilled lemon herb chicken breast is my absolute go-to for those evenings. It’s bright, juicy, and feels like a little bit of summer, even on a busy Tuesday.
Serving: 4 | Pre Time: 10 minutes | Cooking Time: 15 minutes
Ingredients
– 4 boneless, skinless chicken breasts (about 6 oz each)
– 1/4 cup rich extra virgin olive oil
– 1/4 cup freshly squeezed lemon juice
– 3 cloves garlic, finely minced
– 1 tbsp fresh rosemary, finely chopped
– 1 tbsp fresh thyme leaves
– 1 tsp kosher salt
– 1/2 tsp finely ground black pepper
– 1 lemon, thinly sliced
Instructions
1. Pat the 4 boneless, skinless chicken breasts completely dry with paper towels to ensure a good sear.
2. In a medium bowl, whisk together 1/4 cup rich extra virgin olive oil, 1/4 cup freshly squeezed lemon juice, 3 finely minced garlic cloves, 1 tbsp finely chopped fresh rosemary, 1 tbsp fresh thyme leaves, 1 tsp kosher salt, and 1/2 tsp finely ground black pepper to create the marinade.
3. Place the dried chicken breasts in a large resealable bag or shallow dish and pour the marinade over them, turning to coat evenly. (Tip: Letting them marinate for at least 30 minutes in the fridge makes a huge difference in flavor, but even 10 minutes helps if you’re short on time.)
4. Preheat your grill or a grill pan over medium-high heat until it reaches about 400°F.
5. Remove the chicken from the marinade, letting any excess drip off, and place it on the hot grill. Discard the used marinade.
6. Grill the chicken for 6-7 minutes without moving it to develop beautiful grill marks.
7. Carefully flip each chicken breast using tongs and continue grilling for another 6-7 minutes. (Tip: The chicken is done when it reaches an internal temperature of 165°F on an instant-read thermometer inserted into the thickest part.)
8. During the last 2 minutes of cooking, add the thinly sliced lemon to the grill and cook until lightly charred and softened, about 1-2 minutes per side.
9. Transfer the grilled chicken and lemon slices to a clean plate or cutting board and let it rest for 5 minutes before slicing. (Tip: Resting is non-negotiable—it keeps all those delicious juices inside the meat.)
10. Slice the chicken against the grain and serve immediately with the grilled lemon slices on top.
Unbelievably tender with a perfect char, this chicken has a vibrant, herby punch from the fresh rosemary and thyme. I love serving it over a simple arugula salad or with roasted potatoes to soak up the lemony juices—it’s a meal that always feels special without any fuss.
Keto-Friendly Beef Stir Fry
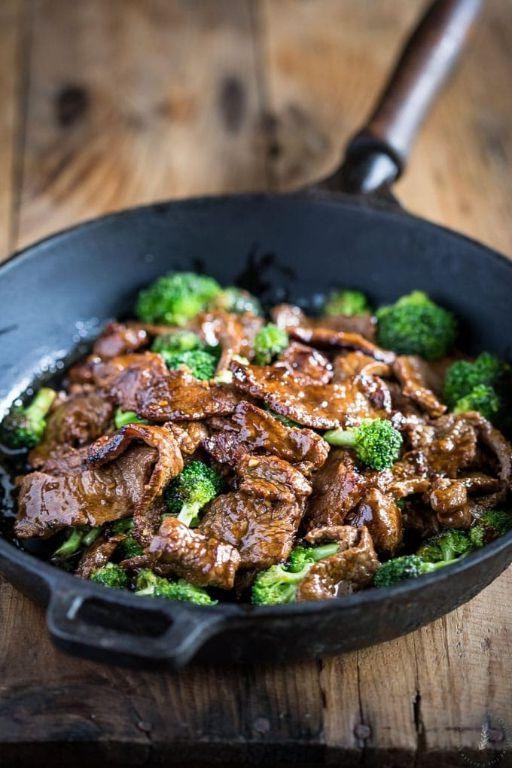
Recently, I found myself craving a hearty stir-fry but wanted to stick to my keto goals—enter this lifesaver of a recipe. It’s become my go-to weeknight dinner because it’s incredibly satisfying without the carb overload, and the best part is how quickly it comes together. I love how the savory beef and crisp veggies create a perfect balance that feels indulgent yet totally guilt-free.
Serving: 4 | Pre Time: 15 minutes | Cooking Time: 15 minutes
Ingredients
– 1.5 pounds of thinly sliced sirloin steak, cut into bite-sized strips
– 3 tablespoons of rich avocado oil, divided
– 4 cups of crisp broccoli florets
– 1 large red bell pepper, thinly sliced into vibrant strips
– 1/2 cup of sliced earthy cremini mushrooms
– 3 cloves of aromatic garlic, minced
– 1 tablespoon of freshly grated ginger
– 1/4 cup of savory soy sauce (or coconut aminos for a soy-free option)
– 1 tablespoon of toasted sesame oil
– 1/2 teaspoon of finely ground black pepper
– 2 thinly sliced green onions for garnish
Instructions
1. Pat the sirloin steak strips completely dry with paper towels to ensure a good sear.
2. Heat 2 tablespoons of rich avocado oil in a large skillet or wok over medium-high heat until it shimmers, about 2 minutes.
3. Add the steak strips in a single layer, cooking undisturbed for 2 minutes to develop a golden-brown crust.
4. Flip the steak and cook for an additional 2 minutes until browned on all sides, then transfer to a plate.
5. In the same skillet, add the remaining 1 tablespoon of rich avocado oil and heat for 30 seconds.
6. Add the crisp broccoli florets and cook, stirring frequently, for 4 minutes until they brighten in color.
7. Stir in the thinly sliced red bell pepper and earthy cremini mushrooms, cooking for 3 more minutes until slightly softened.
8. Add the minced aromatic garlic and freshly grated ginger, cooking for 1 minute until fragrant to avoid burning.
9. Return the cooked steak to the skillet, pouring in the savory soy sauce and toasted sesame oil.
10. Toss everything together and cook for 2 minutes, allowing the sauce to coat the ingredients evenly.
11. Season with finely ground black pepper, then remove from heat.
12. Garnish with thinly sliced green onions before serving.
This stir-fry delivers a wonderful contrast with tender, juicy beef and crisp-tender vegetables that still have a bit of bite. The savory sauce clings beautifully to every component, making each forkful deeply flavorful. Try serving it over cauliflower rice for a complete keto meal, or enjoy it straight from the skillet for a quick, comforting dinner that never disappoints.
Garlic Butter Shrimp with Zoodles
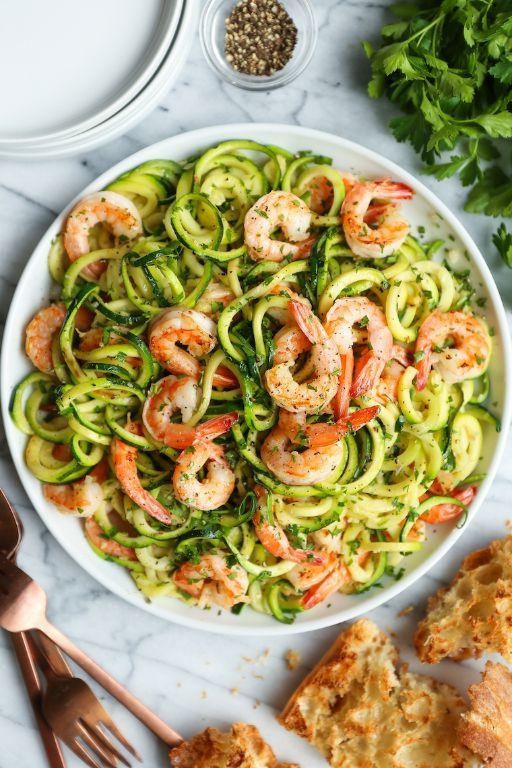
Kicking off a busy weeknight dinner doesn’t have to mean sacrificing flavor or health—this Garlic Butter Shrimp with Zoodles is my go-to when I want something quick, satisfying, and packed with fresh ingredients. I first whipped this up on a whim after a long day at work, and now it’s a regular in my rotation because it comes together in under 30 minutes and always feels like a treat. Trust me, even my picky eaters clean their plates every time!
Serving: 4 | Pre Time: 15 minutes | Cooking Time: 10 minutes
Ingredients
– 1 pound large raw shrimp, peeled and deveined
– 4 medium zucchini, spiralized into zoodles
– 4 tablespoons unsalted butter, cut into cubes
– 4 cloves garlic, minced
– 2 tablespoons fresh lemon juice
– 1/4 cup fresh parsley, finely chopped
– 1/2 teaspoon crushed red pepper flakes
– 1/4 teaspoon fine sea salt
– 1/4 teaspoon freshly ground black pepper
– 2 tablespoons extra virgin olive oil
Instructions
1. Pat the shrimp completely dry with paper towels to ensure a good sear.
2. Season the shrimp evenly with fine sea salt and freshly ground black pepper.
3. Heat extra virgin olive oil in a large skillet over medium-high heat until shimmering, about 2 minutes.
4. Add the shrimp to the skillet in a single layer, cooking for 2 minutes per side until pink and opaque, then transfer to a plate.
5. Reduce the heat to medium and add unsalted butter to the same skillet, letting it melt completely.
6. Stir in minced garlic and crushed red pepper flakes, cooking for 1 minute until fragrant but not browned.
7. Add spiralized zucchini to the skillet, tossing to coat in the garlic butter, and cook for 3–4 minutes until just tender but still crisp.
8. Return the cooked shrimp to the skillet, pouring in fresh lemon juice and stirring to combine everything evenly.
9. Remove the skillet from the heat and fold in finely chopped fresh parsley for a burst of color and freshness.
10. Divide the mixture among plates, serving immediately while warm.
Glistening with that garlicky butter sauce, this dish offers a delightful contrast between the tender, juicy shrimp and the crisp, light zoodles. I love how the lemon brightens everything up without overpowering it—perfect for a cozy dinner or even a fancy-ish lunch. Sometimes I’ll toss in a handful of cherry tomatoes or serve it over a bed of quinoa for an extra hearty twist.
Low Carb Turkey and Spinach Skillet
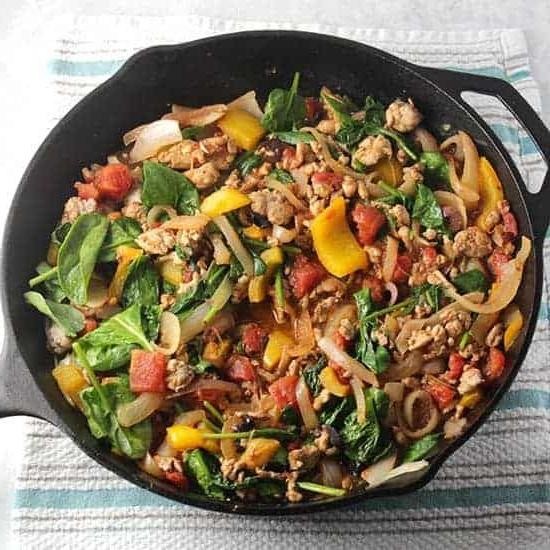
Haven’t we all had those nights where we want something hearty and healthy but don’t want to spend hours in the kitchen? This one-pan wonder is my go-to for a quick, low-carb dinner that feels indulgent but keeps things light. I love how the spinach wilts into the savory turkey, creating a cozy meal in under 30 minutes.
Serving: 4 | Pre Time: 10 minutes | Cooking Time: 20 minutes
Ingredients
– 1 tablespoon rich extra virgin olive oil
– 1 pound lean ground turkey
– 1 medium yellow onion, finely diced
– 2 cloves fresh garlic, minced
– 1 teaspoon smoked paprika
– ½ teaspoon fine sea salt
– ¼ teaspoon freshly cracked black pepper
– 5 ounces fresh baby spinach leaves
– 1 cup shredded sharp cheddar cheese
– ½ cup heavy cream
Instructions
1. Heat 1 tablespoon of rich extra virgin olive oil in a large skillet over medium-high heat until it shimmers, about 1 minute.
2. Add 1 pound of lean ground turkey to the skillet, breaking it apart with a wooden spoon into small crumbles.
3. Cook the turkey for 5-7 minutes, stirring occasionally, until it is no longer pink and begins to brown lightly.
4. Stir in 1 finely diced medium yellow onion and cook for 4-5 minutes until the onion turns translucent and soft.
5. Add 2 minced cloves of fresh garlic and cook for 1 minute until fragrant, being careful not to let it burn.
6. Sprinkle in 1 teaspoon of smoked paprika, ½ teaspoon of fine sea salt, and ¼ teaspoon of freshly cracked black pepper, stirring to coat the turkey mixture evenly.
7. Tip: For deeper flavor, let the spices toast with the turkey for 30 seconds before moving to the next step.
8. Pour in ½ cup of heavy cream, stirring to combine, and bring the mixture to a gentle simmer.
9. Reduce the heat to medium-low and let it simmer for 3 minutes until the cream slightly thickens.
10. Add 5 ounces of fresh baby spinach leaves to the skillet in handfuls, stirring until each batch wilts before adding more, about 2-3 minutes total.
11. Tip: If your skillet is crowded, cover it briefly to help the spinach wilt faster without overcooking the turkey.
12. Sprinkle 1 cup of shredded sharp cheddar cheese evenly over the top of the skillet mixture.
13. Cover the skillet with a lid and cook on low heat for 2-3 minutes until the cheese is fully melted and bubbly.
14. Tip: For a golden-brown cheese crust, remove the lid and broil the skillet for 1-2 minutes, watching closely to prevent burning.
15. Remove the skillet from the heat and let it rest for 2 minutes before serving.
This skillet delivers a creamy, cheesy texture with pops of savory turkey and tender spinach in every bite. The smoked paprika adds a subtle warmth that makes it feel like a comfort food classic. Try scooping it over roasted cauliflower rice or into crisp lettuce cups for a fun, low-carb twist that’s perfect for weeknights.
Almond-Crusted Baked Salmon
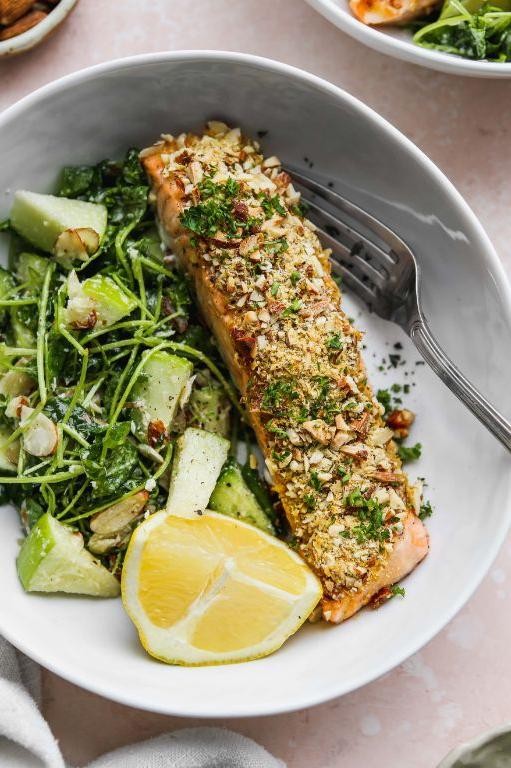
This almond-crusted baked salmon is one of those recipes that feels fancy but is secretly simple enough for a busy weeknight. I first made it for a last-minute dinner party and now it’s my go-to when I want something healthy that still impresses. The crunchy almond topping and tender, flaky fish are a match made in heaven.
Serving: 4 | Pre Time: 15 minutes | Cooking Time: 15 minutes
Ingredients
– 4 (6-ounce) skin-on salmon fillets
– 1 cup finely chopped raw almonds
– 2 tablespoons rich extra virgin olive oil
– 1 tablespoon fresh lemon juice
– 1 teaspoon finely minced garlic
– 1 teaspoon aromatic smoked paprika
– ½ teaspoon coarse kosher salt
– ¼ teaspoon finely ground black pepper
– 2 tablespoons chopped fresh parsley for garnish
– Lemon wedges for serving
Instructions
1. Preheat your oven to 400°F and line a rimmed baking sheet with parchment paper.
2. Pat the salmon fillets completely dry with paper towels to ensure the crust adheres well.
3. In a medium bowl, combine the finely chopped raw almonds, rich extra virgin olive oil, fresh lemon juice, finely minced garlic, aromatic smoked paprika, coarse kosher salt, and finely ground black pepper.
4. Stir the almond mixture until it forms a cohesive, slightly damp paste.
5. Divide the almond paste evenly among the tops of the salmon fillets, pressing it into a thick, even layer that covers the surface.
6. Place the coated salmon fillets on the prepared baking sheet.
7. Bake in the preheated oven for 12–15 minutes, until the almond crust is golden brown and the salmon flakes easily with a fork. (Tip: For extra crunch, you can broil for the final 1–2 minutes, but watch closely to prevent burning.)
8. Remove the baking sheet from the oven and let the salmon rest for 3 minutes. (Tip: This resting time allows the juices to redistribute, keeping the fish moist.)
9. Transfer the salmon to serving plates, garnish with chopped fresh parsley, and serve immediately with lemon wedges on the side. (Tip: Squeezing the lemon over the salmon just before eating brightens all the flavors.)
Really, the contrast between the nutty, crisp topping and the buttery-soft salmon is what makes this dish special. I love serving it over a bed of lemony quinoa or with roasted asparagus for a complete, colorful meal that always feels a bit celebratory.
Cheesy Cauliflower Steak

Sometimes, you just need a hearty, satisfying meal that doesn’t weigh you down—and that’s exactly where this Cheesy Cauliflower Steak comes in. I first made it on a cozy Sunday when I wanted something indulgent yet veggie-packed, and now it’s a regular in my rotation for its simplicity and wow factor.
Serving: 2 | Pre Time: 10 minutes | Cooking Time: 25 minutes
Ingredients
– 1 large head of cauliflower, trimmed into two 1-inch-thick steaks
– 2 tablespoons rich extra virgin olive oil
– 1 teaspoon coarse sea salt
– ½ teaspoon freshly ground black pepper
– ½ cup shredded sharp cheddar cheese
– ¼ cup grated Parmesan cheese
– 2 tablespoons chopped fresh parsley
– 1 tablespoon unsalted butter
Instructions
1. Preheat your oven to 400°F and line a baking sheet with parchment paper.
2. Place the cauliflower steaks on the prepared baking sheet and brush both sides generously with the rich extra virgin olive oil.
3. Season the steaks evenly on both sides with the coarse sea salt and freshly ground black pepper.
4. Roast the cauliflower in the preheated oven for 15 minutes, until the edges start to turn golden brown and tender when pierced with a fork. Tip: For even cooking, avoid overcrowding the steaks on the sheet.
5. Remove the baking sheet from the oven and sprinkle the shredded sharp cheddar cheese and grated Parmesan cheese evenly over the top of each cauliflower steak.
6. Return the baking sheet to the oven and bake for an additional 5–7 minutes, until the cheese is fully melted and bubbly. Tip: Watch closely to prevent the cheese from burning—it should be golden and gooey.
7. While the cauliflower bakes, melt the unsalted butter in a small saucepan over low heat until just liquid, about 1–2 minutes.
8. Remove the cauliflower steaks from the oven and drizzle the melted unsalted butter over the top.
9. Garnish with the chopped fresh parsley before serving immediately. Tip: Let the steaks rest for a minute after baking to set the cheese slightly for easier slicing.
Vibrant and comforting, this dish boasts a tender-crisp cauliflower base with a rich, cheesy crust that’s irresistibly savory. Serve it alongside a simple arugula salad or over creamy mashed potatoes for a complete meal that’s as visually stunning as it is delicious.
Spicy Tuna Sushi Rolls

Whenever I’m craving something with a kick, I turn to these spicy tuna sushi rolls—they’re my go‑to for a quick, satisfying meal that never disappoints. I first fell in love with them during a cozy night in with friends, and now I make them almost weekly, tweaking the spice level to match my mood. There’s something so comforting about rolling up fresh ingredients and getting that perfect bite every time.
Serving: 4 | Pre Time: 25 minutes | Cooking Time: 5 minutes
Ingredients
– 2 cups of perfectly cooked sushi rice, still warm and slightly sticky
– 4 sheets of toasted nori seaweed, crisp and briny
– 8 ounces of sushi‑grade tuna, finely chopped into small, even pieces
– 2 tablespoons of creamy mayonnaise, preferably Japanese‑style Kewpie
– 1 tablespoon of spicy sriracha sauce, with its vibrant red heat
– 1 teaspoon of toasted sesame oil, fragrant and nutty
– 1 ripe avocado, sliced into thin, buttery strips
– 1 small cucumber, julienned into crisp, refreshing matchsticks
– 2 tablespoons of seasoned rice vinegar, tangy and sweet
– 1 teaspoon of granulated sugar, for balancing the rice
– ½ teaspoon of fine sea salt, to enhance the flavors
– 1 tablespoon of toasted white sesame seeds, for a crunchy finish
Instructions
1. In a medium bowl, combine the warm sushi rice with the seasoned rice vinegar, granulated sugar, and fine sea salt, gently folding until evenly coated—this step ensures the rice is flavorful and glossy.
2. In a separate small bowl, mix the chopped sushi‑grade tuna with the creamy mayonnaise, spicy sriracha sauce, and fragrant toasted sesame oil until well‑blended; for a milder spice, reduce the sriracha by half.
3. Lay one sheet of crisp nori on a bamboo sushi mat, shiny‑side down, and evenly spread about ½ cup of the seasoned sushi rice over the nori, leaving a 1‑inch border at the top edge.
4. Arrange a quarter of the buttery avocado slices and crisp cucumber matchsticks horizontally along the center of the rice, then spoon a quarter of the spicy tuna mixture over the vegetables.
5. Using the sushi mat, tightly roll the nori away from you, applying gentle pressure to form a compact cylinder; dampen the top border with water to seal the roll securely.
6. Repeat steps 3–5 with the remaining ingredients to make three more rolls, wiping the knife with a damp cloth between cuts for cleaner slices.
7. With a sharp, wet knife, slice each roll into 8 even pieces, about 1‑inch thick, to prevent the fillings from squishing out.
8. Arrange the sushi pieces on a serving platter and sprinkle with the toasted white sesame seeds for added crunch and visual appeal.
Unbelievably creamy from the avocado and mayo, these rolls deliver a punch of heat that mellows into a savory, umami‑rich finish. I love serving them with extra sriracha on the side for dipping, or for a fun twist, top each piece with a tiny dollop of spicy mayo and a sprinkle of furikake. The contrast between the cool, crisp cucumber and the warm, spicy tuna makes every bite irresistibly dynamic.
Avocado Stuffed with Egg Salad
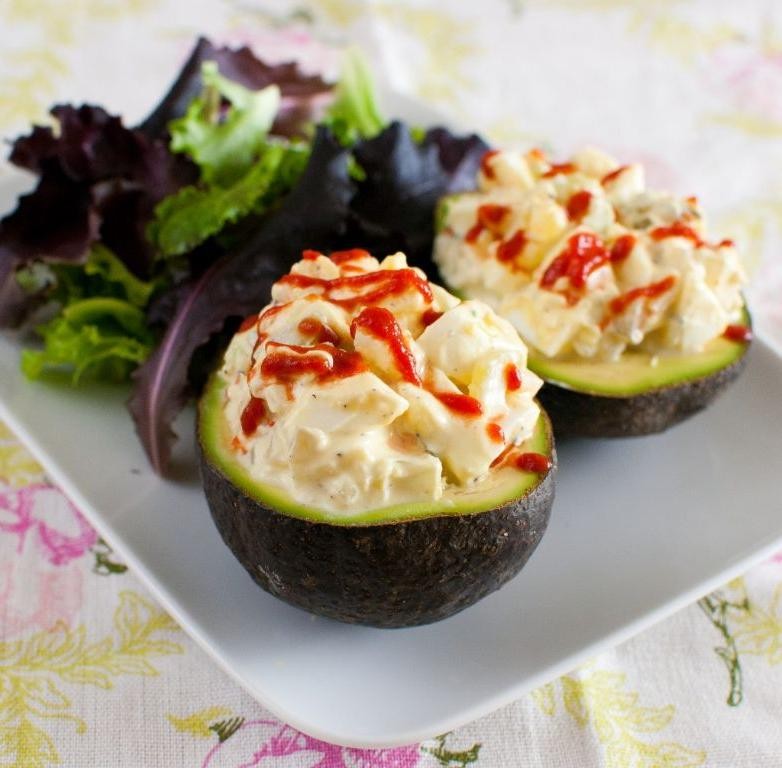
Gosh, I can’t tell you how many times I’ve stared into my fridge, hungry but uninspired, only to have this simple combo save the day. Avocado stuffed with egg salad is my go-to when I want something creamy, satisfying, and ready in a flash—it’s the kind of easy lunch I make while my coffee brews. I love how the cool, rich avocado plays against the savory salad, and it always feels a little fancy despite the minimal effort.
Serving: 2 | Pre Time: 15 minutes | Cooking Time: 12 minutes
Ingredients
– 2 large, ripe Hass avocados
– 4 large farm-fresh eggs
– 1/4 cup creamy mayonnaise
– 1 tbsp tangy Dijon mustard
– 1 tbsp freshly squeezed lemon juice
– 1/4 cup finely diced crisp celery
– 1 tbsp finely chopped fresh chives
– 1/2 tsp finely ground black pepper
– 1/4 tsp kosher salt
Instructions
1. Place 4 large farm-fresh eggs in a single layer in a medium saucepan and cover them with cold water by 1 inch.
2. Bring the water to a rolling boil over high heat, then immediately remove the pan from heat, cover it, and let the eggs sit for exactly 12 minutes.
3. Tip: Letting the eggs sit off the heat prevents rubbery whites and ensures perfectly cooked yolks.
4. While the eggs cook, halve 2 large, ripe Hass avocados lengthwise and remove the pits.
5. Scoop out about 1 tablespoon of flesh from each avocado half to create a larger cavity, placing the scooped avocado in a medium mixing bowl.
6. Drizzle the avocado halves with 1 tbsp freshly squeezed lemon juice to prevent browning.
7. After 12 minutes, transfer the eggs to a bowl of ice water and let them cool completely for about 5 minutes.
8. Peel the cooled eggs under running cold water to make removal easier.
9. Finely chop the peeled eggs and add them to the bowl with the scooped avocado.
10. Add 1/4 cup creamy mayonnaise, 1 tbsp tangy Dijon mustard, 1/4 cup finely diced crisp celery, 1 tbsp finely chopped fresh chives, 1/2 tsp finely ground black pepper, and 1/4 tsp kosher salt to the bowl.
11. Tip: Mix gently with a fork to maintain some texture in the egg salad rather than mashing it smooth.
12. Fold all ingredients together until just combined.
13. Evenly divide the egg salad mixture among the 4 prepared avocado halves, mounding it slightly.
14. Tip: For extra crunch, sprinkle with additional chopped chives or serve on a bed of peppery arugula.
15. Serve immediately.
Rich and creamy, the egg salad nestles into the buttery avocado for a delightful contrast in textures. I adore the bright pops of celery and chives against the savory base, making each bite interesting. Try it open-faced on toasted sourdough for a hearty twist, or add a sprinkle of smoked paprika for a smoky kick.
Crispy Parmesan Roasted Broccoli

Whenever I’m craving something crispy, savory, and secretly healthy, my mind always goes straight to this Crispy Parmesan Roasted Broccoli. It’s the side dish that consistently steals the spotlight at my dinner table, and I love how it transforms humble broccoli into a crave-worthy treat with just a handful of pantry staples.
Serving: 4 | Pre Time: 10 minutes | Cooking Time: 20 minutes
Ingredients
– 1 large head of fresh broccoli, cut into bite-sized florets
– 3 tablespoons of rich extra virgin olive oil
– 1/2 cup of finely grated Parmesan cheese
– 1/4 cup of coarse panko breadcrumbs
– 2 cloves of fresh garlic, minced
– 1 teaspoon of smoked paprika
– 1/2 teaspoon of coarse kosher salt
– 1/4 teaspoon of finely ground black pepper
Instructions
1. Preheat your oven to 425°F and line a large, rimmed baking sheet with parchment paper for easy cleanup.
2. In a large mixing bowl, combine the fresh broccoli florets with the rich extra virgin olive oil, tossing thoroughly to coat every piece evenly—this ensures maximum crispiness.
3. Sprinkle the minced fresh garlic, smoked paprika, coarse kosher salt, and finely ground black pepper over the broccoli, then toss again until the florets are uniformly seasoned.
4. In a small bowl, mix the finely grated Parmesan cheese with the coarse panko breadcrumbs to create the crispy topping.
5. Evenly scatter the Parmesan-panko mixture over the seasoned broccoli on the baking sheet, pressing lightly to help it adhere—this prevents the topping from burning before the broccoli roasts through.
6. Roast in the preheated oven at 425°F for 18–20 minutes, or until the broccoli is tender with slightly charred edges and the topping is golden brown and crispy.
7. Remove from the oven and let it rest for 2–3 minutes on the baking sheet; this allows the cheese to set for optimal crunch.
Ultimate satisfaction comes from that first bite: the broccoli is tender yet firm, with a nutty, savory crust from the Parmesan and a hint of smokiness. I love serving it as a standalone snack with a squeeze of lemon or piled high next to grilled chicken for a quick, flavorful weeknight meal.
Pork Chops with Creamy Mushroom Sauce
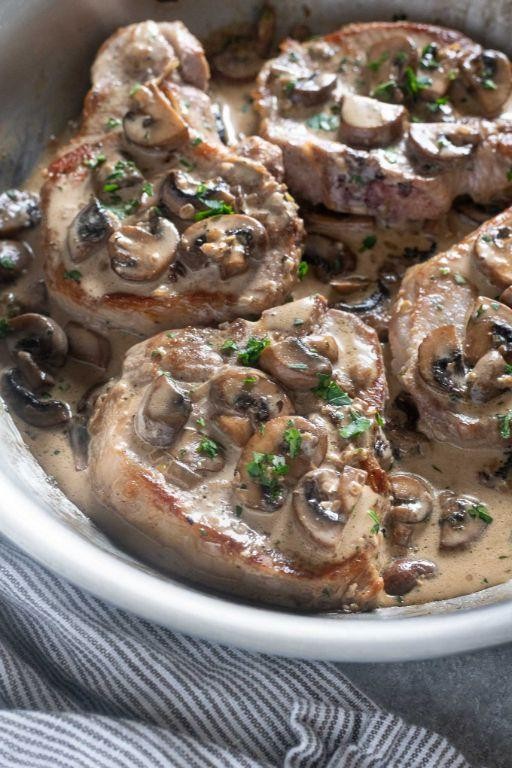
Nothing beats coming home to a comforting, savory dinner after a long day, and these Pork Chops with Creamy Mushroom Sauce have become my go-to weeknight hero. I first made them on a chilly evening when I craved something hearty but didn’t want to spend hours in the kitchen—now they’re a regular in my rotation, perfect for impressing guests or treating myself.
Serving: 4 | Pre Time: 10 minutes | Cooking Time: 25 minutes
Ingredients
– 4 bone-in pork chops, about 1-inch thick
– 2 tablespoons rich extra virgin olive oil
– 1 teaspoon finely ground black pepper
– 1 teaspoon kosher salt
– 8 ounces cremini mushrooms, sliced into thick, earthy pieces
– 3 cloves garlic, minced to a fragrant paste
– 1 cup heavy cream, full-fat and velvety
– 1/2 cup low-sodium chicken broth, savory and warm
– 1 tablespoon fresh thyme leaves, aromatic and stripped from stems
– 2 tablespoons unsalted butter, cold and creamy
Instructions
1. Pat the pork chops completely dry with paper towels to ensure a golden sear.
2. Season both sides of the pork chops evenly with kosher salt and finely ground black pepper.
3. Heat rich extra virgin olive oil in a large skillet over medium-high heat until shimmering, about 2 minutes.
4. Add the pork chops to the skillet and cook for 5–6 minutes per side until deeply browned and the internal temperature reaches 145°F on a meat thermometer.
5. Transfer the pork chops to a plate and tent loosely with foil to rest, which keeps them juicy.
6. In the same skillet, add the sliced cremini mushrooms and cook for 5–7 minutes, stirring occasionally, until they release their liquid and turn golden brown.
7. Stir in the minced garlic and cook for 1 minute until fragrant, being careful not to burn it.
8. Pour in the low-sodium chicken broth to deglaze the pan, scraping up any browned bits from the bottom for extra flavor.
9. Add the heavy cream and fresh thyme leaves, then simmer the sauce for 5 minutes until it thickens slightly and coats the back of a spoon.
10. Whisk in the cold unsalted butter until the sauce becomes glossy and smooth, then remove from heat.
11. Return the pork chops to the skillet, spooning the creamy mushroom sauce over them to warm through for 2 minutes.
That rich, velvety sauce clings to every bite of the tender pork, with the earthy mushrooms adding a satisfying depth. Try serving it over a bed of buttery mashed potatoes or with crusty bread to soak up every last drop—it’s a meal that feels indulgent yet comes together so effortlessly.
Tender Lamb Chops with Garlic Butter

Every time I make these lamb chops, I’m reminded of that cozy dinner party last fall where my friend declared them the best she’d ever had—and honestly, I have to agree. There’s something about the tender, juicy meat paired with that rich, garlicky butter that feels both elegant and utterly comforting. I love how quickly they come together, making them perfect for a weeknight treat or a last-minute gathering.
Serving: 4 | Pre Time: 10 minutes | Cooking Time: 10 minutes
Ingredients
– 8 frenched lamb chops, about 1-inch thick
– 2 tablespoons rich extra virgin olive oil
– 1 teaspoon coarse kosher salt
– ½ teaspoon freshly ground black pepper
– 4 tablespoons unsalted butter, softened
– 3 cloves garlic, minced
– 1 tablespoon fresh rosemary, finely chopped
– 1 tablespoon fresh thyme leaves
– 1 lemon, cut into wedges for serving
Instructions
1. Pat the frenched lamb chops completely dry with paper towels to ensure a good sear.
2. Rub the lamb chops all over with the rich extra virgin olive oil.
3. Season both sides of the lamb chops evenly with the coarse kosher salt and freshly ground black pepper.
4. Let the lamb chops sit at room temperature for 10 minutes to take the chill off—this helps them cook more evenly.
5. Heat a large cast-iron skillet over medium-high heat until it’s very hot, about 3 minutes.
6. Place the lamb chops in the skillet without crowding them, working in batches if needed.
7. Sear the lamb chops for 3 minutes on the first side until they develop a deep golden-brown crust.
8. Flip the lamb chops and cook for another 2–3 minutes for medium-rare, or until they reach an internal temperature of 135°F on an instant-read thermometer.
9. Transfer the lamb chops to a plate and loosely tent them with foil to rest for 5 minutes—this keeps them juicy.
10. Reduce the skillet heat to low and add the unsalted butter to melt.
11. Stir in the minced garlic, finely chopped fresh rosemary, and fresh thyme leaves, cooking for 1 minute until fragrant but not browned.
12. Spoon the garlic butter generously over the rested lamb chops.
13. Serve the lamb chops immediately with lemon wedges on the side for a bright squeeze.
Oh, the texture is pure perfection—crispy on the outside, tender and pink inside, with that buttery sauce clinging to every bite. I love how the garlic and herbs mellow into a savory richness that pairs beautifully with a simple arugula salad or creamy mashed potatoes. For a fun twist, try drizzling any extra butter over roasted vegetables or crusty bread to soak it all up.
Balsamic Glazed Caprese Salad
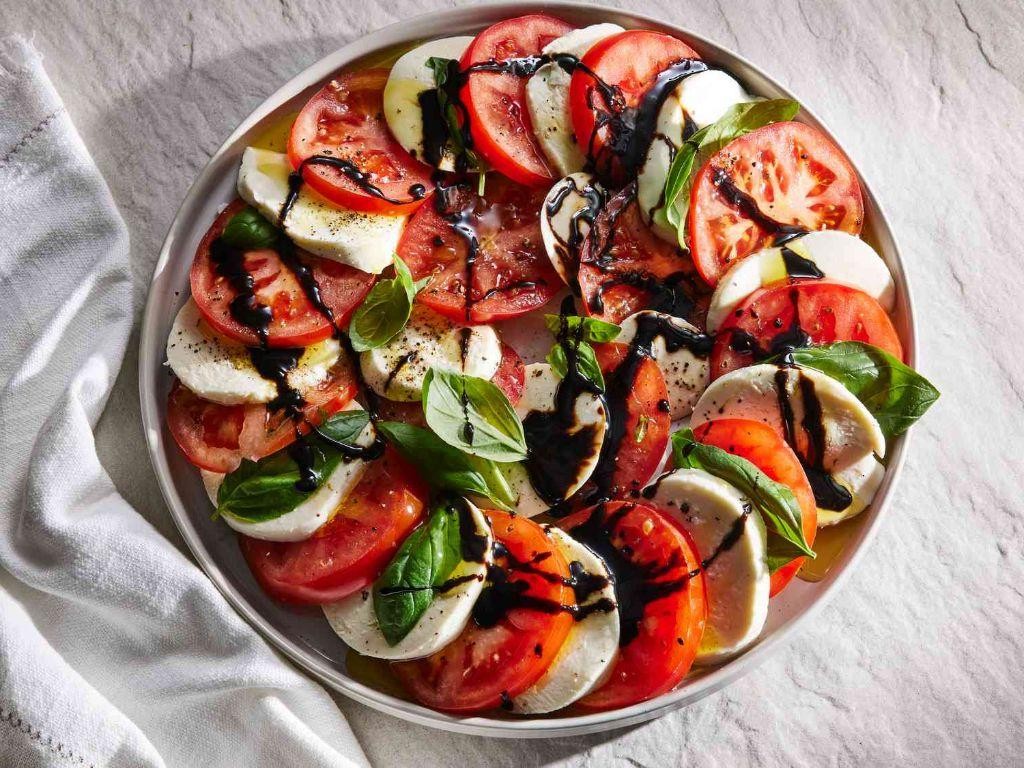
Oftentimes, the simplest dishes are the ones that truly shine, and this Balsamic Glazed Caprese Salad is a perfect example. I love making this when my garden is overflowing with ripe tomatoes, and I need a quick, elegant appetizer that feels both fresh and indulgent. It’s my go-to for summer potlucks because it always disappears first!
Serving: 4 | Pre Time: 15 minutes | Cooking Time: 10 minutes
Ingredients
– 4 large, vine-ripened heirloom tomatoes
– 8 ounces of fresh, creamy mozzarella cheese (preferably a ball)
– 1 cup of aged balsamic vinegar
– 1/4 cup of rich extra virgin olive oil
– 1/4 cup of fragrant fresh basil leaves
– 1/2 teaspoon of flaky sea salt
– 1/4 teaspoon of coarsely ground black pepper
Instructions
1. Slice the 4 large, vine-ripened heirloom tomatoes into 1/4-inch thick rounds and arrange them on a large serving platter.
2. Slice the 8 ounces of fresh, creamy mozzarella cheese into rounds of similar thickness and layer them alternately with the tomato slices.
3. In a small saucepan over medium heat, pour the 1 cup of aged balsamic vinegar and bring it to a gentle simmer, stirring occasionally.
4. Reduce the heat to low and let the vinegar simmer for 8-10 minutes, until it thickens to a syrupy consistency that coats the back of a spoon—this is your balsamic glaze. Tip: Watch it closely to prevent burning, as it can go from perfect to burnt quickly!
5. Drizzle the 1/4 cup of rich extra virgin olive oil evenly over the arranged tomatoes and mozzarella.
6. Sprinkle the 1/2 teaspoon of flaky sea salt and 1/4 teaspoon of coarsely ground black pepper over the salad.
7. Tear the 1/4 cup of fragrant fresh basil leaves by hand and scatter them over the top for a rustic look. Tip: Tearing instead of chopping helps release more of the basil’s aromatic oils.
8. Once the balsamic glaze has cooled slightly, drizzle it generously over the salad in a zigzag pattern. Tip: Let the glaze cool for a minute to avoid wilting the fresh basil.
9. Serve immediately at room temperature to allow the flavors to meld beautifully.
Zesty and vibrant, this salad offers a delightful contrast between the juicy tomatoes and creamy mozzarella, all tied together with that sweet-tart balsamic glaze. For a creative twist, try layering it on toasted baguette slices for a quick crostini, or pair it with grilled chicken for a light summer meal—it’s as versatile as it is delicious!
Conclusion
Overall, this roundup offers a fantastic variety of tasty, satisfying meals that support your health goals. We hope you feel inspired to try a few recipes this week! Don’t forget to leave a comment telling us which dish you loved most and share your favorite finds on Pinterest to help other home cooks.


