Whether you’re trying to eat healthier or just want to make vegetables the star of your meals, you’ve come to the right place! We’ve gathered 20 delicious, nutritious veggie-packed recipes that are perfect for busy weeknights and satisfying dinners. From quick stir-fries to comforting roasted dishes, these meals prove healthy eating can be absolutely delicious. Get ready to fall in love with vegetables all over again!
Quinoa and Roasted Vegetable Pilaf
Zesty quinoa dishes have become my go-to weeknight solution, especially after discovering how perfectly roasted vegetables complement those fluffy little grains. I first made this pilaf during a busy Tuesday when I needed something healthy but didn’t want to sacrifice flavor, and now it’s in my regular rotation. There’s something so satisfying about the way the vegetables caramelize and mingle with the quinoa that makes this feel like comfort food, even though it’s packed with nutrients.
2
servings15
minutes40
minutesIngredients
For the roasted vegetables:
- 1 medium red bell pepper, chopped into 1-inch pieces
- 1 medium zucchini, chopped into 1-inch pieces
- 1 small red onion, chopped into 1-inch pieces
- 2 tbsp olive oil
- 1/2 tsp salt
- 1/4 tsp black pepper
For the quinoa:
- 1 cup quinoa
- 2 cups vegetable broth
- 2 cloves garlic, minced
- 1/4 cup chopped fresh parsley
- 2 tbsp lemon juice
Instructions
- Preheat your oven to 425°F.
- Place the chopped red bell pepper, zucchini, and red onion on a baking sheet.
- Drizzle 2 tablespoons of olive oil over the vegetables.
- Sprinkle 1/2 teaspoon salt and 1/4 teaspoon black pepper over the vegetables.
- Toss the vegetables until evenly coated with oil and seasonings.
- Roast the vegetables for 20-25 minutes until edges are browned and vegetables are tender.
- While vegetables roast, rinse 1 cup quinoa in a fine-mesh strainer under cold water for 1 minute to remove bitterness.
- Heat a medium saucepan over medium heat.
- Add the rinsed quinoa to the dry saucepan and toast for 3 minutes, stirring constantly until fragrant.
- Add 2 minced garlic cloves to the quinoa and cook for 30 seconds until fragrant.
- Pour 2 cups vegetable broth into the saucepan with quinoa.
- Bring the mixture to a boil over high heat.
- Reduce heat to low, cover the saucepan, and simmer for 15 minutes until liquid is absorbed.
- Remove the saucepan from heat and let the quinoa sit covered for 5 minutes to steam.
- Fluff the cooked quinoa with a fork.
- Combine the roasted vegetables with the cooked quinoa in a large bowl.
- Stir in 1/4 cup chopped fresh parsley and 2 tablespoons lemon juice.
And that’s it—you’ve got a pilaf with wonderful texture contrasts between the fluffy quinoa and caramelized vegetables. The lemon juice brightens everything up beautifully, while the roasted vegetables add a subtle sweetness that balances the nutty quinoa perfectly. I love serving this warm with grilled chicken or letting it cool completely for a fantastic next-day lunch salad.
Zucchini Noodles with Avocado Pesto
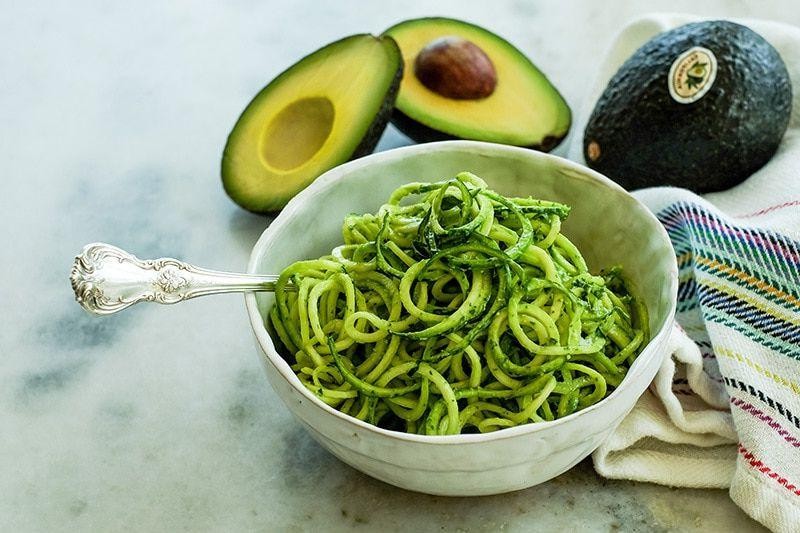
My garden is overflowing with zucchini right now, and after making every possible zucchini bread and fritter, I finally discovered this magical zucchini noodles recipe that’s become my go-to weeknight dinner. It’s so fresh and satisfying that even my picky eater asked for seconds!
5
servings15
minutes3
minutesIngredients
- For the zucchini noodles:
- 4 medium zucchinis, spiralized
- 1 tbsp olive oil
- 1/2 tsp salt
- For the avocado pesto:
- 2 ripe avocados, pitted and peeled
- 1/2 cup fresh basil leaves, packed
- 1/4 cup pine nuts
- 2 garlic cloves
- 3 tbsp lemon juice
- 1/4 cup olive oil
- 1/4 tsp black pepper
Instructions
- Spiralize 4 medium zucchinis using the medium blade of your spiralizer.
- Sprinkle 1/2 tsp salt evenly over the zucchini noodles and let them sit in a colander for 10 minutes to draw out excess moisture.
- While the zucchini rests, combine 2 pitted and peeled avocados, 1/2 cup packed basil leaves, 1/4 cup pine nuts, 2 garlic cloves, 3 tbsp lemon juice, 1/4 cup olive oil, and 1/4 tsp black pepper in a food processor.
- Process the avocado pesto mixture on high speed for 45 seconds, scraping down the sides once, until completely smooth and creamy.
- Press the salted zucchini noodles firmly with paper towels to remove all released liquid.
- Heat 1 tbsp olive oil in a large skillet over medium heat for 1 minute.
- Add the dried zucchini noodles to the skillet and cook for 2 minutes, tossing constantly, just until slightly softened but still al dente.
- Remove the skillet from heat immediately and transfer the warm zucchini noodles to a large mixing bowl.
- Pour the prepared avocado pesto over the warm zucchini noodles.
- Toss everything together gently but thoroughly until every strand is coated in the vibrant green sauce.
This dish has the most wonderful creamy texture from the avocado pesto clinging to the tender-crisp zucchini noodles. The bright lemon and basil flavors make it taste like summer in a bowl, and I love serving it topped with extra pine nuts for crunch or alongside grilled chicken for a complete meal.
Grilled Vegetable and Chickpea Salad
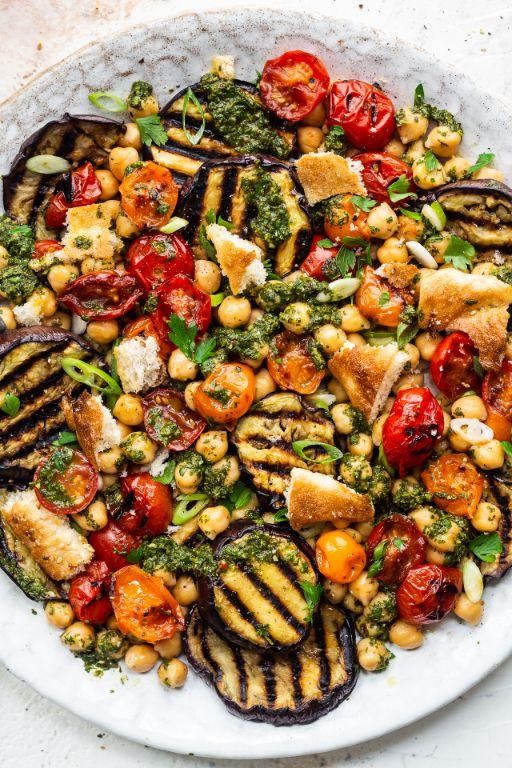
Every time summer starts fading into fall, I find myself craving one last hurrah of grilled goodness before swapping my tongs for soup ladles. This grilled vegetable and chickpea salad has become my go-to transition dish—it’s hearty enough to feel substantial but still bright and fresh, perfect for those warm September evenings when you’re not quite ready to let go of barbecue season. I actually started making this after a friend brought something similar to a potluck, and now it’s a staple in my kitchen because it’s so versatile and always a crowd-pleaser.
2
servings15
minutes8
minutesIngredients
- For the vegetables:
- 2 medium zucchinis, sliced lengthwise into 1/4-inch thick strips
- 1 large red bell pepper, seeded and cut into 1-inch wide strips
- 1 small red onion, cut into 1/2-inch thick rounds
- 1 tablespoon olive oil
- 1/2 teaspoon salt
- For the salad base:
- 1 (15-ounce) can chickpeas, rinsed and drained
- 4 cups chopped romaine lettuce
- For the dressing:
- 3 tablespoons olive oil
- 2 tablespoons lemon juice
- 1 teaspoon Dijon mustard
- 1/4 teaspoon black pepper
Instructions
- Preheat your grill to medium-high heat, approximately 400°F.
- Brush the zucchini, red bell pepper, and red onion evenly with 1 tablespoon olive oil and sprinkle with 1/2 teaspoon salt. Tip: Keeping the onion in rounds helps prevent them from falling through the grill grates.
- Place the vegetables directly on the grill grates and cook for 4 minutes per side, until you see prominent grill marks and the vegetables are tender but still have a slight bite.
- Transfer the grilled vegetables to a cutting board and let them rest for 2 minutes to allow the juices to redistribute.
- Chop the grilled vegetables into bite-sized pieces. Tip: Letting them cool slightly before chopping makes them easier to handle and keeps them from becoming mushy.
- In a large bowl, combine the chopped romaine lettuce and rinsed chickpeas.
- In a small bowl, whisk together 3 tablespoons olive oil, 2 tablespoons lemon juice, 1 teaspoon Dijon mustard, and 1/4 teaspoon black pepper until fully emulsified. Tip: Whisking the dressing vigorously helps create a creamy, well-combined emulsion that coats the salad evenly.
- Pour the dressing over the lettuce and chickpeas, and toss gently to coat.
- Add the chopped grilled vegetables to the bowl and toss everything together once more.
What I love most about this salad is how the smoky char from the grill contrasts with the crisp romaine and creamy chickpeas—it’s a textural dream. The lemon-Dijon dressing cuts through the richness beautifully, making each bite feel both light and satisfying. Try serving it alongside grilled chicken or stuffing it into pita pockets for a quick lunch; it holds up surprisingly well if you want to make it ahead for picnics or weekday meals.
Cauliflower Steak with Chimichurri Sauce

Cooking has always been my therapy after a long day, and there’s something incredibly satisfying about transforming humble vegetables into something spectacular. Cauliflower steak with chimichurri sauce became my go-to dinner party showstopper after I accidentally served it to my vegetarian friend who still talks about it years later. It’s one of those dishes that looks fancy but is surprisingly simple to pull off, even on a busy weeknight.
2
portions15
minutes40
minutesIngredients
For the Cauliflower Steaks
– 1 large head cauliflower
– 3 tablespoons olive oil
– 1 teaspoon smoked paprika
– 1/2 teaspoon garlic powder
– 1/2 teaspoon salt
– 1/4 teaspoon black pepper
For the Chimichurri Sauce
– 1 cup fresh parsley leaves
– 1/4 cup fresh cilantro leaves
– 3 cloves garlic
– 2 tablespoons red wine vinegar
– 1/3 cup olive oil
– 1/2 teaspoon red pepper flakes
– 1/4 teaspoon salt
Instructions
1. Preheat your oven to 400°F and line a baking sheet with parchment paper.
2. Remove the outer leaves from the cauliflower head and trim the stem, keeping the core intact to hold the steaks together.
3. Slice the cauliflower vertically into 1-inch thick steaks, yielding 2-3 center cuts—reserve the florets that fall off for another use.
4. In a small bowl, whisk together 3 tablespoons olive oil, smoked paprika, garlic powder, salt, and black pepper.
5. Brush both sides of each cauliflower steak generously with the seasoned oil mixture using a pastry brush.
6. Arrange the cauliflower steaks in a single layer on the prepared baking sheet without overcrowding.
7. Roast for 25 minutes at 400°F until the edges are golden brown and caramelized.
8. Carefully flip each steak using a spatula and roast for another 15 minutes until tender when pierced with a fork.
9. While the cauliflower roasts, combine parsley, cilantro, garlic, red wine vinegar, 1/3 cup olive oil, red pepper flakes, and 1/4 teaspoon salt in a food processor.
10. Pulse the sauce ingredients 8-10 times until finely chopped but not pureed, scraping down the sides as needed.
11. Transfer the roasted cauliflower steaks to serving plates using a spatula.
12. Spoon the chimichurri sauce generously over the warm cauliflower steaks. Seriously, the contrast between the smoky, caramelized cauliflower and the bright, herbaceous chimichurri creates magic in every bite. I love serving these over creamy polenta or alongside roasted potatoes for a complete meal that always impresses my dinner guests.
Sweet Potato and Black Bean Enchiladas

There’s something magical about how sweet potatoes and black beans create the most satisfying vegetarian filling—I first discovered this combo when trying to use up leftover ingredients after Thanksgiving, and now it’s become my go-to comfort food. These enchiladas have that perfect balance of creamy, spicy, and hearty that even my meat-loving husband requests regularly.
8
enchiladas25
minutes33
minutesIngredients
For the filling:
– 2 large sweet potatoes (about 3 cups when mashed)
– 1 can (15 oz) black beans, rinsed and drained
– 1 cup frozen corn
– 1 tsp ground cumin
– 1/2 tsp chili powder
– 1/4 tsp salt
For assembly:
– 8 corn tortillas
– 2 cups red enchilada sauce
– 1 cup shredded Monterey Jack cheese
– 1/4 cup chopped fresh cilantro
Instructions
1. Preheat your oven to 375°F.
2. Pierce sweet potatoes several times with a fork and microwave for 8-10 minutes until completely soft when squeezed with tongs.
3. Scoop the sweet potato flesh into a large bowl and mash with a fork until smooth.
4. Stir in black beans, frozen corn, cumin, chili powder, and salt until well combined.
5. Warm corn tortillas in a dry skillet for 15 seconds per side to make them pliable—this prevents cracking when rolling.
6. Spread 1/2 cup enchilada sauce evenly across the bottom of a 9×13 inch baking dish.
7. Spoon about 1/3 cup of the sweet potato mixture onto each tortilla and roll tightly.
8. Place rolled enchiladas seam-side down in the baking dish, packing them snugly.
9. Pour remaining 1 1/2 cups enchilada sauce over the top, making sure all tortilla surfaces are covered to prevent drying out.
10. Sprinkle shredded cheese evenly over the enchiladas.
11. Bake at 375°F for 20-25 minutes until the cheese is bubbly and slightly golden around the edges.
12. Remove from oven and let rest for 5 minutes before serving—this allows the filling to set for cleaner slices.
13. Garnish with fresh cilantro just before serving.
You’ll love how the creamy sweet potato filling contrasts with the slightly chewy tortillas and tangy sauce. The edges get delightfully crispy while the centers stay wonderfully moist, and I sometimes serve these with a cool avocado crema to balance the spice—perfect for making ahead and reheating for busy weeknights.
Stuffed Bell Peppers with Quinoa and Spinach

Perfect for those busy weeknights when you want something healthy but satisfying, these stuffed bell peppers have become my go-to meal prep solution. I first discovered this recipe when my garden overflowed with bell peppers last summer, and now it’s a regular in our rotation because even my picky eater asks for seconds!
2
portions20
minutes51
minutesIngredients
- For the filling:
- 4 large bell peppers (any color)
- 1 cup quinoa
- 2 cups vegetable broth
- 2 tbsp olive oil
- 1 medium onion, diced
- 3 cloves garlic, minced
- 5 oz fresh spinach
- 1 cup shredded mozzarella cheese
- 1/2 tsp salt
- 1/4 tsp black pepper
- For topping:
- 1/4 cup grated Parmesan cheese
Instructions
- Preheat your oven to 375°F.
- Cut the tops off 4 large bell peppers and remove all seeds and membranes.
- Rinse 1 cup quinoa under cold water in a fine-mesh strainer for 1 minute to remove bitterness.
- Combine the rinsed quinoa with 2 cups vegetable broth in a medium saucepan.
- Bring the quinoa mixture to a boil over high heat.
- Reduce heat to low, cover the saucepan, and simmer for 15 minutes until all liquid is absorbed.
- Heat 2 tbsp olive oil in a large skillet over medium heat.
- Sauté 1 diced medium onion for 5 minutes until translucent.
- Add 3 minced garlic cloves and cook for 1 more minute until fragrant.
- Stir in 5 oz fresh spinach and cook for 3 minutes until completely wilted.
- Remove the skillet from heat and combine the spinach mixture with the cooked quinoa.
- Mix in 1 cup shredded mozzarella cheese, 1/2 tsp salt, and 1/4 tsp black pepper.
- Spoon the quinoa filling evenly into the hollowed bell peppers, packing it down gently.
- Sprinkle 1/4 cup grated Parmesan cheese over the top of each stuffed pepper.
- Place the stuffed peppers in a baking dish and bake at 375°F for 25 minutes until peppers are tender.
- Broil the peppers for 2-3 minutes until the cheese topping is golden brown and bubbly.
Nothing beats cutting into these peppers and seeing the colorful layers of quinoa and spinach inside. The peppers become wonderfully tender while the quinoa filling stays fluffy and moist. Try serving them over a bed of mixed greens for a complete meal, or slice them into rings for an impressive party appetizer that always disappears quickly!
Broccoli and Tofu Stir-Fry

Kind of like that one friend who always has your back, this broccoli and tofu stir-fry has become my go-to weeknight lifesaver. I first threw it together during a particularly chaotic Tuesday when my fridge was nearly empty, and now it’s a staple I make almost weekly—it’s that quick, forgiving, and delicious. Whether you’re a tofu newbie or a seasoned stir-fry pro, this recipe will have you feeling like a kitchen hero in no time.
2
servings20
minutes15
minutesIngredients
For the tofu:
– 1 block (14 oz) firm tofu, pressed and cubed
– 2 tbsp cornstarch
– 1/4 tsp salt
– 2 tbsp vegetable oil
For the sauce:
– 1/4 cup soy sauce
– 2 tbsp rice vinegar
– 1 tbsp maple syrup
– 1 tsp sesame oil
– 2 cloves garlic, minced
– 1 tsp grated fresh ginger
For the stir-fry:
– 1 large head broccoli, cut into florets
– 1 medium carrot, thinly sliced
– 1/2 medium red bell pepper, sliced
Instructions
1. Press the tofu block between paper towels with a heavy pan on top for 15 minutes to remove excess water.
2. Cut the pressed tofu into 1-inch cubes.
3. In a medium bowl, toss tofu cubes with 2 tbsp cornstarch and 1/4 tsp salt until evenly coated.
4. Heat 2 tbsp vegetable oil in a large skillet over medium-high heat until shimmering.
5. Add coated tofu cubes in a single layer and cook for 4-5 minutes per side until golden brown and crispy.
6. Remove tofu from skillet and set aside on a plate lined with paper towels.
7. In a small bowl, whisk together 1/4 cup soy sauce, 2 tbsp rice vinegar, 1 tbsp maple syrup, 1 tsp sesame oil, 2 cloves minced garlic, and 1 tsp grated ginger.
8. Add broccoli florets to the hot skillet and cook for 3 minutes, stirring occasionally.
9. Add sliced carrot and red bell pepper to the skillet and cook for another 2 minutes until vegetables are bright but still crisp.
10. Pour the prepared sauce over the vegetables and bring to a simmer.
11. Return the cooked tofu to the skillet and toss everything together until well coated and heated through, about 1 minute.
12. Remove from heat and serve immediately.
Vibrant and satisfying, this stir-fry delivers a perfect contrast between the crispy tofu edges and tender-crisp vegetables that still have a nice bite. The sauce clings beautifully to every component, creating that irresistible glossy finish that makes takeout jealous. I love serving it over jasmine rice, but it’s also fantastic stuffed into warm tortillas for a fun fusion twist.
Eggplant Parmesan with Marinara Sauce
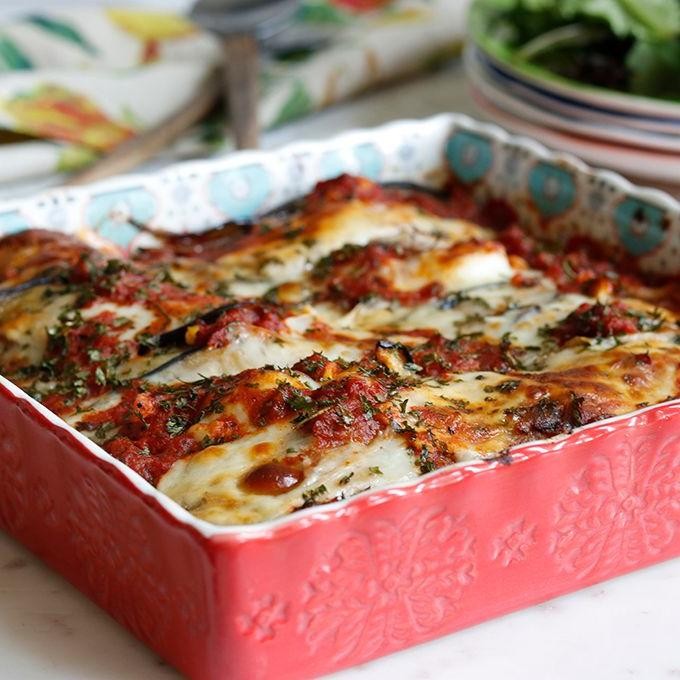
Baking this classic Italian-American dish always reminds me of Sunday dinners at my grandmother’s house, where the aroma of tomatoes and herbs would fill her tiny kitchen for hours. I’ve adapted her recipe over the years to get that perfect crispy crust without the eggplant turning soggy, which was my biggest challenge when I first started cooking. Trust me, the extra step of salting the eggplant makes all the difference between a good eggplant parmesan and a truly spectacular one.
6
servings45
minutes40
minutesIngredients
For the eggplant:
– 2 large eggplants, sliced into 1/2-inch rounds
– 1 tablespoon kosher salt
– 3 large eggs
– 2 cups Italian-style breadcrumbs
– 1 cup all-purpose flour
– 1/2 cup vegetable oil for frying
For assembly:
– 4 cups marinara sauce
– 2 cups shredded mozzarella cheese
– 1 cup grated Parmesan cheese
– 1/2 cup fresh basil leaves
Instructions
1. Arrange eggplant slices in a single layer on baking sheets and sprinkle both sides with kosher salt.
2. Let the salted eggplant rest for 30 minutes to draw out excess moisture.
3. Pat each eggplant slice completely dry with paper towels.
4. Preheat your oven to 375°F.
5. Set up three shallow bowls: one with flour, one with beaten eggs, and one with breadcrumbs.
6. Dredge each eggplant slice first in flour, shaking off excess.
7. Dip the floured slice into the beaten eggs, coating completely.
8. Press the egg-coated slice into breadcrumbs until fully covered.
9. Heat vegetable oil in a large skillet over medium-high heat until it shimmers.
10. Fry breaded eggplant slices in batches for 3-4 minutes per side until golden brown.
11. Drain fried eggplant on a wire rack set over a baking sheet.
12. Spread 1 cup of marinara sauce evenly in the bottom of a 9×13-inch baking dish.
13. Arrange half of the fried eggplant slices in a single layer over the sauce.
14. Sprinkle 1 cup of mozzarella and 1/2 cup of Parmesan over the eggplant layer.
15. Top with another cup of marinara sauce and scatter half of the basil leaves.
16. Repeat layers with remaining eggplant, cheeses, sauce, and basil.
17. Bake uncovered at 375°F for 25-30 minutes until cheese is bubbly and lightly browned.
18. Let the baked dish rest for 10 minutes before serving.
Unbelievably crispy eggplant layers hold their structure beautifully against the rich marinara, while the three-cheese blend creates those irresistible golden bubbles on top. I love serving generous squares over a bed of spaghetti for the classic presentation, though it’s equally fantastic stuffed into crusty bread for an epic sandwich the next day. The contrast between the crunchy exterior and tender interior makes every bite worth the careful preparation.
Mushroom and Asparagus Risotto

Last week, I found myself with a beautiful bunch of asparagus and some gorgeous cremini mushrooms from the farmers market, and I knew exactly what I wanted to make—this creamy, comforting risotto that always feels like a warm hug. It’s become my go-to dish when I want something fancy-feeling but actually quite simple to pull together on a busy weeknight.
3
servings15
minutes40
minutesIngredients
For the vegetable base:
– 1 tablespoon olive oil
– 1 tablespoon unsalted butter
– 1 small yellow onion, finely chopped
– 8 ounces cremini mushrooms, sliced
– 1 pound asparagus, trimmed and cut into 1-inch pieces
For the risotto:
– 1 ½ cups Arborio rice
– ½ cup dry white wine
– 6 cups chicken broth, kept warm
– ½ cup grated Parmesan cheese
– 2 tablespoons fresh parsley, chopped
Instructions
- Heat olive oil and butter in a large, heavy-bottomed pot over medium heat until butter melts completely.
- Add chopped onion and cook for 4-5 minutes until translucent and fragrant.
- Add sliced mushrooms and cook for 6-7 minutes until they release their liquid and turn golden brown.
- Add asparagus pieces and cook for 3-4 minutes until bright green and slightly tender.
- Add Arborio rice and stir constantly for 2 minutes until grains are lightly toasted and coated with oil.
- Pour in white wine and cook while stirring until liquid is completely absorbed, about 2 minutes.
- Add 1 cup of warm chicken broth and stir continuously until broth is nearly absorbed.
- Continue adding broth ½ cup at a time, stirring constantly and waiting until each addition is absorbed before adding the next.
- Cook for 18-20 minutes total until rice is creamy but still slightly firm to the bite.
- Remove from heat and stir in Parmesan cheese until melted and fully incorporated.
- Fold in chopped parsley just before serving.
Creamy with just the right amount of bite, this risotto has become my favorite way to celebrate spring vegetables. The earthy mushrooms and bright asparagus create such a wonderful balance of flavors that I often find myself going back for seconds. Sometimes I’ll top it with extra Parmesan and a drizzle of truffle oil for an extra special touch when we have company.
Kale and Brussels Sprouts Caesar Salad
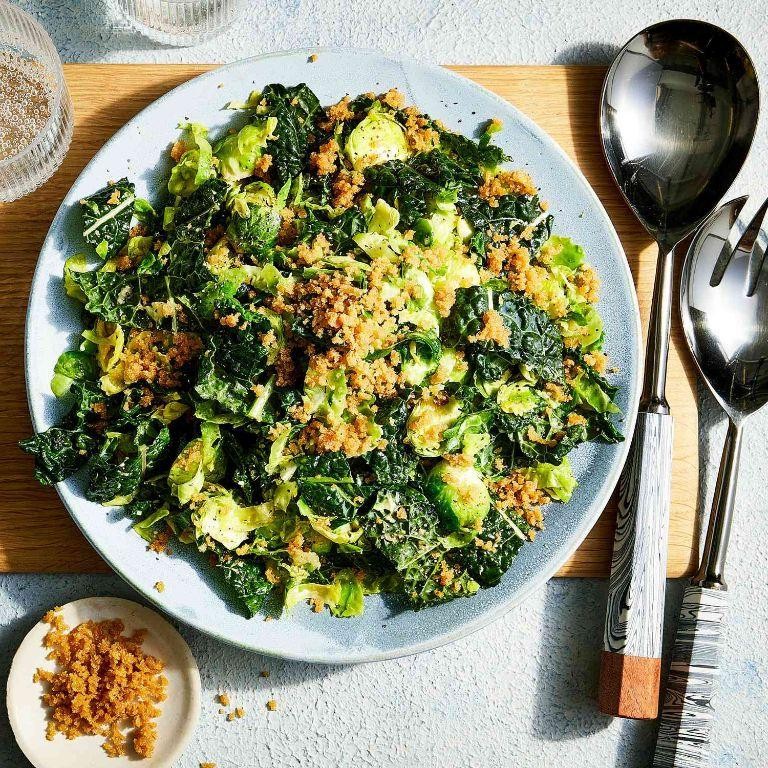
Until recently, I never thought I’d be the person craving a salad for dinner, but this kale and Brussels sprouts Caesar has completely changed my perspective. I first made it for a potluck last fall when I wanted something that could hold up for hours without getting soggy, and now it’s become my go-to for everything from weeknight dinners to holiday gatherings.
4
servings25
minutes15
minutesIngredients
For the salad base:
– 1 bunch kale, stems removed and leaves thinly sliced (about 6 cups)
– 1 pound Brussels sprouts, trimmed and thinly sliced
– 1/2 cup grated Parmesan cheese
For the dressing:
– 1/2 cup mayonnaise
– 2 tablespoons fresh lemon juice
– 2 anchovy fillets, minced
– 1 garlic clove, minced
– 1 teaspoon Dijon mustard
– 1/4 cup grated Parmesan cheese
– 1/4 teaspoon black pepper
For the croutons:
– 2 cups cubed bread (1-inch pieces)
– 2 tablespoons olive oil
– 1/4 teaspoon garlic powder
Instructions
1. Preheat your oven to 375°F.
2. Place bread cubes on a baking sheet and drizzle with 2 tablespoons olive oil.
3. Sprinkle 1/4 teaspoon garlic powder evenly over the bread cubes.
4. Bake for 12-15 minutes until golden brown and crisp, tossing halfway through.
5. Remove kale leaves from their stems and thinly slice them into ribbons.
6. Trim the ends off 1 pound Brussels sprouts and slice them thinly using a sharp knife or mandoline.
7. Combine 6 cups sliced kale and sliced Brussels sprouts in a large bowl.
8. Massage the kale and Brussels sprouts with your hands for 2-3 minutes until they become slightly wilted and darker in color. (Tip: Massaging helps break down the tough fibers, making the greens more tender.)
9. In a separate bowl, combine 1/2 cup mayonnaise, 2 tablespoons fresh lemon juice, 2 minced anchovy fillets, 1 minced garlic clove, and 1 teaspoon Dijon mustard.
10. Whisk the dressing ingredients together until completely smooth and emulsified.
11. Add 1/4 cup grated Parmesan cheese and 1/4 teaspoon black pepper to the dressing and whisk to combine.
12. Pour the dressing over the massaged greens in the large bowl.
13. Toss everything together until the greens are evenly coated with dressing. (Tip: Let the dressed salad sit for 10 minutes before serving to allow the flavors to meld.)
14. Add the baked croutons and remaining 1/2 cup grated Parmesan cheese to the salad.
15. Toss gently one final time to distribute the croutons and cheese evenly. (Tip: Reserve a few croutons and some cheese to sprinkle on top for better presentation.)
This salad delivers the most satisfying crunch from both the sturdy greens and those garlicky croutons, while the bold Caesar dressing clings perfectly to every nook and cranny. The combination of kale’s earthy notes with the slightly bitter Brussels sprouts creates a complex flavor profile that stands up beautifully to the rich, umami-packed dressing. Try serving it topped with grilled chicken or shrimp for a complete meal, or pack it for lunch—it actually gets better as it sits!
Spaghetti Squash with Tomato Basil Sauce
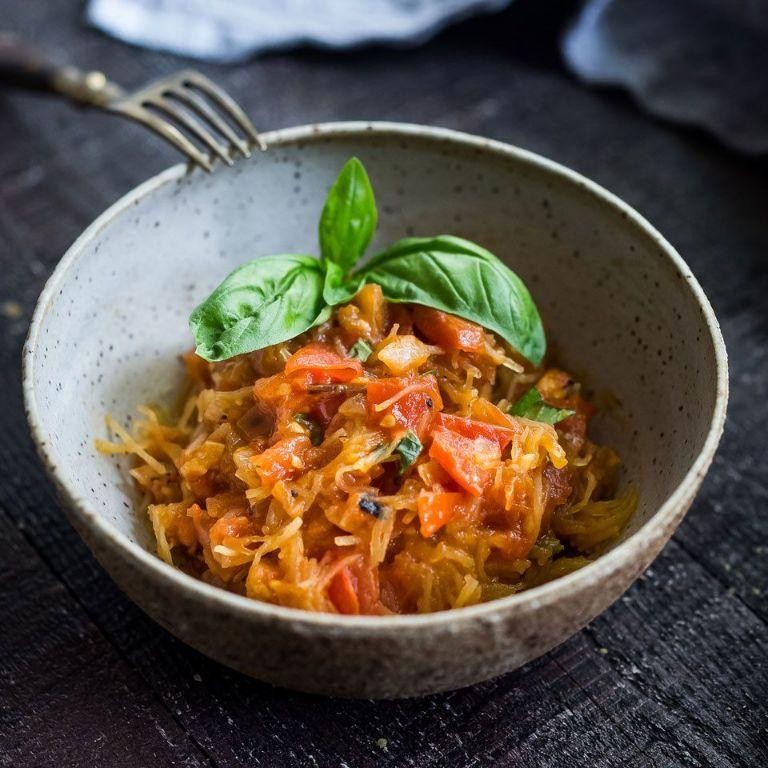
You know, I used to be intimidated by spaghetti squash until my neighbor brought me one from her garden last fall. Now it’s my go-to healthy comfort food that even my picky kids will devour.
4
servings15
minutes60
minutesIngredients
For the squash:
– 1 large spaghetti squash (about 3 pounds)
– 2 tablespoons olive oil
– 1 teaspoon salt
For the sauce:
– 2 tablespoons olive oil
– 3 garlic cloves, minced
– 1 (28-ounce) can crushed tomatoes
– 1/4 cup fresh basil leaves, chopped
– 1 teaspoon salt
– 1/2 teaspoon black pepper
– 1/4 teaspoon red pepper flakes
Instructions
1. Preheat your oven to 400°F.
2. Carefully cut the spaghetti squash in half lengthwise using a sharp chef’s knife.
3. Scoop out all the seeds and stringy pulp from each squash half with a spoon.
4. Brush the cut sides of the squash with 2 tablespoons of olive oil.
5. Sprinkle 1 teaspoon of salt evenly over the oiled squash halves.
6. Place the squash halves cut-side down on a baking sheet lined with parchment paper.
7. Roast the squash in the preheated oven for 35-40 minutes until the flesh is tender when pierced with a fork.
8. While the squash roasts, heat 2 tablespoons of olive oil in a large saucepan over medium heat.
9. Add the minced garlic and cook for 1 minute until fragrant but not browned.
10. Pour in the crushed tomatoes and stir to combine with the garlic.
11. Add 1 teaspoon of salt, 1/2 teaspoon black pepper, and 1/4 teaspoon red pepper flakes to the sauce.
12. Simmer the sauce uncovered for 20 minutes, stirring occasionally.
13. Remove the roasted squash from the oven and let it cool for 5 minutes.
14. Use a fork to scrape the squash flesh into spaghetti-like strands into a large bowl.
15. Stir the chopped fresh basil into the finished tomato sauce.
16. Pour the warm tomato basil sauce over the spaghetti squash strands and toss gently to combine.
Using a fork to scrape the squash creates those perfect noodle-like strands that hold the sauce beautifully. Unexpectedly, this dish has become our family’s favorite meatless Monday meal – the sweet squash strands balance the bright tomato sauce in a way that feels both comforting and fresh. I love serving it with extra basil sprinkled on top and a sprinkle of nutritional yeast for a cheesy flavor without the dairy.
Roasted Carrot and Lentil Soup

During those chilly autumn evenings when I’m craving something comforting yet healthy, this roasted carrot and lentil soup has become my absolute go-to. There’s something magical about how roasting transforms humble carrots into sweet, caramelized perfection that makes this soup feel both nourishing and indulgent. I actually started making this recipe after my friend Sarah brought over a similar version when I was sick last winter, and now it’s become my favorite way to use up those extra carrots sitting in the fridge.
6
servings15
minutes60
minutesIngredients
For roasting the vegetables
– 1.5 lbs carrots, peeled and chopped into 1-inch pieces
– 2 tbsp olive oil
– 1 tsp salt
– 1/2 tsp black pepper
For the soup base
– 1 medium yellow onion, diced
– 3 cloves garlic, minced
– 1 cup brown lentils, rinsed
– 6 cups vegetable broth
– 1 tsp ground cumin
– 1/2 tsp smoked paprika
Instructions
1. Preheat your oven to 425°F and line a baking sheet with parchment paper.
2. Toss the chopped carrots with 2 tablespoons of olive oil, 1 teaspoon of salt, and 1/2 teaspoon of black pepper until evenly coated.
3. Spread the carrots in a single layer on the prepared baking sheet and roast for 25-30 minutes until tender and lightly browned around the edges.
4. While carrots roast, heat 1 tablespoon of olive oil in a large pot over medium heat and sauté the diced onion for 5-7 minutes until translucent.
5. Add the minced garlic and cook for 1 minute until fragrant, being careful not to burn it.
6. Stir in 1 cup of rinsed brown lentils, 1 teaspoon of ground cumin, and 1/2 teaspoon of smoked paprika, toasting the spices for 30 seconds.
7. Pour in 6 cups of vegetable broth and bring the mixture to a boil.
8. Reduce heat to a simmer, cover the pot, and cook for 25 minutes until lentils are tender but not mushy.
9. Add the roasted carrots to the pot and use an immersion blender to puree the soup until smooth, leaving some texture if preferred.
10. Simmer the blended soup for 5 more minutes to allow flavors to meld together.
Creating this velvety soup always reminds me why I love simple, whole ingredients. The roasted carrots lend a natural sweetness that balances perfectly with the earthy lentils and warm spices, while the texture stays wonderfully creamy without any dairy. Sometimes I like to swirl in a dollop of Greek yogurt or top with toasted pumpkin seeds for extra crunch, making each bowl feel like a cozy hug in the best possible way.
Butternut Squash and Sage Risotto

Biting into a creamy, comforting bowl of risotto always feels like a warm hug, especially when autumn rolls around and butternut squash is at its peak. I first fell in love with this dish during a cozy dinner party where the host added fresh sage, and the aromatic, earthy fragrance completely won me over. Now, it’s my go-to for impressing guests or just treating myself on a chilly evening.
3
servings15
minutes55
minutesIngredients
– For the squash: 1 small butternut squash (peeled, seeded, and cubed into 1/2-inch pieces), 1 tbsp olive oil, 1/4 tsp salt
– For the risotto base: 1 cup Arborio rice, 4 cups vegetable broth (kept warm on the stove), 1/2 cup dry white wine
– For flavoring: 1 medium yellow onion (finely chopped), 2 cloves garlic (minced), 2 tbsp unsalted butter, 1/4 cup grated Parmesan cheese, 1/4 cup fresh sage leaves (chopped), 1/4 tsp black pepper
Instructions
1. Preheat your oven to 400°F and line a baking sheet with parchment paper.
2. Toss the cubed butternut squash with 1 tbsp olive oil and 1/4 tsp salt on the baking sheet.
3. Roast the squash for 25 minutes until tender and lightly browned at the edges.
4. Heat the vegetable broth in a saucepan over medium-low heat to keep it warm throughout cooking.
5. Melt 1 tbsp butter in a large, heavy-bottomed pot over medium heat.
6. Add the finely chopped onion and cook for 5 minutes until translucent.
7. Stir in the minced garlic and cook for 1 minute until fragrant.
8. Tip: Toasting the rice before adding liquid enhances its nutty flavor and helps it absorb broth evenly.
9. Add the Arborio rice to the pot and stir constantly for 2 minutes until the grains are lightly toasted.
10. Pour in the dry white wine and cook while stirring until the wine is fully absorbed.
11. Add 1 ladle of warm vegetable broth to the rice and stir continuously until the liquid is absorbed.
12. Repeat adding broth one ladle at a time, stirring after each addition until absorbed, for about 20-25 minutes.
13. Tip: Stirring frequently releases the rice’s starch, creating that signature creamy texture without needing cream.
14. Fold in the roasted butternut squash, chopped sage, remaining 1 tbsp butter, grated Parmesan, and 1/4 tsp black pepper.
15. Cook for 2 more minutes, stirring gently to combine all ingredients.
16. Tip: Let the risotto rest off the heat for 2 minutes before serving to allow flavors to meld and the texture to perfect creaminess.
17. Remove the pot from the heat and let it stand for 2 minutes. Every spoonful of this risotto is velvety and rich, with the sweet squash balancing the savory Parmesan and fragrant sage. I love serving it in shallow bowls topped with extra sage leaves fried crisp in butter for a crunchy contrast, or alongside a simple arugula salad to brighten up the plate.
Spinach and Artichoke Stuffed Portobello Mushrooms
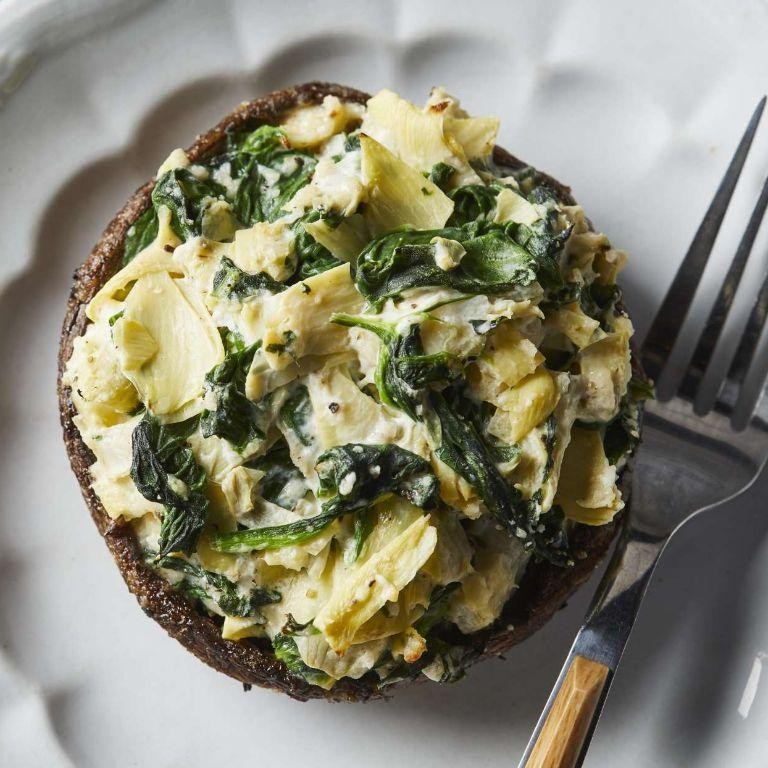
Oh my goodness, you guys—I’ve been dreaming about this recipe ever since I found those giant portobello mushrooms at the farmers’ market last weekend. There’s something so satisfying about stuffing mushrooms until they’re practically bursting, and this spinach and artichoke version is my new favorite weeknight dinner. I love how it feels fancy but comes together with ingredients I usually have on hand.
4
portions15
minutes35
minutesIngredients
For the mushrooms:
– 4 large portobello mushroom caps
– 1 tablespoon olive oil
– 1/4 teaspoon salt
– 1/4 teaspoon black pepper
For the filling:
– 1 (10 oz) package frozen chopped spinach, thawed and squeezed dry
– 1 (14 oz) can artichoke hearts, drained and chopped
– 1 cup shredded mozzarella cheese
– 1/2 cup grated Parmesan cheese
– 1/2 cup cream cheese, softened
– 1/4 cup mayonnaise
– 1 garlic clove, minced
– 1/4 teaspoon red pepper flakes
Instructions
1. Preheat your oven to 375°F.
2. Use a spoon to scrape out the gills from each portobello mushroom cap. (Tip: Removing the gills prevents the mushrooms from getting watery during baking.)
3. Brush both sides of the mushroom caps with 1 tablespoon olive oil.
4. Season the insides of the mushroom caps with 1/4 teaspoon salt and 1/4 teaspoon black pepper.
5. Place the mushroom caps gill-side up on a baking sheet lined with parchment paper.
6. Bake the mushroom caps for 10 minutes at 375°F to partially cook them.
7. While the mushrooms bake, combine 1 package thawed and squeezed spinach, 1 can chopped artichoke hearts, 1 cup mozzarella, 1/2 cup Parmesan, 1/2 cup cream cheese, 1/4 cup mayonnaise, 1 minced garlic clove, and 1/4 teaspoon red pepper flakes in a medium bowl.
8. Mix the filling ingredients until fully combined. (Tip: Letting the cream cheese sit at room temperature for 15 minutes beforehand makes mixing much easier.)
9. Remove the partially baked mushroom caps from the oven.
10. Divide the spinach-artichoke filling evenly among the 4 mushroom caps, pressing it gently into each cap.
11. Return the stuffed mushrooms to the oven and bake for 20 minutes at 375°F. (Tip: The filling should be bubbly and lightly golden on top when done.)
12. Switch your oven to broil and broil the mushrooms for 2–3 minutes until the tops are golden brown.
13. Carefully remove the baking sheet from the oven.
Zesty, creamy, and packed with savory flavor, these stuffed mushrooms have a wonderful contrast between the meaty portobello and the rich, cheesy filling. I love serving them alongside a simple arugula salad for a complete meal, or you could slice them and arrange them over toasted baguette slices for an impressive appetizer.
Conclusion
Great news—you’ve got 20 tasty, healthy veggie recipes at your fingertips! Whether you’re a seasoned cook or just starting out, these dishes make nutritious eating easy and delicious. Pick a recipe, give it a try, and let us know your favorite in the comments. Loved this roundup? Share it on Pinterest to inspire fellow food lovers!


