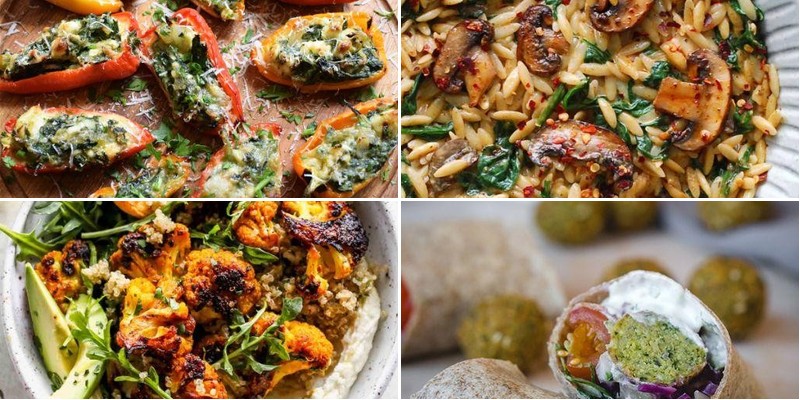
Tonight, let’s transport your dinner table straight to the sun-drenched coasts of the Mediterranean. Imagine flavorful, vibrant meals that are as nourishing as they are delicious, all ready in a flash for your busy weeknights. If you’re craving wholesome dinners that burst with fresh ingredients and simple elegance, you’ve come to the right place. Get ready to discover 19 healthy recipes that will become your new favorites.
Grilled Lemon Herb Mediterranean Chicken Salad
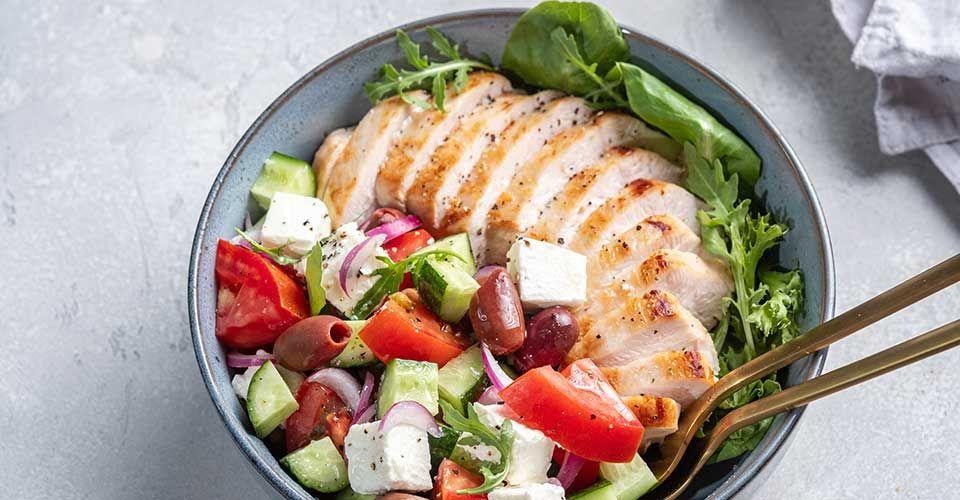
You’ll love how this Grilled Lemon Herb Mediterranean Chicken Salad brings bright, fresh flavors to your table with minimal fuss. Let’s walk through each step together, so you can confidently build this vibrant dish from scratch. By the end, you’ll have a satisfying, restaurant-worthy salad that’s perfect for lunch or a light dinner.
2
servings20
minutes14
minutesIngredients
– 1 lb boneless, skinless chicken breasts (I always pat them dry first for better browning)
– 3 tbsp extra virgin olive oil (my go-to for its fruity notes)
– 2 tbsp freshly squeezed lemon juice (bottled just doesn’t compare)
– 1 tsp dried oregano (crush it between your fingers to wake up the aroma)
– 2 cloves garlic, minced (fresh is key here—no jarred stuff)
– 1/2 tsp kosher salt (I prefer it for its clean flavor)
– 1/4 tsp black pepper, freshly ground
– 6 cups chopped romaine lettuce (crisp and sturdy for holding up to dressing)
– 1 cup cherry tomatoes, halved (they burst with sweetness when ripe)
– 1/2 cup sliced cucumber (I leave the skin on for extra crunch)
– 1/4 cup red onion, thinly sliced (soak in ice water for 5 minutes if you want to tame the bite)
– 1/4 cup crumbled feta cheese (the salty tang balances everything)
– 2 tbsp chopped fresh parsley (it adds a pop of color and freshness)
Instructions
1. Preheat your grill to medium-high heat, about 400°F, and lightly oil the grates to prevent sticking.
2. In a small bowl, whisk together 2 tablespoons olive oil, lemon juice, oregano, garlic, salt, and pepper to create the marinade.
3. Place the chicken breasts in a shallow dish and pour half of the marinade over them, turning to coat evenly.
4. Let the chicken marinate at room temperature for 15 minutes—this short rest allows the flavors to penetrate without making the texture mushy.
5. Grill the chicken for 6–7 minutes per side, or until the internal temperature reaches 165°F and the exterior has clear grill marks.
6. Transfer the chicken to a cutting board and let it rest for 5 minutes; this keeps the juices locked in.
7. While the chicken rests, assemble the salad base by combining romaine, cherry tomatoes, cucumber, and red onion in a large bowl.
8. Slice the rested chicken against the grain into 1/2-inch strips for tender bites.
9. Arrange the sliced chicken over the salad, then drizzle with the remaining marinade as dressing.
10. Top with crumbled feta and fresh parsley, tossing gently just before serving to keep the greens crisp.
Each bite delivers a satisfying crunch from the fresh veggies, balanced by the juicy, herb-kissed chicken and tangy feta. Try serving it stuffed into pita pockets or alongside grilled pita wedges for a heartier meal—it’s versatile enough to shine anywhere.
Mediterranean Quinoa Salad with Chickpeas
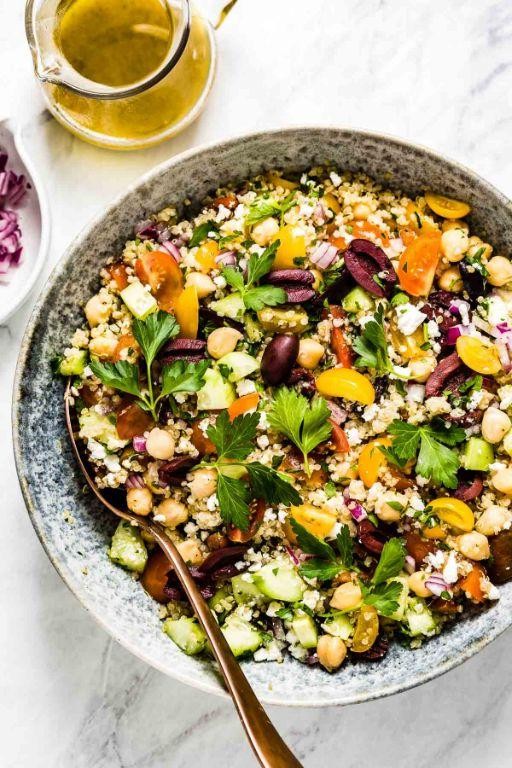
Every home cook needs a reliable, nutritious salad that comes together quickly yet feels special enough for company. Mediterranean Quinoa Salad with Chickpeas is that perfect balance—packed with protein, vibrant colors, and fresh flavors that improve as they mingle. Let’s walk through building this satisfying dish step by step, ensuring perfect results even if you’re new to grain salads.
3
servings15
minutes25
minutesIngredients
- 1 cup quinoa, rinsed well (this removes the natural bitter coating called saponin)
- 2 cups water (I find filtered water makes the quinoa taste cleaner)
- 1 (15 oz) can chickpeas, rinsed and drained thoroughly (pat them dry with a towel for better texture)
- 1 cup cherry tomatoes, halved (I like the sweet burst they provide)
- 1/2 English cucumber, diced (the seeds are less watery, which keeps the salad crisp)
- 1/4 cup red onion, finely diced (soak in ice water for 5 minutes if you want to tame the sharpness)
- 1/4 cup Kalamata olives, pitted and sliced (their briny saltiness is essential)
- 1/4 cup fresh parsley, chopped (flat-leaf holds up better than curly)
- 3 tablespoons extra virgin olive oil (my go-to for its fruity notes)
- 2 tablespoons fresh lemon juice (bottled just doesn’t compare)
- 1 teaspoon dried oregano
- 1/2 teaspoon salt
- 1/4 teaspoon black pepper
Instructions
- Combine the rinsed quinoa and 2 cups water in a medium saucepan.
- Bring the mixture to a boil over high heat, then immediately reduce the heat to low and cover the pan tightly.
- Simmer the quinoa for exactly 15 minutes—you’ll know it’s done when the grains are translucent and the little white tails have emerged.
- Remove the pan from the heat and let the quinoa stand, still covered, for 10 minutes to steam and absorb any residual moisture.
- Fluff the quinoa with a fork and spread it on a baking sheet to cool completely to room temperature, which prevents the vegetables from wilting when mixed in.
- In a large mixing bowl, combine the cooled quinoa, rinsed chickpeas, halved cherry tomatoes, diced cucumber, diced red onion, sliced Kalamata olives, and chopped parsley.
- In a small bowl or jar, whisk together the extra virgin olive oil, fresh lemon juice, dried oregano, salt, and black pepper until well combined.
- Pour the dressing over the quinoa and vegetable mixture.
- Toss everything gently but thoroughly until all ingredients are evenly coated with the dressing.
Crisp cucumbers and juicy tomatoes provide a refreshing crunch against the fluffy quinoa and creamy chickpeas, while the lemony oregano dressing ties all the Mediterranean flavors together beautifully. Serve it scooped into lettuce cups for a light lunch, or alongside grilled chicken or fish for a more substantial meal—it also travels wonderfully for picnics or potlucks.
Baked Cod with Olives and Sundried Tomatoes
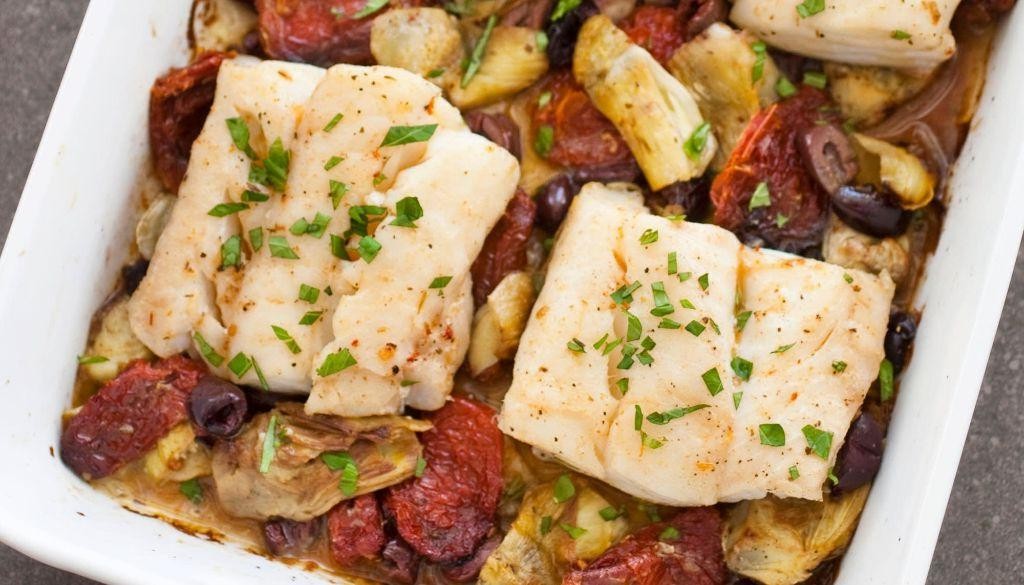
Unlocking the secrets to perfectly flaky fish doesn’t require chef-level skills—this baked cod with olives and sun-dried tomatoes delivers restaurant-quality results with straightforward steps anyone can follow. Using just a handful of vibrant ingredients, we’ll transform simple cod fillets into a Mediterranean-inspired masterpiece that’s both impressive and approachable for weeknight dinners. Let me walk you through each precise movement to ensure your fish turns out moist, flavorful, and beautifully presented every single time.
2
servings15
minutes15
minutesIngredients
– 1.5 lbs fresh cod fillets (I always look for thick, even pieces for consistent cooking)
– 3 tbsp extra virgin olive oil (my go-to for its fruity notes that complement the fish)
– 1/2 cup pitted Kalamata olives (their briny punch is essential—don’t substitute with canned black olives)
– 1/4 cup chopped sun-dried tomatoes packed in oil (I reserve the oil from the jar for brushing the baking dish)
– 3 cloves garlic, minced (freshly minced releases the most aromatic oils)
– 1 tsp dried oregano (crush it between your palms first to awaken the flavors)
– 1/2 tsp sea salt (I prefer coarse for better texture distribution)
– 1/4 tsp black pepper (freshly cracked makes all the difference)
– 1 lemon (room temperature slices more cleanly for beautiful presentation)
Instructions
1. Preheat your oven to 400°F and lightly brush a 9×13 inch baking dish with 1 tablespoon of olive oil.
2. Pat the cod fillets completely dry with paper towels—this crucial step ensures proper browning rather than steaming.
3. Arrange the dried cod fillets in a single layer in the prepared baking dish.
4. Drizzle the remaining 2 tablespoons of olive oil evenly over all cod surfaces.
5. Sprinkle the minced garlic, dried oregano, sea salt, and black pepper directly onto the fish.
6. Distribute the Kalamata olives and chopped sun-dried tomatoes evenly around and over the fillets.
7. Cut the lemon into 1/4-inch thick slices and arrange them over the fish and vegetables.
8. Bake at 400°F for precisely 12-15 minutes until the fish flakes easily with a fork but still appears moist.
9. Remove the baking dish from the oven and let it rest for 3 minutes before serving—this allows the juices to redistribute throughout the fish.
A final squeeze of fresh lemon juice over the rested cod brightens all the Mediterranean flavors beautifully. The firm yet tender flakes of fish contrast wonderfully with the chewy sun-dried tomatoes and briny olives, creating a symphony of textures in every bite. For a complete meal, serve this over creamy polenta or alongside roasted asparagus to soak up the delicious pan juices.
Turmeric-Spiced Cauliflower Rice Bowl
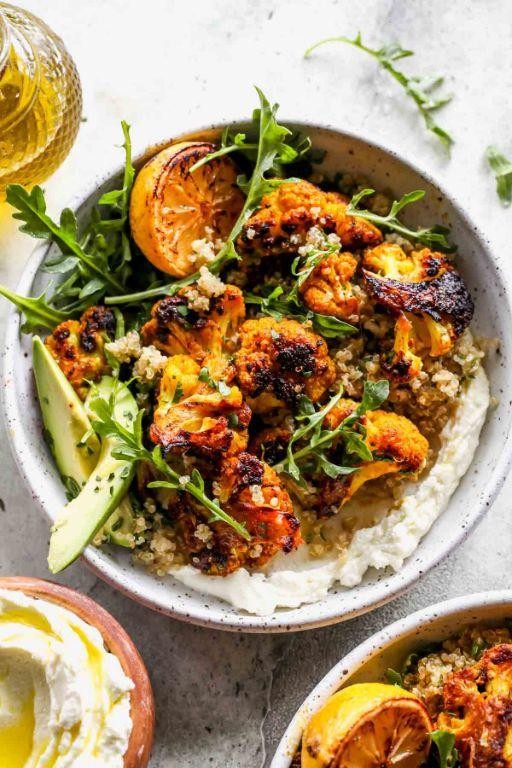
Every home cook needs a reliable, flavorful grain-free bowl in their repertoire, and this turmeric-spiced cauliflower rice version delivers both nutrition and vibrant taste in under 30 minutes. Essentially, we’ll transform fresh cauliflower into rice-like grains, then sauté them with aromatic spices and colorful vegetables for a satisfying one-bowl meal. Expect a methodical approach that builds layers of flavor while keeping the process accessible for beginners.
5
servings15
minutes15
minutesIngredients
– 1 large head cauliflower, cut into florets (about 4 cups when riced—I find the texture holds better than frozen)
– 2 tablespoons extra virgin olive oil (my go-to for its fruity notes that complement the spices)
– 1 medium yellow onion, finely diced (this sweet variety balances the turmeric’s earthiness)
– 2 cloves garlic, minced (freshly minced releases the most aroma)
– 1 teaspoon ground turmeric (I prefer organic for its brighter color and potency)
– 1/2 teaspoon ground cumin (toasted whole seeds I grind myself for deeper flavor)
– 1/4 teaspoon black pepper (freshly cracked helps activate turmeric’s benefits)
– 1 cup frozen peas, thawed (these sweet pops contrast nicely with the spices)
– 1/4 cup chopped fresh parsley (flat-leaf holds up better than curly when heated)
– 1 tablespoon fresh lemon juice (squeezed right before using to preserve brightness)
– 1/2 teaspoon fine sea salt (I find it distributes more evenly than kosher here)
Instructions
1. Place cauliflower florets in a food processor and pulse 10-12 times until pieces resemble rice grains, scraping down sides once halfway through.
2. Heat olive oil in a large skillet over medium heat until it shimmers, about 1 minute.
3. Add diced onion and cook for 4-5 minutes until translucent and slightly golden at the edges.
4. Stir in minced garlic and cook for 30 seconds until fragrant but not browned.
5. Sprinkle turmeric, cumin, black pepper, and salt over the onion mixture, stirring constantly for 30 seconds to toast the spices.
6. Add riced cauliflower to the skillet and toss to coat evenly with spiced oil mixture.
7. Cook cauliflower rice undisturbed for 3 minutes to develop light browning on the bottom.
8. Stir cauliflower rice and continue cooking for 4-5 minutes until tender but still slightly firm to the bite.
9. Mix in thawed peas and cook for 1 minute just to warm through.
10. Remove skillet from heat and stir in chopped parsley and fresh lemon juice.
Serve this immediately while warm for the best texture—the cauliflower rice should be tender yet separate, not mushy. Spicy turmeric and earthy cumin create a warm base that’s brightened by the lemon and fresh parsley. Try topping it with a fried egg for extra protein or folding in chickpeas to make it heartier.
Zucchini Noodle Greek Salad
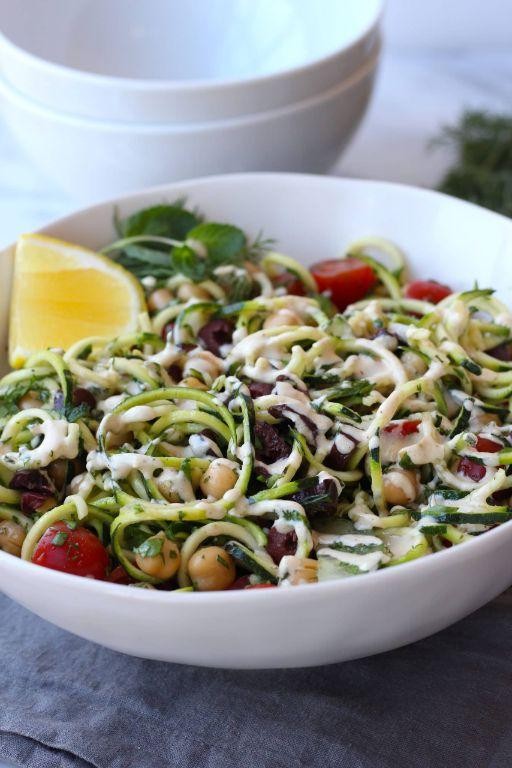
Now that summer zucchini is at its peak, I find myself spiralizing it into fresh “noodles” for this vibrant Greek-inspired salad. This light yet satisfying dish comes together in minutes and makes the most of seasonal produce. Let me walk you through creating this refreshing meal step by step.
2
servings15
minutesIngredients
– 2 medium zucchinis, spiralized into noodles (I look for firm, glossy-skinned ones)
– 1 cup cherry tomatoes, halved (the sweeter, the better!)
– 1/2 English cucumber, diced (I love its thin skin and minimal seeds)
– 1/4 red onion, thinly sliced (soaking in ice water tames the bite)
– 1/4 cup Kalamata olives, pitted and halved (their briny flavor is essential)
– 2 oz feta cheese, crumbled (I prefer block feta over pre-crumbled for better texture)
– 2 tbsp extra virgin olive oil (my go-to for dressings)
– 1 tbsp red wine vinegar
– 1 tsp dried oregano
– 1/4 tsp salt
– 1/8 tsp black pepper
Instructions
1. Spiralize 2 medium zucchinis using the medium noodle blade and place them in a large bowl.
2. Halve 1 cup of cherry tomatoes and add them to the zucchini noodles.
3. Dice 1/2 English cucumber into 1/2-inch pieces and add to the bowl.
4. Thinly slice 1/4 red onion and add it to the vegetable mixture.
5. Pit and halve 1/4 cup Kalamata olives, then add them to the bowl.
6. Crumble 2 oz of feta cheese over the vegetables.
7. In a small bowl, whisk together 2 tbsp extra virgin olive oil and 1 tbsp red wine vinegar for 30 seconds until emulsified.
8. Add 1 tsp dried oregano, 1/4 tsp salt, and 1/8 tsp black pepper to the dressing and whisk for 15 seconds more.
9. Pour the dressing over the salad ingredients.
10. Toss everything gently with salad tongs for 1 minute until evenly coated.
11. Let the salad rest at room temperature for 10 minutes to allow flavors to meld.
This salad delivers a wonderful contrast between the crisp zucchini noodles and creamy feta, with the tangy dressing bringing all the Mediterranean flavors together. Try serving it alongside grilled chicken or stuffing it into pita pockets for a portable lunch—the zucchini noodles hold up surprisingly well without getting soggy.
Sweet Potato and Spinach Frittata

Crafting a satisfying breakfast doesn’t have to be complicated, especially when you combine nutrient-rich sweet potatoes and fresh spinach in a simple frittata. This one-pan wonder is perfect for busy mornings or weekend brunch, delivering both flavor and nutrition in every slice. Follow these straightforward steps to create a dish that will become your new go-to.
5
servings15
minutes35
minutesIngredients
– 2 medium sweet potatoes, peeled and diced into ½-inch cubes (I find smaller cubes cook more evenly)
– 1 tablespoon extra virgin olive oil (my go-to for its fruity notes)
– 6 large eggs, preferably at room temperature for better volume
– ½ cup whole milk (it creates a creamier texture than skim)
– 2 cups fresh spinach, roughly chopped (packed measure for maximum greens)
– ½ teaspoon garlic powder (I love the subtle flavor it adds)
– ½ teaspoon smoked paprika (for that warm, smoky depth)
– ½ cup shredded sharp cheddar cheese (it melts beautifully)
– ¼ teaspoon black pepper, freshly ground
Instructions
1. Preheat your oven to 375°F to ensure it’s ready when needed.
2. Heat 1 tablespoon of extra virgin olive oil in a 10-inch oven-safe skillet over medium heat.
3. Add 2 medium diced sweet potatoes to the skillet and cook for 12-15 minutes, stirring occasionally, until they are tender and lightly browned.
4. Tip: Don’t overcrowd the skillet—this helps the potatoes crisp up instead of steam.
5. While potatoes cook, whisk 6 large eggs, ½ cup whole milk, ½ teaspoon garlic powder, ½ teaspoon smoked paprika, and ¼ teaspoon black pepper in a medium bowl until fully combined.
6. Stir 2 cups of fresh spinach into the skillet with the cooked sweet potatoes and cook for 1-2 minutes, just until the spinach wilts.
7. Tip: Wilt the spinach quickly to retain its bright color and nutrients.
8. Pour the egg mixture evenly over the potatoes and spinach in the skillet.
9. Sprinkle ½ cup shredded sharp cheddar cheese on top.
10. Transfer the skillet to the preheated oven and bake for 18-20 minutes, until the center is set and the edges are golden.
11. Tip: Check for doneness by inserting a knife in the center—it should come out clean.
12. Remove the skillet from the oven and let the frittata rest for 5 minutes before slicing.
Another fantastic way to enjoy this frittata is chilled the next day, sliced thin for a protein-packed lunch. Its fluffy texture pairs wonderfully with the earthy sweet potatoes and mild spinach, while the smoked paprika adds a warm undertone that elevates the entire dish.
Mediterranean Stuffed Eggplant with Quinoa
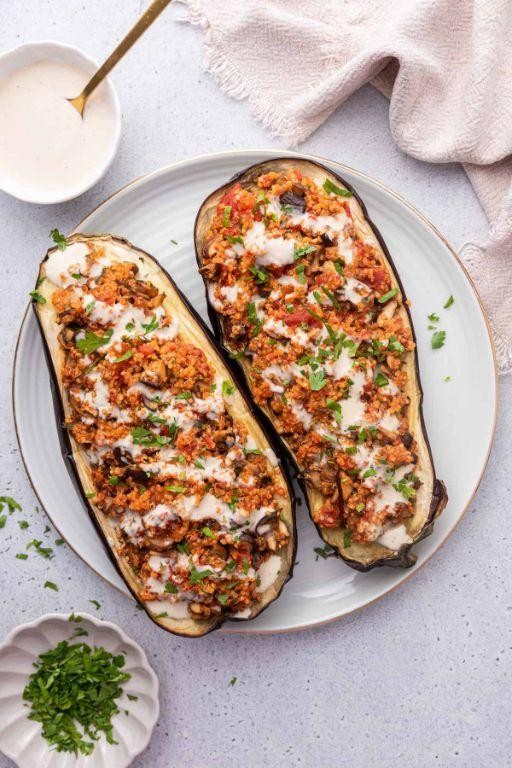
Ready to transform humble eggplants into a stunning Mediterranean masterpiece? This stuffed eggplant recipe walks you through each simple step, creating a wholesome meal that’s both impressive and approachable for any home cook. You’ll be amazed at how these simple ingredients come together into something truly special.
4
portions20
minutes48
minutesIngredients
– 2 medium eggplants (I look for ones that feel heavy for their size)
– 1 cup quinoa (rinsed well to remove that bitter coating)
– 2 cups vegetable broth (homemade if you have it, but store-bought works great)
– 1 yellow onion, diced (I prefer sweet onions for this recipe)
– 3 cloves garlic, minced (fresh is always better than jarred here)
– 1 cup cherry tomatoes, halved (they add such bright bursts of flavor)
– 1/2 cup crumbled feta cheese (I use the block kind and crumble it myself)
– 1/4 cup extra virgin olive oil (my go-to for Mediterranean dishes)
– 2 tbsp fresh parsley, chopped (it really makes the flavors pop)
– 1 tsp dried oregano
– 1/2 tsp salt
– 1/4 tsp black pepper
Instructions
1. Preheat your oven to 400°F and line a baking sheet with parchment paper.
2. Cut both eggplants in half lengthwise and scoop out the flesh, leaving a 1/4-inch border to create boats.
3. Brush the inside of each eggplant boat with 2 tablespoons of olive oil and sprinkle with salt.
4. Place the eggplant boats cut-side up on the baking sheet and bake for 25 minutes until slightly softened.
5. While the eggplants bake, heat the remaining olive oil in a medium saucepan over medium heat.
6. Add the diced onion and cook for 5 minutes until translucent, stirring occasionally.
7. Stir in the minced garlic and cook for 1 minute until fragrant.
8. Add the rinsed quinoa to the pan and toast for 2 minutes, stirring constantly.
9. Pour in the vegetable broth and bring to a boil, then reduce heat to low and cover.
10. Simmer the quinoa for 15 minutes until all liquid is absorbed.
11. Remove the quinoa from heat and let it sit covered for 5 minutes to steam.
12. Fluff the quinoa with a fork and stir in the cherry tomatoes, feta, parsley, oregano, and black pepper.
13. Remove the eggplant boats from the oven and carefully fill each with the quinoa mixture.
14. Return the stuffed eggplants to the oven and bake for another 15 minutes until the tops are lightly golden.
15. Let the stuffed eggplants rest for 5 minutes before serving.
Vibrant and satisfying, these stuffed eggplants offer a wonderful contrast between the tender baked eggplant and the fluffy quinoa filling. The feta provides creamy saltiness that balances the sweet cherry tomatoes perfectly. Try serving them with a simple Greek salad or alongside grilled chicken for a complete Mediterranean feast that will transport your taste buds straight to the coast.
Lentil and Roasted Red Pepper Soup
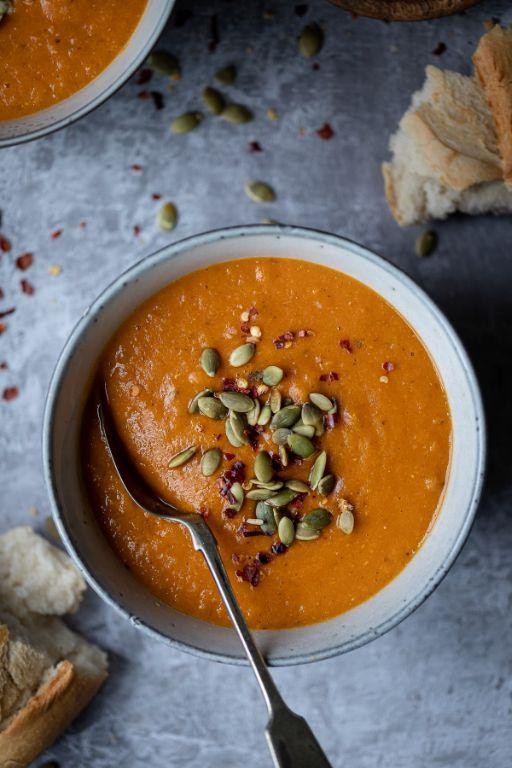
Gently warming up with a bowl of homemade soup is one of life’s simple pleasures, especially when it’s this nourishing lentil and roasted red pepper creation. I’ll walk you through each step methodically so you can build confidence in your soup-making skills. Let’s begin with gathering our ingredients before we start cooking.
4
servings15
minutes46
minutesIngredients
- 2 tablespoons extra virgin olive oil (my go-to for its fruity notes)
- 1 medium yellow onion, diced (I find sweet onions work beautifully here)
- 2 carrots, peeled and diced into ¼-inch pieces
- 2 celery stalks, diced (don’t skip these—they add wonderful depth)
- 3 garlic cloves, minced (fresh is always better than jarred in my kitchen)
- 1 cup brown lentils, rinsed and picked over
- 1 jar (12 ounces) roasted red peppers, drained and chopped
- 6 cups vegetable broth (I prefer low-sodium to control seasoning)
- 1 teaspoon smoked paprika (this adds that lovely smoky undertone)
- ½ teaspoon dried thyme
- 1 bay leaf (remove it before serving—it’s not meant to be eaten)
- 2 tablespoons fresh lemon juice (brightens everything up at the end)
- Salt and black pepper to season throughout
Instructions
- Heat 2 tablespoons olive oil in a large Dutch oven or heavy-bottomed pot over medium heat for 2 minutes until shimmering.
- Add diced onion, carrots, and celery to the pot and cook for 8 minutes, stirring occasionally, until vegetables have softened and onions are translucent.
- Stir in minced garlic and cook for 1 minute exactly until fragrant but not browned.
- Add rinsed lentils, chopped roasted red peppers, vegetable broth, smoked paprika, dried thyme, and bay leaf to the pot.
- Bring the mixture to a boil over high heat, then immediately reduce to a simmer.
- Cover the pot partially and simmer for 35 minutes, until lentils are tender but not mushy.
- Remove the bay leaf and discard it carefully.
- Stir in 2 tablespoons fresh lemon juice and season with salt and black pepper.
- Ladle the hot soup into bowls and serve immediately.
But what makes this soup truly special is how the creamy lentils contrast with the sweet, smoky peppers. The texture is hearty yet smooth, perfect for dipping crusty bread or topping with a dollop of Greek yogurt. Consider garnishing with fresh parsley or a drizzle of olive oil for an extra touch of elegance.
One-Pan Greek Chicken and Rice
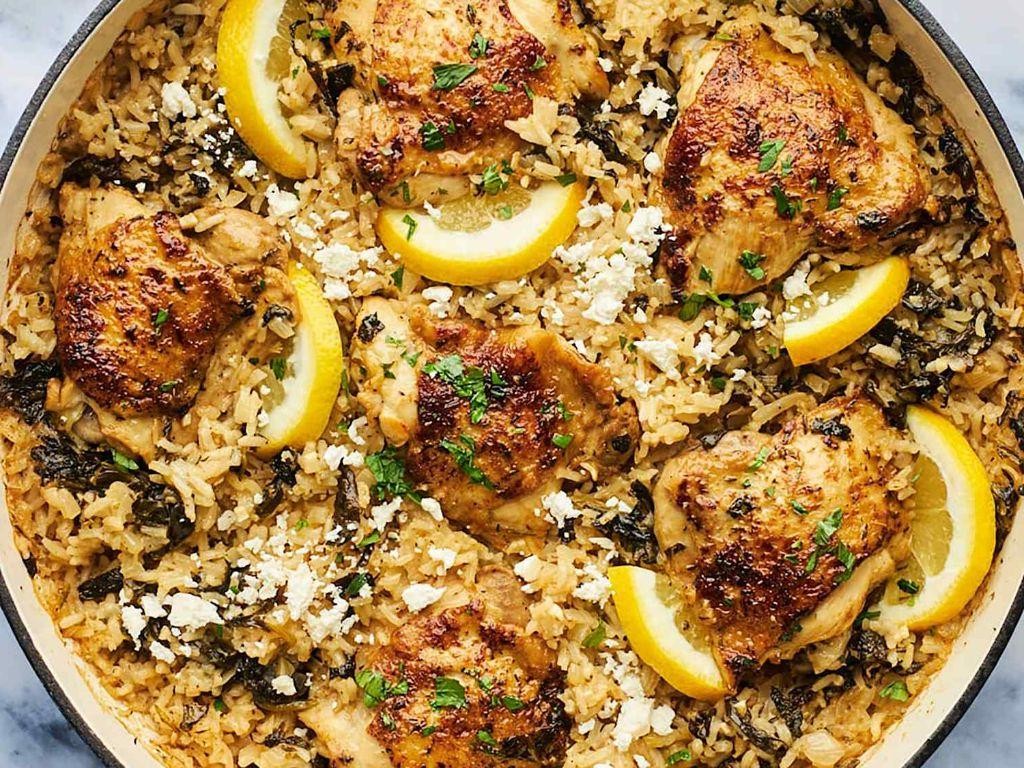
Sometimes you just need a meal that comes together effortlessly in one pan, and this Greek-inspired chicken and rice delivers exactly that with minimal cleanup and maximum flavor. Start by gathering your ingredients and prepping your workspace for a smooth cooking experience.
4
servings15
minutesIngredients
- 1.5 lbs boneless, skinless chicken thighs – I prefer thighs for their juiciness, but breasts work too if you adjust cooking time
- 1 cup long-grain white rice – rinse it well to remove excess starch for fluffier results
- 2 tbsp extra virgin olive oil – my go-to for its fruity notes that complement the Mediterranean flavors
- 1 medium yellow onion, diced – about 1 cup for sweet foundation flavor
- 3 garlic cloves, minced – fresh is best here for that aromatic punch
- 1.5 cups chicken broth – use low-sodium so you control the seasoning
- 1 lemon, juiced – about 3 tbsp of bright, fresh acidity
- 1 tsp dried oregano – crush it between your fingers to wake up the oils
- 1/2 tsp salt – I use fine sea salt for even distribution
- 1/4 tsp black pepper – freshly ground makes all the difference
- 1/2 cup crumbled feta cheese – buy block feta and crumble yourself for better texture
- 1/4 cup chopped fresh parsley – reserve some for garnish at the end
Instructions
- Pat chicken thighs completely dry with paper towels and season both sides evenly with salt and pepper.
- Heat olive oil in a large, oven-safe skillet over medium-high heat until shimmering, about 2 minutes.
- Place chicken thighs in the hot oil and sear until golden brown, 4-5 minutes per side, then transfer to a plate.
- Add diced onion to the same skillet and cook until translucent, about 4 minutes, scraping up any browned bits from the chicken.
- Stir in minced garlic and cook until fragrant, exactly 1 minute to prevent burning.
- Add rinsed rice to the skillet and toast for 2 minutes, stirring constantly, until edges turn slightly translucent.
- Pour in chicken broth and lemon juice, then sprinkle dried oregano over the liquid.
- Return chicken thighs to the skillet, nestling them into the rice mixture.
- Bring liquid to a boil, then immediately reduce heat to low, cover tightly, and simmer for 20 minutes.
- Remove skillet from heat and let stand covered for 5 minutes to allow rice to steam and absorb remaining liquid.
- Uncover and fluff rice with a fork, then sprinkle with crumbled feta and chopped parsley.
And just like that, you have a complete meal with tender chicken and fluffy rice infused with bright lemon and savory herbs. The feta adds a creamy saltiness that contrasts beautifully with the tangy lemon broth. Serve it straight from the skillet with extra lemon wedges for squeezing over individual portions.
Vegetable and Hummus Platter with Pita
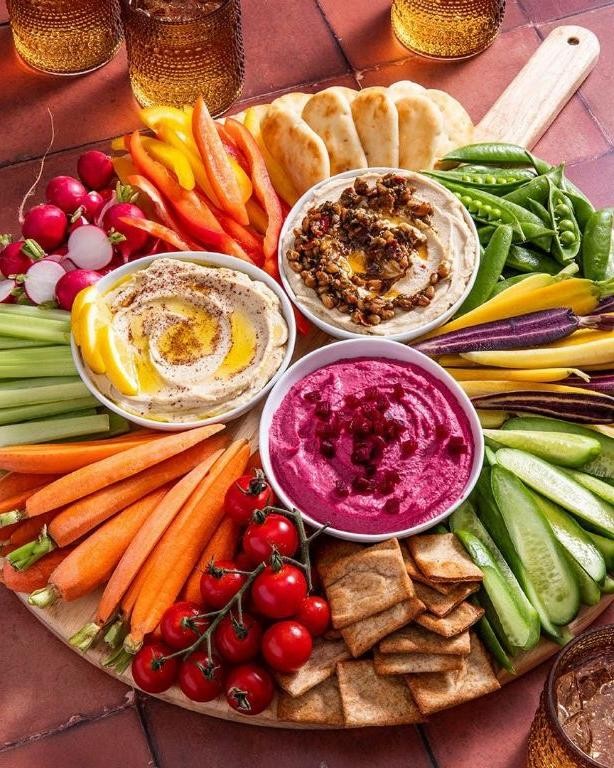
Let’s create a vibrant vegetable and hummus platter that’s perfect for sharing. This colorful arrangement makes healthy eating feel celebratory and requires no cooking at all. I’ll walk you through building this beautiful platter step by step.
4
servings20
minutesIngredients
– 2 cups store-bought hummus (I love the roasted garlic variety for extra flavor)
– 4 whole wheat pita breads (the soft, pocket-style ones work beautifully)
– 1 large English cucumber (these are seedless and less watery than regular cucumbers)
– 2 large red bell peppers (their sweet crunch pairs perfectly with the creamy hummus)
– 1 bunch rainbow carrots (the colorful varieties make the platter visually stunning)
– 1 pint cherry tomatoes (I look for the sweetest ones I can find)
– 1/4 cup extra virgin olive oil (my go-to for drizzling at the end)
– 1 tablespoon za’atar seasoning (this Middle Eastern blend adds wonderful herbal notes)
Instructions
1. Place the hummus in a medium serving bowl and create a shallow well in the center with the back of a spoon.
2. Drizzle 2 tablespoons of olive oil into the well you created in the hummus.
3. Sprinkle the za’atar seasoning evenly over the hummus and oil.
4. Cut each pita bread into 8 triangular wedges using kitchen scissors or a sharp knife.
5. Arrange the pita wedges around the edges of a large serving platter, slightly overlapping them.
6. Wash the English cucumber thoroughly and slice it into 1/4-inch thick rounds.
7. Cut the red bell peppers in half, remove the seeds and white membranes, then slice into 1/2-inch wide strips.
8. Peel the rainbow carrots and slice them diagonally into 1/4-inch thick ovals.
9. Rinse the cherry tomatoes and pat them completely dry with paper towels.
10. Arrange the cucumber rounds in a single layer on one section of the platter.
11. Place the bell pepper strips in a neat pile beside the cucumbers.
12. Create a small mound of carrot slices next to the peppers.
13. Scatter the cherry tomatoes in the remaining empty space on the platter.
14. Position the prepared hummus bowl in the center of the platter.
15. Drizzle the remaining 2 tablespoons of olive oil over the arranged vegetables.
Here’s what makes this platter special: the cool, crisp vegetables provide refreshing contrast to the creamy, garlicky hummus, while the za’atar adds earthy complexity. For a creative twist, try serving it with warm pita wedges straight from the oven, or add some briny olives and feta cheese for Mediterranean flair.
Falafel Wrap with Tzatziki Sauce

Satisfyingly crispy on the outside yet tender within, this falafel wrap brings Mediterranean street food right to your kitchen with a refreshing tzatziki sauce that balances every bite perfectly. Let me walk you through creating this vibrant meal step by step, ensuring even first-time cooks achieve fantastic results. We’ll build each component methodically before assembling the final wrap.
3
wraps25
minutes10
minutesIngredients
– 1 can (15 oz) chickpeas, drained and rinsed—I always pat them dry thoroughly for crispier falafel
– 1/4 cup fresh parsley leaves, packed—the vibrant green makes such a difference
– 2 cloves garlic, minced—fresh is essential here for that sharp kick
– 1 tsp ground cumin—toasted cumin seeds ground fresh if you have them
– 1/2 tsp baking powder—this little secret helps create that light interior
– 3 tbsp all-purpose flour—just enough to bind without making them dense
– 1/4 cup vegetable oil for frying—a neutral oil with high smoke point works best
– 4 large flour tortillas—I prefer the burrito-size for easier wrapping
– 1 cup plain Greek yogurt—full-fat gives the creamiest texture
– 1/2 cucumber, grated and squeezed dry—removing excess water prevents a watery sauce
– 1 tbsp fresh dill, finely chopped—dried just doesn’t compare in freshness
– 1 tbsp lemon juice—freshly squeezed brightens everything up
– 2 cups shredded lettuce—iceberg provides the perfect crunch
– 1 large tomato, diced—ripe summer tomatoes elevate this dramatically
Instructions
1. Combine chickpeas, parsley, garlic, cumin, and baking powder in a food processor.
2. Pulse the mixture for 15 seconds until coarsely ground but not pureed.
3. Transfer the mixture to a bowl and stir in flour until just combined.
4. Shape the mixture into 12 equal-sized balls, about 1.5 inches each.
5. Heat vegetable oil in a skillet over medium heat until it reaches 350°F.
6. Carefully place falafel balls in the hot oil without crowding the pan.
7. Fry the falafel for 3-4 minutes until golden brown on the bottom.
8. Flip each falafel and cook for another 3 minutes until evenly browned.
9. Remove falafel with a slotted spoon and drain on paper towels.
10. In a separate bowl, whisk together Greek yogurt and lemon juice.
11. Stir in grated cucumber and fresh dill until fully incorporated.
12. Warm tortillas in a dry skillet over medium heat for 30 seconds per side.
13. Place one warmed tortilla flat on your work surface.
14. Spread 1/4 of the tzatziki sauce evenly across the center of the tortilla.
15. Arrange 3 falafel balls in a line down the center of the sauce.
16. Top with 1/2 cup shredded lettuce and 1/4 of the diced tomatoes.
17. Fold the bottom edge of the tortilla up over the filling.
18. Fold the sides inward tightly to encase the filling completely.
19. Roll the wrap firmly away from you to form a tight cylinder.
20. Repeat the assembly process with remaining tortillas and ingredients.
Our falafel wraps deliver that wonderful contrast of warm, spiced chickpea patties against cool, creamy tzatziki and crisp fresh vegetables. Once you master the basic technique, try adding pickled red onions or swapping the lettuce for tabbouleh to create your own signature version.
Spinach and Feta Stuffed Peppers

Perfect for busy weeknights, these spinach and feta stuffed peppers combine vibrant colors with hearty flavors in a dish that’s both nutritious and satisfying. Preparing them is straightforward, and I’ll guide you through each step to ensure your peppers turn out tender and delicious every time.
4
portions20
minutes45
minutesIngredients
- 4 large bell peppers, any color—I love using a mix for a rainbow effect
- 1 tablespoon extra virgin olive oil, my go-to for its fruity notes
- 1 small yellow onion, finely chopped—this adds a sweet base
- 2 cloves garlic, minced fresh for the best aroma
- 10 ounces frozen chopped spinach, thawed and squeezed dry to avoid sogginess
- 1 cup cooked quinoa, which I prefer for its light texture
- 1 cup crumbled feta cheese, plus extra for topping if you’re like me and love extra tang
- 1 teaspoon dried oregano, a classic herb that never disappoints
- 1/2 teaspoon salt, to balance the flavors
- 1/4 teaspoon black pepper, freshly ground for a kick
Instructions
- Preheat your oven to 375°F to ensure it’s ready for baking.
- Slice the tops off the bell peppers and remove the seeds and membranes, then place them upright in a baking dish.
- Heat the olive oil in a large skillet over medium heat until it shimmers, about 1 minute.
- Add the chopped onion and cook for 4-5 minutes, stirring occasionally, until it turns translucent and soft.
- Stir in the minced garlic and cook for 30 seconds more, just until fragrant to avoid burning.
- Mix in the squeezed-dry spinach, cooked quinoa, feta cheese, oregano, salt, and black pepper until well combined.
- Spoon the filling evenly into the pepper cavities, pressing down gently to pack it in.
- Cover the baking dish with aluminum foil and bake for 25 minutes to steam the peppers.
- Remove the foil and bake for another 10-15 minutes, until the pepper edges are slightly charred and tender.
- Let the peppers rest for 5 minutes before serving to set the filling.
Just out of the oven, these peppers offer a delightful contrast between the soft, savory filling and the slightly crisp pepper walls. Juicy and flavorful, they pair wonderfully with a simple green salad or can be topped with a dollop of Greek yogurt for extra creaminess.
Roasted Garlic and Herb Shrimp
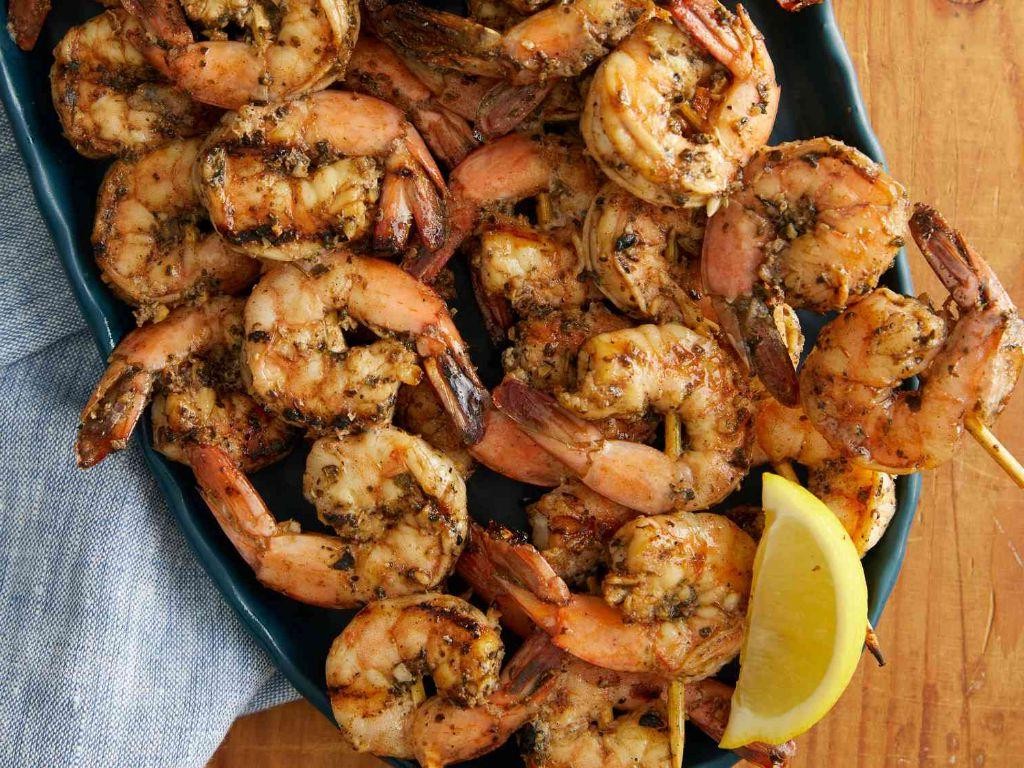
Friendly home cooks, let’s master a dish that transforms simple shrimp into something truly spectacular with minimal effort. Following these precise steps will give you perfectly cooked, aromatic shrimp every single time.
4
servings10
minutes8
minutesIngredients
– 1 pound large raw shrimp, peeled and deveined (I always buy wild-caught for better flavor)
– 4 tablespoons extra virgin olive oil (my go-to for roasting)
– 6 cloves garlic, minced (fresh is essential here, not jarred)
– 2 tablespoons fresh lemon juice (about half a juicy lemon)
– 1 teaspoon dried oregano
– 1/2 teaspoon smoked paprika
– 1/4 teaspoon red pepper flakes (adjust based on your heat preference)
– 1/4 cup fresh parsley, chopped (save this for the very end)
– Salt to taste (I use about 3/4 teaspoon kosher salt)
Instructions
1. Preheat your oven to 400°F and position the rack in the center for even heating.
2. Pat the shrimp completely dry with paper towels—this crucial step ensures they roast instead of steam.
3. In a medium bowl, whisk together olive oil, minced garlic, lemon juice, oregano, smoked paprika, red pepper flakes, and salt until fully combined.
4. Add the dried shrimp to the marinade and toss until every piece is evenly coated.
5. Arrange the shrimp in a single layer on a rimmed baking sheet, making sure none overlap.
6. Roast at 400°F for exactly 6-8 minutes, until the shrimp turn pink and opaque with lightly curled edges.
7. Remove the baking sheet from the oven and immediately sprinkle with fresh parsley—the residual heat will wilt it perfectly.
8. Let the shrimp rest for 2 minutes on the baking sheet to allow juices to redistribute.
Lemon-kissed and herb-infused, these shrimp emerge with a firm yet tender bite and garlic that mellows beautifully in the oven. Serve them over creamy polenta to soak up the flavorful oil, or pile them atop a crisp green salad for a light meal that feels anything but ordinary.
Mushroom and Spinach Orzo
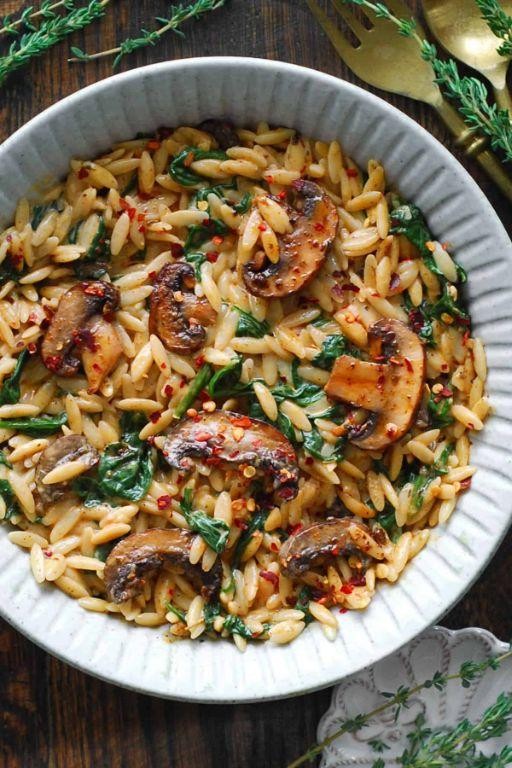
Keeping weeknight dinners both delicious and straightforward is my constant goal, and this Mushroom and Spinach Orzo hits that sweet spot perfectly. Let’s walk through creating this comforting, one-pan meal together, focusing on clear steps that build flavor beautifully.
4
servings15
minutes24
minutesIngredients
– 1 cup orzo pasta (I find the rice-shaped pasta cooks more evenly than larger shapes)
– 8 ounces cremini mushrooms, sliced (baby bellas add wonderful earthy depth)
– 3 cups fresh spinach leaves (I always buy pre-washed to save time)
– 2 cloves garlic, minced (freshly minced releases the most aroma)
– 1 small yellow onion, diced (this forms the flavor foundation)
– 2 tablespoons extra virgin olive oil (my go-to for its fruity notes)
– 2 cups vegetable broth (low-sodium lets you control seasoning)
– 1/4 cup grated Parmesan cheese (the real stuff melts so much better)
– 1 teaspoon dried thyme (rubbing it between your fingers wakes up the oils)
– 1/2 teaspoon black pepper (freshly cracked adds brighter flavor)
– 1/2 teaspoon salt (I add this gradually throughout cooking)
Instructions
1. Heat 2 tablespoons olive oil in a large skillet over medium heat until it shimmers, about 1 minute.
2. Add diced onion and cook until translucent, approximately 4-5 minutes, stirring occasionally.
3. Stir in sliced mushrooms and cook until they release their liquid and begin to brown, about 6-7 minutes.
4. Add minced garlic and cook until fragrant, exactly 30 seconds to prevent burning.
5. Pour in 1 cup orzo pasta and toast while stirring constantly for 2 minutes until lightly golden.
6. Add 2 cups vegetable broth, 1 teaspoon dried thyme, 1/2 teaspoon salt, and 1/2 teaspoon black pepper.
7. Bring mixture to a boil, then reduce heat to maintain a steady simmer.
8. Cover skillet and cook for 8 minutes until most liquid is absorbed.
9. Uncover and stir in 3 cups fresh spinach until wilted, about 2 minutes.
10. Remove from heat and stir in 1/4 cup grated Parmesan cheese until melted and creamy.
Velvety orzo cradles the earthy mushrooms and tender spinach in every bite, creating a satisfying texture that’s neither too firm nor mushy. The Parmesan adds a salty sharpness that balances the dish beautifully, while serving it alongside grilled chicken or with an extra sprinkle of cheese makes it feel special enough for company.
Mediterranean Chickpea and Kale Stew
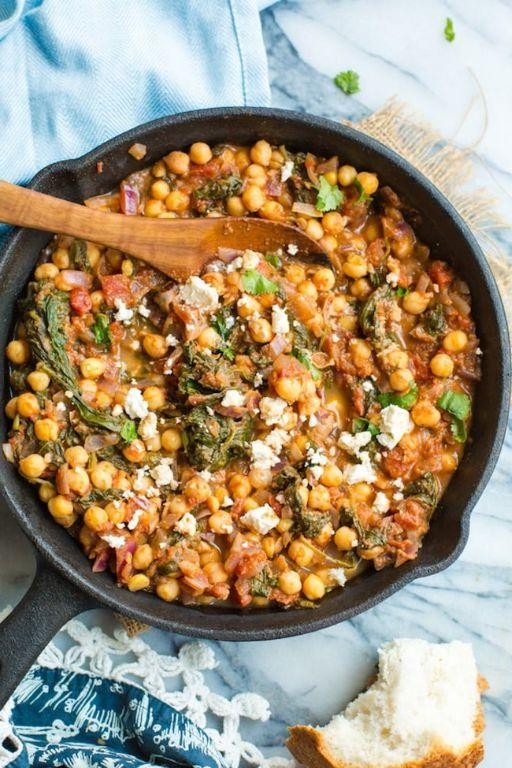
Ready to dive into a comforting, nutrient-packed meal that comes together with minimal fuss? This Mediterranean chickpea and kale stew is perfect for busy weeknights when you want something wholesome yet satisfying. Let me walk you through each simple step to create this vibrant dish.
5
servings15
minutes31
minutesIngredients
– 2 tablespoons extra virgin olive oil (my go-to for its fruity flavor)
– 1 medium yellow onion, diced (I find sweet onions work beautifully here)
– 3 garlic cloves, minced (freshly minced makes all the difference)
– 1 teaspoon dried oregano
– ½ teaspoon red pepper flakes (adjust based on your heat preference)
– 2 (15-ounce) cans chickpeas, drained and rinsed
– 1 (28-ounce) can crushed tomatoes
– 4 cups chopped kale, stems removed
– 4 cups vegetable broth
– 1 lemon, juiced (about 3 tablespoons)
– Salt and black pepper
Instructions
1. Heat 2 tablespoons olive oil in a large pot over medium heat for 2 minutes until shimmering.
2. Add diced onion and cook for 6-8 minutes, stirring occasionally, until translucent and fragrant.
3. Stir in minced garlic and cook for 1 minute until golden but not browned.
4. Sprinkle in 1 teaspoon dried oregano and ½ teaspoon red pepper flakes, toasting for 30 seconds to release their oils.
5. Add drained chickpeas and stir to coat with the aromatics for 1 minute.
6. Pour in crushed tomatoes and 4 cups vegetable broth, scraping any browned bits from the pot bottom.
7. Bring the stew to a boil over high heat, then reduce to a simmer and cook uncovered for 15 minutes.
8. Stir in 4 cups chopped kale and cook for 5 minutes until wilted and vibrant green.
9. Squeeze in fresh lemon juice and season with salt and black pepper to your preference.
Ladle this stew into deep bowls and notice how the kale retains just enough texture while the chickpeas become wonderfully tender. The bright lemon cuts through the rich tomato base beautifully, making each spoonful feel both comforting and revitalizing. For an extra treat, serve it over creamy polenta or with crusty bread to soak up every last drop of the flavorful broth.
Tomato Basil and Mozzarella Salad
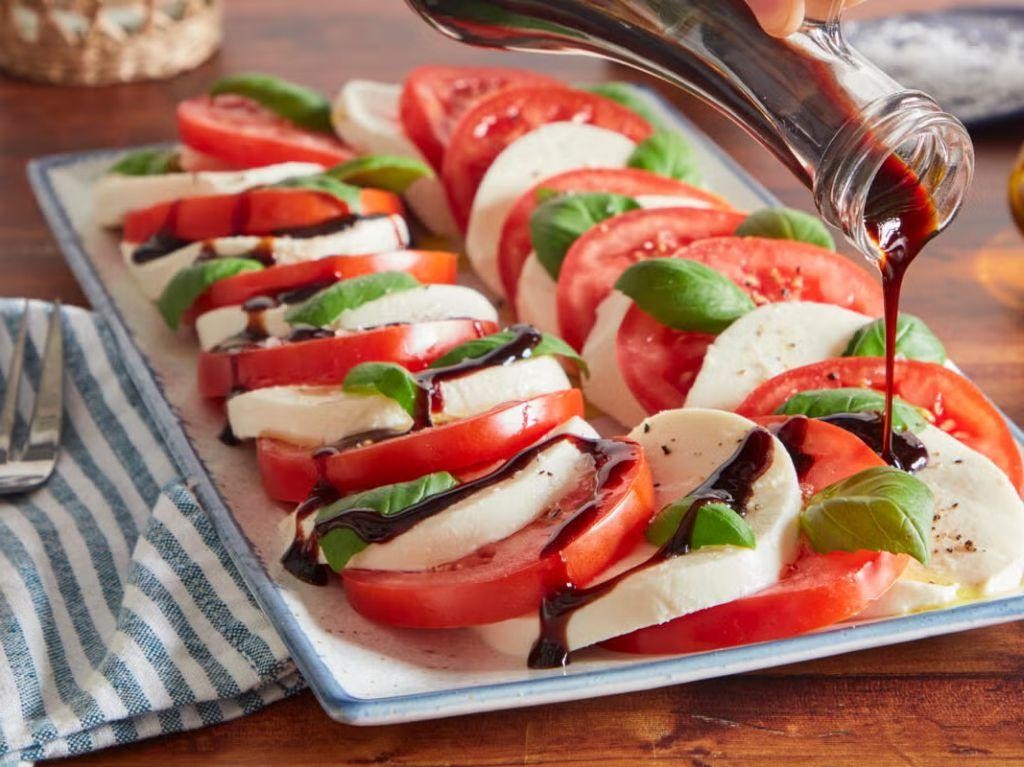
Crafting this classic summer salad requires just a few simple steps, but attention to detail makes all the difference between good and exceptional. Let me walk you through each movement precisely, ensuring your Tomato Basil and Mozzarella Salad turns out vibrant and perfectly balanced every single time.
4
servings15
minutesIngredients
- 4 large ripe tomatoes – I look for ones that feel heavy for their size with taut skin
- 8 ounces fresh mozzarella cheese – the kind packed in water gives the creamiest texture
- 1/4 cup fresh basil leaves – torn by hand right before using to prevent bruising
- 3 tablespoons extra virgin olive oil – my go-to for its fruity, peppery notes
- 1 tablespoon balsamic vinegar – aged varieties provide deeper flavor complexity
- 1/2 teaspoon sea salt – I prefer flaky Maldon salt for its delicate crunch
- 1/4 teaspoon freshly ground black pepper – freshly cracked makes a noticeable difference
Instructions
- Wash and dry 4 large ripe tomatoes thoroughly with a clean kitchen towel.
- Slice each tomato into 1/4-inch thick rounds using a sharp serrated knife.
- Drain 8 ounces fresh mozzarella cheese from its packaging liquid.
- Slice the mozzarella into 1/4-inch thick rounds matching your tomato slices.
- Arrange tomato and mozzarella slices in alternating, overlapping layers on a serving platter.
- Tear 1/4 cup fresh basil leaves with your fingers directly over the arranged slices.
- Drizzle 3 tablespoons extra virgin olive oil evenly across the entire arrangement.
- Sprinkle 1/2 teaspoon sea salt uniformly over the salad surface.
- Grind 1/4 teaspoon black pepper directly over the assembled ingredients.
- Drizzle 1 tablespoon balsamic vinegar in a zigzag pattern across the platter.
- Let the salad rest at room temperature for exactly 10 minutes before serving.
Nothing beats the juicy burst of ripe tomatoes against the creamy mozzarella, with basil providing that fresh herbal punch. The resting time allows the salt to draw out the tomatoes’ natural sweetness while the olive oil and vinegar mellow into a cohesive dressing. Try serving it alongside grilled crusty bread to soak up every last drop of the flavorful juices.
Artichoke and Olive Tapenade Pasta
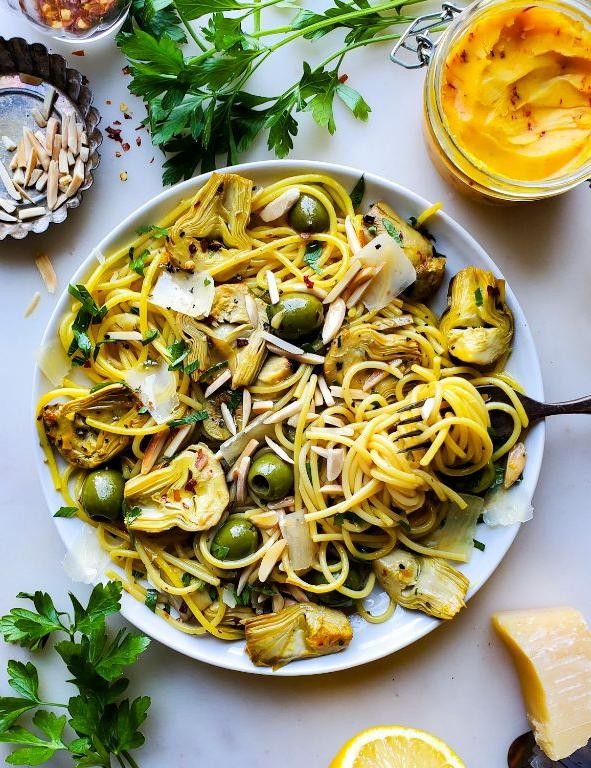
Nothing beats a quick, flavorful pasta dish that comes together in under 30 minutes. Now, let’s transform simple pantry staples into a vibrant Artichoke and Olive Tapenade Pasta that’s perfect for busy weeknights.
5
servings10
minutes15
minutesIngredients
- 8 ounces dried penne pasta – I always keep a box in my pantry for last-minute meals
- 1 (14-ounce) can artichoke hearts, drained and chopped – the marinated kind adds extra flavor
- 1 cup pitted Kalamata olives – I prefer these for their rich, briny taste
- 3 cloves garlic, minced – fresh is always best for maximum aroma
- 1/4 cup extra virgin olive oil – my go-to for its fruity notes
- 2 tablespoons fresh lemon juice – about half a large lemon
- 1/4 cup fresh parsley, chopped – it brightens up the whole dish
- 1/4 teaspoon red pepper flakes – just enough for a subtle kick
- 1/2 teaspoon salt – start with this and adjust later
Instructions
- Fill a large pot with 4 quarts of water and bring to a rolling boil over high heat.
- Add 1 tablespoon of salt to the boiling water, then stir in 8 ounces of penne pasta.
- Cook the pasta for 9-11 minutes, stirring occasionally, until al dente (tender but still firm to the bite).
- While pasta cooks, drain and chop 1 can of artichoke hearts into 1/2-inch pieces.
- Pit 1 cup of Kalamata olives if not already pitted, then roughly chop them.
- Mince 3 cloves of garlic finely to distribute flavor evenly throughout the dish.
- Heat 1/4 cup olive oil in a large skillet over medium heat for 1 minute.
- Add the minced garlic and 1/4 teaspoon red pepper flakes to the skillet.
- Sauté for 1-2 minutes until fragrant but not browned, stirring constantly.
- Add the chopped artichokes and olives to the skillet, cooking for 3-4 minutes until warmed through.
- Stir in 2 tablespoons of fresh lemon juice and 1/2 teaspoon salt.
- Drain the cooked pasta, reserving 1/2 cup of pasta water.
- Add the drained pasta to the skillet with the artichoke-olive mixture.
- Toss everything together, adding reserved pasta water 2 tablespoons at a time until the sauce coats the pasta nicely.
- Remove from heat and stir in 1/4 cup chopped fresh parsley.
Absolutely satisfying with its briny olives and tender artichokes clinging to every pasta tube. The creamy texture from the starchy pasta water balances the bright lemon notes perfectly. Try serving it topped with grilled shrimp or alongside roasted chicken for a complete meal that feels restaurant-worthy.
Conclusion
Feast your way to better health with these 19 vibrant Mediterranean dinners! From quick weeknight meals to impressive dishes for company, there’s something delicious for every taste. We’d love to hear which recipes become your new favorites—drop us a comment below and don’t forget to share this collection on Pinterest for your next culinary adventure!