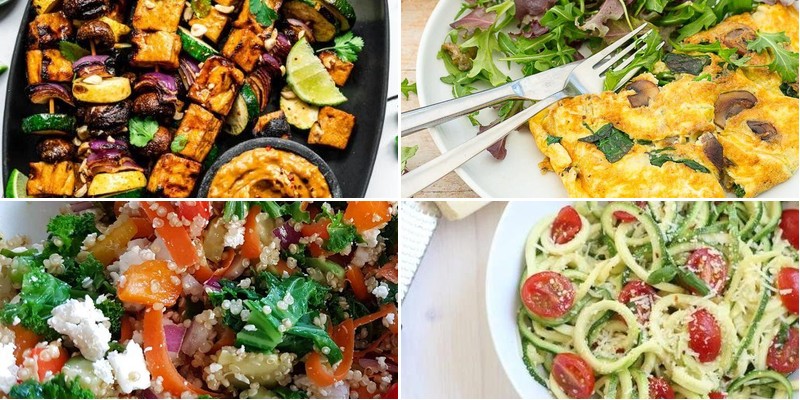
Unlock the joy of nourishing both you and your little one with these 25 vibrant, healthy meal recipes designed for pregnancy. From quick, protein-packed dinners to comforting, nutrient-rich favorites, each dish is crafted to support your energy and well-being. Let’s make every bite count—dive in for delicious inspiration that celebrates this special journey!
Quinoa and Avocado Salad with Lemon Dressing
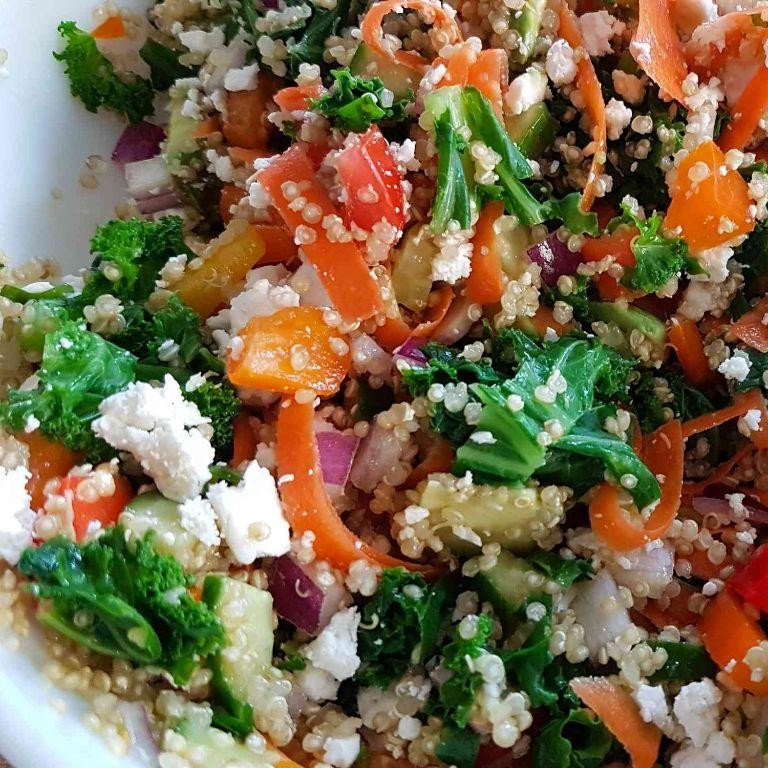
Ever find yourself craving something fresh, healthy, and ridiculously easy to throw together? This quinoa and avocado salad is my go-to for a quick, satisfying lunch. You’ll love the bright, zesty flavors and how it comes together in no time.
Serving: 4 | Pre Time: 15 minutes | Cooking Time: 15 minutes
3
servings15
minutes15
minutesIngredients
– 1 cup quinoa, rinsed well (this removes any bitterness)
– 2 cups water
– 2 ripe avocados, diced (I like them just soft to the touch)
– 1 cup cherry tomatoes, halved
– 1/2 cup red onion, finely chopped
– 1/4 cup fresh cilantro, chopped (parsley works if you’re not a cilantro fan)
– 1/4 cup extra virgin olive oil (my go-to for dressings)
– 3 tbsp fresh lemon juice
– 1 tsp honey
– 1/2 tsp salt
– 1/4 tsp black pepper
Instructions
1. Rinse 1 cup of quinoa thoroughly in a fine-mesh strainer under cold water for about 30 seconds.
2. Combine the rinsed quinoa and 2 cups of water in a medium saucepan.
3. Bring the mixture to a boil over high heat.
4. Once boiling, reduce the heat to low, cover the saucepan, and simmer for 15 minutes.
5. After 15 minutes, remove the saucepan from the heat and let it sit, covered, for 5 minutes to steam. (Tip: Don’t peek while it’s simmering—this keeps the steam in for perfect fluffy quinoa.)
6. Fluff the cooked quinoa with a fork and transfer it to a large mixing bowl to cool slightly.
7. While the quinoa cools, dice 2 ripe avocados and halve 1 cup of cherry tomatoes.
8. Finely chop 1/2 cup of red onion and 1/4 cup of fresh cilantro.
9. Add the diced avocados, halved cherry tomatoes, chopped red onion, and chopped cilantro to the bowl with the quinoa.
10. In a small bowl, whisk together 1/4 cup of extra virgin olive oil, 3 tbsp of fresh lemon juice, 1 tsp of honey, 1/2 tsp of salt, and 1/4 tsp of black pepper until well combined. (Tip: Use fresh lemon juice for the brightest flavor—it makes all the difference!)
11. Pour the dressing over the quinoa and vegetable mixture in the large bowl.
12. Gently toss everything together until evenly coated. (Tip: Be gentle with the avocado to keep it from turning mushy.)
13. Serve immediately or chill in the refrigerator for up to 30 minutes to let the flavors meld.
Ready to dig in? The quinoa adds a lovely nutty chew, while the avocado brings a creamy contrast that’s simply irresistible. I love scooping this salad into lettuce cups for a low-carb twist or pairing it with grilled chicken for a heartier meal.
Sweet Potato and Black Bean Enchiladas

Diving into a cozy dinner? These sweet potato and black bean enchiladas are a total crowd-pleaser—they’re hearty, packed with flavor, and come together without a fuss. You’ll love how the creamy sweet potatoes mingle with the smoky beans and melty cheese.
Serving: 6 | Pre Time: 20 minutes | Cooking Time: 30 minutes
6
servings20
minutes30
minutesIngredients
– 2 medium sweet potatoes, peeled and diced into ½-inch cubes (I like them small for quicker cooking)
– 1 (15-ounce) can black beans, drained and rinsed (go for low-sodium if you prefer)
– 1 cup shredded Monterey Jack cheese (extra for topping if you’re a cheese lover like me)
– 8 (6-inch) corn tortillas (I warm them up first to prevent cracking)
– 2 cups red enchilada sauce (store-bought works great, but homemade is a fun weekend project)
– 1 tablespoon olive oil (extra virgin is my go-to for a hint of fruitiness)
– 1 teaspoon ground cumin (toasted cumin adds a deeper flavor)
– ½ teaspoon chili powder (adjust to your heat preference)
– Salt to taste (I start with a pinch and adjust as I go)
Instructions
1. Preheat your oven to 375°F (190°C) and lightly grease a 9×13-inch baking dish with olive oil.
2. Heat 1 tablespoon olive oil in a large skillet over medium heat until shimmering, about 2 minutes.
3. Add the diced sweet potatoes to the skillet and cook, stirring occasionally, until tender and lightly browned, about 10-12 minutes. Tip: Cover the skillet for the first 5 minutes to steam them slightly and speed up cooking.
4. Stir in the black beans, 1 teaspoon ground cumin, and ½ teaspoon chili powder, cooking for another 2 minutes until fragrant.
5. Remove the skillet from heat and let the mixture cool slightly, about 5 minutes, then fold in 1 cup shredded Monterey Jack cheese.
6. Warm the corn tortillas in a dry skillet over medium heat for 15-20 seconds per side until pliable. Tip: Wrap them in a clean towel to keep them warm and flexible while you assemble.
7. Spoon about ⅓ cup of the sweet potato and black bean filling onto each tortilla, roll tightly, and place seam-side down in the prepared baking dish.
8. Pour 2 cups red enchilada sauce evenly over the rolled tortillas, making sure to coat them completely.
9. Sprinkle additional shredded cheese on top if desired, then bake in the preheated oven for 20-25 minutes, until the sauce is bubbly and the cheese is melted and golden. Tip: Broil for the last 2 minutes for an extra crispy top, but watch closely to avoid burning.
10. Let the enchiladas cool for 5 minutes before serving to set the filling.
Gorgeously golden and bubbling, these enchiladas offer a satisfying mix of creamy sweet potatoes and hearty beans with a hint of smokiness from the spices. Serve them topped with fresh cilantro, a dollop of sour cream, or alongside a crisp green salad for a complete meal that’s as vibrant as it is delicious.
Spinach and Feta Stuffed Chicken Breast
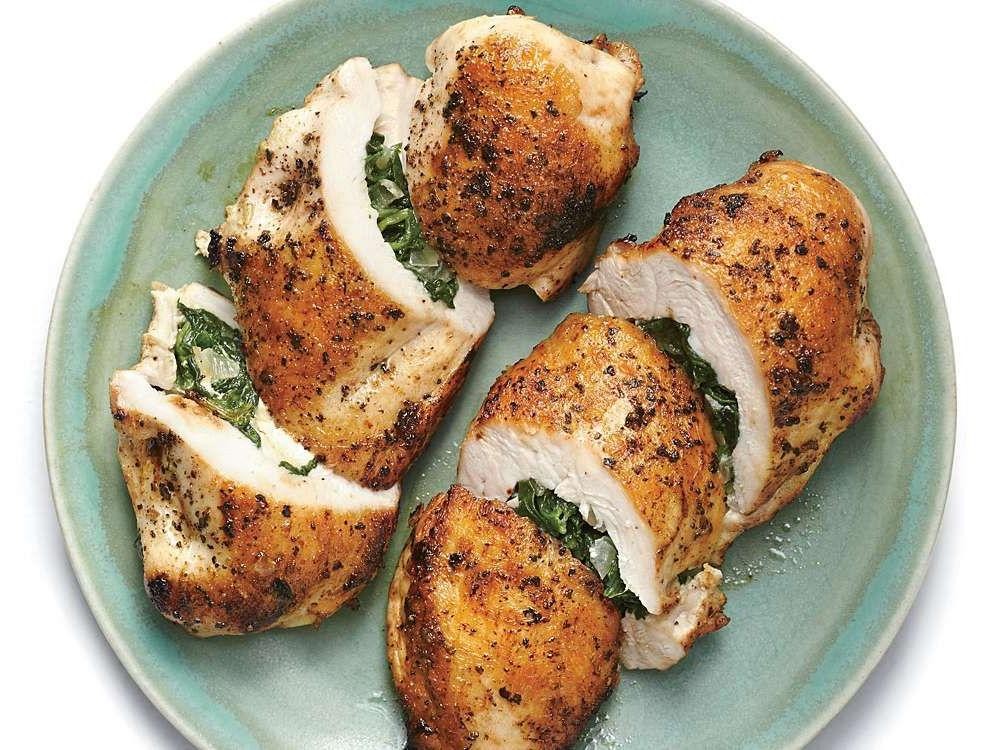
Now, if you’re looking for a simple yet impressive dinner that feels fancy without the fuss, this spinach and feta stuffed chicken breast is your answer. It’s a one-pan wonder that comes together quickly, and the cheesy, herby filling makes every bite delicious. You’ll love how it turns a basic chicken breast into something special.
Serving: 4 | Pre Time: 15 minutes | Cooking Time: 25 minutes
5
servings15
minutes25
minutesIngredients
– 4 boneless, skinless chicken breasts (about 6 oz each—I like to pound them slightly for even cooking)
– 1 cup fresh spinach, roughly chopped (packed tight—it wilts down a lot!)
– 1/2 cup crumbled feta cheese (I prefer the block feta for better texture, but pre-crumbled works too)
– 1/4 cup cream cheese, softened (room temp blends smoother with the feta)
– 2 cloves garlic, minced (fresh is best here for that punchy flavor)
– 1 tbsp olive oil (extra virgin olive oil is my go-to for a fruity note)
– 1 tsp dried oregano
– 1/2 tsp salt
– 1/4 tsp black pepper
Instructions
1. Preheat your oven to 375°F and lightly grease a baking dish with a bit of the olive oil.
2. In a medium bowl, combine the spinach, feta, cream cheese, garlic, oregano, salt, and pepper—mix until well blended. Tip: Let the cream cheese sit out for 10 minutes first to make stirring easier.
3. Lay each chicken breast flat on a cutting board and use a sharp knife to cut a horizontal pocket into the thickest side, being careful not to cut all the way through.
4. Divide the spinach-feta mixture evenly among the chicken pockets, pressing it in gently to fill them without overstuffing. Tip: Don’t pack too tight, or the filling might leak out during baking.
5. Seal each pocket by securing with toothpicks or tying with kitchen twine if needed.
6. Heat the remaining olive oil in a large oven-safe skillet over medium-high heat until shimmering, about 1 minute.
7. Place the stuffed chicken breasts in the skillet and sear for 2-3 minutes per side until golden brown. Tip: This step locks in juices and adds flavor, so don’t skip it!
8. Transfer the skillet to the preheated oven and bake for 20-25 minutes, or until the chicken reaches an internal temperature of 165°F when checked with a meat thermometer.
9. Remove from the oven and let rest for 5 minutes before serving.
Golden and juicy, this chicken emerges with a creamy, tangy center that pairs perfectly with the tender meat. Serve it sliced over a bed of rice or with roasted veggies for a complete meal—it’s sure to become a weeknight favorite.
Lentil and Vegetable Soup with Turmeric

Perfect for a chilly December afternoon like today, this lentil and vegetable soup with turmeric is the cozy, one-pot meal you’ve been craving. It’s packed with nourishing ingredients that come together in under an hour, making it ideal for busy weeknights when you want something hearty without the fuss.
Serving: 4 | Prep Time: 15 minutes | Cooking Time: 35 minutes
3
servings15
minutes35
minutesIngredients
- 2 tablespoons extra virgin olive oil (my go-to for its fruity flavor)
- 1 medium yellow onion, diced (I like mine finely chopped so it melts into the soup)
- 2 medium carrots, peeled and sliced into ¼-inch rounds
- 2 celery stalks, chopped (don’t skip these—they add a nice crunch)
- 3 cloves garlic, minced (fresh is best here for that aromatic punch)
- 1 teaspoon ground turmeric (it gives the soup that gorgeous golden hue)
- 1 cup brown lentils, rinsed and picked over (no soaking needed, which is a win)
- 4 cups vegetable broth (low-sodium lets you control the salt)
- 1 (14.5-ounce) can diced tomatoes, undrained (they add a touch of acidity)
- 1 teaspoon salt (adjust later if needed)
- ½ teaspoon black pepper (freshly ground if you have it)
- 2 cups fresh spinach, roughly chopped (toss it in at the end for a vibrant green pop)
- 1 tablespoon lemon juice (a squeeze brightens everything up)
Instructions
- Heat the olive oil in a large pot over medium heat until it shimmers, about 1 minute. Tip: Swirl the oil to coat the pot evenly for better sautéing.
- Add the onion, carrots, and celery to the pot. Cook, stirring occasionally, until the vegetables soften and the onion turns translucent, about 8 minutes.
- Stir in the garlic and turmeric. Cook for 1 minute until fragrant—don’t let the garlic burn. Tip: Turmeric blooms in oil, enhancing its flavor and color.
- Add the lentils, vegetable broth, diced tomatoes with their juices, salt, and pepper to the pot. Stir to combine.
- Increase the heat to high and bring the soup to a boil. Once boiling, reduce the heat to low, cover the pot, and simmer for 25 minutes. Tip: Keep the lid slightly ajar to prevent overflow.
- After 25 minutes, check that the lentils are tender by pressing one with a spoon—it should mash easily.
- Stir in the spinach and lemon juice. Cook uncovered for 2 minutes until the spinach wilts but stays bright green.
- Remove the pot from the heat. Taste and adjust seasoning with more salt or pepper if desired.
Zesty and comforting, this soup has a thick, stew-like texture from the lentils, with a warm, earthy flavor from the turmeric that’s balanced by the fresh spinach and lemon. Serve it with crusty bread for dipping, or top it with a dollop of yogurt and a sprinkle of fresh herbs for an extra touch of creaminess and color.
Grilled Salmon with Asparagus and Quinoa

Wondering what to make for a healthy yet satisfying dinner? This grilled salmon with asparagus and quinoa is your answer—it’s packed with flavor, comes together in under 30 minutes, and feels fancy without the fuss. Perfect for a weeknight or impressing guests!
Serving: 4 | Pre Time: 10 minutes | Cooking Time: 20 minutes
3
servings10
minutes20
minutesIngredients
– 4 salmon fillets (about 6 oz each, skin-on for extra crispiness)
– 1 lb asparagus (trim the woody ends—I just snap them off by hand)
– 1 cup quinoa (rinsed well to remove bitterness)
– 2 cups water (for cooking the quinoa)
– 2 tbsp extra virgin olive oil (my go-to for its fruity flavor)
– 2 cloves garlic (minced, fresh is best here)
– 1 lemon (juiced, about 2 tbsp, plus extra wedges for serving)
– 1 tsp salt (I use sea salt for a clean taste)
– ½ tsp black pepper (freshly ground if you have it)
Instructions
1. Preheat your grill to medium-high heat, about 400°F.
2. Rinse the quinoa under cold water in a fine-mesh strainer for 30 seconds to remove saponins.
3. In a medium saucepan, combine the rinsed quinoa and 2 cups water.
4. Bring the quinoa to a boil over high heat, then reduce the heat to low, cover, and simmer for 15 minutes until the water is absorbed.
5. While the quinoa cooks, pat the salmon fillets dry with paper towels to ensure a good sear.
6. Brush both sides of the salmon fillets with 1 tbsp olive oil and season evenly with ½ tsp salt and ¼ tsp black pepper.
7. Trim the asparagus by snapping off the tough ends where they break naturally.
8. Toss the asparagus with the remaining 1 tbsp olive oil, minced garlic, ½ tsp salt, and ¼ tsp black pepper in a bowl.
9. Place the salmon fillets skin-side down on the preheated grill and cook for 5 minutes without moving.
10. Flip the salmon fillets and cook for another 3-4 minutes until the internal temperature reaches 145°F and the flesh flakes easily.
11. Add the asparagus to the grill in a single layer and cook for 5-7 minutes, turning once, until tender-crisp and lightly charred.
12. Remove the quinoa from heat, fluff it with a fork, and stir in the lemon juice.
13. Transfer the grilled salmon and asparagus to a serving platter.
14. Serve the salmon and asparagus over the quinoa, garnished with lemon wedges.
Getting this dish on the table is a breeze! The salmon turns out flaky and moist with a hint of smokiness from the grill, while the asparagus adds a crisp, earthy bite. Try topping it with a dollop of Greek yogurt or a sprinkle of fresh dill for a creamy twist—it’s a meal that’s as vibrant as it is delicious.
Vegetable Stir-Fry with Tofu and Brown Rice
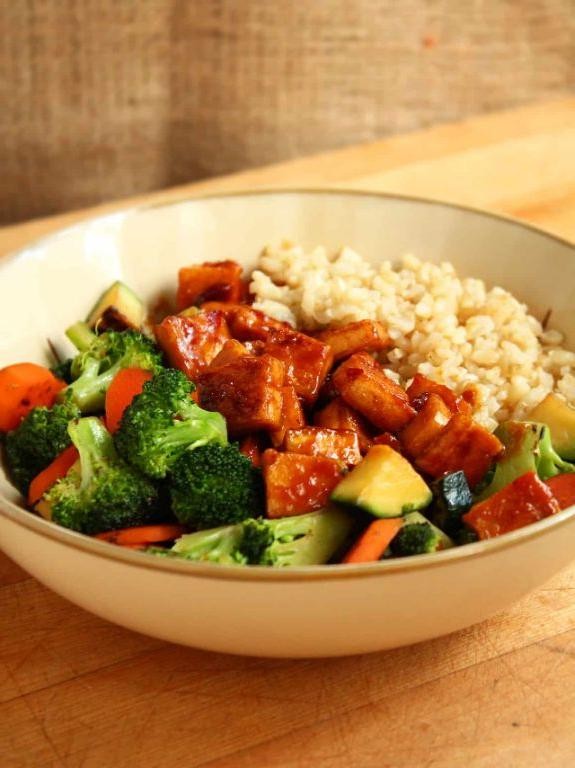
Dinner doesn’t have to be complicated to be delicious. This vegetable stir-fry with tofu and brown rice is my go-to weeknight meal—it’s packed with flavor, comes together in under 30 minutes, and leaves you feeling satisfied without being heavy. You’ll love how versatile it is too!
Serving: 4 | Pre Time: 15 minutes | Cooking Time: 20 minutes
5
servings15
minutes20
minutesIngredients
– 1 cup uncooked brown rice (I always rinse mine first—it helps remove excess starch)
– 1 (14 oz) block extra-firm tofu, pressed for 15 minutes and cubed (pressing makes it crispier!)
– 2 tbsp avocado oil (my favorite for high-heat cooking)
– 1 red bell pepper, thinly sliced
– 1 cup broccoli florets
– 1 medium carrot, julienned
– 3 cloves garlic, minced (fresh is best here)
– 1 tbsp fresh ginger, grated
– ¼ cup low-sodium soy sauce
– 1 tbsp rice vinegar
– 1 tsp sesame oil (don’t skip this—it adds amazing aroma)
– 2 green onions, sliced for garnish
Instructions
1. Cook 1 cup brown rice according to package directions (usually 1:2 rice-to-water ratio). Tip: Let it steam off the heat for 5 minutes after cooking for fluffier rice.
2. While rice cooks, press tofu between paper towels with a heavy pan for 15 minutes to remove excess moisture, then cut into 1-inch cubes.
3. Heat 1 tbsp avocado oil in a large skillet or wok over medium-high heat until shimmering (about 350°F).
4. Add tofu cubes in a single layer and cook undisturbed for 3-4 minutes until golden brown on one side.
5. Flip tofu and cook another 3-4 minutes until all sides are crispy, then transfer to a plate.
6. Add remaining 1 tbsp avocado oil to the same skillet and increase heat to high.
7. Add bell pepper, broccoli, and carrot, stirring constantly for 4-5 minutes until vegetables are bright and slightly tender but still crisp.
8. Push vegetables to the sides, add garlic and ginger to the center, and cook for 30 seconds until fragrant. Tip: Don’t let the garlic burn—it turns bitter!
9. Return tofu to the skillet and add soy sauce, rice vinegar, and sesame oil.
10. Toss everything together for 1-2 minutes until well coated and heated through.
11. Serve immediately over cooked brown rice, garnished with green onions.
Look at that beautiful plate! The tofu stays wonderfully crispy while the vegetables maintain just the right amount of crunch. I love how the savory soy sauce balances with the bright ginger and garlic—it’s seriously addictive. Sometimes I’ll add a sprinkle of sesame seeds or serve it with a side of sriracha for those who like extra heat.
Greek Yogurt Parfait with Berries and Nuts
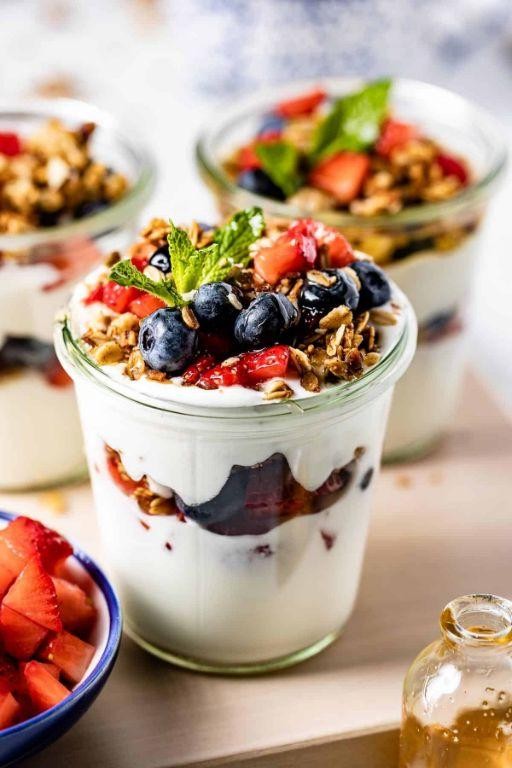
Diving into a delicious breakfast or snack doesn’t have to be complicated. This Greek yogurt parfait with berries and nuts is my go-to for a quick, satisfying treat that feels both indulgent and wholesome. You’ll love how easy it is to throw together.
Serving: 1 | Pre Time: 10 minutes | Cooking Time: 0 minutes
1
servings10
minutesIngredients
– 1 cup plain Greek yogurt (I love the thick, creamy texture of full-fat for extra richness)
– 1/2 cup mixed fresh berries, like strawberries and blueberries (rinsed and patted dry—frozen work great too, just thaw them first)
– 2 tbsp honey (local honey adds a lovely floral note if you have it)
– 1/4 cup granola (choose your favorite crunchy kind for that perfect bite)
– 2 tbsp chopped mixed nuts, such as almonds and walnuts (toasting them lightly in a dry pan first brings out amazing flavor)
Instructions
1. Spoon half of the Greek yogurt into the bottom of a clear glass or jar to create the first layer.
2. Drizzle 1 tablespoon of honey over the yogurt layer for a touch of sweetness.
3. Add half of the mixed berries on top of the honey-drizzled yogurt.
4. Sprinkle half of the granola evenly over the berries to add crunch.
5. Layer the remaining Greek yogurt over the granola.
6. Drizzle the remaining 1 tablespoon of honey over this second yogurt layer.
7. Top with the remaining mixed berries.
8. Finish by sprinkling the chopped mixed nuts and the remaining granola over the berries. Tip: For best texture, assemble just before serving to keep the granola from getting soggy.
9. Serve immediately with a long spoon to dig through all the layers. Tip: If using frozen berries, let them thaw at room temperature for about 10 minutes to avoid making the yogurt too watery.
10. Enjoy right away for the freshest taste. Tip: Feel free to mix in a dash of vanilla extract with the yogurt beforehand for an extra flavor boost if you like.
Here’s the beauty of this parfait: each spoonful delivers a creamy, tangy yogurt paired with juicy berries and a satisfying crunch from the nuts and granola. Honestly, it’s so versatile—try it drizzled with a bit of melted dark chocolate for a decadent twist or layer it in a portable jar for an on-the-go breakfast that never disappoints.
Whole Wheat Pasta with Broccoli and Pesto
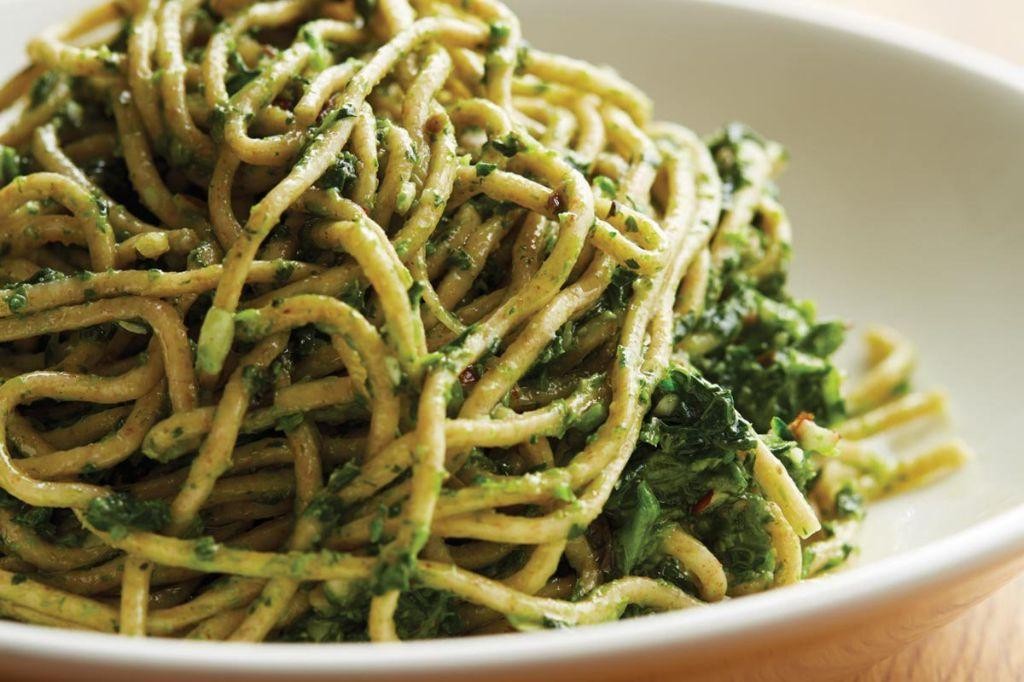
Okay, you know those nights when you want something wholesome but don’t want to spend hours in the kitchen? This whole wheat pasta with broccoli and pesto is your answer—it’s hearty, fresh, and comes together in no time.
Serving: 4 | Pre Time: 10 minutes | Cooking Time: 15 minutes
4
servings10
minutes15
minutesIngredients
– 12 oz whole wheat pasta (I like fusilli because it holds the pesto so well)
– 4 cups broccoli florets (fresh is best, but frozen works in a pinch)
– 1/3 cup extra virgin olive oil (my go-to for its fruity flavor)
– 2 cups fresh basil leaves (packed—don’t skimp here!)
– 1/2 cup grated Parmesan cheese (the good stuff, please)
– 1/3 cup pine nuts (toasted lightly for extra crunch)
– 2 cloves garlic (minced finely to avoid bitter bites)
– Salt and black pepper (I always use kosher salt for better control)
Instructions
1. Bring a large pot of salted water to a rolling boil over high heat.
2. Add the whole wheat pasta and cook for 8-10 minutes, stirring occasionally, until al dente (check the package directions, but taste a piece at 8 minutes—it should have a slight bite).
3. While the pasta cooks, heat 1 tablespoon of the olive oil in a large skillet over medium-high heat.
4. Add the broccoli florets and sauté for 5-7 minutes, stirring frequently, until they’re bright green and tender-crisp (tip: don’t overcrowd the pan to get a nice sear).
5. In a food processor, combine the basil, Parmesan, pine nuts, garlic, and remaining olive oil.
6. Pulse the mixture for 30-45 seconds, scraping down the sides once, until it forms a coarse paste (tip: if it’s too thick, add a splash of pasta water to loosen it).
7. Drain the pasta, reserving 1/2 cup of the starchy pasta water.
8. Return the pasta to the pot and add the pesto and broccoli, tossing gently to coat everything evenly.
9. If the sauce seems dry, gradually stir in the reserved pasta water, 2 tablespoons at a time, until it reaches your desired consistency (tip: this water helps the pesto cling to the pasta beautifully).
10. Season with salt and black pepper to taste, then divide into bowls.
So, what you get is a dish with a satisfying chew from the whole wheat pasta, balanced by the creamy pesto and crisp-tender broccoli. Serve it warm with an extra sprinkle of Parmesan, or try it chilled the next day for a tasty pasta salad twist—it’s versatile like that!
Baked Falafel with Cucumber-Yogurt Sauce

Finally, let’s talk about a healthier twist on a classic that’s perfect for meal prep or a quick dinner. Baked falafel gives you all that crispy-on-the-outside, tender-on-the-inside goodness without the deep-frying fuss, and paired with a cool cucumber-yogurt sauce, it’s a total win. You’ll love how simple this comes together for a satisfying vegetarian meal.
Serving: 4 | Pre Time: 15 minutes | Cooking Time: 25 minutes
4
servings15
minutes25
minutesIngredients
– 1 (15-ounce) can chickpeas, drained and rinsed—I give them a good pat dry with paper towels to help with crispiness
– 1/2 cup fresh parsley leaves, packed (I like the bright flavor of flat-leaf parsley here)
– 1/4 cup fresh cilantro leaves, packed—skip it if you’re not a cilantro fan, no judgment!
– 1/4 cup diced yellow onion, about half a small onion
– 3 cloves garlic, minced (fresh is best for that punchy aroma)
– 1 tablespoon extra virgin olive oil, my go-to for drizzling
– 1 tablespoon all-purpose flour
– 1 teaspoon ground cumin
– 1/2 teaspoon ground coriander
– 1/2 teaspoon baking powder
– 1/2 teaspoon salt
– 1/4 teaspoon black pepper
– For the sauce: 1 cup plain Greek yogurt (I use full-fat for creaminess), 1/2 cup grated cucumber, squeezed dry in a towel to remove excess water, 1 tablespoon fresh lemon juice, 1 tablespoon chopped fresh dill, and 1/4 teaspoon salt
Instructions
1. Preheat your oven to 400°F and line a baking sheet with parchment paper.
2. In a food processor, combine the chickpeas, parsley, cilantro, onion, and garlic, then pulse until finely chopped but not pureed—you want a coarse texture for the best bite.
3. Tip: Scrape down the sides of the processor once or twice to ensure everything mixes evenly.
4. Transfer the mixture to a bowl and stir in the olive oil, flour, cumin, coriander, baking powder, salt, and pepper until well combined.
5. Using your hands, shape the mixture into 12 equal-sized balls, about 1.5 inches each, and place them on the prepared baking sheet.
6. Gently flatten each ball into a patty about 1/2-inch thick to help them cook through evenly.
7. Bake in the preheated oven for 20-25 minutes, flipping halfway through, until golden brown and firm to the touch.
8. Tip: For extra crispiness, spritz the patties lightly with cooking spray before baking.
9. While the falafel bakes, make the sauce by whisking together the Greek yogurt, grated cucumber, lemon juice, dill, and salt in a small bowl until smooth.
10. Tip: Let the sauce chill in the fridge for 10 minutes to let the flavors meld while the falafel finishes baking.
11. Remove the falafel from the oven and let them cool on the sheet for 5 minutes to set.
Now, dig into these baked beauties—they’re wonderfully crispy on the outside with a soft, herb-packed center that’s not at all dry. The cool, tangy cucumber-yogurt sauce adds a refreshing contrast that makes every bite pop. Try stuffing them into pita pockets with fresh veggies or serving over a salad for a light, creative twist.
Hearty Chickpea and Spinach Curry

Gather around, friends—this cozy curry is the perfect answer to a chilly evening when you want something nourishing but don’t feel like spending hours in the kitchen. It’s packed with protein and greens, and the spices will make your whole kitchen smell amazing.
Serving: 4 | Pre Time: 10 minutes | Cooking Time: 25 minutes
4
servings10
minutes25
minutesIngredients
– 2 tablespoons extra virgin olive oil (my go‑to for a fruity base)
– 1 medium yellow onion, diced (I like mine finely chopped so it melts into the sauce)
– 3 garlic cloves, minced (fresh is best here—it really brightens the dish)
– 1 tablespoon freshly grated ginger (trust me, grating it yourself makes a huge difference)
– 1 tablespoon curry powder (I use a mild blend, but feel free to spice it up)
– 1 teaspoon ground cumin
– 1 (15‑ounce) can chickpeas, drained and rinsed (give them a good shake in a colander to remove excess liquid)
– 1 (14‑ounce) can diced tomatoes, with their juices
– 1 (13.5‑ounce) can full‑fat coconut milk (shaken well before opening)
– 4 cups fresh spinach, roughly chopped (baby spinach works great too)
– ½ teaspoon salt
– ¼ teaspoon freshly ground black pepper
– Cooked basmati rice or naan, for serving (I always have rice ready to go)
Instructions
1. Heat the olive oil in a large, heavy‑bottomed pot or Dutch oven over medium heat for 1 minute until shimmering.
2. Add the diced onion and cook, stirring occasionally, for 5 minutes until softened and translucent.
3. Stir in the minced garlic and grated ginger, and cook for 1 minute until fragrant—don’t let the garlic brown.
4. Sprinkle in the curry powder and ground cumin, and toast the spices with the onion mixture for 30 seconds to release their oils.
5. Pour in the diced tomatoes with their juices and use a wooden spoon to scrape up any browned bits from the bottom of the pot.
6. Add the drained chickpeas and stir to coat them in the tomato‑spice mixture.
7. Pour in the coconut milk, then add the salt and black pepper, and stir everything together until well combined.
8. Bring the curry to a gentle simmer over medium‑high heat, then reduce the heat to low, cover the pot, and let it cook for 15 minutes to allow the flavors to meld.
9. Uncover the pot and stir in the chopped spinach, cooking for 2–3 minutes until the spinach is just wilted and bright green.
10. Taste the curry and adjust seasoning if needed, then remove it from the heat.
11. Serve the curry hot over cooked basmati rice or with warm naan on the side.
Unbelievably creamy and warmly spiced, this curry has a velvety texture from the coconut milk and a hearty bite from the chickpeas. The spinach adds a fresh, earthy note that balances the richness perfectly. Try topping it with a dollop of yogurt or a squeeze of lime for a bright, tangy finish.
Zucchini Noodles with Tomato and Basil
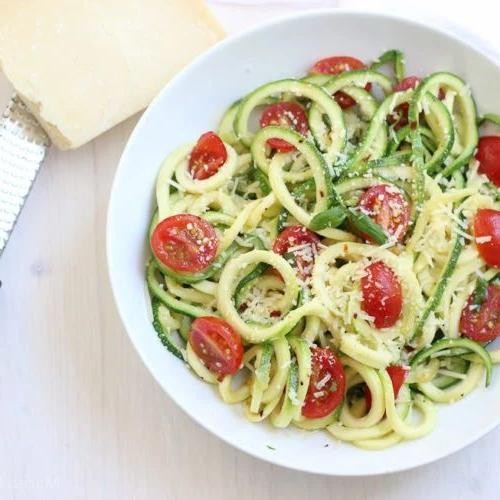
Sometimes you just need a meal that feels fresh, light, and comes together in a flash. This zucchini noodle dish is exactly that—a vibrant, no-cook sauce tossed with crisp veggie noodles for a satisfying dinner that won’t weigh you down.
Serving: 2 | Pre Time: 15 minutes | Cooking Time: 0 minutes
2
servings15
minutesIngredients
– 2 medium zucchinis, spiralized into noodles (I find this yields the perfect amount for two)
– 1 pint cherry tomatoes, halved (they’re sweeter and juicier than larger ones)
– 1/4 cup fresh basil leaves, roughly torn (don’t skimp—fresh basil makes all the difference)
– 2 tbsp extra virgin olive oil, my go-to for its fruity flavor
– 1 small garlic clove, minced (about 1 tsp)
– 1/4 tsp salt
– 1/8 tsp black pepper
– 2 tbsp grated Parmesan cheese (optional, but I love the salty kick it adds)
Instructions
1. Place the halved cherry tomatoes in a medium mixing bowl.
2. Add the minced garlic, extra virgin olive oil, salt, and black pepper to the bowl with the tomatoes.
3. Gently toss the tomato mixture until all ingredients are evenly combined. Let it sit for 10 minutes at room temperature—this allows the flavors to meld and the tomatoes to release their juices, creating a simple sauce. Tip: If you have time, let it sit for up to 30 minutes for even more flavor.
4. While the tomato mixture rests, use a spiralizer to turn the zucchinis into noodles. If you don’t have a spiralizer, a vegetable peeler works for wide ribbons.
5. Pat the zucchini noodles dry with a paper towel to remove excess moisture, which helps prevent a watery sauce.
6. Add the zucchini noodles and torn basil leaves to the bowl with the tomato mixture.
7. Toss everything together until the zucchini noodles are evenly coated with the sauce. Tip: Use tongs or two large spoons for gentle tossing to avoid breaking the noodles.
8. Divide the mixture between two plates or bowls.
9. Sprinkle each serving with 1 tablespoon of grated Parmesan cheese, if using.
10. Serve immediately. Tip: For a heartier meal, add grilled chicken or chickpeas on top.
Keep it simple and enjoy it right away—the zucchini noodles stay crisp, while the tomatoes offer a sweet, juicy burst. The fresh basil and garlic tie it all together with a garden-fresh aroma. Try serving it alongside crusty bread to soak up every last bit of that flavorful tomato dressing.
Mushroom and Spinach Omelette

Fancy a quick, satisfying breakfast that feels fancy but comes together in minutes? This mushroom and spinach omelette is your new go-to. It’s packed with savory flavor and cooks up fluffy every time.
Serving: 1 | Pre Time: 5 minutes | Cooking Time: 7 minutes
1
servings5
minutes7
minutesIngredients
– 2 large eggs (I prefer room temp eggs here—they whip up fluffier)
– 1 tbsp unsalted butter (for that rich, classic flavor)
– 1/4 cup sliced cremini mushrooms (baby bellas work great too)
– 1/2 cup fresh spinach, roughly chopped (packed—it wilts down a lot)
– 1 tbsp whole milk or water (a splash makes the eggs extra tender)
– 1/8 tsp kosher salt
– 1/8 tsp black pepper, freshly ground if you have it
– 1 tbsp extra virgin olive oil (my go-to for sautéing)
– 1 tbsp grated Parmesan cheese (optional, but adds a nice salty kick)
Instructions
1. Crack 2 large eggs into a small bowl. Add 1 tbsp whole milk or water, 1/8 tsp kosher salt, and 1/8 tsp black pepper.
2. Whisk the egg mixture vigorously with a fork for about 30 seconds until fully combined and slightly frothy. Tip: Whisking well incorporates air for a fluffier omelette.
3. Heat a 8-inch nonstick skillet over medium heat. Add 1 tbsp extra virgin olive oil and let it warm for 30 seconds.
4. Add 1/4 cup sliced cremini mushrooms to the skillet. Sauté for 2-3 minutes, stirring occasionally, until they soften and start to brown.
5. Add 1/2 cup fresh spinach to the skillet with the mushrooms. Cook for 1 minute, stirring constantly, until the spinach wilts completely. Tip: Wilt the spinach quickly to keep it bright green and avoid sogginess.
6. Transfer the cooked mushrooms and spinach to a plate. Wipe the skillet clean with a paper towel.
7. Return the skillet to medium heat. Add 1 tbsp unsalted butter and let it melt completely, swirling to coat the pan.
8. Pour the whisked egg mixture into the skillet. Let it cook undisturbed for 30 seconds until the edges just start to set.
9. Use a spatula to gently lift the edges of the omelette and tilt the pan, letting uncooked egg flow underneath. Repeat around the edges for about 1-2 minutes until the top is mostly set but still slightly wet. Tip: Keep the heat medium—too high and the eggs can brown too quickly.
10. Spoon the cooked mushrooms and spinach evenly over one half of the omelette. Sprinkle with 1 tbsp grated Parmesan cheese if using.
11. Carefully fold the empty half of the omelette over the filling with the spatula. Cook for another 30 seconds to 1 minute to warm the filling through.
12. Slide the omelette onto a plate. Serve immediately.
Nothing beats that first bite—the eggs are tender and fluffy, with savory mushrooms and fresh spinach in every forkful. Try it with a side of toast or a simple salad for a complete meal.
Tofu and Vegetable Skewers with Peanut Sauce

Aren’t you tired of the same old weeknight dinners? These tofu and vegetable skewers with peanut sauce are about to become your new favorite—they’re easy, packed with flavor, and perfect for grilling season. You’ll love how the creamy peanut sauce ties everything together.
Serving: 4 | Pre Time: 20 minutes | Cooking Time: 10 minutes
3
servings20
minutes10
minutesIngredients
– 1 block (14 oz) extra-firm tofu, pressed for at least 15 minutes to remove excess water—this helps it get nice and crispy
– 1 red bell pepper, cut into 1-inch pieces (I love the sweet crunch it adds)
– 1 zucchini, sliced into ½-inch rounds
– 8 oz cremini mushrooms, stems trimmed (baby bellas work great too)
– ¼ cup soy sauce (I use low-sodium to control the saltiness)
– 2 tbsp olive oil
– ½ cup creamy peanut butter (the natural kind without added sugar is my go-to for a richer flavor)
– 2 tbsp lime juice, freshly squeezed if possible
– 1 tbsp maple syrup
– 1 tsp grated fresh ginger
– 1 garlic clove, minced
– ¼ cup water, plus more as needed to thin the sauce
Instructions
1. Cut the pressed tofu into 1-inch cubes and place them in a medium bowl.
2. Add the soy sauce and olive oil to the tofu, tossing gently to coat all pieces evenly.
3. Let the tofu marinate at room temperature for 10 minutes while you prepare the vegetables.
4. Thread the tofu cubes, red bell pepper pieces, zucchini rounds, and mushrooms onto skewers, alternating ingredients for a colorful mix.
5. Preheat a grill or grill pan to medium-high heat (about 400°F).
6. Place the skewers on the grill and cook for 4-5 minutes per side, turning once, until the tofu is lightly charred and the vegetables are tender-crisp.
7. While the skewers cook, make the peanut sauce by combining the peanut butter, lime juice, maple syrup, grated ginger, minced garlic, and ¼ cup water in a small bowl.
8. Whisk the sauce vigorously until smooth, adding more water 1 tablespoon at a time if it’s too thick—you want a drizzle-able consistency.
9. Remove the skewers from the grill and transfer them to a serving platter.
10. Drizzle the peanut sauce generously over the skewers just before serving.
But the best part is how these skewers come together: the tofu gets slightly crispy on the outside while staying tender inside, and the peanut sauce adds a creamy, tangy kick that balances the smoky veggies. Try serving them over a bed of quinoa or with extra sauce on the side for dipping—they’re a hit at summer barbecues or cozy indoor dinners alike.
Stuffed Bell Peppers with Quinoa and Beef

Let’s be honest—sometimes you just need a cozy, satisfying meal that feels like a hug in a bowl. These stuffed bell peppers with quinoa and beef are exactly that: hearty, flavorful, and surprisingly easy to pull together on a busy weeknight. You’ll love how the quinoa soaks up all the savory goodness while the peppers get tender and sweet.
Serving: 4 | Pre Time: 15 minutes | Cooking Time: 45 minutes
4
servings15
minutes45
minutesIngredients
– 4 large bell peppers, any color you like—I often grab a mix for a vibrant look
– 1 lb lean ground beef (85/15 works great for flavor without too much grease)
– 1 cup uncooked quinoa, rinsed well to remove any bitterness
– 1 small yellow onion, finely diced—I always keep mine chilled to avoid tears!
– 2 cloves garlic, minced (fresh is best, but jarred works in a pinch)
– 1 (15 oz) can diced tomatoes, undrained—they add a nice juicy base
– 1 cup shredded mozzarella cheese, divided (I like part-skim for a lighter touch)
– 2 tbsp extra virgin olive oil, my go-to for sautéing
– 1 tsp dried oregano
– ½ tsp salt
– ¼ tsp black pepper
Instructions
1. Preheat your oven to 375°F.
2. Slice the tops off the bell peppers and remove the seeds and membranes.
3. Place the peppers upright in a baking dish.
4. Heat the olive oil in a large skillet over medium-high heat.
5. Add the diced onion and cook for 3–4 minutes until translucent.
6. Add the minced garlic and cook for 1 minute until fragrant.
7. Add the ground beef to the skillet and cook for 5–7 minutes, breaking it up with a spoon until no pink remains.
8. Stir in the rinsed quinoa, diced tomatoes with their juices, oregano, salt, and black pepper.
9. Bring the mixture to a simmer, then reduce heat to low, cover, and cook for 15 minutes until the quinoa is tender and liquid is absorbed.
10. Remove the skillet from heat and stir in ½ cup of the shredded mozzarella cheese.
11. Spoon the quinoa-beef mixture evenly into the prepared bell peppers, packing it gently.
12. Top each pepper with the remaining ½ cup of mozzarella cheese.
13. Cover the baking dish with aluminum foil and bake for 25 minutes.
14. Remove the foil and bake for an additional 10 minutes until the cheese is bubbly and golden.
15. Let the peppers cool for 5 minutes before serving.
Grab a fork and dig in! The peppers turn wonderfully soft and sweet, contrasting with the savory, cheesy filling that’s packed with protein from the beef and quinoa. For a fun twist, try drizzling them with a bit of hot sauce or serving alongside a crisp green salad—it’s a complete meal that’s as pretty as it is delicious.
Roasted Beet and Goat Cheese Salad
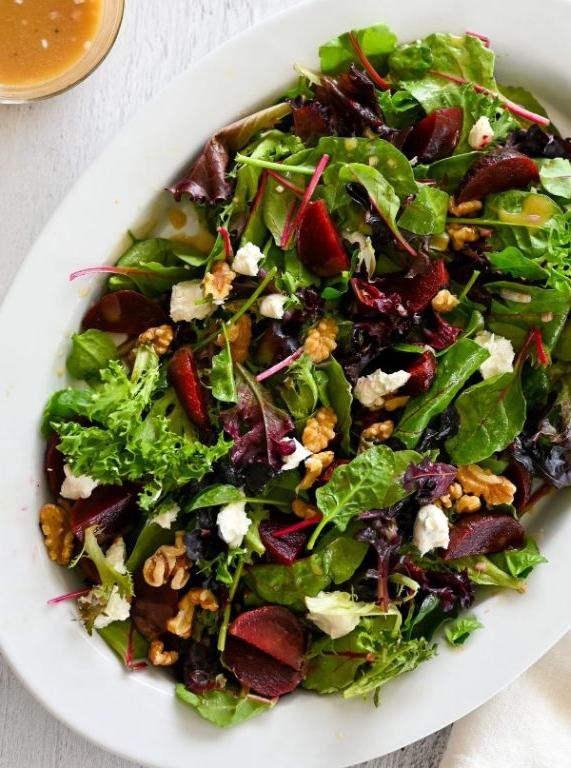
You know those salads that feel like a special occasion but are actually simple to throw together? This roasted beet and goat cheese salad is exactly that—earthy, creamy, and perfect for when you want something a little fancy without the fuss.
Serving: 4 | Pre Time: 15 minutes | Cooking Time: 45 minutes
2
servings15
minutes45
minutesIngredients
– 4 medium beets, scrubbed (I like a mix of red and golden for color)
– 2 tablespoons extra virgin olive oil, plus more for drizzling (my go-to for roasting)
– 1/2 teaspoon kosher salt
– 1/4 teaspoon freshly ground black pepper
– 5 ounces mixed greens (I grab a spring mix for variety)
– 4 ounces goat cheese, crumbled (room temp spreads easier)
– 1/4 cup chopped walnuts, toasted (trust me, toasting makes all the difference)
– 2 tablespoons balsamic vinegar
Instructions
1. Preheat your oven to 400°F and line a baking sheet with parchment paper.
2. Trim the tops off the beets and wrap each one tightly in aluminum foil—this steams them perfectly.
3. Place the wrapped beets on the baking sheet and roast for 45 minutes, or until a fork pierces them easily.
4. Let the beets cool for 10 minutes, then peel off the skins under running water (tip: wear gloves to avoid stains!).
5. Slice the peeled beets into 1/2-inch wedges and toss them in a bowl with 1 tablespoon olive oil, salt, and pepper.
6. Arrange the mixed greens on a large platter and top with the roasted beet wedges.
7. Sprinkle the crumbled goat cheese and toasted walnuts evenly over the salad.
8. In a small bowl, whisk together the remaining 1 tablespoon olive oil and balsamic vinegar until emulsified.
9. Drizzle the dressing over the salad just before serving (tip: add it last to keep the greens crisp).
10. Finish with an extra pinch of salt and pepper if desired.
Dive into this salad for a wonderful mix of textures—the beets are tender and sweet, the goat cheese adds a creamy tang, and the walnuts give a satisfying crunch. It’s fantastic as a light lunch or paired with grilled chicken for dinner; try serving it on a big wooden board for a rustic touch that’ll impress your guests.
Miso Soup with Seaweed and Tofu

Brace yourself for the coziest, most comforting bowl you’ll make all week. This miso soup with seaweed and tofu is like a warm hug from the inside out, and it comes together in minutes when you need something nourishing and quick.
Serving: 4 | Pre Time: 5 minutes | Cooking Time: 10 minutes
4
servings5
minutes10
minutesIngredients
– 4 cups water (I use filtered for the cleanest flavor)
– 1 (4-inch) piece kombu seaweed (dried, it adds that deep umami base)
– 1/4 cup dried wakame seaweed (it plumps up beautifully in the broth)
– 1/4 cup white miso paste (my favorite is the mild, sweet variety)
– 1 (14-ounce) package firm tofu, cut into 1/2-inch cubes (pat it dry first so it doesn’t water down the soup)
– 2 green onions, thinly sliced (save the green parts for garnish)
– 1 tbsp soy sauce (use low-sodium if you’re watching salt)
Instructions
1. Combine 4 cups water and the 4-inch piece of kombu in a medium saucepan over medium-high heat.
2. Bring the water to a gentle simmer—you’ll see small bubbles forming around the edges—then immediately remove the kombu with tongs (this prevents bitterness).
3. Reduce the heat to low and whisk in 1/4 cup white miso paste until it’s fully dissolved and no lumps remain (tip: add it off the heat to preserve its probiotics).
4. Add 1/4 cup dried wakame seaweed and let it soak in the broth for 2 minutes, until softened and expanded.
5. Gently stir in the cubed tofu and 1 tbsp soy sauce, then simmer for 3 minutes to heat the tofu through without breaking it apart.
6. Turn off the heat and stir in the sliced green onions (tip: adding them last keeps their fresh crunch).
7. Ladle the soup into bowls and serve immediately while hot (tip: avoid boiling after adding miso to keep its flavor vibrant).
Miso soup delivers a silky, savory broth with tender tofu and chewy seaweed in every spoonful. The subtle saltiness from the soy sauce balances the miso’s richness perfectly. Try topping it with a sprinkle of sesame seeds or a dash of chili oil for an extra kick on chilly evenings.
Homemade Vegetable Sushi Rolls

Veggie sushi rolls are the perfect way to enjoy sushi at home without any fuss. You can customize them with whatever crunchy vegetables you have on hand, making them a fun and healthy meal. Let’s roll up something delicious together!
Serving: 4 | Pre Time: 30 minutes | Cooking Time: 20 minutes
5
servings30
minutes20
minutesIngredients
– 2 cups sushi rice (rinsed well—I find this makes it less sticky)
– 2 1/4 cups water
– 1/4 cup rice vinegar (seasoned is my go-to for that authentic tang)
– 2 tbsp granulated sugar
– 1 tsp salt
– 4 sheets nori seaweed (the toasted kind adds a nice crunch)
– 1 medium cucumber, julienned (I like English cucumbers for fewer seeds)
– 1 medium carrot, julienned (peeled first for a smoother texture)
– 1 avocado, sliced (ripe but firm works best here)
– Soy sauce for dipping (low-sodium is my preference)
– Pickled ginger for serving (optional, but it adds a zesty kick)
Instructions
1. Rinse the sushi rice under cold water in a fine-mesh strainer until the water runs clear, about 3-4 times.
2. Combine the rinsed rice and 2 1/4 cups water in a medium saucepan over high heat.
3. Bring the mixture to a boil, then reduce the heat to low, cover the saucepan, and simmer for 20 minutes.
4. Remove the saucepan from the heat and let the rice sit, covered, for 10 minutes to steam.
5. In a small bowl, whisk together the rice vinegar, granulated sugar, and salt until the sugar dissolves completely.
6. Transfer the cooked rice to a large, non-metallic bowl and gently fold in the vinegar mixture with a rice paddle or spatula.
7. Spread the seasoned rice in a thin, even layer on a baking sheet to cool to room temperature, about 15 minutes.
8. Place one sheet of nori on a bamboo sushi mat with the shiny side facing down.
9. Wet your hands lightly with water to prevent sticking, then spread about 1/2 cup of the cooled rice evenly over the nori, leaving a 1-inch border at the top edge.
10. Arrange a few strips of julienned cucumber, carrot, and sliced avocado horizontally across the center of the rice.
11. Lift the edge of the bamboo mat closest to you and roll it away from you, pressing gently to form a tight cylinder.
12. Use a sharp knife dipped in water to slice the roll into 8 even pieces, wiping the knife clean between cuts.
13. Repeat steps 8-12 with the remaining nori sheets and ingredients.
14. Serve the sushi rolls immediately with small bowls of soy sauce and pickled ginger on the side.
Unbelievably fresh, these rolls have a satisfying crunch from the veggies and a subtle sweetness from the rice. The nori adds a savory, umami flavor that pairs perfectly with a dip of soy sauce—try arranging them on a platter with extra ginger for a colorful, shareable appetizer!
Baked Oatmeal with Almonds and Blueberries
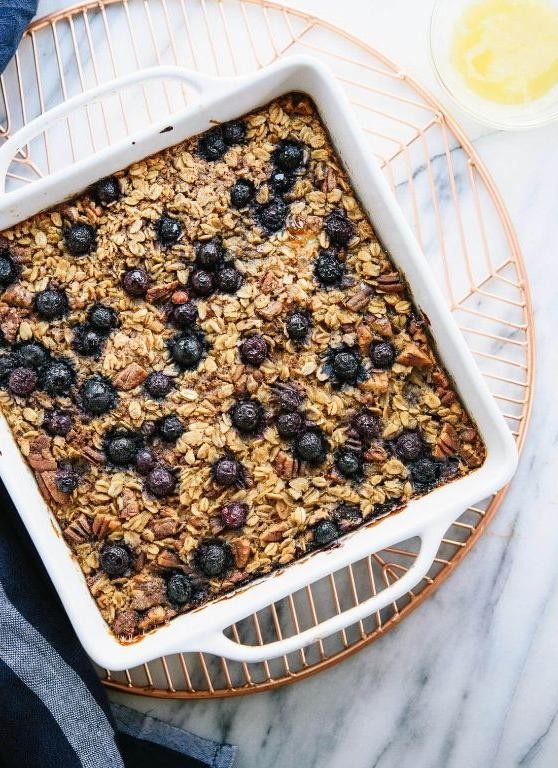
Fancy a cozy, hands-off breakfast that feels like a hug in a dish? This baked oatmeal with almonds and blueberries is your new go-to. It’s simple to throw together, and the oven does all the work while you sip your coffee.
Serving: 6 | Pre Time: 10 minutes | Cooking Time: 35 minutes
6
servings10
minutes35
minutesIngredients
- 2 cups old-fashioned rolled oats (I love the hearty texture these give)
- 1/3 cup sliced almonds (toasted for extra crunch if you have time)
- 1 cup fresh or frozen blueberries (frozen work great and won’t bleed as much)
- 2 large eggs, at room temperature (they blend into the wet ingredients more smoothly)
- 1 3/4 cups whole milk (or your favorite milk alternative)
- 1/4 cup pure maple syrup (the real stuff makes all the difference)
- 1 tsp vanilla extract
- 1 tsp ground cinnamon
- 1/2 tsp baking powder
- 1/4 tsp salt
- Butter or non-stick spray for greasing the dish
Instructions
- Preheat your oven to 375°F (190°C).
- Grease an 8×8-inch baking dish thoroughly with butter or non-stick spray to prevent sticking.
- In a large mixing bowl, combine the old-fashioned rolled oats, sliced almonds, ground cinnamon, baking powder, and salt.
- In a separate medium bowl, whisk together the room-temperature eggs, whole milk, pure maple syrup, and vanilla extract until smooth.
- Pour the wet ingredients into the bowl with the dry ingredients and stir until just combined—don’t overmix.
- Gently fold in the blueberries, being careful not to crush them if using fresh ones.
- Transfer the mixture to the greased baking dish and spread it evenly with a spatula.
- Bake in the preheated oven for 35 minutes, or until the top is golden brown and the center is set when lightly pressed.
- Remove from the oven and let it cool in the dish for 10 minutes before slicing. Tip: This resting time helps it firm up for cleaner cuts.
Here’s the best part: it comes out warm and custardy in the middle with a lightly crisp top. The almonds add a nice nutty bite, and those blueberries burst with sweet-tart flavor in every spoonful. Try it drizzled with a little extra maple syrup or a dollop of yogurt for a creamy contrast.
Conclusion
A nourishing pregnancy starts with delicious, wholesome meals! We hope these 25 recipes inspire your kitchen with vibrant flavors and essential nutrients. Give them a try, share which ones become your favorites in the comments below, and don’t forget to pin this article on Pinterest to help other expecting parents discover these healthy ideas. Happy cooking!