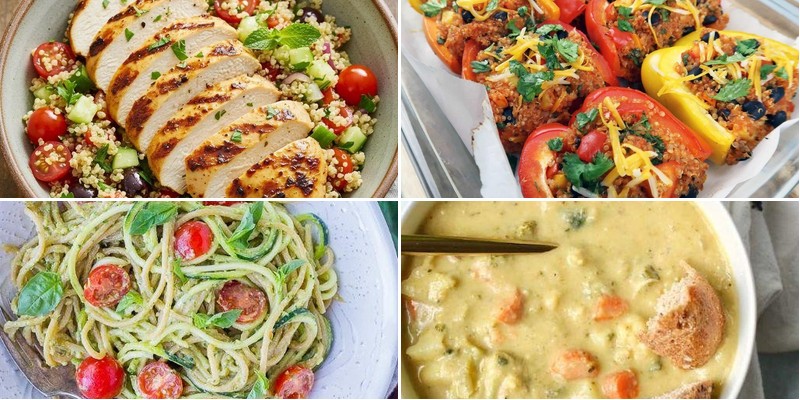
You know those days when you want something nourishing, satisfying, and genuinely good for you—all at once? We’ve gathered 29 delicious, healthy, and hearty recipes that deliver exactly that, from quick weeknight dinners to cozy weekend comfort food. Get ready to find your new favorite meals for breakfast, lunch, and dinner right here.
Quinoa and Black Bean Stuffed Peppers

Getting perfectly roasted bell peppers filled with a protein-packed quinoa mixture is easier than you might think. Gather your ingredients and follow these precise steps to create a satisfying vegetarian meal that’s both nutritious and visually stunning. This method ensures evenly cooked peppers with a flavorful, well-balanced filling every time.
5
portions20
minutes60
minutesIngredients
– 4 large bell peppers, halved lengthwise and seeded
– 1 cup quinoa, thoroughly rinsed
– 2 cups vegetable broth
– 1 can (15 oz) black beans, drained and rinsed
– 1 cup corn kernels, fresh or frozen
– 1 medium yellow onion, finely diced
– 3 cloves garlic, minced
– 2 tbsp extra virgin olive oil
– 1 tsp ground cumin
– 1 tsp smoked paprika
– ½ tsp chili powder
– 4 oz Monterey Jack cheese, freshly grated
– ¼ cup fresh cilantro, chopped
– Kosher salt to season
Instructions
1. Preheat your oven to 375°F and lightly brush the bell pepper halves with 1 tablespoon of extra virgin olive oil.
2. Arrange the peppers cut-side up on a parchment-lined baking sheet and roast for 15 minutes until slightly softened.
3. While peppers roast, heat the remaining olive oil in a medium saucepan over medium heat.
4. Sauté the diced yellow onion for 5-7 minutes until translucent and fragrant.
5. Add the minced garlic and cook for 1 additional minute until aromatic but not browned.
6. Stir in the rinsed quinoa, ground cumin, smoked paprika, and chili powder, toasting for 2 minutes to enhance flavor development.
7. Pour in the vegetable broth, bring to a boil, then reduce heat to low, cover, and simmer for 15 minutes until liquid is absorbed.
8. Remove the quinoa from heat and fluff with a fork, then let stand covered for 5 minutes to complete absorption.
9. Gently fold in the drained black beans, corn kernels, and chopped fresh cilantro.
10. Season the quinoa mixture with kosher salt, being careful not to oversalt as the cheese will add salinity.
11. Remove the partially roasted peppers from the oven and evenly divide the quinoa filling among them.
12. Top each pepper with freshly grated Monterey Jack cheese, distributing it evenly across all portions.
13. Return the stuffed peppers to the oven and bake for 20-25 minutes until cheese is golden brown and bubbly.
14. Let the peppers rest for 5 minutes before serving to allow the filling to set properly.
Mouthwatering and satisfying, these stuffed peppers offer a delightful contrast between the tender roasted pepper shells and the toothsome quinoa filling. The smoked paprika provides a subtle smokiness that complements the earthy black beans, while the melted Monterey Jack cheese creates a creamy texture throughout. For an elegant presentation, serve alongside a crisp green salad dressed with lime vinaigrette to balance the dish’s richness.
Hearty Lentil and Vegetable Stew
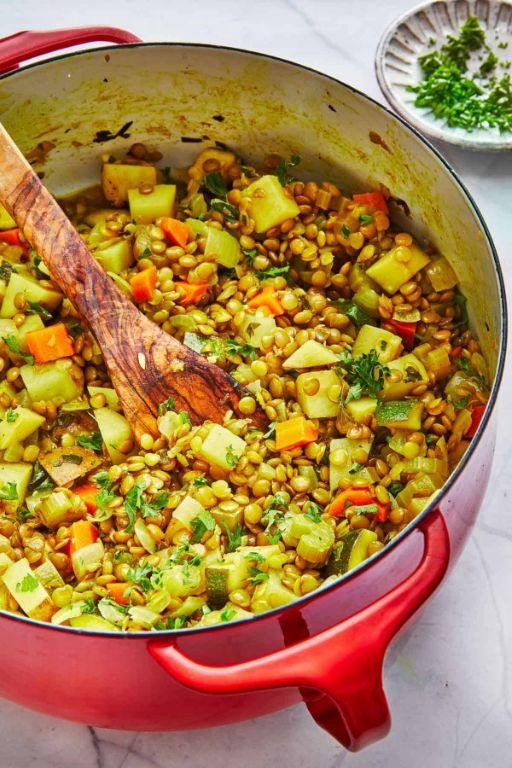
This comforting lentil and vegetable stew delivers deep, earthy flavors with minimal effort, making it perfect for busy weeknights or cozy weekends. Through careful layering of ingredients and patient simmering, we’ll develop a rich, complex broth that transforms simple components into something truly special. The methodical approach ensures even the newest cook can achieve restaurant-quality results in their own kitchen.
6
servings20
minutes50
minutesIngredients
- 2 tablespoons extra virgin olive oil
- 1 large yellow onion, finely diced
- 3 medium carrots, peeled and cut into ½-inch rounds
- 2 celery stalks, cut into ¼-inch slices
- 4 garlic cloves, minced
- 1½ cups brown lentils, rinsed and drained
- 6 cups vegetable stock
- 1 (14.5-ounce) can diced tomatoes, with juices
- 2 bay leaves
- 1 teaspoon smoked paprika
- ½ teaspoon freshly cracked black pepper
- 1 teaspoon fine sea salt
- 3 cups chopped kale, stems removed
- 2 tablespoons fresh lemon juice
- ¼ cup chopped fresh parsley
Instructions
- Heat the extra virgin olive oil in a large Dutch oven over medium heat until shimmering but not smoking.
- Add the finely diced yellow onion and cook for 5 minutes, stirring occasionally, until translucent and fragrant.
- Add the carrot rounds and celery slices, cooking for an additional 4 minutes until slightly softened.
- Stir in the minced garlic and cook for exactly 1 minute until aromatic but not browned.
- Add the rinsed brown lentils to the pot, stirring to coat with the oil and vegetable mixture.
- Pour in the vegetable stock and canned diced tomatoes with their juices.
- Add the bay leaves, smoked paprika, freshly cracked black pepper, and fine sea salt.
- Bring the mixture to a boil over high heat, then immediately reduce to a gentle simmer.
- Cover the pot and simmer for 35 minutes, stirring once halfway through to prevent sticking.
- Test the lentils for doneness—they should be tender but still hold their shape.
- Stir in the chopped kale and cook uncovered for 5 minutes until the kale has wilted and turned bright green.
- Remove the pot from heat and discard the bay leaves.
- Stir in the fresh lemon juice and chopped parsley just before serving.
Gradually adding the lemon juice at the end brightens the entire dish while preserving its fresh, citrusy notes. The finished stew boasts a velvety texture where the lentils have partially broken down to thicken the broth, while the vegetables maintain their structural integrity. For an elegant presentation, serve in shallow bowls garnished with an extra drizzle of olive oil and crusty artisanal bread for dipping into the rich, tomato-infused liquid.
Grilled Lemon Herb Chicken with Quinoa Salad
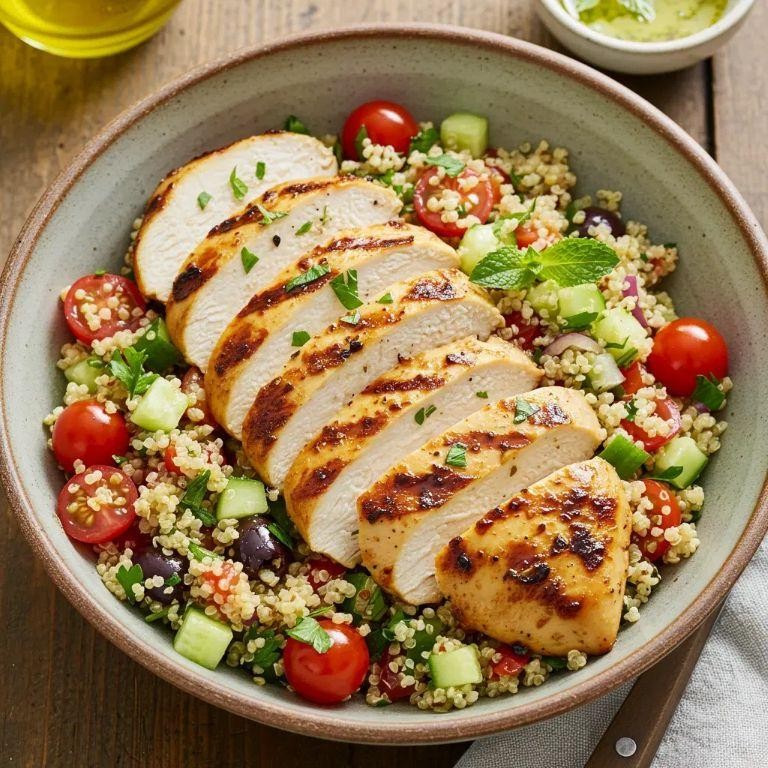
Tackling a wholesome, flavorful meal doesn’t have to be complicated, and this grilled lemon herb chicken with quinoa salad is the perfect example. This methodical guide will walk you through creating a perfectly balanced dish, from the juicy, herb-crusted chicken to the light and zesty quinoa salad, ensuring delicious results every time.
3
servings40
minutes28
minutesIngredients
- 4 boneless, skinless chicken breasts (about 6 ounces each)
- 1/4 cup extra-virgin olive oil
- 3 tablespoons freshly squeezed lemon juice
- 2 cloves garlic, minced
- 1 tablespoon fresh rosemary, finely chopped
- 1 tablespoon fresh thyme leaves
- 1 teaspoon kosher salt
- 1/2 teaspoon freshly cracked black pepper
- 1 cup uncooked quinoa, rinsed
- 2 cups chicken stock
- 1/2 English cucumber, finely diced
- 1/4 cup fresh parsley, chopped
- 2 tablespoons fresh mint, chopped
- 1/4 cup crumbled feta cheese
Instructions
- Place the chicken breasts in a large, shallow dish.
- In a small bowl, whisk together the extra-virgin olive oil, freshly squeezed lemon juice, minced garlic, finely chopped rosemary, thyme leaves, kosher salt, and freshly cracked black pepper to create the marinade.
- Pour the marinade over the chicken breasts, ensuring they are fully coated.
- Cover the dish and refrigerate the chicken for a minimum of 30 minutes, or up to 4 hours, to allow the flavors to penetrate. (Tip: For maximum flavor, let the chicken marinate for the full 4 hours.)
- Preheat your grill to a medium-high heat of 400°F.
- While the grill heats, rinse the quinoa thoroughly in a fine-mesh strainer under cold water until the water runs clear to remove its natural bitter coating.
- In a medium saucepan, combine the rinsed quinoa and chicken stock.
- Bring the mixture to a boil over high heat.
- Once boiling, immediately reduce the heat to low, cover the saucepan, and simmer for 15 minutes.
- After 15 minutes, remove the saucepan from the heat and let the quinoa stand, covered, for 5 minutes to steam and absorb any remaining liquid.
- Remove the chicken from the marinade, allowing the excess to drip off.
- Place the chicken breasts on the preheated grill.
- Grill the chicken for 6-7 minutes.
- Flip the chicken breasts using tongs.
- Grill for an additional 6-7 minutes, or until the internal temperature reaches 165°F when checked with an instant-read thermometer. (Tip: Avoid pressing down on the chicken with a spatula, as this will release its precious juices.)
- Transfer the grilled chicken to a clean plate.
- Let the chicken rest for 5 minutes before slicing to allow the juices to redistribute.
- Fluff the cooked quinoa with a fork.
- Transfer the fluffed quinoa to a large mixing bowl.
- Add the finely diced cucumber, chopped parsley, chopped mint, and crumbled feta cheese to the quinoa.
- Toss the salad gently to combine all ingredients evenly. (Tip: For a brighter flavor, add the fresh herbs just before serving to maintain their vibrant color and aroma.)
- Slice the rested chicken breasts against the grain into 1/2-inch thick strips.
For a complete meal, serve the warm, juicy chicken slices over a generous bed of the cool, herby quinoa salad. The tender, charred chicken provides a savory contrast to the light, fluffy quinoa and crisp cucumber, while the lemon and fresh herbs tie everything together with a bright, refreshing finish. This dish is also excellent served chilled, making it a perfect next-day lunch.
Roasted Sweet Potato and Chickpea Salad

Often overlooked in favor of more complex dishes, this roasted sweet potato and chickpea salad offers a perfect balance of earthy sweetness and satisfying texture that comes together with straightforward technique. Our methodical approach ensures even cooking and optimal flavor development for a dish that shines through simplicity. Let’s begin with careful preparation and move through each step with precision.
3
servings15
minutes40
minutesIngredients
- 2 medium sweet potatoes, peeled and diced into ½-inch cubes
- 1 (15-ounce) can chickpeas, thoroughly rinsed and drained
- 2 tablespoons extra virgin olive oil, divided
- 1 teaspoon smoked paprika
- ½ teaspoon fine sea salt
- ¼ teaspoon freshly cracked black pepper
- 3 cups baby arugula
- 2 tablespoons raw pepitas
- 1 tablespoon freshly squeezed lemon juice
- 1 teaspoon pure maple syrup
- ¼ cup crumbled feta cheese
- 2 tablespoons finely chopped fresh parsley
Instructions
- Preheat your oven to 425°F and position one rack in the upper third and another in the lower third of the oven.
- Combine the diced sweet potatoes, rinsed chickpeas, 1 tablespoon olive oil, smoked paprika, sea salt, and black pepper in a large mixing bowl, tossing until all pieces are evenly coated.
- Spread the sweet potato and chickpea mixture in a single layer on a parchment-lined baking sheet, ensuring pieces don’t touch for optimal browning.
- Roast on the upper rack for 20 minutes, then rotate the pan 180 degrees and continue roasting for another 15-20 minutes until sweet potatoes are tender when pierced with a fork and chickpeas are crisp.
- While the vegetables roast, toast the raw pepitas in a dry skillet over medium heat for 3-4 minutes, shaking the pan frequently until they begin to pop and turn golden brown.
- Whisk together the remaining 1 tablespoon olive oil, freshly squeezed lemon juice, and pure maple syrup in a small bowl until emulsified.
- Transfer the roasted sweet potatoes and chickpeas to a large serving bowl and allow them to cool for 5 minutes to prevent wilting the greens.
- Add the baby arugula to the slightly cooled roasted vegetables and drizzle with the prepared dressing, tossing gently to combine.
- Sprinkle the toasted pepitas, crumbled feta cheese, and finely chopped fresh parsley over the salad just before serving.
The finished salad presents a delightful contrast between the creamy sweet potatoes and crisp chickpeas, with the peppery arugula providing a fresh counterpoint to the smoky paprika. For an elegant presentation, consider serving it in individual bowls garnished with extra feta and a drizzle of high-quality olive oil. The maple-lemon dressing subtly enhances the natural sweetness while cutting through the richness, creating a well-balanced dish that improves as it rests.
Zucchini Noodles with Avocado Pesto and Cherry Tomatoes
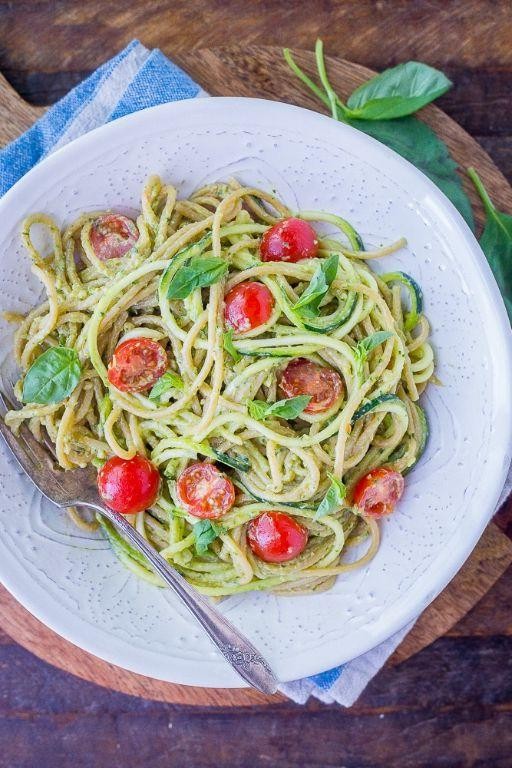
Venturing into healthier pasta alternatives doesn’t mean sacrificing flavor or satisfaction. This zucchini noodle dish transforms simple vegetables into an elegant meal with vibrant colors and creamy textures that will make you forget you’re eating your daily greens. Let me guide you through creating this beautiful, nutrient-packed dish that comes together in under 30 minutes.
3
servings20
minutes5
minutesIngredients
– 4 medium zucchini, spiralized into noodles
– 2 ripe Hass avocados, pitted and scooped
– ¼ cup fresh basil leaves, tightly packed
– 2 tablespoons pine nuts, lightly toasted
– 2 cloves garlic, minced
– 3 tablespoons extra virgin olive oil
– 2 tablespoons freshly squeezed lemon juice
– 1 pint cherry tomatoes, halved
– ¼ cup grated Parmigiano-Reggiano cheese
– Sea salt and freshly ground black pepper
Instructions
1. Place the spiralized zucchini noodles in a colander and sprinkle with 1 teaspoon of sea salt.
2. Let the zucchini noodles drain for 15 minutes to remove excess moisture, then pat dry with paper towels.
3. Combine the avocado flesh, basil leaves, toasted pine nuts, minced garlic, and lemon juice in a food processor.
4. Pulse the mixture 5 times, then process continuously while slowly drizzling in the olive oil until a smooth, creamy pesto forms.
5. Transfer the avocado pesto to a large mixing bowl and season with ½ teaspoon sea salt and ¼ teaspoon freshly ground black pepper.
6. Heat a large skillet over medium-high heat for 2 minutes until a water droplet sizzles upon contact.
7. Add the zucchini noodles to the dry skillet and sauté for exactly 3 minutes, tossing constantly with tongs.
8. Remove the skillet from heat and immediately transfer the zucchini noodles to the bowl with avocado pesto.
9. Gently toss the zucchini noodles with the pesto using tongs until evenly coated.
10. Fold in the halved cherry tomatoes and grated Parmigiano-Reggiano cheese.
11. Divide the finished dish among four serving plates.
The creamy avocado pesto clings beautifully to each zucchini noodle, creating a luxurious mouthfeel that contrasts with the burst of sweet cherry tomatoes. For an elegant presentation, garnish with additional basil leaves and a drizzle of high-quality olive oil, or top with grilled shrimp for added protein that complements the dish’s fresh flavors perfectly.
Spicy Black Bean and Butternut Squash Chili
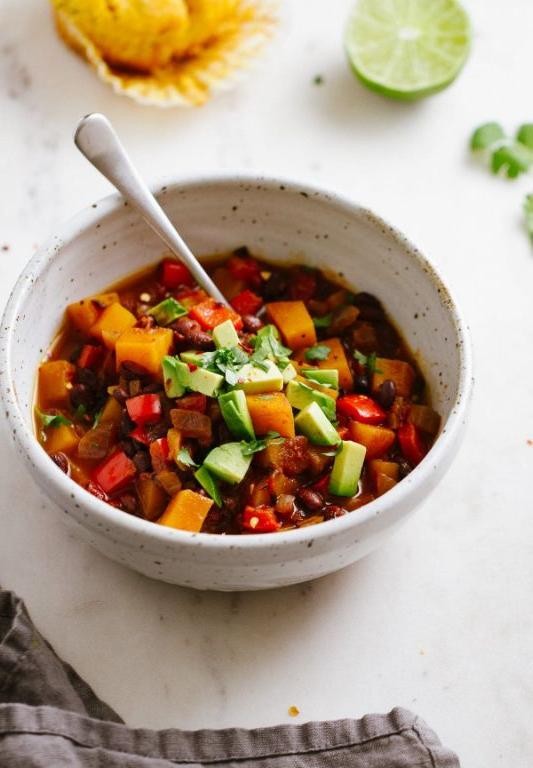
Unquestionably, this hearty chili brings together the earthy sweetness of butternut squash with the bold heat of spices in a comforting one-pot meal that’s perfect for crisp autumn evenings. Understanding the building layers of flavor will help you create a deeply satisfying dish that improves with time. Using this methodical approach ensures perfectly tender squash and well-developed spices without any bitterness.
6
servings20
minutes50
minutesIngredients
– 2 tablespoons cold-pressed avocado oil
– 1 large yellow onion, finely diced
– 4 garlic cloves, minced
– 2 tablespoons ancho chili powder
– 1 tablespoon ground cumin
– 1 teaspoon smoked paprika
– 4 cups butternut squash, peeled and cut into ½-inch cubes
– 2 (15-ounce) cans black beans, drained and rinsed
– 1 (28-ounce) can fire-roasted diced tomatoes
– 4 cups vegetable broth
– 2 tablespoons tomato paste
– 1 tablespoon apple cider vinegar
– 1 teaspoon fine sea salt
– ½ teaspoon freshly cracked black pepper
Instructions
1. Heat avocado oil in a large Dutch oven over medium heat until shimmering.
2. Add diced onion and cook for 6-8 minutes until translucent and lightly golden around the edges.
3. Stir in minced garlic and cook for 1 minute until fragrant but not browned.
4. Add ancho chili powder, ground cumin, and smoked paprika, toasting the spices for 30 seconds to release their oils.
5. Incorporate tomato paste and cook for 1 minute until it darkens slightly in color.
6. Add butternut squash cubes and stir to coat thoroughly with the spice mixture.
7. Pour in vegetable broth, using a wooden spoon to scrape any browned bits from the bottom of the pot.
8. Add fire-roasted diced tomatoes, black beans, sea salt, and black pepper.
9. Bring the mixture to a boil, then immediately reduce heat to maintain a gentle simmer.
10. Cover and cook for 25-30 minutes until the squash is fork-tender but not mushy.
11. Stir in apple cider vinegar to brighten the flavors.
12. Simmer uncovered for 5 minutes to allow the liquid to thicken slightly.
13. Remove from heat and let rest for 10 minutes before serving.
When serving, the chili presents a beautiful contrast of creamy black beans against the tender squash cubes in a richly spiced tomato broth. What makes this dish particularly special is how the natural sweetness of the squash balances the smoky heat from the ancho chili powder. Whether topped with avocado slices or served over cornbread, this chili develops even deeper flavors when refrigerated overnight.
Loaded Vegetable Quinoa Buddha Bowl
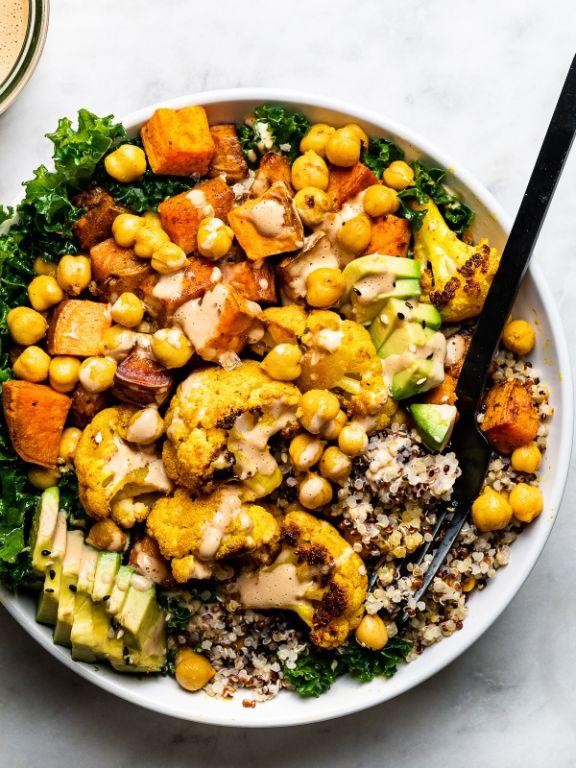
Mastering the art of balanced nutrition becomes effortless with this vibrant bowl that layers textures and flavors in perfect harmony. Making a loaded vegetable quinoa Buddha bowl requires careful preparation of each component, then artful assembly for maximum visual appeal and taste. Follow these precise steps to create a restaurant-quality meal at home.
2
servings20
minutes40
minutesIngredients
– 1 cup tri-color quinoa, thoroughly rinsed
– 2 cups filtered water
– 1 teaspoon fine sea salt
– 2 tablespoons extra virgin olive oil, divided
– 1 large sweet potato, peeled and diced into ½-inch cubes
– 1 teaspoon smoked paprika
– 2 cups organic baby kale
– 1 ripe avocado, sliced
– ¼ cup raw pumpkin seeds
– 2 tablespoons fresh lemon juice
– 1 tablespoon tahini paste
– 1 garlic clove, minced
– 2 tablespoons filtered water
Instructions
1. Combine 1 cup rinsed tri-color quinoa with 2 cups filtered water and ½ teaspoon fine sea salt in a medium saucepan.
2. Bring the quinoa mixture to a rolling boil over high heat, then immediately reduce to the lowest simmer setting.
3. Cover the saucepan tightly and cook for exactly 15 minutes until all liquid is absorbed and quinoa grains display tiny white spirals.
4. Remove the cooked quinoa from heat and let it steam, covered, for 5 minutes to achieve maximum fluffiness.
5. Preheat your oven to 400°F and line a baking sheet with parchment paper.
6. Toss 1 large diced sweet potato with 1 tablespoon extra virgin olive oil, 1 teaspoon smoked paprika, and remaining ½ teaspoon fine sea salt until evenly coated.
7. Spread the seasoned sweet potato cubes in a single layer on the prepared baking sheet.
8. Roast the sweet potatoes at 400°F for 20-25 minutes until edges are caramelized and centers yield easily to fork pressure.
9. While vegetables roast, toast ¼ cup raw pumpkin seeds in a dry skillet over medium heat for 3-4 minutes until they pop and turn golden brown.
10. Whisk together 1 tablespoon extra virgin olive oil, 2 tablespoons fresh lemon juice, 1 tablespoon tahini paste, 1 minced garlic clove, and 2 tablespoons filtered water until emulsified.
11. Fluff the rested quinoa with a fork to separate the grains completely.
12. Divide the fluffy quinoa evenly between two serving bowls as your base layer.
13. Arrange 1 cup organic baby kale, roasted sweet potato cubes, and sliced avocado artistically over the quinoa in each bowl.
14. Drizzle the tahini-lemon dressing generously over the assembled components.
15. Garnish each bowl with toasted pumpkin seeds for crunch and visual contrast.
Gloriously textured with creamy avocado against crisp kale and crunchy seeds, this bowl delivers earthy sweetness from roasted vegetables balanced by bright, tangy dressing. The nutty quinoa base absorbs flavors beautifully while providing complete protein. For an elegant presentation, serve in wide, shallow bowls that showcase the colorful layers, or pack components separately for a make-ahead lunch that stays fresh for hours.
Savory Mushroom and Spinach Breakfast Frittata

Versatile enough for weekend brunch or weekday meal prep, this savory frittata combines earthy mushrooms and tender spinach in a protein-rich base. Let’s walk through the methodical process of creating this satisfying dish that delivers restaurant-quality results with home kitchen techniques.
2
servings15
minutes33
minutesIngredients
– 8 large pasture-raised eggs, lightly beaten
– 1 cup cremini mushrooms, thinly sliced
– 2 cups fresh spinach leaves, stems removed
– 1/2 cup yellow onion, finely diced
– 1/4 cup heavy cream
– 2 tablespoons clarified butter
– 1/2 teaspoon kosher salt
– 1/4 teaspoon freshly ground black pepper
– 1/4 teaspoon smoked paprika
– 2 ounces Gruyère cheese, freshly grated
Instructions
1. Preheat your oven to 375°F and position the rack in the center position.
2. Heat 1 tablespoon of clarified butter in a 10-inch oven-safe skillet over medium heat until it shimmers.
3. Add the finely diced yellow onion and cook for 4-5 minutes until translucent and fragrant.
4. Incorporate the thinly sliced cremini mushrooms and cook for 6-7 minutes until they release their moisture and develop golden edges.
5. Add the fresh spinach leaves and cook for 2-3 minutes until just wilted, stirring constantly.
6. Tip: Wilt spinach quickly by covering the skillet briefly to create steam.
7. Transfer the vegetable mixture to a plate and wipe the skillet clean with a paper towel.
8. In a medium bowl, combine the lightly beaten pasture-raised eggs, heavy cream, kosher salt, black pepper, and smoked paprika, whisking vigorously for 30 seconds until fully incorporated.
9. Tip: Whisking eggs thoroughly creates a lighter, fluffier frittata texture.
10. Heat the remaining 1 tablespoon of clarified butter in the cleaned skillet over medium-low heat.
11. Pour the egg mixture into the skillet and arrange the cooked vegetables evenly across the surface.
12. Sprinkle the freshly grated Gruyère cheese over the entire surface.
13. Cook undisturbed for 4-5 minutes until the edges begin to set.
14. Tip: Avoid stirring once the eggs are in the skillet to ensure proper setting.
15. Transfer the skillet to the preheated oven and bake for 12-14 minutes until the center is just set and the top is lightly golden.
16. Remove from oven and let rest for 5 minutes before slicing. Our finished frittata emerges with a delicate custard-like interior contrasting beautifully with the caramelized mushroom edges and melted Gruyère crust. Consider serving wedges alongside roasted cherry tomatoes or atop toasted sourdough for contrasting textures that highlight the dish’s sophisticated flavor profile.
Healthy Turkey and Vegetable Stuffed Cabbage Rolls

Let’s create a nourishing meal that transforms humble ingredients into elegant parcels of flavor. Learning to make stuffed cabbage rolls builds foundational kitchen skills while delivering impressive results for family dinners or entertaining. This methodical approach ensures perfect texture and balanced flavors every time.
12
rolls30
minutes60
minutesIngredients
- 1 large head green cabbage, core removed
- 1 pound ground turkey (93% lean)
- 1 cup cooked quinoa, cooled
- 2 tablespoons extra virgin olive oil
- 1 medium yellow onion, finely diced
- 3 garlic cloves, minced
- 1 large carrot, finely grated
- 1 celery stalk, finely diced
- 1 teaspoon dried oregano
- 1/2 teaspoon smoked paprika
- 1/4 cup fresh parsley, chopped
- 1 large pasture-raised egg, lightly beaten
- 2 cups tomato purée
- 1 tablespoon apple cider vinegar
- 1 teaspoon raw honey
- 1/2 teaspoon sea salt
- 1/4 teaspoon freshly ground black pepper
Instructions
- Bring a large stockpot of salted water to a rolling boil.
- Submerge the whole cabbage head in boiling water for 4 minutes to soften leaves.
- Transfer cabbage to an ice water bath to halt cooking, preserving vibrant color.
- Carefully separate 12 large outer leaves, patting dry with paper towels.
- Heat olive oil in a skillet over medium heat until shimmering.
- Sauté diced onion for 5 minutes until translucent and fragrant.
- Add minced garlic and cook for 1 minute until aromatic but not browned.
- Combine ground turkey, cooked quinoa, sautéed vegetables, grated carrot, diced celery, dried oregano, smoked paprika, chopped parsley, beaten egg, sea salt, and black pepper in a large mixing bowl.
- Mix filling ingredients thoroughly using hands or a fork until well incorporated.
- Place 1/3 cup filling in the center of each cabbage leaf.
- Fold sides inward, then roll tightly from stem end to form secure parcels.
- Arrange rolls seam-side down in a single layer in a 9×13-inch baking dish.
- Whisk together tomato purée, apple cider vinegar, and raw honey until emulsified.
- Pour sauce evenly over cabbage rolls, coating each completely.
- Cover baking dish tightly with aluminum foil.
- Bake at 375°F for 45 minutes until filling reaches 165°F internally.
- Remove foil and bake uncovered for 15 minutes until sauce thickens slightly.
- Let rest for 10 minutes before serving to allow flavors to meld.
Each bite reveals tender cabbage leaves yielding to the savory turkey filling, while the tangy tomato sauce provides bright counterpoint to the earthy quinoa and vegetables. Experiment with serving these elegant rolls over cauliflower purée or alongside roasted root vegetables for a complete autumnal meal. Enjoy the satisfying contrast between the silky exterior and textured interior that makes this dish both comforting and sophisticated.
Beet and Arugula Salad with Goat Cheese and Walnuts
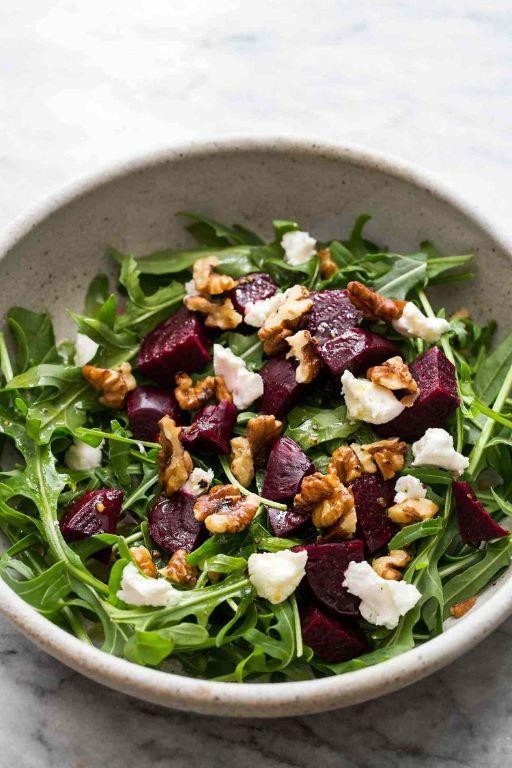
Haven’t you noticed how the simplest salads often become the most memorable? This vibrant combination brings together earthy sweetness, peppery greens, and creamy tang in perfect harmony. Let’s walk through each step methodically to ensure your salad turns out beautifully balanced every single time.
5
servings20
minutes60
minutesIngredients
– 3 medium red beets, scrubbed
– 5 ounces baby arugula
– 4 ounces fresh goat cheese, crumbled
– 1/2 cup raw walnut halves
– 2 tablespoons extra virgin olive oil
– 1 tablespoon aged balsamic vinegar
– 1/2 teaspoon Dijon mustard
– 1/4 teaspoon fine sea salt
– 1/8 teaspoon freshly cracked black pepper
Instructions
1. Preheat your oven to 400°F and line a baking sheet with parchment paper.
2. Wrap each scrubbed beet individually in aluminum foil, creating tight packets to trap steam.
3. Roast the beet packets on the center oven rack for 45-60 minutes until a paring knife inserts with minimal resistance.
4. Remove beets from oven and carefully unwrap, allowing them to cool until safe to handle—about 15 minutes.
5. Peel the beets by rubbing the skins with paper towels; the roasted skins should slip off easily.
6. Cut peeled beets into 1/2-inch cubes and set aside to cool completely to room temperature.
7. Toast walnut halves in a dry skillet over medium heat for 3-4 minutes, shaking frequently until fragrant and lightly golden.
8. Whisk together olive oil, balsamic vinegar, Dijon mustard, sea salt, and black pepper in a small bowl until emulsified.
9. Arrange baby arugula in a large serving bowl as your base layer.
10. Scatter the cooled beet cubes evenly over the arugula.
11. Sprinkle toasted walnuts and crumbled goat cheese across the salad components.
12. Drizzle the prepared vinaigrette over the entire salad just before serving.
You’ll love how the creamy goat cheese melts slightly against the warm beets while the walnuts provide satisfying crunch. Try serving this alongside grilled chicken or flaky salmon for a complete meal that feels both rustic and refined.
Whole Wheat Pasta Primavera with Garlic Olive Oil
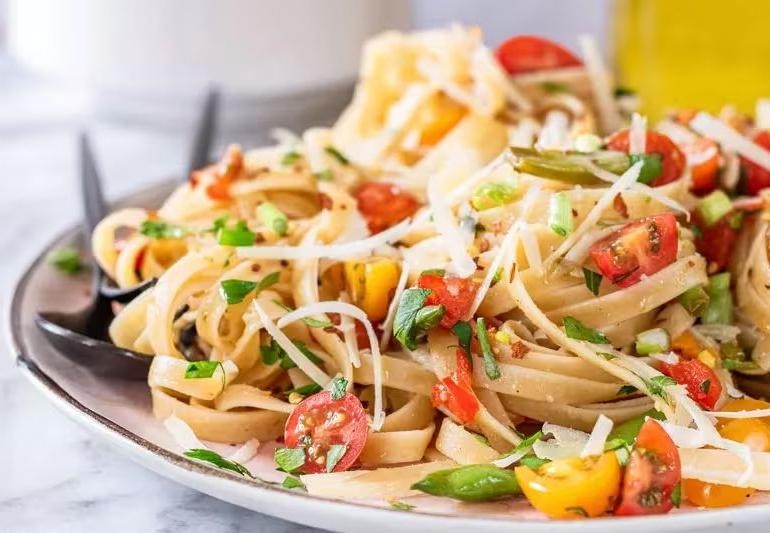
Gathering fresh spring vegetables and quality pantry staples makes this whole wheat pasta primavera an approachable yet sophisticated weeknight meal. Following these methodical steps will ensure perfectly cooked pasta and vibrant, crisp-tender vegetables every single time. Let’s begin with preparing our ingredients and equipment.
3
servings15
minutes15
minutesIngredients
– 12 ounces whole wheat spaghetti
– 3 tablespoons extra virgin olive oil
– 4 garlic cloves, thinly sliced
– 1 cup asparagus spears, trimmed and cut into 2-inch pieces
– 1 cup cherry tomatoes, halved
– 1 cup frozen peas, thawed
– 1/4 cup fresh basil leaves, chiffonade-cut
– 2 tablespoons fresh lemon juice
– 1/4 teaspoon red pepper flakes
– Kosher salt
– Freshly ground black pepper
Instructions
1. Bring 6 quarts of heavily salted water to a rolling boil in a large stockpot.
2. Add whole wheat spaghetti and cook for 8-10 minutes until al dente, stirring occasionally to prevent sticking.
3. Meanwhile, heat extra virgin olive oil in a large skillet over medium-low heat until shimmering but not smoking.
4. Add thinly sliced garlic and cook for 1-2 minutes until fragrant and lightly golden, stirring constantly to prevent burning.
5. Increase heat to medium-high and add asparagus pieces, sautéing for 3-4 minutes until bright green and slightly tender.
6. Incorporate halved cherry tomatoes and cook for 2-3 minutes until skins begin to wrinkle but maintain structure.
7. Drain cooked pasta, reserving 1/2 cup of starchy pasta water for later use.
8. Add drained spaghetti directly to the vegetable mixture in the skillet.
9. Pour in thawed peas and 1/4 cup reserved pasta water, tossing continuously to emulsify.
10. Remove skillet from heat and stir in chiffonade-cut basil, fresh lemon juice, and red pepper flakes.
11. Season generously with kosher salt and freshly ground black pepper, tossing until evenly distributed.
Perfectly cooked whole wheat pasta provides a nutty base that complements the crisp-tender vegetables beautifully. The garlic-infused olive oil creates a light sauce that clings to every strand without heaviness. For an elegant presentation, garnish with additional basil leaves and serve immediately in warmed bowls.
One-Pot Mediterranean Chicken and Farro

Many home cooks find themselves short on time but still craving a wholesome, flavor-packed meal that doesn’t require endless cleanup. Making a satisfying dinner with minimal fuss is simpler than you might think, especially when you embrace the one-pot method that keeps everything contained while building complex flavors. This Mediterranean-inspired dish brings together tender chicken, nutty farro, and vibrant vegetables in perfect harmony.
3
servings15
minutes45
minutesIngredients
– 1.5 lbs boneless, skinless chicken thighs, patted dry
– 2 tbsp extra virgin olive oil, divided
– 1 large yellow onion, finely diced
– 3 garlic cloves, minced
– 1 cup pearled farro, rinsed
– 2 cups low-sodium chicken stock, heated to 180°F
– 1 cup cherry tomatoes, halved
– 1/2 cup Kalamata olives, pitted
– 2 tbsp fresh lemon juice
– 1/4 cup fresh parsley, chopped
– 1 tsp dried oregano
– 1/2 tsp smoked paprika
Instructions
1. Pat chicken thighs completely dry with paper towels and season both sides generously with kosher salt and black pepper.
2. Heat 1 tablespoon olive oil in a large Dutch oven over medium-high heat until shimmering but not smoking.
3. Place chicken thighs in the hot oil and sear for 4-5 minutes per side until golden brown crust forms.
4. Transfer chicken to a clean plate, leaving rendered fat in the pot.
5. Add remaining olive oil to the pot and sauté diced onion for 3-4 minutes until translucent.
6. Stir in minced garlic and cook for 30 seconds until fragrant but not browned.
7. Add rinsed farro to the pot and toast for 2 minutes, stirring constantly to coat with oil.
8. Pour in heated chicken stock, scraping any browned bits from the bottom of the pot.
9. Return chicken thighs to the pot, nestling them into the farro mixture.
10. Bring to a gentle boil, then reduce heat to low, cover, and simmer for 25 minutes.
11. Remove lid and scatter cherry tomatoes and Kalamata olives over the surface.
12. Continue cooking uncovered for 5-7 minutes until tomatoes begin to soften.
13. Drizzle lemon juice over the dish and sprinkle with fresh parsley.
14. Let rest off heat for 5 minutes before serving to allow flavors to meld.
Keep in mind that the farro will continue to absorb liquid as it rests, creating a perfectly textured grain that’s neither too dry nor soupy. The chicken becomes incredibly tender from the slow simmering process, while the tomatoes and olives provide bright, briny counterpoints to the earthy farro. For an elegant presentation, garnish with additional fresh herbs and serve with crusty bread to soak up every last bit of the flavorful cooking liquid.
Creamy Cauliflower and Broccoli Soup

You’ll find this creamy cauliflower and broccoli soup surprisingly simple to master, even if you’re new to soup-making. Let’s walk through each step together to create a velvety, comforting bowl that highlights the natural sweetness of these winter vegetables. Begin by gathering your ingredients and equipment before we start cooking.
4
servings15
minutes40
minutesIngredients
– 2 tablespoons clarified butter
– 1 large yellow onion, finely diced
– 2 garlic cloves, minced
– 1 medium head cauliflower, cut into 1-inch florets
– 1 medium head broccoli, cut into 1-inch florets
– 4 cups vegetable stock
– 1 cup heavy cream
– 1 teaspoon fine sea salt
– ½ teaspoon freshly ground white pepper
– ¼ teaspoon freshly grated nutmeg
Instructions
1. Heat 2 tablespoons of clarified butter in a large Dutch oven over medium heat until shimmering but not smoking.
2. Add 1 large finely diced yellow onion and sauté for 5-7 minutes until translucent and fragrant.
3. Stir in 2 minced garlic cloves and cook for exactly 60 seconds until aromatic but not browned.
4. Add 1 head of cauliflower florets and 1 head of broccoli florets to the pot, stirring to coat with the aromatics.
5. Pour in 4 cups of vegetable stock and bring to a gentle simmer over medium-high heat.
6. Reduce heat to maintain a steady simmer, cover partially, and cook for 20-25 minutes until vegetables are fork-tender.
7. Carefully transfer the hot mixture to a high-speed blender in batches, filling only halfway to prevent overflow.
8. Blend each batch on high speed for 90 seconds until completely smooth and velvety.
9. Return the pureed soup to the clean pot and place over low heat.
10. Stir in 1 cup of heavy cream until fully incorporated.
11. Season with 1 teaspoon fine sea salt, ½ teaspoon freshly ground white pepper, and ¼ teaspoon freshly grated nutmeg.
12. Heat gently for 3-5 minutes until warmed through, stirring constantly—do not allow to boil.
Buttery smooth with subtle nutty undertones, this soup achieves remarkable creaminess without overwhelming richness. Consider garnishing with toasted pumpkin seeds for contrasting texture or a drizzle of truffle oil to elevate the earthy notes. The vibrant green flecks from the broccoli create visual appeal while maintaining the soup’s elegant, uniform consistency.
Eggplant and Lentil Curry with Coconut Milk

Zestfully exploring global flavors brings us to this comforting eggplant and lentil curry with coconut milk, where creamy textures meet aromatic spices in perfect harmony. This methodical approach ensures even novice cooks can achieve restaurant-quality results with confidence. Let’s begin our culinary journey with precise measurements and clear techniques.
3
servings15
minutes50
minutesIngredients
– 2 medium globe eggplants, cut into 1-inch cubes
– 1 cup brown lentils, rinsed and drained
– 1 large yellow onion, finely diced
– 3 garlic cloves, minced
– 1 tablespoon fresh ginger, grated
– 2 tablespoons clarified butter
– 1 tablespoon garam masala
– 1 teaspoon turmeric powder
– 1/2 teaspoon cayenne pepper
– 1 (13.5-ounce) can full-fat coconut milk
– 2 cups vegetable broth
– 1/4 cup fresh cilantro, chopped
– 1 tablespoon fresh lime juice
Instructions
1. Heat clarified butter in a large Dutch oven over medium heat until shimmering.
2. Add diced onion and sauté for 5 minutes until translucent, stirring frequently.
3. Add minced garlic and grated ginger, cooking for 1 minute until fragrant.
4. Stir in garam masala, turmeric, and cayenne pepper, toasting for 30 seconds to release oils.
5. Add eggplant cubes and toss to coat evenly with spice mixture.
6. Cook eggplant for 8 minutes, stirring occasionally, until slightly softened.
7. Pour in rinsed lentils and vegetable broth, bringing to a gentle boil.
8. Reduce heat to low, cover, and simmer for 25 minutes until lentils are tender.
9. Stir in coconut milk and simmer uncovered for 10 minutes to thicken sauce.
10. Remove from heat and fold in chopped cilantro and fresh lime juice.
Ultimately, this curry achieves a luxurious velvety texture where the tender eggplant melts into the creamy coconut base while maintaining structural integrity. The earthy lentils provide substantial body that contrasts beautifully with the bright acidity from the lime. Consider serving over jasmine rice or with warm naan to soak up every bit of the aromatic sauce.
Baked Salmon with Garlic Dill Yogurt Sauce

Getting perfectly cooked salmon with a creamy sauce doesn’t require chef-level skills—just follow these methodical steps for a restaurant-quality meal at home. This baked salmon with garlic dill yogurt sauce combines flaky fish with bright, herbaceous flavors in a surprisingly simple preparation that yields impressive results every time.
4
portions15
minutes14
minutesIngredients
– 1.5 lbs wild-caught salmon fillet, skin-on
– 2 tbsp extra virgin olive oil
– 1 tsp kosher salt
– ½ tsp freshly cracked black pepper
– 1 cup whole milk Greek yogurt
– 2 garlic cloves, microplaned
– 2 tbsp fresh dill fronds, finely minced
– 1 tbsp freshly squeezed lemon juice
– ¼ tsp fine sea salt
Instructions
1. Position oven rack in center position and preheat oven to 400°F.
2. Pat salmon fillet completely dry with paper towels, ensuring no moisture remains on the surface.
3. Drizzle olive oil over salmon and rub evenly across entire surface with your fingertips.
4. Season salmon uniformly with kosher salt and black pepper, including the sides.
5. Place salmon skin-side down on parchment-lined baking sheet, allowing 1-inch clearance around edges.
6. Bake for 12-14 minutes until internal temperature reaches 125°F when tested with instant-read thermometer.
7. Combine Greek yogurt, microplaned garlic, minced dill, lemon juice, and fine sea salt in medium bowl.
8. Whisk sauce ingredients vigorously for 45 seconds until completely emulsified and smooth.
9. Remove salmon from oven when thermometer reads 125°F and transfer to cutting board.
10. Let salmon rest undisturbed for 5 minutes to allow juices to redistribute throughout the flesh.
11. Slice salmon against the grain into 4 equal portions using sharp chef’s knife.
12. Spoon 2 tablespoons garlic dill yogurt sauce beside each salmon portion before serving.
Each flaky, moist salmon portion contrasts beautifully with the cool, tangy sauce that clings to every bite. For an elegant presentation, try serving it over lemon-infused quinoa with roasted asparagus spears arranged alongside—the crisp-tender vegetables provide wonderful textural variation against the silky fish.
Crispy Tofu Stir Fry with Snap Peas and Bell Peppers

Now, let’s create a perfectly textured stir-fry that balances crispiness with vibrant vegetables. This method ensures your tofu develops a golden crust while maintaining a tender interior, with snap peas and bell peppers adding fresh crunch and sweetness to each bite.
3
servings35
minutes15
minutesIngredients
– 14 ounces extra-firm tofu, pressed and cubed
– 3 tablespoons cornstarch
– ¼ cup avocado oil
– 1 red bell pepper, julienned
– 1 yellow bell pepper, julienned
– 8 ounces snap peas, trimmed
– 3 cloves garlic, minced
– 1 tablespoon fresh ginger, grated
– ¼ cup tamari
– 2 tablespoons rice vinegar
– 1 tablespoon toasted sesame oil
– 2 teaspoons maple syrup
– ½ teaspoon red pepper flakes
– 2 scallions, thinly sliced
– 1 tablespoon toasted sesame seeds
Instructions
1. Press the 14 ounces of extra-firm tofu between paper towels with a heavy pan for 30 minutes to remove excess moisture.
2. Cut the pressed tofu into 1-inch cubes and toss with 3 tablespoons of cornstarch until evenly coated.
3. Heat ¼ cup of avocado oil in a large wok or skillet over medium-high heat until it shimmers, about 375°F.
4. Add the coated tofu cubes in a single layer, working in batches if necessary to avoid crowding.
5. Fry the tofu for 4-5 minutes per side until golden brown and crispy, turning with tongs for even browning.
6. Transfer the crispy tofu to a paper towel-lined plate using a slotted spoon.
7. Drain all but 1 tablespoon of oil from the wok, returning it to medium-high heat.
8. Add the julienned red and yellow bell peppers, sautéing for 2 minutes until slightly softened.
9. Incorporate the 8 ounces of trimmed snap peas, cooking for another 2 minutes while maintaining their bright green color.
10. Push vegetables to the sides of the wok and add the 3 cloves of minced garlic and 1 tablespoon of grated ginger to the center.
11. Cook the garlic and ginger for 30 seconds until fragrant but not browned.
12. Combine ¼ cup tamari, 2 tablespoons rice vinegar, 1 tablespoon toasted sesame oil, 2 teaspoons maple syrup, and ½ teaspoon red pepper flakes in a small bowl.
13. Pour the sauce mixture over the vegetables, stirring to coat evenly.
14. Return the crispy tofu to the wok, tossing gently to combine with the sauce and vegetables.
15. Cook for 1 minute until everything is heated through and well incorporated.
16. Remove from heat and garnish with 2 thinly sliced scallions and 1 tablespoon of toasted sesame seeds.
Here, the contrast between the crispy tofu exterior and tender interior creates wonderful textural complexity. The sweet-savory sauce clings beautifully to each component, while the fresh vegetables maintain their satisfying crunch. Serve this over jasmine rice or alongside soba noodles for a complete meal that highlights these complementary textures.
Conclusion
Overall, these 29 delicious recipes make healthy eating simple and satisfying for every meal. We hope you find new favorites to nourish your family! Try a few, then share which ones you loved in the comments below. Don’t forget to pin this roundup on Pinterest so you can easily return to these hearty recipes anytime.


