
Mmm… imagine the sun-drenched flavors of Greece right in your kitchen! We’ve gathered 27 delicious, healthy Greek recipes that are perfect for busy weeknights, vibrant gatherings, or simply adding a touch of Mediterranean magic to your meals. From quick dinners to fresh, feel-good favorites, get ready to be inspired. Let’s dive into these tasty, wholesome dishes you’ll love making again and again!
Grilled Mediterranean Chicken Souvlaki

Nestled in the quiet of my kitchen, the scent of lemon and oregano drifts through the air, a simple promise of the sun-drenched flavors to come. This grilled chicken souvlaki is less about elaborate preparation and more about letting a few good ingredients speak for themselves, a gentle reminder of meals shared under warmer skies.
Serving: 4 | Pre Time: 20 minutes | Cooking Time: 10 minutes
Ingredients
– Boneless, skinless chicken breasts – 1 ½ lbs
– Lemon juice – ¼ cup
– Extra virgin olive oil – ¼ cup
– Dried oregano – 2 tsp
– Garlic cloves – 3, minced
– Salt – 1 tsp
– Black pepper – ½ tsp
– Wooden skewers – 8, soaked in water for 30 minutes
Instructions
1. Cut the 1 ½ lbs of chicken breasts into 1-inch cubes.
2. In a large bowl, whisk together ¼ cup lemon juice, ¼ cup olive oil, 2 tsp dried oregano, the 3 minced garlic cloves, 1 tsp salt, and ½ tsp black pepper to create the marinade.
3. Add the cubed chicken to the bowl, tossing until every piece is thoroughly coated in the marinade.
4. Cover the bowl and refrigerate the chicken for at least 1 hour, or up to 4 hours for deeper flavor penetration.
5. While the chicken marinates, soak 8 wooden skewers in water for a full 30 minutes to prevent them from burning on the grill.
6. Preheat a grill or grill pan to medium-high heat, approximately 400°F.
7. Thread the marinated chicken cubes onto the soaked skewers, leaving a small space between each piece for even cooking.
8. Place the skewers on the preheated grill.
9. Grill the chicken for 4-5 minutes, until the bottom develops clear grill marks and releases easily from the grates.
10. Flip each skewer and grill for another 4-5 minutes, until the internal temperature of the chicken reaches 165°F when checked with an instant-read thermometer.
11. Remove the skewers from the grill and let them rest for 3 minutes before serving.
Off the grill, the chicken is wonderfully charred at the edges yet impossibly tender and juicy within, carrying the bright, herbal notes of the marinade in every bite. Serve it tucked into warm pita with a dollop of tzatziki, or simply over a bed of crisp greens for a lighter, equally satisfying meal.
Spinach and Feta Stuffed Peppers

Now, as the afternoon light slants across the kitchen counter, I find myself drawn to the quiet comfort of preparing something simple yet deeply satisfying. The gentle act of stuffing a pepper feels like a small, deliberate kindness to oneself, a way to gather warmth and nourishment into a single, vibrant vessel.
Serving: 4 | Pre Time: 15 minutes | Cooking Time: 35 minutes
Ingredients
– Bell peppers – 4 large
– Olive oil – 2 tbsp
– Onion – 1 medium, diced
– Garlic – 2 cloves, minced
– Fresh spinach – 5 oz
– Feta cheese – 1 cup, crumbled
– Cooked rice – 1 cup
– Salt – ½ tsp
– Black pepper – ¼ tsp
Instructions
1. Preheat your oven to 375°F.
2. Slice the tops off the bell peppers and remove all seeds and membranes from the inside.
3. Place the hollowed peppers upright in a baking dish just large enough to hold them snugly.
4. Heat the olive oil in a large skillet over medium heat for 1 minute.
5. Add the diced onion to the skillet and cook, stirring occasionally, for 5 minutes until it becomes translucent.
6. Stir in the minced garlic and cook for 1 more minute until fragrant.
7. Add the fresh spinach to the skillet and cook for 2-3 minutes, stirring constantly, until it wilts completely and releases its moisture.
8. Remove the skillet from the heat and let the mixture cool for 2 minutes.
9. In a medium bowl, combine the cooked rice, crumbled feta cheese, salt, and black pepper.
10. Gently fold the cooled spinach mixture from the skillet into the rice and feta mixture until evenly distributed.
11. Spoon the filling into each prepared bell pepper, pressing down lightly to pack it in, and fill them to the top.
12. Cover the baking dish tightly with aluminum foil.
13. Bake the peppers at 375°F for 25 minutes.
14. Carefully remove the foil and continue baking for 10 more minutes until the pepper edges begin to lightly char and the filling is heated through.
15. Let the peppers rest in the dish for 5 minutes before serving to allow the filling to set.
Here, the peppers emerge tender yet still holding their shape, with the filling creamy from the feta and studded with bits of wilted spinach. Their flavor is bright and savory, perfect alongside a simple green salad or with a dollop of cool Greek yogurt for contrast.
Classic Greek Salad with Lemon Dressing
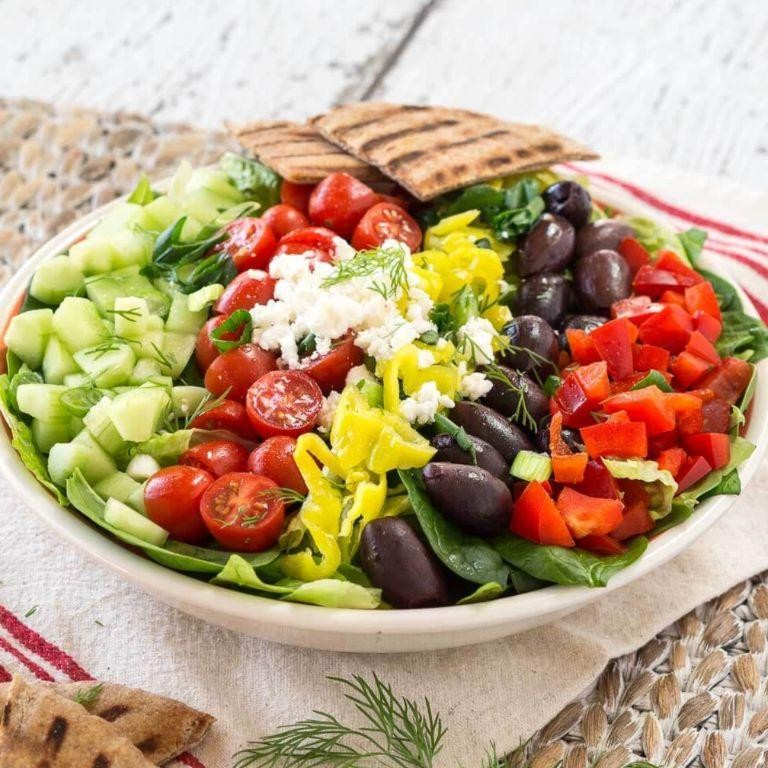
Just now, as the afternoon light slants across my kitchen counter, I find myself craving something bright and honest—a simple salad that feels like a quiet conversation with the sun. It’s a moment for crisp textures and a tangy, lemony whisper, a humble assembly that needs no fuss, only care.
Serving: 4 | Pre Time: 15 minutes | Cooking Time: 0 minutes
Ingredients
– Romaine lettuce – 1 head
– Cucumber – 1 large
– Cherry tomatoes – 2 cups
– Red onion – ½ medium
– Kalamata olives – ½ cup
– Feta cheese – 4 oz
– Extra virgin olive oil – ¼ cup
– Fresh lemon juice – 3 tbsp
– Dried oregano – 1 tsp
– Salt – ½ tsp
– Black pepper – ¼ tsp
Instructions
1. Rinse the Romaine lettuce under cold water, then pat it completely dry with a clean kitchen towel to prevent a soggy salad.
2. Tear the dried lettuce into bite-sized pieces by hand and place them in a large serving bowl.
3. Peel the cucumber, slice it into ¼-inch thick rounds, and add them to the bowl.
4. Halve the cherry tomatoes and thinly slice the red onion, then combine both with the lettuce and cucumber.
5. Pit the Kalamata olives if needed, scatter them over the salad, and crumble the feta cheese on top.
6. In a small jar, whisk together the extra virgin olive oil, fresh lemon juice, dried oregano, salt, and black pepper until fully emulsified—about 30 seconds of shaking.
7. Drizzle the dressing evenly over the salad just before serving to keep the vegetables crisp.
8. Gently toss everything with salad tongs until all ingredients are lightly coated, taking care not to crush the feta.
9. Divide the salad among four plates immediately for the freshest presentation.
You’ll notice the crunch of the lettuce against the juicy tomatoes, while the briny olives and creamy feta mingle with that zesty lemon dressing. Try serving it alongside grilled chicken or stuffed into a pita for a hearty twist—it’s a salad that feels both timeless and wonderfully alive.
Healthy Moussaka with Eggplant

Lately, I’ve been craving something that feels both nourishing and comforting, a dish that wraps you in warmth without weighing you down. This healthy moussaka, with its layers of tender eggplant and savory filling, has become my quiet kitchen companion on these reflective afternoons.
Serving: 6 | Pre Time: 20 minutes | Cooking Time: 60 minutes
Ingredients
– Eggplant – 2 medium
– Olive oil – 3 tbsp
– Ground turkey – 1 lb
– Onion – 1 medium, diced
– Garlic – 3 cloves, minced
– Tomato paste – 2 tbsp
– Cinnamon – ½ tsp
– Salt – 1 tsp
– Plain Greek yogurt – 1 cup
– Egg – 1
– Nutmeg – ¼ tsp
Instructions
1. Preheat your oven to 400°F.
2. Slice the eggplant into ¼-inch rounds.
3. Brush both sides of each eggplant slice with 2 tbsp of olive oil.
4. Arrange the eggplant slices in a single layer on a baking sheet.
5. Roast the eggplant for 20 minutes, flipping halfway through, until golden and tender.
6. Heat the remaining 1 tbsp of olive oil in a large skillet over medium heat.
7. Add the diced onion and cook for 5 minutes, stirring occasionally, until softened.
8. Add the minced garlic and cook for 1 minute until fragrant.
9. Add the ground turkey, breaking it up with a spoon, and cook for 8-10 minutes until no longer pink.
10. Stir in the tomato paste, cinnamon, and ½ tsp of salt, cooking for 2 more minutes.
11. In a small bowl, whisk together the Greek yogurt, egg, nutmeg, and remaining ½ tsp of salt until smooth.
12. In a 9×13 inch baking dish, layer half of the roasted eggplant slices.
13. Spread the turkey mixture evenly over the eggplant layer.
14. Top with the remaining eggplant slices.
15. Pour the yogurt mixture over the top, spreading it to cover completely.
16. Bake at 375°F for 30 minutes, until the top is set and lightly golden.
17. Let the moussaka rest for 10 minutes before serving.
Finally, this moussaka emerges with a creamy top that gives way to soft, melting layers beneath. The hint of cinnamon whispers through the savory turkey, creating a deeply satisfying balance. For a bright finish, I sometimes scatter fresh parsley over individual servings, letting its freshness cut through the richness.
Light and Fluffy Tzatziki Sauce

Dipping into this recipe feels like a quiet afternoon in the kitchen, where simple ingredients come together to create something cool and refreshing. It’s a moment to slow down and stir with intention, letting the flavors meld into a sauce that’s both light and comforting.
Serving: 4 | Pre Time: 15 minutes | Cooking Time: 0 minutes
Ingredients
– Greek yogurt – 1 cup
– Cucumber – 1 medium
– Garlic – 1 clove
– Fresh dill – 2 tbsp, chopped
– Lemon juice – 1 tbsp
– Olive oil – 1 tsp
– Salt – ½ tsp
Instructions
1. Peel the cucumber completely, then grate it using the large holes of a box grater.
2. Place the grated cucumber in a clean kitchen towel and squeeze firmly over the sink for 1–2 minutes to remove as much liquid as possible; this prevents a watery sauce.
3. In a medium mixing bowl, combine the Greek yogurt and squeezed cucumber.
4. Mince the garlic clove finely and add it to the bowl.
5. Chop the fresh dill until you have 2 tablespoons and stir it into the mixture.
6. Pour in the lemon juice, olive oil, and salt.
7. Whisk all ingredients together for about 2 minutes until fully blended and smooth.
8. Cover the bowl tightly with plastic wrap and refrigerate for at least 1 hour to allow the flavors to develop; chilling is key for the best taste.
9. After chilling, give the sauce a final stir before serving to ensure an even consistency.
Enjoying this tzatziki reveals a creamy, airy texture with a bright tang from the lemon and a subtle garlic kick. It’s perfect as a dip for warm pita or a cool topping for grilled vegetables, adding a refreshing touch to any meal.
Chickpea and Lemon Orzo Soup

Zestful memories of cozy afternoons often find their way into a simmering pot, where simple ingredients transform into something deeply comforting. This chickpea and lemon orzo soup is one of those quiet kitchen rituals that feels like a warm embrace, a gentle pause in the day where each stir brings a little more peace. It’s a humble, brothy dish that carries the bright whisper of lemon and the hearty comfort of chickpeas, perfect for when you need a moment to just be.
Serving: 4 | Pre Time: 10 minutes | Cooking Time: 25 minutes
Ingredients
– Olive oil – 2 tbsp
– Yellow onion – 1, diced
– Garlic – 3 cloves, minced
– Vegetable broth – 6 cups
– Chickpeas – 1 (15-oz) can, drained and rinsed
– Orzo pasta – 1 cup
– Lemon – 1, juiced
– Fresh parsley – ¼ cup, chopped
– Salt – 1 tsp
– Black pepper – ½ tsp
Instructions
1. Heat the olive oil in a large pot over medium heat until it shimmers lightly.
2. Add the diced yellow onion and cook for 5 minutes, stirring occasionally, until it becomes translucent and soft.
3. Stir in the minced garlic and cook for 1 minute, just until fragrant to avoid burning.
4. Pour in the vegetable broth and bring the mixture to a gentle boil over high heat.
5. Add the drained and rinsed chickpeas, reduce the heat to medium-low, and let it simmer uncovered for 10 minutes to allow the flavors to meld.
6. Stir in the orzo pasta and cook for 8 minutes, stirring occasionally to prevent sticking, until the orzo is al dente.
7. Remove the pot from the heat and stir in the lemon juice, chopped fresh parsley, salt, and black pepper.
8. Let the soup sit for 2 minutes off the heat to allow the flavors to settle before serving.
Every spoonful of this soup offers a delightful contrast: the tender orzo and creamy chickpeas swim in a light, lemony broth that feels both refreshing and nourishing. For a creative twist, try topping it with a sprinkle of red pepper flakes or a drizzle of extra olive oil to enhance its rustic charm, making it a versatile dish that welcomes quiet dinners or shared moments alike.
Baked Greek Lemon Chicken Thighs

Maybe it’s the quiet of a late afternoon, the way the light slants across the kitchen counter, that makes a simple meal feel like a small, deliberate comfort. This dish, with its bright citrus and fragrant herbs, is one I return to when the day asks for something both effortless and deeply satisfying.
Serving: 4 | Pre Time: 15 minutes | Cooking Time: 45 minutes
Ingredients
– Bone-in, skin-on chicken thighs – 2 lbs
– Olive oil – 2 tbsp
– Lemon juice – ¼ cup
– Dried oregano – 1 tsp
– Garlic powder – ½ tsp
– Salt – 1 tsp
– Black pepper – ½ tsp
– Chicken broth – ½ cup
Instructions
1. Preheat your oven to 400°F.
2. Pat the 2 lbs of bone-in, skin-on chicken thighs completely dry with paper towels—this helps the skin crisp beautifully.
3. In a small bowl, whisk together the 2 tbsp of olive oil, ¼ cup of lemon juice, 1 tsp of dried oregano, ½ tsp of garlic powder, 1 tsp of salt, and ½ tsp of black pepper until combined.
4. Place the dried chicken thighs in a large baking dish, arranging them in a single layer.
5. Pour the whisked marinade evenly over all the chicken thighs, making sure each piece is coated.
6. Pour the ½ cup of chicken broth into the bottom of the baking dish around the chicken, not over it, to create steam and prevent drying.
7. Bake the chicken at 400°F for 45 minutes, or until the internal temperature reaches 165°F when checked with an instant-read thermometer inserted into the thickest part of a thigh.
8. For extra crispy skin, switch the oven to broil on high for the final 2-3 minutes of cooking, watching closely to prevent burning.
9. Remove the baking dish from the oven and let the chicken rest for 5 minutes before serving to allow the juices to redistribute.
From the first bite, the chicken is wonderfully tender and juicy, with the lemon and oregano creating a bright, savory melody. The skin, crisped to a perfect golden brown, offers a delightful contrast in texture. For a complete meal, serve these thighs over a bed of fluffy rice or orzo to soak up the flavorful pan juices, or alongside roasted vegetables for a simple, nourishing plate.
Whole Wheat Greek Pita Bread

Perhaps there’s something quietly comforting about the process of making bread—the way flour dusts the counter like morning frost, the steady rhythm of kneading that feels like a meditation. This whole wheat Greek pita is one of those simple, honest foods that asks for little but gives so much in return, with its soft, pliable texture and subtle nuttiness.
Serving: 8 | Pre Time: 90 minutes | Cooking Time: 10 minutes
Ingredients
- Whole wheat flour – 2 cups
- All-purpose flour – 1 cup
- Active dry yeast – 2 ¼ tsp.
- Warm water – 1 cup (110°F)
- Olive oil – 2 tbsp.
- Salt – 1 tsp.
- Honey – 1 tsp.
Instructions
- Combine the warm water (110°F), honey, and active dry yeast in a large bowl, and let it sit for 5 minutes until foamy.
- Add the whole wheat flour, all-purpose flour, salt, and olive oil to the yeast mixture.
- Stir with a wooden spoon until a shaggy dough forms, then turn it out onto a lightly floured surface.
- Knead the dough by hand for 8–10 minutes until it becomes smooth and elastic, adding a sprinkle of flour if it feels too sticky.
- Place the dough in a lightly oiled bowl, cover it with a damp kitchen towel, and let it rise in a warm spot for 1 hour or until doubled in size.
- Punch down the risen dough to release air bubbles, then divide it into 8 equal pieces using a bench scraper.
- Roll each piece into a ball, cover with the towel, and let rest for 10 minutes to relax the gluten.
- On a floured surface, roll each ball into a 6-inch circle about ¼-inch thick, keeping the edges even for even cooking.
- Preheat a cast-iron skillet or griddle over medium-high heat (about 400°F) for 5 minutes until hot.
- Cook each pita for 1–2 minutes on one side until bubbles form and the bottom has golden-brown spots.
- Flip the pita and cook for another 1–2 minutes until puffed and lightly charred, pressing gently with a spatula if needed to encourage puffing.
- Transfer the cooked pitas to a clean kitchen towel, wrapping them loosely to keep them soft and pliable.
But the real magic happens when you tear into one—the soft, warm interior gives way to a slight chewiness from the whole wheat, with a hint of sweetness from the honey. Serve them fresh off the skillet stuffed with grilled vegetables and tzatziki, or let them cool to use as wraps for lunches; they stay wonderfully flexible, making every bite a tender embrace of flavor and texture.
Greek Yogurt and Cucumber Dip

Zestful moments often arrive in the quietest of preparations, like this simple dip that gathers coolness and creaminess into one bowl. It’s a gentle pause in the day, a way to turn a few humble ingredients into something refreshing and nourishing, perfect for a light snack or a shared plate.
Serving: 4 | Pre Time: 10 minutes | Cooking Time: 0 minutes
Ingredients
– Greek yogurt – 1 cup
– Cucumber – 1 medium
– Garlic – 1 clove
– Lemon juice – 1 tbsp
– Olive oil – 1 tbsp
– Salt – ½ tsp
– Dill – 1 tbsp, fresh, chopped
Instructions
1. Peel the cucumber completely using a vegetable peeler.
2. Cut the peeled cucumber in half lengthwise and scoop out the seeds with a small spoon to prevent excess water in the dip.
3. Grate the cucumber on the large holes of a box grater into a medium bowl.
4. Sprinkle ¼ teaspoon of salt over the grated cucumber and let it sit for 5 minutes to draw out moisture.
5. While waiting, mince the garlic clove finely with a knife.
6. Squeeze the grated cucumber firmly with your hands over the sink to remove as much liquid as possible, which helps keep the dip thick and creamy.
7. In a separate mixing bowl, combine the Greek yogurt, squeezed cucumber, minced garlic, lemon juice, olive oil, remaining ¼ teaspoon of salt, and chopped dill.
8. Stir all ingredients together with a spoon or spatula until fully incorporated and smooth, about 1 minute.
9. Taste the dip and adjust seasoning if needed, but avoid overmixing to maintain a light texture.
10. Cover the bowl with plastic wrap and refrigerate for at least 30 minutes to allow the flavors to meld, which enhances the overall taste.
Velvety and cool, this dip offers a creamy texture with subtle tang from the yogurt and bright freshness from the cucumber and dill. Serve it chilled with crisp pita chips or fresh vegetable sticks, or spread it on sandwiches for a refreshing twist that feels both simple and special.
Herbed Quinoa Greek Tabbouleh
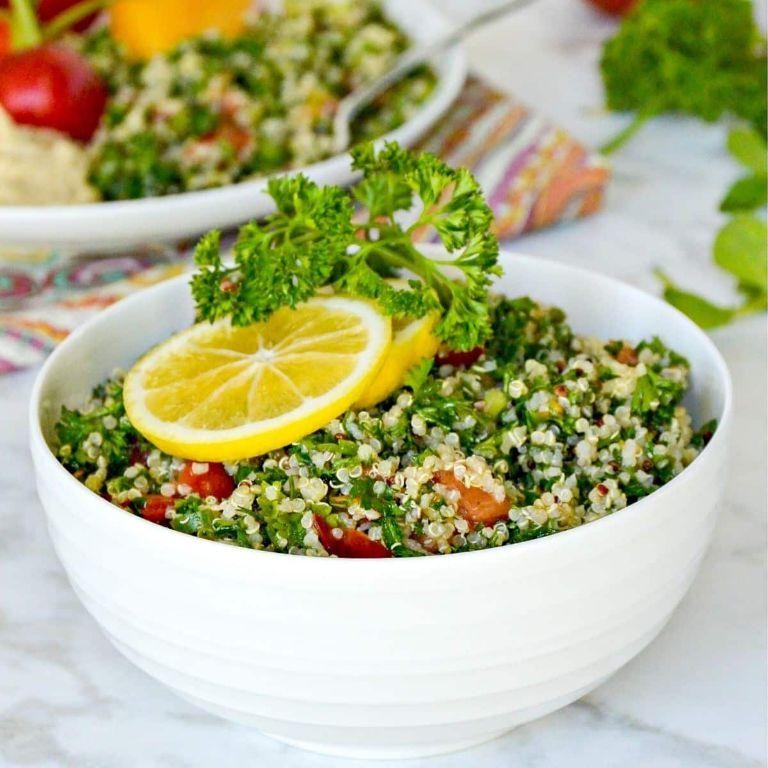
Lately, I’ve been craving something that feels both nourishing and nostalgic, a dish that bridges the gap between hearty comfort and bright freshness. This herbed quinoa Greek tabbouleh is exactly that—a gentle, wholesome blend where ancient grains meet Mediterranean sunshine, perfect for quiet afternoons when you want to savor each bite slowly. It’s a simple, soulful creation that comes together with little fuss, letting the ingredients speak for themselves in a soft, harmonious chorus.
Serving: 4 | Pre Time: 15 minutes | Cooking Time: 20 minutes
Ingredients
– Quinoa – 1 cup
– Water – 2 cups
– Salt – ½ tsp
– Lemon juice – ¼ cup
– Olive oil – 3 tbsp
– Cucumber – 1 cup, diced
– Cherry tomatoes – 1 cup, halved
– Red onion – ¼ cup, finely chopped
– Fresh parsley – ½ cup, chopped
– Fresh mint – ¼ cup, chopped
– Feta cheese – ½ cup, crumbled
Instructions
1. Rinse 1 cup of quinoa thoroughly under cold running water in a fine-mesh strainer for about 30 seconds to remove any bitterness, then drain well.
2. In a medium saucepan, combine the rinsed quinoa, 2 cups of water, and ½ tsp salt, and bring to a boil over high heat.
3. Once boiling, reduce the heat to low, cover the saucepan tightly with a lid, and simmer for 15 minutes until all the water is absorbed and the quinoa grains are tender with little white tails visible.
4. Remove the saucepan from the heat, fluff the cooked quinoa with a fork, and let it cool uncovered to room temperature for about 10 minutes to prevent it from becoming mushy when mixed.
5. In a large mixing bowl, whisk together ¼ cup lemon juice and 3 tbsp olive oil until fully emulsified into a smooth dressing.
6. Add 1 cup diced cucumber, 1 cup halved cherry tomatoes, ¼ cup finely chopped red onion, ½ cup chopped fresh parsley, and ¼ cup chopped fresh mint to the bowl with the dressing.
7. Gently fold in the cooled quinoa until all ingredients are evenly coated with the dressing, being careful not to crush the vegetables.
8. Just before serving, sprinkle ½ cup crumbled feta cheese over the top and toss lightly once more to distribute it without breaking it down too much.
9. For best flavor, cover the bowl and refrigerate the tabbouleh for at least 30 minutes to allow the ingredients to meld together and the quinoa to absorb the dressing fully.
Just out of the fridge, this tabbouleh offers a delightful contrast of textures—the fluffy quinoa mingles with crisp cucumbers and juicy tomatoes, while the herbs lend a fragrant, earthy note that’s brightened by the tangy feta. Serve it chilled in a shallow bowl, perhaps garnished with extra mint leaves or alongside grilled chicken for a heartier meal, letting its refreshing quality shine through on a warm day or as a light lunch that feels both satisfying and serene.
Roasted Greek Vegetable Plate
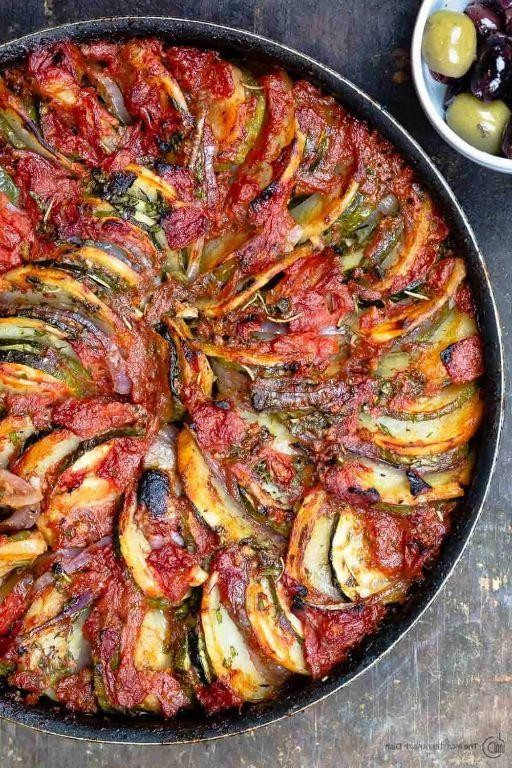
Under the quiet hum of the oven, a simple transformation begins, turning humble vegetables into a warm, fragrant mosaic that feels like a gentle embrace on a slow afternoon.
Serving: 4 | Pre Time: 15 minutes | Cooking Time: 35 minutes
Ingredients
– Zucchini – 2 medium, cut into 1-inch chunks
– Red bell pepper – 1 large, cut into 1-inch pieces
– Red onion – 1 medium, cut into 1-inch wedges
– Cherry tomatoes – 1 pint
– Olive oil – ¼ cup
– Dried oregano – 1 tbsp
– Salt – 1 tsp
– Black pepper – ½ tsp
– Feta cheese – 4 oz, crumbled
– Lemon – 1, juiced
Instructions
1. Preheat your oven to 425°F (218°C) and line a large baking sheet with parchment paper.
2. In a large bowl, combine the zucchini, red bell pepper, red onion, and cherry tomatoes.
3. Drizzle the olive oil over the vegetables, then sprinkle with the dried oregano, salt, and black pepper.
4. Toss everything with your hands until each vegetable piece is evenly coated with oil and seasonings.
5. Spread the vegetables in a single layer on the prepared baking sheet, ensuring they are not crowded to allow for proper roasting.
6. Roast in the preheated oven for 25 minutes, then remove the sheet and gently shake it to redistribute the vegetables.
7. Return the baking sheet to the oven and roast for an additional 10 minutes, or until the vegetables are tender and have caramelized edges.
8. Remove the baking sheet from the oven and immediately transfer the roasted vegetables to a serving platter.
9. Sprinkle the crumbled feta cheese evenly over the warm vegetables.
10. Drizzle the fresh lemon juice over the entire dish just before serving.
Let the vegetables rest for a moment, their edges crisped and sweet from the oven’s heat, mingling with the creamy, briny feta and bright lemon. This dish offers a soft, yielding texture with pockets of juicy tomato, perfect served over a bed of warm grains or alongside grilled chicken for a heartier meal.
Spanakopita with Phyllo and Spinach

Wandering through the kitchen on this quiet afternoon, I find myself drawn to the simple comfort of folding layers of flaky pastry around a savory filling. There’s something deeply soothing about the rhythm of preparing spanakopita, each step a gentle meditation that transforms humble ingredients into a golden, fragrant dish.
Serving: 8 | Pre Time: 30 minutes | Cooking Time: 40 minutes
Ingredients
– Phyllo dough – 1 package (16 sheets)
– Frozen chopped spinach – 20 oz, thawed and squeezed dry
– Feta cheese – 8 oz, crumbled
– Eggs – 2 large
– Unsalted butter – ½ cup, melted
– Olive oil – 2 tbsp
– Onion – 1 medium, finely chopped
– Garlic – 3 cloves, minced
– Dill – ¼ cup, chopped
– Salt – 1 tsp
– Black pepper – ½ tsp
Instructions
1. Preheat the oven to 375°F and lightly grease a 9×13-inch baking dish with olive oil.
2. Heat 2 tbsp olive oil in a large skillet over medium heat, then add the chopped onion and cook for 5–7 minutes until translucent and soft.
3. Add the minced garlic to the skillet and cook for 1 minute until fragrant, being careful not to let it brown.
4. In a large mixing bowl, combine the squeezed spinach, cooked onion-garlic mixture, crumbled feta, chopped dill, salt, and black pepper.
5. Beat the 2 eggs in a small bowl until uniform, then fold them into the spinach mixture until fully incorporated.
6. Unroll the phyllo dough and cover it with a damp towel to prevent drying out while you work.
7. Place one sheet of phyllo in the prepared baking dish, brush it lightly with melted butter, and repeat with 7 more sheets, brushing each layer.
8. Spread the spinach filling evenly over the phyllo layers, leaving a ½-inch border around the edges.
9. Top the filling with the remaining 8 phyllo sheets, brushing each layer with melted butter as before.
10. Trim any overhanging edges with kitchen shears, then score the top layers into 8 portions with a sharp knife.
11. Bake at 375°F for 35–40 minutes, until the phyllo is golden brown and crisp.
12. Remove from the oven and let cool for 15 minutes before cutting along the scored lines.
Unfolding from the oven, the spanakopita emerges with a shatteringly crisp exterior that gives way to a creamy, herb-flecked interior. The salty tang of feta balances the earthy spinach, while the buttery layers melt delicately on the tongue. Serve it warm alongside a simple Greek salad or with a dollop of cool tzatziki for a refreshing contrast.
Zucchini Fritters with Feta

Lately, I’ve been craving something simple and nourishing, a quiet kitchen project that fills the air with a warm, savory scent. These zucchini fritters, dotted with salty feta, are just that—a humble, satisfying bite that feels like a gentle exhale at the end of the day.
Serving: 4 | Pre Time: 15 minutes | Cooking Time: 20 minutes
Ingredients
– Zucchini – 2 medium
– All-purpose flour – ½ cup
– Large egg – 1
– Crumbled feta cheese – ½ cup
– Fresh dill – 2 tbsp, chopped
– Garlic powder – 1 tsp
– Salt – ½ tsp
– Black pepper – ¼ tsp
– Olive oil – 3 tbsp
Instructions
1. Grate the zucchini using the large holes of a box grater into a clean kitchen towel.
2. Twist the towel tightly over the sink to squeeze out all excess liquid from the zucchini; this prevents soggy fritters.
3. Transfer the dried zucchini to a large mixing bowl.
4. Add the all-purpose flour, large egg, crumbled feta cheese, chopped fresh dill, garlic powder, salt, and black pepper to the bowl.
5. Mix everything together with a fork until just combined, being careful not to overmix.
6. Heat the olive oil in a large non-stick skillet over medium heat until it shimmers, about 2 minutes.
7. Scoop ¼ cup of the batter for each fritter and gently flatten it into a ½-inch thick patty in the hot skillet.
8. Cook the fritters for 3–4 minutes per side, or until they are deeply golden brown and crisp at the edges.
9. Transfer the cooked fritters to a paper towel-lined plate to drain any excess oil; let them rest for 2 minutes to set.
10. Repeat steps 7–9 with the remaining batter, adding more olive oil to the skillet if it becomes dry.
Here, the fritters emerge with a delicate crispness giving way to a tender, almost creamy interior, the feta melting into little salty pockets. I love them still warm, perhaps with a dollop of cool yogurt or simply as they are, a quiet moment of comfort on a plate.
Souvlaki-Marinated Tofu Skewers

Kindly, as the afternoon light fades, I find myself drawn to the kitchen, craving something that marries simplicity with deep, comforting flavors. These skewers, inspired by the vibrant streets of Athens but rooted in my quiet kitchen, offer a gentle nod to tradition while embracing a plant-based heart. They’re a reminder that the most satisfying meals often begin with a few humble ingredients and a moment of patience.
Serving: 4 | Pre Time: 30 minutes | Cooking Time: 10 minutes
Ingredients
– Extra-firm tofu – 1 block (14 oz)
– Lemon juice – ¼ cup
– Olive oil – 2 tbsp
– Dried oregano – 1 tsp
– Garlic powder – ½ tsp
– Salt – ½ tsp
– Black pepper – ¼ tsp
– Wooden skewers – 8
Instructions
1. Place 8 wooden skewers in a shallow dish, cover them completely with water, and let soak for 20 minutes to prevent burning during cooking.
2. Drain the block of extra-firm tofu, wrap it tightly in a clean kitchen towel, and press it gently under a heavy pan for 15 minutes to remove excess moisture.
3. Cut the pressed tofu into 1-inch cubes, aiming for about 24 pieces total.
4. In a medium bowl, whisk together ¼ cup lemon juice, 2 tbsp olive oil, 1 tsp dried oregano, ½ tsp garlic powder, ½ tsp salt, and ¼ tsp black pepper until well combined.
5. Add the tofu cubes to the marinade, toss gently to coat each piece evenly, and let marinate at room temperature for 15 minutes, stirring once halfway through for deeper flavor absorption.
6. Preheat a grill or grill pan to medium-high heat, about 400°F, and lightly oil the grates to prevent sticking.
7. Thread 3 marinated tofu cubes onto each soaked skewer, leaving a small space between pieces for even cooking.
8. Place the skewers on the preheated grill and cook for 4–5 minutes per side, turning once with tongs, until they develop golden-brown grill marks and feel firm to the touch.
9. Remove the skewers from the grill and let them rest for 2 minutes on a plate to allow the juices to settle.
These skewers emerge with a satisfyingly crisp exterior that gives way to a tender, juicy interior, infused with the bright tang of lemon and earthy oregano. Try serving them over a bed of fluffy rice with a dollop of cool tzatziki, or tuck them into warm pita bread with fresh tomatoes and onions for a handheld feast that feels both nourishing and celebratory.
Greek-Inspired Stuffed Tomatoes

Just as the afternoon light begins to soften, casting long shadows across the kitchen, I find myself drawn to the simple, sun-ripened promise of summer produce. It’s a quiet moment for a dish that feels like a gentle embrace, a way to hold onto warmth as the day cools.
Serving: 4 | Pre Time: 20 minutes | Cooking Time: 45 minutes
Ingredients
– Large beefsteak tomatoes – 4
– Long-grain white rice – ½ cup
– Yellow onion – 1, medium
– Fresh mint – ¼ cup, chopped
– Olive oil – 2 tbsp
– Salt – 1 tsp
– Ground black pepper – ½ tsp
– Water – 1 cup
Instructions
1. Preheat your oven to 375°F (190°C).
2. Slice the top ¼ inch off each tomato, reserving the tops.
3. Use a spoon to carefully scoop out the pulp and seeds from each tomato, creating a hollow shell; place the pulp in a bowl and set aside.
4. Finely dice the yellow onion.
5. Heat the olive oil in a medium saucepan over medium heat for 1 minute.
6. Add the diced onion to the pan and cook for 5 minutes, stirring occasionally, until translucent and fragrant.
7. Add the rice to the pan with the onions and stir constantly for 2 minutes to lightly toast the grains, which helps prevent mushiness.
8. Stir in the reserved tomato pulp, salt, and black pepper.
9. Pour in the water and bring the mixture to a boil.
10. Immediately reduce the heat to low, cover the saucepan, and simmer for 15 minutes, until the rice has absorbed most of the liquid but is still slightly firm.
11. Remove the saucepan from the heat and stir in the chopped fresh mint; let the filling sit, uncovered, for 5 minutes to allow the flavors to meld.
12. Evenly divide the rice filling among the four hollowed tomato shells.
13. Place the stuffed tomatoes in a baking dish just large enough to hold them snugly.
14. Pour ¼ cup of water into the bottom of the baking dish around the tomatoes to create steam during baking.
15. Place the reserved tomato tops back onto each stuffed tomato.
16. Bake the tomatoes in the preheated oven for 25 minutes, until the tomato shells are tender and the filling is hot throughout.
17. Carefully remove the baking dish from the oven and let the tomatoes rest for 10 minutes before serving; this resting time allows the filling to set perfectly.
Finally, the baked shells yield softly to a fork, revealing a fragrant, herb-speckled filling where each grain of rice remains distinct. The gentle acidity of the tomato mingles with the earthy mint in a quiet, comforting harmony. For a simple, complete meal, serve them warm alongside a crisp green salad dressed with lemon and a drizzle of the same olive oil.
Mediterranean Quinoa Salad

A quiet afternoon like this one, with the light fading softly through the kitchen window, always feels right for something simple and nourishing. It’s the kind of meal that comes together with little fuss, each ingredient adding its own quiet note to the whole.
Serving: 4 | Pre Time: 10 minutes | Cooking Time: 15 minutes
Ingredients
– Quinoa – 1 cup
– Water – 2 cups
– Olive oil – ¼ cup
– Lemon juice – 3 tbsp
– Cucumber – 1 cup, diced
– Cherry tomatoes – 1 cup, halved
– Red onion – ½ cup, finely chopped
– Feta cheese – ½ cup, crumbled
– Kalamata olives – ½ cup, pitted and halved
– Salt – 1 tsp
– Black pepper – ½ tsp
Instructions
1. Rinse 1 cup of quinoa thoroughly in a fine-mesh strainer under cold running water for 1 minute to remove its natural bitter coating.
2. Combine the rinsed quinoa and 2 cups of water in a medium saucepan and bring to a boil over high heat.
3. Once boiling, reduce the heat to low, cover the saucepan, and simmer for exactly 15 minutes until all the water is absorbed and the quinoa grains are tender and have sprouted little tails.
4. Remove the saucepan from the heat, fluff the cooked quinoa with a fork, and transfer it to a large mixing bowl to cool completely for about 20 minutes; spreading it out helps it cool faster and prevents clumping.
5. While the quinoa cools, whisk together ¼ cup of olive oil, 3 tablespoons of lemon juice, 1 teaspoon of salt, and ½ teaspoon of black pepper in a small bowl to create the dressing.
6. Dice 1 cup of cucumber, halve 1 cup of cherry tomatoes, finely chop ½ cup of red onion, crumble ½ cup of feta cheese, and halve ½ cup of pitted Kalamata olives.
7. Pour the prepared dressing over the cooled quinoa in the large mixing bowl and toss gently until evenly coated.
8. Add the diced cucumber, halved cherry tomatoes, chopped red onion, crumbled feta cheese, and halved olives to the dressed quinoa.
9. Fold all the ingredients together gently with a large spoon or spatula until just combined to keep the vegetables intact and the feta from breaking down too much.
Here, the salad settles into itself, the quinoa providing a light, fluffy base that holds the bright, briny notes from the olives and feta. It’s wonderfully adaptable, too—try serving it tucked into lettuce cups for a crisp handheld lunch, or let it sit overnight for the flavors to deepen and meld even further.
Lemon and Herb Lentil Salad
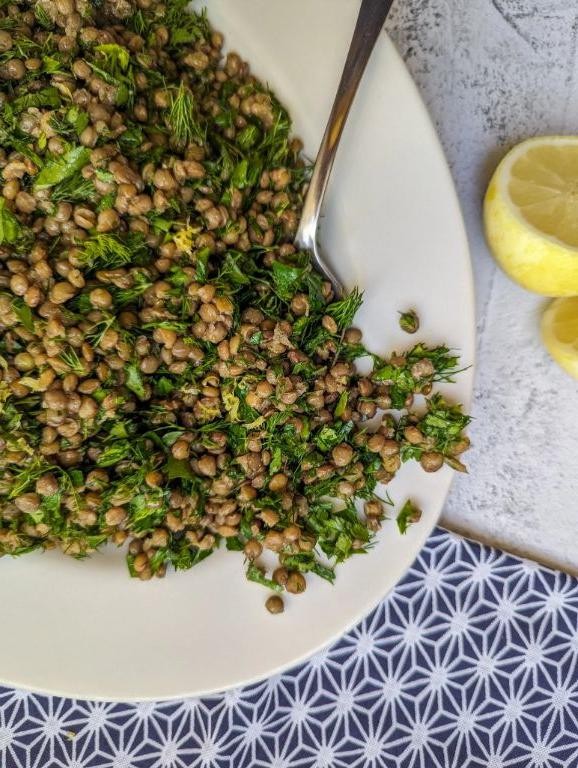
Gently, as the afternoon light softens, I find myself craving something bright and nourishing—a simple salad that feels like a quiet moment of care. This lemon and herb lentil salad is just that, a humble bowl of earthy lentils lifted by zesty citrus and fresh herbs, perfect for a light lunch or a side that whispers of spring even in winter.
Serving: 4 | Pre Time: 10 minutes | Cooking Time: 25 minutes
Ingredients
– Lentils – 1 cup
– Water – 3 cups
– Salt – ½ tsp
– Lemon – 1
– Olive oil – ¼ cup
– Fresh parsley – ½ cup, chopped
– Fresh mint – ¼ cup, chopped
– Black pepper – ¼ tsp
Instructions
1. Rinse 1 cup of lentils under cold water in a fine-mesh strainer to remove any debris.
2. In a medium saucepan, combine the rinsed lentils, 3 cups of water, and ½ tsp salt, then bring to a boil over high heat.
3. Reduce the heat to low, cover the saucepan, and simmer the lentils for 20–25 minutes until they are tender but not mushy, checking at 20 minutes by tasting a lentil for doneness.
4. While the lentils cook, zest and juice 1 lemon into a small bowl, ensuring to avoid the bitter white pith for a cleaner flavor.
5. In a large mixing bowl, whisk together the lemon zest, lemon juice, ¼ cup olive oil, and ¼ tsp black pepper until well combined.
6. Drain the cooked lentils in the strainer, then rinse them briefly under cold water to stop the cooking process and cool them for the salad.
7. Add the cooled lentils to the large bowl with the dressing, tossing gently to coat them evenly.
8. Fold in ½ cup chopped fresh parsley and ¼ cup chopped fresh mint, mixing until the herbs are distributed throughout the salad.
9. Let the salad sit at room temperature for 10 minutes to allow the flavors to meld, stirring once halfway through.
Vividly, this salad offers a delightful contrast: the lentils provide a soft, hearty base, while the lemon adds a sharp, refreshing zing that brightens each bite. Serve it over a bed of greens for extra crunch, or pack it for a picnic where its flavors deepen with time, making every spoonful a gentle reminder of simplicity and warmth.
Baked Feta and Tomato Pasta

Venturing into the kitchen tonight feels like returning to a quiet, familiar room—the kind where simple ingredients can become a gentle, comforting meal. This baked feta and tomato pasta is one of those effortless dishes that simmers into something rich and cozy, perfect for a slow evening when you want warmth without fuss.
Serving: 4 | Pre Time: 10 minutes | Cooking Time: 35 minutes
Ingredients
– Cherry tomatoes – 2 pints
– Feta cheese block – 8 oz
– Olive oil – ¼ cup
– Garlic cloves – 4, minced
– Dried oregano – 1 tsp
– Red pepper flakes – ¼ tsp
– Pasta – 12 oz
– Fresh basil – ¼ cup, chopped
Instructions
1. Preheat your oven to 400°F.
2. In a 9×13-inch baking dish, combine the cherry tomatoes, minced garlic, dried oregano, and red pepper flakes.
3. Drizzle the olive oil evenly over the tomato mixture, tossing gently to coat everything—this helps the tomatoes blister and release their juices as they bake.
4. Place the feta cheese block in the center of the dish, nestling it among the tomatoes.
5. Bake uncovered for 30 minutes, or until the tomatoes have burst and the feta is soft and slightly golden on top.
6. While the dish bakes, bring a large pot of salted water to a boil and cook the pasta according to package directions until al dente, reserving 1 cup of pasta water before draining—this starchy water will help create a silky sauce later.
7. Remove the baking dish from the oven and use a fork to mash the feta and tomatoes together into a creamy sauce.
8. Stir in the drained pasta and reserved pasta water, a little at a time, until the sauce coats the noodles evenly; add more water if needed for desired consistency.
9. Fold in the chopped fresh basil just before serving to preserve its bright flavor and color.
Dipping a fork into this pasta reveals a velvety, tangy sauce that clings to each strand, with bursts of sweet tomato and a hint of spice from the pepper flakes. For a creative twist, try serving it topped with toasted breadcrumbs or alongside a crisp green salad to balance the richness.
Conclusion
Feast your way to wellness with these 27 vibrant Greek recipes! From quick lunches to impressive dinners, this collection makes healthy eating a delicious adventure. We’d love to hear which dishes become your new favorites—drop a comment below and share the inspiration on Pinterest to spread the Mediterranean joy. Happy cooking!


